Weapons
The parts requiring the most work on this kit are without a doubt the weapons. The 5-inch turrets sit on the wrong axis, the 40mm are acceptable but are very bare, and the 20mm are just plain terrible. Here's how we go about fixing all these problems...
The 5-inch 38 cal. guns are a
take-it-or-leave-it situation. Dreadnought Model Shipywards has released a set of resin
aftermarket turrets, which will save you hours of work. You can see the review of
those turrets here. Or, you can leave
them as is, and only those with a deep knowledge of the ship will notice that they sit too
far forward on the mounts. Since my model was static, I simply removed the centerpost and
glued the turrets into place a fraction of an inch aft. It works. The guns in the turrets
are supposed to 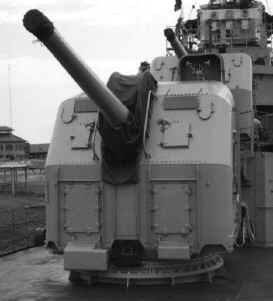 be off center, the barrel center
is a little to starboard. It slips my mind just how much, but it is just enough to
make it noticable. Again, you can take the time to correct this, or leave it as is.
The roof for both No.1 and No. 5 turret are also wrong. These turrets each had an
additional panel in the roof. Since these turrets were located under the No.2 and 4
mounts, extra bracing was as added to protect against the blast from the upper mounts when
fired over the turret roof. I ground the turret face down and added a strip of styrene to
the opened hole where the extra panel should have been. Hatches and ports can be added
with styrene or brass. I then added the barrels and blast bags. The kit parts don't fit
very well, you may want to scratchbuild the blastbag. I neglected to add the steel tubing
for the blast bag supports , there were two types, one was similar to a grab iron, the
other was a triangular tent-like fitting. You'll need to check your particular ship to see
which type was carried. I ground the grab irons (solid plastic tabs) off the rear of the
turrets and replaced them with N gauge model railroad box-car grab irons. This improves
the turret appearance considerably. You can also use brass wire, but the railroad parts
were both pre-bent and uniform. I drilled out the barrels, and that was about it...
be off center, the barrel center
is a little to starboard. It slips my mind just how much, but it is just enough to
make it noticable. Again, you can take the time to correct this, or leave it as is.
The roof for both No.1 and No. 5 turret are also wrong. These turrets each had an
additional panel in the roof. Since these turrets were located under the No.2 and 4
mounts, extra bracing was as added to protect against the blast from the upper mounts when
fired over the turret roof. I ground the turret face down and added a strip of styrene to
the opened hole where the extra panel should have been. Hatches and ports can be added
with styrene or brass. I then added the barrels and blast bags. The kit parts don't fit
very well, you may want to scratchbuild the blastbag. I neglected to add the steel tubing
for the blast bag supports , there were two types, one was similar to a grab iron, the
other was a triangular tent-like fitting. You'll need to check your particular ship to see
which type was carried. I ground the grab irons (solid plastic tabs) off the rear of the
turrets and replaced them with N gauge model railroad box-car grab irons. This improves
the turret appearance considerably. You can also use brass wire, but the railroad parts
were both pre-bent and uniform. I drilled out the barrels, and that was about it...
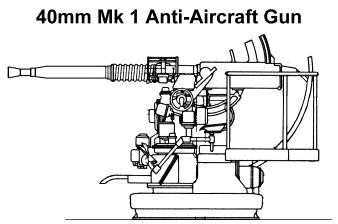 The
40mm mounts on the kits lack detail, but a little extra effort in this area goes a long
way. A simple and effective method of fixing these guns is to replace them with HR
Products 40mm mounts. I should have done this, but my repeated calls to HR in Illinois
were never returned. Anyway, if you choose to keep the kit guns, here's how you go about
fixing them up. The first step is to cut the barrels off from the breach. I sanded the
coil springs off the barrels, and wrapped copper telephone wire around each, creating a
new "spring". I then put the barrels aside. N-gauge model railroad brake wheels
were added to each side of the mount for the elevation and turning controls along with
some brass wire and locomotive fittings for hydraulic lines and electrical junction boxes,
etc. The steel seats for the aimer and gunner were added. I also added a pair of 1/72
aircraft rudder pedals to each side, since these were nothing more than T-shaped parts in
the kit. I added a sighting bar and gunsights, since I was modelling and early 40mm mount
without the radar. I got a set of 1/48 photoetch WWI machine gun sights, and added those
to each of the mounts on both sides. After I attached the barrels, I added the circular
steel chutes to the rear or the mounts, railings from brass wire, and attached ready use
boxes to the back railings. I drilled out the barrels using a small drill followed by a
triangular Dremel bit. Open the barrel ends (they're flared) by twisting the bit by hand.
Two or three turns and they're cleaned out. My advice, if you can get in touch with HR
Products, is to get the their 40mm twins. You can also get quads if you decide to do an
emergency AA fit Fletcher.
The
40mm mounts on the kits lack detail, but a little extra effort in this area goes a long
way. A simple and effective method of fixing these guns is to replace them with HR
Products 40mm mounts. I should have done this, but my repeated calls to HR in Illinois
were never returned. Anyway, if you choose to keep the kit guns, here's how you go about
fixing them up. The first step is to cut the barrels off from the breach. I sanded the
coil springs off the barrels, and wrapped copper telephone wire around each, creating a
new "spring". I then put the barrels aside. N-gauge model railroad brake wheels
were added to each side of the mount for the elevation and turning controls along with
some brass wire and locomotive fittings for hydraulic lines and electrical junction boxes,
etc. The steel seats for the aimer and gunner were added. I also added a pair of 1/72
aircraft rudder pedals to each side, since these were nothing more than T-shaped parts in
the kit. I added a sighting bar and gunsights, since I was modelling and early 40mm mount
without the radar. I got a set of 1/48 photoetch WWI machine gun sights, and added those
to each of the mounts on both sides. After I attached the barrels, I added the circular
steel chutes to the rear or the mounts, railings from brass wire, and attached ready use
boxes to the back railings. I drilled out the barrels using a small drill followed by a
triangular Dremel bit. Open the barrel ends (they're flared) by twisting the bit by hand.
Two or three turns and they're cleaned out. My advice, if you can get in touch with HR
Products, is to get the their 40mm twins. You can also get quads if you decide to do an
emergency AA fit Fletcher.
Authors note: Get HR Products from Floating Drydock.
The 20mm in the
kit are horrible, and wrong. To the best of my knowledge Melvin carried single 20mm
mounts, not twins. Although I have not been able to confirm this, all of my photos show
that ships carrying twin 20mm mounts also had emergency AA fits (quad 40mm amidships and
forward torpedo tubes landed) The Kidd is a good example of this. I would be very
interested if anyone has information to the contrary. 20mm mounts are available from
HR Products (call Floating Drydock) in either twin or single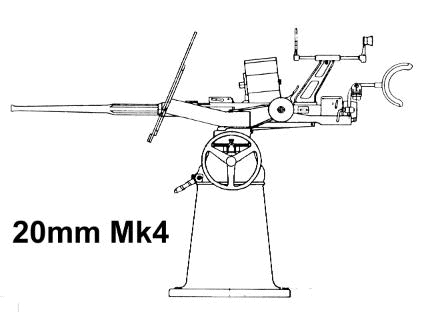 configuration. I scratchbuilt singles, since the Cushing was fitted with them. I started
with a piece of stainless tube and brass wire, and created the barrel. The springs were
housed within the barrel, I added a Kadee HO Coupler spring (read: real small) to the
barrel at the juction. While it is not perfectly correct, it is better than having no
recoil spring at all. The breach was Evergreen stock, and the shoulder rests copper wire.
You'll need to decide which type of gunsights you'll use, either the early Mk5 ringsight
or the Mk14 computing sight. The ringsight is simple, photoetched 1/48 aircraft sights
work well. The computing sight is a black box with 2 clear parts and a couple of wires.
The splinter shields are scratchbuilt from Evergreen strip, 'angle iron' and 'U-channel'.
The ammo drums are from sprue. I kept the actual mount for the weapons, I simply added the
new gun and shield. When you've done the first mount and pulled out half of your hair,
compare your new 20mm to one provided in the kit. I think you'll like the results. But,
hindsight speaking again, your best bet is to get the HR Products 20mm, especially since
you'll need to do this as many as 7 times for single mounts, 14 for twins.
configuration. I scratchbuilt singles, since the Cushing was fitted with them. I started
with a piece of stainless tube and brass wire, and created the barrel. The springs were
housed within the barrel, I added a Kadee HO Coupler spring (read: real small) to the
barrel at the juction. While it is not perfectly correct, it is better than having no
recoil spring at all. The breach was Evergreen stock, and the shoulder rests copper wire.
You'll need to decide which type of gunsights you'll use, either the early Mk5 ringsight
or the Mk14 computing sight. The ringsight is simple, photoetched 1/48 aircraft sights
work well. The computing sight is a black box with 2 clear parts and a couple of wires.
The splinter shields are scratchbuilt from Evergreen strip, 'angle iron' and 'U-channel'.
The ammo drums are from sprue. I kept the actual mount for the weapons, I simply added the
new gun and shield. When you've done the first mount and pulled out half of your hair,
compare your new 20mm to one provided in the kit. I think you'll like the results. But,
hindsight speaking again, your best bet is to get the HR Products 20mm, especially since
you'll need to do this as many as 7 times for single mounts, 14 for twins.
I would have included more photos of the weapons, especially those on my finished model, unfortunately, I have none!
Home Hull Main Deck Forward Deckhouse and Bridge Weapons Aft Deckhouse and Fittings Depth Charges Facts Conclusion