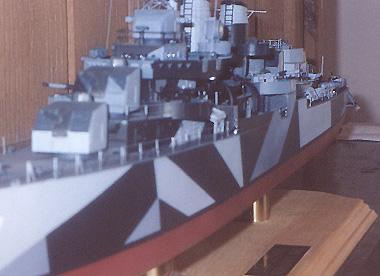
Forward Deckhouse and Bridge
When you start building this kit, its bareness will depress you, especially as you're constructing subassemblies. But as you can see by the above photo, (I apologize for the quality, I am not a good photographer) it looks busy when you get it all together. I originally wanted to replace the doors, as most are incorrect, but decided against it. I figured it wouldn't effect the overall look of the model that much, and I wasn't building for competition purposes. I did remove the hose reels. I scratchbuilt replacements by coiling thin solder, then added strips of styrene over the top to form the reel. I then glued the mess to the wall. It's simple, but adds a lot. I also replaced a few of the electrical conduits that run along the sides, and replaced them with solder wire. Most of the enhancements that can made to this kit are of this type, simple replacements of parts that are molded on. I also removed the ladders and replaced them with ladders from a model railroad accessory set.
After constructing the 01 Decklevel, you'll need to remove the "walls" that surround the deck. These were railings, but were often fitted with spray shields made from canvas. It seems that Lindbergh replaced canvas spray shields with solid walls everywhere on the ship, as you will find in the upper works. These walls were removed with a set of Xuron nippers, giving a flat cut against the deck.

Sand smooth, and add railing stanchions. You'll need to refer to a set of plans for the placement and spacing. Full plans for 3 wartime Fletchers are available in my book, click HERE for more info (one of two plugs for my book). Plans are also available from other sources, click HERE for recommended research materials.
You'll need to build a pair of ladders going from the main deck to the 01 Deck Level. I found a set of stairs from Plastruct that scaled up well. I scratchbuilt handrails from brass wire, and glued them into place while the 01 Deck level was test fit onto the main deck.
The forward 40mm gun tubs lack detail, so I added very small Plastruct T-stock to simulate the interior bracing. (I won't mention it again, but I did that with all the 40mm tubs, as well as the splinter shields for the 20mm). I also added several ready-use ammo boxes to the inside of the 40mm tubs, and behind the forward 40mm positions along the deckhouse wall below the bridge wings. That covers 01 Deck Level.
After the walls for the 02 deck level are built but before the bridge wings top cap (part 21) are added, you'll want to remove the "lip" around the front of the bridge wings. You need to add strips of Plastruct or Evergreen to the face of the bridge, then add styrene strip to simulate the opening . This is difficult to explain, I hope this photo helps. I won't mark it up, since there's a lot of useful information in this photo for these levels.
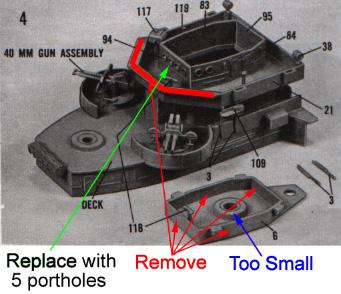
After completing these minor tasks, you'll need to address a Lindbergh major-error. The forward bulkhead of the pilothouse has 5 portholes, not 4 as shown in the kit. No exceptions, there were never 4 portholes on square-bridged Fletchers. There were 4 on some Sumners, but we're not building a Sumner now, are we? Evergreen sheet, a drill, and you're in business. I replaced some of the details with solder wire. You can get portholes from HR Products. (avl. from Floating Drydock)
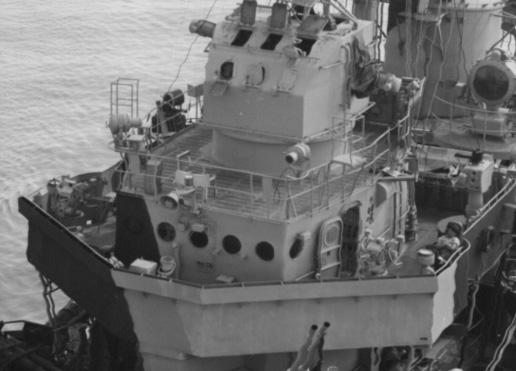
The Mk37 Fire Control Director, well, it can used, but you'll more than likely want to discard the radar that sits atop the director. Refer to the following graphics for the proper appearance of a Mk37 gun director and Mk4 radar:
The radar can be scratchbuilt easily enough, and hatches on the director can be added, as well as the ladder and canvas weather bags around the ranging posts. I cobbled a scratchbuilt set of radar from left-over brass from the GMM modern NJ set, but it didn't fly too well. I eventually ended up photoetching my own.
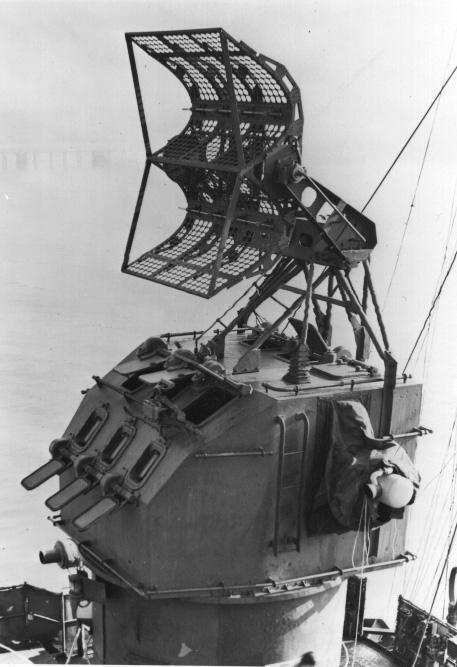
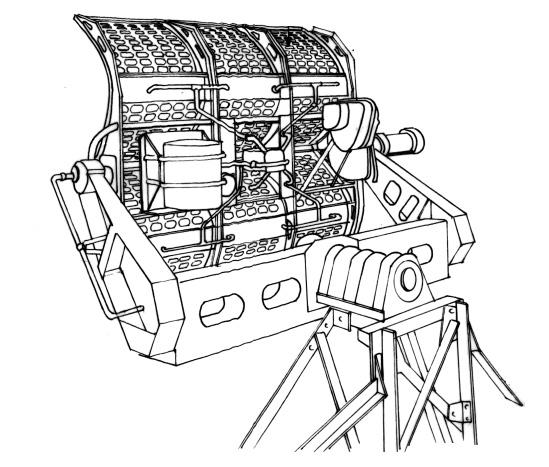
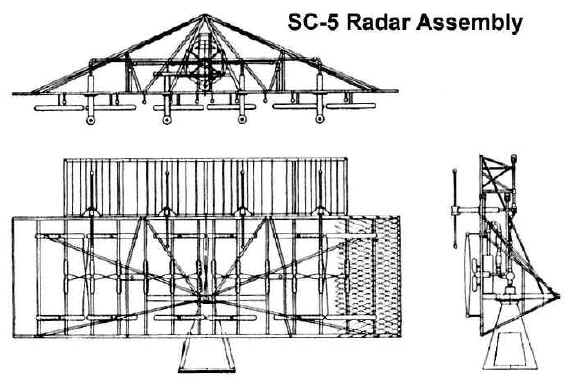
That covers the structural part of the bridge area. The foremast was built pretty much out of the box, but I added an SG radar set, I think it was bits from the aircraft parts box, and the SC-2 series radar. Again, I cheated (boo-hiss) and used an N-gauge window frame covered with steel mesh. It passes. Here's the art work for the proper radar. This is taken from a USN NavOps manual.
Home Hull Main Deck Forward Deckhouse and Bridge Weapons Aft Deckhouse and Fittings Depth Charges Facts Conclusion