| page 4 of 5 |
| Building the Bouvet
by Jim Baumann |
| page 4 of 5 |
| GUN TURRETS | |
| All the kit-supplied turrets had the right footprint, apertures
and overall dimensions.
However... the simply did not have sufficient curvature to their roofs,; initially I chose to ignore this--but whichever way I looked at the turrest I could not reconcile myself with this compromise.... Of course I attempted to simulate this curvature myself-and achieved a fine result with putty and white glue on both the main for and aft turrets-- but was I unable to repeat this relative success with the eight small or the midships 10.8 in turrets... so resorted to outside help to do the job mechanically and repeatably. So having had a really good experience when I built my 1/700 Carnot. with having new circular turrets turned by Burkhardt of BMK. I hoped they would be able to assist me with this new challenge. Tediously the turrets on Bouvet were of an oval plan section so no amount of wizardry on a lathe was going to produce these. BMK CNC milled new turret masters--and cast these impeccably in grey resin with the desired raised curvature on top. |
 |
 |
|
| The main and midships turrets were near perfect--merely
ovalling the gun aperture being required to make fully perfect. However
.
The 8 x small turrets had --in my view--the sighting cupolas made too small--
which the official plans would lead one to believe to be correct... alas....
photos suggested otherwise.
Fortunately I had cut off the original cupolas whilst attempting to make my own curved tops. I removed the new small turrets cast cupolas and replaced them with the original YS kits versions...! |
 |
 |
|
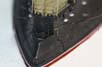
| The four large turrets had sighting slits on the fwd face
in the shape of an upside down crucifix--with a hinged cover for them.
Bouvet along with most French Battleships of her era had turret-sealing doors adjacent to the gun barrels... On Bouvet the fore and aft turrets had these doors top-hinged. While the midships battery had them side-hinged |
 |
 |
|
 |
|
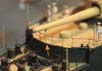
| The turrets seals were all installed satisfactorily and
added greatly to the overall effect. The enormously long gun barrels had
a cradle support when the guns were not in action--in the form of a tripod
structure with a padded cradle.
The turret top rails were unlike the kit items--actually 2 bar but very low; I used some fine 1/700 rails with the bottom rail removed and mounted with matt varnish. |
 |
 |
|
| SMALL BUT IMPORTANT DETAILS | |
| The aft superstructure had small triangular gussets supporting the
overhead deck, these were made of paper; tacked in place with paint!
The deck drainpipes were also added each side. |
 |
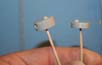
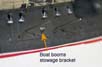
| The aft davits for the deployment of the life rings were
a graceful shape and held off the hull by small brackets.
The davit was cut from thin brass wire, flattened slightly at its base gradually to give some taper and the bottom bent into a sharp kink to give support via a hole drilled into the hull; the bracket being cut from pieces of scrap handrail angles The midships searchlights were deployed via a small railway- these tracks I made of thin PE strip on end with some aircraft wing bracing PE cut down for the bracing as seen on photos. The after-most boat booms had a stowage bracket to allow the booms to be stowed like 'folded arms' |
 |
 |
|
 |
|
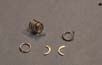
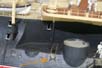
| Bouvet carried two spare folded-stocked admiralty pattern
anchors amidships. These were quickly made from pieces of chunky nickel
silver PE, with a curved stainless steel PE bottom; enhanced with paper
triangular flukes attached with CA .
The balance balls and the ' casting' were thickened up with white glue--the effect when painted and installed was pleasing" |
 |
 |
|
 |
|
| The devil is indeed in the detail; a cleat here, a small
handrail there.... I have added all the davit blocks--these are each made
of 4 pieces of PE.
A further challenge was the ships name; on the real thing these were almost certainly brass letters screwed to the aft stern flanks . The obvious solution appeared to be a decal of gold lettering printed on An Alps printer, however it looked too flat as if it were painted.- the letters conformed to the shape of the hull and looked - well wrong!! Various alternatives were explored, PE letters-- ( Accurate Armour ==> 1 mm letters--size good--far to thick ) PE part letters gleaned from old GMM and WEM frets they all looked clunky... Eventually the name in dark yellow surrounded by black was printed onto photo paper using a small photo printer. This photo-paper was wetted-- and the 'paper' peeled and pared away with a blade at the back leaving the upper surface 'film'. This was further pared away with a sharp blade --and the letters were then very carefully cut out individually and applied with a paintbrush using thinned matt varnish as the adhesive. The whole area was thereafter locally flooded with matt acrylic varnish to remove some of the relief. |
 |
 |
|
 |
|
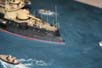
| I made the main French Tricolour ensign; ships of this era when in
Harbour often carried the most ENORMOUS flags.... which added a welcome
contrast to the black and yellow....
These ensigns were made on thin waxed paper, the white was masked with Tamiya tape--suitably de-tacked so as not to lift the surface of the paper and then coloured with artist water-soluble coloured pencils. When dry the flags were sandwiched in thin tissue paper and the brutal crumpling began.... After four failed attempts the result was to my liking--an Ensign stirred by about 10-15 knots of breeze.... |
 |
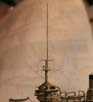
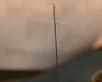
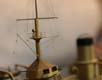
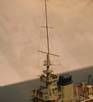
| Rigging was done entirely with stretched sprue as described
here.
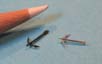
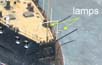
Bouvet when at anchor carried four lamps on a halyard on the aft mast-which was suspended from a tiny small gaff at the top of the mast--on the starboard side . This very small gaff was made using a piece of 1/700 hand railing longitudinal bent to a right angle and attached with CA- with some accelerator on a cocktail stick being wafted about in its vicinity.... because the Super-glue was not being very super and they...(the gaff(lets !) kept falling off!!! The lamps were very small pieces of brass wire attached to the tan sprue with matt varnish The small blocks on the spars for the (sparse!!) signal halyards were made from tiny circles cut from the WEM Koenig PE brailing davits- very small, lots of them and totally regular--I added them after the halyards had been attached to the yards. The foremast was fundamentally a repeat of the aft mast--except the process was complicated somewhat by the boat boom rigging passing twixt shrouds and halyards. The various boat spar-davits were an adventure of their own, mainly due to the puzzling over rope leads and how it could all have possibly worked! |
 |
 |
|
 |
|
 |
|
 |
|
| Overall it was a very long build, often with no end appearing
to be visible.
Nevertheless, I also kept telling myself that I was merely sticking
the bits together, the real credit lay with Yiannis of YS Masterpiece Models
who mastered and cast this great jumping off point to a finished model.
Further credit must go to fellow modelwarshipper cerberusjf; He tirelessly co-analysed for-and-with me the numerous wonderful photos of this ship seeking out many of the minute details Steve Foulkes for tapered stainless steel masts and name-printing wizardry. |
|
| page 4 of 5 |
More
of Jim Baumann's work.
Updated 2010

© ModelWarships.com