| page 3 of 5 |
| Building the Bouvet
by Jim Baumann |
| page 3 of 5 |
| SMALL GUNS | |
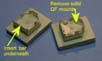
| The fighting top platforms each have 4 x QF guns, these were mounted
on hexapods; the kit erroneously depicts these as solid.
I removed the cast on mountings with a micro-chisel. To guard against the floor of the platform bowing in or collapsing ;( as it is mounted on two thin wafers of resin for ultimately easy removal from the casting blocks) I inserted some styrene bar underneath as support. |
 |
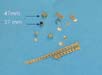
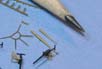
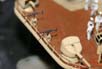
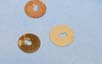
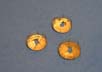
| The 47 mm guns on the fwd bridge and aft superstructure
level each had a tapering lightly oblong base made of metal plates pierced
with a circular hole on all four sides. The 37 mm QF guns on the midships
gun deck had a similar base -- but square and only pierced with a hole
on 2 sides...
Initial attempts making these of solid and drilling retrospectively were inconsistent--I managed one real beauty--but failed to repeat it neatly... I found some large diameter pierced girder in the WEM Koenig PE set. By cutting lightly angled sections of this PE strip with holes I was able to make the bases this PE, sealing the open angled edges with stretched sprue and mounting the finished deal on a sliver of styrene to gain the correct height. The photo below explains the method; it was fiddly work on very small components. |
 |
 |
|
 |
|
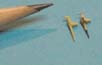
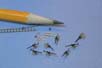
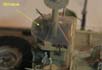
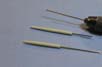
| Bouvet like many ships of her era carried a large numbers
of QF guns, with four being installed in each of the fighting tops. The
guns in the kit were fundamentally ok--but fragile. The mounts in
the fighting tops were actually eight- legged tripods-more accurately they
are called Octapods...Having much earlier in the build removed the solid
lumps of resin in the fighting top I was ready to install the guns.
Being an avid and addicted PE buyer--I guessed I would have something
suitable...--
Because the base of the resin cast fighting top is ticker than the steel plate of the real thing, I had to shorten the etched legs a little, so to ensure the gun would be the right height in relation to the splinter shield wall; this is thankfully not really noticeable when the guns are placed. (Future YS kits will hopefully have a PE fold-up fighting top with a thin metal floor. A is the PE mounting from the WEM set B is the barrel==> cut down from NNT 1/700 5.9 in German barrels... ==> I reasoned that 1/700 5.9 in ( divided by two!) was close enough to a 1/350 3" QF gun barrel. C is some Modelrailway thick etched ladderstock-from, which the hinge bracket supports were cut Some small bits of wire, PE shoulder braces along with a heft portion of patience completed a fair rendition of these guns. The folded Heptapod was given a small drop of white glue to give a bearing surface for securing the barrels to, thereafter construction was reasonably straightforward. |
 |
 |
|
 |
|
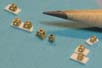
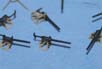
| Small guns--the 37 mm QF as well as the revolvers were
scratch built- easy enough -- but time consuming.
The kit resin items were alas a bit clunky for my liking. The pedestals are sanded cocktail stick points infused with CA--taller and thinner! |
 |
 |
|
| PLATFORMS AND FIGHTING TOPS | |
| The main fighting tops, which had previously had the cast gun mounts removed, were now fitted with the delightful and pleasingly accurate under-platform braces. The supplied stub mast casting aided the accurate placement of the braces in close proximity of the mast when fitted. | 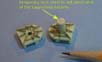 |
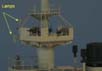
| The fore mats forward fighting top was furnished with awning supports in addition to having 2 x lamps fabricated with the associated tiny brackets. |  |
 |
|
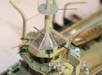
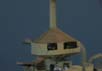
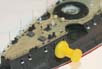
| The aft (and sometimes the fwd) fighting top was often
seen partially or entirely covered with shaped canvas drapes.
There was a permanently fitted supporting frame for this. The aft fighting top also carried a Binnacle. I elected to cover the aft Fighting top in canvas and leave the fwd one uncovered. I made the framework of thin copper wire, carefully and tediously measuring each length individually and then tacked in place with matt varnish. This allowed final positioning and was afterwards reinforced with a droplet of CA applied via a flexible piece of stretched sprue. The QF gun apertures were bridged with a piece of stretched sprue so as to permit the next stage, the spanning of the framework with thinned white glue to represent the canvas. I thinned the glue 50/50 with distilled water and applied using a long thin watercolour artists rigger brush, this having very long and soft hairs can maintain a large span of white glue film without applying any pressure that might distort the fine framework... |
 |
 |
|
 |
|
| The upper platforms were supplied as nice pieces of PE,
with arms for signal flag arms etched on; these were duly removed and would
be replaced with steel rods material later in the build, meanwhile
the ladder access apertures were cut in to the brass bases.
To ensure the platform floors stayed within acceptable levels of ' thin-ness'... I added the rails around the OUTSIDE edge of the floors, using superthin over-etched WEM items. |
 |
 |
|
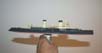
| The upper masts were made of sanded tapered stainless-steel welding
rod. The intermediate mast sections had an unusual taper, this was well
captured in the supplied resin parts- and seeing no need to 'reinvent the
wheel'...
I decided to use them. However in fear of thin resin rods attemptiong to distort with age a bit of modification would be required. I carefully drilled all the way though from their bases using a pinvice and inserted thick stainless steel wire rod to guarantee their stability indefinitely. The yards had only slight taper according to photosI used some thin
brass tubing. The centres of which were built up with paint layers. They
then had a thin stainless steel wire inserted through them and stabilise
into a laminate with glue dribbled in, this would prevent the yards distorting
when the halyards were tensioned.
|
 |
| WATERLINE AND MOUNTING | |
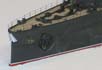
| Prior to the ship being mounted to its water base to protect
its ever-increasing fragility, the boot-topping and white line needed to
be added. I painted the red underwater section freehand, wiping away excess
with a thinner laden brush; being haunted by a fear of paint or eyebrow
removal with the use of masking tape....
The white waterline stripe was surprisingly tricky--as the white line is at the very top of the armour belt, and due to the varying degrees of tumblehome from fwd to aft the lines had to be eyeballed to get a consistent line that withstood inspection from all angles. The white line on this model is a decal; made by using the excellent products of TL decals, a German firm whose products I have used before available here. These decals are made using a screen printing process--and as such have no visible carrier film beyond the print-making them ideal for my purposes. |
 |
 |
|
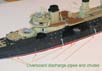
| The model was secured to the base with 2 x large No 8 pozi-drive screws
in the pre-drilled countersunk holes in the barbettes which were finally
be concealed when the turrets were finally installed. Thereafter the remaining
hatches were all installed , painted and the portholes were glazed. I also
added all the overboard discharge pipes and chutes made of copper and brass
wire as well styrene square section for the chutes- cut ,angled and
then sanded.
The sea-scape was deliberately made in a lightish blue hueemulating the sandy bottom with patches of rock and week giving the light and dark shades. Water was quite flatoffshore breeze (as verified in photos) The vast ensign on its very tall ensign staff was again copied from period postcards of the ship. |
 |
| THE FOREDECK | |
| The bow had new 'searchlight' doors made of curved paper. --The existing
supplied PE items were fine--but whilst curving these PE parts on
the bench with a piece of bar one of them span away into oblivion across
the modelroom... 20 minutes search convinced me that making new ones was
going to be quickest!
The fwd hawse-pipe was opened, the casting surround made of brass wire
and had a cover made of brass.
|
 |
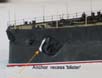
| A modelfriend observed a small feature missing from the hull that is
not shown on the plans; a small rounded "blister" at the fwd edge face
of the anchor recess.
The model being as advanced in construction as it was at this stage the prospect of filling and sanding was out of the question; I almost chose to ignore this feature... but then I devised a cunning plan.. Two coats of white glue were applied, once the lower edge has been cut and painted it gave a fair rendition of this feature... |
 |
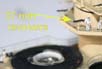
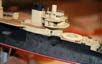
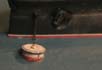
| The ship is depicted moored to a Buoy. This was made of styrene tube sliced at an angle with a copper wire ring and a piece of brass for the lid and a piece of copper wire for the ring to which the chain will be shackled. | 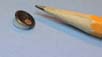 |
| The mooring buoy has now been installed and given the scruffy scuffed
look seen in photos.
The no.8 was based on a contemporary Marius Bar photo of the ship in 1899. |
 |
| AWNING STANCHIONS | |
| The positions for these would have been best marked and
drilled prior to painting, detailing screwing and gluing the ship
to its base.The stanchions themselves are supplied within the PE set
However they were: a) flat. b) too fat.... c) too short for most applications... d) tricky to apply to take any kind of rigging loading... This is mainly due to the stanchions on the real ship being mounted
OUTBOARD-- with two standoffs to give presumably a greater athwartships
spread of canvas-along with less trip hazards.
The lower crank of the stanchion fitted neatly into the push-pin created hole and was secured reliably by adding droplets of CA to level. Once set firmly-- The upper brackets were partially done with a drop of white glue or stretched sprue where access was difficult, especially in amongst the forest of boatcranes...(!!) The aft enormously tall ensign staff was installed along and the awning bracing structure was made. |
 |
 |
| page 3 of 5 |
More
of Jim Baumann's work.
Updated 2010

© ModelWarships.com