USS Laffey (DD-459) Benson class destroyer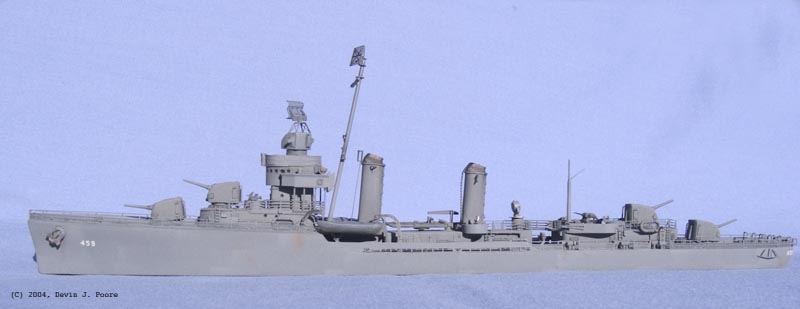
By Devin J. Poore Ship History: The name USS Laffey is pretty well known among those of us who build WWII ships and have read some Pacific War history. This ship is renowned for going toe-to-toe against the Japanese battleship Hiei during the famous Battle of Third Savo, otherwise known as The Battle of Friday the 13th. Unfortunately, she did not survive the encounter, and sank barely a year after her launching . The Dictionary of American Naval Fighting Ships history entry for the Laffey can be read here. Please Note: this is not the USS Laffey that is famous for surviving the multiple Kamikaze attacks later in the war. That is a Sumner class destroyer that was named for this ship.
The Kit: First thing to know is that at the time of starting this kit and the time of this writing (October 2004), there is no kit of the USS Laffey on the market. After I had decided on building a model of the USS Juneau, I wanted to stick another ship in the water with her. After searching through some photos, I came up with the one on the opening page of this write up. Looking at what few photos I could find of USS Laffey, I figured I could build one, if I could kit bash two of the Blue Water Navy (now known as Yankee Modelworks) Benson/Gleaves kits. Of course, buying two resin kits to build one ship is a bit pricey, so I called them directly and asked if it would be possible to get the USS Aaron Ward kit, but with the bridge, forward deck house, and funnels for the USS Farenholt substituted in the kit. No problem, the kit was on the way. This build is very similar to my USS Farenholt article on this site, so if I fail to mention something in this article, it's probably in the other one. Reference Books and Photos: Plan Set: Benson/Gleaves Destroyers, by Timothy Dike Classic Warship Publishing title #12: USN Benson/Gleaves Class Destroyers, by Steve Wiper Several photos of the USS Laffey can be found on the Naval Historical Center's home page here.
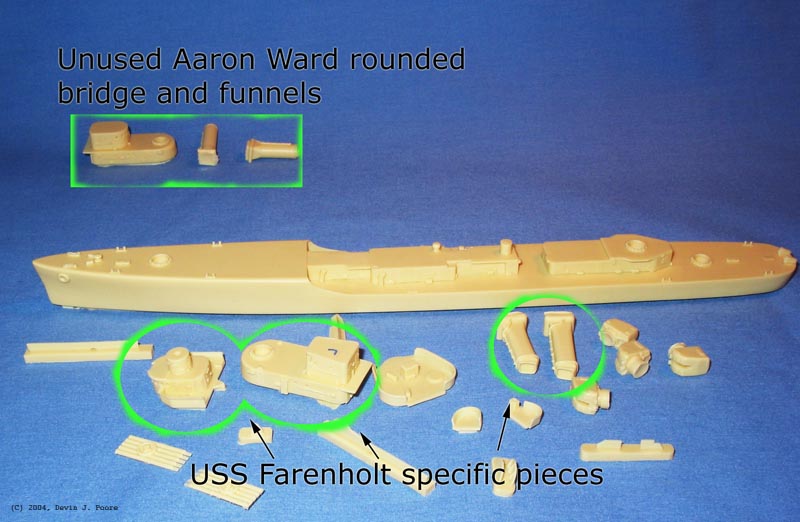
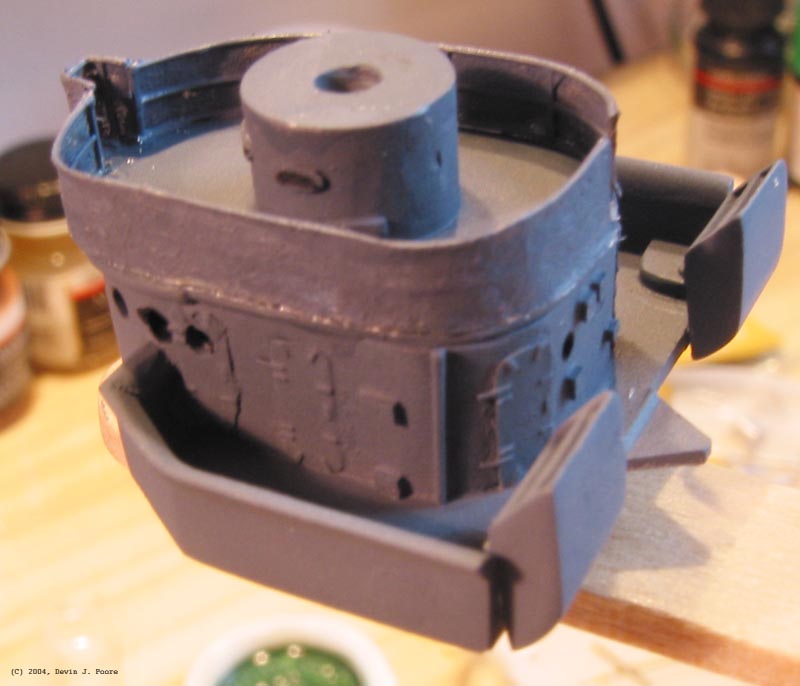
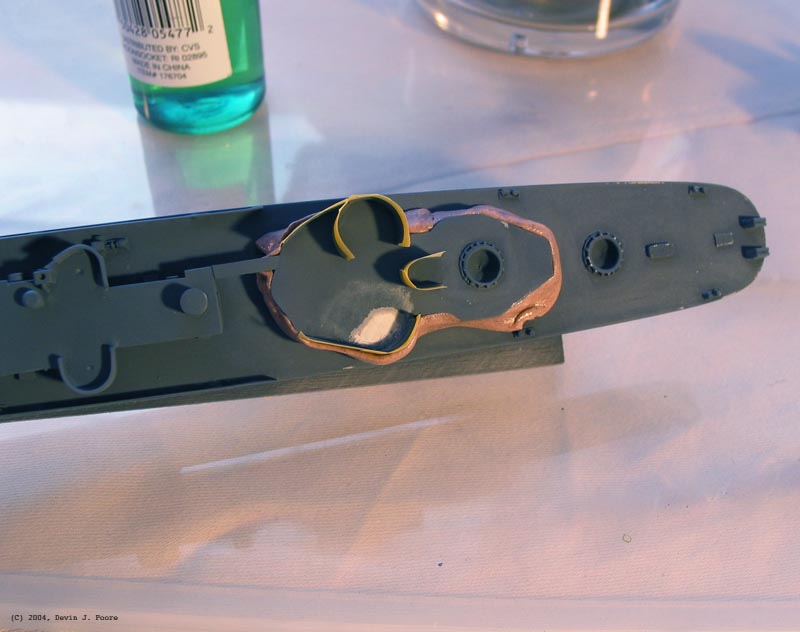
Opening the Box: Am I the only one who loves, absolutely loves, the sight and smell of fresh cream colored resin right out of the box? Anyway... The first thing to do was open up the kit and see what I had. Parts laid out, I saw that they had not only shipped me the parts I requested, but the original bridge and funnel parts as well. I set the rounded sections aside as indicated in photo 0 (yes, I started numbering with zero. Don't ask. Long story), and got to work. Too see shots of the PE sheet and white metal details, check out my previously mentioned USS Farenholt article; the parts are exactly the same.
Hull Corrections and Initial Building:
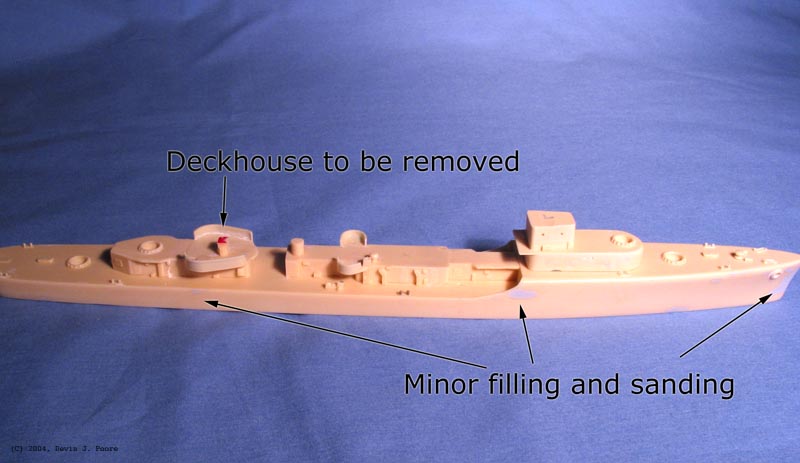
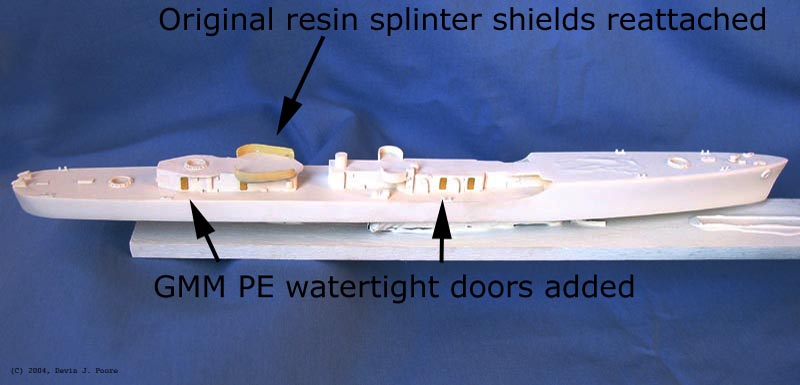
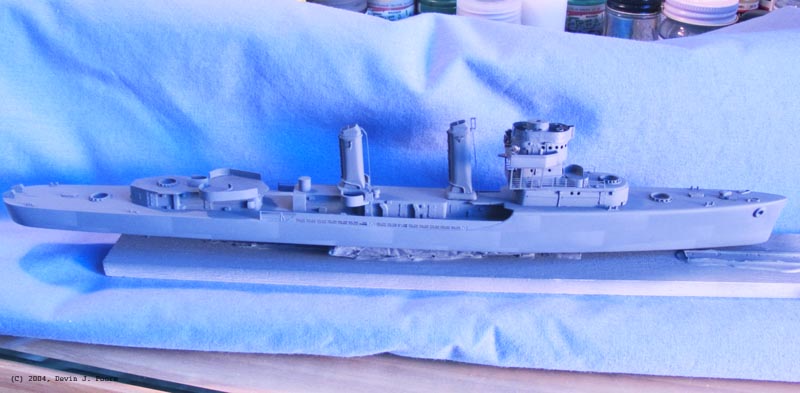
Since this was not a USS Laffey kit, obviously there were some changes I would need to make to get her correct. Unfortunately, I didn't catch all of them in time. Oh well, it's only a hobby. Photo 1 shows the kit essentially out of the box, laid out to see what there was to see. The structure aft with the red roof had to go. Laffey didn't have it. Various small dings and scratches in the resin had to be filled with Mr. Surfacer and sanded smooth, but nothing major. The BWN/YMW kits are beautifully cast; I have yet to get hold of a bad one (I have a dozen or so of their kits in my stash). Photo 2 shows my initial construction, attaching the waist 20 mm positions. The shielding is a bit thick and probably should have been replaced, but I thinned it later and I think it's okay, and that's all that matters. Also, in this photo you can see the splinter shielding around that errant deck house has been removed. Sanding sticks, tight area, resin snaps, so I removed the whole thing. And it really did make the sanding much easier to get correct. I also sanded off the watertight hatches, fire stations, and life rings at this point, for no more reason than I wanted to see how the GMM details looked on a finished kit. Photo 3 shows the first primer put to resin. I'm using the Krylon white sandable variety here. Good stuff if you don't have a lot of fine detail to contend with, and at this point I did not. After that was laid in, I started applying the PE doors and other details. I stuck these on with white glue, as it gives me a little time to move the items into correct alignment, and is less caustic to my eyes than CA variety glues.
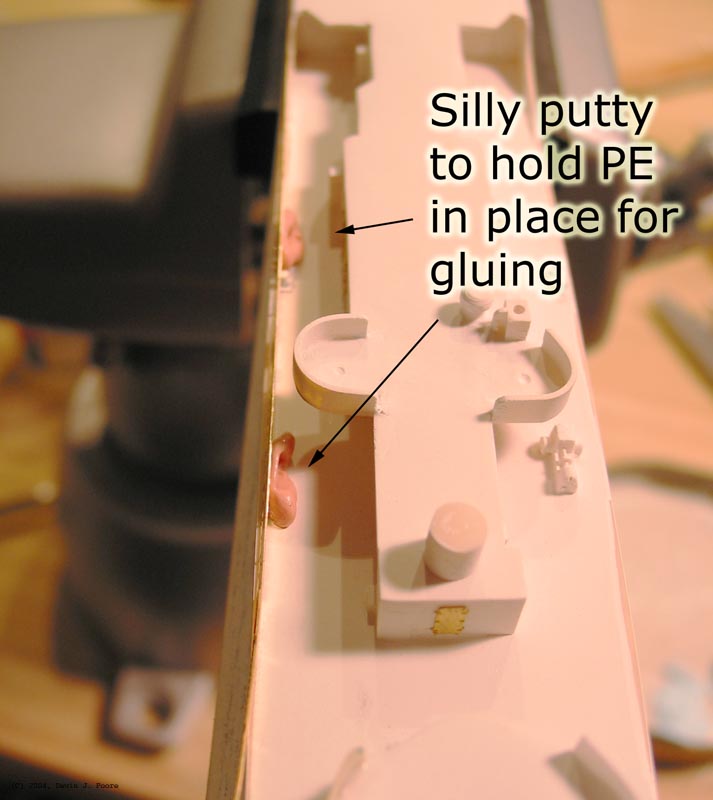
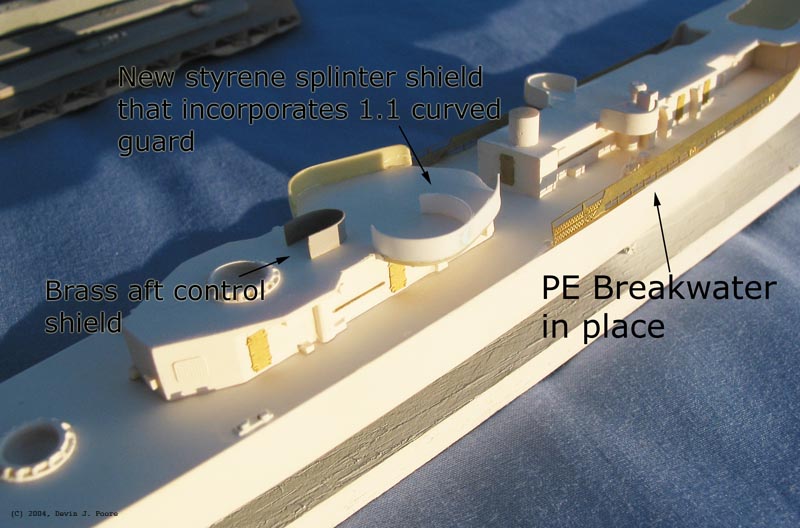
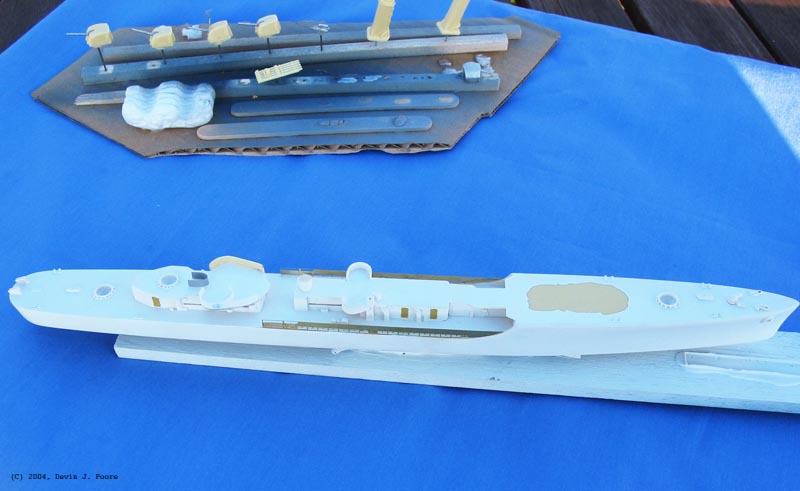
Some PE and More Priming: Photo 4 shows a use for Silly Putty: holding pieces in place before applying glue. This way you can make sure that a long piece, such as this PE breakwater, is perfectly aligned, and not have to futz around with it while the glue sets on you. Photo 5 shows this piece in place after glue has set up. Also, in photo 5, you can see where I replaced one of the previously re-attached splinter shields. Looking at the plans and photos, the rounded 1.1" mount tub blended into the rest of the structure. I wasn't about to try to glue and then blend thing strips of resin and styrene, so I did it all in plastic. Photo 6 is just showing everything primed and ready to paint. The small items (stacks, mounts, etc.) are all stuck to stick pins or pieces of wire, and then stuck into balsa runners to hold during airbrushing.
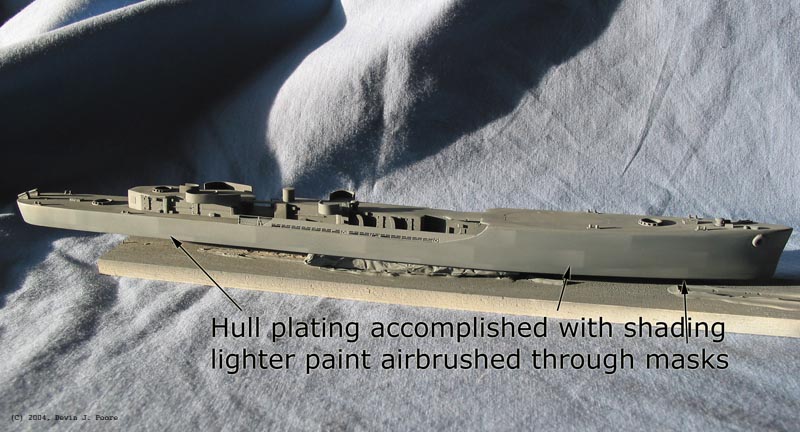
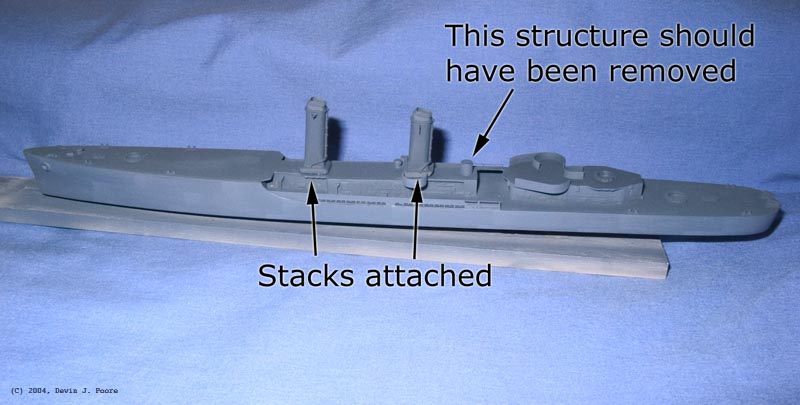
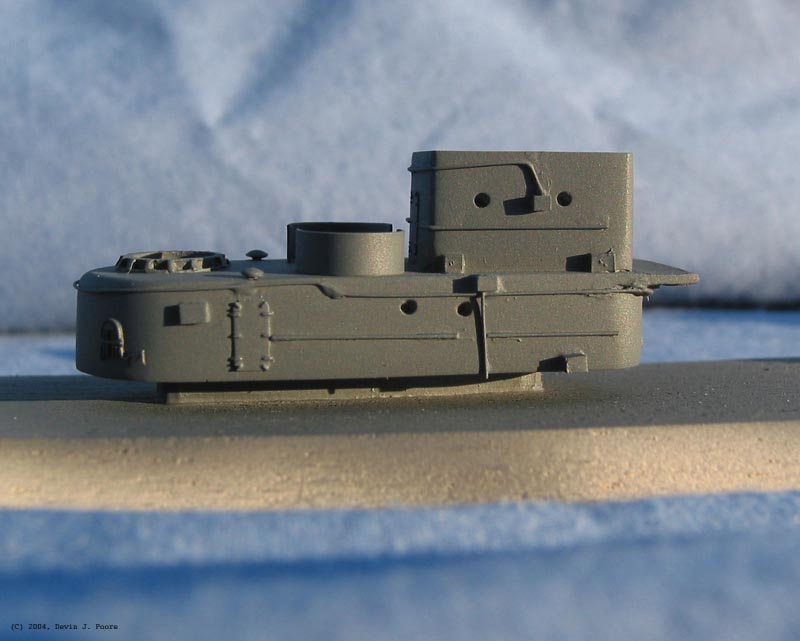
The Start of Painting: Initially I began painting this kit with the new (at the time) WEM Colourcoats line of paints. They worked great. But, upon using them, I was reminded why I had switched to the Badger acrylics. Enamels are just too much of a hassle for me to work with. I'm in an apartment, so cleanup, disposal, and paint fumes (even with a spray booth) make them a bad choice for me. I went with the Testors Marine acrylic line of paints for the USS Laffey. So far, every bottle of the stuff with one exception has been a spot on match for the Snyder and Short paint chip references. The only exception was the 20-B, and I have since found bottles of that which were correct, so just check them, and you should be fine. Photo 7 shows my experiment for this kit: simulating hull plating with paint shading. As you can see, it looks pretty darn good. The only problem I've encountered is that with the final flat coat, it reduces the contrast so much that I should have gone even lighter with the lightened 5-N at this stage. Oh well, live and learn. Photo 8 shows the opposite side of the hull, with different lighting conditions, and the stacks attached. Also, I've pointed out the aft searchlight tower in this shot. It should have been removed and the much nicer PE open structure platform used. Something I missed, and I didn't realize it until I had started attaching the railing and other details. At that point, I was not about to go back and mess with anything. Something else that I missed is that on the forward hull there should have been a row of portholes. Totally blew by me. Again, not worth messing with at this late stage, in my opinion.
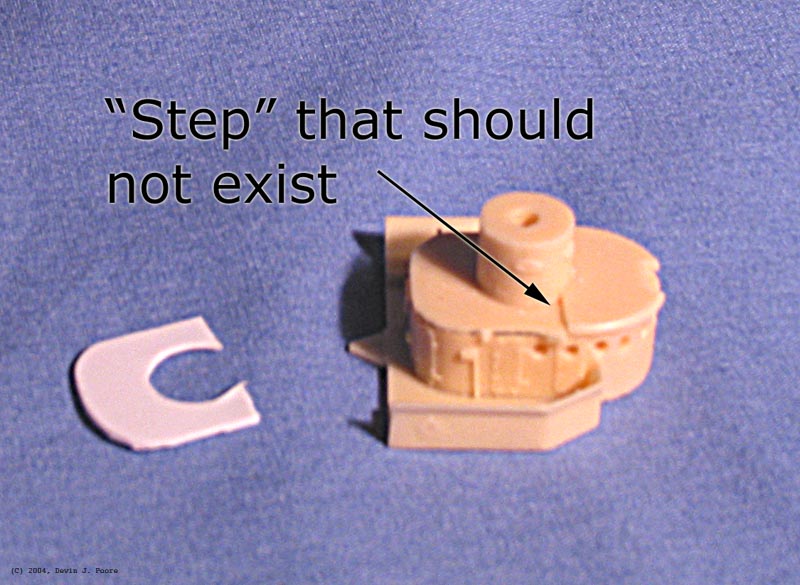
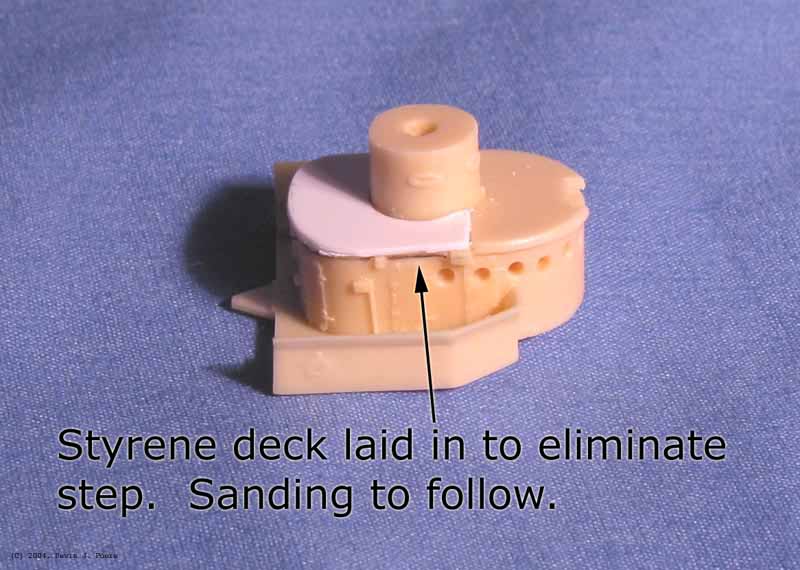
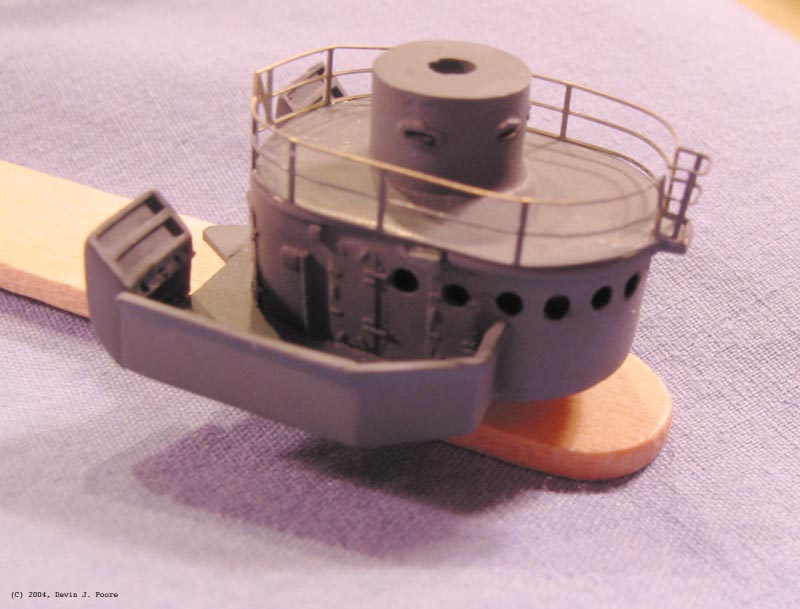
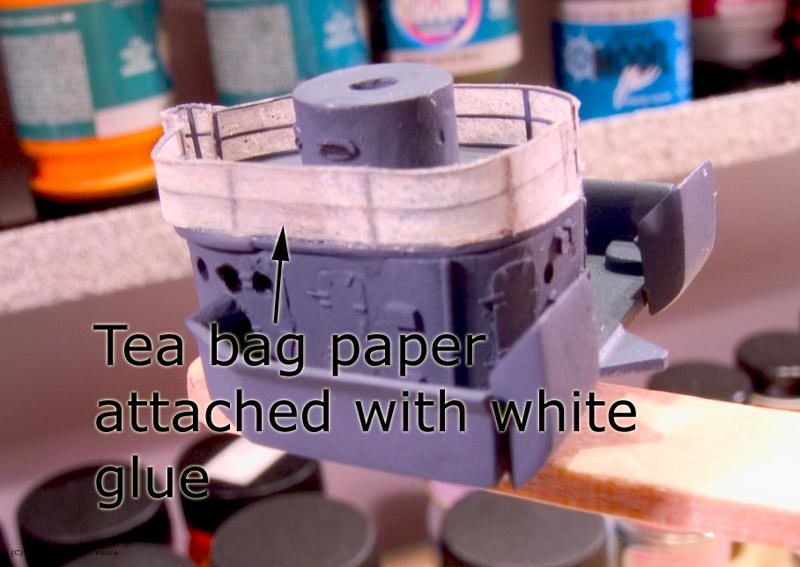
Bridge: One of the things I never realized when building my USS Farenholt, is that there is an error on the top of the bridge. Photo 9 shows how this piece is molded with a definite "step". I believe it was one of Tim Dike's reviews of a kit on this site that pointed out that this should not be here. I checked my photos, and sure enough, I could not find it anywhere. Photo 9 also shows the piece of sheet styrene that I cut to shape. Photo 10 shows that piece in place. I glued it in with super glue, hit it with accelerator, and sanded. I was lucky and got the rounded section that butts up against the radar barbette almost exactly right. Otherwise, filling and sanding that area would have been a headache. With the deck fixed, I primed the piece, and then shot it with some of my 5-N mix. Photo 11 shows this done, and the flag bags and railings added. All photos of Laffey show canvas covers over the railings on the bridge, so I used my old teabag paper trick. Cut the paper from a teabag to size, soak it in thinned white glue, and stick it to the rail, as in Photo 12. You have to poke and prod and re-apply glue as necessary to get it in all of the crevices, but eventually it sets up. I then used a brush to paint the tissue after dry; the brush giving it a little more texture, and it allowed paint buildup and stiffen the paper even more, shown in Photo 13.
Forward Deckhouse: Photo 14 shows the forward deckhouse. I really went to town on this section. I could get a sanding stick to every area of this piece, so I sanded it smooth, removed all of the hand rail, piping, door and fire station detail (again, because I could and wanted to, the original detail looked fine), and replaced it. As an aside, some have asked me "why go through replacing this detail if there is nothing wrong with it?". The answer is practice. I have some kits in my stash that are going to need this sort of work, so if I can practice on a kit that is otherwise excellent, I get the experience with little risk. Also, my Blue Water Navy USS Yorktown (CV-5) kit has some soft detail on the island and on one or two of the hangar wall section, and so I plan on doing this with that kit. Every model I do is practice for the day I start that USS Yorktown kit. Anyway, photo 15 shows the deck house with the paint laid in. Note the darkness of the 5-N in this shot. In photo 16, you can see that the 5-N is much lighter. This is simply due to the flat coat that I applied after assembling this structure. It really draws the color down; nice scale effect. This photo also shows many of the railings, wing supports, and splinter shields attached.
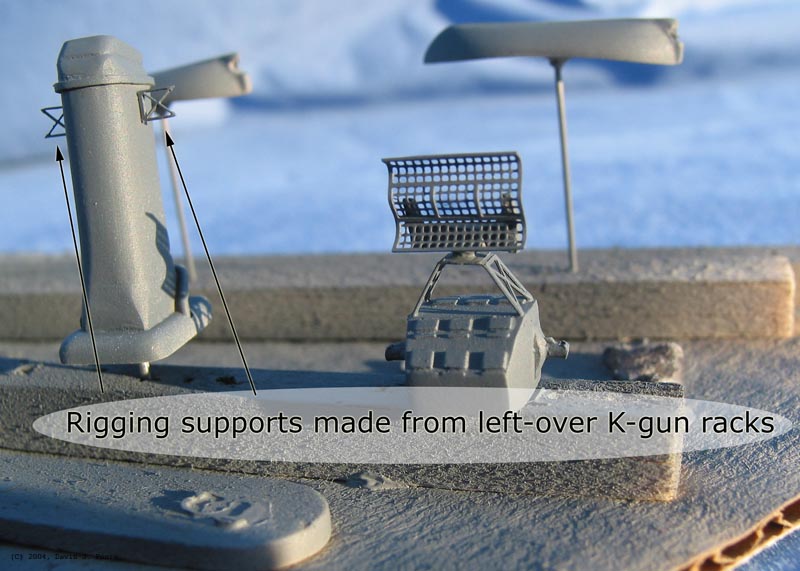
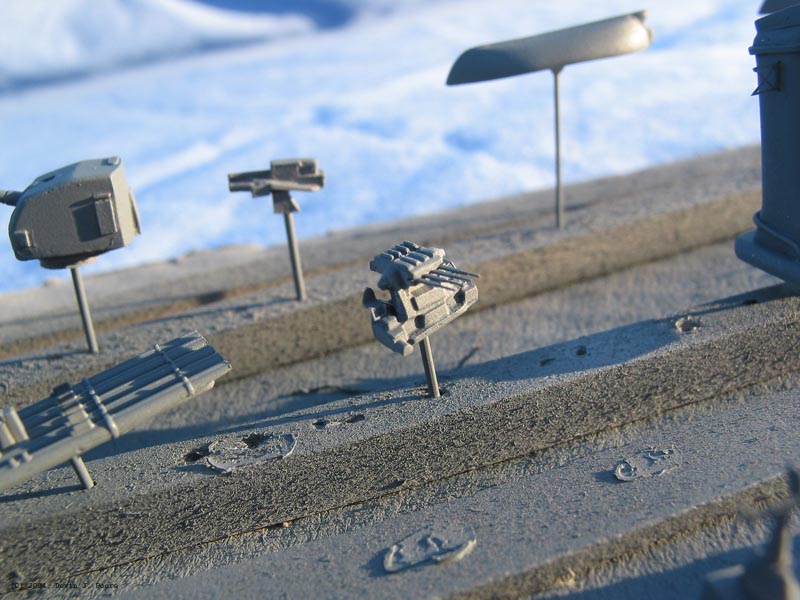
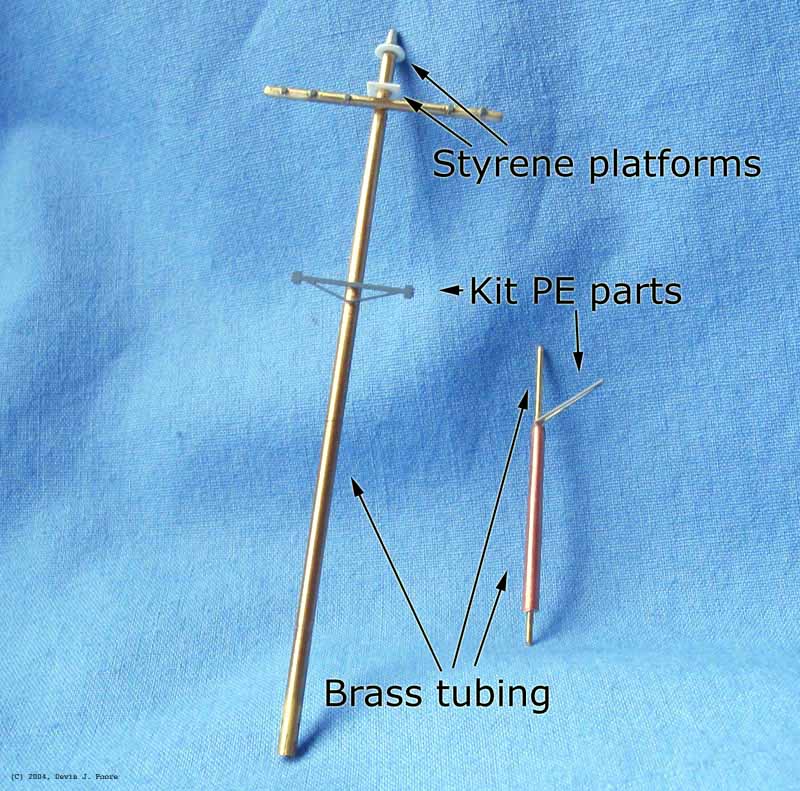
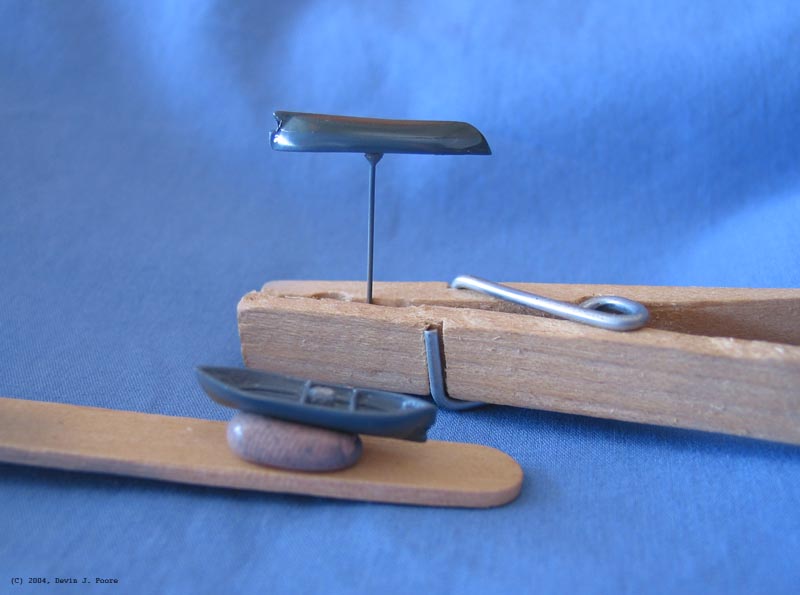
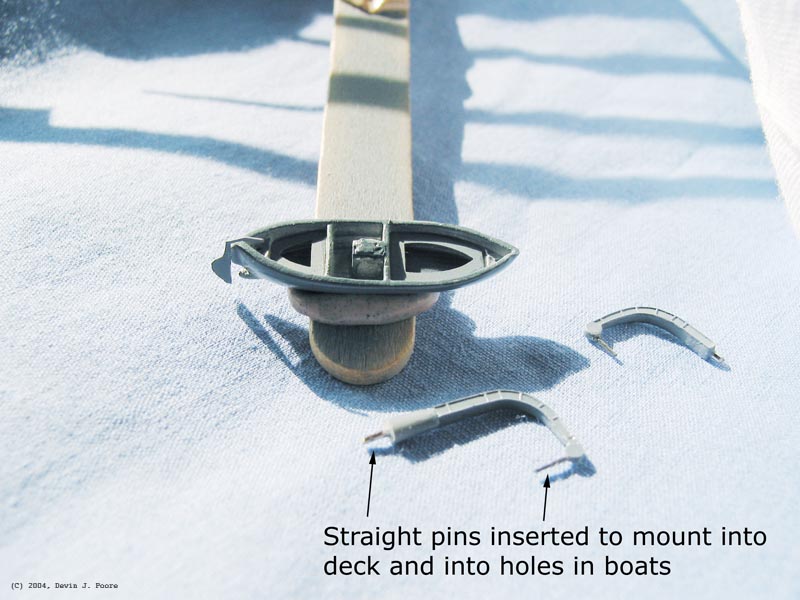
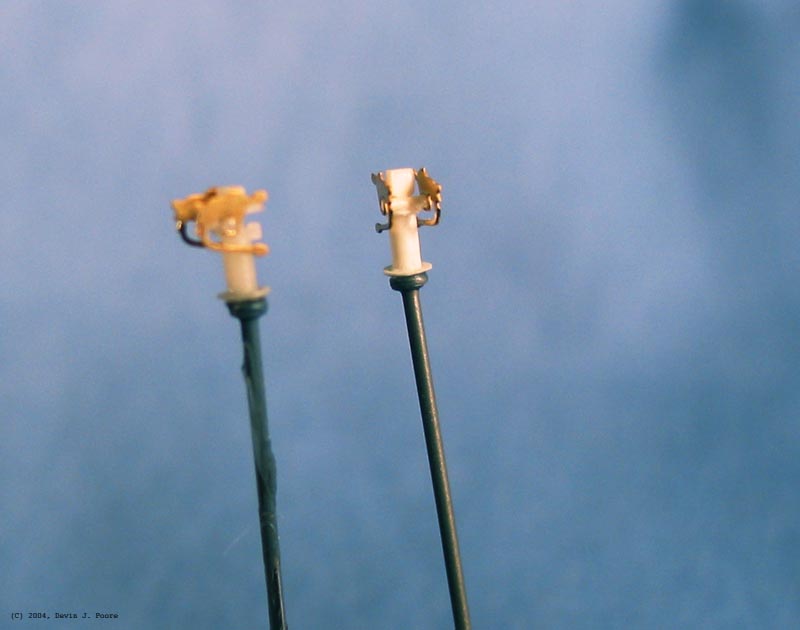
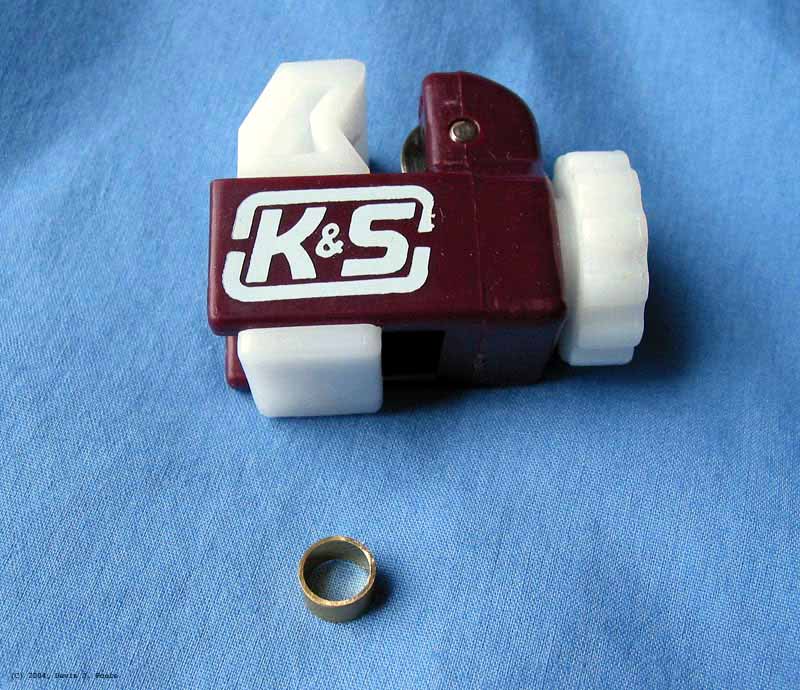
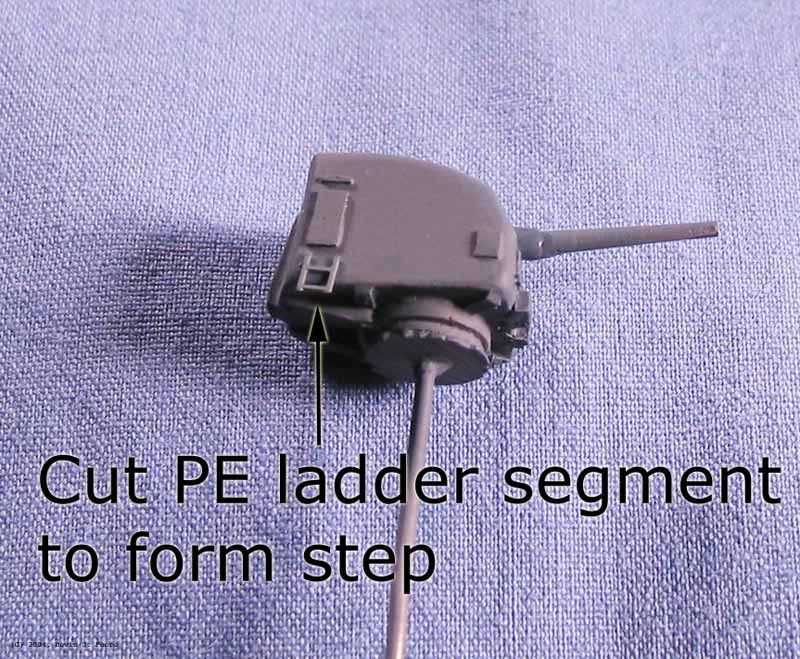
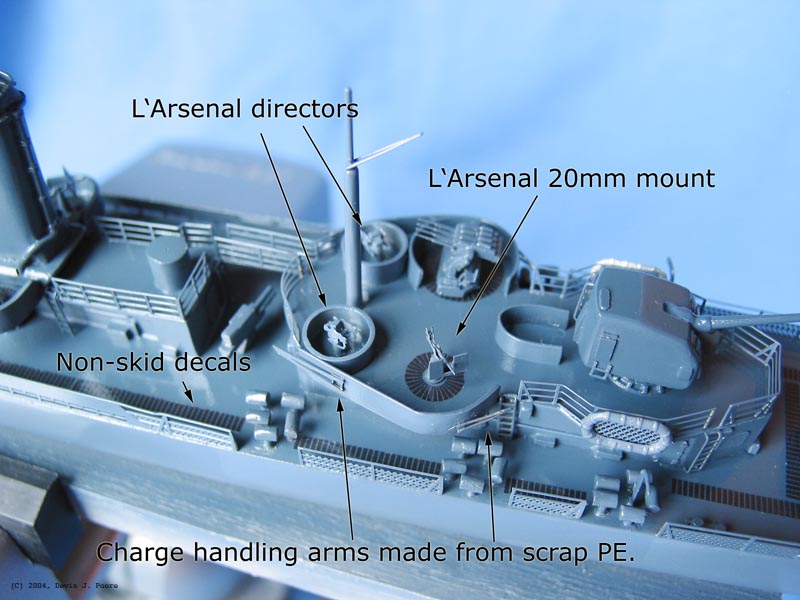
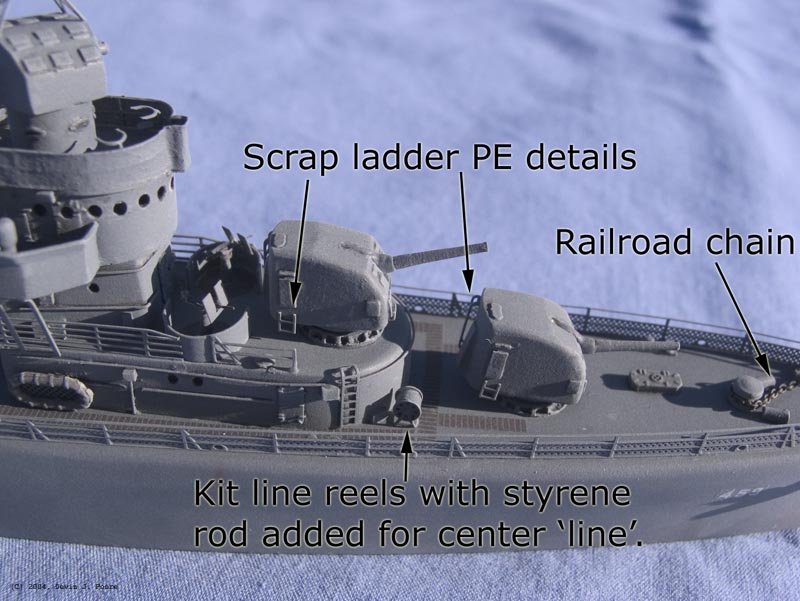
Details and Fittings: While all of the above was going on, I was also working on the fittings, weapons, and other various smaller parts of the ship. Most of these come in the kit as white metal parts that are detailed with PE. The white metal is very well cast, only a slight texture on a few pieces that disappeared quickly with a little sanding. Photo 17 shows the stacks and the gun director. I replaced the kit supplied rigging on the stack with custom made ones that look more like what is in photos of the actual ship. Photo 18 shows other pieces, mainly the quad 1.1" gun mount and the torpedo tubes. In this kit the torpedo tubes are no longer individual tubes that must be sanded to size and then glued to the base, watching the alignment all of the time. They are now more finely cast in one piece of resin, and are a huge improvement. The 1.1 mount in the photo is kit stock, I only added gunner's seats from bent 20mm gun shield PE. Photo 19 shows the masts. As annotated, I used kit PE and brass tubing for these; white metal masts are supplied, and will do you fine if you do not plan on doing any rigging. Over time, though, rigging will cause them to bend. At this time I superglue my mast components together. I've stress tested them in the past, and you get a very strong bond if you sand a flat spot on the tubes where they attach. When I get time, I'll experiment with soldering them together, but right now, it isn't necessary for me. Photos 20 and 21 show the ship's boats and davits. Getting these davits on the ship with the boats mounted properly is still the most difficult operation to building these kits. This time through I marked the locations on the deck where I wanted them, drilled a hole, and then did the same for the davit, putting a wire pin in the base of the davit. Another pin was added at the pulley end of the davit, to mount into the boat. This made the assembly a bit easier, but it's still a tricky maneuver. Some aftermarket parts. These are the L'Arsenal MK 51 directors. Technically, they are not correct for the Laffey, as her 20mm and definitely 1.1 would have used older models, but they were physically very similar and at this size, you can't tell the difference. Photo 22 shows them glued together, resin body and two PE handles and counter weights. Photo 23 shows my tubing cutter and a section of brass tubing I cut to the proper height to make a tub for these directors. The white metal ones in the kit were a bit thick for my taste, and a little small in diameter. Photo 24 just shows some of the quick things I did to add a little more to the gun turrets. I cut a section of ladder stock and used it to make steps for each access hatch. Also, I added a ladder to the back of each mount. About two minutes of extra work per mount, but it makes a heck of a difference.
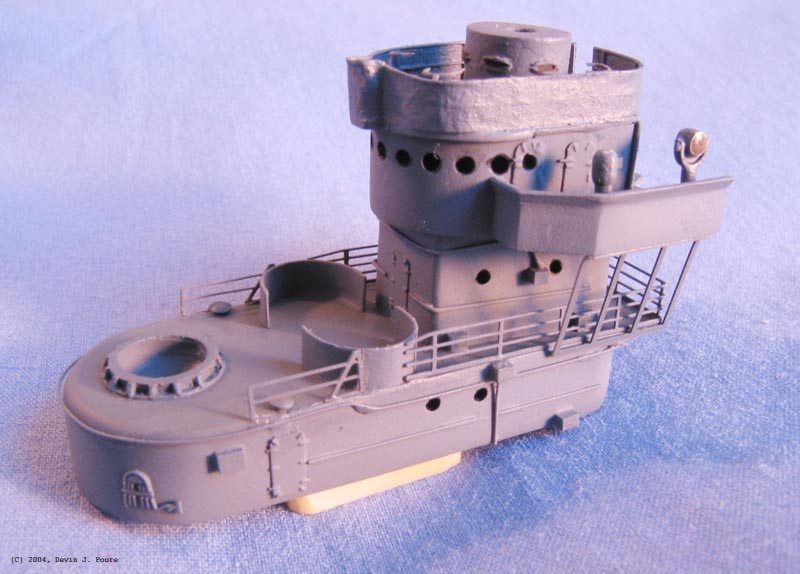
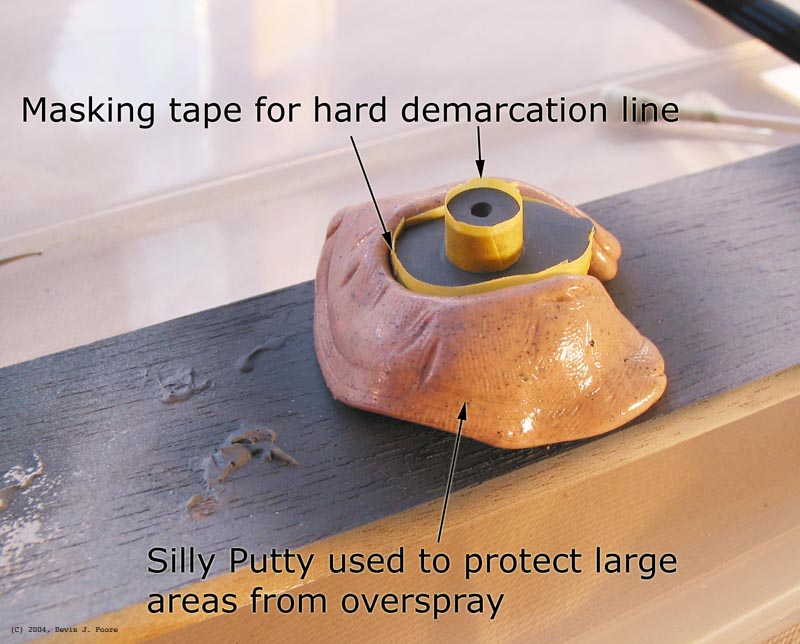
Painting the Decks: One of the headaches of painting ships is 1/350th and smaller scales is the difference in color of the horizontal and the vertical surfaces. I've read different ways of dealing with this, but I always keep coming back to what I do here: masking off one or the other and airbrushing. Photo 25 shows how I use Tamiya brand masking tape to get the hard line of the deck, and then all other areas are covered with Silly Putty (or 3M blue painter's tape and paper towels works, too). It can be tedious, especially when you're dealing with areas that have a lot of splinter shielding and catwalks, such as in Photo 26, but it gets the best results as far as I'm concerned, so I'm willing to invest the time. Photo 27 is another overall shot, showing the finished deck blue laid in, stacks and forward deck house and bridge attached. This is always my favorite part of a build; something that has at most times looked like a jumble of individual pieces for months finally takes on personality and shape as a ship.
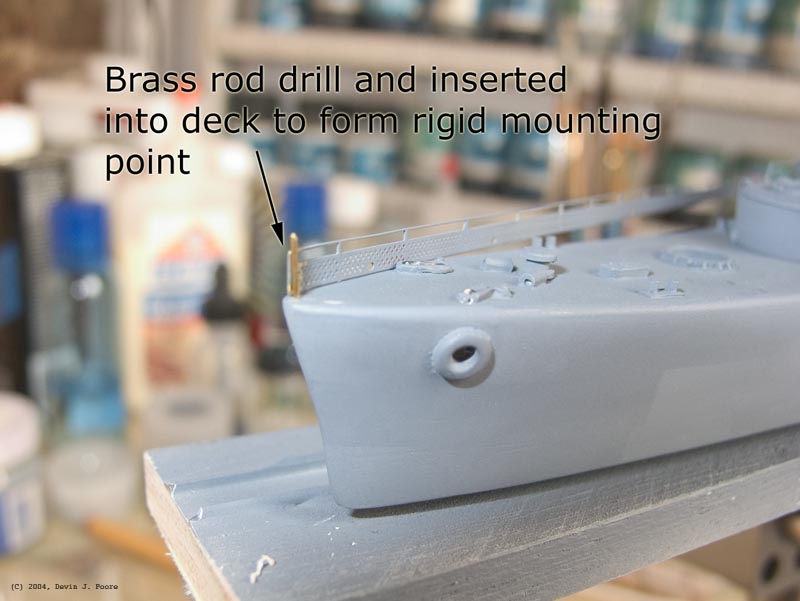
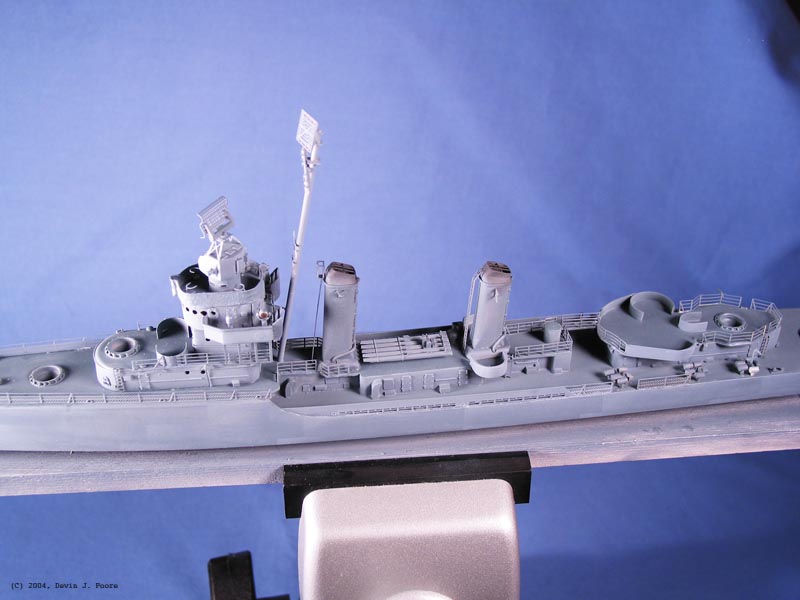
Final PE and Details: In the home stretch now. Photo 28 shows one of the cheats I did on this model. On the USS Farenholt, getting the forward most rails to meet exactly and stay put was a huge headache (not as big as the ship's boats, but it was close). This photo shows my solution; I drilled into the deck at the meeting point and sunk a metal pin. After both railing ends were affixed here with some thin epoxy, I went ahead with attaching the rest of the rail. It gives a good solid stepping off point, and I will be less likely to snap this joint if I accidentally hit it with my fingers. Photo 29 shows the PE complete. No, not really going to go over how to do that. There's nothing difficult about it, just take your time! There would be days where the entire progress would be just railings on the forward deck house. Better to go slow and be neat than fast and messy, in my opinion. Also, start on the top of the ship and work down. That way your hands won't be banging into the lower decks and destroying brass while you work. One thing I will point you to on PE procedures, though, is a way to deal with folding the depth charge stern racks. Read my method for that here. Photo 30 is pre-weathering, and also shows off details on the aft part of the ship. I kept weathering subtle on Laffey, not wanting to go over the top due to the hull shading. I did a gloss coat first; I've heard some say that they can get good results on a flat base with washes, but I can't. The gloss I use is Future Floor Polish, thinned only slightly with rubbing alcohol, and put on in two or three very light airbrush coats. This stuff dries so thin as to add virtually no paint buildup to the model. It won't even clog fine PE details. After it dried for a day, a wash of oil paints, very dark gray and brown, was applied. Don't just slop it onto the entire model; use a very fine brush, load it up with thinned paint, and touch it to the edge of details. Capillary action will pull it around the details. If too much, wick some away with the corner of a paper towel, if not enough, wait for it to dry a bit, and then apply more. After the oil wash dried for a few days, I sprayed it with a flat coat, and then dry-brushed a very light shade of the 5-N. Photo 31 shows details on the forward part of the ship, and the results after weathering was complete.
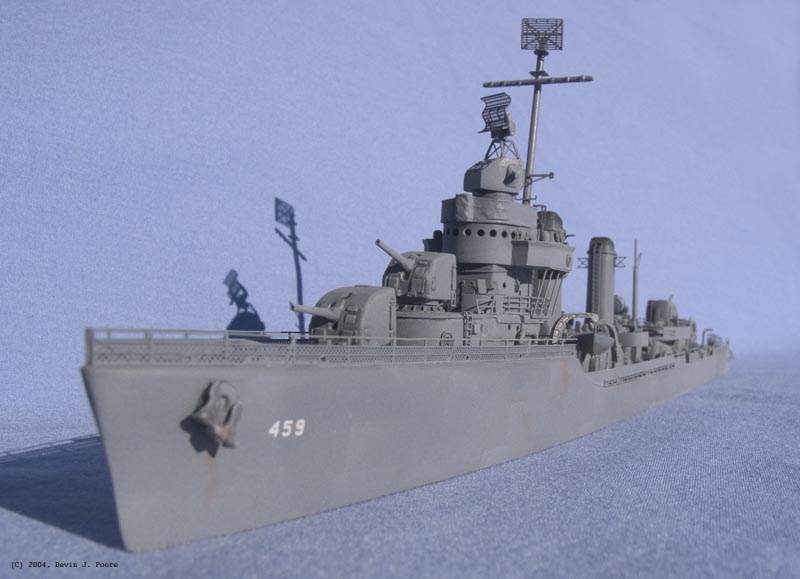
Final Views: Well, it's ready to "go in the water" with the USS Juneau. Both of the ships need their rigging (which I put off until they are mounted so as to have a good solid base under them), crew members, and some other minor final details. I hope to get this diorama done soon, as I've been playing with it for just too long now, and I'm dying to get on to building one of the Trumpeter bird farms. Back to the Main Build page Back to the USS
Juneau page
|