'From Stem to Stern'
Building the Revell S-100 Schnellboot
By Jeff Herne
'From Stem to Stern'
Building the Revell S-100 Schnellboot
By Jeff Herne
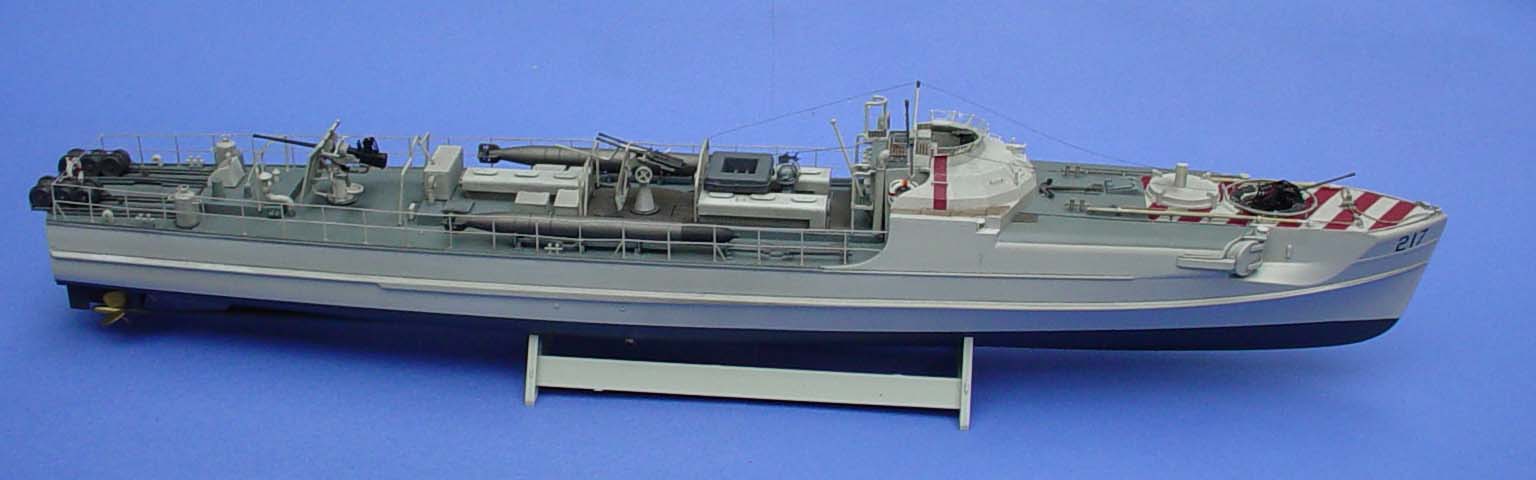
Revells S-100 is one of the finest ship model kits to be released in plastic in several years. Its well detailed, and accurately represents the sleek lines of the S-100 class boats. Although the kit is very nice straight from the box, modelers can take this kit to the next level with the White Ensign Detail set #7201, designed specifically for this kit.
This particular S-boot is my 3rd Revell kit in the last year. I actually stumbled upon this kit, I had initially purchased one simply to scrounge the 37mm AA gun for my 1/72 U-boat project. After the U-boat project was done, I replaced the 37mm AA gun from the S-boot with a Flakvierling 38 from a 1/72 Hasegawa armor kit, and I was hooked. I built my first boat as a modified S-100 class with the quad 20mm, the second was out of the box stock, and this one is the third. After receiving the White Ensign set, I knew I had to do another one.
The beauty of 1/72nd scale is that the parts are big enough to handle, yet the detail is retained. I started my S-boot by adding the decks to the hull and filling the seams along the sides. All three kits Ive built have a rather large gap (1/16th to 1/8th inch) at the stern, which was closed up with plastic strip and sanded smooth.
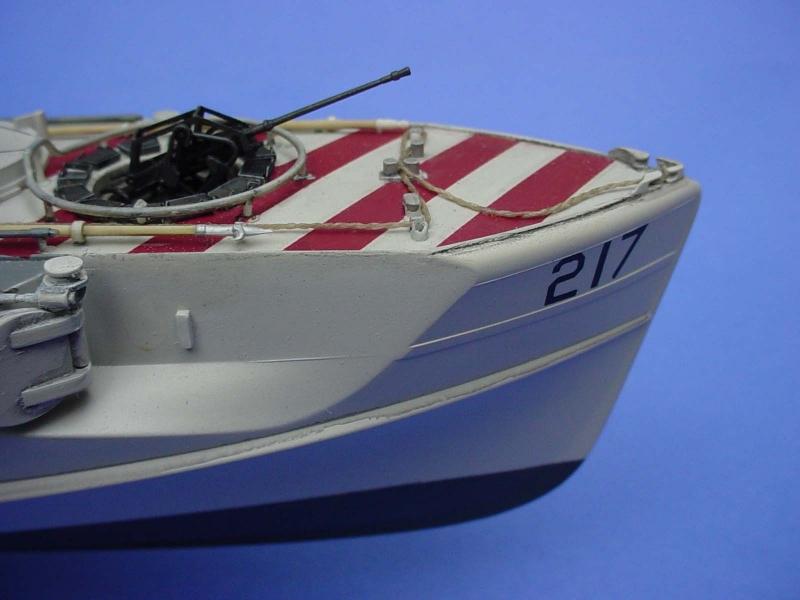
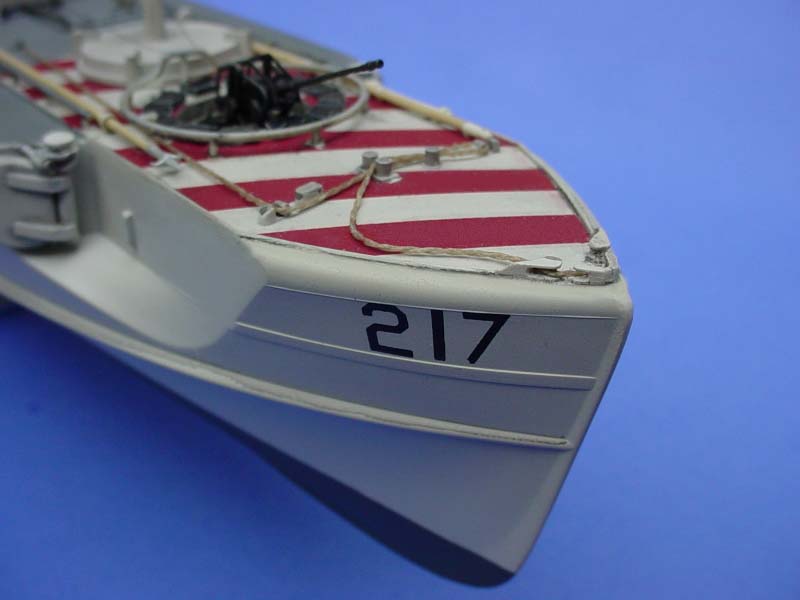
The S-100 class boats have suffered from what I like to call research neglect. There was very little reference materials on these boats until the Warships Pictorial by Steve Wiper was published. This book is a great, affordable reference for anyone wanting a decent model. But of course, I wanted more. Thanks to the Internet, I found www.prinzeugen.com , Dave Krakows website, which has lots of photos and technical information on the Schnellboote series. Dave also has a how-to article highlighting many of the corrections that need to be made if youre looking for 110% accuracy. I took Daves advice and removed the raised area around the bow 20mm position. The deck around the opening in the hull should be flat, on the kit, its conical. This becomes important later on if youre using the WEM brass.
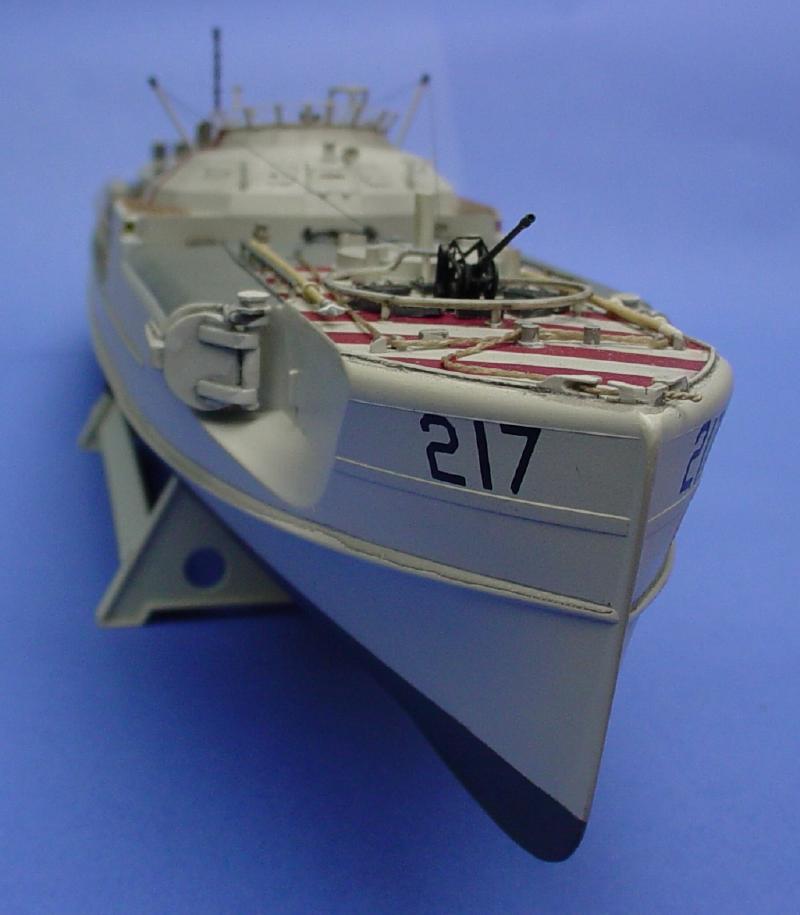
Armed with Steves book and Daves website, I set out to build my ultimate S-100. To date, theres only one reference of S-100 class boats wearing camouflage, and this was apparently a pattern applied to a boat that was in transit from one base to another. That being said, S-100s should be painted in Schnellbootweiss, an off-white light gray, with dark gray decks. I mixed up some Tamiya acrylics to match the FS#17875 number provided. Since the 1 denotes a gloss paint, I decided to tone it down and went with 37875, the flat version of the same color. The decks were painted with Tamiya 70% Neutral Gray mixed with 30% Panzer Gray. I painted the hull Panzer Gray straight from the bottle. Of course, had I been patient, I could have waited and ordered the specific colors from White Ensigns Colour-Coat line. They have all the colors, pre-mixed, for S-boats.
Since everyone should be painting their S-100s the same way, I decided to do some research and see if there were any options I could use to liven up the model.
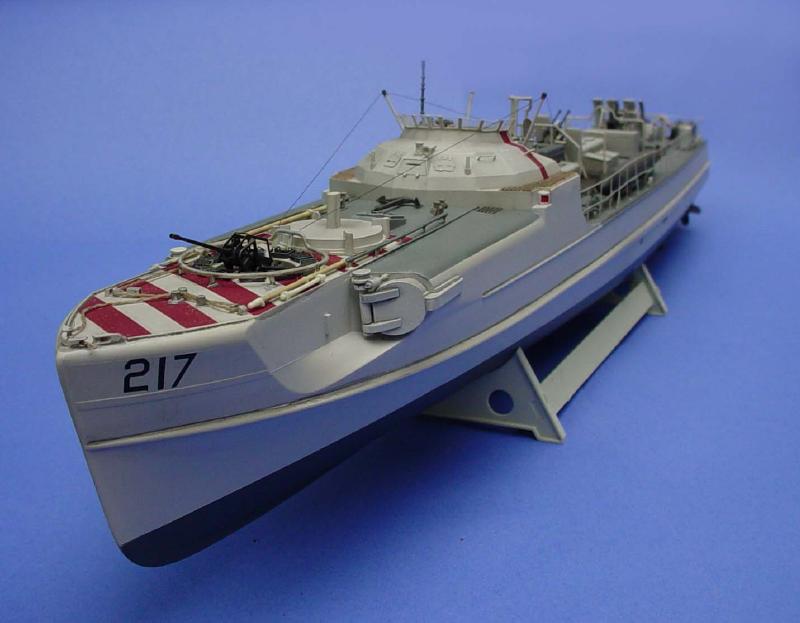
In the Warship Pictorials book, I noticed the red and white identification strips worn by many of the earlier classes in the Mediterranean. I had no information on S-100s wearing those stripes, so I contacted T. Garth Connelly and posed the question to him. Since he was finishing his Schnellboot in Action book, he couldnt give away any details other than yes, some wore them. Thats good enough for me, so I decided to add the stripes. Rather than mask and paint, I used red decal stripes from the local model railroad shop. For me, theyre a lot easier to move around and space then trying to mask and paint (its an angle thing). Once the decals were positioned to my liking, I soaked them with Micro-Sol to get them to conform to the surface. Once dried, I trimmed them with an X-acto knife.
Like all other ship models I build, I usually only keep the instructions around to figure out where the unrecognizable parts belong. This allows me to build in any sequence I want, and Im always working on several subassemblies at once. This keeps my attention focused on the model, and it seems to make the build move along faster.
I typically start the final assembly at the bow and work towards the stern. Since the fittings were basically Schnellbootweiss or Dark Gray, I built most of the subassemblies and then painted everything afterwards, including weathering and drybrushing. Once they were ready, they were added to the hull.
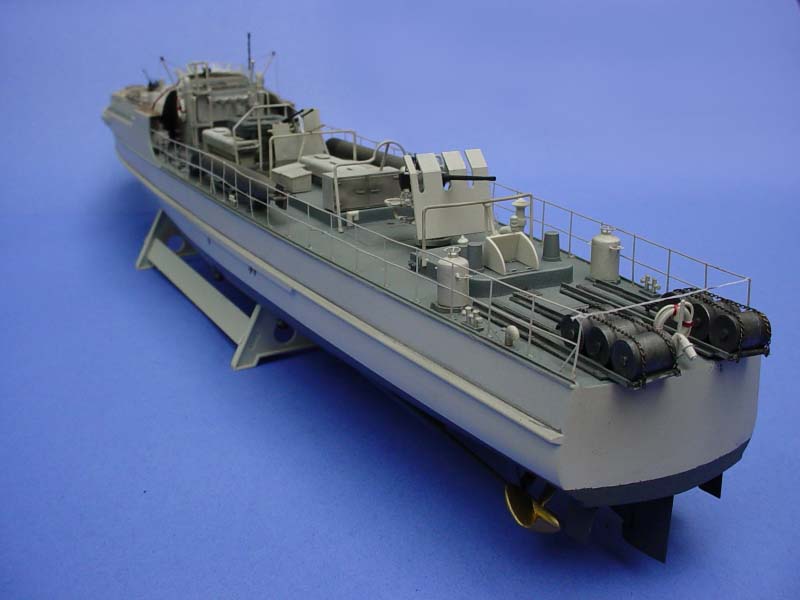
The guns were assembled as per the kit instructions, and I added the White Ensign brass parts to add the additional detail. The bow 20mm is particularly impressive with the brass gun mount parts from White Ensign. I also added brass support bracing, this prevented the gunner from aiming the weapon into any portion of the boat. From there, I added the 20mm magazine holders. Although a bit tedious, with 12 holders and 4 folds each, it really adds some incredible detail to the bow area. Once the model is completed, I added the photoetch magazines to each of the holders. I waited until the model was done, since I wanted the gunmetal of the magazines to contrast the gray of the holders. While handling the model, I mangled the WEM brass support bracing, and although I tried to salvage it, I ended up using the plastic kit supplied part, which is considerably heavier.
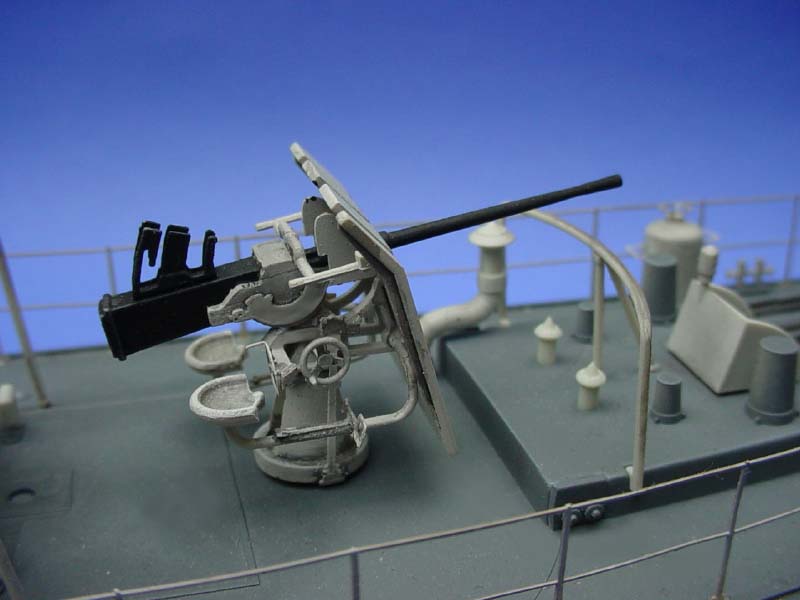
The 37mm in the kit, although accurate in shape, is
somewhat bare until you add the brass parts. Once completed, it really
stands out, especially once its painted and drybrushed.
In all three kits, Ive had trouble with the 20mm Zwilling. The kit instructions are poor, and contrary to popular belief, the guns are angled differently, to allow the magazines to be changed without interfering with the other gun on the mount. If Im allowed one complaint with the WEM set, its that theres no 20mm shell casing bag that Ive seen in most of the photos. I intend to scratchbuild one eventually.
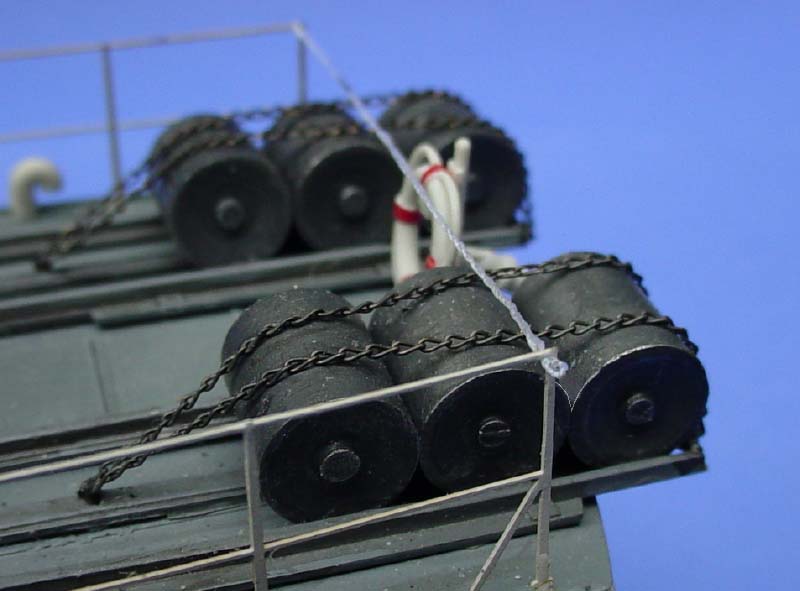
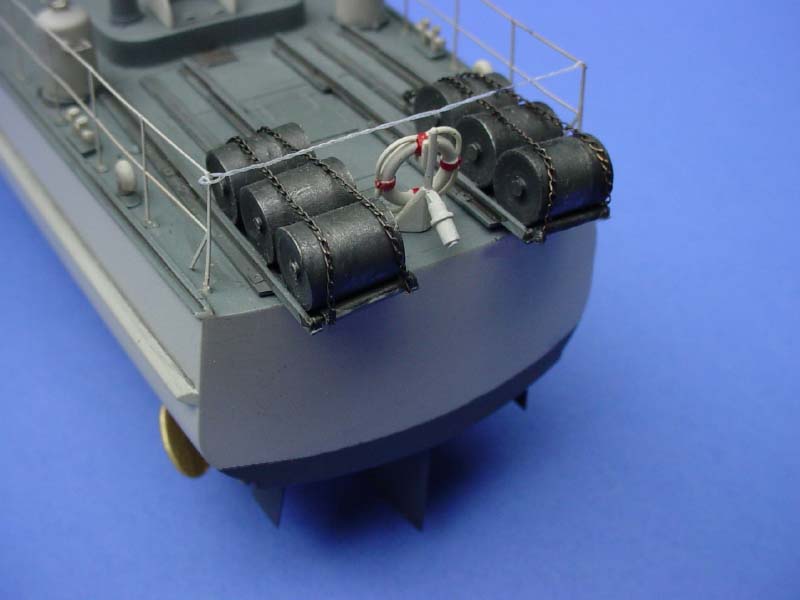
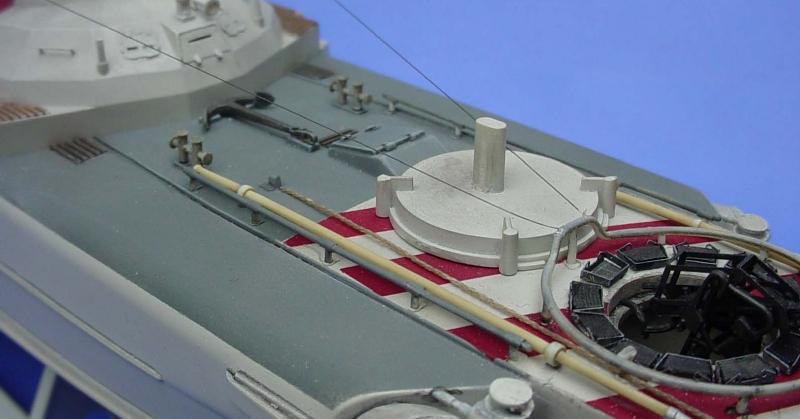
Another area of question with the S-100 class was the stern. Some carried 4 smoke canisters, some 2, some carried depth charge racks, some carried mine rails, some had combinations of both. The Revell kit comes with depth charge rails, but no depth charges. I added the depth charge rails to the stern, and turned nylon rod in my lathe to simulate the depth charges. Although they lack the familiar star pattern on the ends, they suffice. I added some scale chain as tiedowns for the charges.
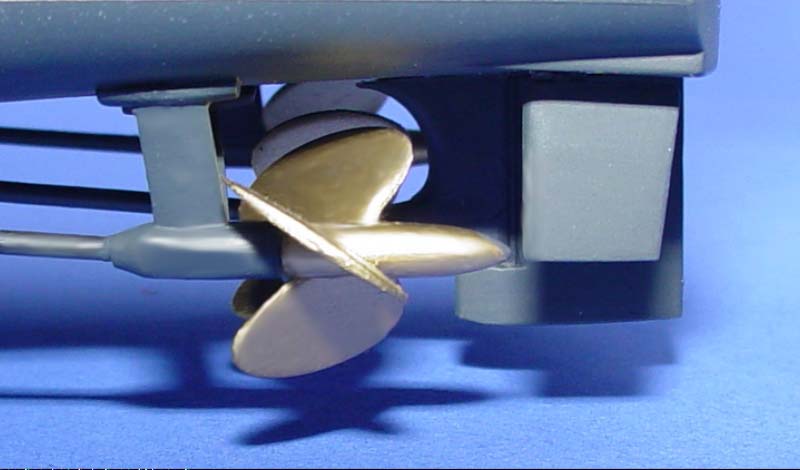
The kits major flaw are the screws, theyre just
plain wrong
but, good news is that Classic Warships does a set of replacement
screws specifically for this kit. Again, I simply couldnt wait
so I added
the kit screws. The method I use for painting the brass screws has worked
out quite well. In some aspects of modeling, I have incredible patience,
in others, I dont. Painting is not one of those aspects, although it should
be. The screws were brush painted with Testors acrylic brass
YUCK
terrible
paint. But, dont give up
after the acrylic has dried, I painted Testors
Model Metallizer brass over the acrylic
and the results are quite satisfactory.
I added the brass props to the torpedoes prior to assembly. Remember, if you add them, that theyre contra-rotating, which means the pitch is opposite.
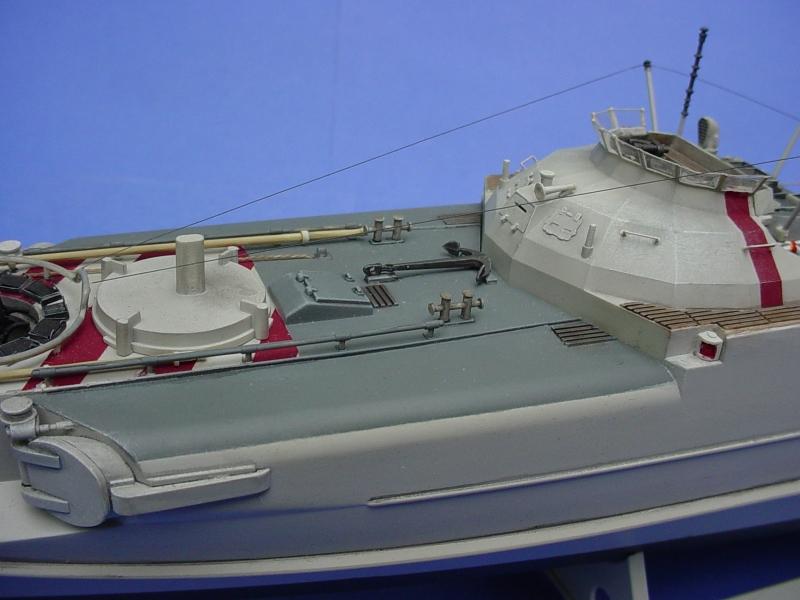
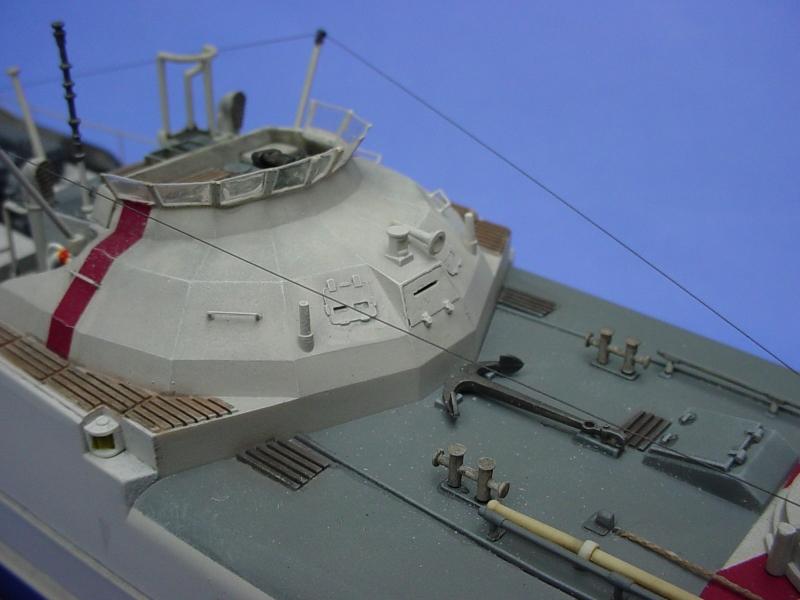
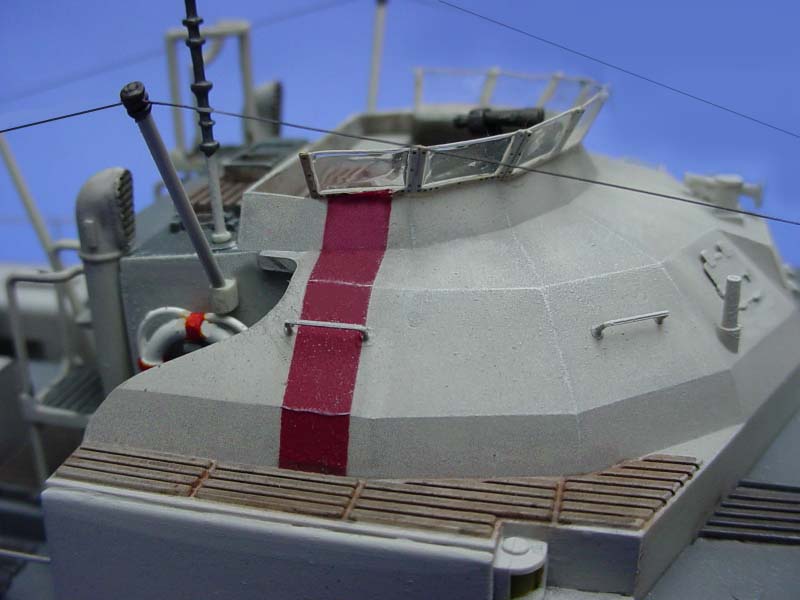
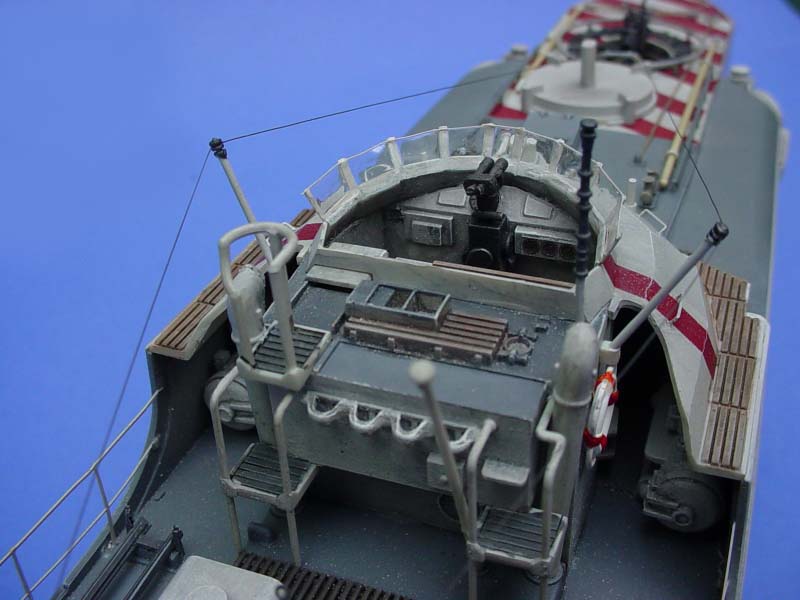
The major component of the kit is the wheelhouse and Kalotte, and although the flaws are not obvious, the armored bridge is actually an S-38 conversion, not a true S-100 production. Many of the S-38 class boats were retrofitted with the armored bridge. A major area of concern is the inside joint where the wheelhouse meets the armored bridge. Youll have to deal with a seam thats tricky, especially if youve pre-assembled the components of the wheelhouse prior to adding the armored bridge to the top. Putty, a needle file, and lots of patience will clean the seam up nicely.
I replaced the grab irons along the face of the bridge
using Gold Medal Models railroad car grab irons, and used the WEM brass
parts for the armored hatches on the face of the wheelhouse. Without a
doubt, the most difficult part to deal with is the windscreen bracing.
Although I personally didnt have any problems with mine, I can see where
it could cause less experienced modelers some troubles, as the part is
fragile and requires multiple bends. White Ensign recommends using the
PE part over the kit supplied clear part, but I found this to be too clunky,
so I glued a piece of clear nylong thread to thetop of the frame, and added
Micro-scale Krystal Kleer.
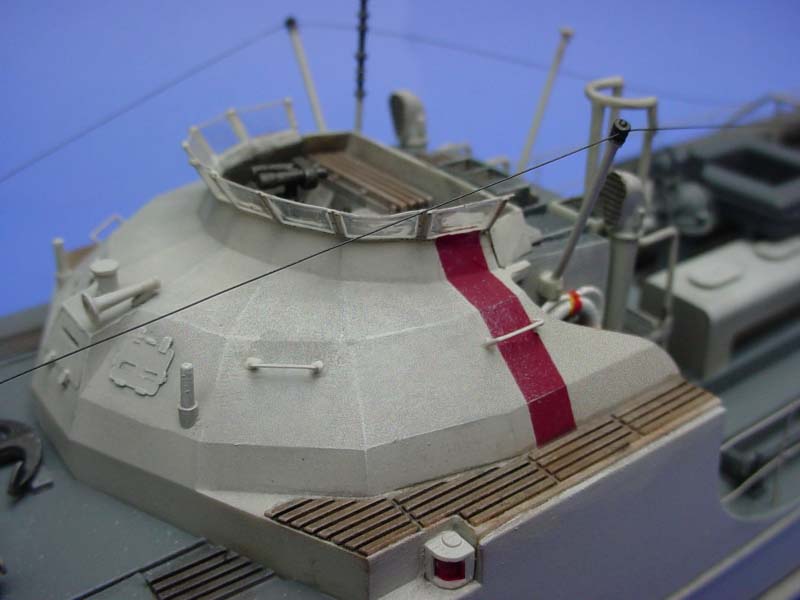
White Ensign provides a nicely etched wheel, but alas, you cant put it on the bridge, as the boats were steered from inside the Kalotte. I started to explore the options of opening the armored ports on the front of the bridge, but realized that youd never be able to see inside it due to their small size. I am saving that wheel for another project!
One of the more interesting bits included in the White Ensign set is the radio box. Although folding the radio box itself is simple, adding the small shelves underneath for stowing maps, charts, or logbooks is a labor of the utmost patience I eventually found some styrene strip that was of appropriate width, and added them to the PE part once painted and drybrushed, it almost looks like I could dial up Berlin!
On the topic of dials White Ensign also included a clock, complete with separate hands so you can accurately model your Schnellboot to the precise hour and minute of her configuration I can see it now I modeled her as she appeared at exactly 2:28 pm on July 7, 1942 Repeat after me I am not a mutant.
Unfortunately, photos of the bridge area of the S-100 are few, so I had no real clue where the clock and radio should be mounted, so the rear bulkhead seemed as good a place as any and besides, it was pretty bare in the kit.
On the edges of the armored Kalotte were inclined ladders. Several photos show the ladders in place, several do not I noticed one particular photo in the Warship Pictorial that shows what appears to be the ladders folded up and under the Kalotte. This makes sense, since the ladders are in the way when a torpedo is loaded I attached my ladders in the folded position under the deck.
Once the basic subassemblies were in place, I started weathering the model. Having seen the photos of S-100s in the Pictorials book, and knowing from my aircraft and armor days how quickly white paint weathered, I concluded my S-boot would be somewhat dirty
The model was washed with a mixture of India ink and Tamiya thinner. Im still reluctant to spray Future on the top of a model thats supposed to be dull, so I took my time and applied the wash with a fine 0000 brush instead of soaking the entire thing. I drybrushed the base colors over the washed areas, then drybrushed the Schnellbootweiss with pure white, and the Deck Gray with Tamiya Sky Gray. Since the lower portion of the hull was painted German Dark Gray, I drybrushed the hull lines with Tamiya Dark Gray, which is slightly lighter. Any lighter shade of the base color works for this process, the amount of contrast you choose is based entirely on the differences in the colors you use. As I was drybrushing the hull around the bumper boards, my brush started to glob up and it really messed things up. I sat there staring at the hull for almost an hour trying to figure out how to resolve the mess, when I finally resigned myself to repainting the hull I soaked a paper towel in Testors Brush Cleaner to start removing the paint from the hull. Once I started removing the caked on enamel, it smoothed the paint out incredibly, and achieved the effect I had originally wanted completely by accident! I wiped down the remainder of the hull using this process, and I cant be any happier with the results.
Once this mess was completed and the model drying, I drybrushed Testors Metallizer Burnt Metal over the 20mms and 37mm AA guns, as well as the radio box, clock, and instrument panel, and the bridge mounted torpedo sight. The torpedos were also painted at this point, the body of the torpedoes were sprayed with Metallizer Burnt Metal, and the warheads with Metallizer Exhaust. Once rubbed out, they actually look like unpainted steel, which was the intention.
The last step of construction was to add the railings from the White Ensign set. I opted for the open rails without the spray shields, but be warned, these parts are fragile I mangled one set before getting both pair glued into place. Fortunately, since theyre straight runs, theyre easy to straighten. My examples didnt fit perfectly, I had some alignment problems with the kits locating points and the stanchions. I realized I had placed the rails in the incorrect stanchion mounts on the deck be careful of this, as sanding the stern to fill the seam can remove the last set of mounts on the deck. Once I relocated everything further aft, it fit nicely, with only some minor bending of the stanchions, half a degree this way, half a degree that way, to resolved the fit.
The model was rigged with nylon quilting thread, and given a coat of Testors Dull-cote to even things out. Once dry, I went after the model with pastels to accentuate some of the details, and to add some color to the weathering. Very slight hints of rust on the Kalotte, around the grab irons, and some of the deck fittings (remember the hull was wood, so no rust from the hull!)
Ive also stumbled onto a method for doing the wooden decking which has yielded some excellent results. Contrary to popular belief, wooden slatting on the deck would not remain wood colored tan for very long, especially when wet and walked on for extended periods of time. I painted the deck strips with the same color of gray as the deck, and applied a heavy black wash between the slats. Once dry, I applied tan and brown pastels to the flat paint, then Dullcote. The result is very believable weathered wood.
The final step in this process is to mount the model to a base. Ive decided to use keel blocks instead of finials or the kit cradle, and that will finish the 3rd S-100 class boat for me.
This is, without a doubt, one of the most enjoyable models Ive ever built, and its the type of ship that looks fast even when its sitting still. Beginners will find this an excellent first ship model, inexpensive ($20 USD retail) with an easy paint scheme, easy to handle parts, and good detail, even out of the box. Experienced modelers will want to add White Ensigns detail set and take this model to the next level. Done properly, this model is a show stopper.

References
Classic
Warships Warship Pictorial #15 Kriegsmarine Schnellboote
White
Ensign Models 1/72 S-100 Schnellboot Photo Etch Set
Classic
Warships 1/72 S-boat propellers
Also on this site: Guido
Hopp's 1/72 Scale buildup of the Revell S Boat
Available Now from all the usual sources