Russian Missile Destroyer

by Noel Carpio
| When I saw an old issue of Fine Scale
Modeler with an article on Sculpting 10 foot waves by Rusty White, and
saw how his 1/350 scale German Bismarck came out, I was stunned!!! I was
so impressed by the results. I immediately wrote Rusty White and asked
him more questions about this even after reading the article more than
three times just to get the details right.
As soon as I got my Sculpey Modeling Compound from the nearest art store, I asked myself what kit should I experiment this with? I thought, "It must be small - but not too small". Then I said "It must be easy to assemble so I could focus my time more on the sculpting part". Then I said "It must be CHEAP - so in case it has to end up in the waste basket, I won't feel too much at a loss. After looking through my collection of unbuilt kit, I found a 30 cm Admiral Panteleyev Guided Missile Destroyer by Zedengfu. This kit was given to me by a friend months ago. Where I come from, this kit does not cost any more than $10 and it falls around 1/500 in scale (more or less). It has a few parts to glue and so I said.... "PERFECT!!!!" |
|
| This kit, to my impression, is a larger mock up of a Pitroad kit. The hull is bogus but the fit is not as bad. I had a lot of check fitting to do before even getting started. After washing, cleaning the parts with detergent and warm water and leaving it to dry, I examined the hull. I glued the deck onto the hull to make the hull sturdier even after slicing it. I used a masking tape to mark where I will be slicing the ship to convert it to waterline. When I was convinced that it was totally straight, I grabbed my KYK Tool (similar to a Dremel Tool) and carefully sliced all the way. |
below to enlarge |
| I sanded the sliced portion with a fine sand paper until it was smooth and perfectly straight. I used a regular ruler and pencil to define where the portholes should be on the sides of this ship. Since there was no recessed details, I used my references to make the best guess where the portholes should be. After defining the points, I drilled the holes with the KYK Tool. | |
| Then I got a piece of wood from a lumber shop for a base. The base was only about 15 inches long and 5 inches wide. You should use hard dried wood since this will be subjected to oven baking. I then started to sculpt the bow waves and used the hull to make sure it is sculpted correctly. Be careful in sculpting waves. If you want it to look like the ship is in heavy seas, do so but be realistic. Do not sculpt it as if it was entering a tidal wave! I read books on ships at seas. It is normal for ships of this size to get splashed badly by stormy waves. When I was done, I made triple sure that the ship fitted the molded waves. When that was assured, I placed it into the oven at 250 degrees Celsius for 15 minutes. | 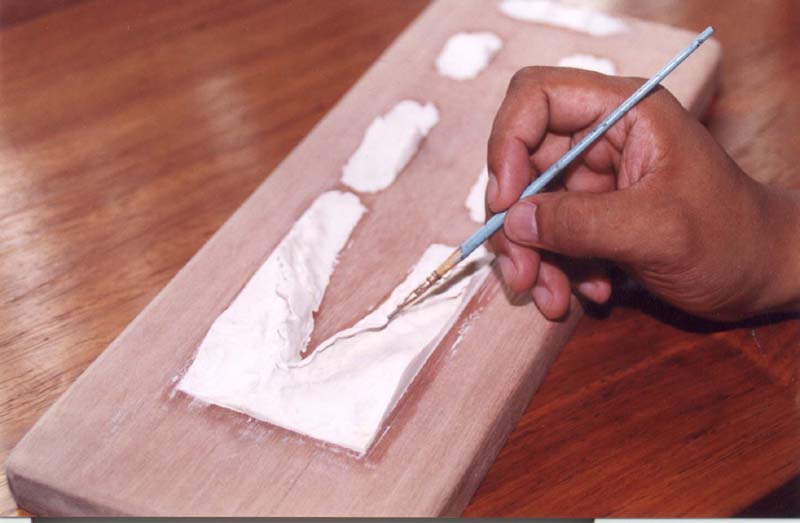 |
| After this, I saw that there were a few cracks on the wood and the sculpey. This is a result of thermal expansion and is normal. For sculptures this small, prolonged oven baking will only result to more cracks so be observant and don't over-cook it. When I felt that the sculpey was rock hard, it was done. I masked four corners of the base to prepare it for painting. After that, I then started painting the entire base with Acrylic Aquamarine Blue with a little mixture of Green and Black to capture the correct "Deep Sea" color. i let it dry for 48 hours. Then I applied my Liquitex Heavy Gloss Gel Medium on the entire painted area. To me, this is the fun part. With Gel Medium, you can further make the waves more realistic since the Gel Medium has the consistency of mayonnaise. Gel Medium also allows you to fill those unwanted cracks. I let this dry for another 48 hours. | |
| While that was on the side, I started assembling the other parts of the ship. I painted these parts the same way I did with the hull and the deck. All vertical surfaces were painted with the Light Grey mixture while the Horizontal surfaces were painted brown. I painted the smoke stacks and mast assembly with Flat black and the bridge windows with gloss blue black. The ship, being a low skill level rating, was fully assembled after about 6 hours or assembly and 2 hours of painting. I washed the entire deck with diluted black oil paint and wiped off the excess. This will enable you to emphasize the shadows of the corners. Then I left it aside to dry. | |
| I then placed the ship on the base and make sure it was in a proper position. You should inspect this in all perspectives to make sure the ship if properly fitted. I did have to sand the areas of the waves that touches the hull to make sure that the fit is right. When that was done, I removed the ship again from the base. I applied Gel Medium on the area where the ship will sit and placed her back into place. The Gel Medium is a good bonding material since it turns rock hard when dry. Then with a thin flat brush, I applied additional Gel Medium on the waves especially on the parts close to the ship. The Gel Medium will allow you to sculpt wave tips and simulate splashing water. Moreover, Gel Medium is transparent/colorless when hardens. After this, I set aside everything to dry for another 48 hours. | |
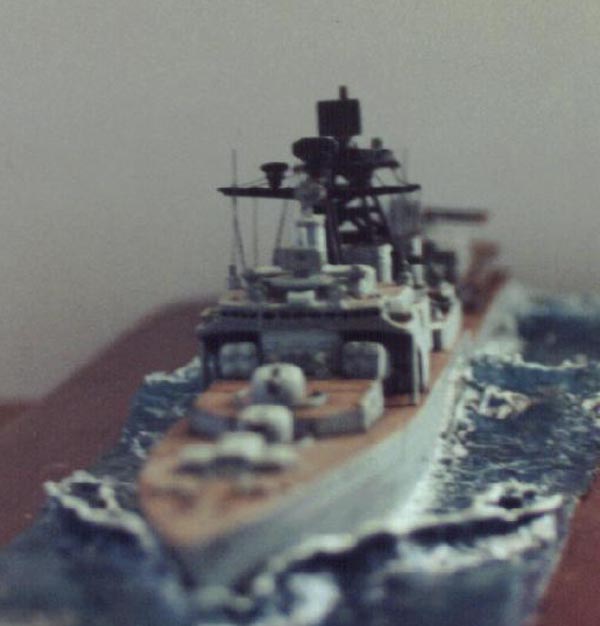
| To finish the diorama, I weathered the ship using pastels. Not to much
though. then I placed excess GMM Photoetch railings from my 1/350 USS Missouri.
I simple cut off one layer of the railing since that will be too large
for a 1/500 scale ship. It looked ok though as seen in the photograph.
I added proper riggings and the ship is done. Then I covered the entire
sea area with paper before making a matte coat over spray on the entire
vessel. I used Humbrol Matte Cote.
This model is almost straight out of the box so nothing extraordinary. For an experiment, I think this project is good enough. I hope to do better with my next one. Noel Carpio |
 |
| Links:
Building the USS North
Carolina by Noel Carpio
|
|

© ModelWarships.com