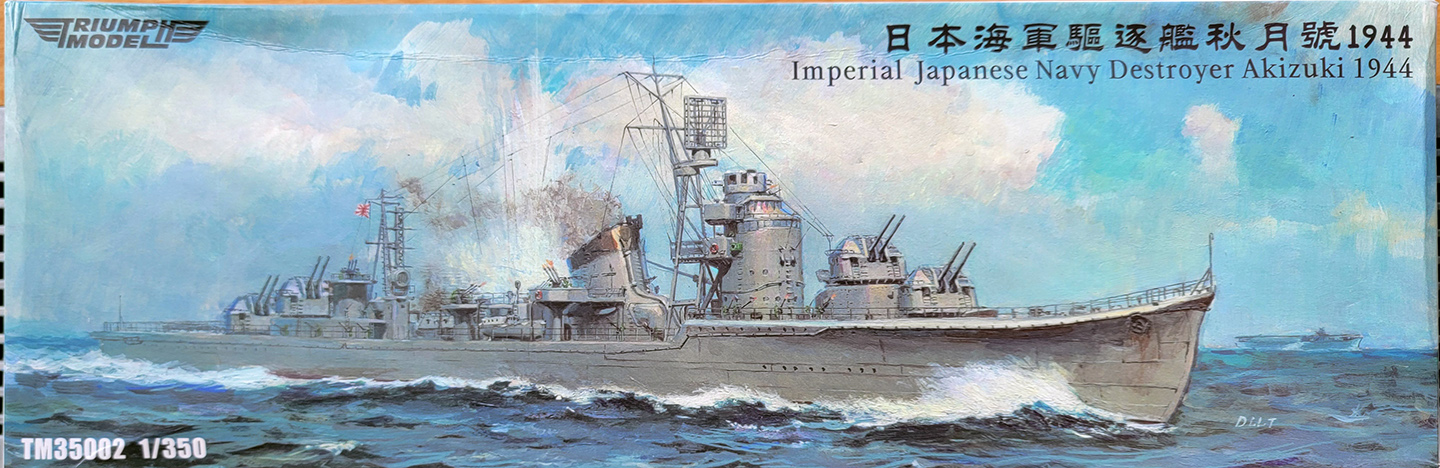
1/350 IJN Akizuki 1944
Akizuki class destroyer
Kit # TM35002FH
|
by Dan Kaplan |
| BACKGROUND* | |||||||||||||||||||||||||||||||||||||||||||
|
By the mid-1930s,
it was recognized in naval circles that the rapid advance of military aircraft
design would soon require improved weaponry and some specialized ships
to defend against them. The Japanese took note of early plans to develop
such a ship type by other navies, notably the Royal Navys Dido class cruiser
and the United States Navys Atlanta class cruiser. The Japanese had their
own plans to modify some existing light cruisers of the Tenryu and the
5500ton class light cruisers, but the obsolescence of these ships, coupled
with budgetary restraints and their navys emphasis on offensive-minded
torpedo squadrons, rendered such plans moot.
At the same time, design work began in 1935 on a successor to the 12.7cm 40cal HA (high angle) AA gun. Eventually known as the Type 98 10cm 65cal gun, it would be recognized as perhaps the Japanese Navys best secondary weapon design of the war. Adopted in 1939, it was a true dual-purpose gun and highly regarded by the IJN. By 1938, the foreseeable need for such a vessel had become pressing. Six vessels incorporating the new gun and a new, sizable hull were authorized under the Maru 4 building plan of 1939 as the Akizuki class destroyer. A further ten ships were authorized under the 1941 Additional Naval Armaments Supplemental programs. All six vessels of the first program and six vessels under the second program were completed. The remaining four vessels were cancelled, as were another sixteen vessels that were authorized but never laid down. Construction of the first four ships began prior to the start of the war, but all twelve vessels were completed during wartime. Later construction featured some changes to fit and AA armament. The last four ships were completed too late to see any meaningful action. Design
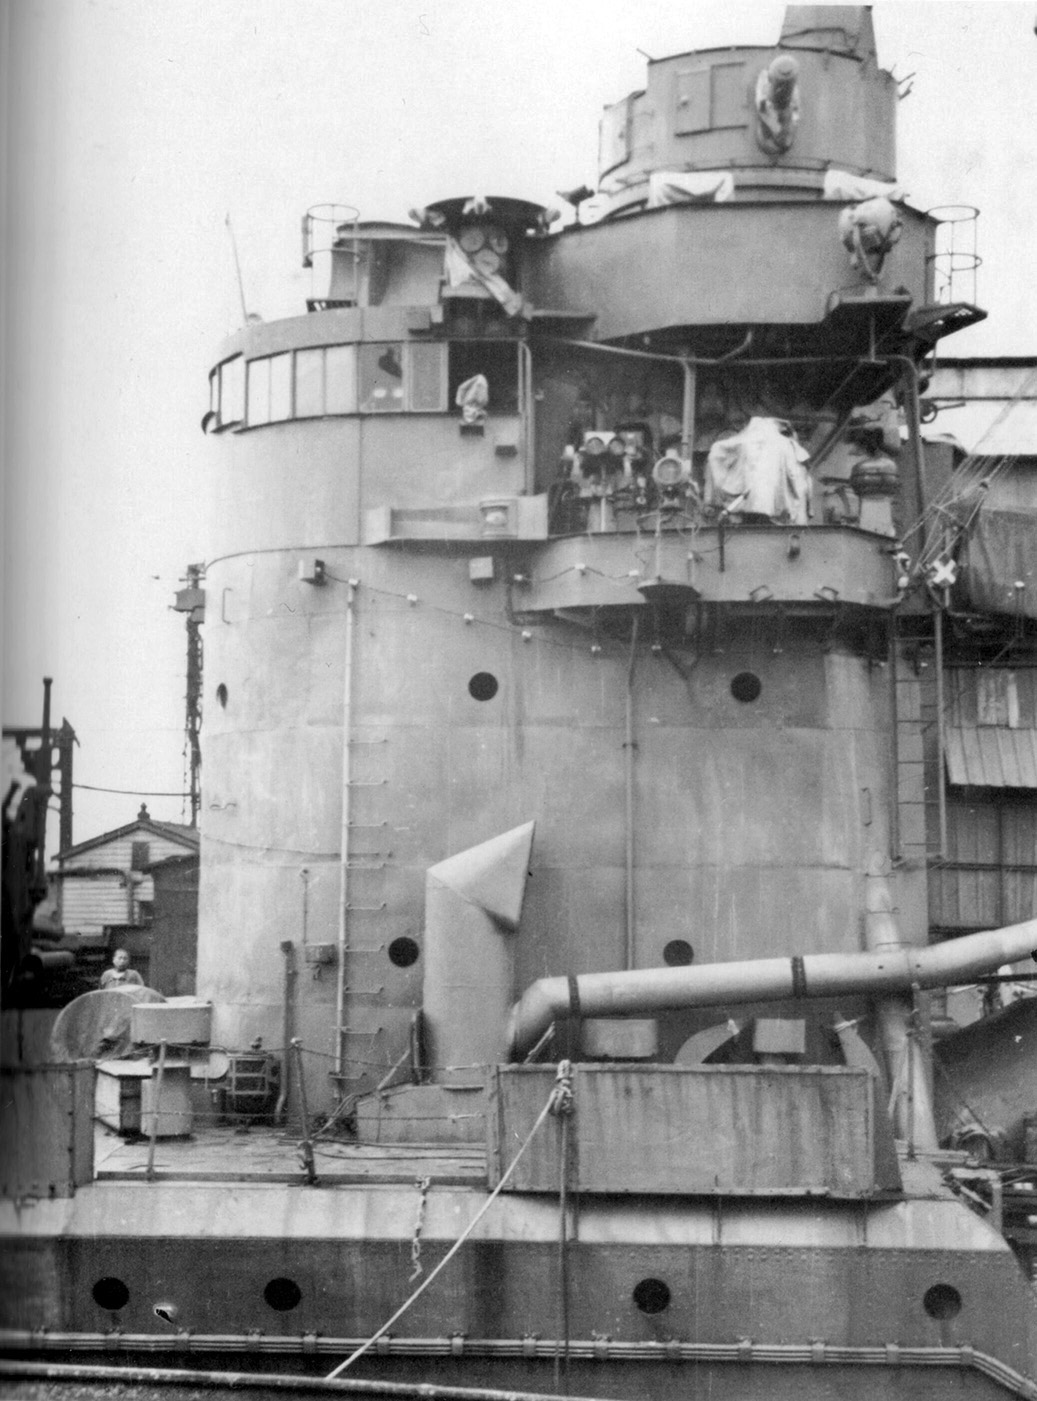
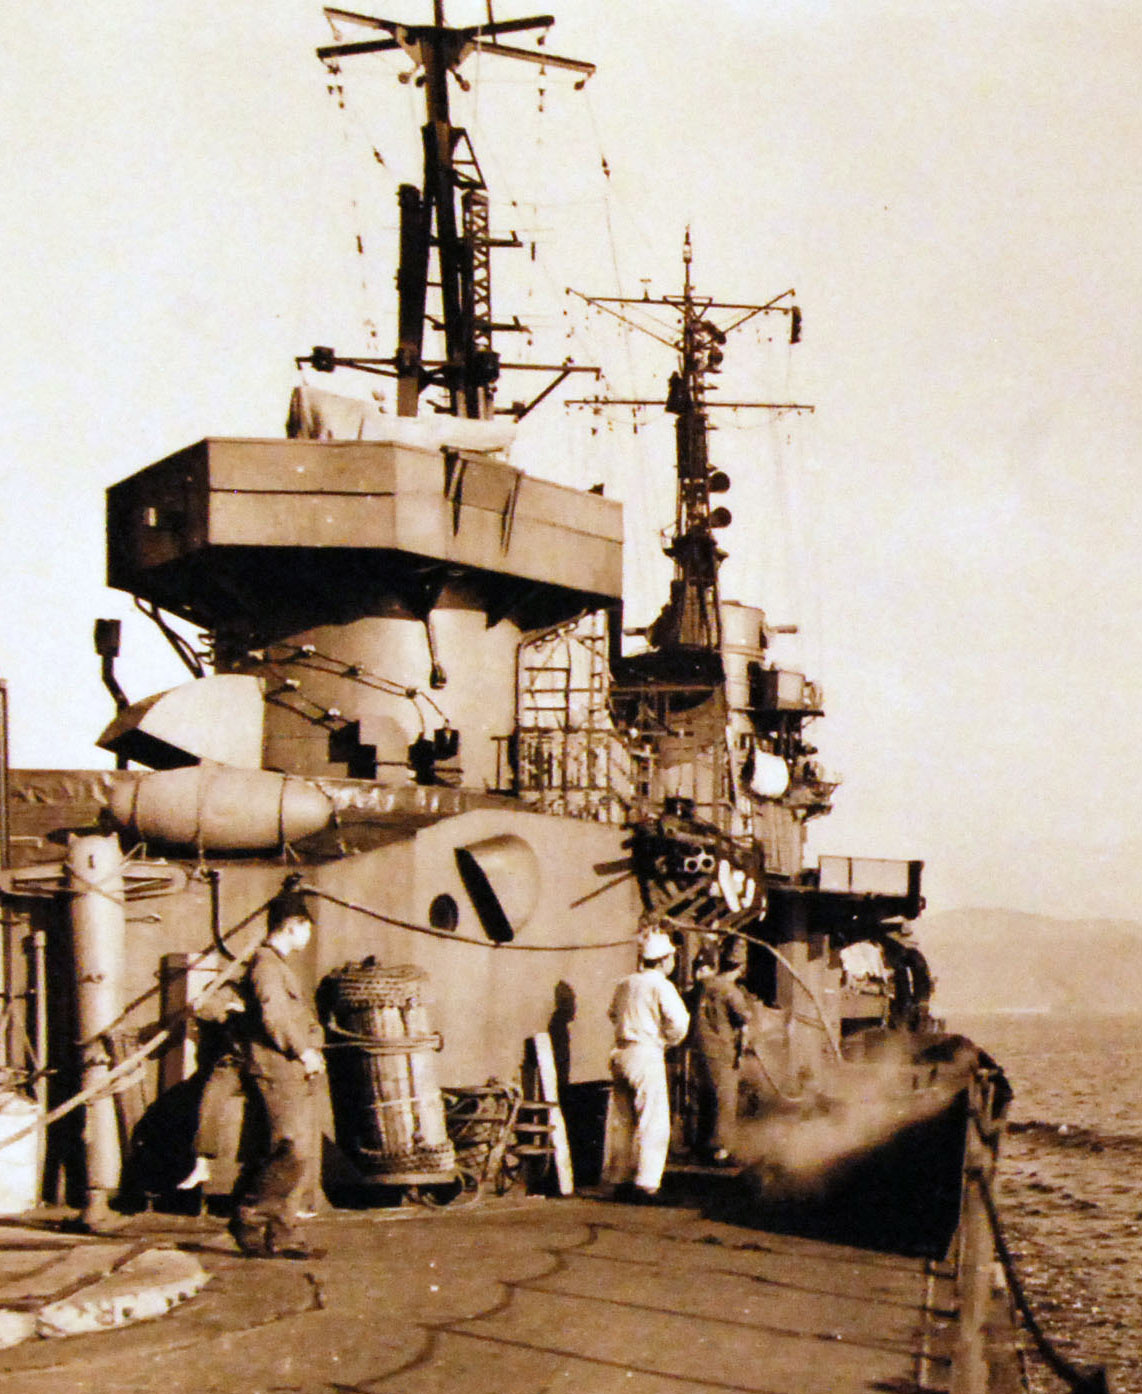
These new ships had a long forecastle and a larger bridge than previous destroyers. Though nominally three stories in height, the bridge was built two meters higher than the earlier types to provide better visibility over the superimposed B turret. It also incorporated the helm station on the compass bridge deck level, as opposed to the more common IJN practice of being located one deck lower. The bridge was topped by an open, air defense position and a modern Type 94 High Angle director for the forward main batteries. Another Type 94 HA director was to be emplaced on the aft deckhouse for the rear main batteries. Eight of the Type 98 10cm/65cal guns were carried in twin mountings in four large, fully enclosed turrets, two forward and two aft, with B and C turrets superimposed over A and D turrets. The Japanese Naval General Staff insisted on a torpedo battery to provide for an offensive capability, so one shielded mount of four tubes carrying four 61cm Type 93 (Long Lance) torpedoes was situated amidships, along with one set of four reloads. Defensively, two twin 25mm AA mounts equipped the initial ships, but changes to the AA fit came quickly. Triple mounts replacing the twins, and additional triple mounts were emplaced in port and starboard pairs opposite the bridge, funnel, and aft deck house. Production lags for the Type 94 HA directors led to its deletion from the rear position and replacement by yet another triple 25mm AA mount. By late in the war, numerous single 25mm AA mounts were added as well. For ASW work, two athwartship depth charge racks and two Y throwers were installed aft of D turret. Six individual roll-off racks ringed the stern, three per side. As the war advanced, the single racks were replaced by the more typical, multi-charge roll off racks and a greater number of depth charges carried. The first seven vessels laid down followed the original design and are known as the Akizuki group. Fuyuzuki became the lead ship of a slightly modified second group of four sisters. Originally identical to the first batch, this subgroup featured some simplifications of the design to aid and speed wartime production. Most prominent of these new features was a simplified bow form below the waterline and a re-arrangement of the main engine room air intakes around the funnel with simplified ducts. There were also changes to the layout of torpedo trolley rails on the main deck, repositioned placements and bandstands for the triple 25mm AA mounts, and the elimination of the aft Type 94 HA main gun director. As mentioned, this director was replaced by another triple 25mm AA mount and bandstand. Some changes to the upper foremast to better accommodate new radars was also enacted. The rear of the bridge superstructure was also enlarged, to better accommodate a radar compartment. The design of the last vessel was further simplified and was considered part of a third batch known as the Michitsuki group. Of these, only Hanazuki was completed. Michitsukis construction was halted when 16% completed and she was broken up after the war. The rest of the group was cancelled. Ship history
Upon her return, she embarked on two convoy missions and was then directed to Rabaul, where she joined the Guadalcanal campaign in late August. Akizuki was attached as an escort to the First Carrier Division (Shokaku, Zuikaku) and participated as such in the Battle of the Eastern Solomons. Afterwards, Akizuki remained officially attached to CarDiv 1 while also running patrols out of Truk and acting as escort for various transport and supply missions in and around the Solomon Islands. At Empress Augusta Bay in late September, she was bombed by B-17s and managed to shoot one down. She was also photographed by another aircraft, revealing the new class of destroyer to the Allies. At the beginning of October, she was assigned to DesDiv 61 in company with her newly commissioned sister ship Terutzuki. Her escort missions to Guadalcanal and surrounding islands continued through mid-October, mostly as an escort for the seaplane carrier Nisshin conducting resupply of heavy arms and men. She also successfully escorted Nisshin and her resupply convoy to Guadalcanal during the Battle for Cape Esperance. Subsequent resupply missions through late October were hard fought and met with mixed success in terms of successful landings and losses. On October 25th, she was part of a gunfire support mission as part of the effort to retake Henderson Field on Guadalcanal. Aircraft from Henderson Field on Guadalcanal attacked the escort group in three waves over several hours. Light cruiser Yura was sunk and Akizuki was damaged by one small hit and two near misses. Her damage was functionally repaired at Rabaul, and she returned to Japan via Truk in company of other units of CarDiv 1. She was fully repaired at Yokosuka Naval Base; those being completed by the end of December 1942. While in dock, an additional triple 25mm AA on a raised bandstand was emplaced to each side of the funnel. Akizuki headed back to Guadalcanal where she resumed a role as escort for more re-supply missions. These new missions were more typically composed of other destroyers and referred to as Rat Runs by the Japanese and the Tokyo Express by the Americans. While responding to a distress call from a cargo ship on January 19th, Akizuki was hit by two torpedoes from USS Nautilus near the Shortland Islands. One did not explode, but the other blew open the hull under the bridge on the starboard side. The flooding was extensive, knocking out #1 boiler and the starboard engine room. The hit also severely strained the keel under the impact point. 14 men were killed and 63 injured. Gingerly, she made it back to the Shortlands for temporary repairs to shore up the keel. She eventually reached Truk and the repair ship Akashi. Akashi managed to make her serviceable for the trip back to Japan via Saipan. She departed Saipan on March 14th, but 40 miles outside the harbor, the bow sagged severely. Fearful of the bow completely breaking off, Akizuki stopped her engines and was towed back to Saipan, where she was temporarily beached. The salvage ship Matsunouri Maru effected a more radical repair. The bridge and forward two turrets were removed to lighten the ship. These were transported separately back to Japan. The weakened bow was then severed and replaced by a temporary bow. A temporary bridge was erected aft the main mast and Akizuki was towed back to Japan in this condition by the auxiliary minelayer Shinko Maru, arriving in very early July 1943. She entered drydock at Mitsubishis Nagasaki Shipyard and remained there until late October 1943. This Mitsubishi facility was responsible for the construction of five of the initial seven Akizuki class ships, and it was here that the decision was made to transplant the bow of the recently launched but still incomplete sister ship Shimotsuki to expedite Akizukis repair. (This course of action is indicative of how highly regarded these ships were. Surprisingly, the severing and rebuilding of Shimotsukis bow does not seem to have delayed her overall construction time. Shimotsuki was completed in March 1944, well within the wartime norm of 21+ months total construction time.) While under repair, Akizuki gained additional 25mm and 13mm AA guns, a Type 21 radar upon the foremast, a Type 93 hydrophone for ASW work, and new roll-off depth charge racks at her stern. Akizuki rejoined DesDiv 61 at the end of the month but spent most of November and December engaged in training and fleet escort missions to Truk, Kwajalein and Kavieng. At Kavieng in early January, she was subject to an Allied air raid that damaged Noshiro, Oyodo and Yamagumo. She returned to Truk and participated in its evacuation in early February, ahead of the Hailstone Operation. She then relocated to the Singapore -Lingga Roads locale where she rejoined the other units of DesDiv 61 and the first Mobile Fleet. There, she and the division began an intensive period of training as AA escorts for the carriers of the fleet. These sessions were interspersed with stints of ASW work and convoy duty. In mid-May, the fleet relocated to Tawi Tawi, where these routines continued. Toward the end of June, the First Mobil Fleet sortied for battle, to oppose the American landings in the Marianas Islands. Akizuki was part of the screen for Force A and the three fleet carriers of CarDiv1. Akizuki fought hard along with the other escorts but, the battle went very badly for the Japanese and Force A lost the carriers Taiho and Shokaku. Another Carrier from Force B: was lost as well. Akizuki escorted the surviving units, including carrier Zuikaku, back to the mainland. Maintenance and training in Japanese home waters occupied the next three months. In early October, Akizuki underwent a refit, then rejoined DesDiv 61 as they escorted the remaining carriers of the Japanese fleet into battle off the Philippines in late October. At the Battle of Cape Engano, Akizuki was screening carriers Zuikaku
and Zuiho from aerial attack. Unfortunately, a direct hit amidships (whether
by bomb or torpedo is still uncertain) set her afire. Shortly thereafter,
she suffered a massive explosion in the vicinity of her torpedo tubes.
She jackknifed, with the two hull halves rotating in opposite directions,
and sank. Destroyer Maki came alongside to rescue survivors despite taking
a bomb hit herself. Crew losses totaled 183 officers and men.
|
|||||||||||||||||||||||||||||||||||||||||||
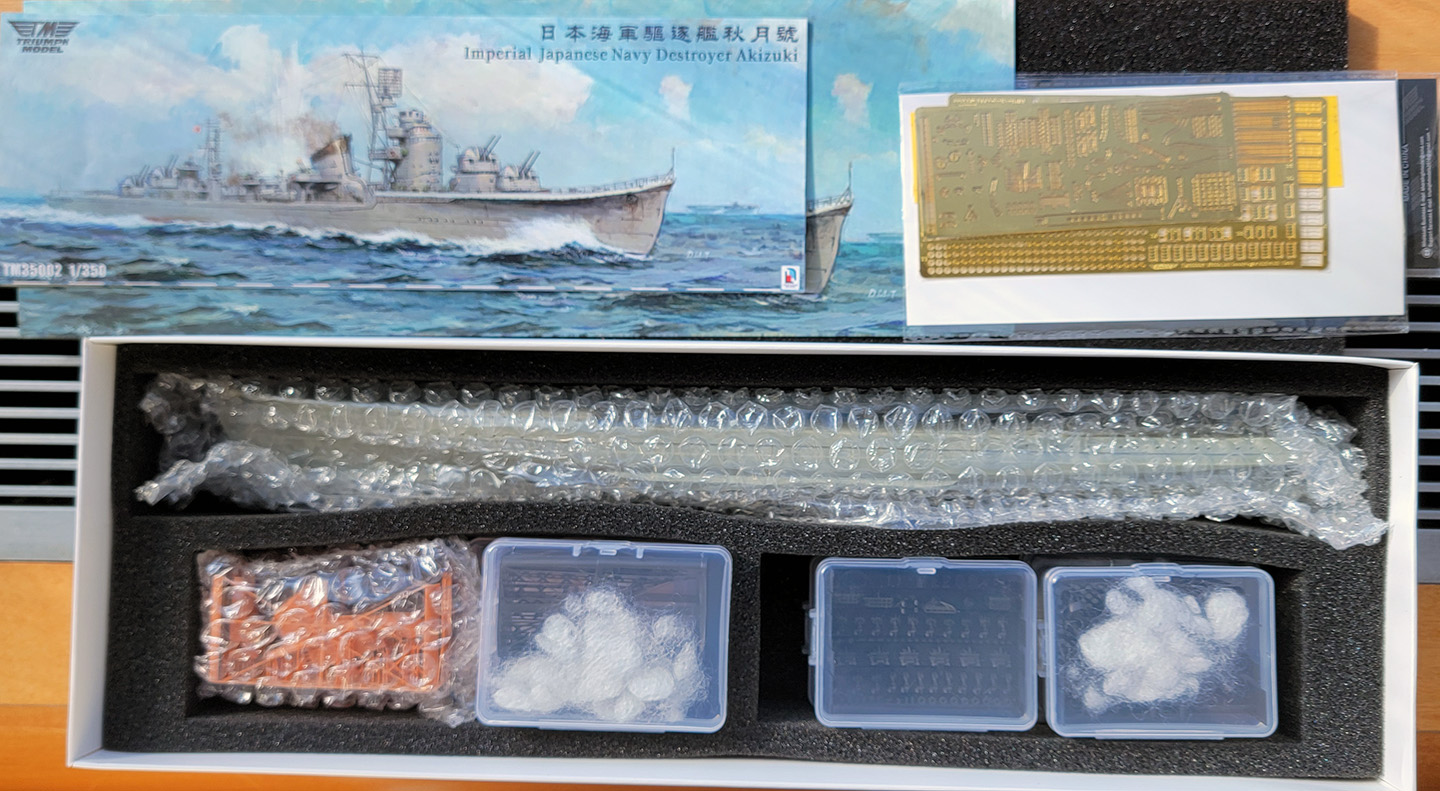
| The
Triumph review kit (released August 2025)
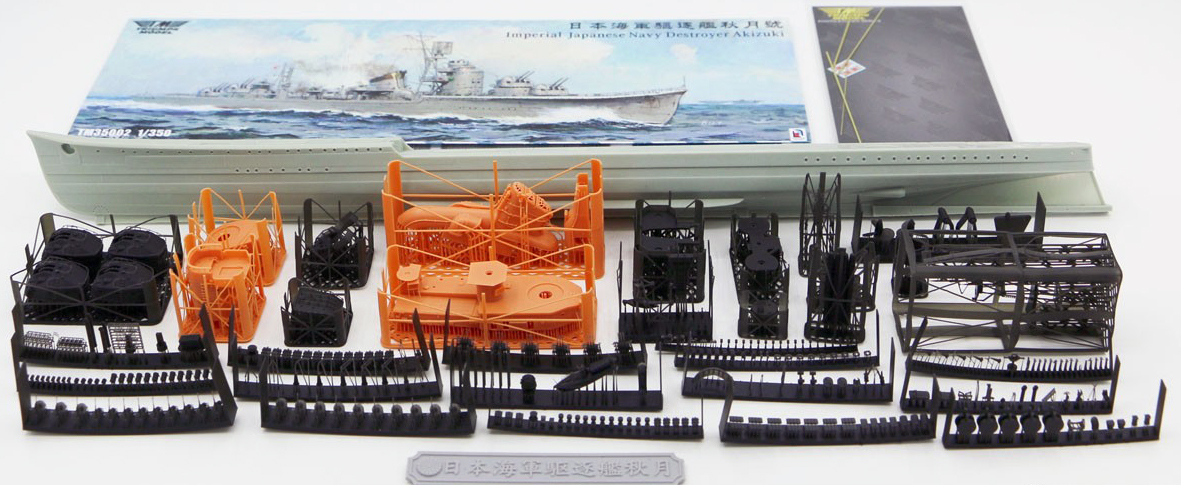
Triumph has simplified its offerings as compared to its recently released Mutsuki kit. Whereas that kit offered four options: waterline or full hull, standard or deluxe, the Akizuki kit comes only as a waterline or full hull kit. A deluxe upgrade package containing three sheets of photo etch parts, turned brass barrels, and a deck mask for painting is available for separate purchase and can be used with either version. This review kit consists of the standard full hull kit and the deluxe upgrade package. The kit hull is cast a very light grey resin. Everything else in the standard kit is a 3D printed part. The basic kit also comes with brass rods for masts and prop shafts (for the full hull version), plus flag decals. There are thirty-two print rafts; numerous smaller parts are contained on twenty-four rafts printed in black while four larger rafts containing superstructural items are printed in orange. Oddly, one of the smaller parts is printed in orange. Also included is a 3D printed nameplate. The kit art and contents are appropriate for Akizuki, late 1944. This same configuration would also be appropriate for sisters Hatsuzuki, Wakatsuki and Shimotsuki in 1944, excepting some placements of the single 25mm AA mounts. |
|||||||||||||||||||||||||||||||||||||||||||
|
|||||||||||||||||||||||||||||||||||||||||||
| THE HULL | |||||||||||||||||||||||||||||||||||||||||||
|
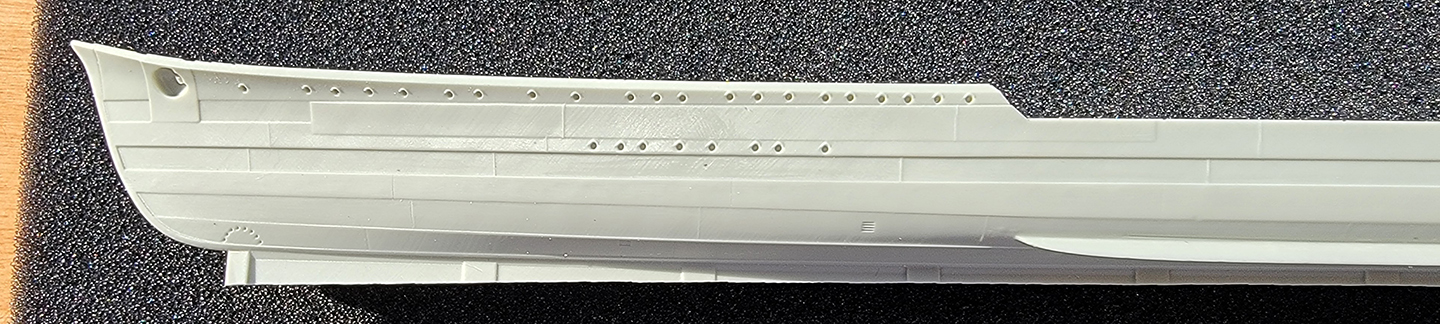
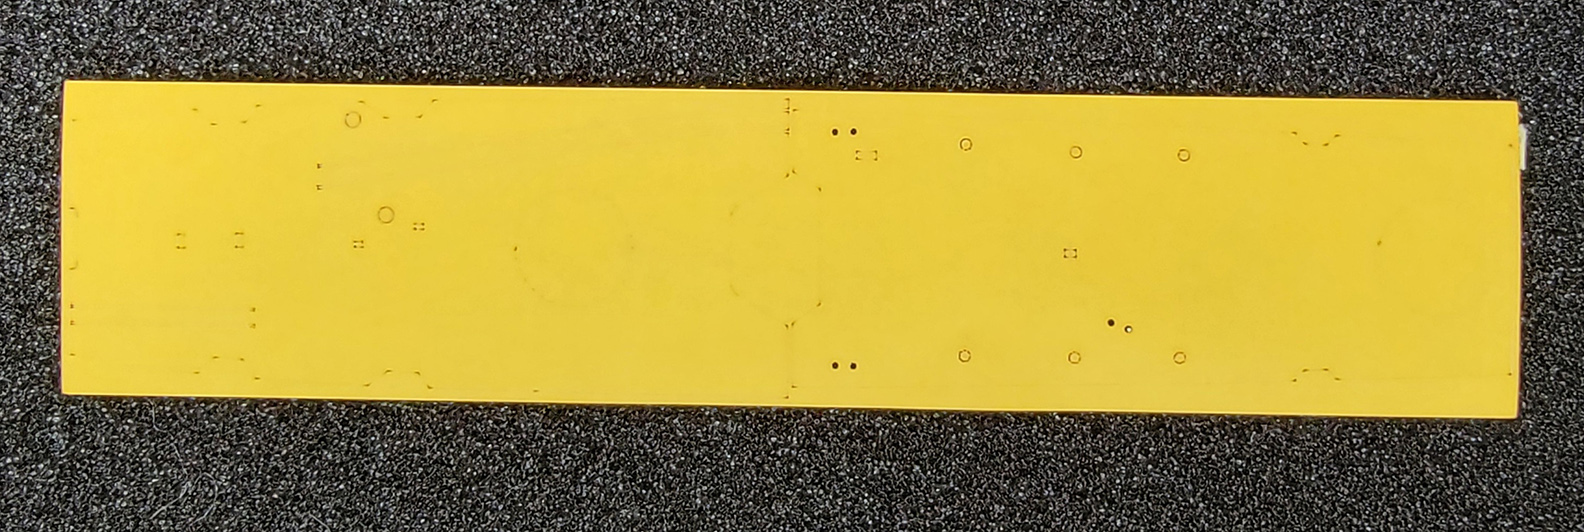
The hull comes
is cast as a full hull, one-piece hull. Theres a resin pour plug along
the length of the keel that will have to cut off and sanded down. Unlike
the
Mutsuki
review sample, this hull is completely level and flat, with no bowing
or hogging.
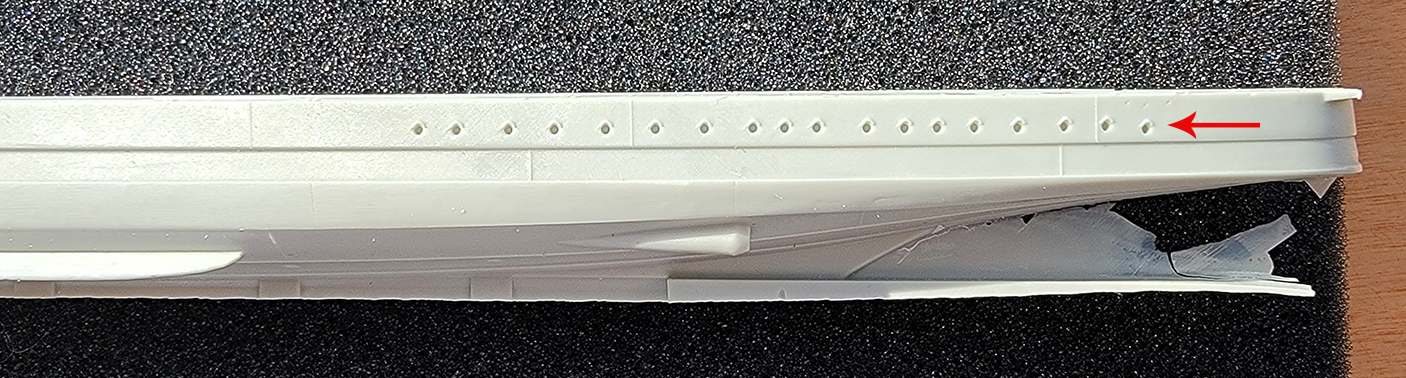
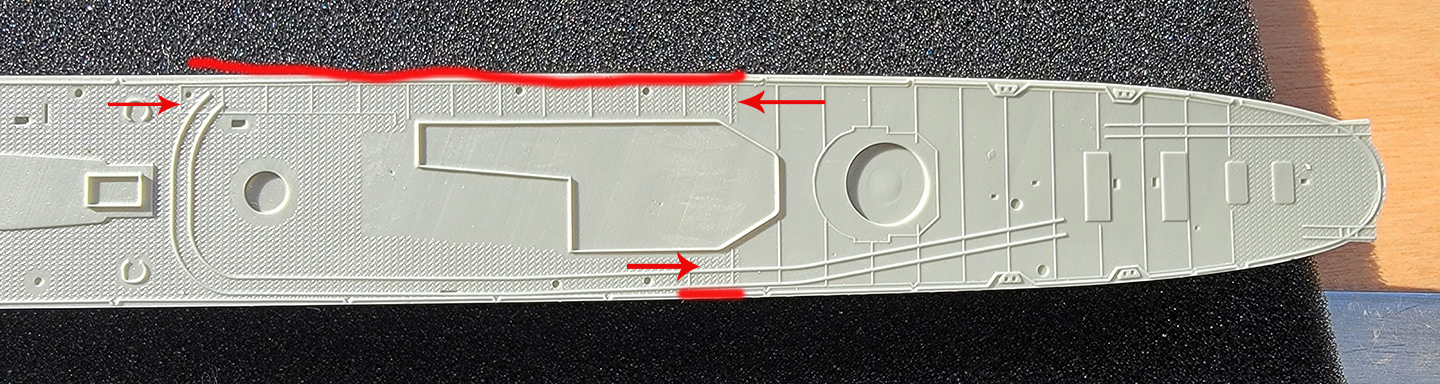
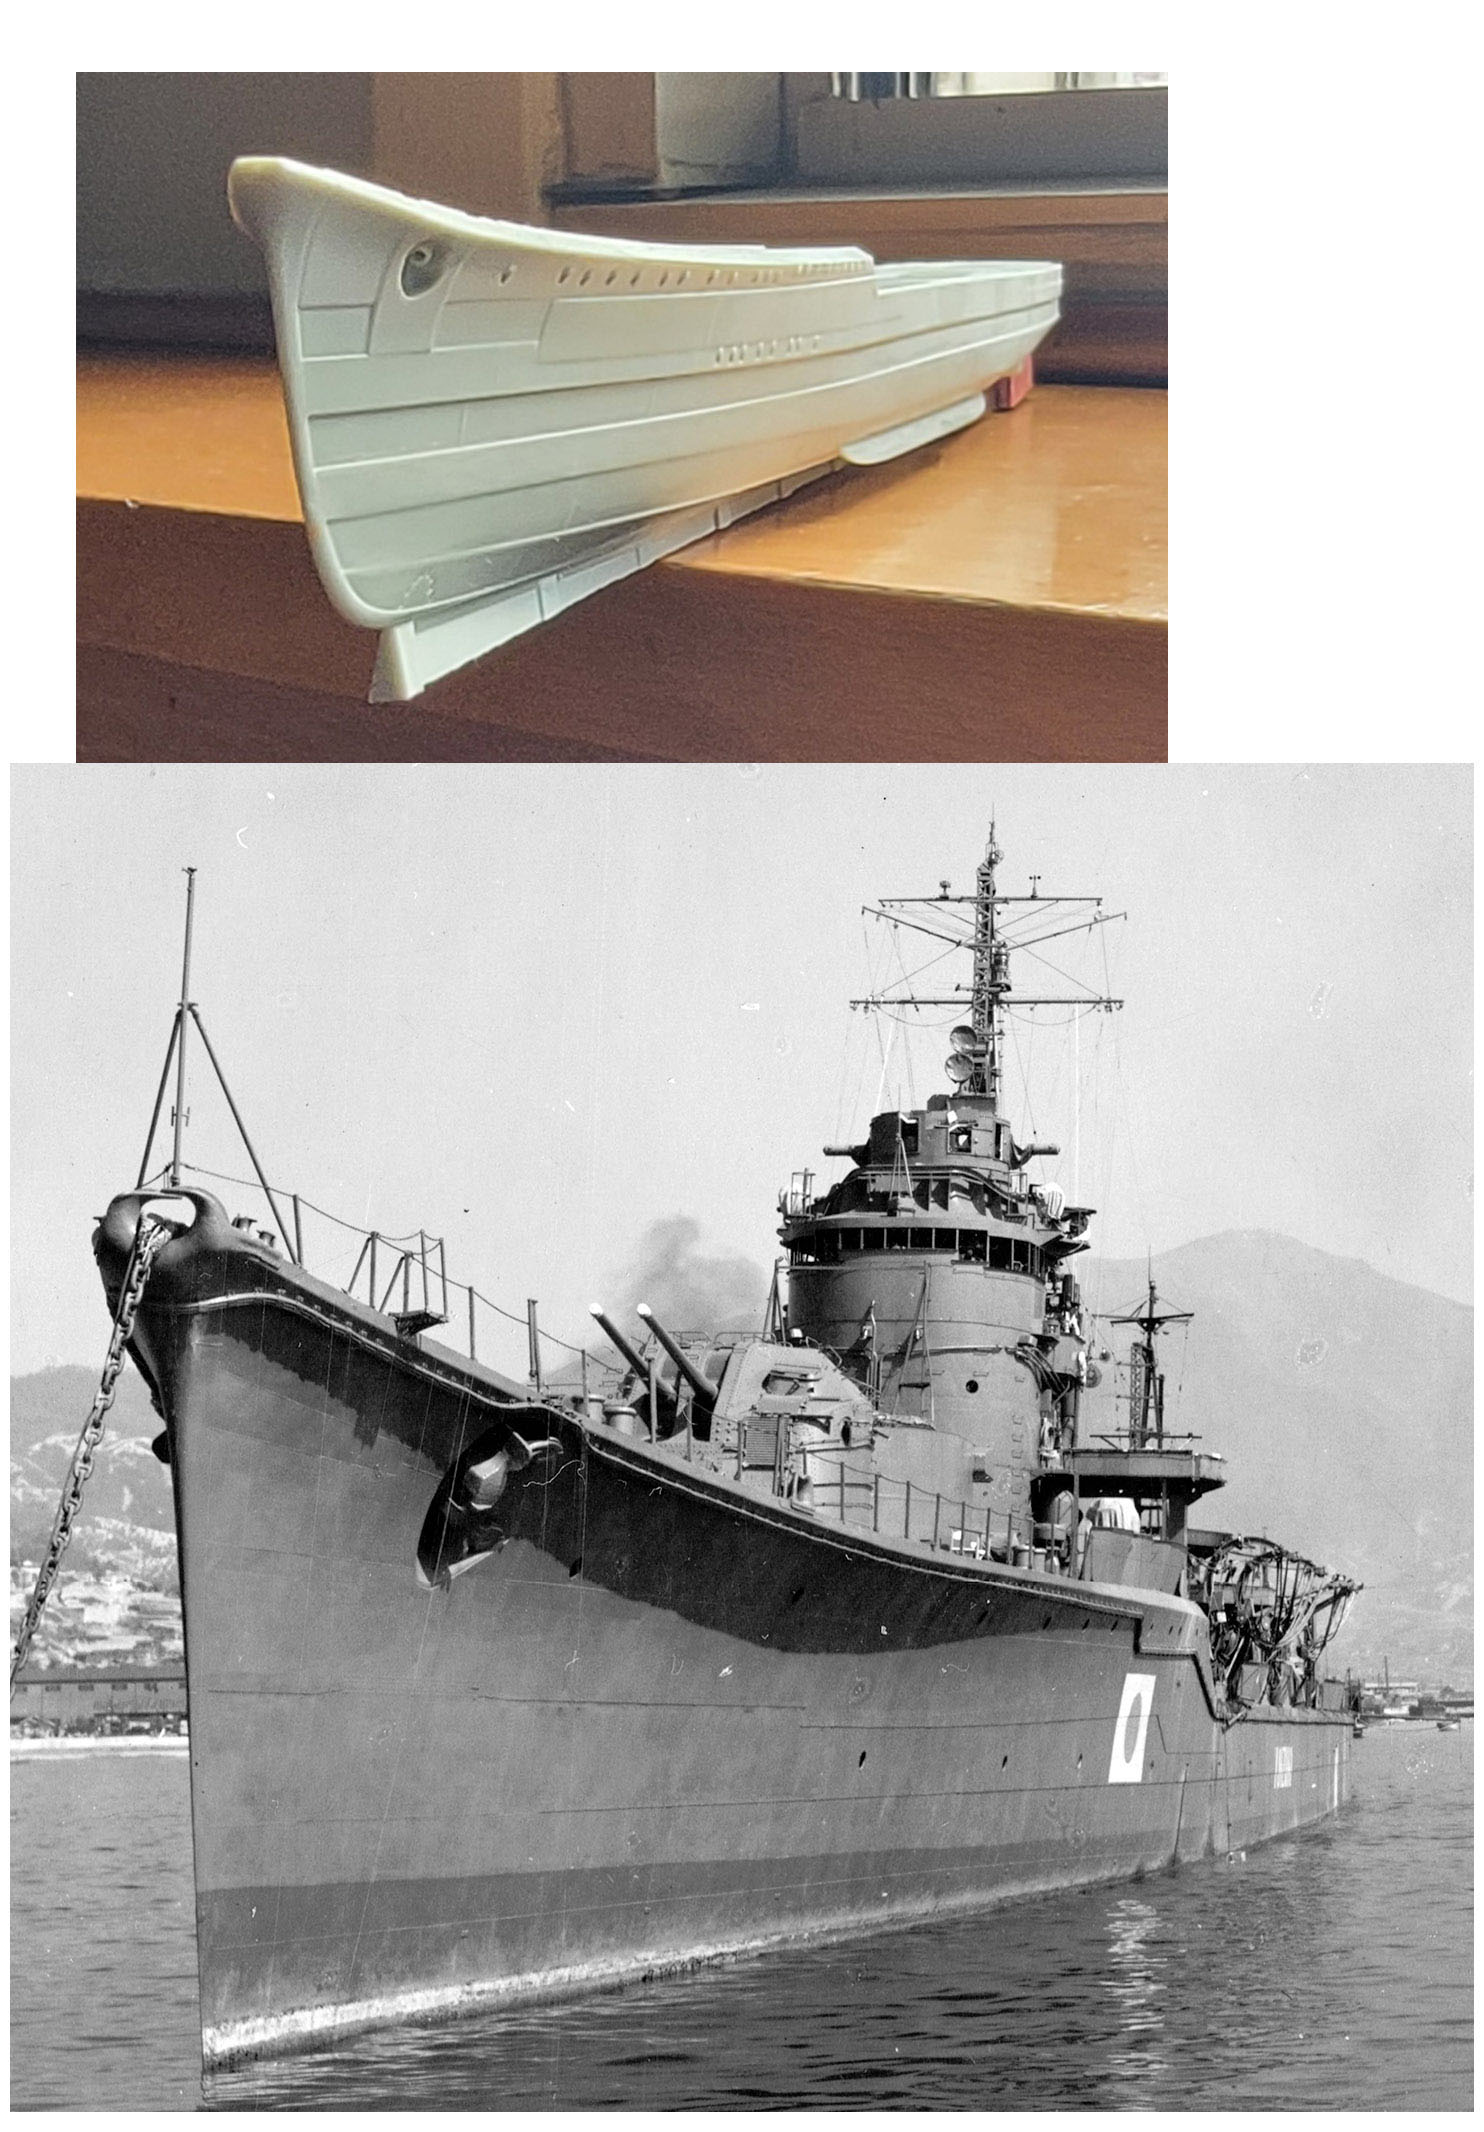
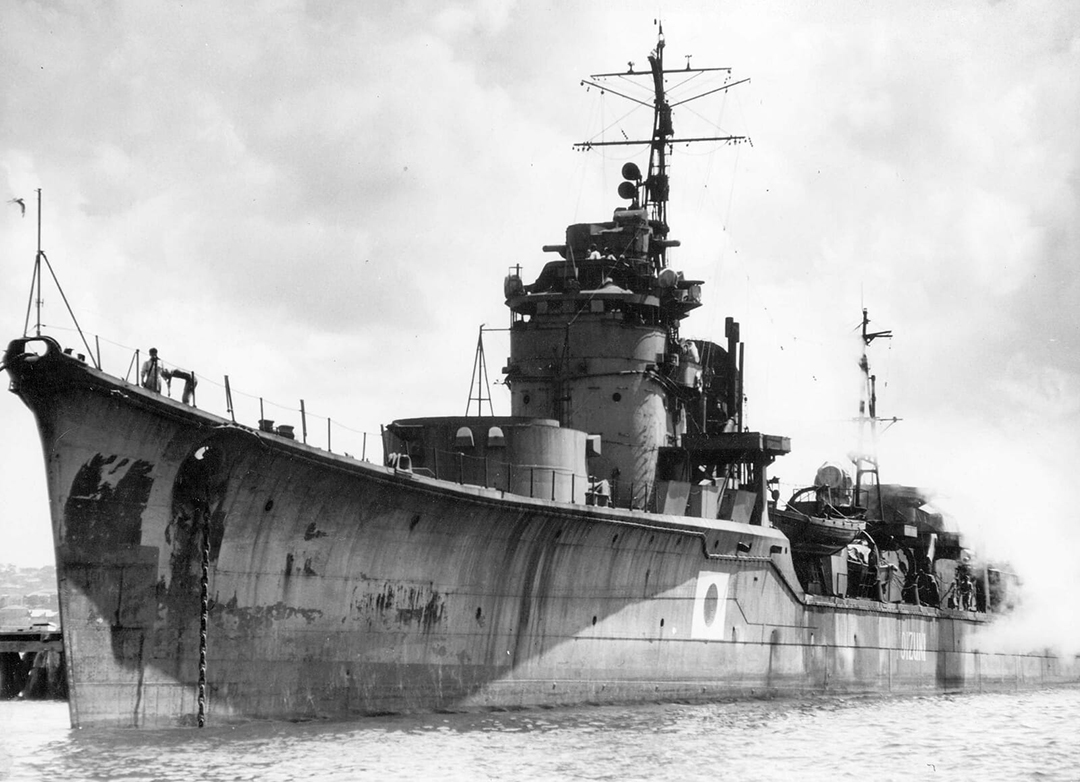
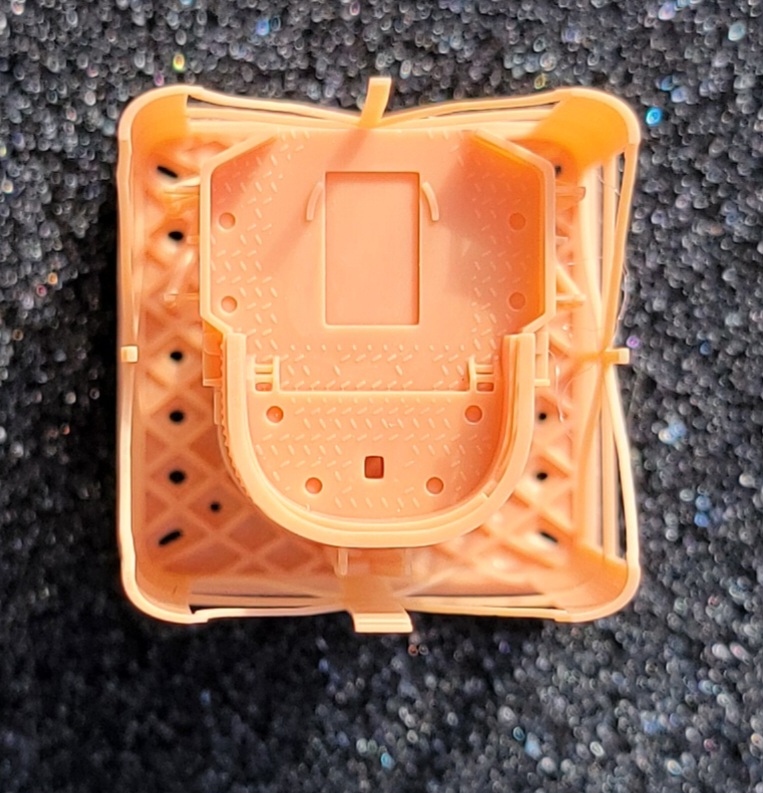
The casting is extremely sharp, with hawse pipes and recesses for the anchors, hull plating, portholes and eyebrows, hull mounted sonar, water intake grills, bilge keels, propeller shaft glands, and placement recesses for the prop shaft brackets and rudder. The forecastle and main decks come with treading, molded brass tie-down strips for the linoleum covered areas, spurnwaters, torpedo trolley and roll-off depth charge rails, extensions at the stern for those roll-off depth charge racks, and recesses for superstructure and equipment placements. The edges of the forecastle deck are properly turtle-backed in shape. All the details are very sharply molded, and as with the Mutsuki kit, Im very impressed by the quality of the casting. Unfortunately, the hull is far from being issue-free. Firstly, theres overstated plating. Its undeniably overscale and a comparison of the kit hull with a photo of class sister Yoizuki lays this out clearly. The leading edge of the bow in profile is also somewhat incorrect. The actual bow angled upwards at in a straight line from the waterline, with a minor curve into the area of the bullnose. Theres more curvature in the kit bow than called for, mostly as it approaches the waterline. There are issues with the portholes as well. At the stern, what should be a completely horizontal line of portholes suddenly shifts downward for the last porthole or two. This is the location of the aft crew quarters, where one can be assured that portholes were not installed at knee height. Nor should many of these portholes be open for 1944. The omission means that one must source some porthole covers from either the deluxe upgrade kit, another aftermarket set, or make them oneself. The hull also lacks a degaussing cable. This class was solely of wartime construction, which means that all ships came equipped with a degaussing cable from their outset. Both covers and cable are part of the deluxe upgrade package but having to pay extra for these details seems a little high-handed to me. I dont consider either omission just the concern of a rivet-counter, and its kind of irksome. I mean, its a 1944 fit, and these details were part of the general fit. There should be nothing to upgrade to. Perhaps the worst hull error has to do with the decking. There are areas aft on the main deck where the treaded metal plating erroneously overlaps with areas of linoleum decking. This is simply bizarre and plainly wrong. It represents a serious lapse in research. In the same vein but less noticeable is the area of treading behind the wave break fairing on the forecastle deck. There was none in that location. These errors are highlighted in the close-up photographs. The kit hull dimensions are slightly under scale. The forecastle is
foreshortened by a few millimeters. Akizukis particulars versus the scale
and kit:
*A separate bullnose adds approximately 1mm+ to this OAL. |
|||||||||||||||||||||||||||||||||||||||||||
|
|||||||||||||||||||||||||||||||||||||||||||
| 3D PRINTED PARTS | |||||||||||||||||||||||||||||||||||||||||||
|
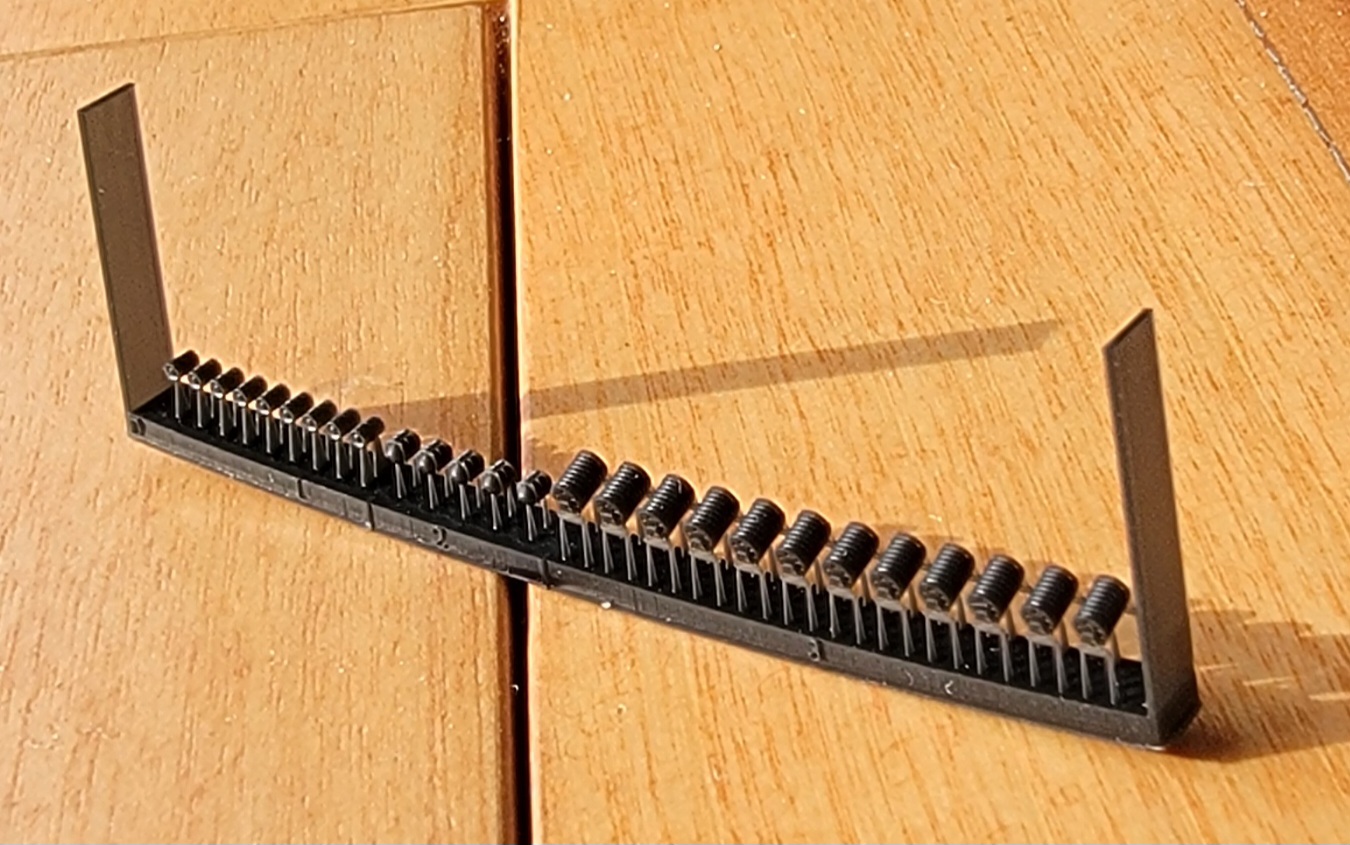
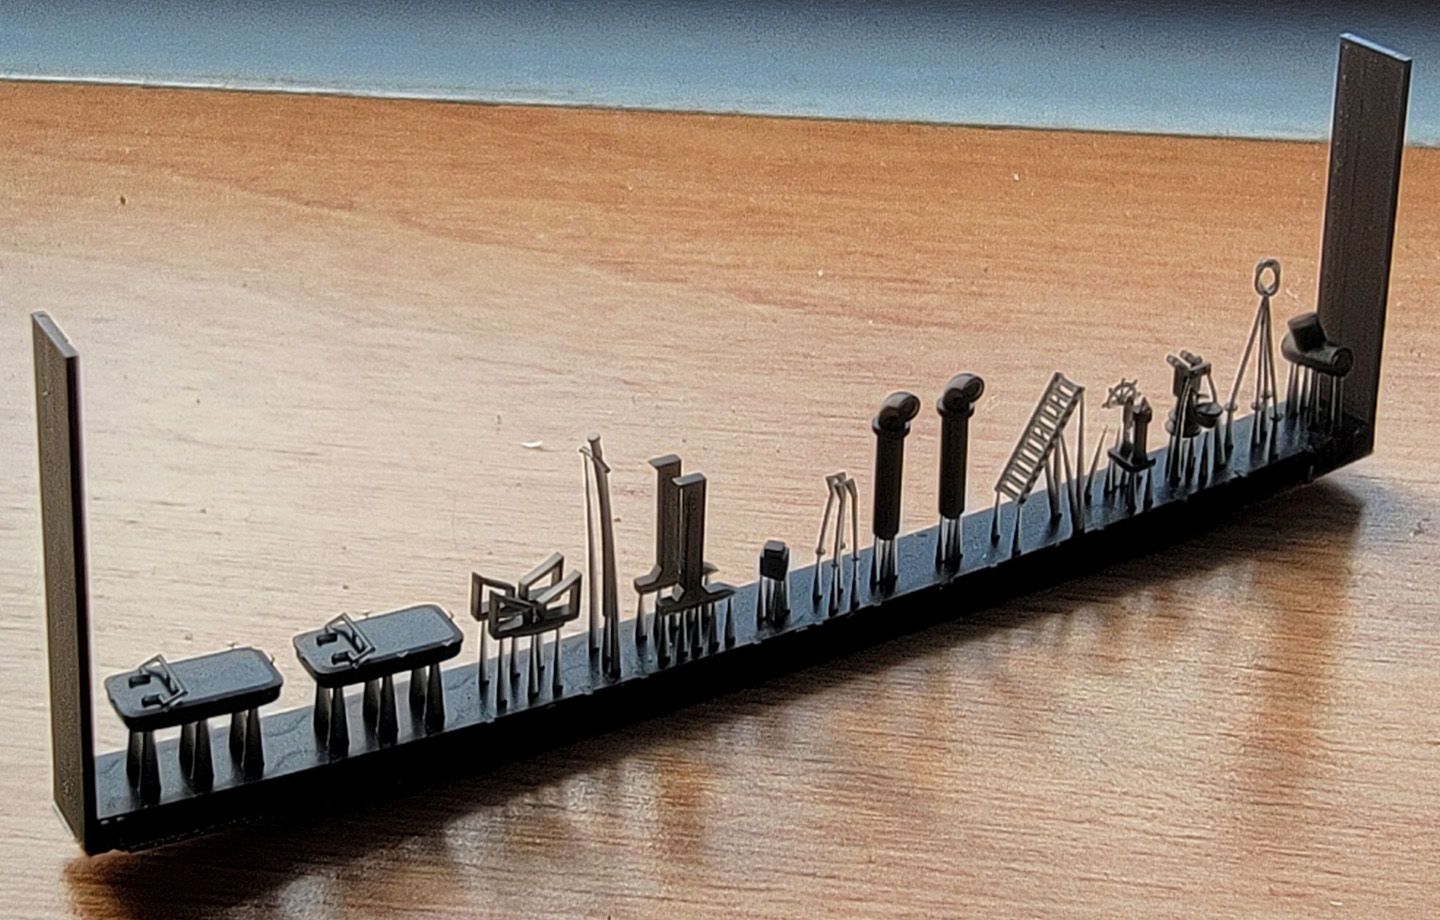
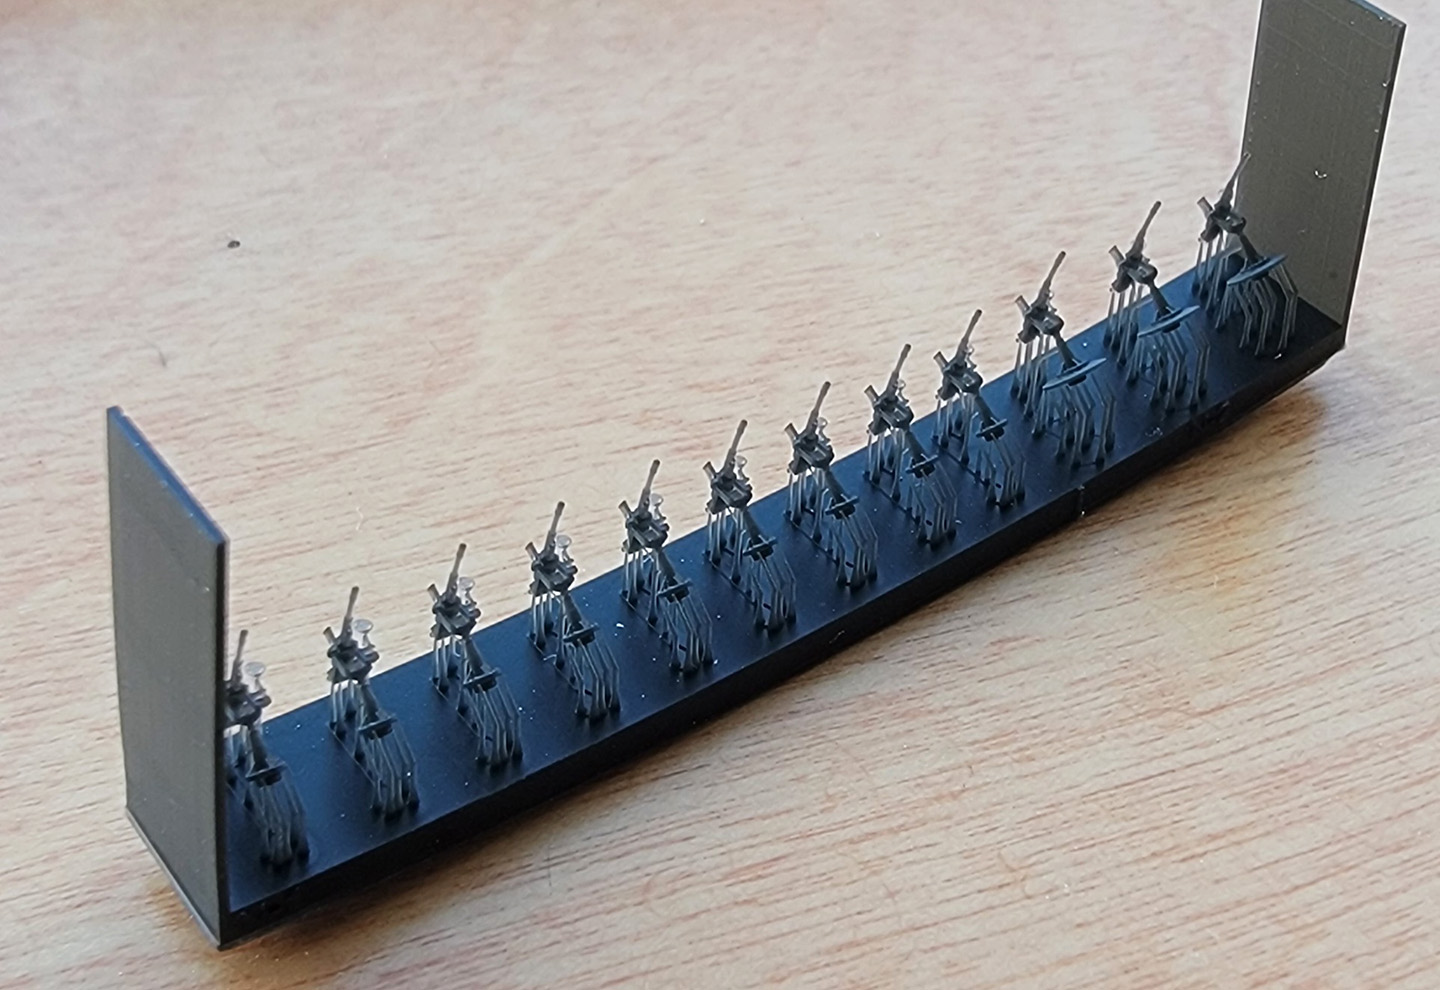
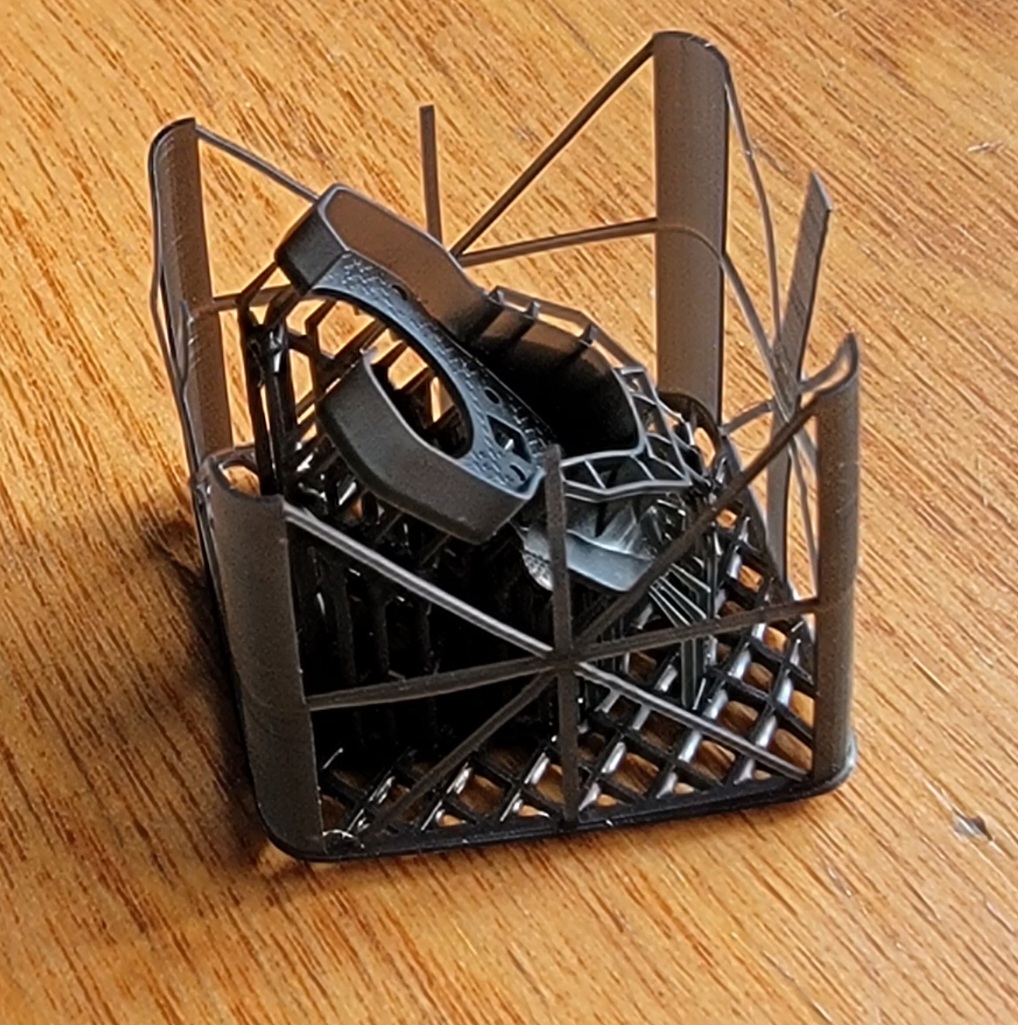
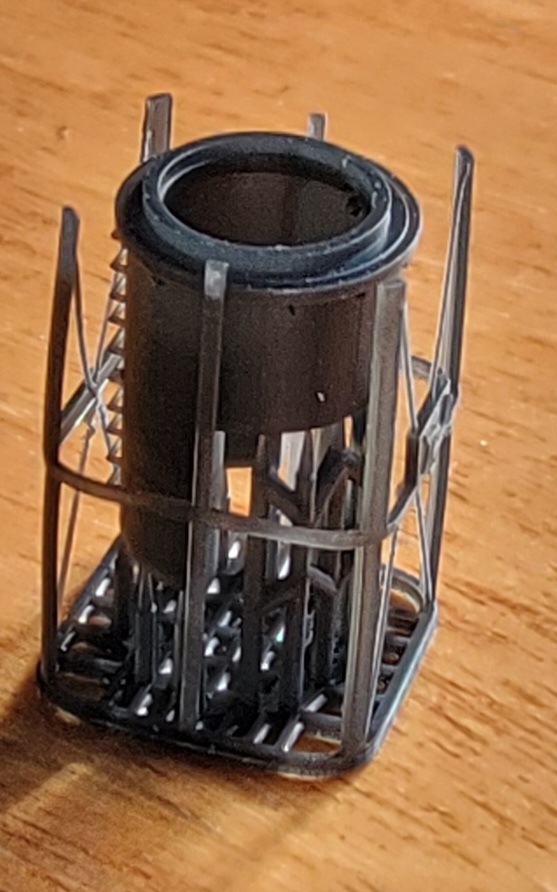
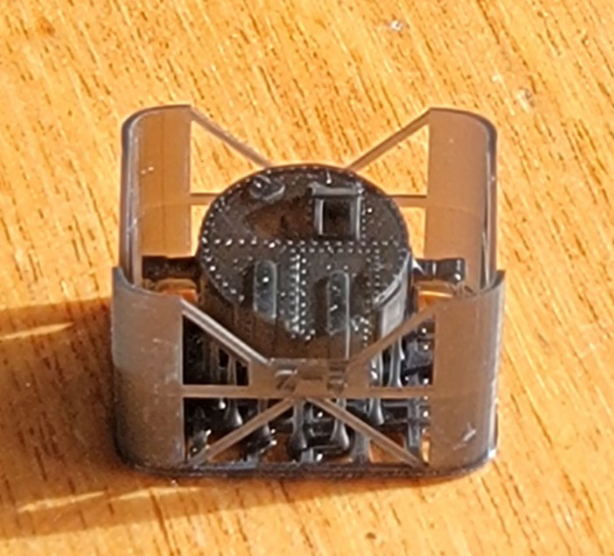
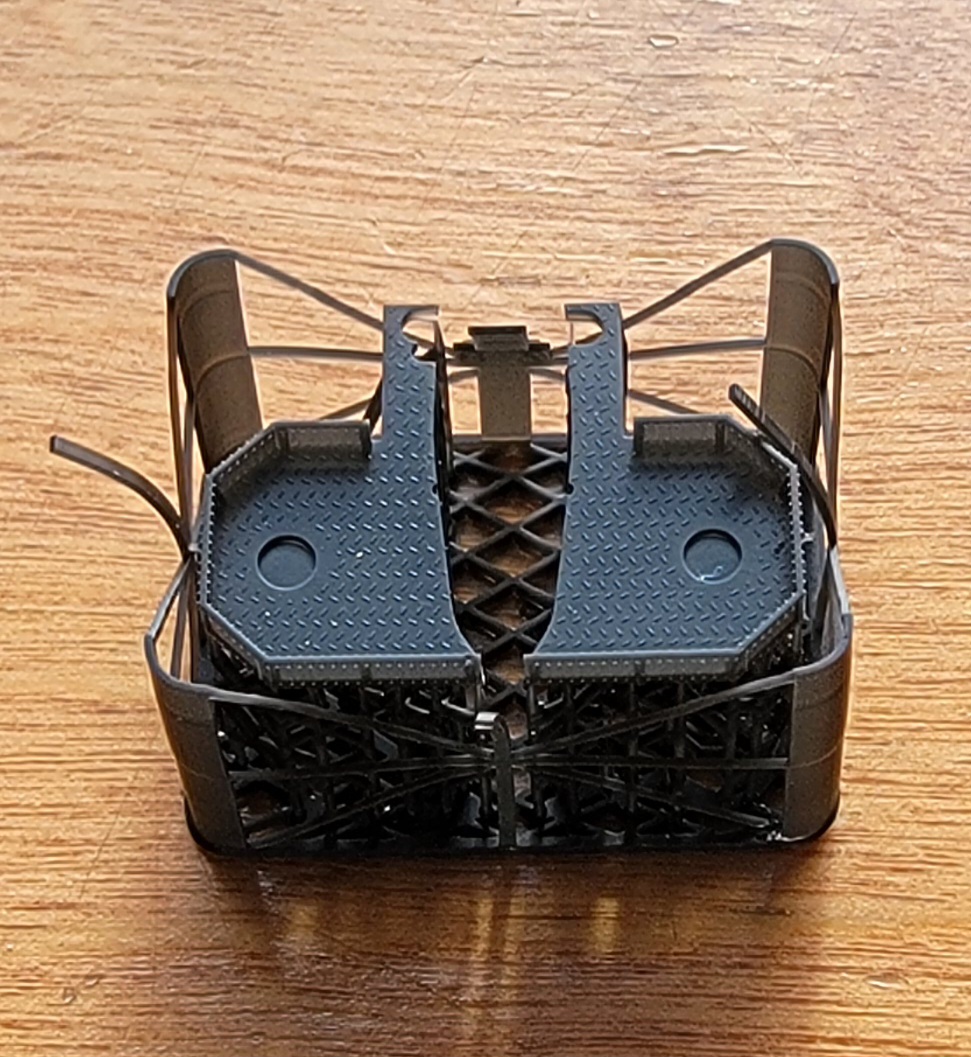
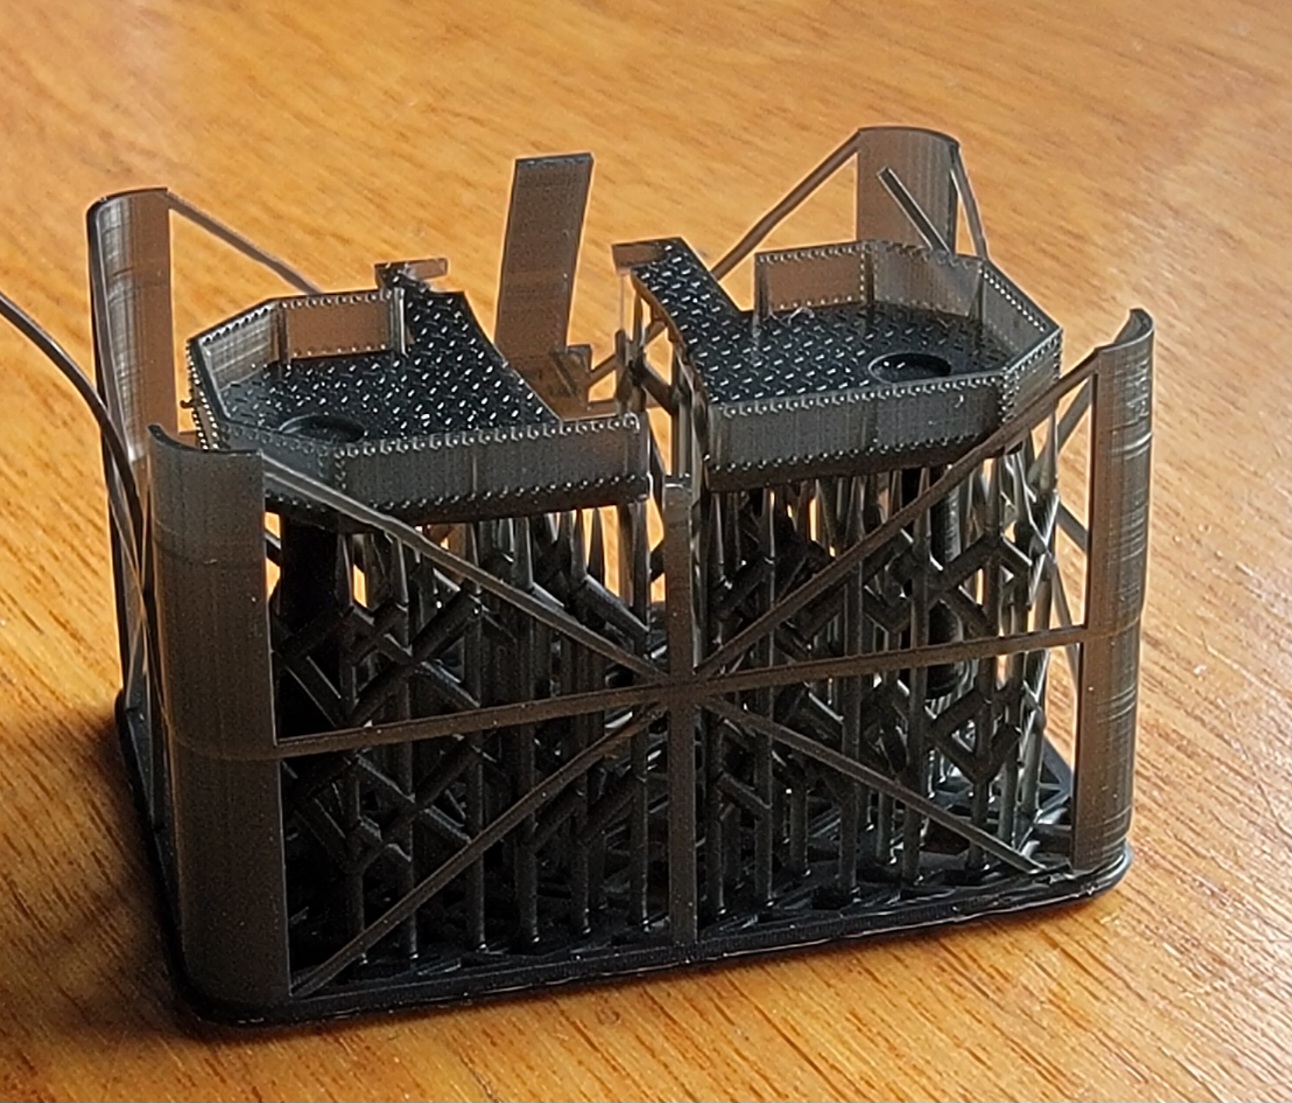
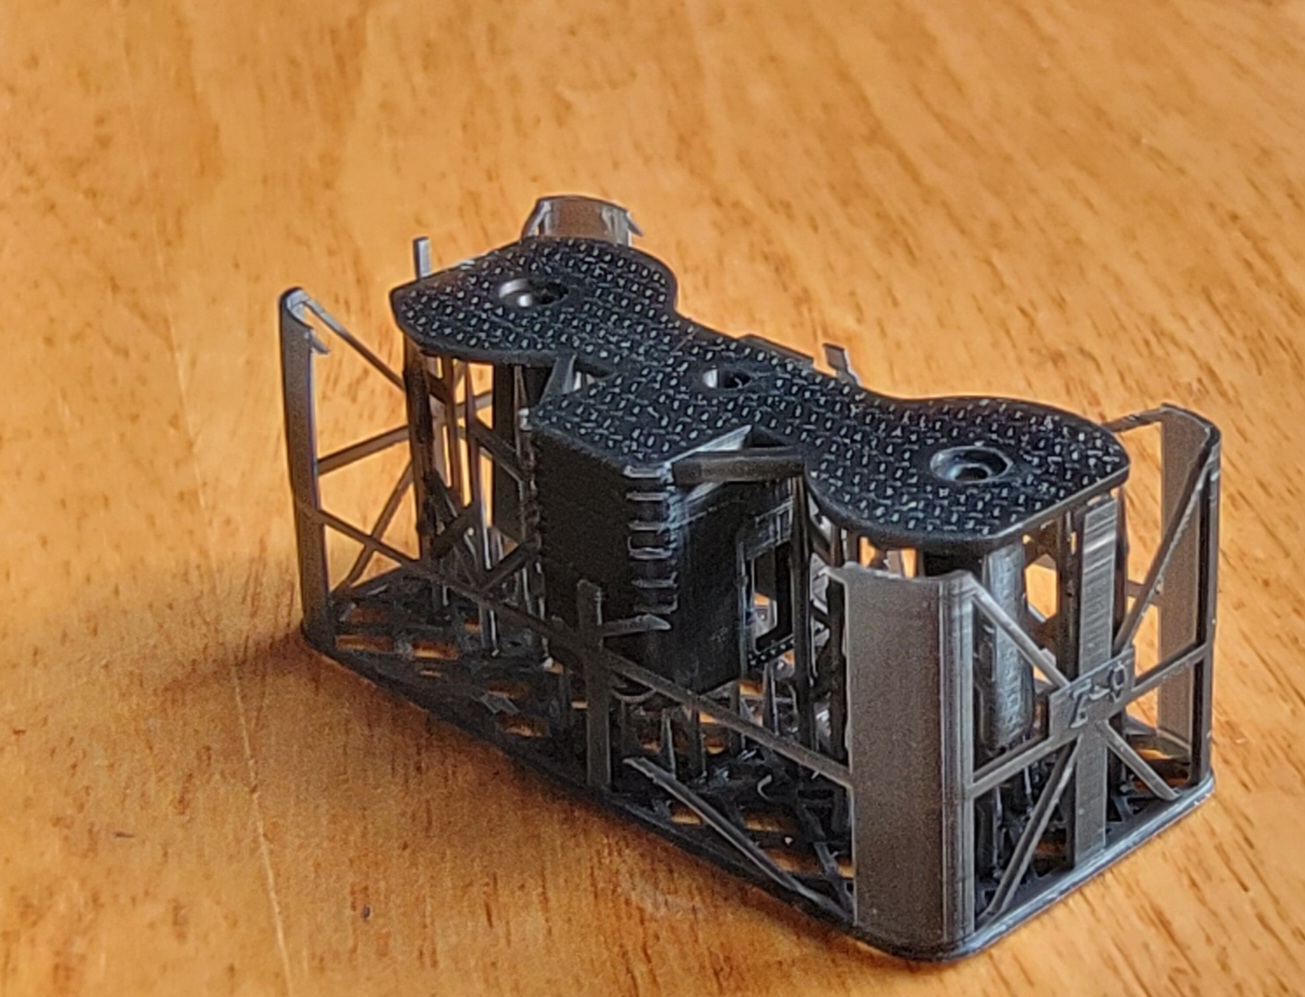
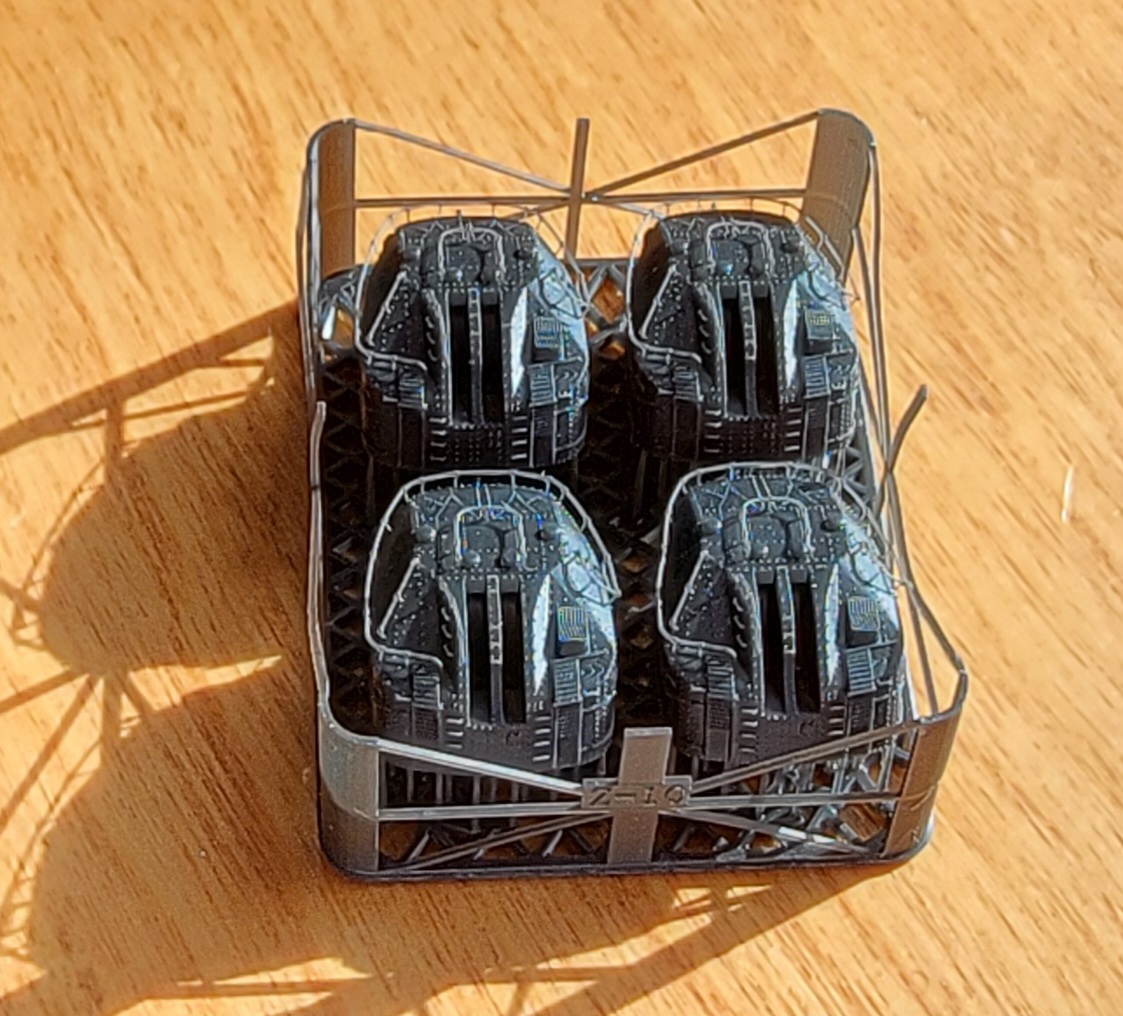
Each raft
has an embossed letter for identification and is listed below. The
embossed letters are tiny and can be hard to locate. Quality-wise, as with
the previous Mutsuki kit, these are superb printings. I cant speak to
how brittle they might be or how easily the parts can be removed from their
rafts, but they are sharply printed and extremely well-formed, with minimal
print lines visible to the naked eye. They also seem to be uniformly correct
in shape.
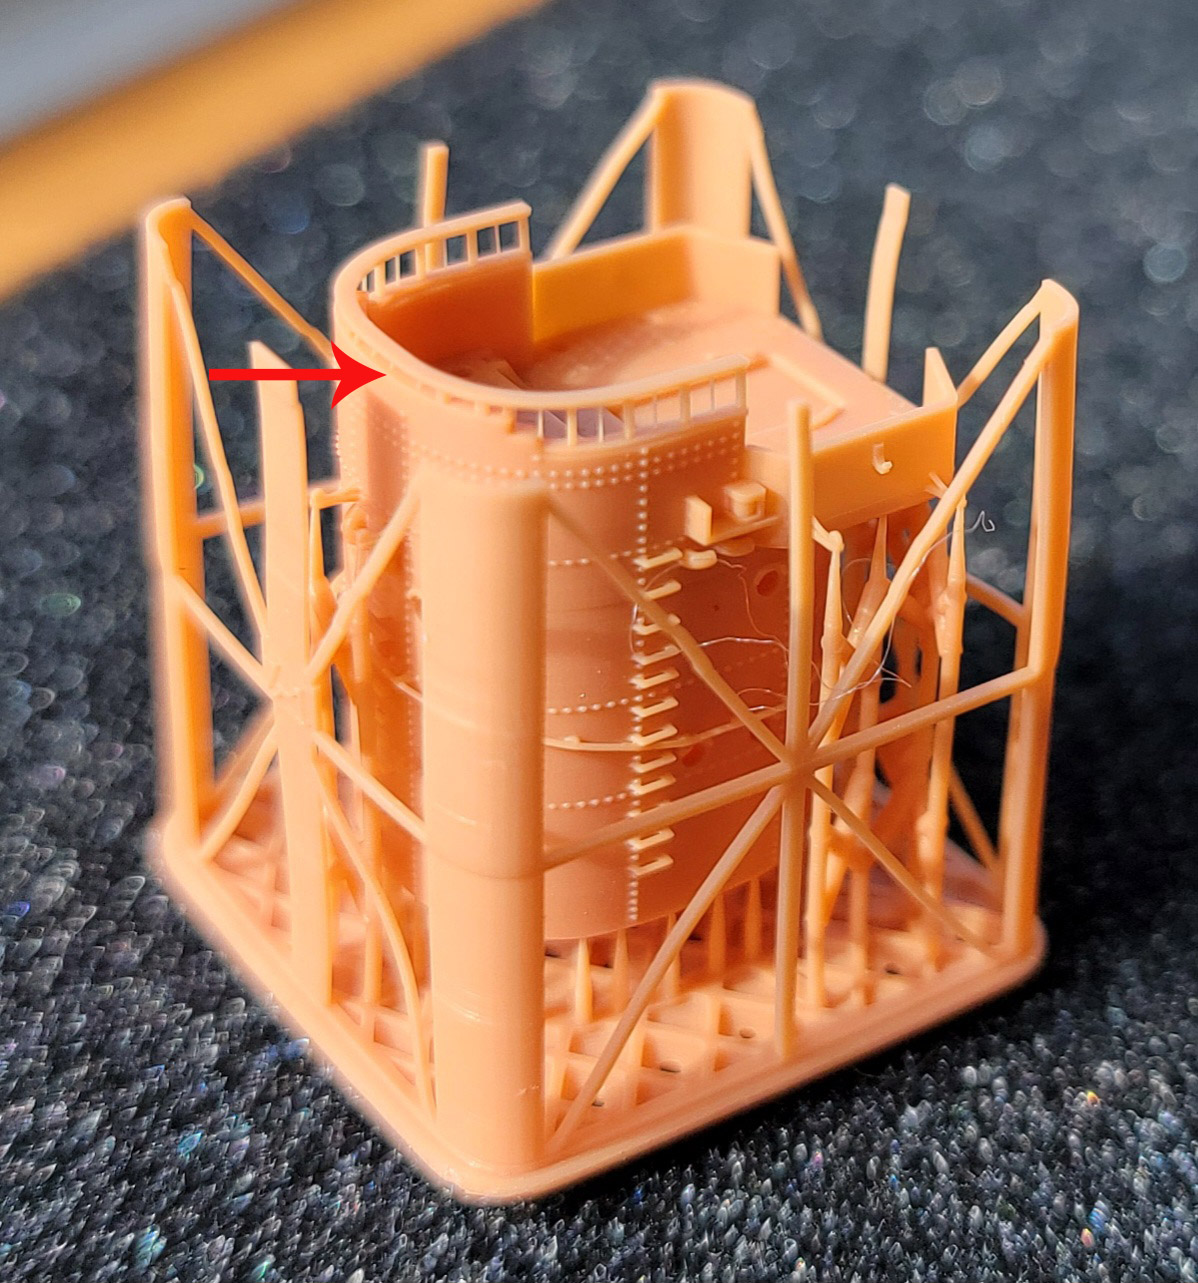
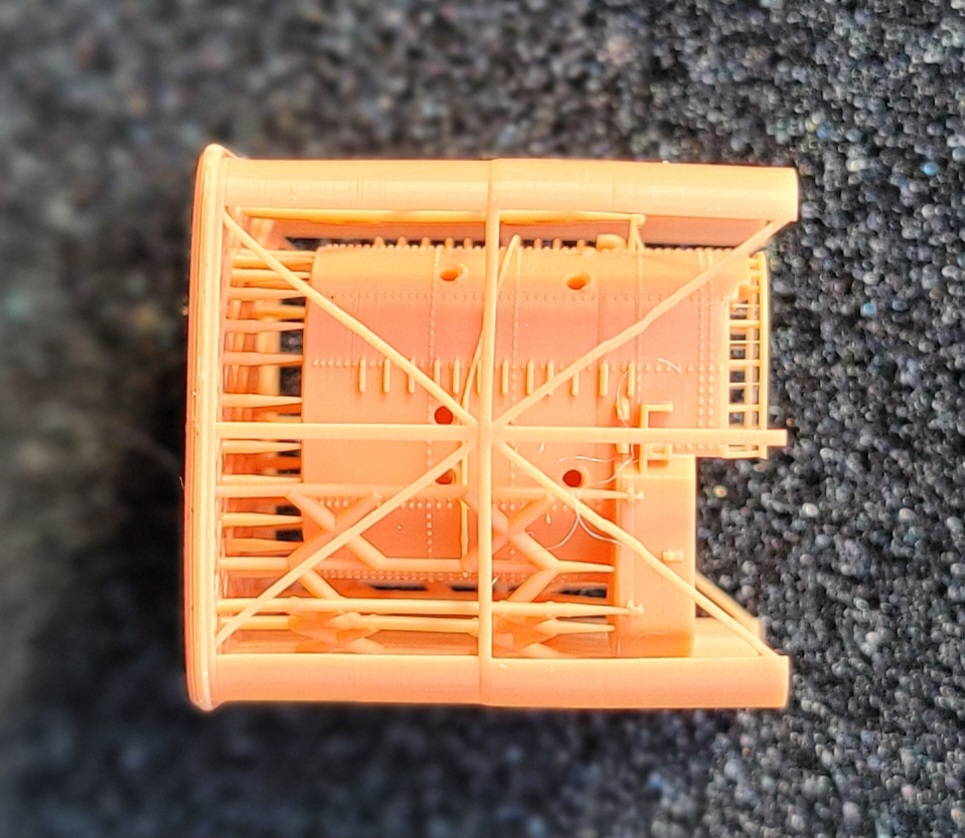
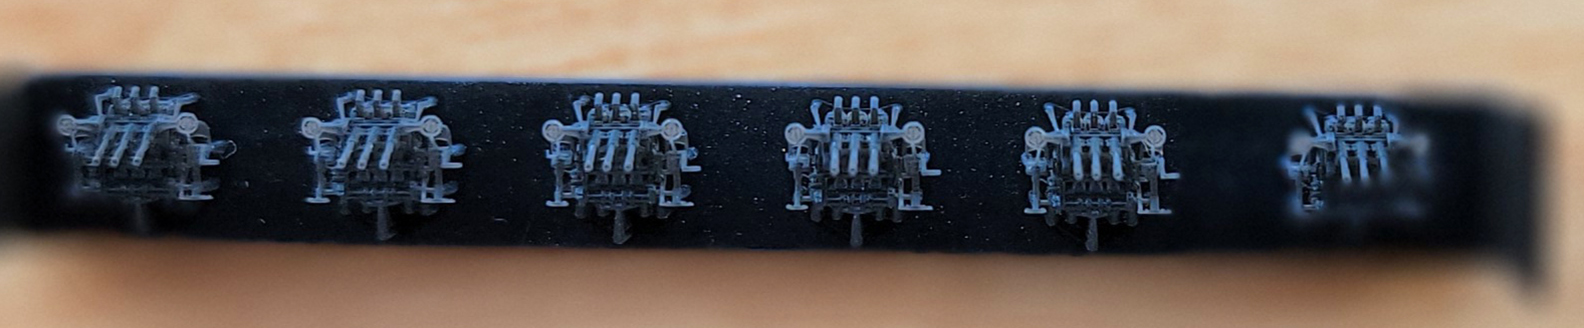
However, there is at least one significant error that carries over to each superstructural component. Each of these pieces displays overtly riveted surfaces. The Akizuki class superstructures were not riveted, they were welded. The only structures on the Akizuki's that had riveting were the gun turrets and torpedo tube shields. Additionally, the line of front-facing bridge windows is extremely undersized in height. |
|||||||||||||||||||||||||||||||||||||||||||
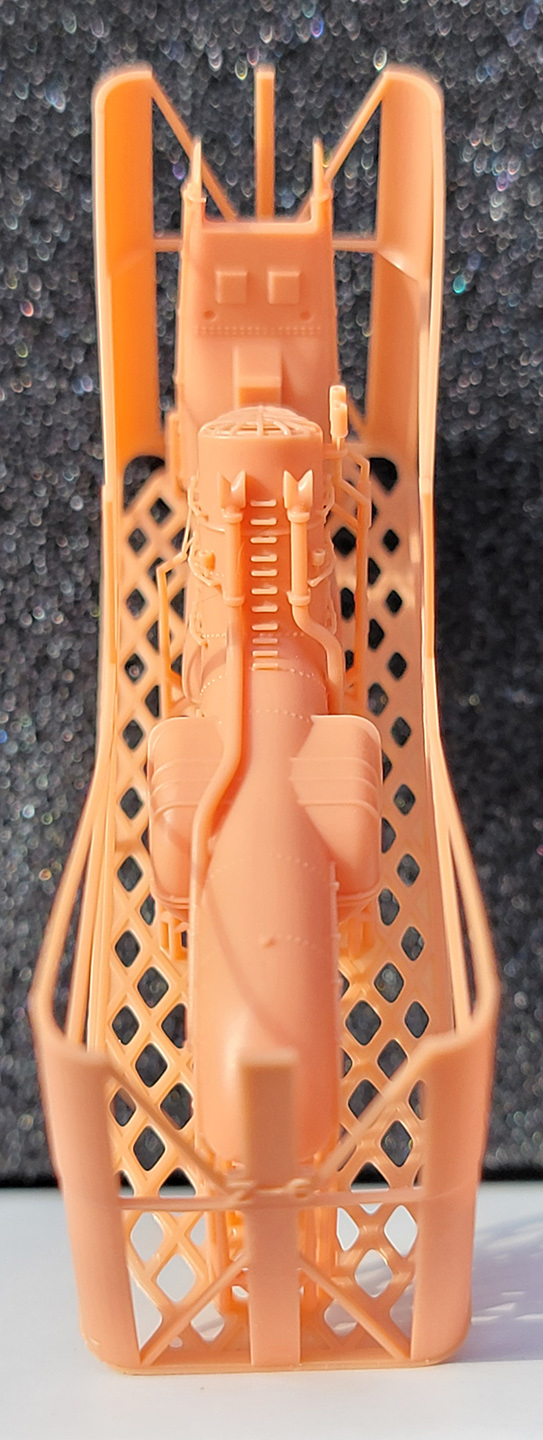
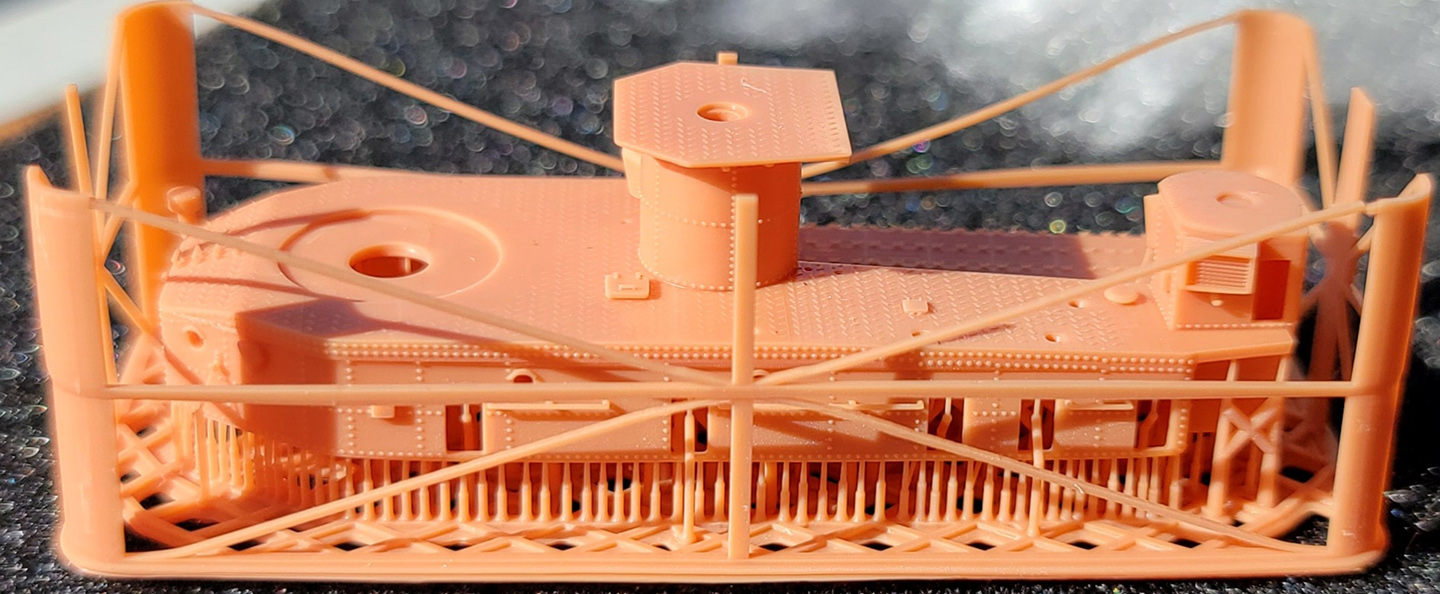
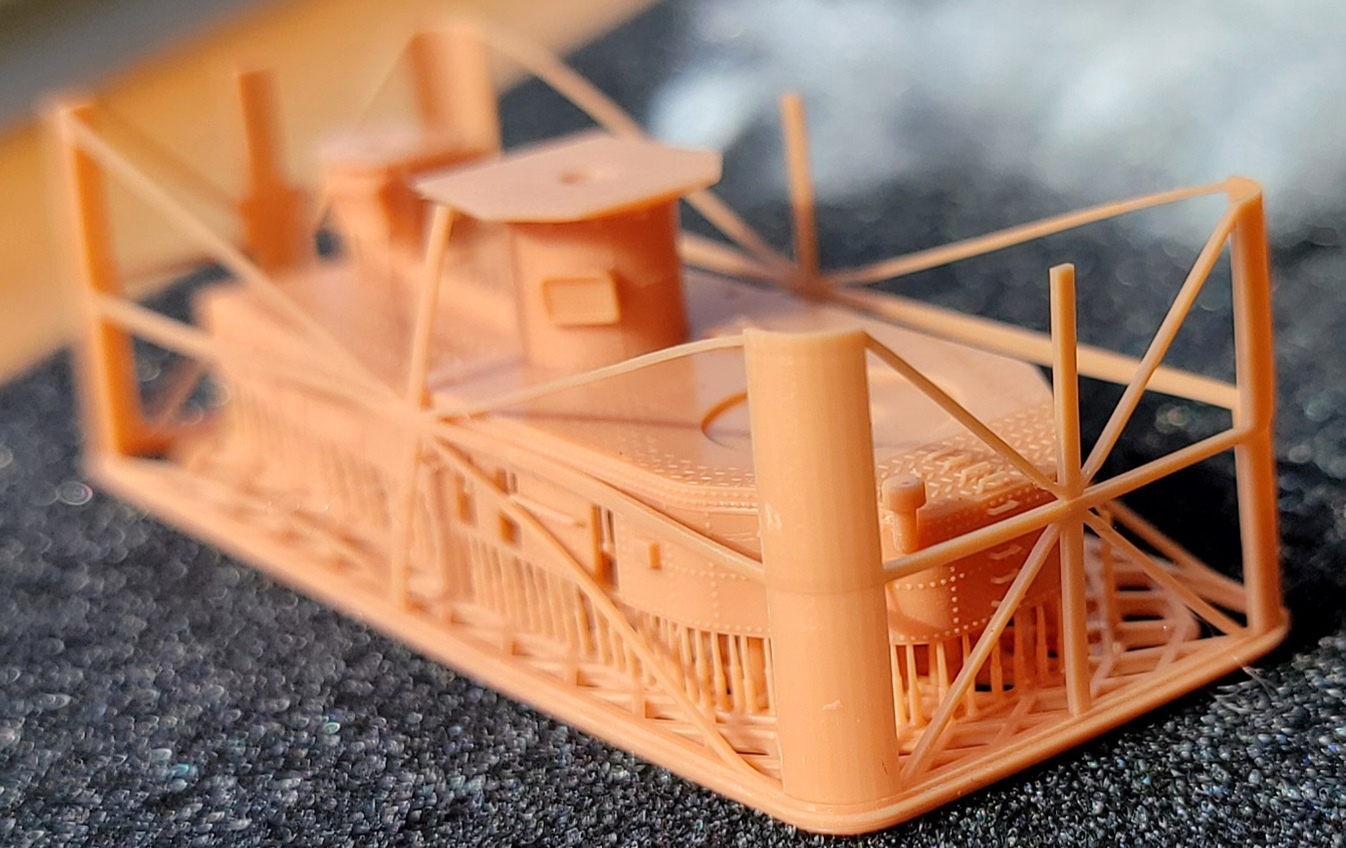
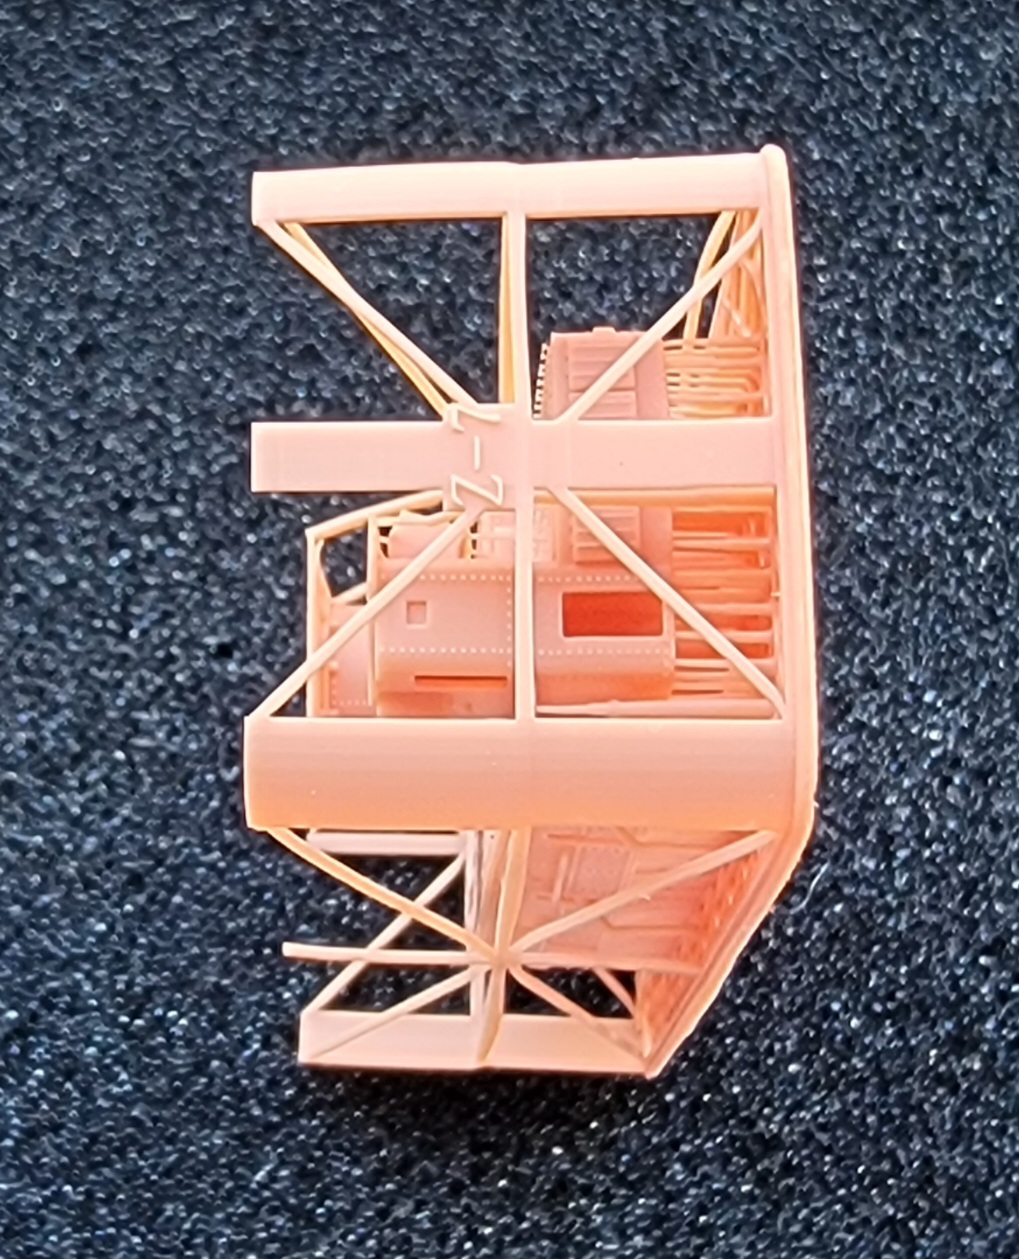
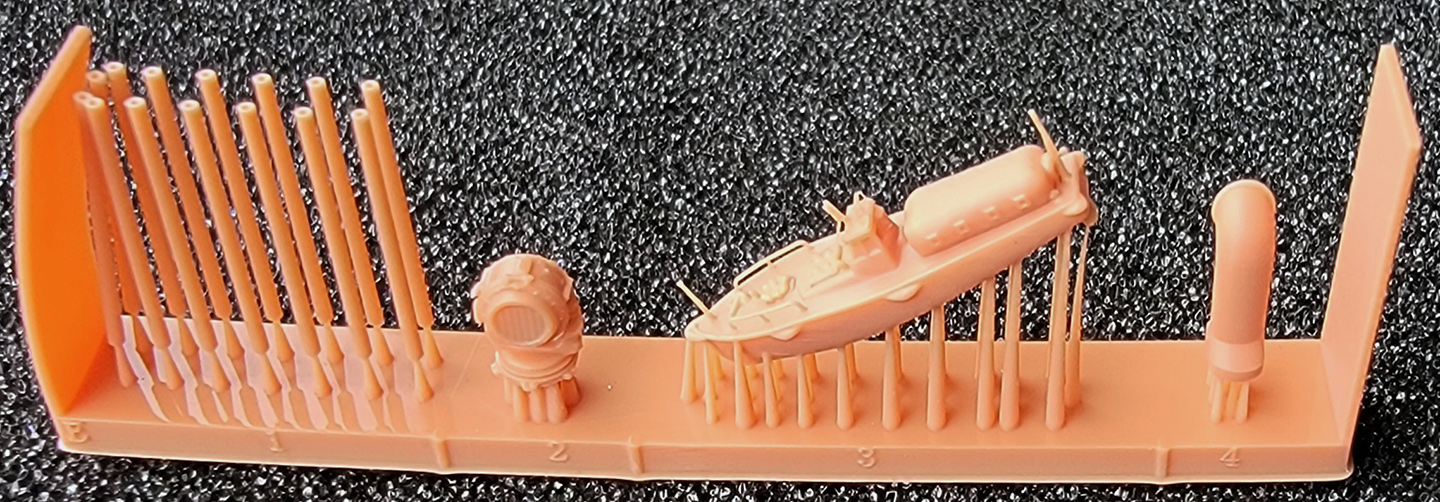
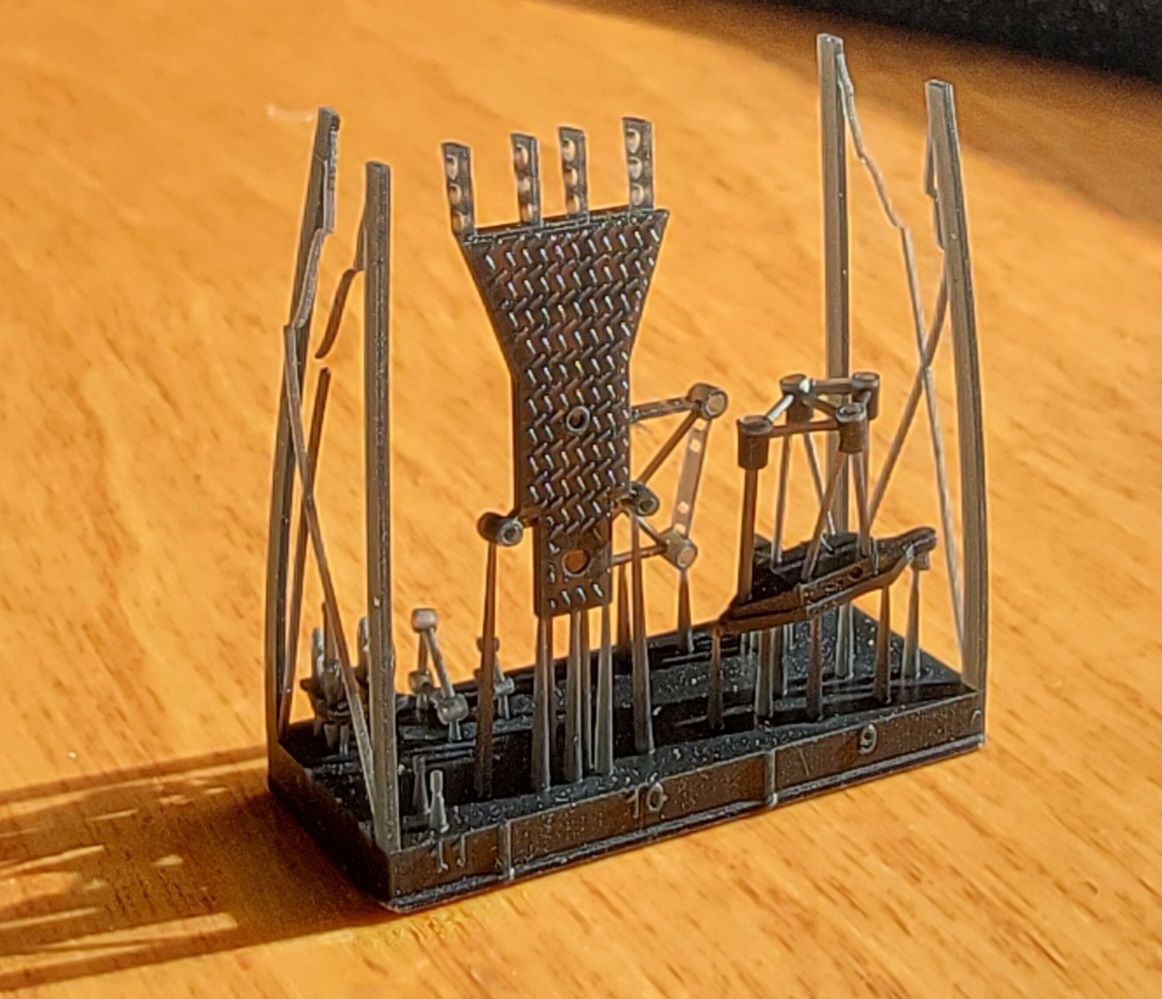
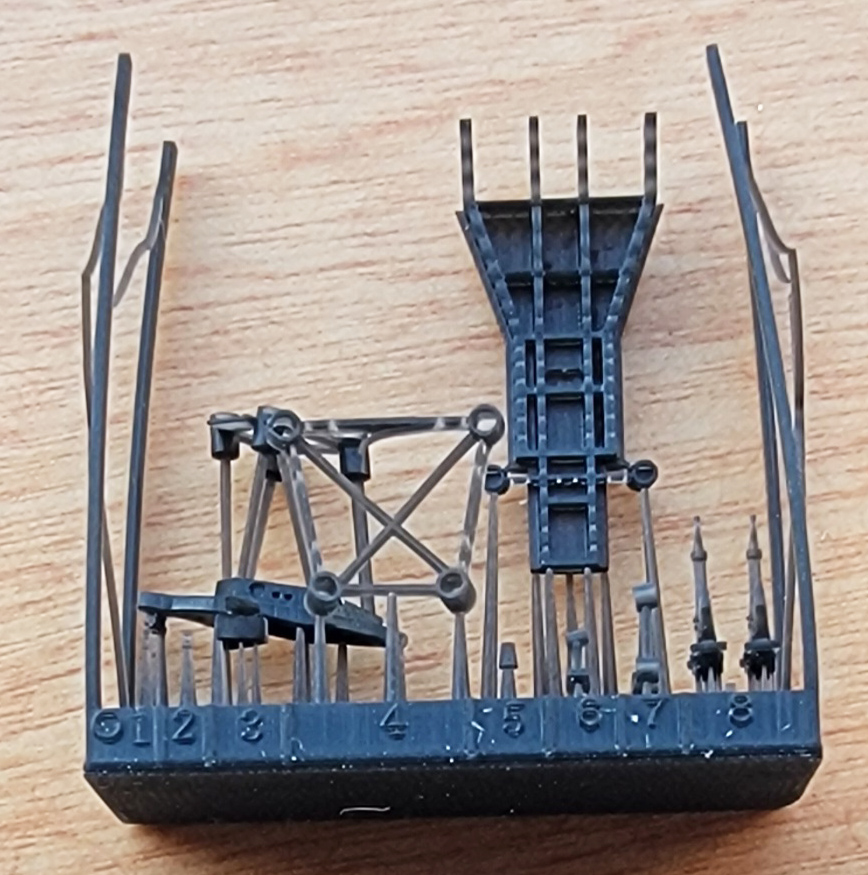
| ORANGE COLORED PRINT RAFTS | |||||||||||||||||||||||||||||||||||||||||||
|
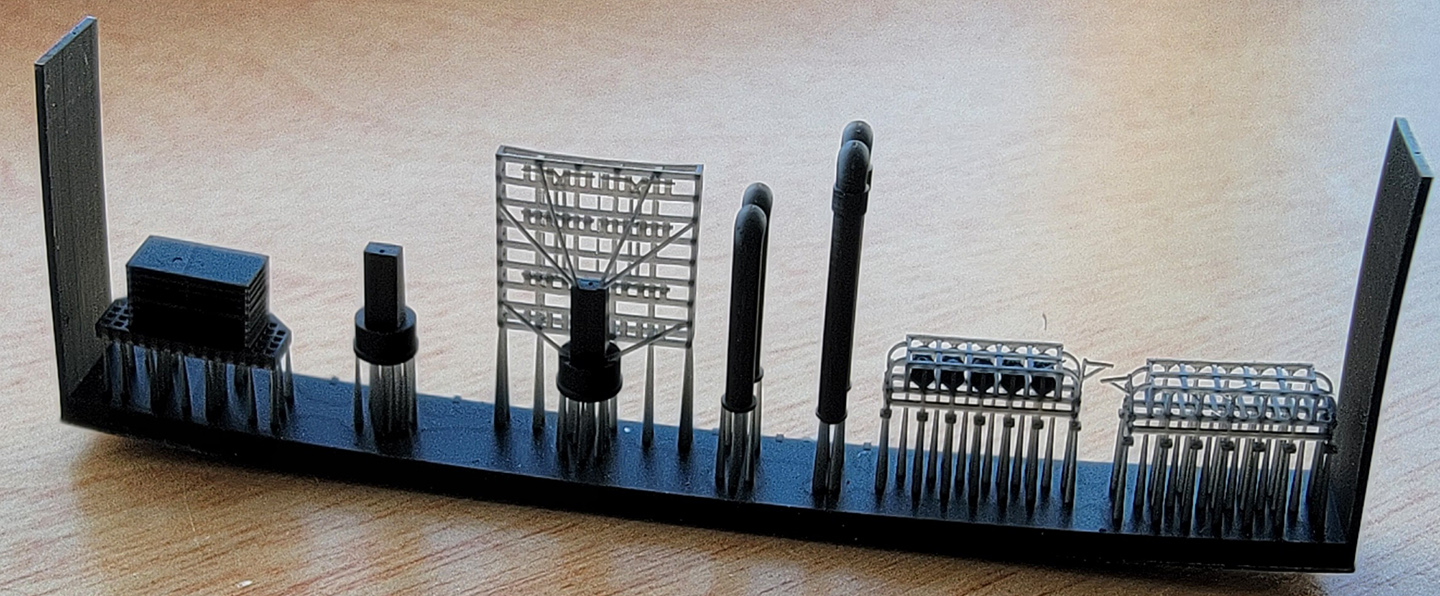
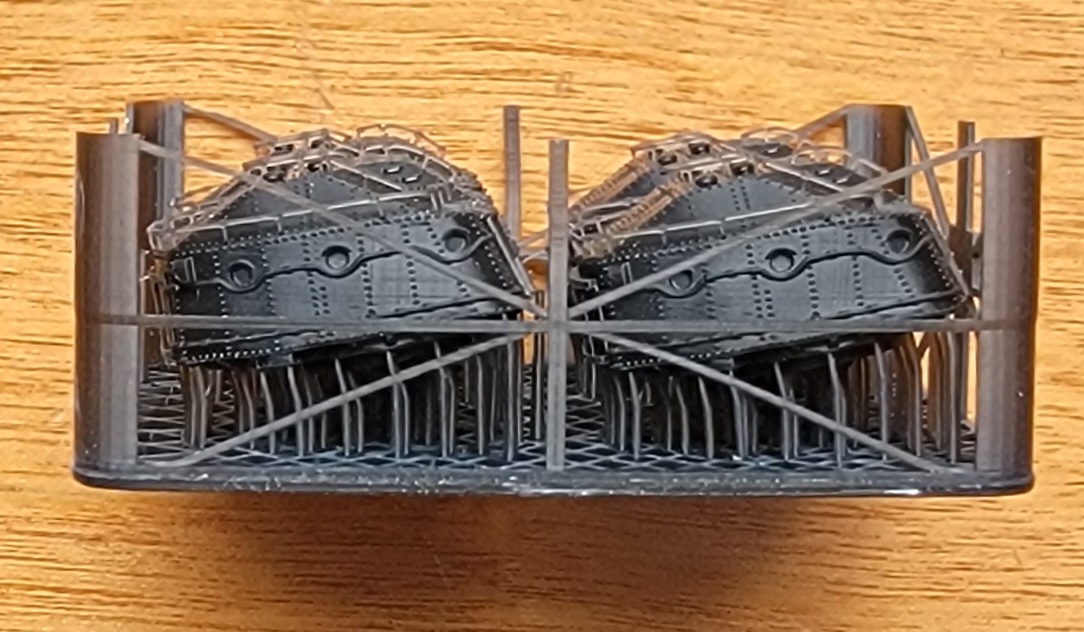
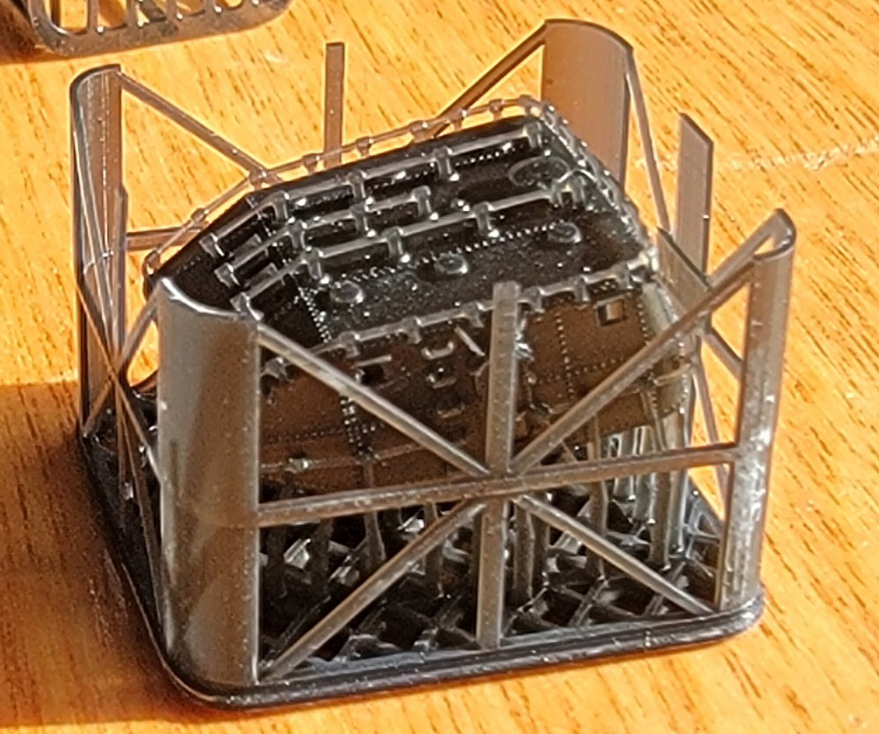
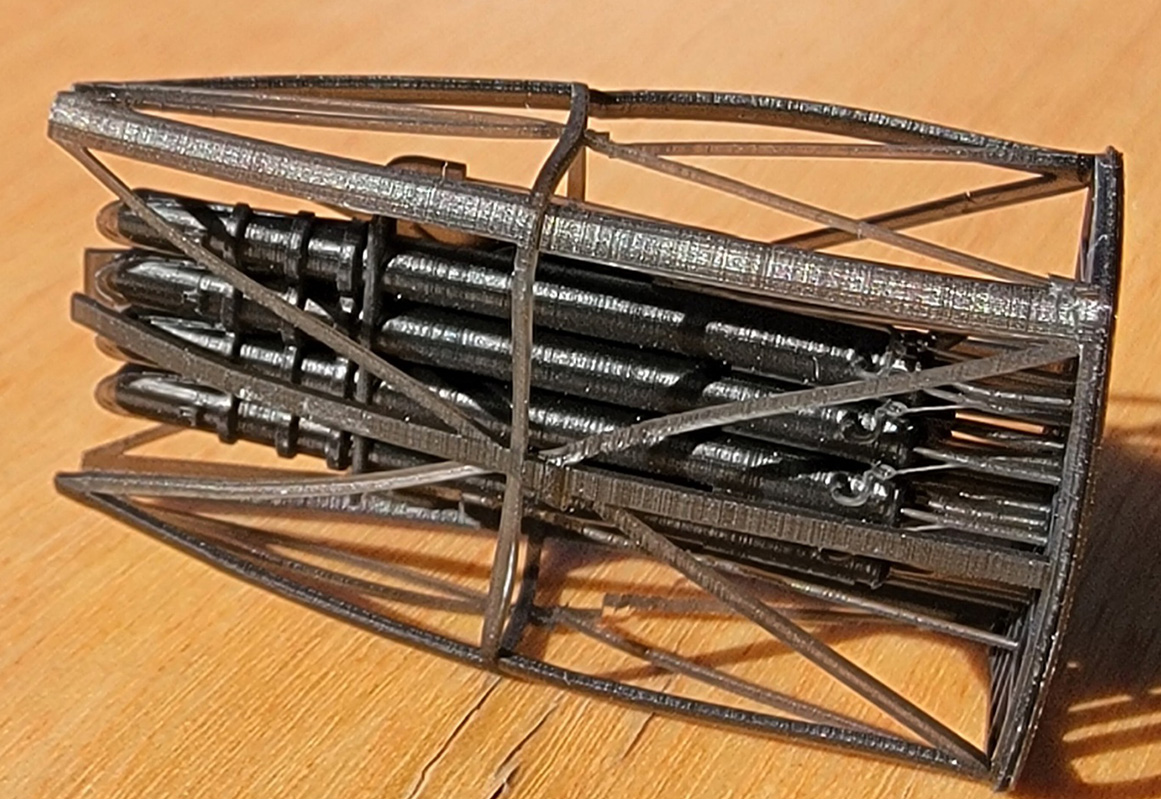
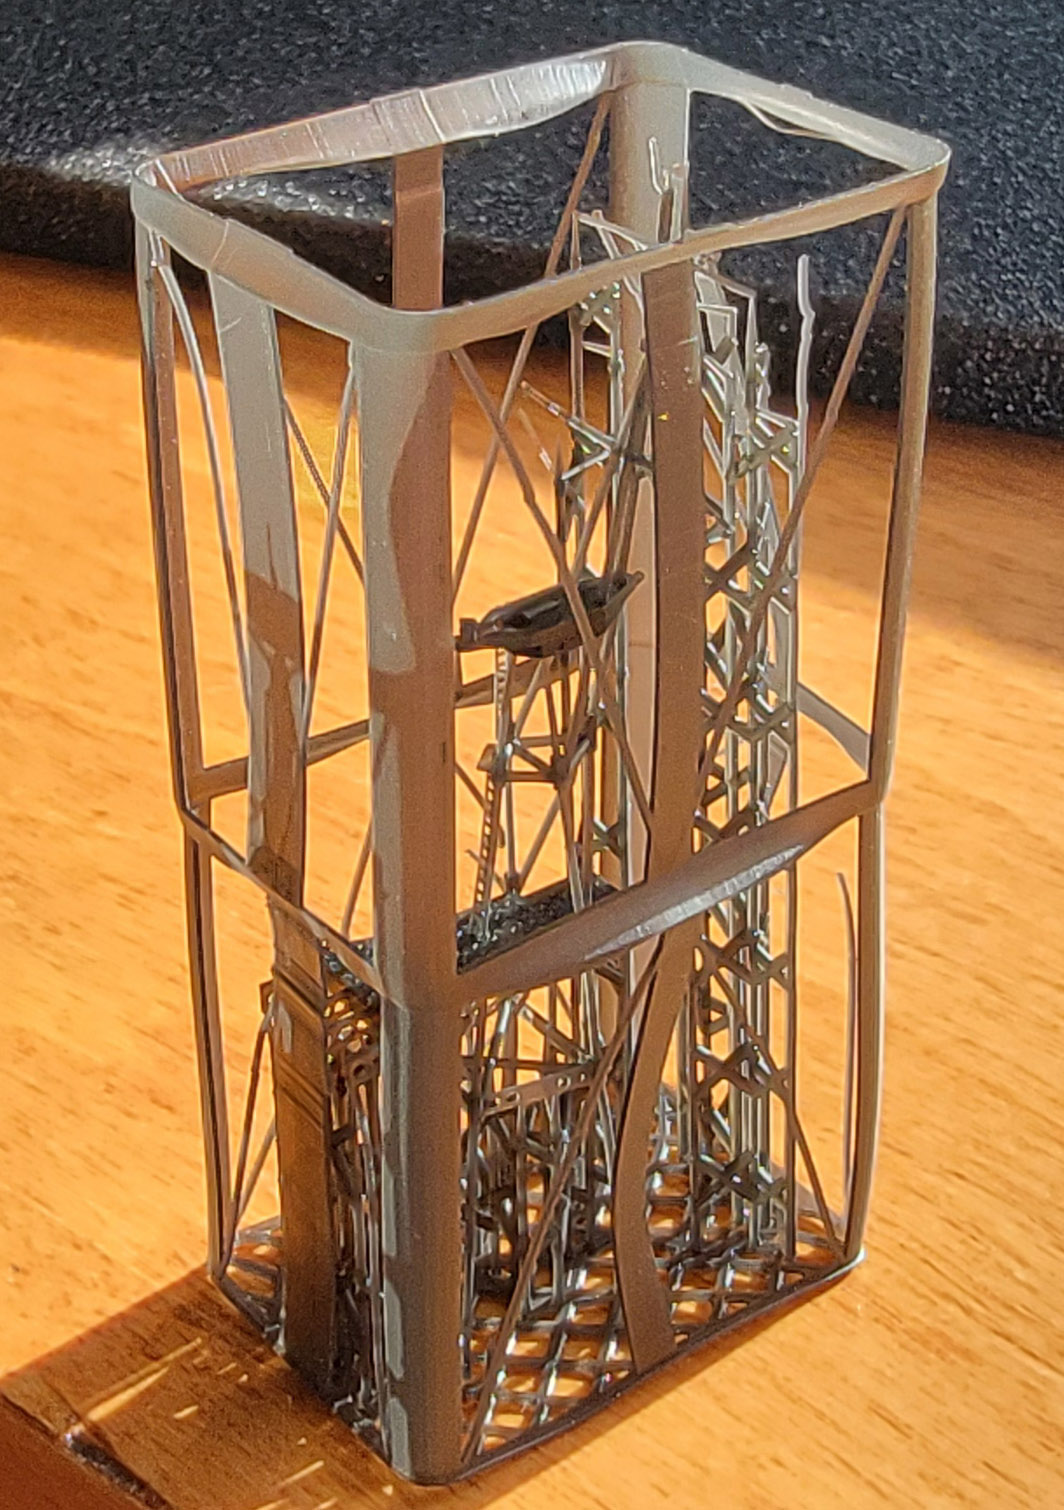
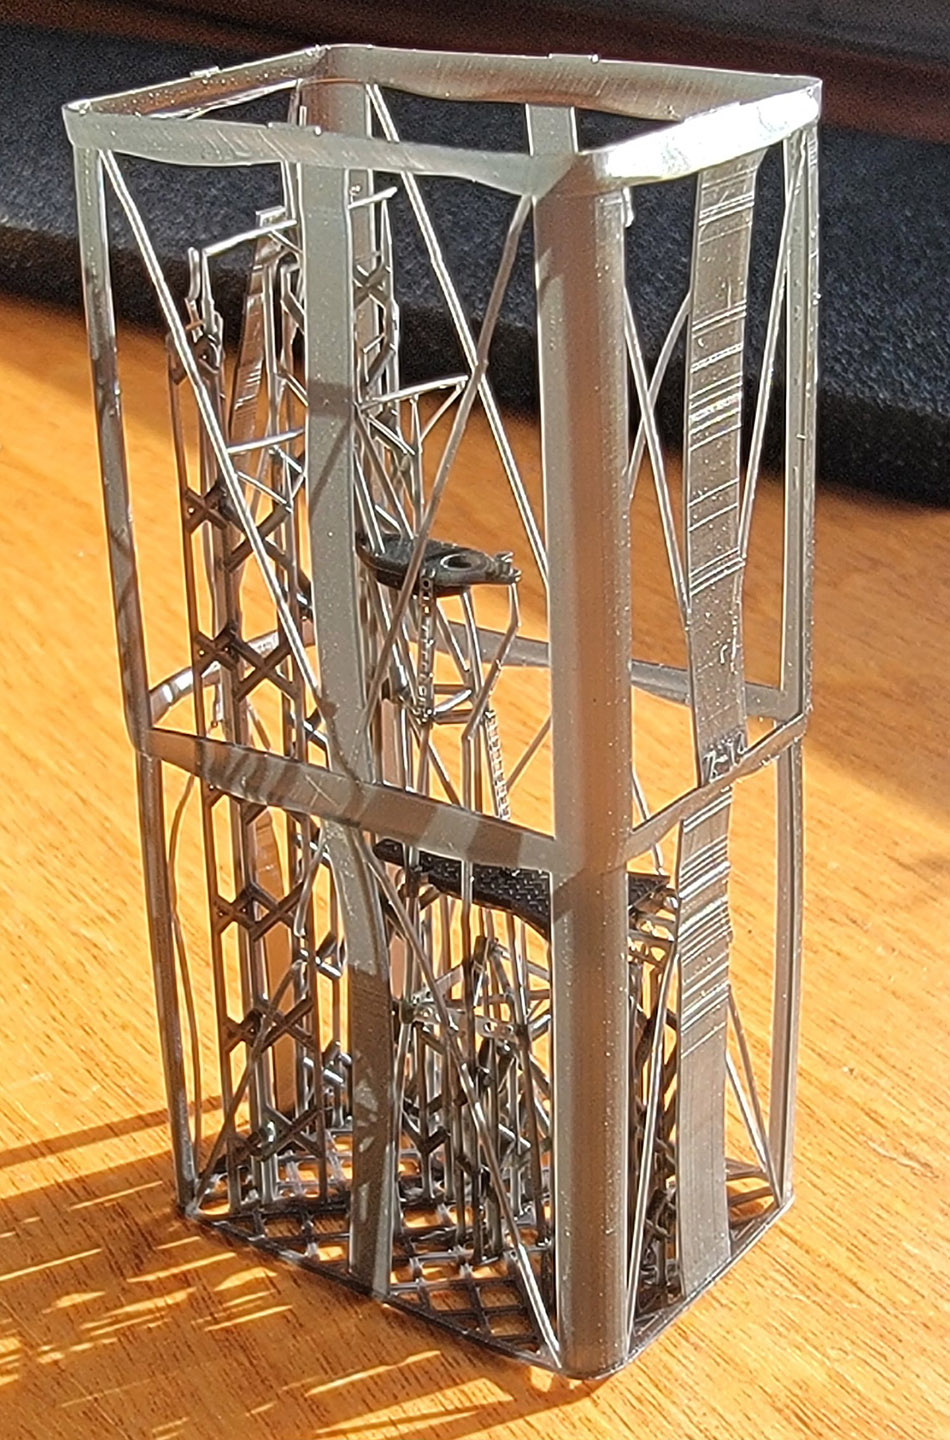
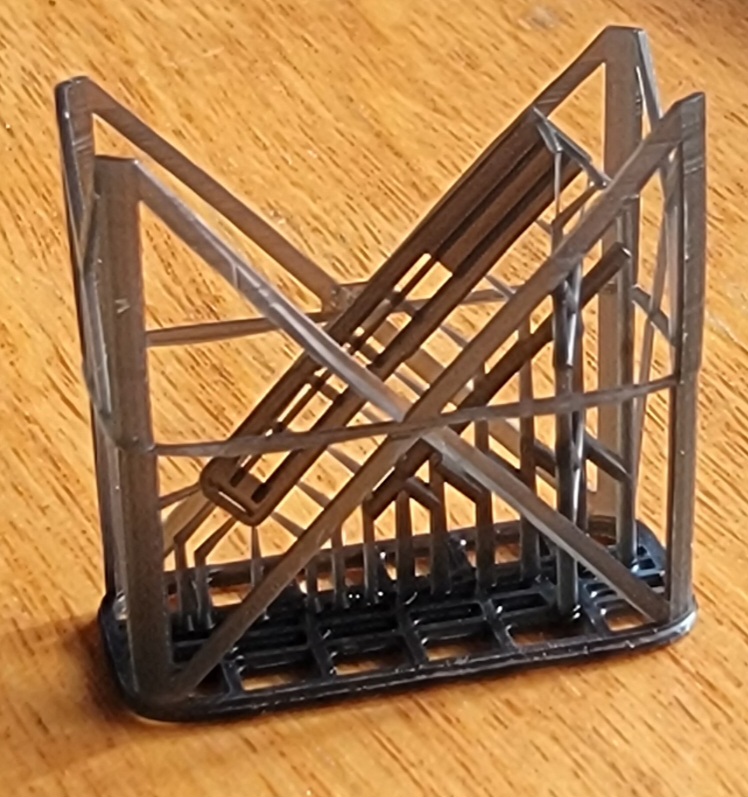
·Z1
- Bridge printed complete except for the roof (which is printed separately
in black). Dont forget to add the instrumentation to the bridge interior
before gluing the roof on.
·Z2 raised mount for superimposed #2 main battery turret ·Z6 funnel and housings. Two parts. ·Z7- aft deckhouse/torpedo reload storage bays, with AA and searchlight platforms |
|||||||||||||||||||||||||||||||||||||||||||
|
|||||||||||||||||||||||||||||||||||||||||||
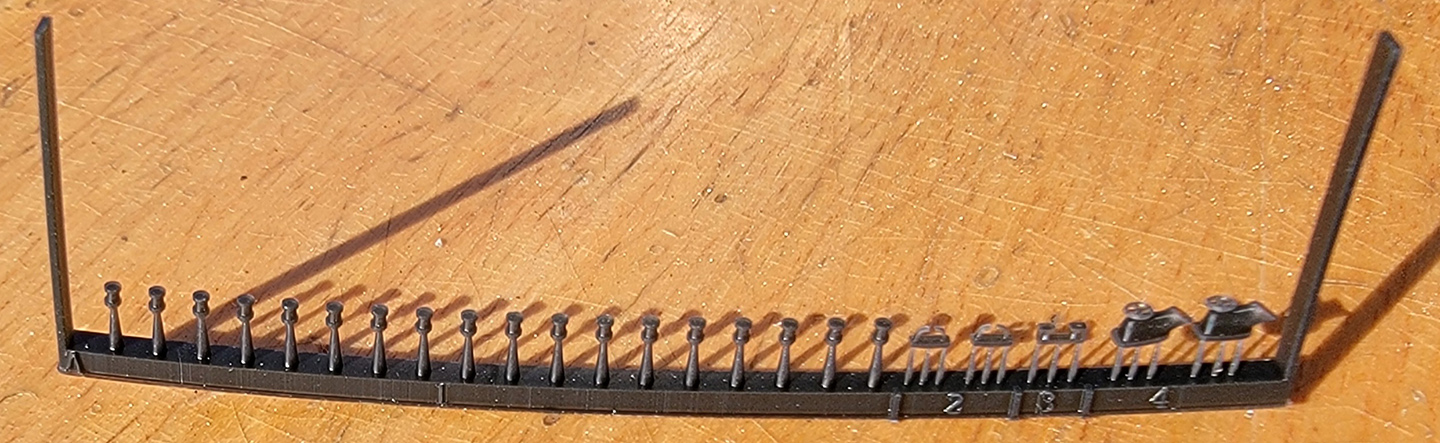
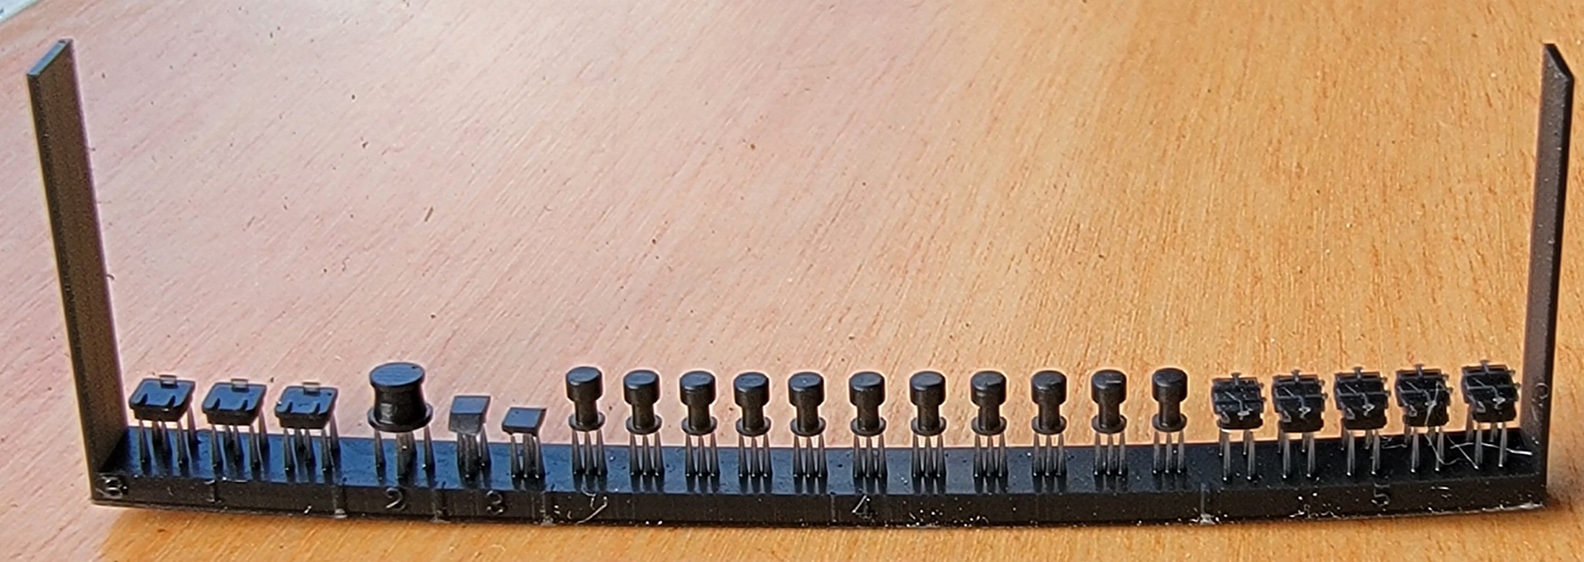
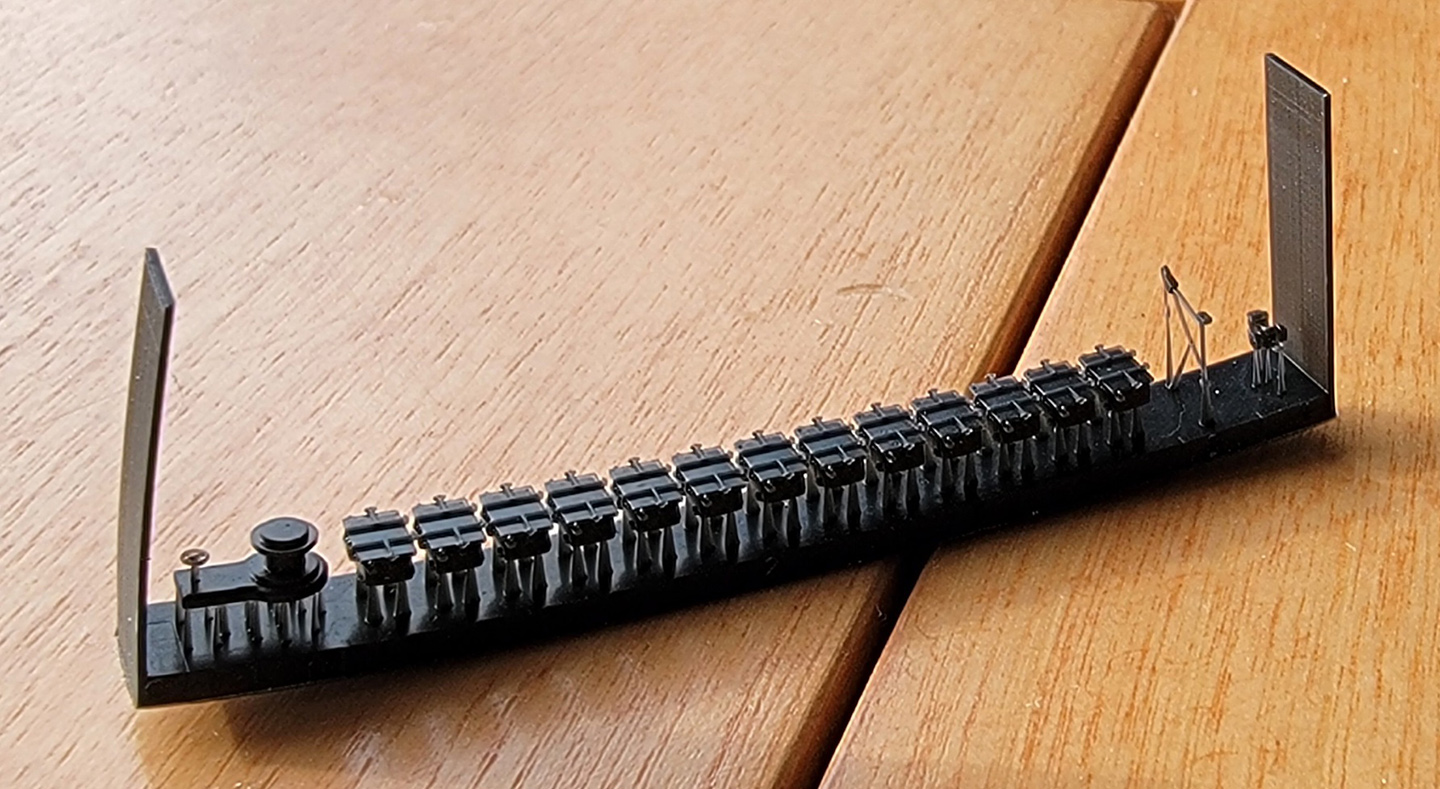
| BLACK COLORED PRINT RAFTS | |||||||||||||||||||||||||||||||||||||||||||
|
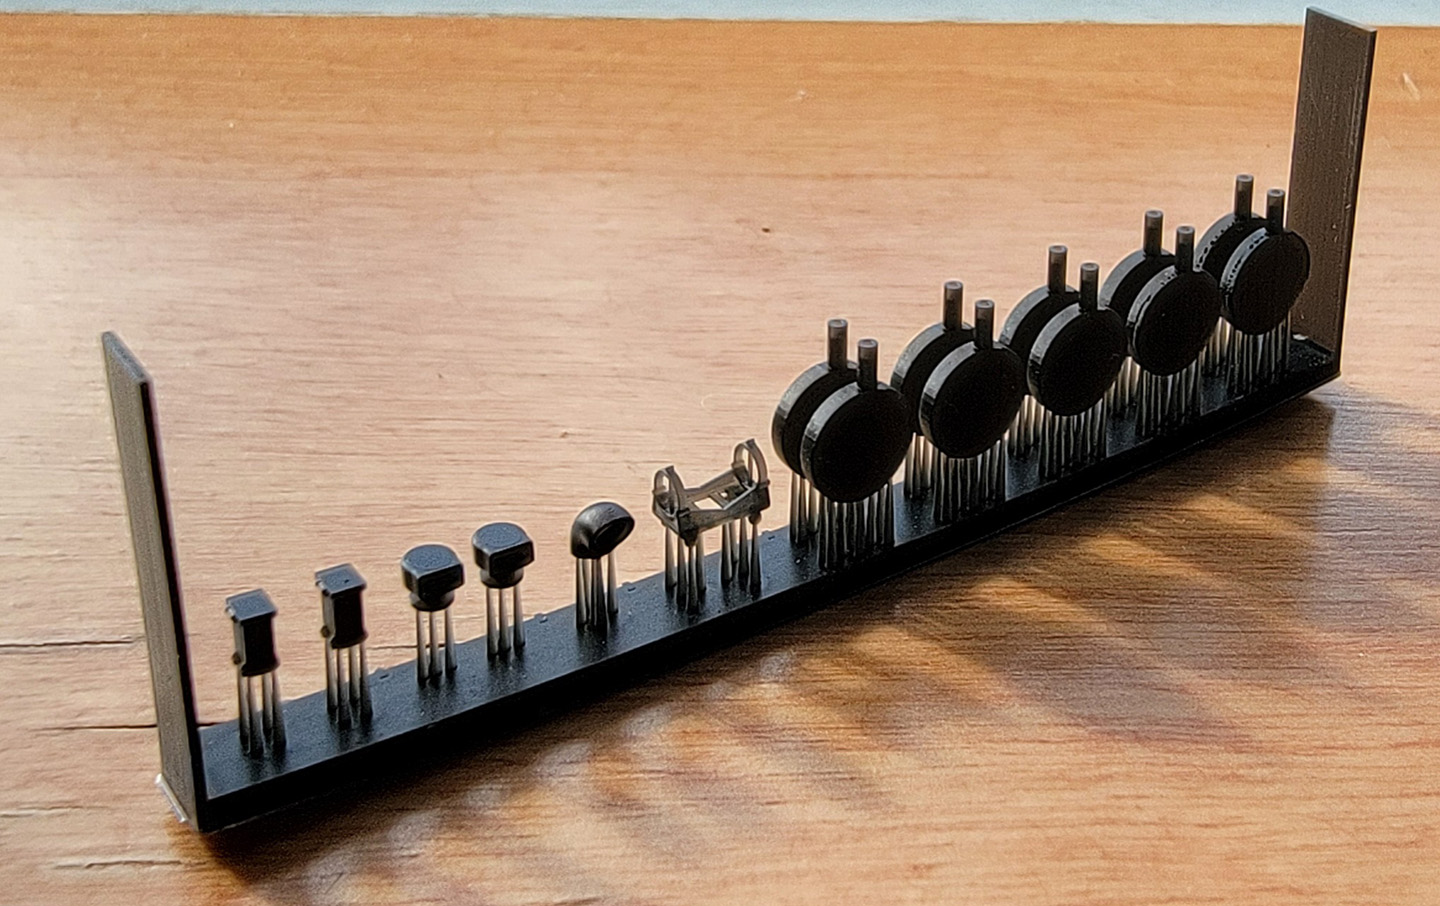
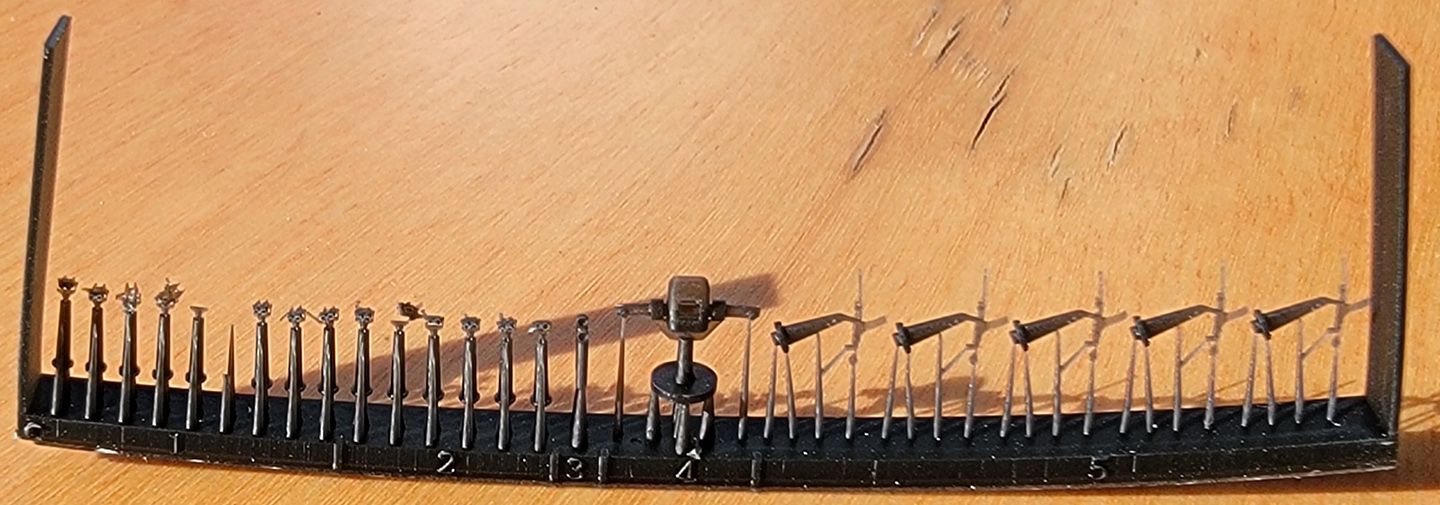
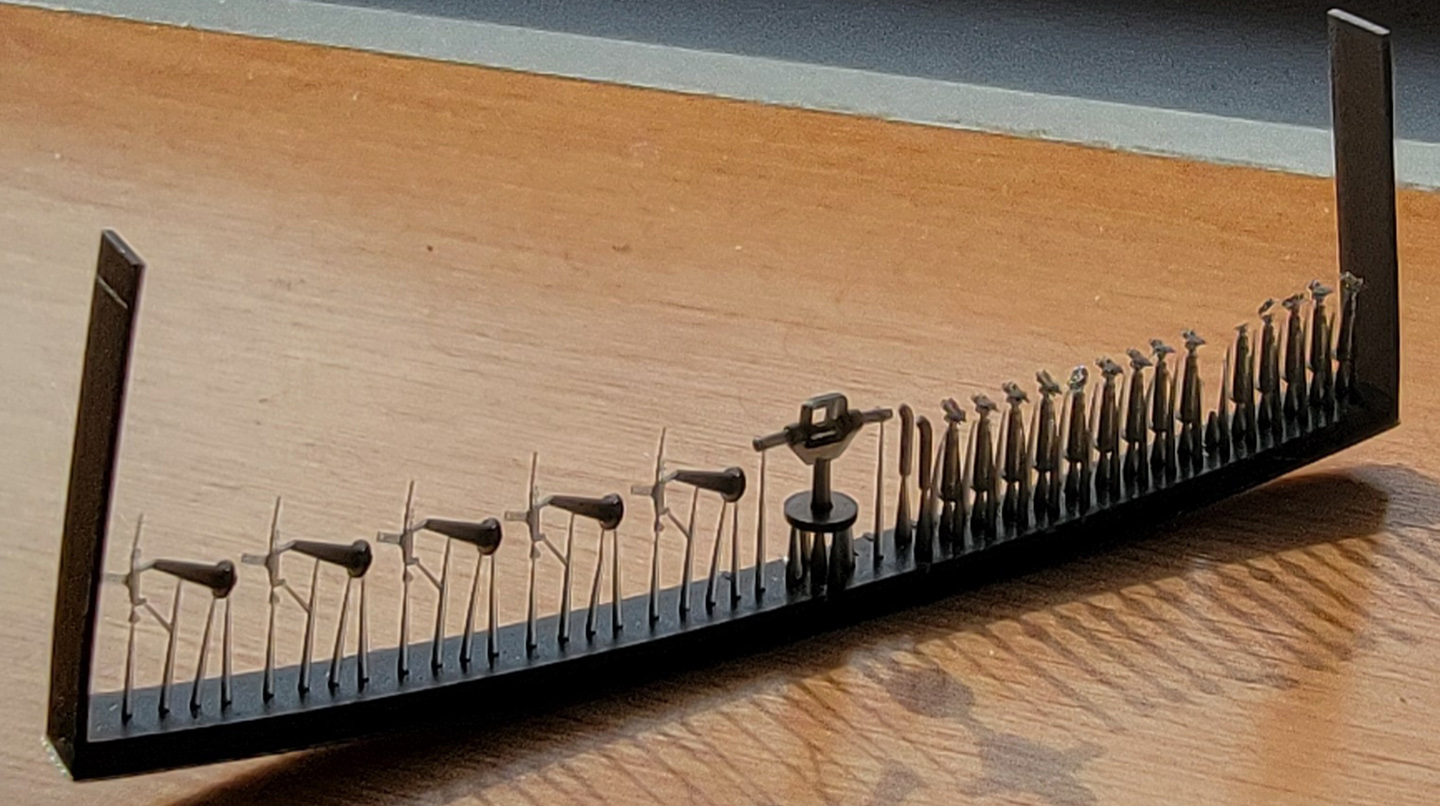
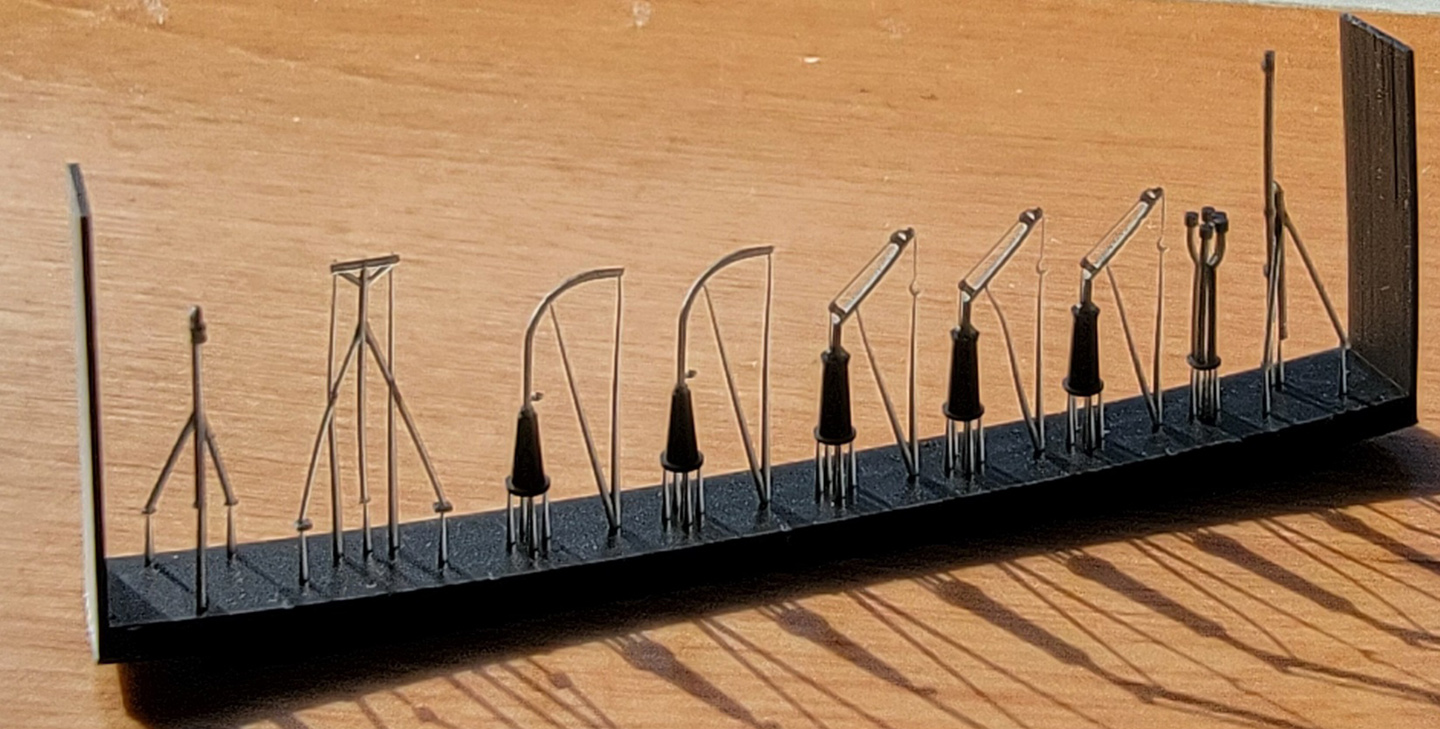
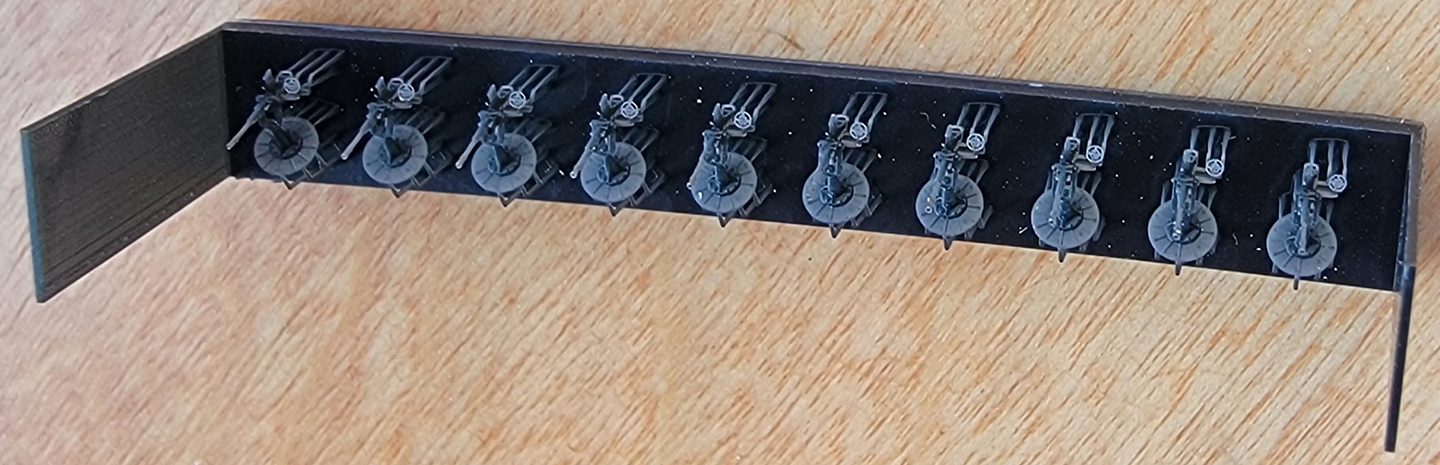
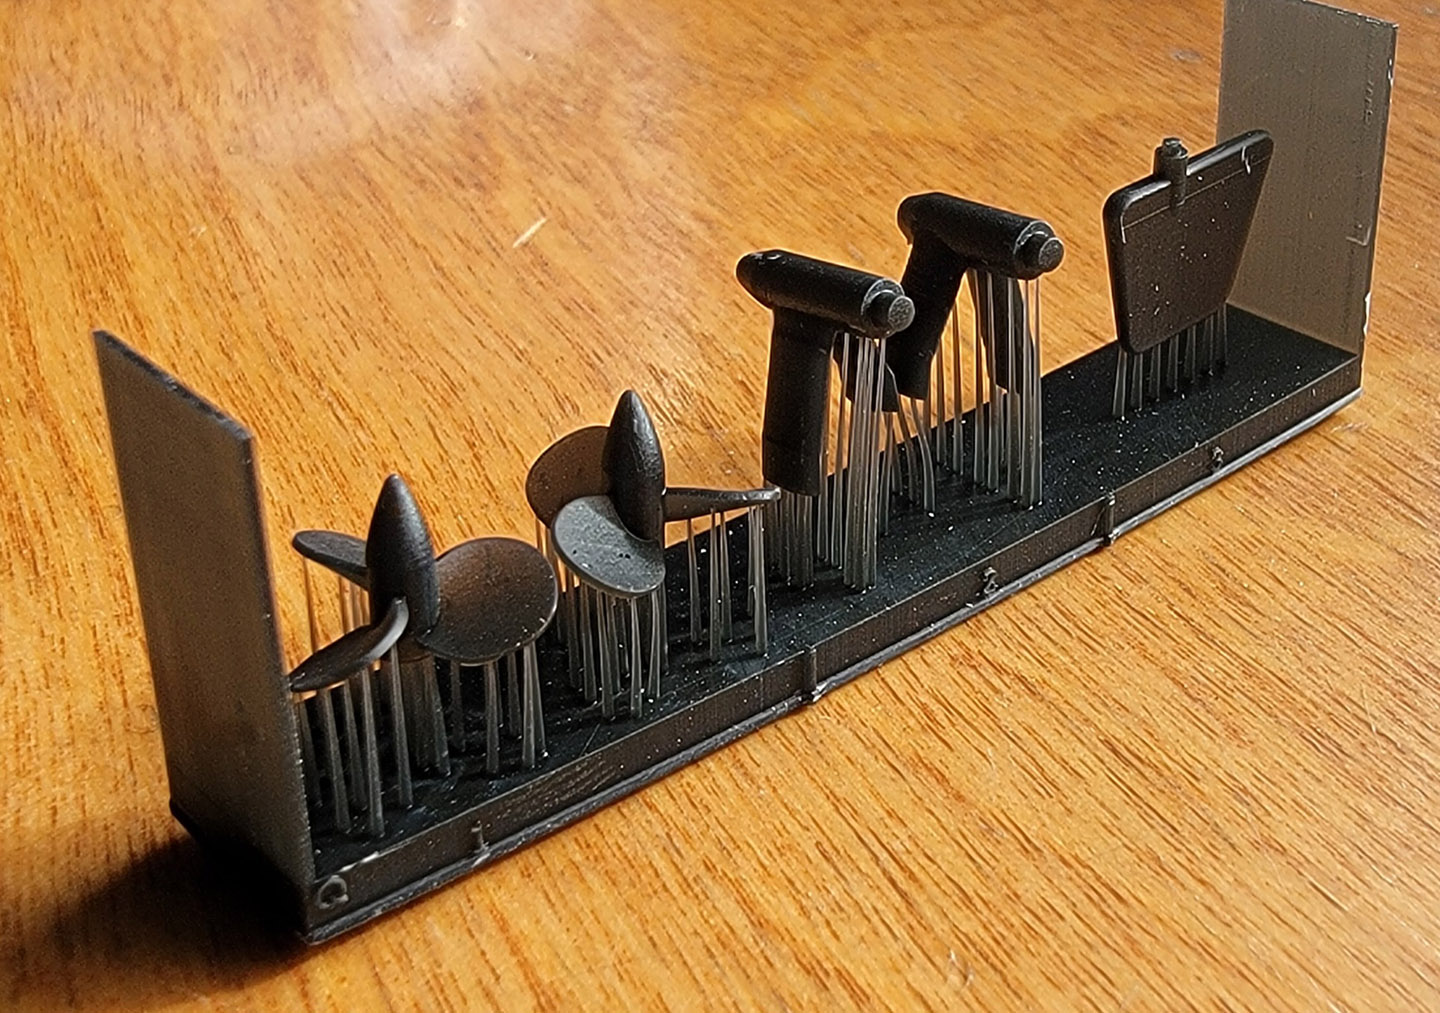
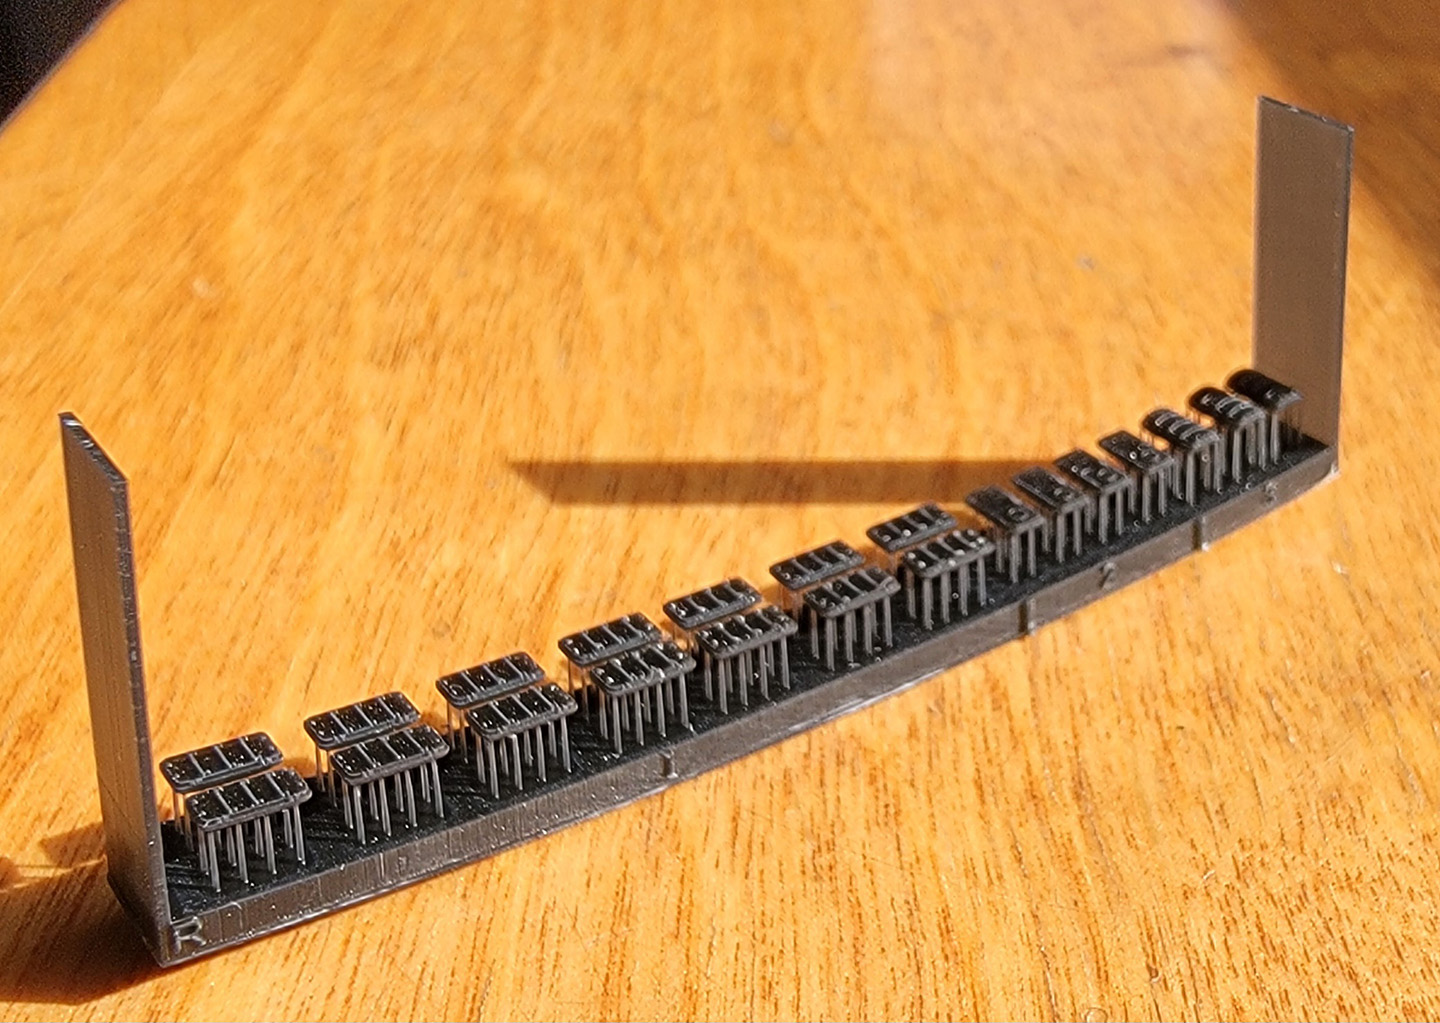
These carry
the smaller parts and fittings, usually in multiples. As with the orange
3D printed parts, these pieces seem uniformly sharp, properly shaped and
scaled. Some parts may be difficult to identify at first, but most are
readily identifiable. The rafts have embossed letters and numbers for identification,
but these are also tiny in size and sometimes hard to see.
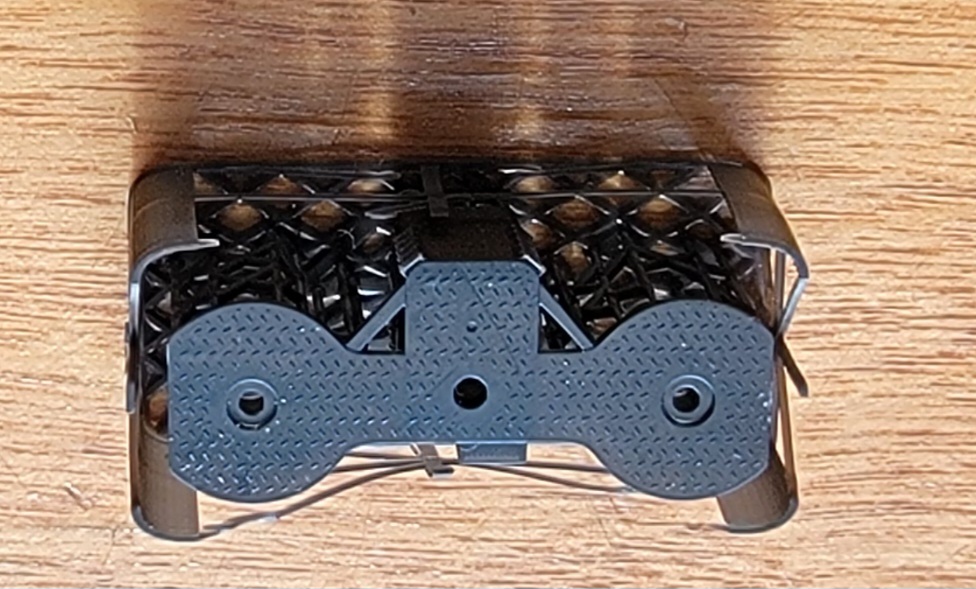
·A bollards, bow and stern fairleads, two hawsepipe covers with handwheel brakes ·B several sizes of deck hatches, a large bitt, and small mushroom deck vents ·C capstan and handbrake wheel, ammo boxes, torpedo handling davit, deck winch ·D Depth charges, bumpers in cages, hawser reels. ·E holds 3D printed main barrels, 90cm searchlight, one 9m motor launch and a large gooseneck intake. The marketing photos show this raft printed in black. I dont know why its been printed in orange here. ·F Sleeves for 10cm barrels, torpedo trolley, deck vents, gooseneck vent ·G - binoculars, 3m rangefinder, 13mmm MG ·H deck hatches, boat cradles, bridge antenna base, speaking tubes, gooseneck vents, support for galley pipe, small access ladder, helm and compass binnacle, searchlight director, RDF antenna ·I life rings, fairleads, small reels, 25mm AA ammo boxes ·J fore and aft jackstaffs, antenna tripod, davits (boat, torpedo & depth charge loading), aux, generator exhaust pipes ·K wave break fairing, propeller guards, torpedo reload gantry vertical support, Y-guns, engine room hatches, bullnose, anchors ·L - depth charge racks, Type 21 radar and extra base, gooseneck air intakes, vegetable locker ·M triple 25mm AA mounts ·N single 25mm AA with small and large round bases ·N2 - single 25mm AA with large round bases ·O - compass bridge deck extension plus component sections and braces for the foremast, plus more anchors. These components require lengths of brass rod for the legs of the mast and assembly is covered only in the deluxe upgrade instructions. Otherwise, see raft Z14 below. · Q - anchors, rudder, props, prop shaft brackets ·R Two types of deck hatches, I think. However, the instructions do not list any hatches from a raft labeled R, only H. Possible erroneous lettering. ·Z3 roof for bridge, with integrated wind vanes. ·Z4 base for Type 94 High Angle director atop the bridge ·Z5 Type 94 High Angle director (main gun director) ·Z8 25mm AA platforms for both sides of funnel ·Z9 central 25mm AA bandstand and RDF/searchlight platform with integrated vents and RDF compartment ·Z10 enclosed 10cm main battery turrets (four) ·Z11- Type 92 mod 4 torpedo tube mount shield (one) ·Z12 quadruple Type 92 torpedo tube mount (one) ·Z13 one piece printed main mast with Type 22 radar attached (hard to see inside its raft) ·Z14 one piece printed foremast (also hard to see inside its raft) ·Z15 overhead torpedo reload gantry girder (paired with a vertical support on raft K) Surprisingly, no printed anchor chain is included with the kit, unlike the previous Mutsuki kit. So, the modeler will need to obtain some chain. |
|||||||||||||||||||||||||||||||||||||||||||
|
|||||||||||||||||||||||||||||||||||||||||||
| BRASS ROD | |||||||||||||||||||||||||||||||||||||||||||
| All four kits come with brass rods for the masts and yardarms, with additional rods for propeller shafts in the full hull ships. The rods must be cut to size based on measurements listed in the instructions. | |||||||||||||||||||||||||||||||||||||||||||
|
|||||||||||||||||||||||||||||||||||||||||||
| INSTRUCTIONS | |||||||||||||||||||||||||||||||||||||||||||
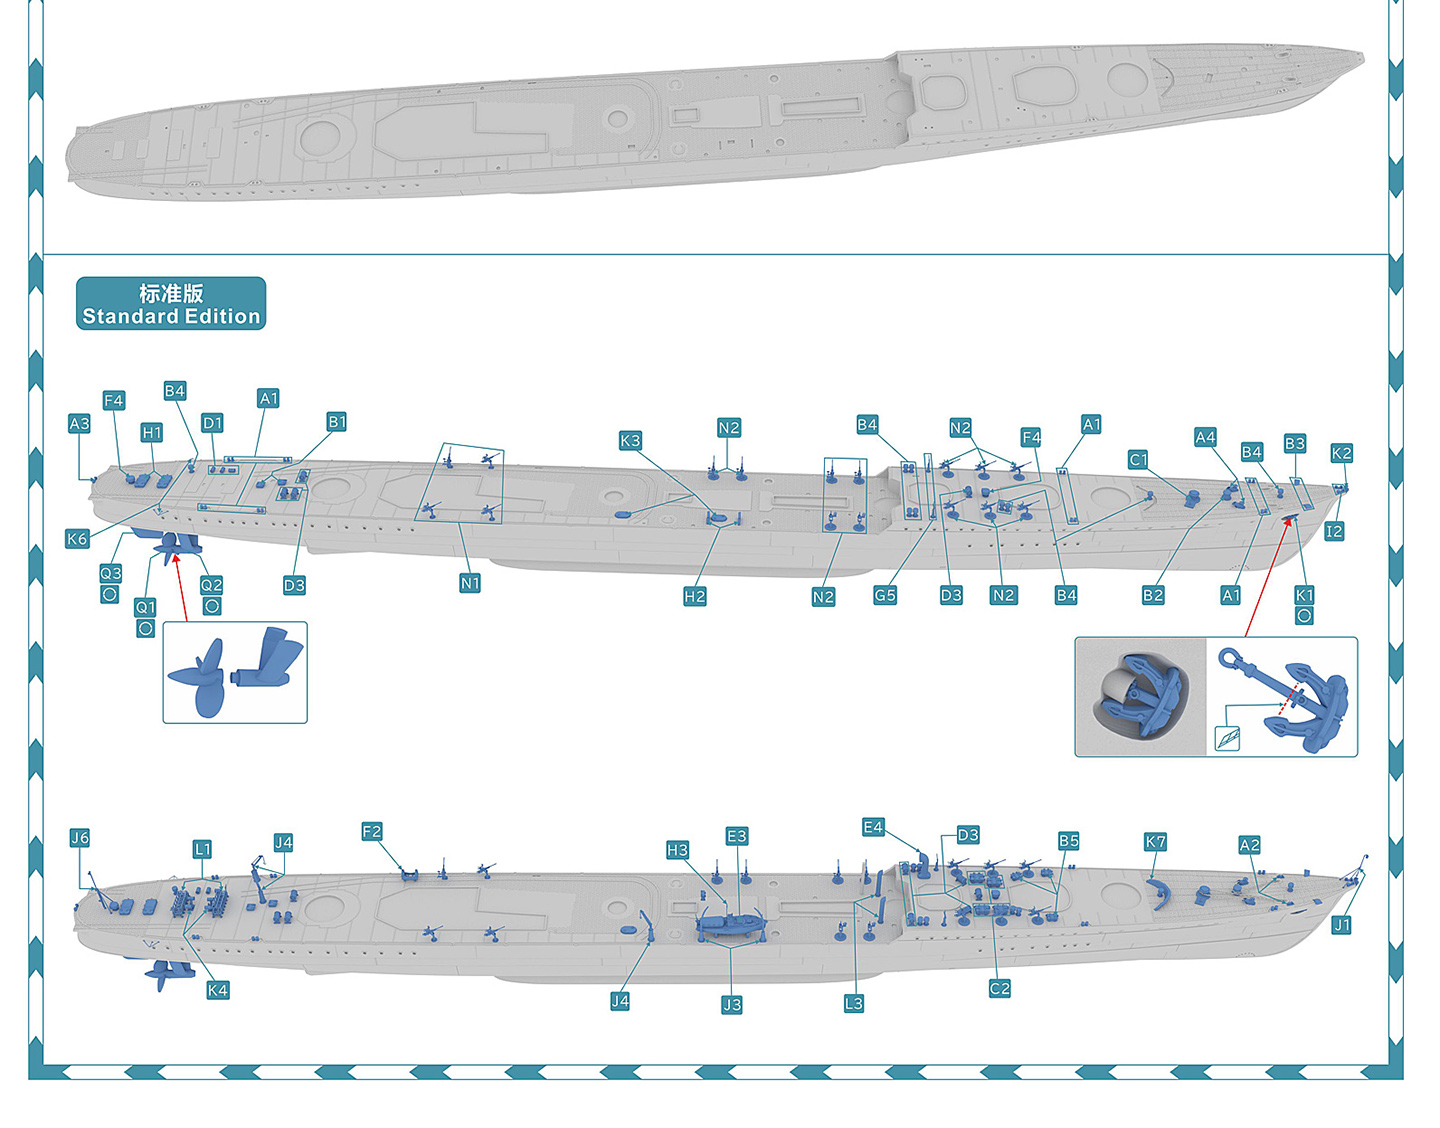
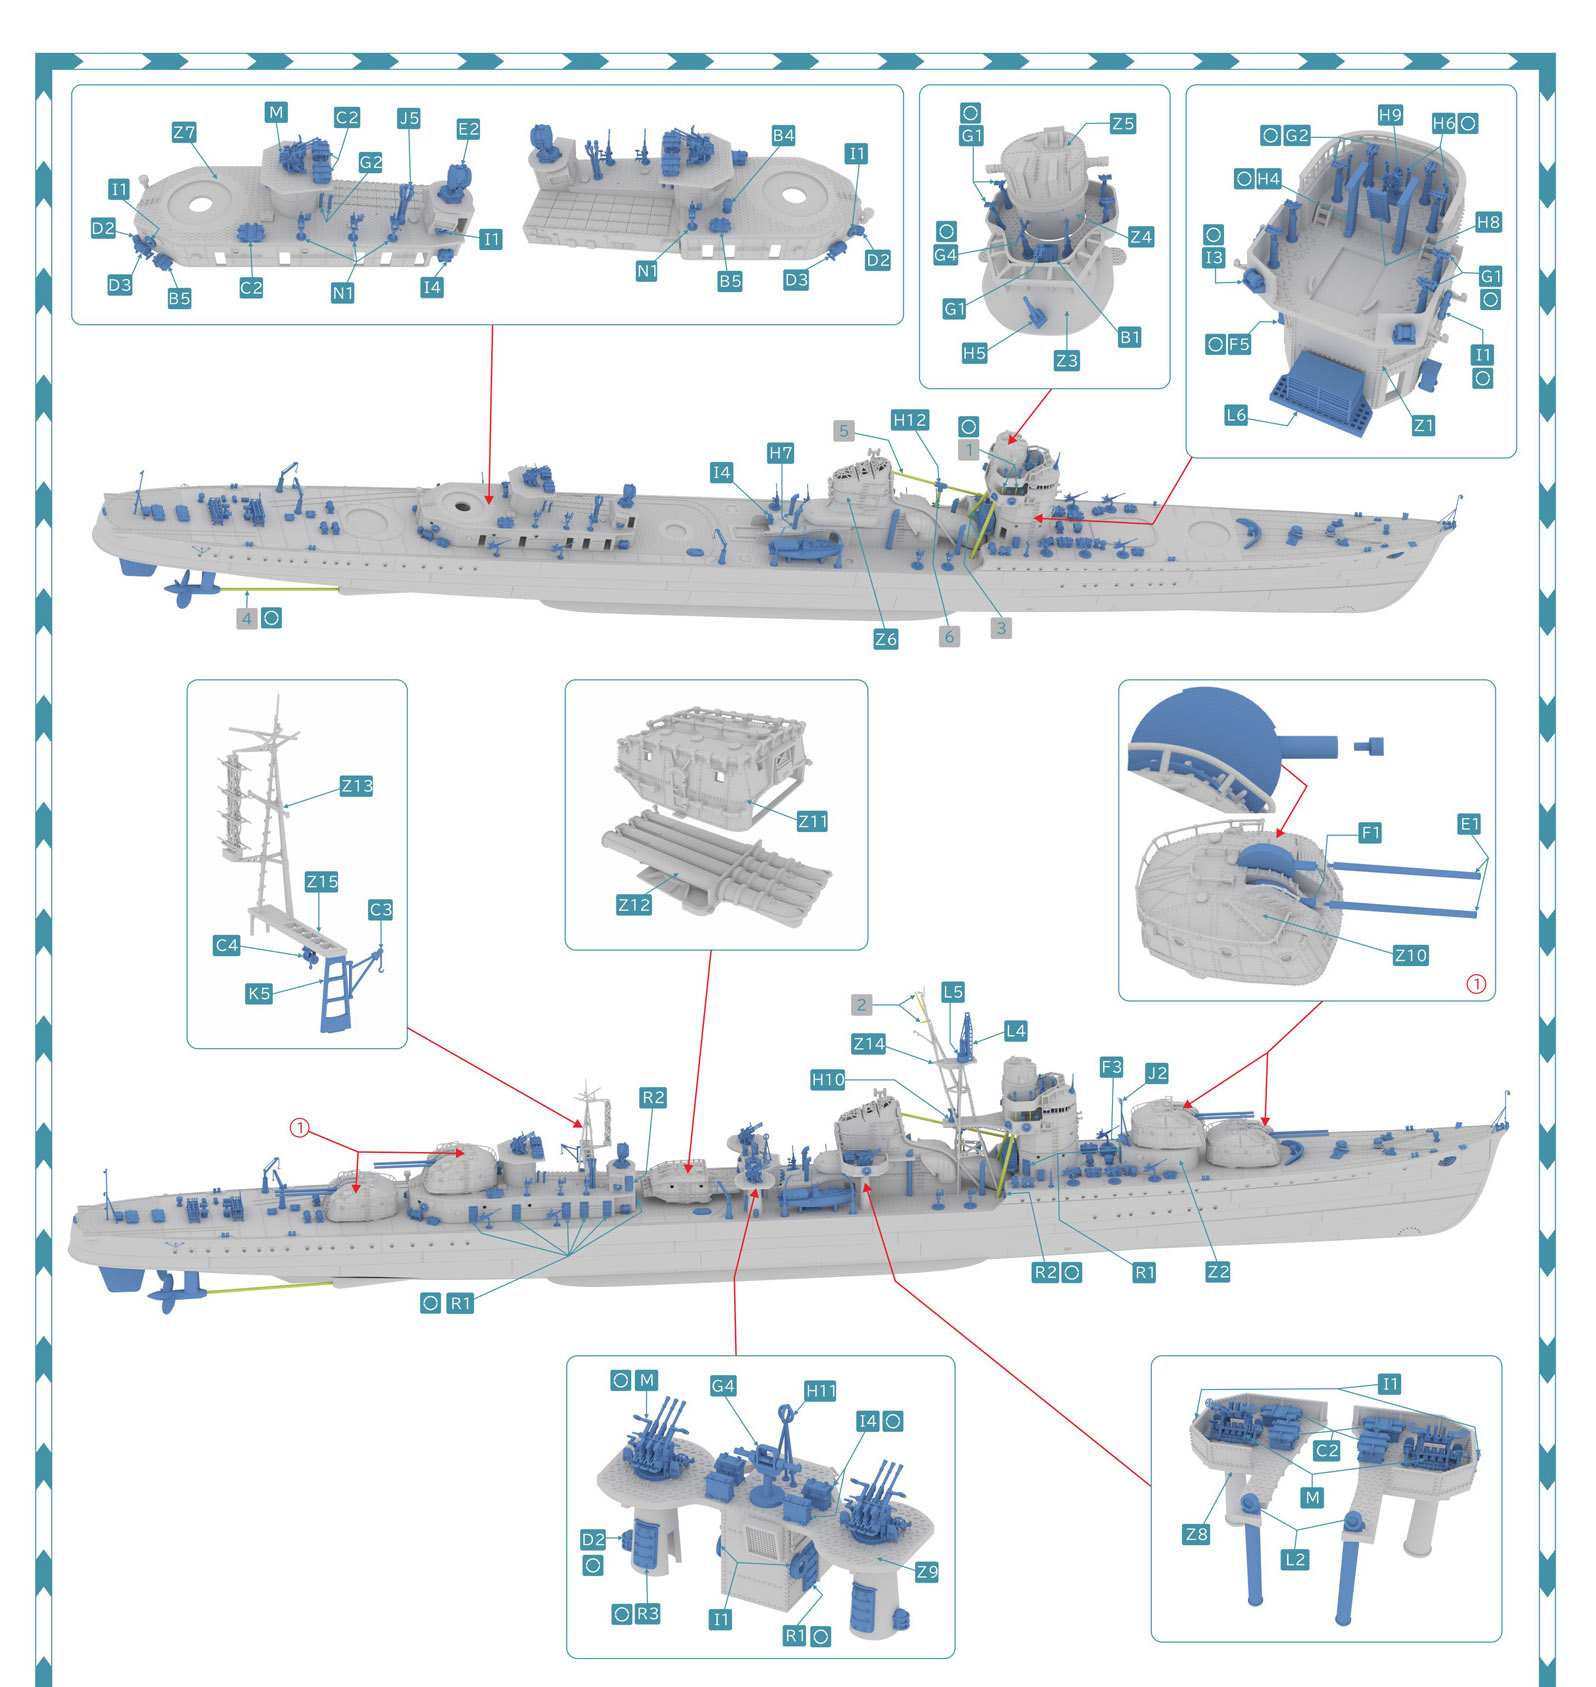
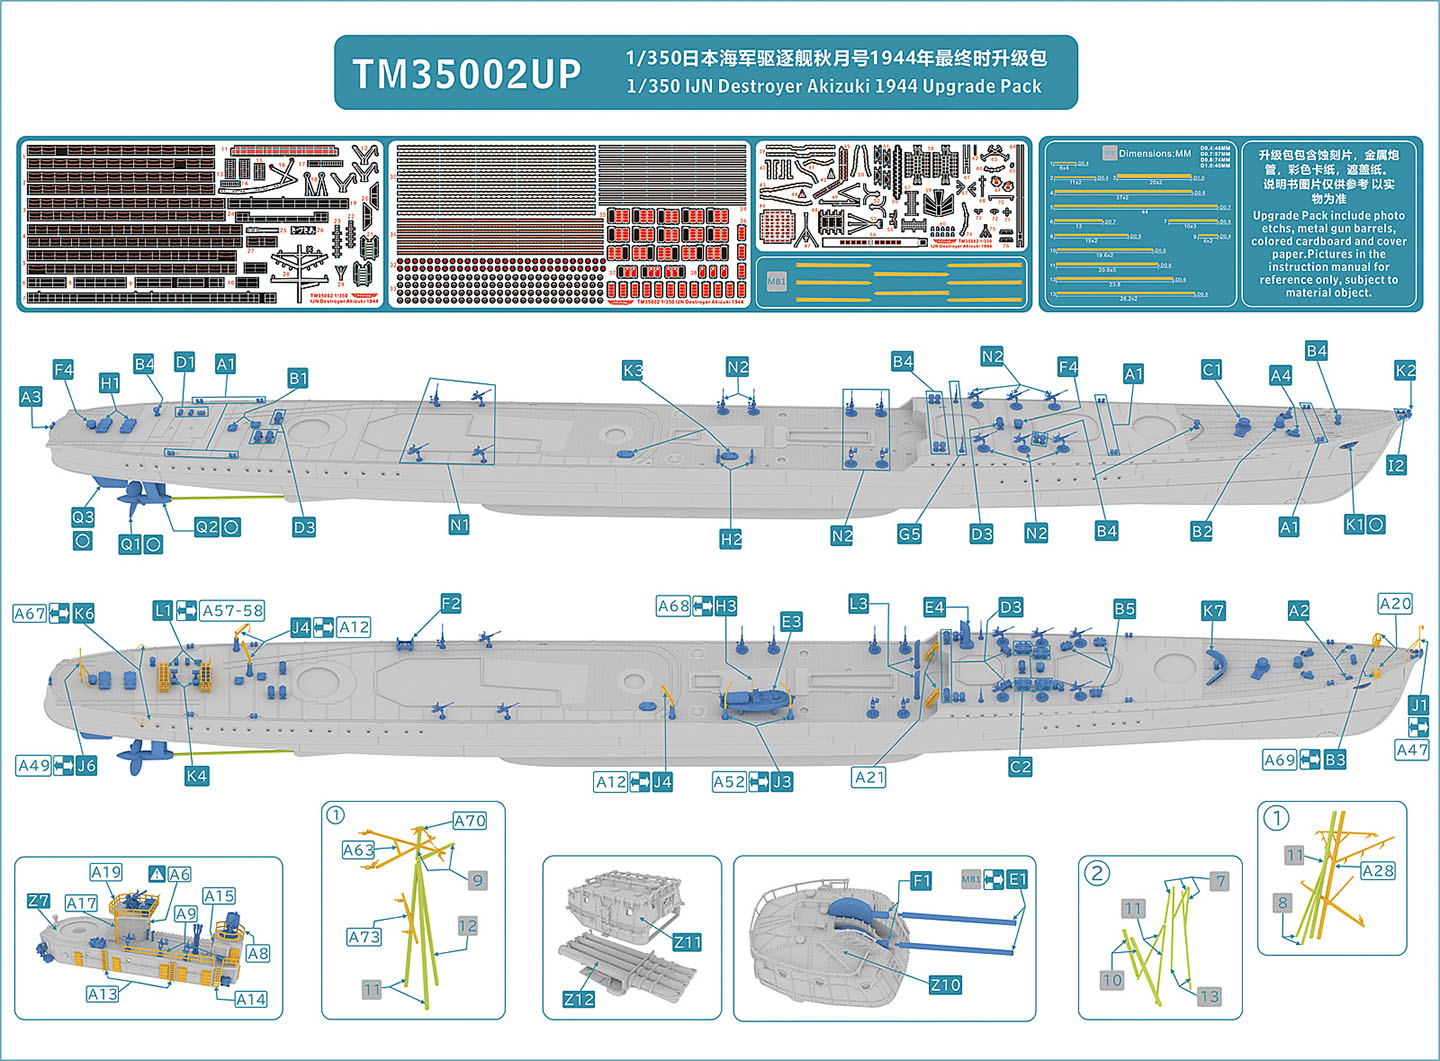
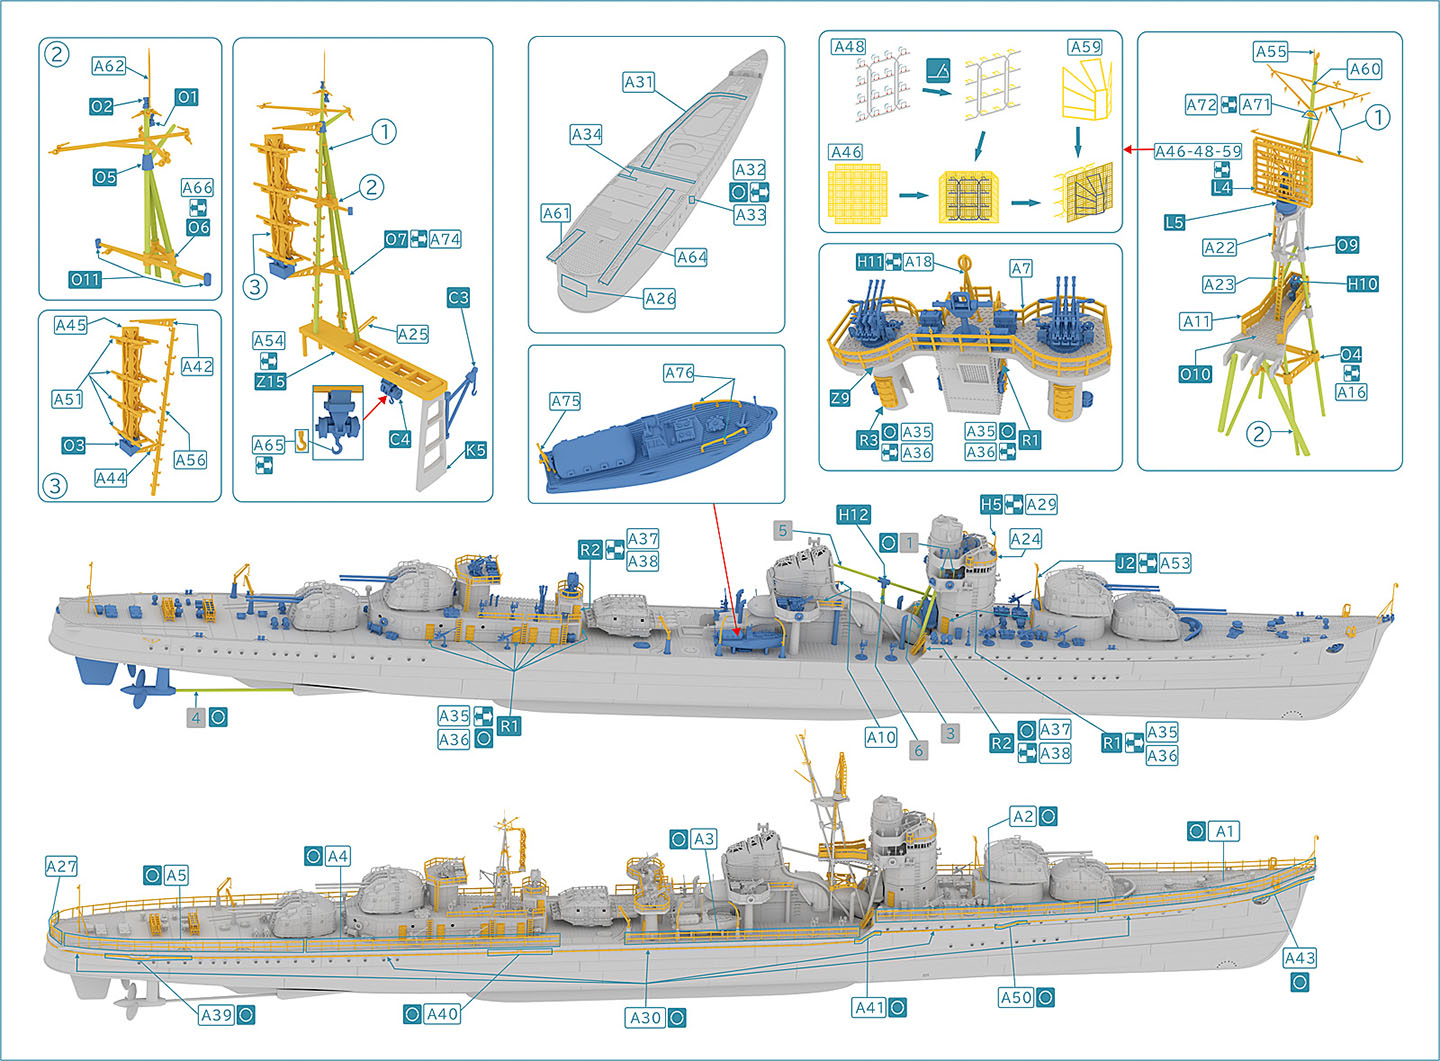
| These are printed in full color on
one, semi- glossy, multipaneled sheet, front and back. The wording is limited
in both English and Chinese, but the illustrated pictorial layouts are
both straightforward and informative. The top of the front page displays
a copy of the box art plus a 3D rendered parts manifest.
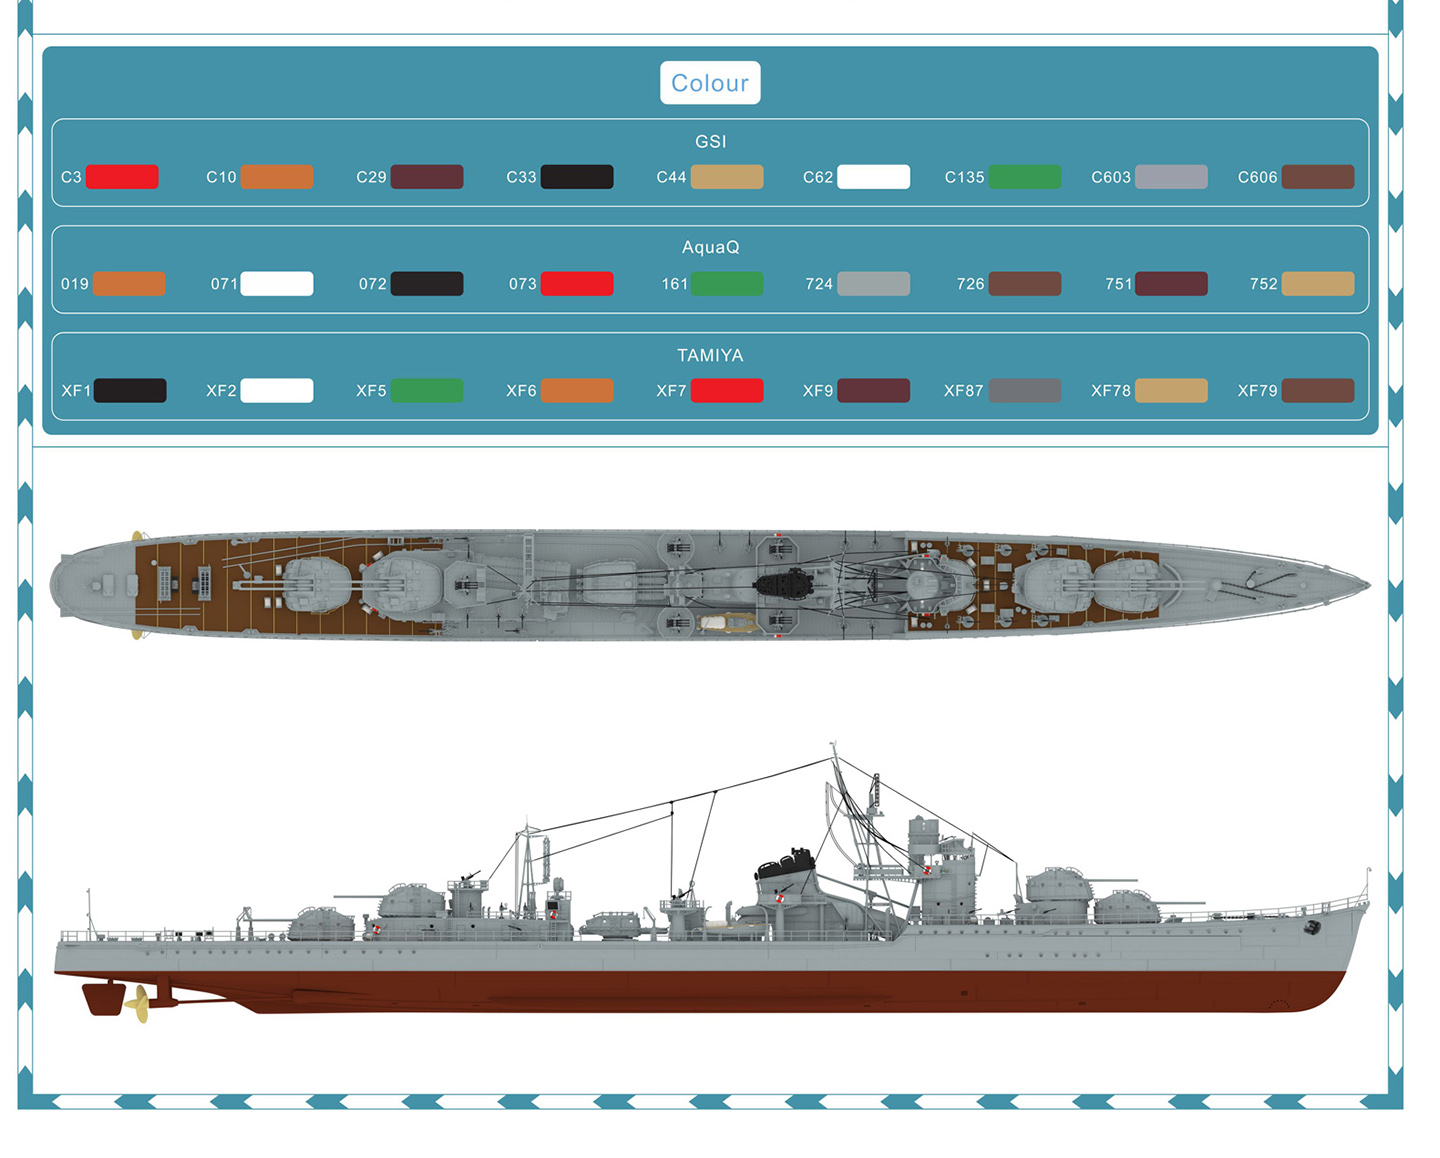
The images of the print rafts on the parts manifest do not show numbers or letters, despite the actual rafts containing such identifiers. The modeler will have to eyeball the actual 3D printed parts carefully against the instructions because the raft numbers are small and difficult to see, particularly those in black with a black background. The bottom of the front sheet displays 3-point perspective images of the standard kit, depicting placement of all the various printed pieces in blue color against the gray hull. Additional steps are carried over onto the back of the sheet. This applies to the construction of substructures as well. The instructions seem somewhat incomplete. For instance, nowhere is it indicated that the compass bridge deck roof is placed on top of the bridge except for the last image, which shows it already in place as part of the whole bridge. The same holds true for the two-part funnel/vent assembly and the foremast. Also included on the back sheet is a color plate with the ships color scheme in 1944. Colors are keyed to three different paint suppliers, GSI, AquaQ and Tamiya, but there is no direct linking of a paint color with a specific ship color. The modeler is left to match colors via the Mk. 1 eyeball. |
|||||||||||||||||||||||||||||||||||||||||||
|
|||||||||||||||||||||||||||||||||||||||||||
| DELUXE EDITION | |||||||||||||||||||||||||||||||||||||||||||
| These packages include photoetch, brass barrels, and a paint mask. | |||||||||||||||||||||||||||||||||||||||||||
| PHOTOETCH | |||||||||||||||||||||||||||||||||||||||||||
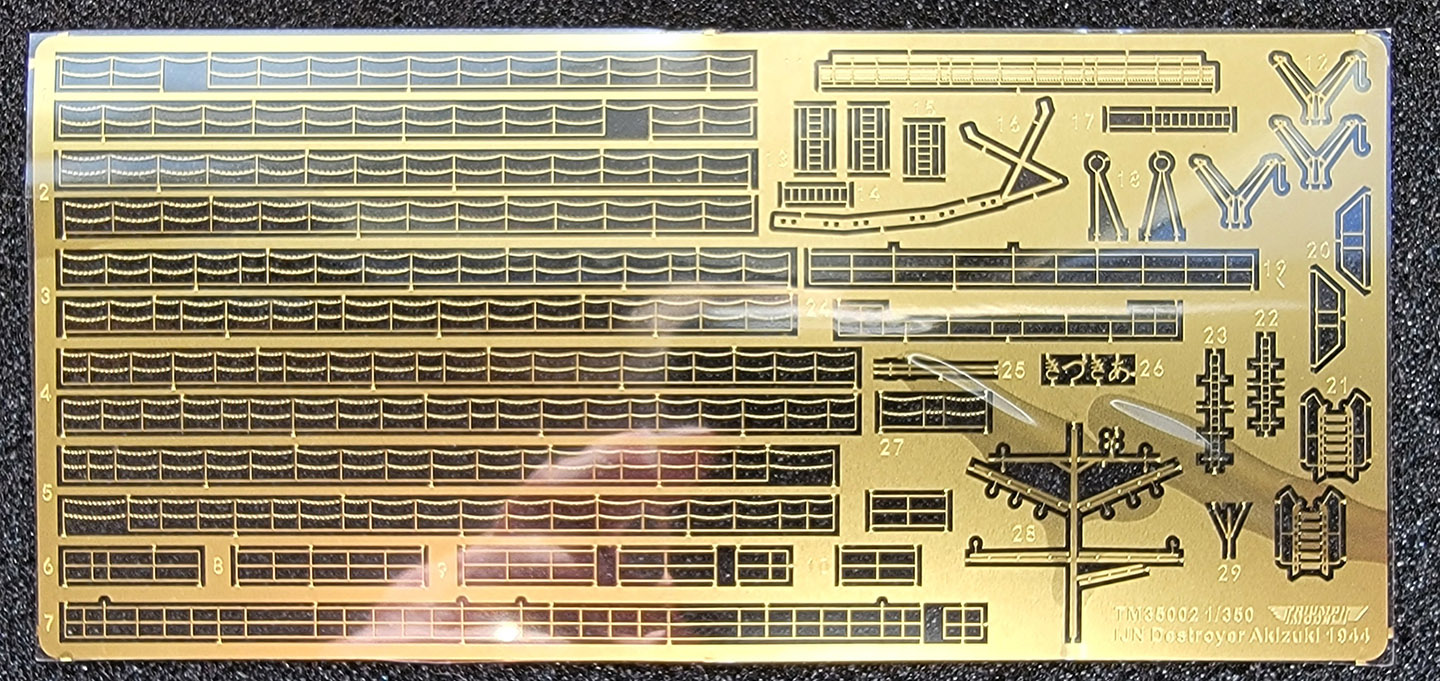
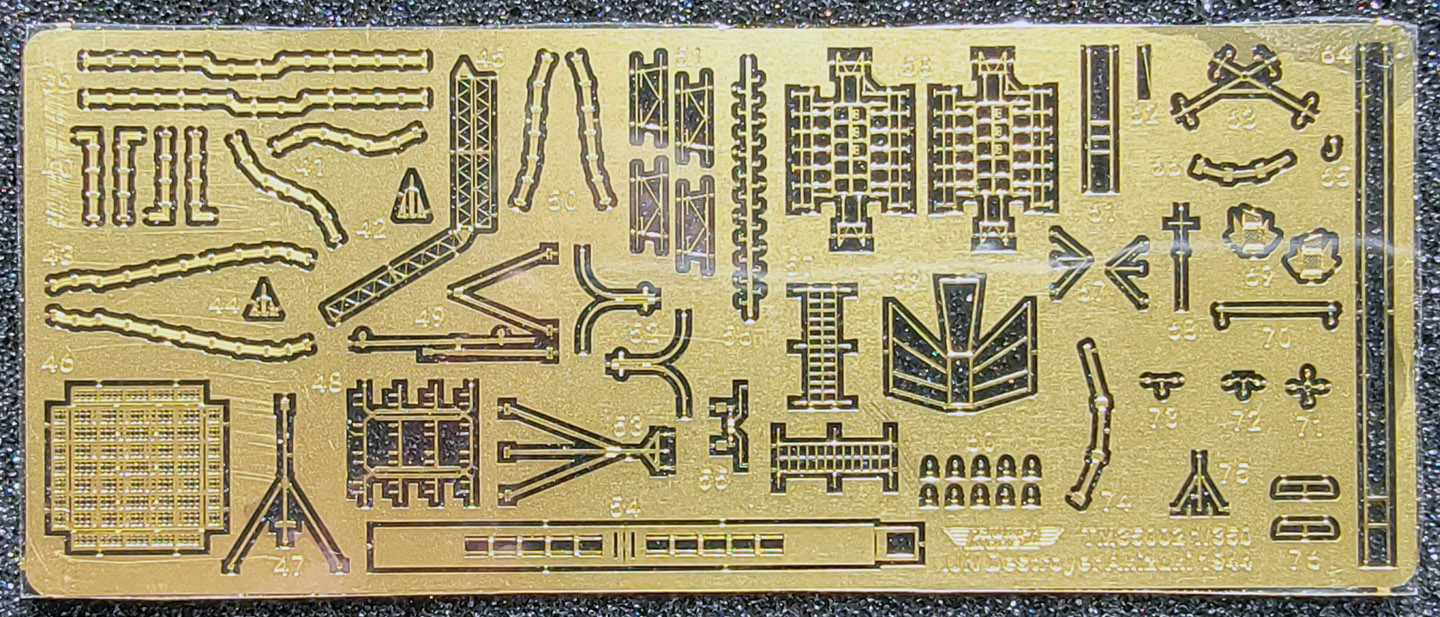
| There are three comprehensive frets
of PE.
Fret 1 contains all the railings for the ship, numerous access ladders, foremast cross-brace, depth charge handling davits, foremast top and yardarms, and hiragana lettering for the stern spelling Akizuki Fret 2 holds numerous parts for a degaussing cable, watertight doors and frames, porthole rims with eyebrows and porthole covers, and what I believe to be brass tie-down strips for the linoleum decking. Fret 3 holds more parts to the degaussing cable, the components of the Type 21 and Type 22 radars, RDF antenna, jackstaffs, boat davits, depth charge racks, the upper portion of the torpedo reload gantry, radio antenna tripod, and few smaller items. |
|||||||||||||||||||||||||||||||||||||||||||
|
|||||||||||||||||||||||||||||||||||||||||||
| BRASS BARRELS | |||||||||||||||||||||||||||||||||||||||||||
| Eight turned barrels are included as befits the four, twin 10cm main battery. These barrels mate with the 3D printed sleeves which are, in turn, inserted into the 3D printed turret faces. | |||||||||||||||||||||||||||||||||||||||||||
|
|||||||||||||||||||||||||||||||||||||||||||
| DECALS | |||||||||||||||||||||||||||||||||||||||||||
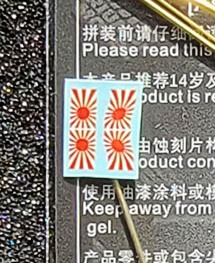
| Two Japanese flags are included, one in wave mode. There are no registration issues. | |||||||||||||||||||||||||||||||||||||||||||
|
|||||||||||||||||||||||||||||||||||||||||||
| PAINT MASK | |||||||||||||||||||||||||||||||||||||||||||
| Thoughtfully included, this mask covers the linoleum decking fore and aft. | |||||||||||||||||||||||||||||||||||||||||||
|
|||||||||||||||||||||||||||||||||||||||||||
| NAMEPLATE | |||||||||||||||||||||||||||||||||||||||||||
| It is 3D printed in light gray with Japanese lettering. The lettering translates as: Japanese Navy destroyer Akizuki. | |||||||||||||||||||||||||||||||||||||||||||
|
|||||||||||||||||||||||||||||||||||||||||||
| DELUXE INSTRUCTIONS | |||||||||||||||||||||||||||||||||||||||||||
| These are in the same format and composition as the regular instructions, just on a smaller sheet. Both sides of the sheet focus on the deluxe upgrade additions, utilizing the same images from the standard kit and kit pieces, and then layering on the photoetch aspects using photoetch imagery in a different color. | |||||||||||||||||||||||||||||||||||||||||||
|
|||||||||||||||||||||||||||||||||||||||||||
| FINAL THOUGHTS | |||||||||||||||||||||||||||||||||||||||||||
|
The Akizuki
class destroyer was a highly regarded design, attractive in appearance,
and remains popular among ship modelers. The absence of a readily available
1/350 kit at present meant there was a gap to fill, and its not surprising
that Triumph saw this as a good opportunity. However, this effort has fallen
short of the mark. Essentially, what we have here is a kit that is excellent
from a production standpoint, but rife with accuracy and detail errors.
In the last few years, advances in technology and materials science have impacted our hobby in numerous positive ways. Coupled with more extensive research, we have seen an explosion of new kits and accessories, allowing for some highly detailed builds in multiple scales with great results. But the thing that I find most striking in this review sample is that technology itself does not automatically confer an exceptional kit. Fundamental research and attention to actual details are still mandatory. Theres no substitute for the basics. While I am admittedly one of the dreaded (or loathsome, or boring) rivet counters, I fully understand that not every modeler needs every aspect of a kit to be perfect and truthfully, that never happens. Allowances often have to be made for production, marketing and profit realities. Still, Triumph has fallen short of the mark here. This is especially true when one considers that the price of this kit is at least triple that of the Wave injection kits when those were in stock. And that kit was more fundamentally accurate, even if not quite as detailed as the Triumph kit. I cannot recommend this kit in good conscience. At best, Im ambivalent about it. If you are looking for a sharply produced kit that resembles an Akizuki type, and arent too concerned with the particulars or price, then this kit may be for you. However, if you feel that accurate details are important components of an expensive, superior kit, then you best be served by searching for one of the Wave/Monochrome styrene kits. Ideally, Id hate to see an effort like this wasted. Instead of consigning the kit to a brief production life, I would urge Triumph to remaster the hull, redesign the compass bridge deck windows, eliminate the rivets on the superstructures, and reissue the kit. In which case, they would have a first-class kit on their hands. Wed happily review the retake version. This review kit came courtesy of Triumph Models. I dont see this kit currently offered for sale by US distributors, but the cost of the kit alone at Hobbylink Japan is approximately US$102, plus shipping and tariffs. The Deluxe Upgrade package is $57. Pricing was cheaper from online sites in Hong Kong, but this does not account for shipping or tariffs. |
 |
||||||||||||||||||||||||||||||||||||||||||