| History | ||||||||||||||||||||||||||||||||||
|
HMS Courageous was laid down at Armstrong-Whitworth during WW1 on 18 March 1915, entering service in early November 1916. As a class of three, HMS Furious, Glorious and Courageous they were conceived by the First Sea Lord Jackie Fisher as a means of forcing their way into the Baltic and assisting an amphibious landing and subsequent invasion within a 100 mile of Berlin and thereby bringing about a speedy end to the war. In order to achieve this it was thought that ships with heavy guns and shallow draft for close inshore operations would be required to work alongside other ships. The plan was not approved -but funding for these 'light' 15in gunned cruisers was, and their building was commenced in secrecy, thereby coining the phrase of Fishers hush-hush cruisers HMS Courageous and HMS Glorious were the most extreme versions of the battlecruiser concept, upstaged only by HMS Furious, which as designed was to carry two 18-in guns in two turrets. During trials, Courageous sustained buckled side plating in the forecastle while running full speed in a rough sea. As a result, additional stiffening was added; this stiffening was not given to Glorious until 1918. The three sisters with their light construction, heavy guns and high speed were somewhat prone to damage and thereby dockyard visits and soon acquired nicknames such as HMS Outrageous, Uproarious, Curious and Spurious respectively The original role for which they had been conceived never materialized and Courageous served in 1917 with the 3rd Cruiser Squadron and was part of the convoy protection system to Scandinavia. She was converted to a minelayer, but was never used in that guise. In November 1917 she partook in the second Battle of Heligoland Bight with HMS Renown and HMS Glorious. After the war she was without a clearly defined role-but that long hull was not to be wasted - Courageous and hers sisters were converted to aircraft carriers. Within three weeks of the outbreak of WW2, HMS Courageous had the misfortune
to be the first British warship to be lost, torpedoed by U-29 on 17 September
1939 off the coast of Ireland with the loss of 518 of her crew.
|
||||||||||||||||||||||||||||||||||
| Model | ||||||||||||||||||||||||||||||||||
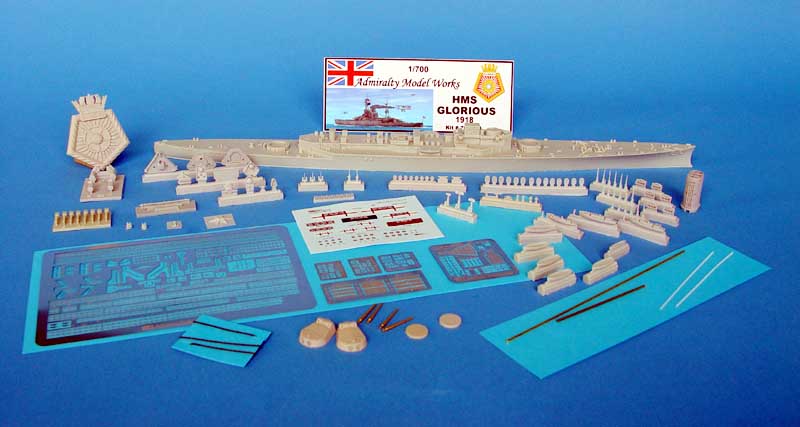
| One of the first kits to be released by new resin company
Admiralty Modelworks was HMS
Courageous in her battlecruiser guise; much anticipated and when it
arrived the box contents were indeed most pleasing.
The kit appears to be based on the Royal Navy 'as fitted' plans, and as such have much detail that is often not shown. The kit of HMS Courageous is depicted in her role as a minelayer; the quarterdeck being festooned with rails; however when the kit of HMS Glorious was released the temptation to have bi-planes on flying off platforms atop turrets proved too much to resist! - I became the proud owner of two kits of this class. |
||||||||||||||||||||||||||||||||||
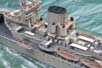
| The decision was made to build my newly acquired kit of HMS Glorious...however... I had far more good quality photos of HMS Courageous - I undertook to build HMS Courageous in 1918 fit using the Glorious kit, complete with torpedo tubes on the aft deck and flying-off platforms. | Click images
to enlarge |
|||||||||||||||||||||||||||||||||
 |
||||||||||||||||||||||||||||||||||
| Fortunately the two sister ships were virtually identical in the later fit with 'coffee-pot' searchlight towers so no problems appeared to stand in the way of my now definite plan. | ||||||||||||||||||||||||||||||||||
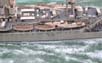
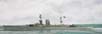
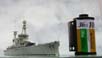
| I acquired a fine sepia real photo view of HMS Courageous (that I have not seen before) for a disproportionate sum (!) from an antique shop; despite being somewhat foxed and bit dirty. Once scanned at 800 dpi the image released a plethora of valuable information, which convinced me that this was the correct way to go! | 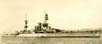 |
|||||||||||||||||||||||||||||||||
| Endless intensive examination of photos did prove that
there were a few minor differences, which I encountered and will describe
in the build notes below.
I must stress at the outset that the kit is of very high quality - and as the first kit to be released from a new company it deserves to be applauded both for choice of subject and execution of the kit. After an initial examination of the parts and instructions I set to sharpening up the hull casting and deck-fittings with a keen eye and blade, squaring off any soft corners and removing anything that I felt I could improve upon. The numerous mushroom vents had their slightly domed tops flattened off with a couple of swipes of a sanding stick; this had the secondary effect of sharpening up the transition of horizontal to vertical face of the vents. I drilled the hawse-pipes for the anchors fwd and created the missing starboard aft anchor hawse-pipe. I then removed some but not all the cast-on doors and replaced them with some of the PE doors supplied, alongside some WEM items where appropriate. HMS Courageous at the time I wished to portray her had all the deck railings on the first level covered full length with canvas dodgers. These were simulated in the usual manner of painting the railings, infilling with white glue and then painting the outside of the dodgers only - thereby permitting a slight contrast in colour twixt the dodger and rail. The railings and bulwarks on the fwd bridge faces and upper platforms were covered with splinter mattresses. These were made using the excellent PE items from WEM, however in an attempt to recreate the uneven appearance on the real ship I bent the strips in alternate direction and crinkled them before flattening again and in part separating them into individual pieces prior to gluing to the cast resin splinter shields. The PE parts had the illusion of thickness created using white glue
run along the top as individual beads.
|
||||||||||||||||||||||||||||||||||
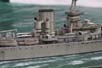
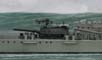
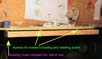
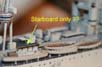
| Rather late in the build (!!) I noticed that the lower bridge winglets on HMS Glorious were, as far as I could ascertain from photos, never present on HMS Courageous; so I duly removed them from my 75% completed model; not without some trepidation and nervous moments!! |  |
|||||||||||||||||||||||||||||||||
|
One of the visual attractions of modeling the ship as in 1918 were the deflection scales painted on the turrets; some research showed the deflection scales on HMS Glorious to have finer graduations than those of Courageous....(an easy way of identifying some incorrectly captioned photos in some books) The scales were drawn on my PC in Serif DrawPlus 5.0 to be made as decals;
printed on my inkjet printer black onto white decal sheet. The compound
shape of the turret was measured and paper patterns made to check the fit.
Various sizes were printed to compensate for any minor mis-measurement.
|
 |
|||||||||||||||||||||||||||||||||
| The gun turrets had the kit-supplied fine brass barrels fitted and
the blastbags were made of white glue, repeated applications gave a satisfactory
look.
The finely cast funnel had the baffle plates within scraped down and the center horizontal band was added using thin wire. Once the funnel had been affixed the steam pipes that enter at the aft lower face were added and made of solder wire. The 'coffee-pot' searchlight towers had the wind deflectors on the upper platform edges added by wrapping thin wire around the upper perimeter, backfilling the gap with CA and then retrospectively paring away the inside face of the resin to simulate the rolled inner edge. (This was also done to the upper foremast platforms) |
 |
|||||||||||||||||||||||||||||||||
| The distinctive spotting top was cast as a solid piece
with windows well defined.
I however really like the idea of the 'partial-see thru' look so I ground off the top of the casting - the size was good and gussets were well rendered- (no need to re-invent the wheel...). New windows proved to be a trickier proposition than thought at first... (The NO think BEFORE you cut syndrome!) The spacing of the window bars did not equate to any PE ladder stock that had appropriate spacing... Faced with this unexpected conundrum and a digital vernier calliper I started measuring every aspect of almost every piece of PE new or old I owned... The solution that presented itself after some considerable time was satisfactory... I used WEM RMS Queen Elizabeth 1/600 Stairway, with the handrails and one side member removed it scaled (almost) perfectly. With the added bonus of the removed side rail giving a suitably thin roof made of paper - to the spotting top. I had previously installed a brass rod extension to the spotting top and drilled an appropriate sized receiving hole in the upper range-finder platform. |
 |
|||||||||||||||||||||||||||||||||
 |
||||||||||||||||||||||||||||||||||
|
Tripod mast construction; - the instructions make this easy by giving exact dimensions to which to cut the supplied metal rod - I however chose to make it more difficult ... as I prefer to drill the hull through all the way and have the tripod legs penetrate the hull fully to make the masts rigid and knock-proof. The mainmast aft by 1918 had an additional searchlight platform fitted,
I made the splinter shield of brass PE fret scrap strip and
the rolled wind deflectors were created using thin wires with the supporting
gussets made of paper triangles.
|
 |
|||||||||||||||||||||||||||||||||
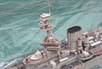
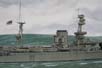
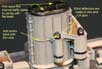
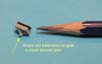
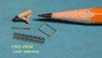
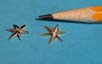
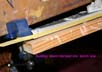
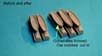
| The starfish supplied in the kit was made of resin; despite careful painting and scraping away the underside I was unable to achieve my desired degree of sharpness. I made a new platform of paper infused with CA, upon which I places cut triangular slivers of brass. | 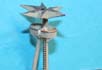 |
|||||||||||||||||||||||||||||||||
 |
||||||||||||||||||||||||||||||||||
|
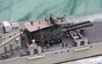
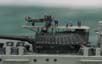
The initial attraction of this ship was the presence of aircraft and platform atop the main gun turrets. All but one photo showed the fwd turret to usually devoid of an aircraft - although the platform was installed throughout, the runway platform along the barrels was rarely present on Courageous - more often on Glorious. These platforms were supplied with the kit and were well rendered -
however the supporting structures - though correct in outline were in my
view to clunky - so I made some finer replicas of brass wire and stretched
sprue.
|
 |
|||||||||||||||||||||||||||||||||
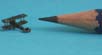
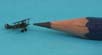
| The aircraft was made of a neat resin fuselage and nicely rendered
PE wings. The relief-etched ribbing of course in 'true' scale would not
really be visible; however my past experiments of 1/700 aircraft with paper
wings appeared 'too flat'.
I gave a tiny bit of curvature to the wings by heating the metal wings and then rolling a tube across the wing athwart - ships on a soft pad of paper - again over-scale - but removes the flatness. The supplied PE inter-wing bracing for my liking was over-scale and
I chose to make my own. I used some very fine handrail in a rectangle -
this was then pulled into a trapezoid shape and the upper connecting part
removed. Once affixed to lower wing the upper wing was secured with a tack
of matte varnish followed up by runny CA.
|
 |
|||||||||||||||||||||||||||||||||
|
The finished assembly was painted and 'detailed' (!) according to some useful online resources. The twin Lewis upper wing mounted machine guns were made of GMM Goldplus handrails and a drop of white glue each. Rigged with stretched sprue and the kit supplied decals installed it was a model in its own right. |
 |
|||||||||||||||||||||||||||||||||
 |
||||||||||||||||||||||||||||||||||
|
The huge athwartships mounted torpedo tubes on the aft deck would have impeded crew transition aft. I was briefly puzzled - but really close examination of small, poor quality photos showed the tubes to be fitted with steps/ladders (without rails!) and a small gangway platform across. This would appear to have been pretty hazardous in a seaway - but I guess in a seaway the quarterdeck would have awash in any case!! The torpedo tubes had the doors added and the hull was fitted with bracing
strips below the tube exits.
|
 |
|||||||||||||||||||||||||||||||||
| The ships name had been cast on quite neatly - but as I had swapped
ships/kits I scraped these off and later made some decals for the name.
I again drew this in Serif 5.0 and experimented with a variety of different
fonts and sizes. Having narrowed down the font to the chosen type I nevertheless
printed a selection of differing sizes, the final decision being made by
what looked right according to photos.
|
 |
|||||||||||||||||||||||||||||||||
| One of the main problems of a long thin model ship such
as this is simply handling the model during construction where access to
the undercuts is still desired prior to mounting on the final base.
I solved this by affixing the model to a long thing piece of wood, screwed through the turret barbettes with spacers underneath so as to paint the waterline cleanly. The model was often mounted in a small bench vice so as to leave both hands free to work on the model. |
 |
|||||||||||||||||||||||||||||||||
 |
||||||||||||||||||||||||||||||||||
| Once the model was ready for mounting on its usual base of a stainless
steel plate; a guarantee against possible later deformation of the hull
by resin warpage. I decided to lightly indicate the plating runs.
As these were subtle and sometimes hard to see on photos of the real ship, any idea of plating strips applied to the model were discarded. I elected to draw these in using a pencil along previously applied masking tape guidelines. Once drawn, they were lightly smudged and washed over to loose the line intensity. |
 |
|||||||||||||||||||||||||||||||||
| Very late in the build I observed another small issue with the aft
mast that I could not leave uncorrected...
I deduced from photos that the structure was added in late 1917 early 1918 - but not to HMS Glorious. |
 |
|||||||||||||||||||||||||||||||||
| The ships boats were a veritable highlight of the kit; finely rendered
models in their own right. Nevertheless there was room for improvement.
I pared the gunwale thickness and added the oar notches as well as the timber rubbing strakes, launches and gigs were furnished with rudders and tillers and rooftop handrails. |
 |
|||||||||||||||||||||||||||||||||
| The Boat cradles were made using WEM PE parts - but cut down lower
so as to give a more correct 'ride height'.
Some photos of the starboard aft area of the ship show a strange pierced gusset bracketed structure inboard of the boats - I was unable to ascertain the function of this or indeed detect any evidence on the port side or at all on images of HMS Glorious. |
 |
|||||||||||||||||||||||||||||||||
| The model was painted using Humbrol 28 with the decks being
Humbrol 27.
Corticene-covered decks were painted using WEM Colourcoats Corticene. All of these received extensive washes in both enamel as well as watercolour. Many minute details were added, most of which have now receded in my memory and are barely visible individually - but do add to the collective whole. Not having a wooden deck it is a very 'grey' ship; so to detract from the overall 'dullness ' of appearance I spent a lot of time adding small details to break up the flat planes. The well depicted bracing strips on the deck for and aft benefited from washing and helped relieve the monotony of horizontal greyness! Anchor cable check chains, hatches, cable reels with covers, additional vents, boat boom supports and operating tripods with bracing struts. Porthole eyebrows were implied by pencil lines, pipe work was added on bridge and platforms, boat tie-downs and placement of the crew in feasible groups of activity helped bring about an air of bustle on this long thin projectile of a ship. |
||||||||||||||||||||||||||||||||||
| In particular the semaphore posts, of which there were four, received
particular attention, as they are often - in my view - wrongly depicted
in some PE sets with the arms extended at 45 degrees.
I made my own - in two sizes, with a disproportionate amount of effort! |
 |
|||||||||||||||||||||||||||||||||
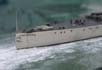
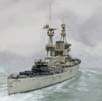
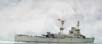
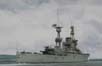
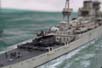
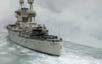
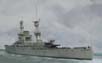
| Completed Ship | ||||||||||||||||||||||||||||||||||
In the main the model was built according to the excellent instructions using most of the kit parts. The photo-etched fret is not the thinnest; and I used perhaps only a third of the PE parts supplied. The inclusion of the PE wings was a great bonus. Railings as ever were sourced from the GMM Gold Plus Superfine. |
||||||||||||||||||||||||||||||||||
|
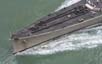
The model was set upon a smooth sea with barely a ripple on the surface, leaving the safe anchorage of Rosyth and working up speed down the Firth of Forth... using my usual artists watercolour paper method of watercolour paper described here.... and painted using enamels and watercolours as described here: The ship was rigged entirely in stretched sprue with a mix of black
for standing rigging and light tan for running rigging as described
here.
|
 |
|||||||||||||||||||||||||||||||||
| In conclusion... | ||||||||||||||||||||||||||||||||||
|
An excellent kit of a magnificent class of ships as built. Any shortcomings in the finesse of the PE can be attributed in the main to my finicky nature! I am sure future releases will set ever-finer standards. I can see myself
having HMS Courageous minelayer fever in the future....
|
 |
|||||||||||||||||||||||||||||||||
| Bibliography: | ||||||||||||||||||||||||||||||||||
|
||||||||||||||||||||||||||||||||||
More
of Jim Baumann's work.
Updated 2009

© ModelWarships.com