|
| page 1 of 5 |
|
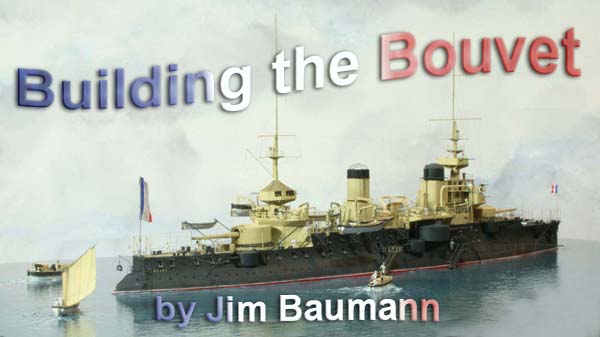
Bouvet was the ultimate development of a five ship class of half-sisters comprising Jaureguiberry, Carnot, Massena and Charles- Martel . Notable features were her extreme tumblehome, high freeboard and face-hardened armour, making her one of the best-protected ships of her time. Bouvet was laid down January 1893, launched April 1896and completed in June 1898. After a brief commission in the northern fleet she served the majority of her on the whole uneventful peacetime career in the Mediterranean fleet. 1901-1902 Admiral Gervais raised his flag in Bouvet . In 1903 Gaulois collided with her port aft with only light plating damage 1906 12-17 April she accompanied Iena and Gaulois to Naples to distribute 9000 rations to the people suffering after the Vesuvius eruption. 1907 Bouvet was put into the division reserve and in the company of Charles Martel and Hoche, during which she flew the flag of Admiral Marin Darbel. 1907 Minor refit during which the fwd bridge layout was changed with the pilothouse moving to ahead of the fwd funnel 1911, she went returned North to Brest 1912 exercised off the coast of Brittany, returned to Mers el Kebir16 October and back to Toulon on November 6. Stationed at Villefranche 29th Nov-3 Dec. 1913 returned to Cherbourg for further refitting and maintenance work and then returned to Toulon. In the first World War Bouvet was sent to the Dardanelles in 1915 as part of an Anglo-French naval force which was tasked with forcing the Dardanelle straits by subduing the Turkish forts with the aim of taking Constantinople. On 18 March the Bouvet was hit by eight shells fired by Turkish artillery within the forts, all of which struck above the waterline, of which one put her fore-turret out of action. She retired from the engagement and sailed into an undetected enemy
minefield and struck a mine that exploded below the starboard mid-ships
10.8 in turret that caused the capsizing of Bouvet. At the point
of impact with the mine she was steaming at speed and this contributed
to her loss in less than 2 minutes. 660 of her crew perished with
the ship. Her loss was a major contributory factor to abandonment of the
naval thrust, which was replaced by the Gallipoli land campaign
.
|
||||||||||||||||||||||||||||||||||
| The Bouvet kit in-the-box I reviewed here at ModelWarships.com. |  |
|||||||||||||||||||||||||||||||||
| BUILDING A MODEL OF BOUVET | ||||||||||||||||||||||||||||||||||
| Much of the 6-month construction time was taken by endlessly staring
at enlarged high-resolution images of the vessel to glean small details
such as vents, hatches and other minutia that does not appear on the digitally
downloaded French Archive plans.
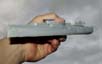
The splendid Luc Feron Monograph and plans of the ship part-aided me in my quest, although these also are not without pit-falls. The kit starting point looked very good and it would have been a speedy build, had I not chosen to make life considerably harder for myself. I envisaged my Bouvet model lying to a mooring buoy, booms and boats out, set in the Mediterranean in her black and yellow scheme with all her hatches open, the latter wish which was to consume a considerable amount of the building time. It was to be a long journey from here.... The YS casting is ' waterline'-- but only a near waterline.... |
 |
|||||||||||||||||||||||||||||||||
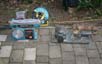
| After checking and measuring from the Plans from the French archives
and after viewing a number of photos--I applied some clear tape to the
hull and visually checked the tape line for fairness by sighting along
and viewing the hull with tape in a mirror; once satisfied I drew a pencil
along that tape line
The sanding of the waste material below the line ' could have been done by hand--but I prefer machines! A more detailed account of how this is done can be seen here: |
 |
|||||||||||||||||||||||||||||||||
| I decided to portray her in her prime in 1899 (according to the Marius
Bar photos of this fit) at her mooring buoy in Mediterranean fleet colours;
Black and yellow. This " yellow" was referred to by some of my French
warship colleagues as a rather sad wishy-washy pale yellow - not
the vibrant dark yellow that the box lid might lead one to believe....
I have settled on HUMBROL 103; a warm linen tone--which most closely equates-in my eyes to some contemporary illustrations and modern models of the ships of that era. With the hull bottom perfectly fair I drilled the Main gun barbettes for eventual screwing down of the model to her eventual base. Meanwhile I screwed some self-tapping screws into the underside of the hull so that I could attach my spring clamp for easy handling at the early stages of the build. |
 |
|||||||||||||||||||||||||||||||||
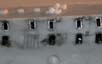
| OPEN HATCHES IN THE HULL | ||||||||||||||||||||||||||||||||||
| With a solid hull, retrospectively creating 60 plus perfectly rectangular
apertures is rather difficult. I experimented on some scrap resin and found
that the cutting the apertures leaving REALLY sharp resin edges was rather
beyond my skill-set.
I devised an alternative method of drilling deep holes, cleaning up the edges with a micro-chisel and Stanley blades and blowing out the resultant swarf and debris with the airbrush. |
 |
|||||||||||||||||||||||||||||||||
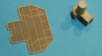
| I made and inserted a PE 'frame' to give the desired sharp
edges, these were cut from the L'Arsenal Liberty ship 1/350 PE set; from
a specific part of the handrails.
These were cut into small squares--wasteful--but effective.... |
 |
|||||||||||||||||||||||||||||||||
 |
||||||||||||||||||||||||||||||||||
| These were installed with CA glue, pre-bent for the areas
where the hull curves, with the edges filled with fine grain automotive
knifing-putty filler.
When fully dry I the pared away the excess with a blade, checking the results with a guide coat of thin black paint to ensure fairness and a good fit. |
 |
|||||||||||||||||||||||||||||||||
 |
||||||||||||||||||||||||||||||||||
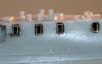
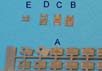
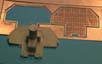
| I purchased an extra' PE fret available from YS
Masterpieces featuring the hatches used for making the master hull.
These PE hatches had to be cut in half--top and bottom halves-and applied to the apertures...An irksome task which I carried out later in the build sequence to prevent the delicate hatches on their small glue joins being knocked off during initial handling by me. A long time was spent cutting to size and attaching the two part hatches. |
||||||||||||||||||||||||||||||||||
|
A This PE fret is available to separate order from YS masterpieces. B On my fret however the relief etch hatches appeared to be slightly 'out of register'. C The hatch was then trimmed symmetrical with scissors D The hatch then had the porthole drilled lightly oversize, after(brush) painting the diameter of the hole will reduce slightly and once installed the 'glass' can be added using Krystal Klear. E The hatch was then cut in half, retaining only the upper half. As the inside of the hatches was white I made the lower hatch pieces of easily square-cut white paper. |
 |
|||||||||||||||||||||||||||||||||
| The two- part hatches had the upper lid supported by a
type of internal wedge mechanism as far as I have been able to glean from
photos.
The lower lids with their white painted inside faces had supporting
chains which are clearly visible in many photos...
I made these using white plastic stretched sprue, attached at the inner face of the white hatch lining with Poly liquid cement. These were tacked onto the lower lids with more liquid poly cement and
the excess removed.
|
 |
|||||||||||||||||||||||||||||||||
 |
||||||||||||||||||||||||||||||||||
 |
||||||||||||||||||||||||||||||||||
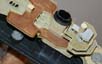
| FUNNELS | ||||||||||||||||||||||||||||||||||
| Resin funnels, by limitations of the technology employed
are always cast solid.
I dislike seeing this weakness on many otherwise well-built models.and as such take great pains to open up the funnels as far as possible using an electric mini-drill and really sharp cutting tools. I use original Dremel parts as they seem to hold their edge longest, but they are also correspondingly expensive!! The dust created is considerabledo wear a mask. |
 |
|||||||||||||||||||||||||||||||||
 |
||||||||||||||||||||||||||||||||||
 |
||||||||||||||||||||||||||||||||||
 |
||||||||||||||||||||||||||||||||||
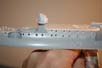
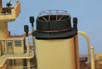
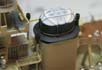
| The funnel cap was made of copper wire for the athwartship bows and stretched sprue for the fore and aft members tricky--as the adhesive surface is very small. |  |
|||||||||||||||||||||||||||||||||
| The fore funnel, when the ship was at anchor as seen in
many period photographs, was often covered with a shaped canvas cover.
The fwd funnel still needed its funnel cage atop. The trick now was to replicate the previous cap; one-offs are easy, repetition is harder.... I added this detail using my usual canvas technology of white glue. After the framework had been given a light coat of thinned matt varnish with a very soft fine brush to bind the copper and sprue together, it was time to add the 'canvas'... Using a water-colourists 'rigger' brush I filled in the segments one at a time, proceeding symmetrically from port to starboard in case of any unwanted distortion occurring, until the entire structure had been spanned with white glue. Two coats were required. |
 |
|||||||||||||||||||||||||||||||||
 |
||||||||||||||||||||||||||||||||||
 |
||||||||||||||||||||||||||||||||||
 |
||||||||||||||||||||||||||||||||||
| The kit supplies the upper handrails on the funnel erroneously as a
platform in PE. The plans would indeed lead one to believe that--alas the
photos say otherwise.
Making a perfect oval in copper wire... was actually surprisingly difficult! The stand offs for these were made of stretched sprue later. |
 |
|||||||||||||||||||||||||||||||||
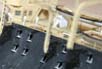
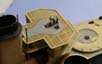
| MIDSHIPS 100 mm GUN DECK | ||||||||||||||||||||||||||||||||||
| The midships Q/F gun deck as in the kit and the plans
was planked. However according to photos this was covered in Lino
. I took the kit part--and pared away the planks with a sharp Stanley blade
until flat.
This deck was extended and adjusted so as to make the walkways fwd where the C-shaped boat crane when being lowered arced througha hinged removable piece of deck was present when to crane was in its upright stowed position. This detail was portrayed on the port side of the model where the deck section can be seen hinged upwards during the boat crane evolutions. The waterway, stanchion bases and this deck edge on the real ship were perfectly flushso once the rails had been installed a lot of time was spent fairing, filling and scraping perfectly flat. The C-shaped crane on the real ship was a metal construction with pierced girders on the inside face only- I represented these apertures using black decal strip painted over at regular intervals. |
 |
|||||||||||||||||||||||||||||||||
 |
||||||||||||||||||||||||||||||||||
 |
||||||||||||||||||||||||||||||||||
 |
||||||||||||||||||||||||||||||||||
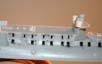
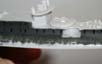
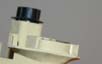
| THE BRIDGE | ||||||||||||||||||||||||||||||||||
| The aforementioned ' extra fret from YS masterpieces...contained
a rather nice piece of PE bridge deck--the same one used that for making
the master resin casting. I rather liked the idea of having the bridge
grating penetrated with real holes;
so cut away the (perfectly cast) resin bridge deck from the back of the pilot house. |
|
|||||||||||||||||||||||||||||||||
 |
||||||||||||||||||||||||||||||||||
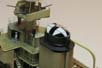
| The open backed pilothouse on the foremast bridge was supplied
as a PE part. No fold lines were etched; requiring some careful alignment
prior to bending. I was aware that once the fwd wall and roof were in place--little
if anything would be 'clearly visible' but I was conscious of the need
of having something visible from all angles.
So after consulting the plans I added the compass, wheel and engine room telegraph, as well as the chart table (attached to the wall of the bridge front face) The floor was also made 'solid' in the areas of the structures by infilling the grating with white glue and paint. The pilothouse was added and photo etch railings were applied laboriously around some of the convoluted shapes, ensuring there was always a stanchion in a corner where verifiable from photos. Beading of copper wire was added to the gun shields and around the upper
edges of the cabins atop the fwd and aft superstructure-as well as around
the outer edges of the pilothouse
|
 |
|||||||||||||||||||||||||||||||||
 |
||||||||||||||||||||||||||||||||||
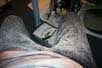
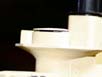
| The conning tower below required its roof removing from
the cast upper bridge deck section.
The window frame divisions were simulated by cutting up some superfine 1/700 handrail, forming this into the oval shape, gluing and the conning tower roof dropped on with matt varnish. |
 |
|||||||||||||||||||||||||||||||||
 |
||||||||||||||||||||||||||||||||||
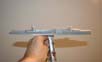
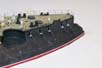
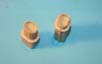
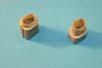
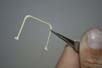
| The davits had the smaller apertures that were cast solid drilled and opened out; the insides shaded dark grey prior to painting yellow. | 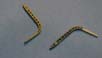 |
|||||||||||||||||||||||||||||||||
| page 1 of 5 |
More
of Jim Baumann's work.
Updated 2010

© ModelWarships.com