The Second World War has no shortage
of dramatic episodes. There are thousands of stories to be explored
so that we might learn of the sacrifices, courage, hardship, and despair
experienced by those who took up the supreme crusade. Few stories
however can match the drama of the German battleship Bismarcks short-lived
career.
In the Reference section below
I have listed a few of the many books that will provide the full story.
Suffice it to say that the Bismarcks story contains all the elements of
an unforgettable war story: a fierce and shocking engagement with
Englands most famous warship- HMS Hood, a desperate sea chase, obsolete
torpedo bombers crippling the state-of-the-art Bismarck, and a final savage
ending surrounded by controversy.
The part that I always think about is
that final night on Bismarck: with her rudder jammed steaming in a circle,
no hope in sight-the might of the Royal Navy steaming furiously towards
the Bismarck for an engagement early next morning-every man aboard the
German ship was left with a dark night to realize that they would probably
not live to see land again. It does not get much more dramatic and
more contemplative than that
Aoshimas 1/700 line of kits are nice
enough out of the box. In the small scale of 1/700 however, many
details understandably must be molded too thick and lack any richness.
To make the kit come alive, a photo etched brass detail set is essential.
I usually use Gold Medal Models sets but for this kit I decided to give
Toms Modelworks brass a try. I used their 1/700
Bismarck/ Tirpitz set and was pleased with their quality.
I have read of inaccuracies with the Bismarck kit but in this
scale, I did not want to concern myself too much with questions of placement,
set-up, or absolute correctness. Also, with this subject, there is
endless debate as to painting schemes, the most prevalent being the question
of what color the tops of the main gun turrets were. Certain accounts
mark the color as a mustard yellow type. Others state it was no different
than the main grey color. My thinking is this: the Bismarck
had a very short operational life with a select number of photographs existing.
Also, there was not that many survivors and few of them left detailed accounts.
Therefore, for this particular ship in 1/700 scale, I can live with some
inaccuracies while striving to make a decent presentation of the Bismarck.
When I tackle the 1/400 Heller
Bismarck, I can be more attentive to detail!
Overall, parts fit was very good. I believe this kit has been in production for quite a while so there was a bit of flash to clean up on some of the smaller parts, especially the secondary and anti-aircraft armament. The main hull and deck is one piece and is nicely done. I separate construction into various sub-assemblies, which is generally the way the instructions dictate. I also kept an eye on the photo etched brass instructions, which helpfully indicate which kit parts to replace.
The main stack is much improved by adding 2 brass crane pieces, vents, and a stack grill. I used my trusty Dremel to drill out the solidly molded stack. Care must be taken here so you do not penetrate through the stack itself. I carefully cut the grill from the brass sheet with an Exacto blade on a piece of hardwood. Green Zap CA glue was used for attaching these brass details.
This sub-assembly went together very well. I cut off the bridge wings, sanded the edges down, and replaced these wings with very nicely done brass pieces. A separate platform with railings completes each bridge wing (2 pieces per wing). The result looks much better than the solidly molded kit pieces. I also replaced the plastic kit radars with brass pieces. These must be carefully folded with a pointy tweezers and are attached to the directors. Another nice touch to add is the aircraft hangar doors. The kit simply has a flat edge. The brass doors provide a nice relief and are easily affixed with CA glue. There is also a large rear aircraft door to attach. Brass railings were cut to shape and attached to the completed superstructure. I replaced the plastic aircraft catapult with the finely detailed brass catapult provided with the Toms Modelworks set as well.
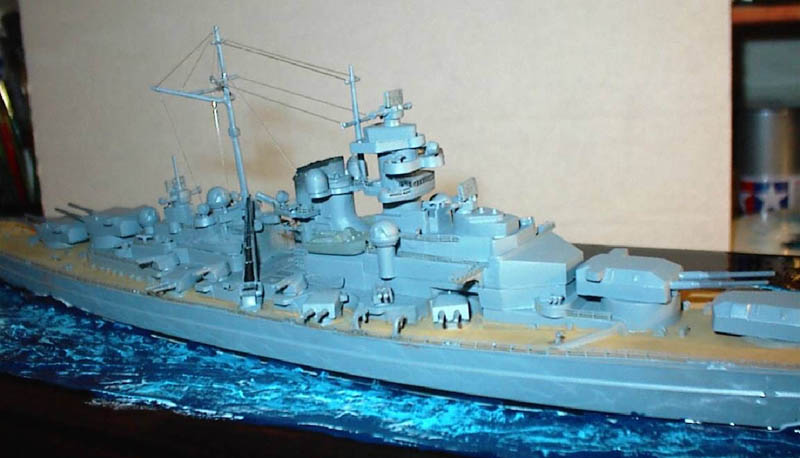
After the main sub-assemblies were completed,
I arranged them in place as you can see in the photo on the right.
I hope you can make out most of the brass details added:
Since the Bismarcks operational
life lasted less than a month and because the German High Command tried
very hard to keep the existence and launching of the ship a secret, there
were only a limited number of black and white photos taken of the ship.
Many of you may be familiar with the black & white camo stripe pattern
that the Bismarck is usually portrayed with on model kit box art and other
paintings. However, it is known that just before the ship sailed
on her fatal mission, these black/ white stripes were painted over to match
the overall grey of the ship.
The Bismarck also was painted a darker
grey on the fore and aft portions of the hull. There was also a cleverly
placed fake bow and stern wave painted onto the ship. This pattern
was an attempt to confuse an enemy observer at long ranges into believing
the ship was moving at a different rate of speed than she actually was.
One must remember that the Bismarcks main reason for being was to prey
on enemy merchant shipping without having to flee at the first sign of
British warships. The intricacies and development of naval ship camouflage
are endless-see the Reference section for an excellent website with information
on the history of this topic.
The basic colors as far as my
knowledge goes needed to paint the Bismarck at the time of her fatal mission
are a dark grey (for the forward and rear hull areas and for the main gun
barrels), Camouflage Grey (for the fake bow and stern waves), a teak or
wood color for the decks which will be accented with pastel chalks, black
(for funnel cap), and a basic grey for the majority of the hull, upperworks,
etc. I wanted to try the Tamiya Acrylic Spray color Haze Grey after
sampling it on a piece of cardboard. This color will be wonderful
on modern US warships as well but it seemed to give me a good basic color
for Bismarck.
After all the sub-assemblies were
glued in place and all railings were installed, I sprayed the entire ship
with the Tamiya Spray Haze Grey (TS-32 in Tamiyas lexicon.) Make
sure you keep your distance here-you dont want the paint to gob up on
the fine brass parts especially the railings. Some sections may fill
anyway but a sharp Exacto blade will clear it up. After drying, I
then used Testors Gunship Grey for the bow and stern sections and Testors
Camouflage Grey for the bow and stern waves. The most tedious and
time-consuming portion of the painting process is the teakwood deck.
There is no easy way around this-it takes patience and loads of touching
up. I used Testors Wood and mixed in a little bit of flat yellow.
I thinned the mixture using Testors thinner and started in using a variety
of brushes. Mistakes will be inevitable especially around the deck
fixtures, which should remain the initial grey color. When the decks
were completed and touched-up, I used a mixture of light, earthy colored
pastel chalks to lighten and provide some texture to the decks.
I used a heavy black wash mixture to fill in the hollowed out
funnel and then painted the top of the stack and grill flat black.
Anchor chains were painted a darker grey and then the fore section was
roughed up with pastel chalk to simulate wear and tear.
The only decals provided in the
kit were one flag for the stern pole and a large swastika to cover the
bow section just before the teak deck begins. I used the stern flag
but could not place the large swastika on the bow. I believe that
Robert Ballard in his discovery of the wreck of the Bismarck found evidence
that the ship did wear this large swastika on a red background. Regardless
of accuracy, I could not have that evil symbol staining my display case-I
decided to leave it off
In terms of ease of construction, the Aoshima Bismarck is a good kit. The Toms Modelworks photo etched brass set adds a wealth of detail to the kit. I am happy with the results and can recommend the kit to any ship modeler. I cannot compare it to the other plastic 1/700 kit made by Matchbox as I have yet to come across that kit.
The Bismarck Chase: New Light On A Famous Engagement, by Robert J. Winklareth, Naval Institute Press, 1998, ISBN 1-55750-183-1.
Janes Battleships of the 20th Century, by Bernard Ireland, HarperCollins, 1996. ISBN 000470-997-7.
Pursuit! By Ludovic Kennedy. Kennedy was a British seaman on a destroyer accompanying the British battleships chasing the Bismarck. This is a fantastic overview of the saga.
Battleship Bismarck by Baron von-Mullenheim Rechberg. This gentleman was one of the few survivors and was a gunnery officer on Bismarck. An incredible account. I believe the Naval Institute Press still carries this title in print.
