USS Fletcher and O'Bannon
in 1/700 Scale
By Lester Abbey
| Tamiya Fletcher - Modeling Notes.
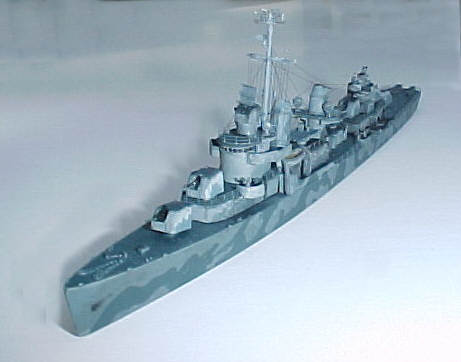
One source of enjoyment that I derive from modeling warships is researching the exact configuration of a warship at a historically significant time and modifying a model to accurately represent this configuration. This model of the Fletcher represents it as it appeared on November 13th 1942 at the Battle of Guadalcanal. |
|
| Another source of interest is to modify parts that for reasons of the plastic molding process are either too thick for 1/700 or not able to be represented at all. | |
| The Tamiya Fletcher Kit is accurate in terms of shape and dimensions. It is as the ship was commissioned in June 1942. Unlike other Tamiya ship kits there is a lack of surface detail that lends itself very well to detailing by adding aftermarket Photoetch parts such as doors, ladders and railings. For an "In the Box" Review of the Tamiya kit click the box top image on the right | Click images
to enlarge |
| Weapons:
The plastic 20 mm guns with the kit are too large so I had to substitute PhotoEtch 20 mm cannon. I used Corsair Armadas 20 mm set. They have PE Shields and barrels and Resin pedestals. This corrects the 2 D look of all the other 20 mm PE sets but they were fiddly and difficult to achieve a uniform height. |
|
| The Torpedo Tubes supplied with the kit can be enhanced by adding brass rods (.006" diameter) atop the outboard tubes. The forward tubes also had a training assembly on top which I scratchbuilt out of PE, brass rod and plastic scraps. | 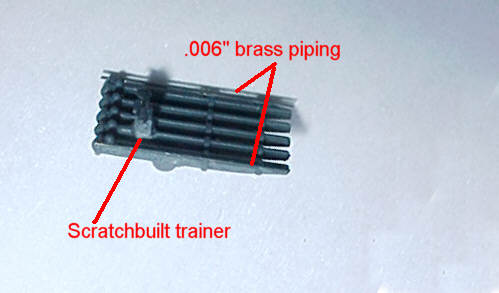 |
| For the 40 mm AA guns I used the WEM accessories and their PE set for sights and rails. The Resin guns had better shapes in the training mechanisms but the barrels were a little thick. (A fault of all plastic and resin guns) were improved by adding some railing behind the mount and some sights above the barrels. | 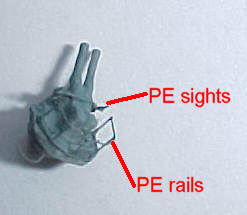 |
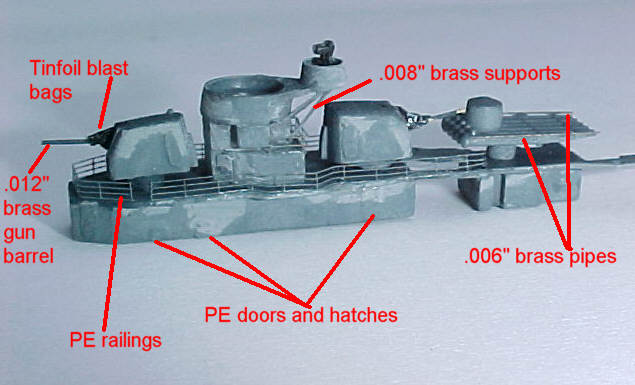
| The 5" mounts in the kit were too small so i used some from a Skywave weapons set. They were good but they looked even better with some photoetch doors and ladders. The plastic barrels were too thick so I substituted .012" brass rod and used a small bit of tinfoil as the blast bags. | 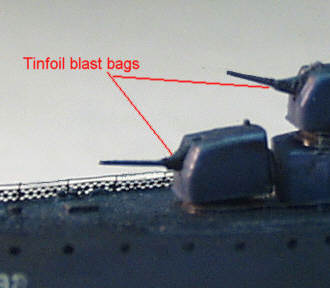 |
| The depth charge racks abaft the beam on the kit were terrible. I had to cut them off and sand down. On the Fletcher and OBannon they had the earlier style of stowing depth charges - there were no cages. I made the depth charges out of .035" rod and glued them together in groups of three. I also scratchbuilt the handling crane out of .006" brass wire. The shape shown is not quite correct - the bend on top should be more like 100 degrees rather than 180. | 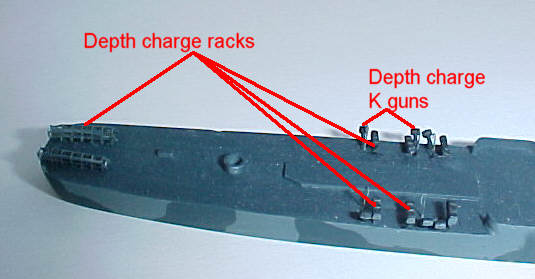 |
| Structures:
Adding detail to structures makes the model more interesting. By November 1942 the Fletcher had a cabin enlarged under the 40 mm gun tub and steel supports for the director tub forward of it. |
 |
| The ships bridge had doors and ladders added. | 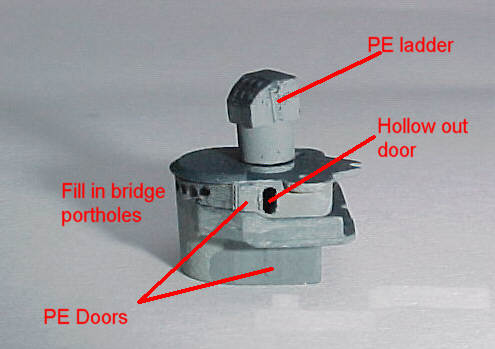 |
| The forward deckhouse also had pe doors and ladders added. I used the open door from the GMM 1/700 doors and hatches set and drilled and filed out a door. I also added some .006" brass for external pipes. | 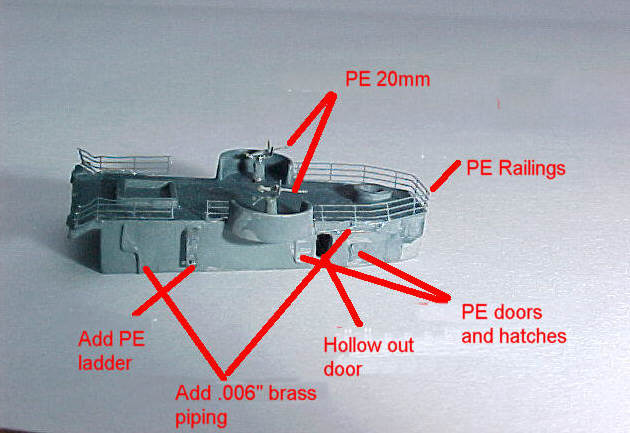 |
| The stacks and mast project from the model and need special attention. The stacks in the kit are very well proportioned but the steam pipes attached aft are a bit large and look better replaced by .12" brass rod bent to shape. The searchlight platform bulwarks were not present in November 1942 so they were sanded down. | 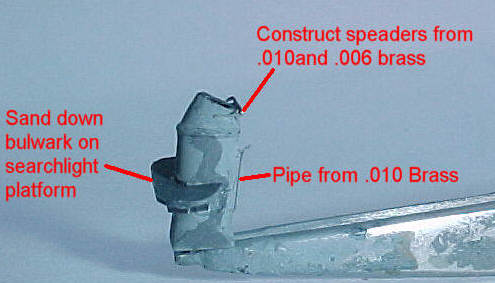 |
| The stacks were hollowed out and funnel grilles were added. There were spreaders atop the aft stack and these had to be scratchbuilt out of .010 and .006 rod | 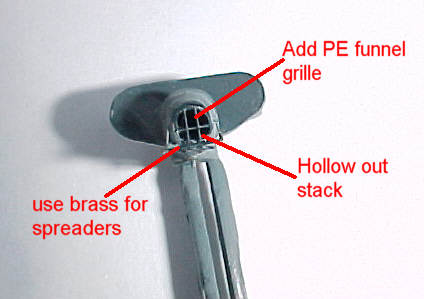 |
| Underneath the searchlight platform there were some prominent supports that also had to be built. | 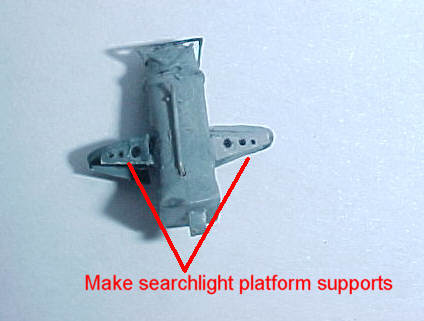 |
 |
|
| Finishing off
The sub assemblies were then put atop the painted hull and final assembly and painting commenced. I painted the Fletcher in the Measure 12 modified scheme that she was in on November 13th. The Fletcher had been out of the yard for 5 months and had seen much duty so she was heavily weathered. |
|
| I added rigging and some deck details such as hose reels and ammunition boxes to give her a wartime look. | |
| The OBannon
The OBannon was a close sister of the Fletcher and at the time of the battle varied very little from the Fletcher except for the paint scheme. I made up some minor differences in the placement of hose reels, life rafts and put a canvas cover over the rails around the searchlight platform. |
|
| I was unable to locate any pictures of the OBannons starboard side when she was wearing Measure 12 Modified. The port side is well documented but the only thing that I can be sure of is that the starboard side is NOT like the port side. I was very successful in implementing this. | |
| Extra things that in retrospect I wished
that Id done.
The Fletcher project was done for a competition and there were time constraints. There were an number of things that I left out - either because of lack of time or because my skill level wasn't up to it. |
|
| 1. Ammo Boxes for the 20 mm guns., There are six
of these - located behind the gun tubs. I put them on the OBannon but
not the Fletcher.
2. Walkways. Dunagin Decals makes a set of decals to simulate walkways on Fletcher class DDs. They are very fine and the decal paper very thin. Their very excellence defeated me - I destroyed most of them while trying to apply them. I think that with practice I could get them to work and they would add greatly to the look and accuracy. 3. Door in front of Bridge. I don't see how I could have missed it but I did. It is clearly shown in a number of pictures. Right behind Mount 52. 4. Mushroom vents near forward TTs. A picture taken in 1942 shows these fairly clearly. Theyre located abreast the tips of the tubes and on the port side. They are about 2 ft high and about the same diameter. They will help break up the otherwise undetailed deck. 5. Ladder to Bridge next to Mast. Its hard to see in pictures and hard to get at in the model but it's there! And it can be done with patience. 6. Floater Nets. A picture of the Fletcher two weeks after the battle shows floater nets attached to the searchlight platform on the aft stack. I would assume that these were there during the battle. I would also assume that there were other floater nets located abreast turret 54. I use 5 bar railing from the GMM merchant set for these. I just furl them longitudinally around a 1 mm drill bit. |
|
| I very much enjoyed this project and I hope those reading
enjoy the result. In time I hope to make accurate models of all the ships
that participated in that famous battle.
Lester Abbey |
|
| Links and references: | |

© ModelWarships.com