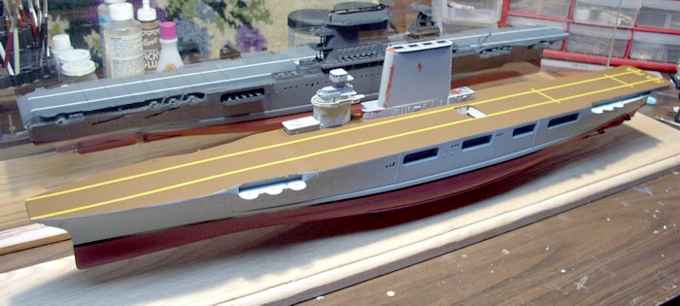
Yellow Wings, Silver Planes and Mahogany Decks
Building a Pre-War USS Saratoga (CV-3) from
Trumpeter's 1942 Lexington (CV-2)
by Martin J. Quinn
Operational History
Laid down as part
of six Lexington-class battle cruisers, Saratoga and her
sister Lexington were converted to aircraft carriers as a result
of the Washington Naval Treaty. The other planned battle
cruisers - Constellation, Ranger,
Constitution and
United
States - were scrapped incomplete on the building ways. Large
(they were the largest ships in the world for sometime) and fast, the two
carriers became the test bed and proving ground for US Naval Aviation in
the 1930s.
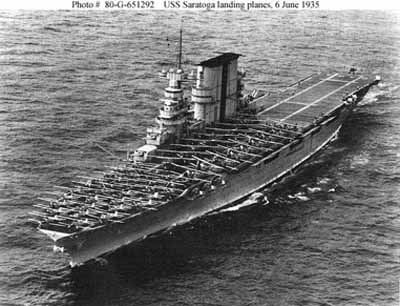
Saratoga
performed solid service during the war - she just missed the Battle of
Midway and participated in the Battle of the Eastern Solomons - but her
record was diminished in some eyes by being torpedoed twice in 1942 and
being severely damaged by kamikazes off Iwo Jima in February, 1945.
Saratoga ended World War II as a training carrier, then met her
demise as a target during the post-war atomic bomb tests at Bikini Atoll,
where she sank after one such test in 1946. Today, she's a
popular diving attraction for visitors to the atoll.
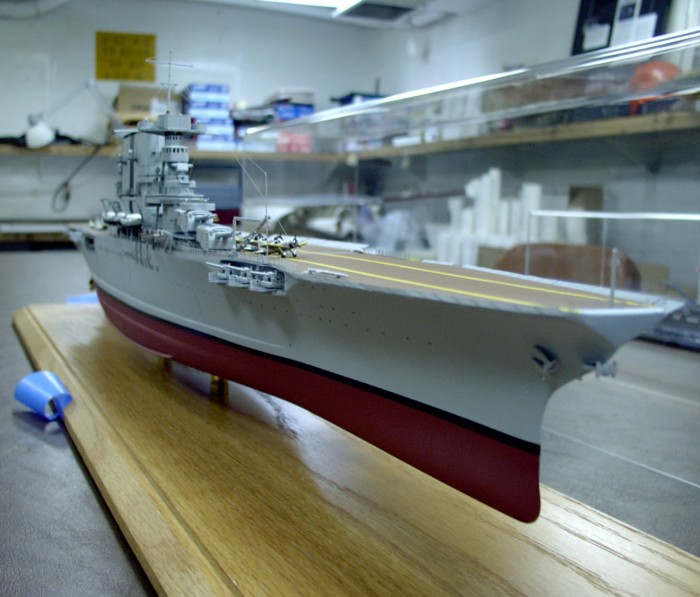
Building a pre-war USS Saratoga
When Trumpeters
1/350 Lexington was released, there was a mix of joy and disdain
in the ship-modeling world. Joy from most that an injection-molded
kit of one of the must have ships was finally released in
1/350th scale, yet disdain from some that the kit was released
in her May 1942 appearance. That meant no 8 inch gun mounts, no mahogany
flight deck, no yellow winged aircraft.
As a fan of the Lady Lex since I read
Queen of the Flat-tops as a kid, I was very happy to get my hands on
this kit, Coral Sea fit or not. I put the model at the
bottom of the 350th pile of kits, planning to build it down
the road. Then in late April 2005, I got an e-mail from fellow
ship-modeler Keith Bender. The Battleship New Jersey
Museum was looking for someone to build a pre-war version of Lexingtons
sister ship, the USS Saratoga would I be interested?
Keith gave me the Curators number, and after a few phone calls back and
forth (and Keiths recommendation), I was given a commission to build Sister
Sara for an upcoming exhibit on the Battleship New Jersey Museum.
The guidelines were that the model
must portray Saratoga circa 1939/1940, full hull, with a mahogany deck,
standard gray paint and yellow-winged planes including some biplanes.
The other guideline was that the model had to be delivered to the Battleship
by November 1, 2005. Hmm
its April. I had just gotten
laid off, so I had some free time on my hands. The model was due
November 1st. I can build a 350th scale carrier
in 6 months, right?
By this time, there were several on-line
builds and reviews of the Trumpeter Lexington kit, most of them
less than flattering. Yes, there was a 1/350 injection-molded
Lexington
kit available, BUT there were problems with it. Instead of
jumping right into my first commission and finding all sorts of problems
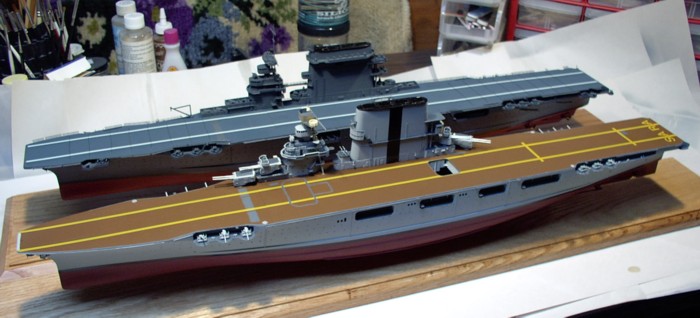
with the kit as I went along, I elected to build the Trumpeter kit as Lexington
at Coral Sea first, then build a second one as Saratoga.
I thought to myself, Im unemployed...I can build two 350th
scale carriers in 6 months
cant I? So, after picking up a
2nd Trumpeter Lexington from the good folks at Research in Scale,
I got to work on my two 350th scale carriers. (Note:
I tried to group each section of the build together, how I built the hull,
island, etc. In reality, I was all over the road during this
project, so while the build is grouped together by section, it's actually
not in chronological order. Not that it matters...just wanted to
mention it!)
I started this project by doing research
lots of research. I already had Classic
Warships Lexington-Class Carriers pictorial, as well as The
Lexington-Class Carriers, by Robert Stern (both of which are out of
print). I then borrowed John Frys book, USS Saratoga CV-3, The
story of a legendary carrier,
from a friend of mine. Additionally,
I picked up a set of plans the Floating Dry-dock advertised at the Lexington
1942. In actuality, they were more "Lexington Late-1941".
Then, I made the trip from Northern
New Jersey down to Keith Benders house in Delaware one weekend.
Keith had been kind enough to copy and reduce a set of plans for the as
built Lexington down to 1/350th scale for me.
He had also started a Lexington-to-Saratoga conversion of
his own, so I wanted to compare notes with him.
The trip was well worth it. Not only did I get to pick up copies
of the plans and some invaluable advice, but I got to see his collection
of amazing 1/350 scale models up close!
Research revealed several things.
First, that there was a dearth of clear photos, drawings or information
on the Lexingtons configuration during the final month she was
in service. Using the CW book, I was able to figure out where
the 1.1 inch, 20mm and .50 caliber AA guns were supposed to go, and
in what configuration. However, there was no clear documentation
on the final configuration on the Lexs bridge.
Much was written on various message boards about the Trumpeter bridge being
90% inaccurate. The problem was finding out what WAS accurate.
Based on my research (using secondary sources) and input from other builders
and modelers, I made the changes I felt were appropriate to my Lex
island but that (and the details of her build) are a story for a different
day.
Fortunately, there were plenty of
photographic references on the Saratoga. Other than
some changes to her island in 1932 - when her flag level was enlarged,
her director moved up a level and the DF loop room on the bottom of the
spotting top was removed Sara stayed very close to her as built
configuration from her commissioning until August 1941, when her bow was
widened and her AA fit upgraded.
Construction on Saratoga started
with some clean-up work. One thing I found very disappointing with
the Trumpeter Lexington model was the amount of flash that needed
to be cleaned up. Almost every part had some flash on it, and
certain parts had quite a bit. There were also an inordinate
number of sinkholes some in very prominent locations! For a 2005
release, I found this quite surprising and disappointing.
Once the clean up was completed, I
got to work on the hull. I had read that there was a weak point along
the top of the upper hull because of the openings for the boat pockets,
and found that to be true once I examined my hull, so the first thing was
to add the boat pockets. As advertised, the fit between the
upper and lower hulls was atrocious. Based on others experience,
I knew the lower hull was narrower than the upper hull. Taking
a cue from Mr. Bender, I inserted some plastic I-beams into the hull at
several locations to spread the lower hull, then mated the halves together.
While the fit was better than right out of the box, it still required quite
a bit of Tamiya putty to eliminate the seam and get the hull flush.
I also found that the lower hull was slightly longer than the upper hull.
The lower stern overhung the upper stern by 1 or 2mm. I solved this
by sanding the lower hull flush with the upper hull.
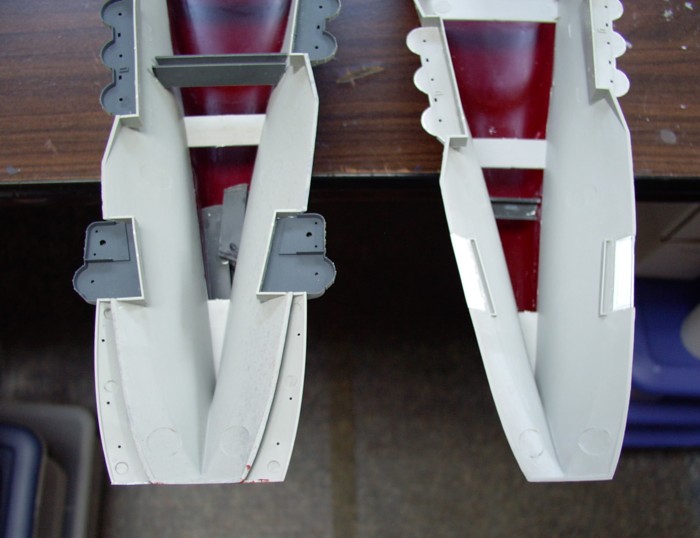
Next, I blocked off the air intakes
on either side of the hull, using more of the I-beams. This prevented
you from seeing right through the model, and gave the appearance of depth
to the openings. I then used additional I-beam to stiffen the
upper hull, by laying a piece from one side of the hull to the other. (Note:
I later found out I had 'spread' the hull of the Lexington too much, and
this would have consequences for that build. Be careful if you try
and stiffen the hull.)
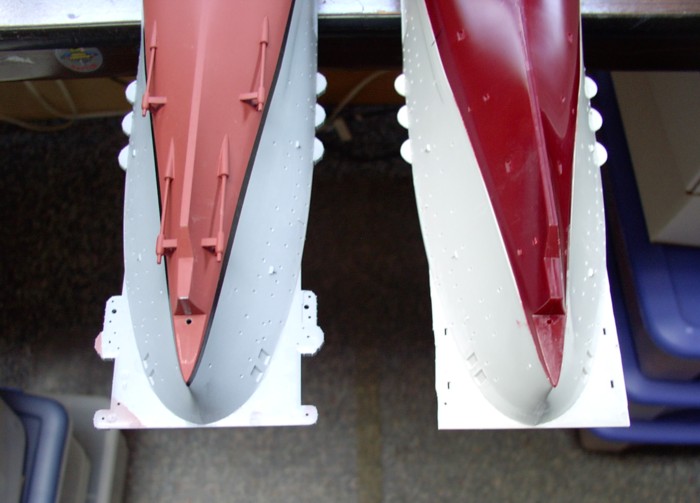
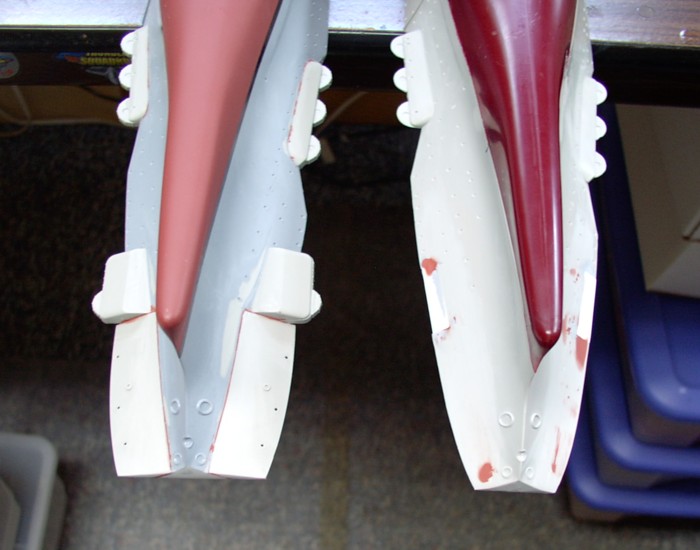
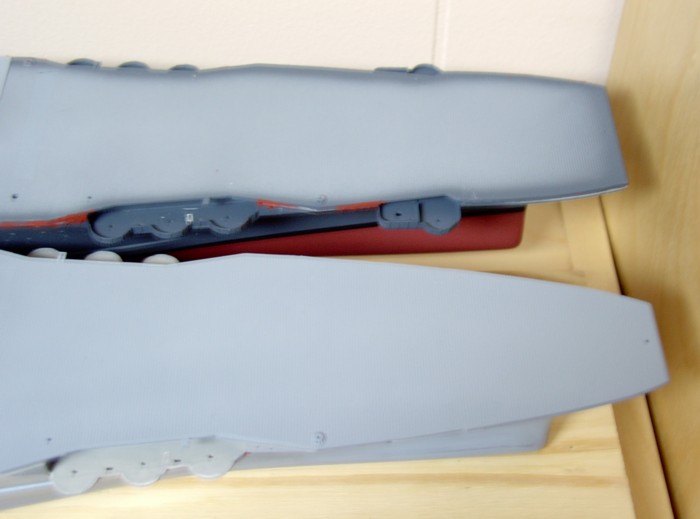
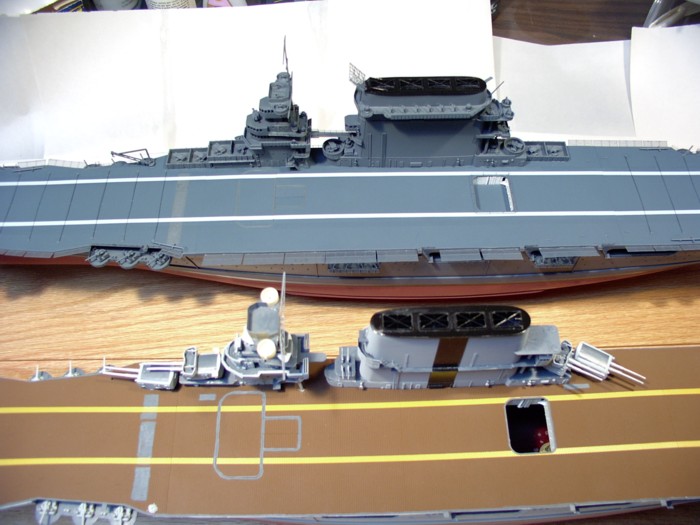
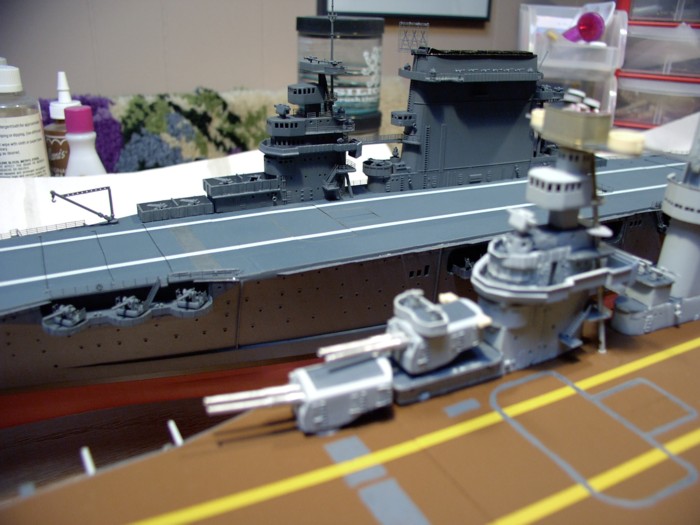
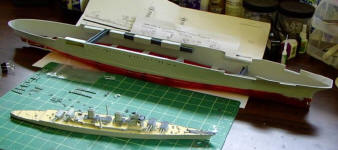 |
| Saratoga hull with stiffeners
in place (1/700 IHP Lexington-class battle cruiser in foreground) |
With the hulls together and sanded,
I now moved onto the props, shafts and rudders. I cleaned up
and installed the prop shafts, which then required some puttying and sanding
to eliminate gaps. The kit comes with four blades props,
which is incorrect for the Lexington-class ships. I decided
to leave these off and deal with this later with either the 3 bladed
props from the Gold Medal Models photo-etch set or the white metal 3 bladed
props from my Yankee Modelworks Lexington (which I planned to build as
a waterline model). Thanks to some documentation given
to me by the aforementioned Keith Bender, I left the rudder off for the
time being the kit rudder is much narrower than the real one, and needed
some attention.
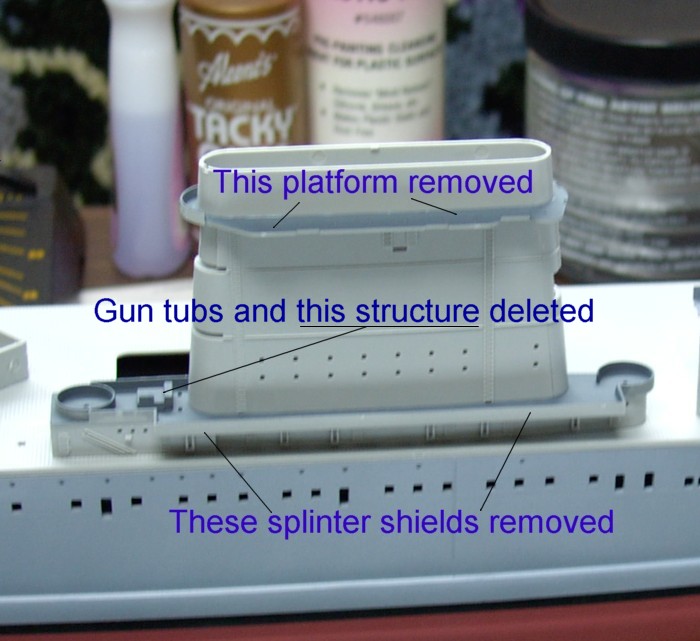
I now added the aft deck (this has
no part#, Trumpeter simply labels it as the "aft deck) to the aft part
of the ship. On the Lexington, I had used this part
right out of the box. For the Saratoga, I eliminated
the platforms and splinter shields along either side of the aft deck piece
before gluing it in place. These were added to Lexington
during various refits. Saratoga didnt receive any additional
AA guns and platforms until 1941. Once the quarterdeck was in place, I
glued the bulkheads in place. Before I got much farther, I drilled
holes in the bottom of the hull for the mounting pedestals, leaving the
pedestals off until later.
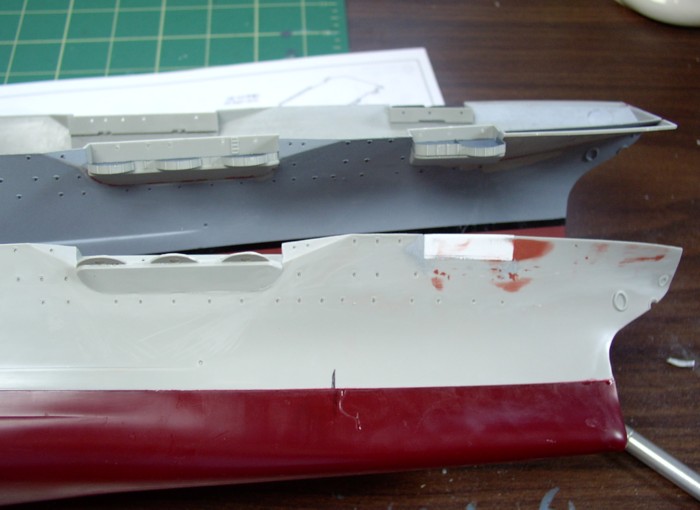
With the aft deck down, I
turned my attention to the bow. The Lexington had AA
platforms added during a 1935 refit. These were located forward
of the 5 inch gun galleries. As previously mentioned,
Saratoga
had no AA upgrades until late 1941, so these platforms were superfluous.
Since Sara didnt have these platforms, I was able to discard Trumpeter
parts B4, B5, B7, B8, B12 and B13. After measuring the openings,
I then took .40 thou plastic card and glued them into place, blocking off
the cut outs. Once dried, I put a bead of super glue along
the seam on the inside of the model, then hit it with some accelerator
to give the card some added strength. The outside seam
was filled with automotive spot and glazing putty, then sanded flush.
After priming, the process was repeated until I was satisfied with the
results. I also sanded off the raised plastic lines on the
forward part of the hull which were for locating parts B16 and B17, the
hull sponsons that supported the widened flight deck.
While building the Lexington,
I had found that the hull was twisted, so I had to glue the three piece
flight deck down in sections, instead of gluing it together and THEN attaching
it to the model . This led to the dreaded seam in the deck,
which I was able to fill but not as successfully as I would have liked.
Still, I decided to use the same method with the Saratoga, since
I figured it was easier to fill a gap between flight deck sections than
to have a gap between the flight deck and the side of the hull.
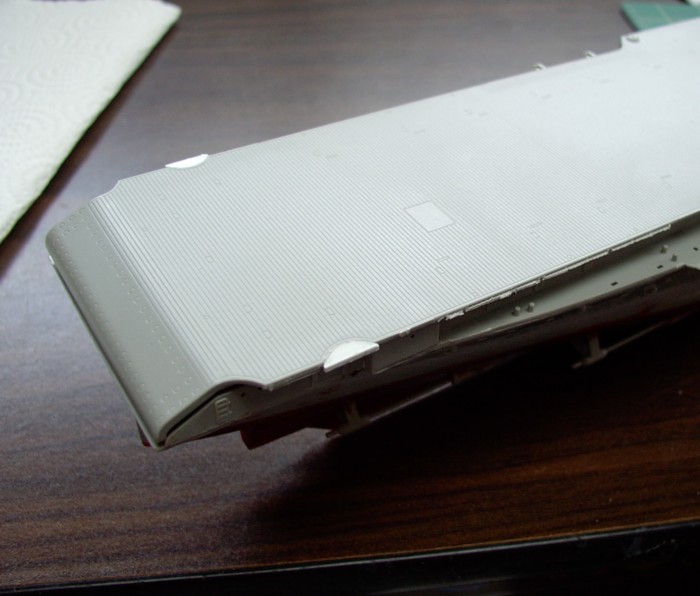
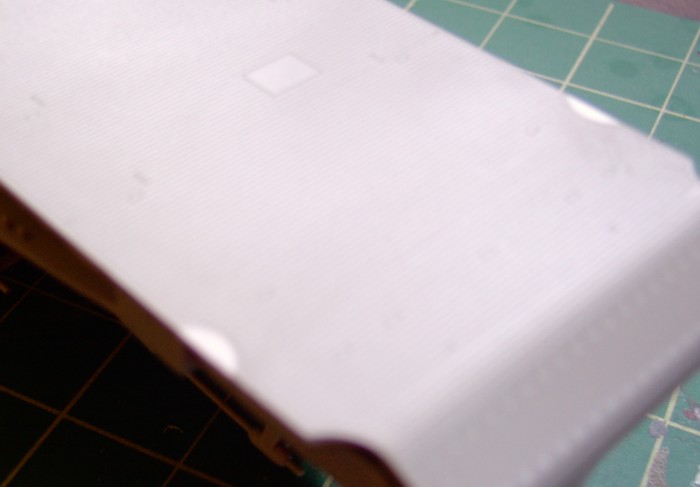
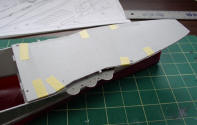
Prior to doing anything else, I cut all the molded on safety nets off the
sides of the flight deck pieces, then sanded the edges smooth.
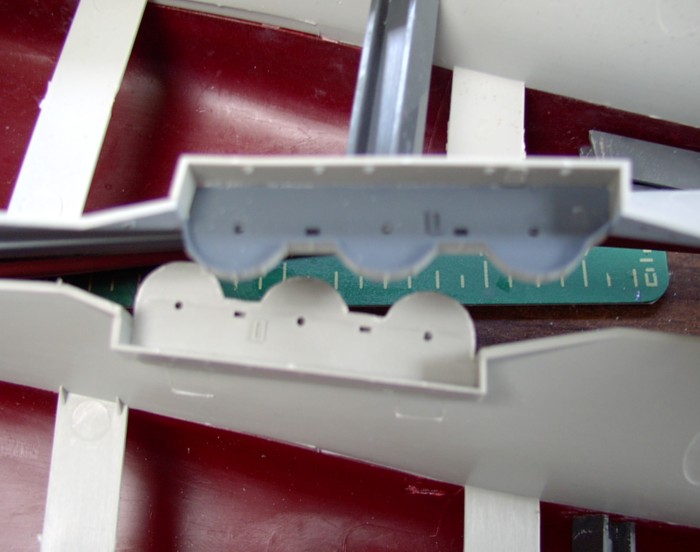
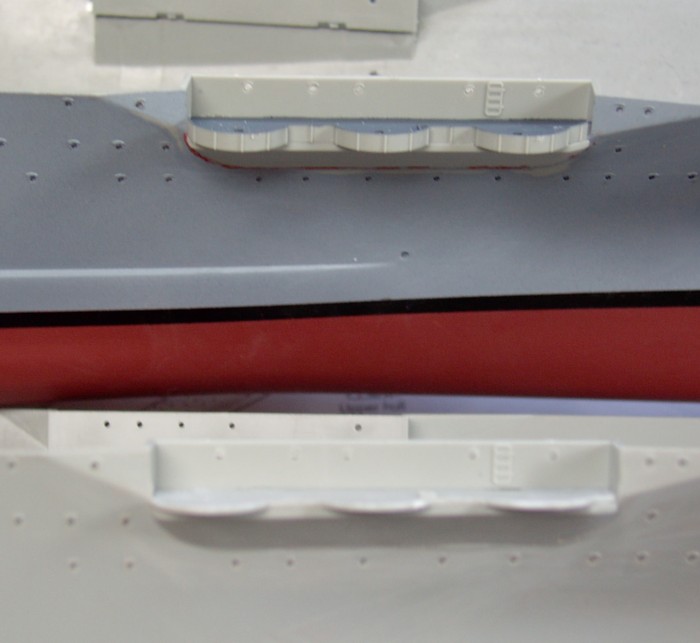
Before gluing the aft section of
the flight deck to the hull, I had to eliminate a pair of rounded
cut outs in the aft section of the flight deck. These cut-outs
were made to accommodate the 3 inch AA guns (later replaced by 1.1 inch
guns) the Lexington received during 1935. Again, Saratoga
didnt have these, so they had to go. Using plastic card
that was about the same thickness as the deck, I cut small pieces to fit
into the notches. After cutting, sanding and dry fitting to
make sure they fit, I super glued the pieces into place and set them aside
to dry. Later, I lightly sanded the plastic card-flight deck
joint, so there was no seam where the cut out had been. I also
sanded the filler pieces flush with the sides of the flight deck.
Once this was done, I scribed planking into the filler pieces, so they
would (hopefully!) look like the rest of the flight deck.
Then, I glued the aft flight deck section down to the hull, to add more
strength to the model.
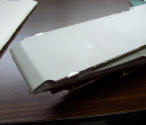 |
 |
 |
 |
| The notch filled
in |
The bow takes shape |
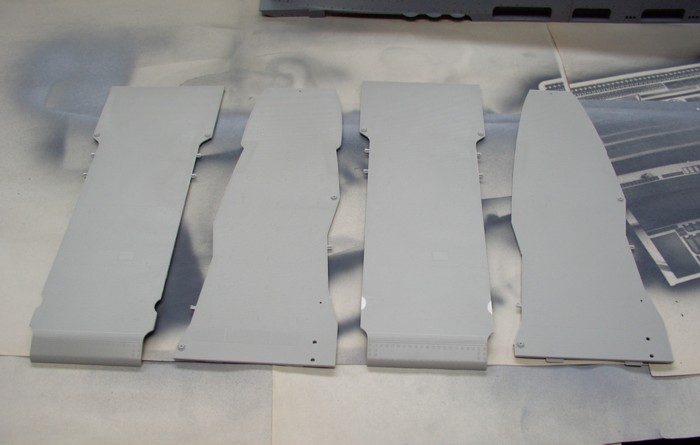
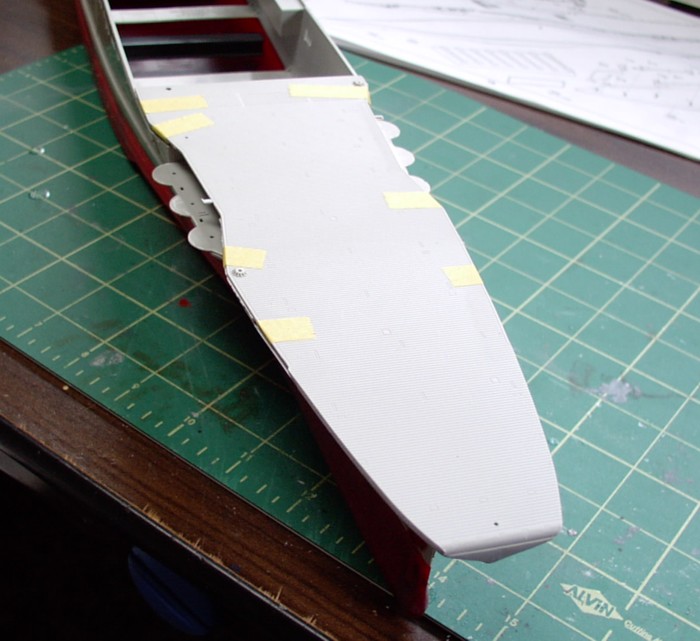
The center and forward sections
of the flight deck were dry-fitted and taped down. Flipping the model
over, I used a pencil to trace the outline of the hull on the bottom of
the forward section of the flight deck. This would be the section
of flight deck Id have to remove to convert my Sara to a pre-war/pre-refit
version. The flight deck pieces were removed from the
hull, then I used a ruler to score the forward section of the flight deck
and remove the now excess pieces as close to the line as I could get.
The forward section of the flight deck was then sanded to the traced line.
Final sanding would take place once the flight deck was installed.
Another disappointment with this
kit was the amount of filler that was required to fill small gaps and seams
where parts met. The gaps between the quarterdeck and the hull
and the flight deck and the hull were puttied, sanded and primed.
With the hulls joined together, the prop shafts on, and the bow reconfigured
for a pre-war version, the pedestals (which I had drilled holes for earlier)
were secured in place with nuts, which were then tightened and super glued
into place.
Now I added the forward elevator
to the center 1/3 of the flight deck, which was glued in the up position.
When that was set, I glued the center piece of the flight deck onto the
hull, taped it down and let it dry. The smaller, aft elevator
was left out, as I planned to display that in the down position, and had
determined during the Lex build that I could add it later.
When the center section was dry and secure on the hull, I glued the forward
third of the flight deck into place, securing it with tape.
When dry, I wet sanded the edges
of the flight deck flush with the hull, then used putty to fill in any
gaps. I put tape down on either side of the seam between the
center and fore/aft sections of the flight deck, then puttied and sanded
that gap, continuing the putty and sanding process as needed.
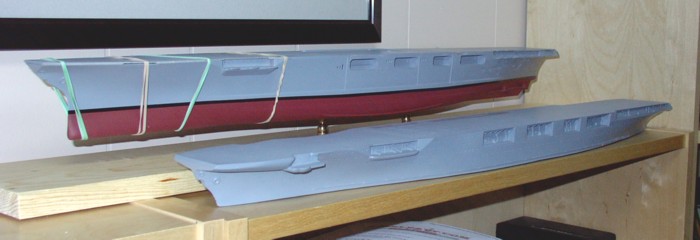
With the hull/flight deck basically
done, I primed everything again, then got ready to paint. I
masked off the model and painted the boot stripe. When this was dry,
I re-masked the hull and airbrushed the bottom of the hull with a few coats
of White Ensigns Norfolk Anti-fouling red. After this
dried, I then painted the upper part of the hull standard gray.
When this was done, I found spots that had to be filled and sanded yet
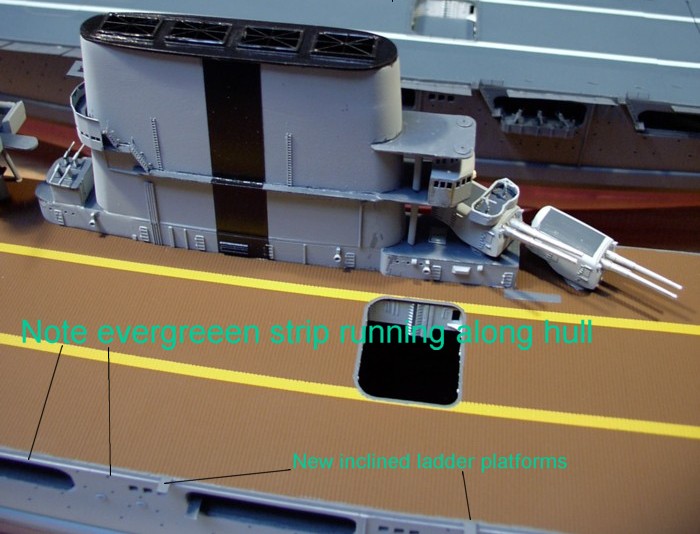
again, which led to touch up painting. I also removed the molded
on platforms for the inclined ladders that led down to the gun galleries
and boat pockets. These all had a small notch in them for the
plastic ladders to fit into, which was noticeable when you placed a photo-etch
inclined ladder against it. All of these platforms were replaced
with .30 thick strip. There was also a raised notch at the
bottom of each ladder, for the molded piece to fit into. I removed
these from the gun galleries only, as they werent noticeable on the platforms
for the boat pockets.
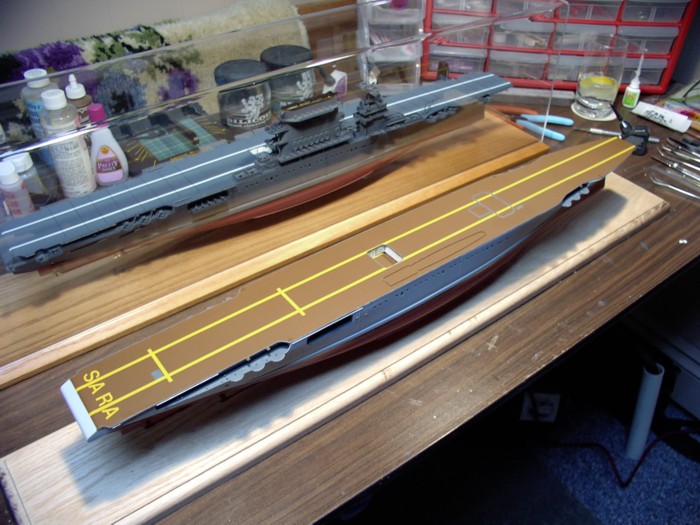
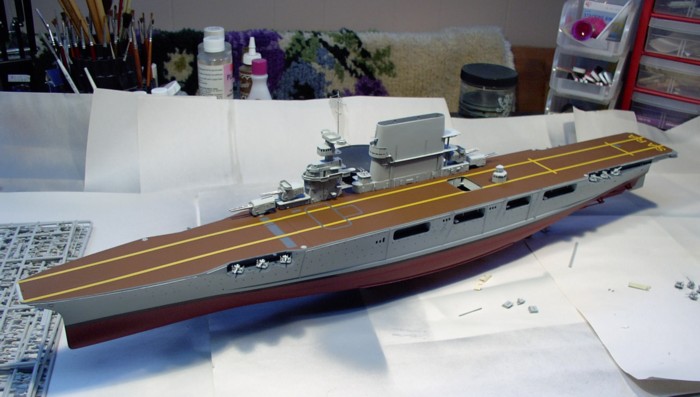
Well, now my model was starting
to look like a pre-war Saratoga. The next step was to
tackle the flight deck. I airbrushed chrome yellow (again from
WEM) onto the flight deck, then using Pactra tape and stencils, masked
the flight deck markings both the lines and the distinctive SARA lettering
at the end of the flight deck. When I pulled the masking
off, I was very happy with the result it really brought the model to
life!
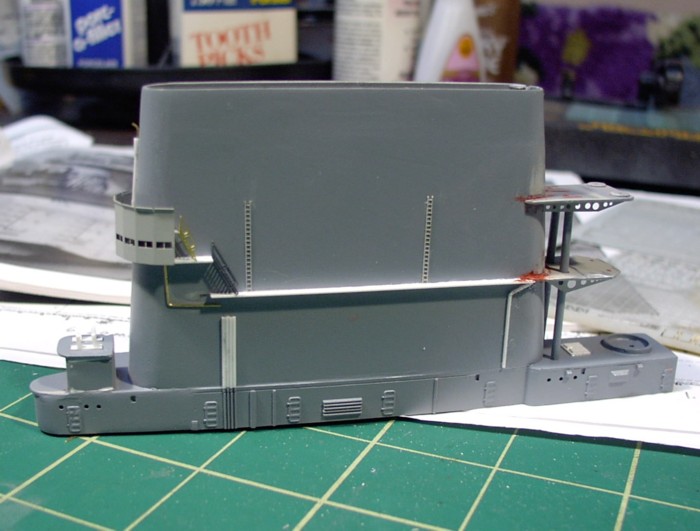
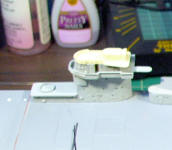
Mounting the model on a piece of
pine board, I began to work on the island and stack.
I had originally planned to buy the Yankee Model Works update set, and
use that for my conversion. But, after chatting with the aforementioned
Keith Bender, we decided the better course of action was to cast the island
from my YMW 1/350 Lexington
kit and use that. So, I handed off the island and
the 8 inch gun mounts to Keith, and he cast two sets one for me and one
for his use (before starting, I checked the YMW website, which said re-casting
parts for personal use was permitted as long as I wasnt selling them).
The island in the YMW Lexington
out of the box is close to the configuration of the Saratoga in 1939/1940.
The main difference was that in 1932, Saratoga had her flag level
extended and enclosed. I started by sanding off the over pour
on the resin copies of my island, and trying to find definitive pictures
of the extended flag level (this was the one area on the Saratoga
that is NOT well documented). Once the parts were sanded
down and primed, I set them off to the side and started working on the
funnel.
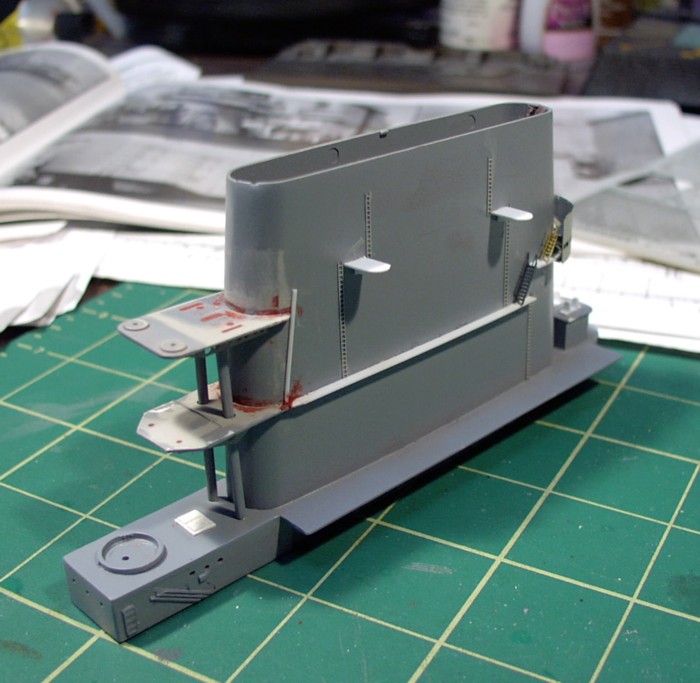
The Saratogas funnel was
quite different from the one in the Trumpeter kit. First, the platform
that held the .50 caliber AA guns (part D13) had to go. Then, the
small platforms on either side of the funnel, as well as the life rafts
on the outboard side of the funnel had to be deleted.
Additionally, the splinter shielding on part C3 also had to go.
I started by using my hobby knife to score the splinter shielding and then
broke it off from part C3. I also had to remove a structure
(what I believe are clipping rooms for the 1.1 guns) that held a Mk 44
director from the aft part of the same part. Once the clipping
room was removed, I filled the resulting hole with plastic card, puttied
and sanded it smooth. I also filled in the locating holes
for the AA guns.
I built the funnel 'out of the box'
from here, except for deleting the aforementioned part D13 for the .50
caliber machine guns. Next, I filled the holes for the lift
rafts on the starboard side of the funnel (part C16) and also the holes
for two small platforms on either side of the funnel. Once
this was done, the funnel was wet sanded smooth, removing all the molded
on detail.
At this point I realized that I
was
going to need the Yankee ModelWorks backdate set - there was no way I was
going to be able to reproduce the fire control station and pri-fly stations
at either end of the funnel and the davits for the ships boats that sat
on the starboard side of the funnel. I had to shelve
the project until the backdate set arrived. Once it did, I
continued work on the funnel. I began by constructing the aft
fire control station as per the instructions, then dry fit it to the funnel.
The conversion set gives you a new resin platform, brass fire control station
and resin roof for the FC station. I found that the backdate
set parts were too tall - the upper platform was angled up if you used
the kit part out of the box. To me, it looked as if the resin
platform was too thick. So, I decided to use the Trumpeter platform,
kit part D21, after removing the molded on splinter shielding.
I carefully removed the brass FC station from the resin part, and added
that to the revised Trumpy part D21.
Well, that didn't work much
better - it now appeared that the resin roof for the FC station was too
high as well, so I carefully broke the FC station apart (again) and made
a new roof from plastic card. It took two attempts to get it right,
but it looked better. However, I decided to glue the platforms
to the funnel without the FC station, at least until the platforms and
masts were dry. This way I knew I'd get the platforms level.
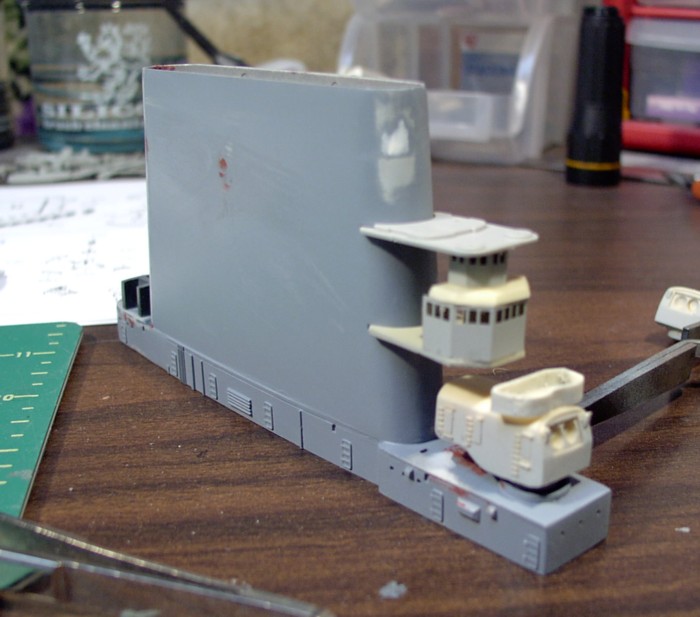
With the platforms in place, I constructed
the pri-fly station, which sits on the forward end of the funnel.
Using the 1/350 plans that I had, I measured and found the correct height
for the funnel, then marked the location with a pencil. While
dry-fitting, I found that the pri-fly station didn't sit properly on the
funnel, so I used a razor saw to cut a notch in the funnel face, which
enabled the station to sit in the correct position. I also
discovered that I had assembled the pri-fly station incorrectly - I had
mixed up the location for the brass platforms inside, which may have contributed
to the problem I had getting the pri-fly to sit correctly.
Now that the pri-fly was on, I added
the walkways and platforms that Saratoga had on her funnel (Lex
has the same arrangement when commissioned). What was needed
now was the small structure at the forward end of the funnel on part C3
that carried the saluting guns. The YMW backdate set's
replacement part for Trumpeter part C3 has this structure flush with the
deck. Pictures of the Sara showed this was a raised
platform, so I made one out of plastic card. I also fabricated
my own saluting guns out of plastic card, plastic rod and brass rod, then
used plastic and brass rod to replicate various pipes and fittings on the
funnel, so it didn't look so 'plain'. Finally, I cut thin rings
from a plastic tube to serve as the mounting ring for the 8 inch gun mounts.
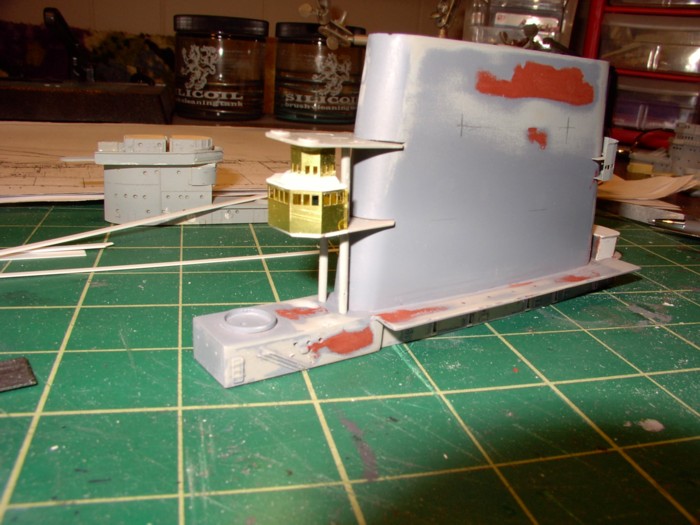
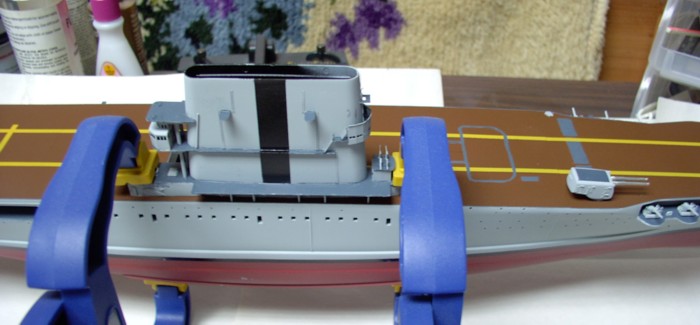
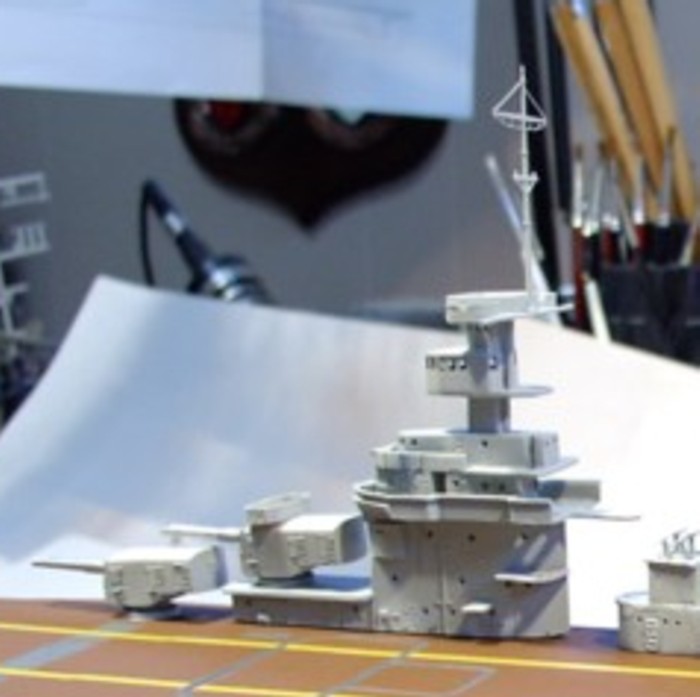
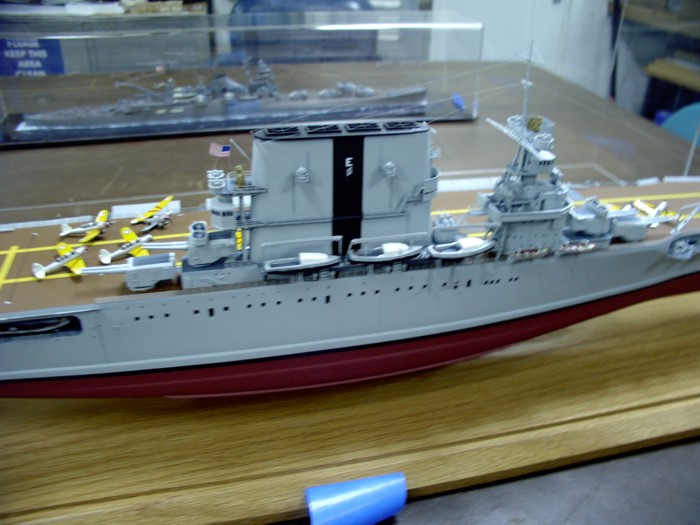
With these completed, the funnel
was painted standard gray, then masked off and the prominent - and famous
- vertical black stripe was airbrushed on. Once the paint dried and the
masking was removed, the funnel was then glued in place and clamped down
securely to the flight deck. Once dried, I added the
top of the funnel, part D8. Part D8 is wildly incorrect out
of the box. The real ship had a 'rounded' shape to the top
of the funnel - Trumpeter replicated this by putting on 'wings' to each
side of this part, making it look more like the Flying Nun (note: obscure
1960's US TV reference) than the Lexington-class funnel.
I sanded the 'wings' off and removed the funnel cap that was unique to
Lexington, added the photo-etch funnel grates (rivet counters beware!
Trumpeter got this shape wrong as well) and glued part D8 to
the funnel.
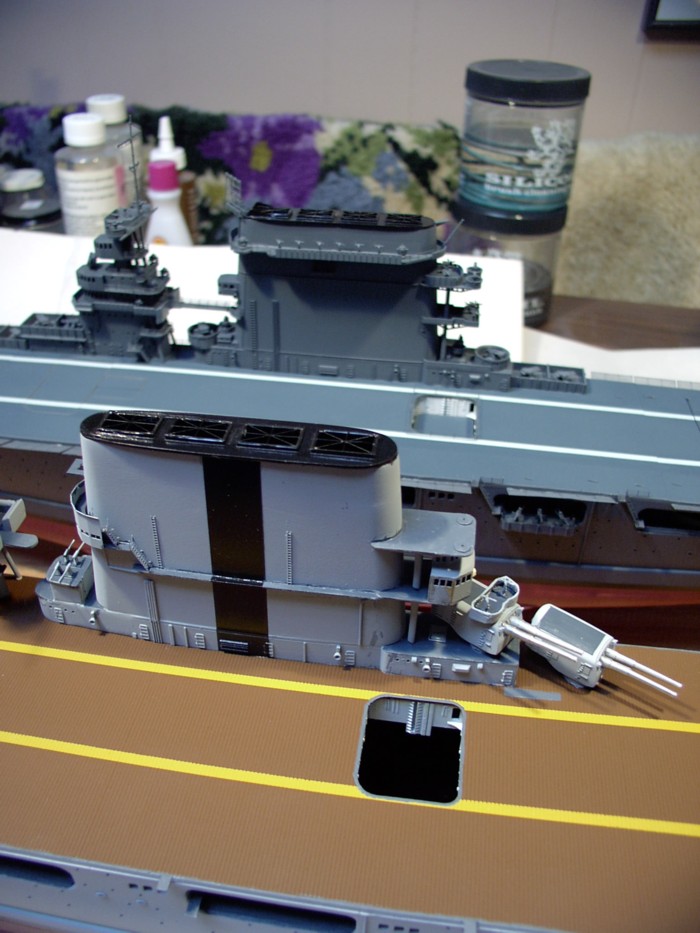
At this point, the hull, flight
deck and funnel were complete. Additionally, my "test" build of the
Lexington was about 90% done. However - time was starting to dwindle.
I had finally found a job, which I started right after a two week family
vacation to Germany. My six month window was now down to three
weeks until delivery. Time to start working on the island...
As I had mentioned earlier, ship
modeler/master builder Keith Bender has cast me a resin copy of the Yankee
ModelWorks
Lexington island to use for this conversion.
Aside from the extended flag plot, the bridge was a near perfect match
for the
Saratoga. To get the extended flag plot
I wanted, I used the replacement flag plot from the Yankee ModelWorks backdate
set in conjunction with my resin copies. The flag plot in the
backdate set had a nice molded on splinter shield that the original YMW
Lexington
kit did not, so I used that as my starting point, and used the original
flag plot for the extension. I sanded the over pour off, cut the
deck off, and chopped the flag plot to the size I wanted, then mated it
onto the front of the flag plot I already had. With some
scrap plastic card, super glue and putty, I had a reasonable facsimile
of the extended flag plot.
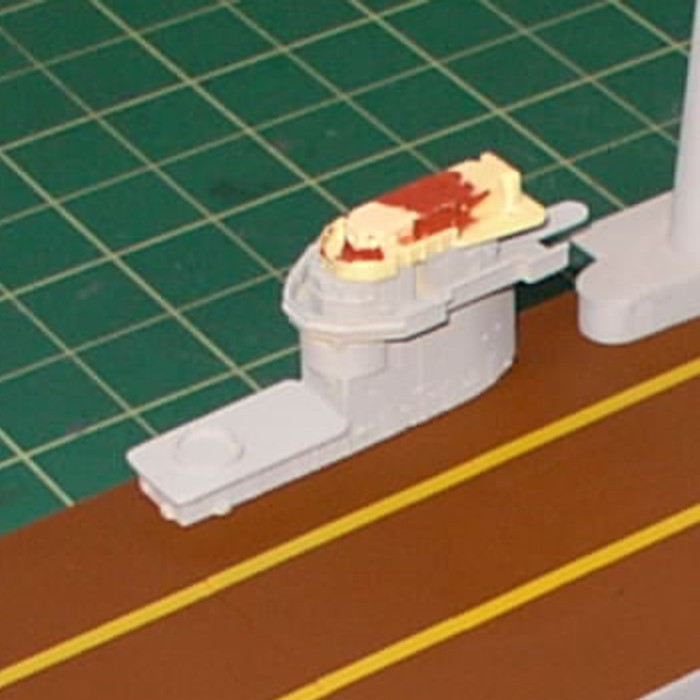
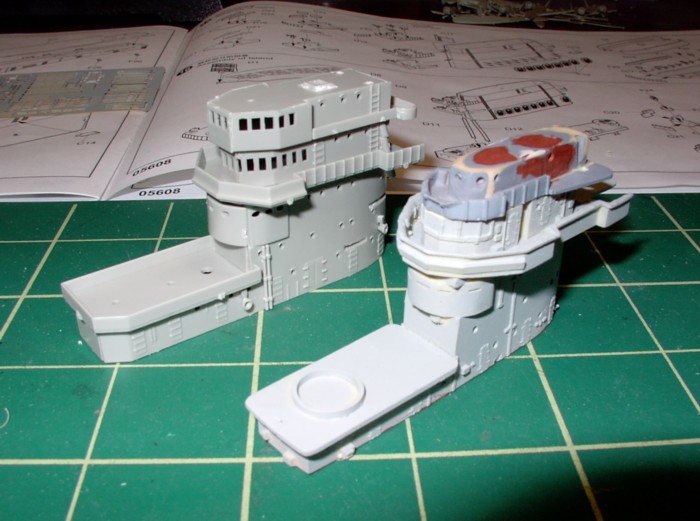
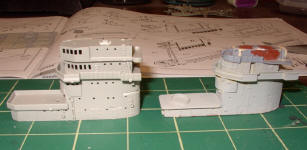
 |
 |
| Flag level before extension |
Flag level after extension |
 |
 |
 |
| |
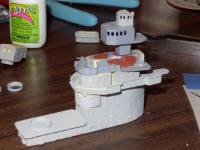
Resin island (right) and the
original Trumpeter island (left) |
|
With the flag plot done, I glued
the island together. The navigation bridge was glued
to the main portion of the island, then the extended flat plot was glued
onto that. Once this was all dry, I to fabricate the platforms
on the port side of the island. At first I tried using the
Trumpeter parts as a guide, but I realized the that Trumpeter island was
too fat and not tapered properly. The Yankee ModelWorks island
fits perfectly on the outline of the island on the ships plans, so I used
the plans and made my platforms, then attached these with superglue.
It was after I attached these platforms that I realized that I hadn't allowed
for the hole in the larger platform for the leg of the tripod mast!
But, these are the things that happen when you are down to about a week
until the model it supposed to be delivered...
The only parts used from the Trumpeter
kit for the island were the parts for the foretop (parts E10, E15, E16,
E17, E19, E27 and E28), which I had previously assembled and set aside.
One of the errors Trumpeter made with the Lexington kit was the
foretop. Not only does the shape look off, but Trumpeter left the
back open. This is wrong. If you look at pictures, you'll see
that this was enclosed by a bulkhead, with doors and windows. I didn't
try and correct the shape, but using some 1/350 ladder stock left over
from a Tom's
ModelWorks set, some plastic card and PE doors from the GMM
PE set, I constructed a bulkhead and enclosed the spotting top.
I dry-fitted the spotting top on
top of the flag plot, then, using 3/16 rod, I cut brass rod and made sure
everything lined up. At this point I had to drill a hole through
the aforementioned island platform with an hobby knife to get the rod to
fit. Once the alignment was good, I cut the brass rod to the
proper length, then test fit the foretop onto the island structure.
 |
 |
 |
| |
Test fit of island without tripod
legs and with Trumpeter foretop |
|
The foretop from the Trumpeter kit,
part E36, looked smallish to me. The width and depth looked good
- and matched up nicely with the plans I had - but the height looked too
shallow. (This seems to be a common problem on scale ship
models - the splinter shields always seem to be knee high.) Additionally,
there was no bracing on the underside, as in the real thing.
Since I had a resin copy of the foretop from the YMW kit, I decided to
test fit that. The brass legs of the tripod mast fit
snugly into the guide holes on the bottom of the foretop, so I decided
to use that instead of the kit part, E36. I also had resin
copies of the tubs that held the range finders on the outer edges of the
foretop, but I needed the brass splinter shielding that gave the foretop
it's distinctive look. As they say, in for a penny, in for
a pound - so I raided my the brass set for my YMW Lexington and
took the splinter shield and lattice yard arm from there. This meant
that my YMW Lexington was now short these pieces, but I figured that would
work itself out in the end (many thanks to Chris Decker of the Trident
Hobbies empire, who agreed to sell me a new set of brass to the YMW Lex).
The end result was - in my opinion - a MUCH better and much more realistic
looking island and foretop.
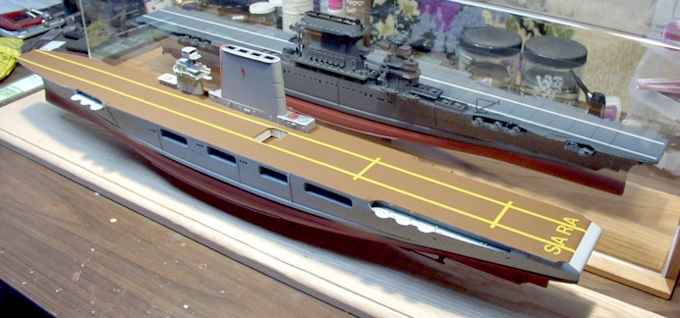
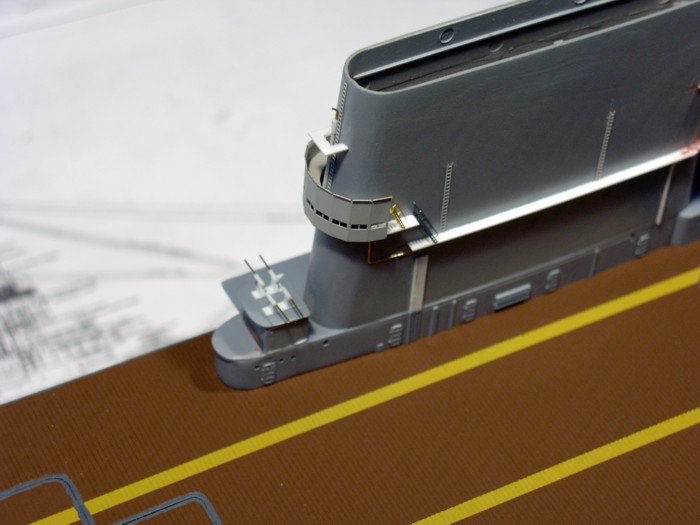
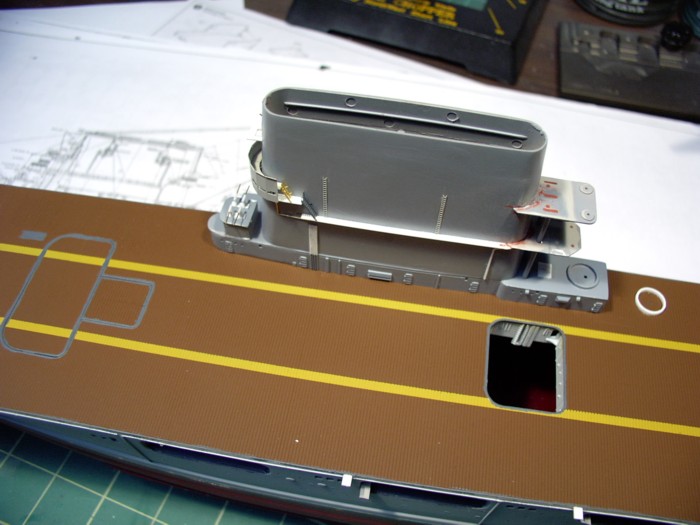
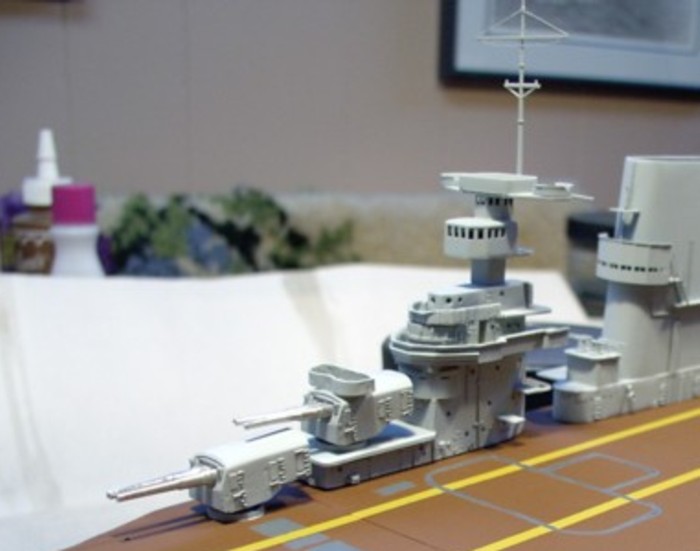
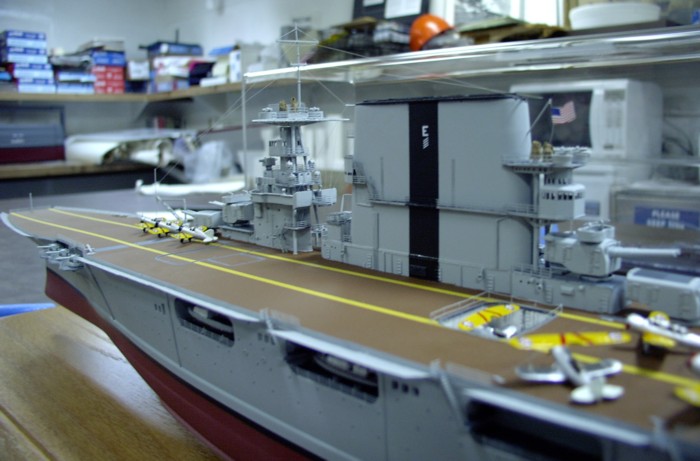
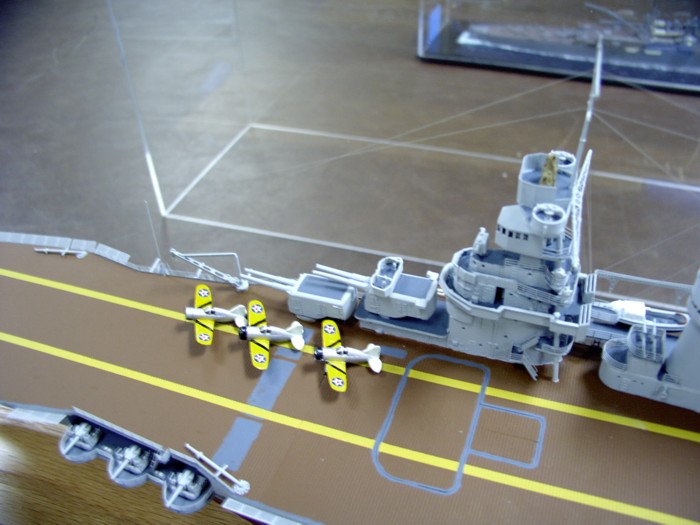
Happy with my decision, I mounted
the island to the flight deck. One note about the positioning
of the island: On the Trumpeter kit, the island is too far away
from the edge of the flight deck. I removed the molded on outline
for the island from the flight deck and re-scribed the lines in the deck
for the planking. The position of the island - determined from the
ships plans I had - was marked in pencil on the flight deck, then the island
was attached with CA glue.
Time was growing even shorter at
this point - I was down to about a week until delivery.
On top of that, my wife was now pregnant and very sick. Building
models - even those with a deadline - took a back seat to taking care of
my family. Which meant that the only time I had to work
on the Saratoga was after my 5 year old son and my wife were in
bed for the night. I resorted to bringing small jobs - like
the airplanes and the ships boats (stolen from an Iron Shipwrights USS
Oklahoma
kit) - with me to work, so I could spend my lunch hour in my car working
on them. The other thing I did was get a two day delay in the delivery
date from the curator at the Battleship New Jersey museum.
The race to finish this model was on...
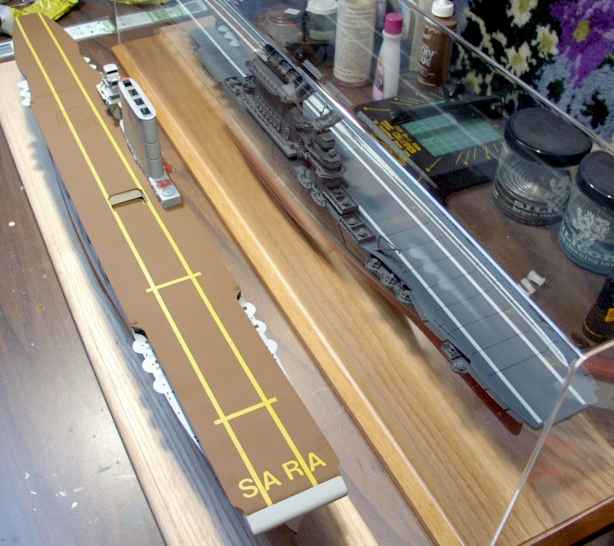
At this point, the model was certainly
looking like a 1940's vintage USS Saratoga, but there was much work still
to do. I masked off the funnel and the flight deck, and airbrushed
the island again. Once that was dry, I added the small resin piece
from the YMW backdate set that extends the funnel deck to the island.
With that in place, I began to add the photo-etch. For
an aircraft carrier, Sara had a lot of railings. I started
with the island and worked my way out from there. It took me
one night worth of work to finish the island.
Earlier, I had mentioned that I
had removed the molded on platforms for the inclined ladders that led down
to the gun galleries and boat pockets, all of which were replaced with
.30 thick strips of evergreen strip. I went around the edge
of the flight deck and made sure the replacements were secured (I had to
replace one or two), then added all the inclined ladders.
Then, I added all the railings around the edge of the flight deck.
Check your references for where the railings go - as I mentioned there
is quite a bit of railing on this ship. Now that the
flight deck was done, I moved down a level to the gun galleries.
Since I had removed the splinter shields, I now had to rail each of the
platforms that held the 5 inch/25 caliber guns. Talk about
tedious! When this was finished, I added the boats and then the railing
to the boat pockets. Gold Medal Models provides extra pre-cut railings
for the boat pockets, which saved me quite a bit of time.
It was now the end of weekend -
the Saratoga was due to dock at the Battleship New Jersey
the following Wednesday. My next move was to add the photo-etch
safety nets on the edge of the flight deck. One painful lesson
I learned from building the Lexington was that the safety nets didn't
go on easily. My method for applying photo-etch in vertical
portions of a model is to brush on some CA accelerator (known as
'zip kicker' here in the US), put a small thin bead of CA onto the PE part,
then attach it to the model with tweezers. Normally, that works
like a charm for me. Did it work when I added the safety nets
to the Lexington? Nope! Luckily, I had discussed
this (after my Lex experience) with another modeler working on his
own Lexington. He ran thin evergreen plastic strip around
the hull to mount the photo-etch safety nets on. So, I did
the same thing (I had added this strip of plastic prior to adding the island).
What took me two nights and a lot of pain when building the Lexington
took me about 90 minutes on the Saratoga. I was very
pleased with the result, it looked MUCH better then the nets on
the Lexington did.
In between my photo-etch work, I
had been working on the air group and the ships boats. I had
promised the curator of the Battleship New Jersey museum that there
would be about a dozen planes on the flight deck, that at least one elevator
would be down and have an aircraft in it, and that there'd be a few bi-planes.
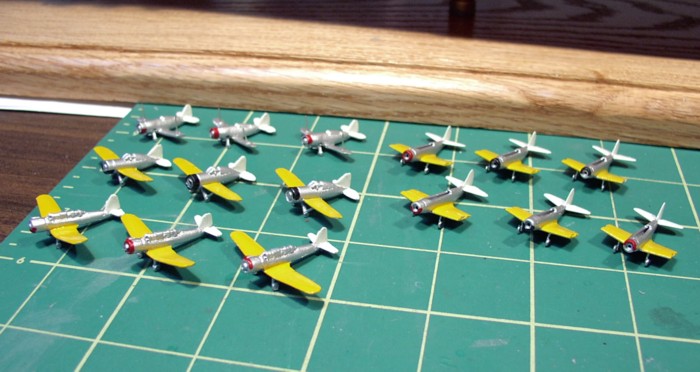
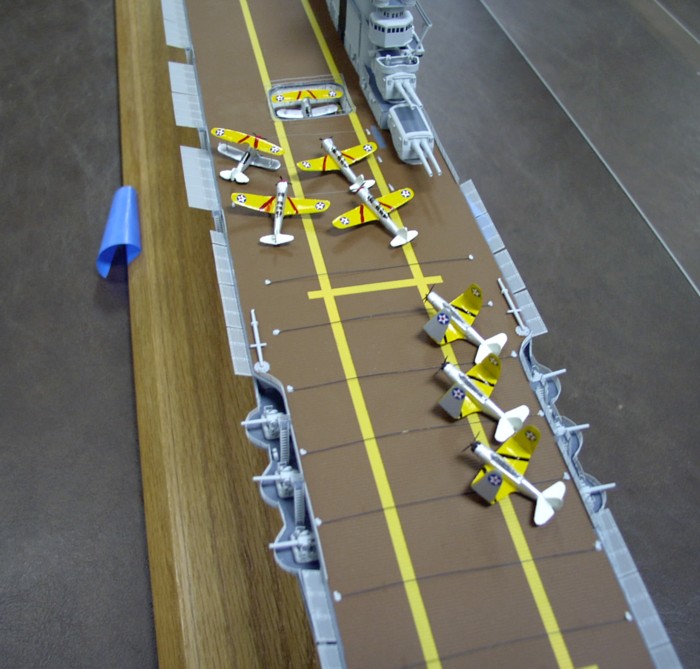
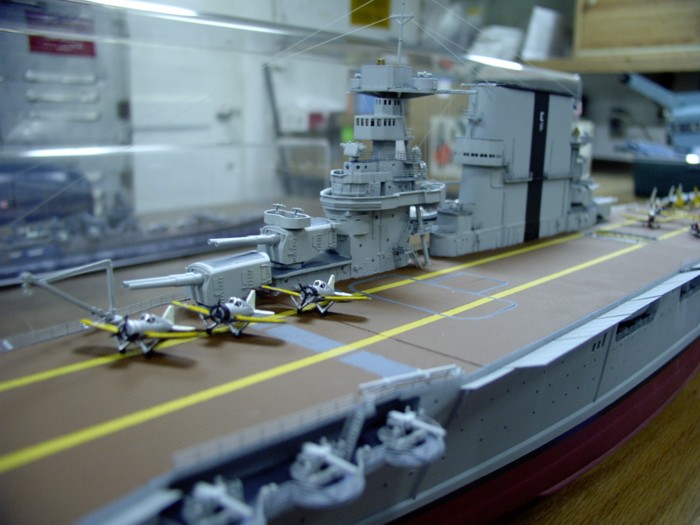
In 1940, the Saratoga's airgroup consisted of TBD Devastators, SB2U Vindicators
and SBC Helldiver bi-planes and F2A-1 Buffalos. The TBDs
came from Trumpeter. The rest of the aircraft came from Iron
Shipwrights, which had released resin Vindicators, Helldivers and Buffalos
in July 2005 at the IPMS/USA National Convention. Since
I was unable to attend the convention, I asked a friend pick me up two
packages (each package contained 6 aircraft) of each aircraft.
He returned with two packs of the Vindicators and Helldivers, but only
one package of Buffalos, which had apparently sold briskly at the ISW stand.
Frankly, I was disappointed with
the ISW planes. Out of 36 aircraft, I was only able to use
9 aircraft. Each plane had a lot of flash. Most planes
had wings that were badly bent. Some were missing their landing
gear. Several had holes in the wings or the tail planes, had
undersized tail planes or were missing one (or both) of their tail planes
altogether. The small set of photo-etch included was the same
for all three planes, when the Vindicator had a different propeller.
There were no instruction. It wasn't until I called ISW that I was
able to discern that what I had though were oversized tail hooks were the
struts for the Helldivers.
Cleaning up what ISW planes I could,
I filled holes, sanded flash and seams and then primed the aircraft.
I then partially assembled the Trumpeter TBDs, which had fit problems of
their own. Owing to the time restrictions, I used acrylic paint for
the aircraft. I airbrushed all the aircraft aluminum, then brush
painted the yellow onto the upper wings. Once this was dry, I painted
the tail of each aircraft white, which was the designated color for the
Saratoga's
aircraft.
I used Tamiya Smoke for the canopies
on the ISW aircraft - I left the TBD canopies clear.
At this point I had 15 aircraft. I decided to make each a different
section, and painted the cowls accordingly. Some were the black
sections, some blue, some red. Either the whole cowl, the upper
half or the lower half of the cowl was painted the appropriate section
color. I didn't paint the band around the fuselage on the section
leaders aircraft, due to the time constraints. When everything
was dry, I brush painted the chevrons on the wings. Being that
I was in rush mode, this didn't come out as well as I would had liked,
but they looked okay enough from a few feet away, which I figured most
people would be viewing the model. At this point, the aircraft
were put aside to dry. It was now Tuesday night.
The model was complete except for
the boat davits, boats, rigging, final construction on the aircraft and
dull coating. I decided to add the photo-etch boat davits
from the Yankee Model Works back-date set. Overall,
the quality of the set and the photo-etch is very good. However,
the boat davits are - in my opinion only - totally over-engineered.
The davits consist of about 13 pieces each, and were a nightmare to put
together - at least for me. It took me over three and a half
hours to assemble and mount the davits to the outboard side of the funnel.
If you are using the YMW backdate set davits on your Lexington or
Saratoga,
TAKE
YOUR TIME with these - they are very complex.
By the time I had finished working
on the davits, it was early in the morning on the day of delivery day,
which I had taken off from work. I retired to bed around 430
in the morning, then had to get up at 730 to take my son to school.
I also had to take return an expired lease the day of delivery, never imagining
that I still wouldn't be finished with the model. After
taking Junior to school (and arranging for someone to pick him up!) and
turning in the lease, I returned home and got back to work. (You'll
also notice that as time started to grow short, there are less and less
pictures...it got to a point that I didn't have time to stop and snap many
shots).
I now added the boats outboard of
the funnel, which were super-glued into place. I finished touching
up the aircraft, then decaled them. Since time was non-existent,
I only added the national insignias on the wings, since I realized (too
late) that I had no appropriate squadron codes. While
the decals dried, I did some touch up painting on the ship, then did some
simple rigging. When the paint dried to the touch,
I airbrushed a light coat of flat on the model.
While the flat coat dried, I finished
construction on the planes, adding the props, the canopies for the TBDs
and upper wings for the Helldivers (what a chore that was).
When these were barely dry, I started adding them to the flight deck.
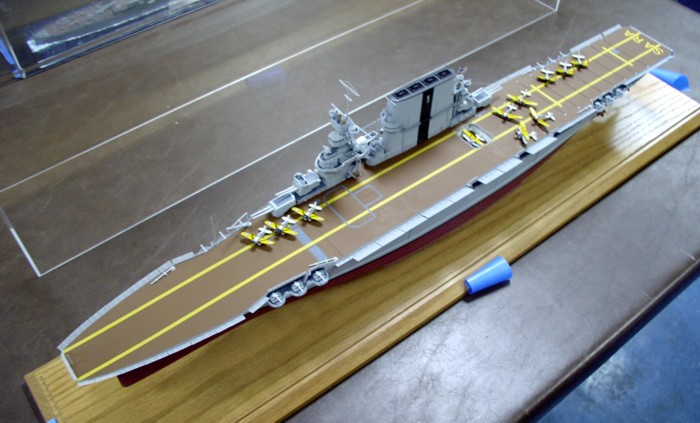
Using white glue, I secured the aircraft onto the flight deck. One
SBC Helldiver went into the aft elevator. The Buffalos were
spotted by the island, the Vindicators and remaining Helldiver (one lost
it's upper wing and I didn't have time left to mess with it) by the funnel,
while the TBDs were spotted aft. I then lightly airbrush one
final coat of flat finish onto the model.
It was now 130 pm on the day of delivery.
The Battleship Museum closed at 5pm.
I lived 2 hours north of the museum.
It was time to go.
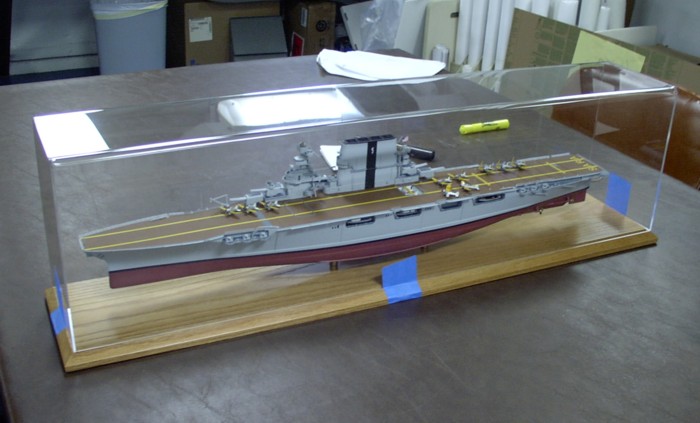
I placed the acrylic cover over the
model, taped it down to the base, placed it (securely) into my Jeep and
headed south. I was happy the model was done. It had
been a frenzied final week just to get it done. While it looked okay,
I wasn't totally happy with the results. My biggest worries now were
that:
a) I would get it to the Battleship
New
Jersey in one piece (remember, I had three hours sleep) and that
b) The Curator of the museum
would be happy with it.
Meeting a good modeling buddy of mine
in Cherry Hill, we headed off to Camden New Jersey and the museum.
I called the Curator on the phone a few blocks away from the museum.
When I introduced myself, he was a little terse - I'm sure he thought I
was calling to postpone again. When I told him I was a block away,
his whole demeanor changed, and he instructed me where to meet him.
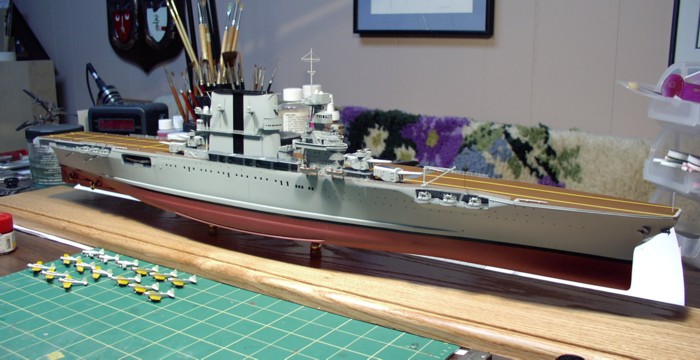
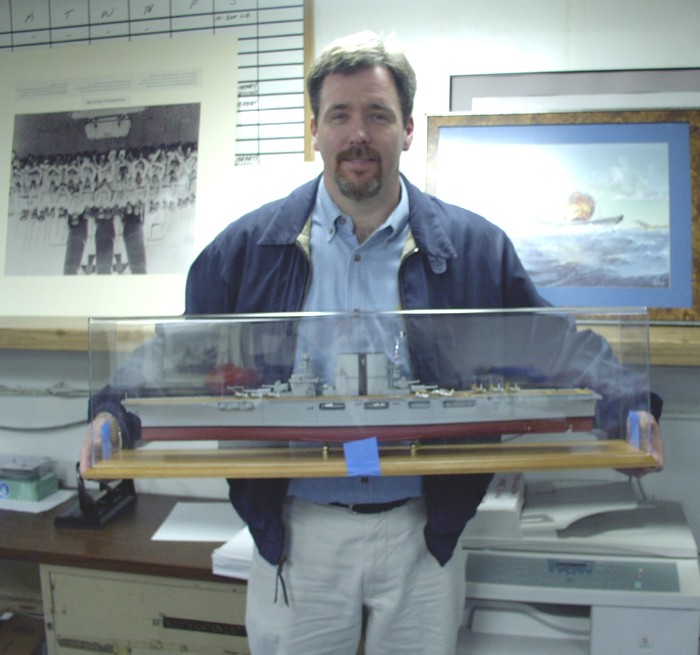
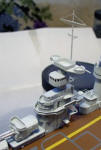
So, about 4 pm on Wednesday, November
2, 2005, I presented the Battleship New Jersey with my first commission
- a 1/350 model of a 1940's vintage USS Saratoga, CV-3.
The curator looked the model over, looked a me and smiled, then told me
how great my model looked. A huge wave of relief
washed over me, and I was able to relax for the first time in weeks.
I had successfully completed and delivered my first commission...I had
converted a Trumpeter 1942 vintage Lexington to a 1940 vintage Saratoga.
The long modeling odyssey was over.
I would like to thank the following
people for their assistance, input, guidance, and patience with me during
this project: Keith Bender, Ron Smith, and Tracy White.
Thanks guys - I couldn't have started or finished this project without
your help.

© ModelWarships.com