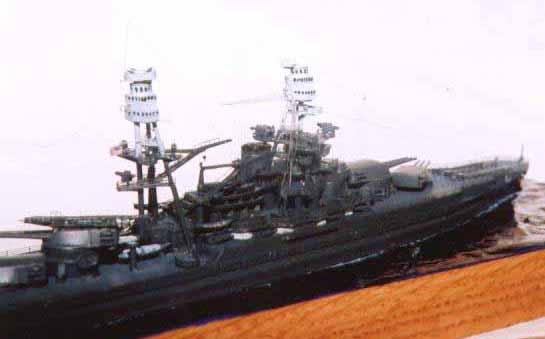
or WHY I KIT BASHED THE WAVELINE and DRAGON ARIZONA KITS.
by Bob Dedmon
| Like a large
number of people Ive been fascinated with the U.S.S. Arizona, her history
and ultimate fate. In my time Ive build numerous representations
of the Arizona but none of them very accurate. My first was built
from the 1/450 kit from Revell about 25
years after the attack. As I grew in experience and knowledge of
the subject Ive discovered most kits of the ship had varying levels of
inaccuracies.
I was very excited when the Waveline
kit of the Arizona was released having had some experience with some
of their earlier kits and the details they included. The Waveline
kit includes some beautiful details but is flawed by what appeared to be
a new technique for casting the resin (injection). This left a large
quantity of flash around most of the parts risking damage to some of the
finer details. I had one of the early releases of the kit so Im
sure this wasnt a result of an old mold, plus Ive seen this problem with
others that have reviewed the kit. Among the items I like about this
kit are the finely cast shields around the 5 anti-aircraft guns and other
gun tubs. I am also pleased with their casting the fore leg of the
tripod masts to the fighting top to maintain the proper stance and height.
The funnel of this kit is nicely cast including the dividers within the
tube as well, and the kit included separate chocks for all the boats.
Other things I like about this kit is that the superstructure is cast with
the deck around it for each segment of the house reducing the seam where
the deck house fits to the deck, that is the overhang of the upper deck
help hide the seam, I also liked Waveline casting the gun deck separate
from the main deck with an appearance of canvas covers over the broadside
5 guns. This is a vast improvement over the pill box appearance
of these guns. The items I didnt like about this kit included:
the main gun houses appeared to be to flat giving a squashed appearance.
The cranes and catapults were all cast as solid pieces leaving the intricate
lattice filled in (I know photo etched brass would fix this and with a
price in the $100 range Id have expected photo etch to be included
it
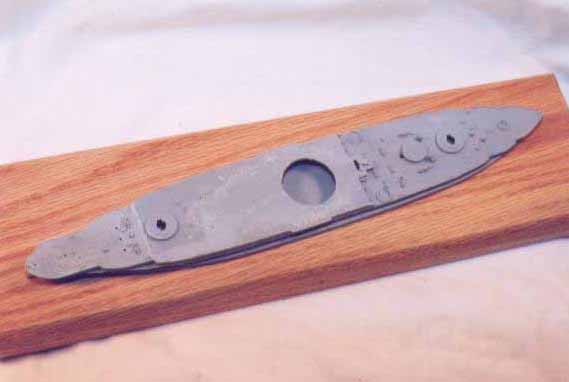
wasnt). Finally the main hull measures out between 5 and ten
scale feet short mainly forward of the number 1 gun. I bought the
Toms ModelWorks 1/700 (750) set for the Arizona to go with this kit and
set it aside to work on other projects that were lined up. Waiting
for a spot in the procession of kits under assembly Dragon
released their version of the Arizona and I decided to examine it with
an eye to build one or the other as the Arizona and the other as some version
of the Pennsylvania.
|
|||||||||||
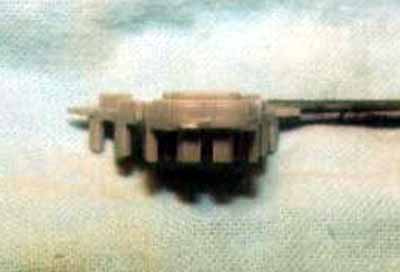
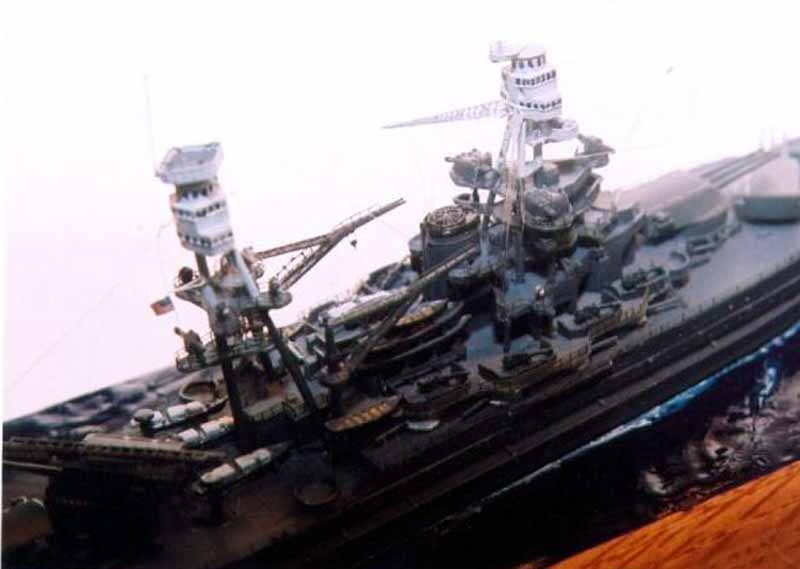
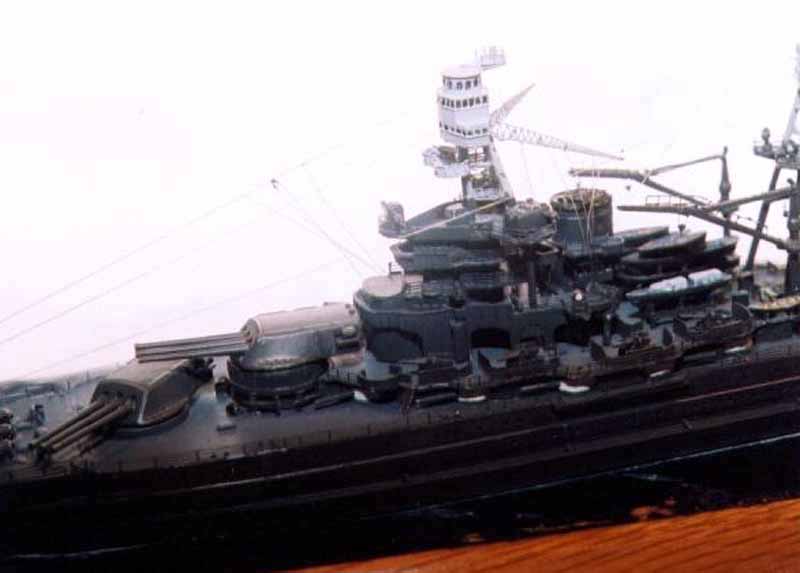
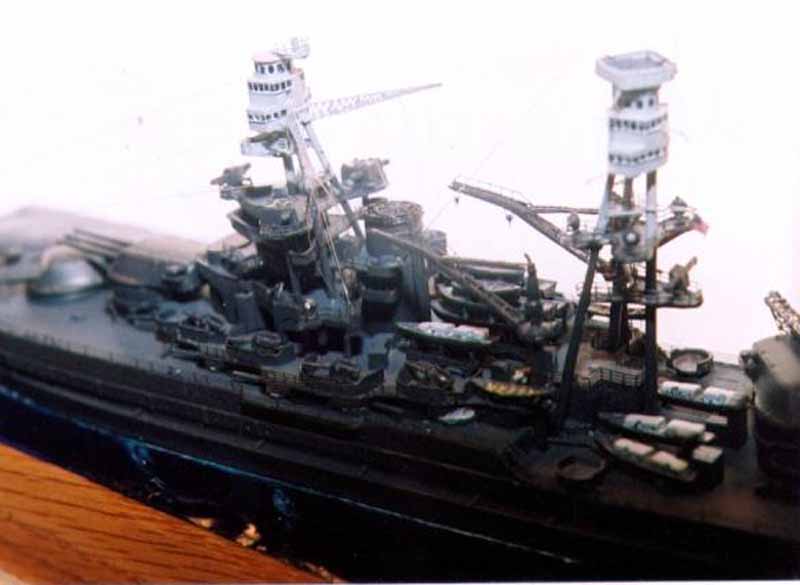
| I was most curious about the Dragon kit as in the past there has been some sort of relationship between Dragon/Skywave/Pit Road/Waveline and I thought this kit could be an injection styrene kit of the Waveline kit. This turned out to be a great mistake, the Dragon kit is entirely new tooling using some interesting techniques and materials. This kit also has its pluses and minuses. To the good this kit has a nicely molded hull (correct length). The main gun houses are cast metal and plastic. They are keyed to fit in slots where they mount allowing freedom of movement and allow for removal if necessary. This can be viewed as a negative as the turret sets up from the surface of the barbettes leaving a small gap. The main guns are either injected plastic or turned brass, both hollowed at the muzzle. This kit includes photo etched brass for the railings, details on the cranes, and rails for the boarding ladders, though overall the fret is a little on the heavy side. The kit also leaves the molded anchor chains off and includes a length of brass chain for the modeler to install. The last positive feature of the kit are new casting 5 25 caliber anti aircraft guns, these are some of the best injection molded 5 25s available anywhere. On the neutral and negative side of the ledger this kit included Aztec stairs in several locations, solid molding for the lattice for the catapults and the main portion of the cranes and cast chocks for the boats. Other neutral features are problems similar to other injection molded kits of the Arizona, pill box broadside guns, typical deck breakdown fore and aft for the one piece hull with resultant gaps (it might have been better to mold the deck separate from the hull), heavy castings for the gun shields and splinter shields around the superstructure. | |||||||||||
| Some of the more negative aspects of this kit include using what appears to be vulcanized rubber for the aircraft crane, upper portion of the fighting tops, and the side structures on the funnel. Another questionable item was a split on the front of the conning tower (I have no idea why it is there but it would require filling prior to building the superstructure). As nice as the main guns are there is a minor problem with them, Dragon allows the guns to be individually positioned, the problem is that the Arizonas guns were on a common slide meaning they must be raised together. Taking the pluses of each kit and working around some of the minor negatives I elected to bash the two kits together. This is how it was done. | |||||||||||
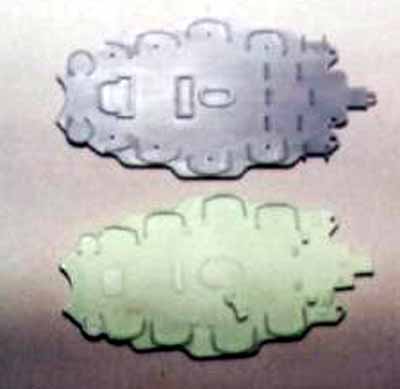
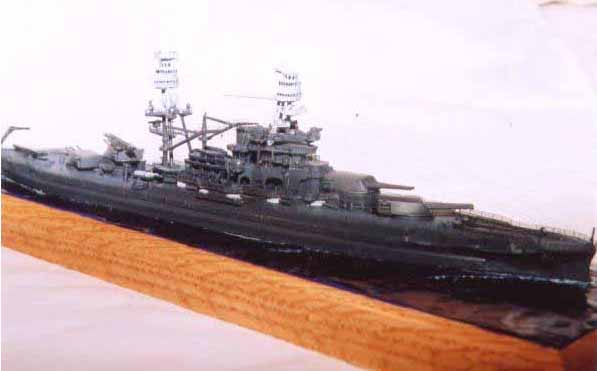
From the Dragon kit I used the
main hull and deck, barbettes, anchor chains, boat crane king posts, and
the main gun mounts. From the Waveline kit I used the forward superstructure,
gun deck, broadside guns, 5 anti aircraft guns, funnel, fighting tops,
boats, and smaller fittings. To begin I assembled the lower hull
and deck pieces. There is a substantial gap between the deck pieces.
I wedged a piece of .020 sheet plastic between the pieces to improve the
fit. Once the cement set I filled the irregular surface with Tamiya
putty and sanded smooth. I rescribbed the deck planks once the filler
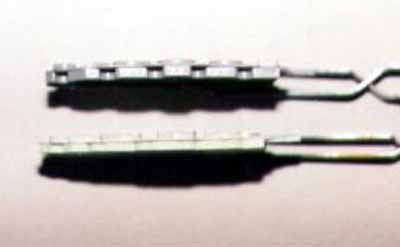
was smoothed out. Next I shaved the alignment wall for the gun deck
and Aztec stairs off and smoothed the area. I needed to work the
structure of the gun deck under the main mast to get the kits to mesh properly;
I sanded the underside of the Waveline gun deck to notch it to fit the
housing molded to the main hull of the Dragon kit. I removed the
barbette from the Dragon kit gun deck and added it to the Waveline gun
deck. I tried a new technique on this project; I assembled
the forward superstructure including the rails and inclined ladders before
installing it on the hull. Toms ModelWorks rails came in handy here.
The particular set of Toms is custom made for the Trumpeter/Minihobby
kit but is mostly useable on this project. The individual rails are
fitted to specific areas of the ship.
|
|||||||||||
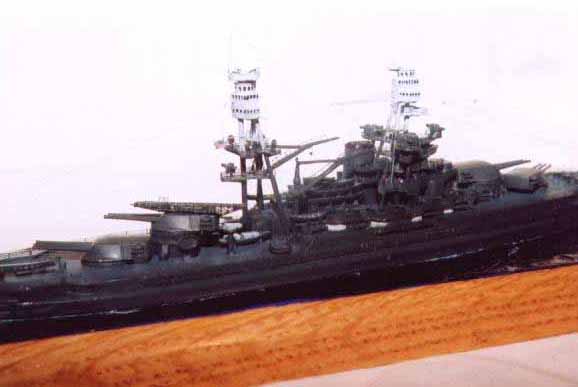
I painted the ship using Model Master acrylic ship colors:
Dark Gray D-5, Haze Gray L-5, Deck Blue 20B. This was also an experiment
as I generally prefer to use enamel paints but the Model Master paints
were more readily available. After getting help to get them to flow
well enough without clogging my airbrush (I used acrylic retarder and thinner
in a TLAR (that looks about right) ratio) I painted the deck blue and lower
hull the dark gray. There is a controversy brewing about the actual
colors the Arizona was wearing at the time of the attack but until I see
the proof to the contrary I will continue to use the standard Measure 1
pattern. The as yet unproved assertion is that the Arizona was actually
a dark blue instead of dark gray. I used two over head photos of
battleship row as reference to justify using deck blue instead of bare
wood. The first photo was taken seconds before the Arizona was hit
by the bomb that killed her and shows the deck shade to be the same as
the Tennessee. The next photo was taken after the attack and shows
the Maryland with a lighter deck shade than the Tennessee and therefore
justifies the darker shade for the Arizonas deck.
|
|||||||||||
| After painting the individual pieces of the superstructure
I installed the rails to the lower level of the parts then installed the
level above it. Once the next level was dry I added the inclined
ladders to the rear of the superstructure and moved to the next level until
the superstructure was finished. On the lowest level of the superstructure
I scratch built with scrap brass the catwalk on its aft edge to fit around
the funnel and added railing to it. After the primary superstructure
was complete I attached it to the gun deck. I then painted the funnel
dark gray and added the catwalk around the front of the funnel. I
painted the funnel cap gloss black with the cavity of the stack flat black
and the baffles within the funnel were painted grimy black then I installed
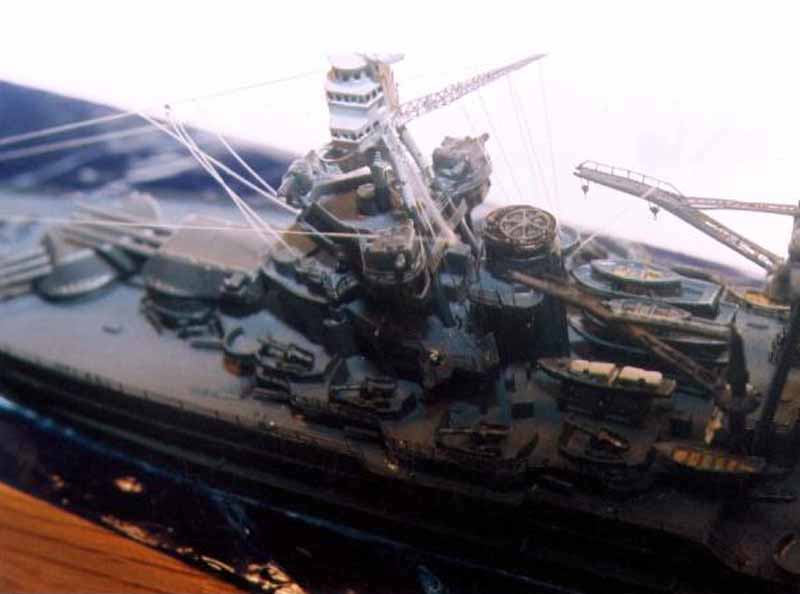
the funnel on the gun deck. I then built up the cranes. For
the boat cranes I cut off the lattice from the king pins and folded the
brass from Toms to fit. To get the support arm to fit properly I
needed to cut the pulley off the top of the king pin and reinstall it on
the top of the support arm. I used the base of the aircraft crane
from the Waveline kit and mounted the Toms crane to that. I built
up the main guns and turrets per instructions for the Dragon kit though
I did cement the barrels at the same angle to represent them being on the
common slide. I painted the turrets Dark gray.
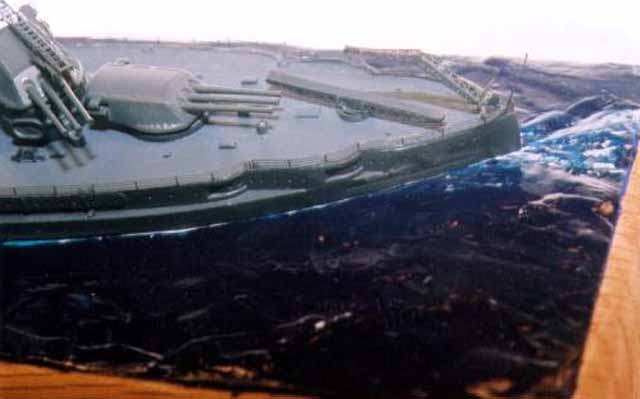
The 5 25 caliber guns are very good but the need a bit of correction. The barrels actually measure out to 0.250 scale, (175 inches actual) instead of the correct 0.203 scale (142 inches actual) long measured from the breach of the weapon. I got my information for the length of the barrel from the Warships1 web site, I dont think this site is still up but I have it archived in my computer. The archive address is: http://web.archive.org/web/20030621115727/http:/warships1.com/. I trimmed the difference off the muzzle end and built per instructions. These guns were painted the dark gray as well and installed in their positions. I replaced the aft legs of the masts with solid brass rod cut to the same length as the resin versions for strength and rigidity. For the main mast I painted the fighting top light gray 5-L along with the sides and the bottom of the upper platform. I installed the rails on both platforms then slid them on the leg attached to the fighting top. I then slid them to correctly position the other legs of the mast to get the correct fit. This is the best fit Ive ever achieved working with a tripod mast. After I got the aft legs secured I installed the final platform, a small triangle just below the fighting top. After that I began installing the various levels of inclined ladders one on each of the aft legs then a single ladder between subsequent levels. Per photos and drawings of the main mast I added a piece of photo etched brass between the aft legs of the mast for a final ladder break between the upper platform and the fighting top. I painted the Captains Gigs and Admirals Barge in Measure 1 as well, I painted the upper works light gray L-5 and the lower hull dark gray D-5. For the open boats I painted the upper portion inside the hull deck blue and painted the lower areas of the inside a bare wood color. I cleaned up the individual chocks and installed them in position on the gun deck then I installed the individual boats per instructions. The broadside 5 guns are just barrels stuck to the canvas openings at each location along the gun deck. Wavelines solution for this is to provide barrels for 5 38 mounts from the Skywave/Pit Road U.S. Navy detail set. They instruct the modeler to cut the barrel from this part at the blast bag. Im not sure of the length of barrel that sticks out past the canvas shield so I followed the instructions (for a change). I then installed the rails and inclined ladders around the gun deck completing the upper superstructure except for the rigging. I then began to install the smaller fiddly bits around the main and quarter deck. I painted and installed an inlet cowl on the bow within the anchor chain runs, this part is only included with the Dragon kit. I used the Waveline vents (3 each) on the quarter deck. One fits toward the bow between the number 3 gunhouse and the mainmast along the centerline of the ship, the other two are inboard of the gig/barges that are mounted on the quarter deck. The Waveline parts were better executed than the Dragon parts AND Dragon did not include the centerline vent. All of these parts were pre-painted dark gray D-5. I dipped the brass chain in a blacking agent to avoid having to paint it prior to installation. I built up Toms ModelWorks catapults, painted them dark gray and installed them. I installed the deck catapult slightly offset from a pure fore/aft orientation which would permit opening the main hatch on the quarter deck between the catapult and the number 4 gunhouse along the centerline. |
|||||||||||
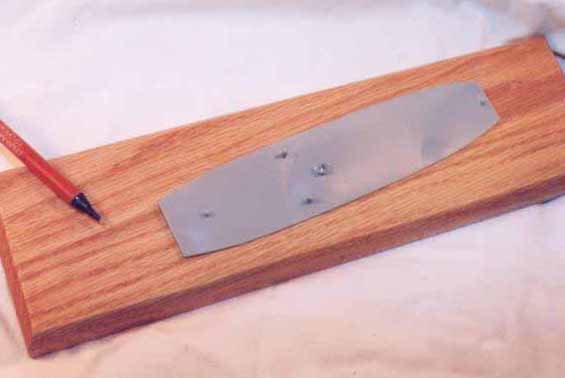
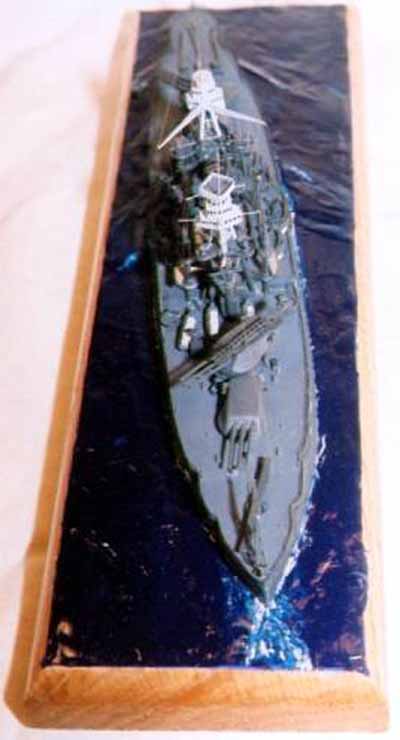
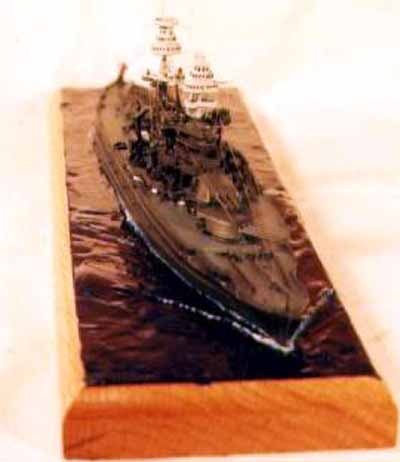
For the base I used a piece of 1 X 4 red oak board 12 inches long.
After routing the edge I traced the outline of the hull in the position
desired to mount the ship. I then attached the bottom of the Dragon
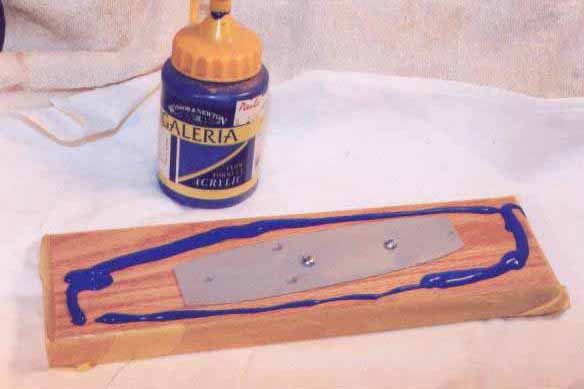
hull as a locating marker and began to lay the water. I used ultramarine
blue acrylic jell paint to simulate the water. I lay down a bead
of paint along each area around the ship then spread it out in a pattern
representing the desired sea state. I use gentle sea states for my
ships as I build 1/700 its easy to over do rougher sea states. The
initial layer will be the basis for the bow wave and wake.
|
|||||||||||
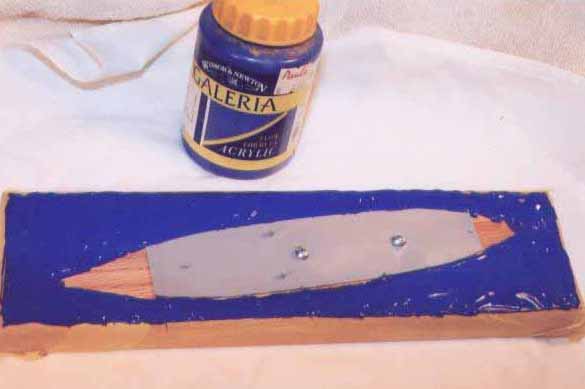
| For the Arizona I tried to represent her moving at around 5 knots like she is approaching the mouth of Pearl Harbor late in 1941. After the basic shape of the water is set I dry brush flat white to emphasize the froth of the ship moving through the water. Once the white is well dried I spray Mr. Colors clear blue (a lacquer) over the entire surface, this gives the white areas an aqua blue hue similar to aerated water from wave action Ive seen along the coast in the Pacific in the past and gives the blue areas a darker sea appearance. Then I go back and retouch some areas of the white to high light areas of fresh wake. Then I over coated the entire base with Future. I then mount the ship to the base for finishing. I attach the outer rails, rigging, and the flag. The flag is attached to the rigging off the mainmast rather than the stern jack. I mounted the flag decal to a piece of thin foil prior to mounting it to allow shaping the flag in a free flying mode. I used scraps of photo etched lattice to fit out the mounting for the rigging on and around the main mast. There were three mounts on the main top to mount halyards, one on each side and one on the side facing the stern. When under way the U.S. flag flew from this position. I used invisible thread for the rigging, antenna wires, and halyards. | |||||||||||
|
|||||||||||