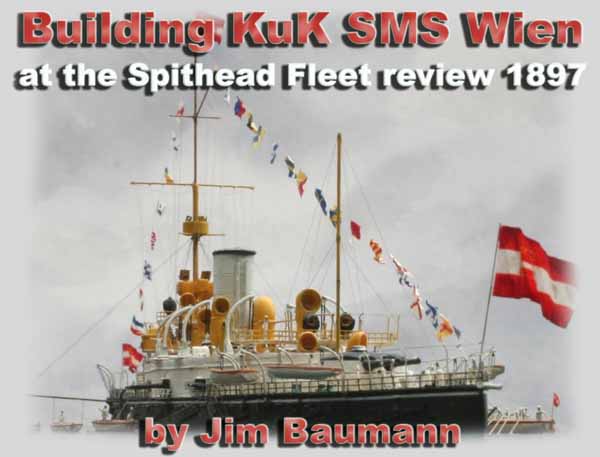
 The Navy of the Austro Hungarian Empire rapidly expanded in the late 1870s onwards, partly buoyed by the successful outcome of the Battle of Lissa in 1866. Designed by Siegfried Popper( later to design the Tegetthof class of Dreadnoughts) the Monarch class was the first A-H ship class to have proper turrets fore and aft. They were somewhat too small to be effectiveand were classified as Coast Defence battleships. Contemporary Navies of other nations also built ships of this type, but it was also a reflection of severe budgetary constraints on the Austro Hungarian Navy at this time. Named after the Capital city of the Austro-Hungarian Empire Wien( Vienna), she was laid down in 1893 and the second launched unit ( 1895) on the three-ship Monarch class, along with SMS Budapest ( famed for having a 38cm Howitzer fitted to her fwd turret position) SMS Wien participated in the usual fleet manoeuvres and ceremonial duties of a navy at peace, the high point being her presence at the 1897 Spithead fleet review, in celebration of the 60 year anniversary of Queen Victoriass reign. September 9 1914 saw Wien bombard the shore Battery at Golis,and throughout September and October she engaged shore batteries on the Montenegro coastline. Late August 1915 she supported the landings at Traste. In August 1917 together with Budapest - she was despatched to Mugia /Trieste as an attack on Trieste by the Italians was anticipated.on 16 November she engaged the Corellazzo shore gun batteryand received 7 direct hits-with no serious damage. On 10 December while on patrol in the Muggia Bay off Trieste she was
hit by two torpedoes fired by the Italian MTB MAS 9; whereupon
she foundered with the loss 46 lives.
|
|||||||||||||||||||||||||||||||
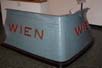
| In 1958 a part of her stern was raised and now can be viewed in the Venice Maritime museum. | Click images
to enlarge |
||||||||||||||||||||||||||||||
 |
|||||||||||||||||||||||||||||||
|
|||||||||||||||||||||||||||||||
| Building the Model. | |||||||||||||||||||||||||||||||
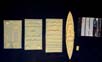
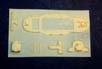
| The HP resin kit of the the KuK SMS Wien is a recent
releaseand in common with the latest models from HP a vast improvement
over some of the firms earlier offerings. It included some brass barrels
which quite look the part too.
The kit appears to be based on the plans drawn by Peter Kovacs; an authority on KuK ships and author of any plans of that navy. In conjunction with the Kovac plan and detail drawing booklet I also used The Modellers very helpful guide to the class, supplied by Robert Toegel, which clearly outlines the differences between the sister ships.- though not entirely infallibly! Upon opening the box I was initially favourably impressed with the relative sharpness of casting and neat design of boat deck |
 |
||||||||||||||||||||||||||||||
 |
|||||||||||||||||||||||||||||||
 |
|||||||||||||||||||||||||||||||
 |
|||||||||||||||||||||||||||||||
| I immediately predrilled some holes in the underside of the model, the centre of which has a no 6 pozidrive selftapping screw inserted into it so as to permit a large springloaded clamp to be fitted. This facilitated the handling of the small model without risk of paintwork or detail damage by clumsy 1:1 scale fingers! | |||||||||||||||||||||||||||||||
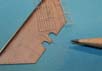
| Close inspection of the plans and photos showed that a number of improvements could be made. Whilst awaiting further photos of the real ship I commenced to make a start on the vast array of cowl vents. These needed to be removed from the casting, and as they were supplied with solid fronts also had to be drilled out; with a view of obtaining as thin an outside edge as possible- a variety of tools and stages were required. | 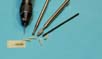 |
||||||||||||||||||||||||||||||
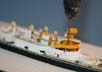
| Once the required photos had been located, construction of the ship itself could re-commence. After an initial coat of paint on the main deck and superstructure, having inspected the cats parts and decided that the intended assembly of the cast parts may result in a structurally unstable assembly with its tall military fwd mast; the answer was to make a metal mast that would pass through all the deck levels and be hollowmuch like the original! | |||||||||||||||||||||||||||||||
| I drilled a hole all the way through to the keel and inserted a copper tube- this was well secured with epoxy. A second larger diameter tube could now be slid over this spigot allowing me to test-fit deck levels and adjust clearances and heights and always being able to remove the parts independently. | 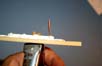 |
||||||||||||||||||||||||||||||
| The square cast on main deck access doors were removed, and replaced with shortened Voyager PE items, depicting 3 of them open. A brass wire strake was made and installed all the way around, checking on heights with photos. | 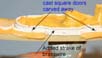 |
||||||||||||||||||||||||||||||
| The entire model was masked for an overall levelling coat of white on the superstructure. | 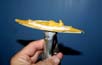 |
||||||||||||||||||||||||||||||
| According to my plans- and my measuring- the kit supplied resin funnel was undersized by some way-as well being the correct shape for sistership Budapest but not Wien..! | |||||||||||||||||||||||||||||||
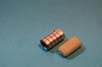
| I made a new funnel of aluminium tubing, scored using a K&S metals
tube cutter to get make the grooves into which I fine wire would be laid
to simulate the handrails.
The scored tube was thereafter lightly crushed to obtain the oval squared shape. |
 |
||||||||||||||||||||||||||||||
| After painting however the handrails, when compared to contemporary photos, looked too clunky . I elected to make another funnel using the above procedure but chose not to fit handrails, merely using the groves to give the impression of rails being there | 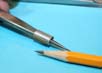 |
||||||||||||||||||||||||||||||
| Steam pipes of brass micro tubing fore and aft and a carefully carved flange of styrene sheet completed the new funnel | |||||||||||||||||||||||||||||||
| The boat deck -which was supplied cast on a thick wafer of resin-
was next testfitted.
I used a large blade to pare away the resin wafer; the blade in preference to sanding as it reduced the risk of unevenness and breakage. However in plan view there were a number of alterations required. The most obvious of these were the boat deck extensions. The overall outline shape needed a bit of tweaking to allow the various companionways to fit and concur with the plans. |
 |
||||||||||||||||||||||||||||||
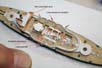
| The model was mounted to its base plate and screwed down securely through the barbettes from underneathsome of the photos show the tips of the screws. | |||||||||||||||||||||||||||||||
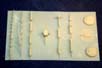
| The skylights as cast were represented by a number of uneven holes; study of the plans showed these to be a series of opening hatches pierced by small round glass windows. I overlaid the casting with some fine 1/350 PE grating, that had previously been coated with thick white paint; the paint clung to the corners and appeared to give the impression of round holes. |  |
||||||||||||||||||||||||||||||
| The black hull during her Victorian colour scheme sported a crisp fine white line just below main deck level. I applied this using the excellent fine line products from TL decals, the decals having no extra carrier film at the edgesobviating the glosscoating beforehand. | 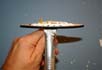 |
||||||||||||||||||||||||||||||
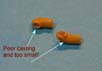
| The casemate guns had the poor resin barrels replaced with NNT brass replacement items. The casemates had lids made of halved brass circles, the casemate doors and drop plates were made of thin brass strip. | 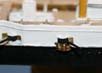 |
||||||||||||||||||||||||||||||
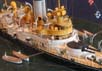
| This ship was liberally festooned with cowl vents- over 45 of various
sizes in total
!!
The kit items, which had earlier been prepared, were now sorted through; many were discarded, partly because of incorrect sizing and many due to being of indifferent quality. |
 |
||||||||||||||||||||||||||||||
| I carved a number of replacement cowls from resin stock- old casting
plugs etc.
Resin machines and sands beautifullypermitting easy replication of a number of cowls that needed to be identical. Evergreen rod made the trunks and a copper wire circle made the rotating joint. |
 |
||||||||||||||||||||||||||||||
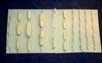
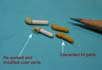
| The fore and aft decks were liberally sprinkled with small cowl vents
of a variety of
Sizes, the positioning of these on the hull casting was good-if incomplete. Alas the quality of the cast-on vents was poor-so they were all cut off and replacements were made using flux-cored lead solder wire of a variety of gauges The fluxcore gives easy centering of the drill bit when drilling out the mouths.- which were later flared out with a cocktail stick that had been sanded into a tapered ballshape . |
 |
||||||||||||||||||||||||||||||
| The cowl vents took a considerable amount of time to make and install. Some of the vent shafts penetrated all bridge levels. These were drilled through in situ and the vent trunks passed through retrospectively. | 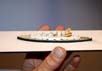 |
||||||||||||||||||||||||||||||
 |
|||||||||||||||||||||||||||||||
| Having hollow tubular masts meant that the various diameters of the military mast could be made simply by sleeving various sizes of tube and rod together- with the rods still locating all the way through to the base of the ship. The upper fighting top was made of brass strip. |  |
||||||||||||||||||||||||||||||
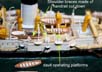
| As the ship progressed detail was added continuouslyalmost
all of it scratchbuilt.
The davits were made of brass wire, the operating rotating gear being circles of copper wire. Davit platforms were made of paper, cut out doubled with scissors thereby ensuring symmetry. 8 x Light and 2 x QF guns were made and detailed using scrap PE. Interdeck stanchions were cut and fitted all around the aft boat deck well; only to virtually disappear from sight once the boats were installed amidships |
 |
||||||||||||||||||||||||||||||
 |
|||||||||||||||||||||||||||||||
| These were made by twisting thin copperwire around a drill shank and gluing to the vessel just above the porthole. Once set, the wire circle was in--filled with thinned white gluewhich when painted gave a pleasing and convincing effect. | 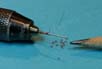 |
||||||||||||||||||||||||||||||
 |
|||||||||||||||||||||||||||||||
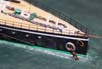
| At the bow the chain apertures on photos of the real ship had a massive
presence-the kit was devoid of any detail here
The reinforcing was made of flattened solder wire for the larger apertures and the smaller ones of brass wire. |
 |
||||||||||||||||||||||||||||||
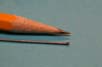
| Torpedo net booms were installed- these were made of stretched(to straighten) brass wire, all cut to equal size on a small chopper jig | 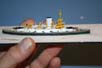 |
||||||||||||||||||||||||||||||
| Anchors were made of PE-backfilled with white glue to give the sense of a massive casting rather than flat metal. | 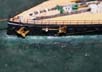 |
||||||||||||||||||||||||||||||
| Despite the diminutive size of the model .- the amount of tools and PE required to work on the model meant my workbench slowly but steadily avalanched across the work areauntil the model was shunned to the side . | 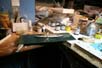 |
||||||||||||||||||||||||||||||
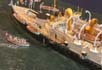
| The very distinctive fwd boat-racks were cobbled together of old WEM Aircraft carrier PE parts; tiny CA butt joints, which were very fragile, made installation thereof a fraught experience!! |  |
||||||||||||||||||||||||||||||
| Ships of that era based in the Mediterranean Sea often carried semi-permanently
installed awning support bars; to gain greater shade coverage the tops
were often curved outboard.
I made my awning supporting bars from fine 1/350 railing longitudinals and curved the tops using tweezers. |
 |
||||||||||||||||||||||||||||||
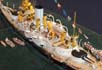
| Small details such as the casemate lid supporting struts, boat racks, navigation lights, shoulder braces for small guns, vents, fairleads, small davits etc all took an extraordinary amount of time for apparently little individual effect- but the cumulative picture was one of a busy ship. | 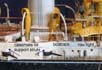 |
||||||||||||||||||||||||||||||
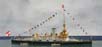
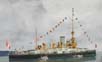
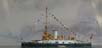
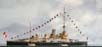
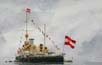
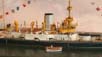
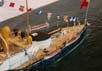
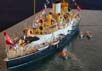
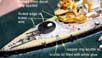
| Because I was depicting my model attending the 1897 Fleet Review in honour of the 50 year anniversary of Queen Victorias reign, modelled to re-enact two photographs of the Wien in the Solent, the ship needed to be showing her full Ensign complement and be dressed overall with signal flags; the instruction to the KuK navy being that there should never be a red flag adjacent to an Ensign. | |||||||||||||||||||||||||||||||
| The Ensigns of various sizes were drawn on the PC using Serif drawplus8. | |||||||||||||||||||||||||||||||
| They were printed onto whiter decal paper, sprayed with
liquid decal film and cut out, and folded back to back. Once they had been
dried they were sandwiched in tissue paper and brutally crumpled. The
tissue paper softened the radius of bend and prevented the decals splitting
or getting scratched. The same procedure was followed for the signal flags(from
my ever dwindling supply of Dunagain decals)
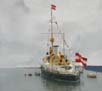
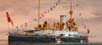
Once dry and crumpled the flags were all given a light coat of matt varnish. Being a fleet review, the ship should show no dirt or signs of weathering;
a little light chalking of the hull (dried saltwater spray ) would give
testament to her long journey from the Adriatic.
Crew were a mixture of Eduard and GMM. Humbrol and Hannants enamel paints were used with an all over spray of Lifecolour matt acrylic varnish. Rigging was carried out in the usual method using stretched sprue of black and brown. See discusion on ShipModels.info forum |
|||||||||||||||||||||||||||||||
|
|||||||||||||||||||||||||||||||
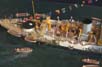
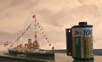
| The water was made of Artists watercolour paper, suitably painted and given a number of coats of clear varnish to give some lustre to the water. | |||||||||||||||||||||||||||||||
|
|||||||||||||||||||||||||||||||
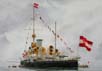
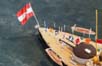
| For the long spans of lightly sagging lines to carry the signal
flags I experimented with fine wiretoo thick.
My daughters human hair(!) - too thick and too unpredictable in behaviour( much like my daughter!) Light Caenis line; alas..-no sag |
|||||||||||||||||||||||||||||||
|
|||||||||||||||||||||||||||||||
| In the end I went back to what I have tried and tested, easiest and
most effectiveif fragile
Stretched sprue --sagged beautifully and deflected
slightly to leeward as well!
The signal flags were attached using thinned matt varnish. |
|||||||||||||||||||||||||||||||
|
|||||||||||||||||||||||||||||||
| All in allan interesting model of an interesting ship. The kits shortcomings were not major, although with only a small amount of research it could have been significantly improved . | |||||||||||||||||||||||||||||||
| Invaluable aids to the construction of this model: | |||||||||||||||||||||||||||||||
| Plans by Peter Kovac ( Nostalgia
navy)
Type ID booklet-Monarch class by THE MODELLER Essential Bibliography: Die Schiffe der KuK Kriegsmarine im Bild Vol 1 KuK Flotte 1900-1918 Wladimir Aichelburg Austro Hunagrian Batlleships Paul J Kemp KuK Dampfschiffe Wladimir Aichelburg Useful reference images Austro Hungarian Battleships Zvonimir Freivogel And various Internet resources!
|
|||||||||||||||||||||||||||||||