|
| page 1 of 2 |
| History | ||||||||||||||||||||||||||||||||||
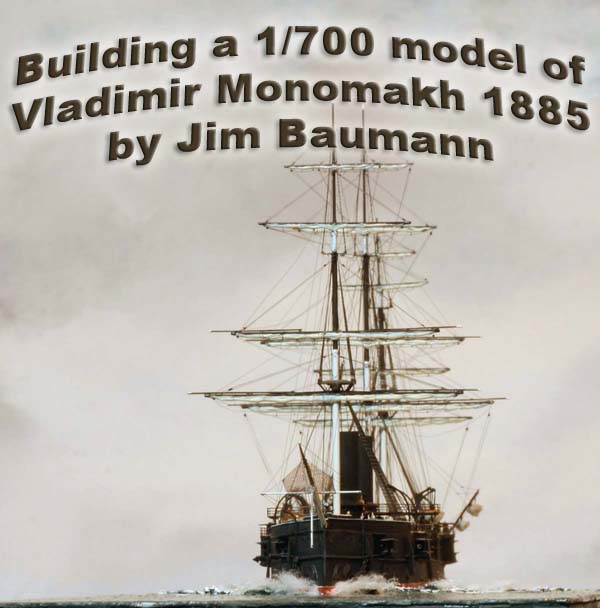
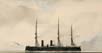
| This Armoured Cruiser of the Imperial Russian Navy, named
Vladimir Monomakh was laid down at the Baltic Shipyard in St
Petersburg 1881, and completed in 1883.
Conceived as a sister-ship to Dimitri Donksoi , she was launched first and as a result of numerous changes and modifications during construction the ships ended up rather different in appearance. During her service career she sailed impressively enormous distances in her various deployments between Europe to the far East. After commissioning and sea trials on 11 October 1884 Vladimir Monomakh began a leisurely voyage from the Baltic Sea to the Far East. She visited the ports of Kristiansand in Norway and Portland Harbour on the South coast of England. Thereafter she sailed for Malta and onwards to Greek Waters; where she spent one and a half months before making for Port Said prior to transiting the Suez Canal. Arriving at Nagasaki, Japan in March 1885 she was appointed Flagship of the Russian Pacific Fleet based at Vladivostock.. From November 1885 to March 1889 among other destinations she visited Manila, Hong Kong, Batavia, Singapore and Penang Island before returning to Kronstadt in 1887 for a refit in 1888. Vladimir Monomakh was stationed in the Mediterranean in late 1889 and for the whole of 1890; acting as the escort the Tsars son, Nicolas II, who was travelling on Pamiat Azova. The ships reached Singapore on 2 March and proceeded to Vladivostock, dropping anchor on May 23. Following an overhaul during August she spent the winter at the port of Nagasaki; returning to Europe and reaching Kronstadt in August 1892 to commence a comprehensive major refit which saw her full sailing rig being cut down to signal masts and her telescopic funnels being fixed in place. On 2 October 1894 the ship, was ordered back to the Mediterranean. Because of increasingly rising tensions of the first Sino -Japanese war of 1894-95, the entire Mediterranean Squadron was ordered to reinforce the 2nd Pacific Squadron. Vladimir Monomakh reached Chefoo in China on 16 April 1896, becoming the Flagship of Rear Admiral Yevgeni Ivanovich Alekseyev, 2nd in command of the Pacif Fleet. She returned to Vladivostock and then arriving at Kobe in Japan January 1896, prior to sailing for home waters and another major modernisation and refit at Kronstadt, during which her now obsolete 8-inch and 6-inch guns were replaced and the propulsive machinery being overhauled and re-boilered. Vladimir Monomakh transferred back to the Pacific Fleet in November 1897 and reached Nagasaki in February 1898. After the expulsion of the Japanese Fleet from Port Arthur as a result of the Triple Intervention she was part of the Russian force occupying that strategic harbour. ( http://en.wikipedia.org/wiki/Triple_Intervention ) During the Boxer Rebellion of 1900, she served as a troopship in June. Upon her return to Port Arthur in September of the same year she accidentally rammed and sank the merchant ship ' Crown of Aragon'. In December 1901 she met her near-sistership Dimitri Donskoi at Hong Kong, the two ships returning to the Mediterranean via the Suez Canal. Vladimir Monomakh remained in the Mediterranean for that summer and reached Kronstadt in October 1902. 1903-04 she remained in the Baltic, during which time there was further upgrading of the QF armament. In February 1905, Vladimir Monomakh was assigned to the Third Pacific
Squadron, which was sent to reinforce Admiral Zinovy Rozhestvensky 's Second
Pacific Squadron. The Third Pacific Squadron transited the Suez Canal and
joined the 2nd Pacific Squadron at Cam Ranh Bay in French Indochina on
14 May 1900
|
||||||||||||||||||||||||||||||||||
| Russo-Japanese War service | ||||||||||||||||||||||||||||||||||
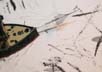
| At the decisive Battle of Tsushima on 27 May 1905, Vladimir
Monomakh was positioned to the right side of the Russian battle-line, guarding
the transports and so avoided the annihilating Japanese gunfire inflicted
upon many of the other vessel of Second Pacific Squadron. She engaged
the cruiser IJN Izumi, which was hit several times and retired from the
engagement.
However Vladimir Monomakh had in turn received several hits herself, one of which had started an ammunition fire. Speedy flooding of the magazine prevented an explosion. As the darkness drew in the surviving Russian warships were attacked by IJN Torpedo boats, one of which was destroyed by gunfire from Vladimir Monomakh. She was torpedoed at 20:40 hours causing major damage, however remained afloat with engines and pumps functioning, though continued to take on water. The next morning Captain Vladimir Aleksandrovich Popov gave the order to abandon ship, and ordered her to be scuttled rather than surrender the ship to the Japanese Forces. Vladimir Monomakh finally slipped under the waves on the morning of 28 May 1905 at 10:20 am. |
||||||||||||||||||||||||||||||||||
|
 |
|||||||||||||||||||||||||||||||||
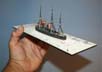
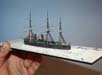
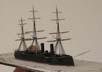
| Building the model of Vladimir Monomakh as in 1884-85 | ||||||||||||||||||||||||||||||||||
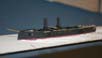
| The 1/700 scale Combrig resin kit of Vladimir Monomakh
is intended to represent the ship at much later point of her career at
Tsushima.
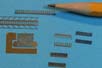
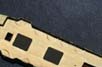
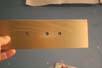
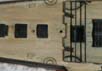
As such considerable modifications were carried out with all her armament, boat stowage arrangements, and the long launch as well as most detail items as well as the entire rig being scratch-built. In addition much cast detail was removed and replaced with finer items as well missing deck features added. Dimensionally the hull was satisfactorily close to the published dimensions as far as I could ascertain. To add interest to the otherwise (potentially) featureless-appearing hull, especially as she was to be painted in black rather than the Russo-Japanese war scheme of white, I decided to open up the gun casemates and drop down hatches as seen in period photos. These were moved fore-and-aft according to plan and photo resources, raised in height with styrene slivers and lined with PE brass rectangles for consistent sizing , these being cut from some older 1/350 handrail from my large stash of Photoetched materials. |
 |
|||||||||||||||||||||||||||||||||
 |
||||||||||||||||||||||||||||||||||
 |
||||||||||||||||||||||||||||||||||
 |
||||||||||||||||||||||||||||||||||
|
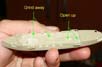
The casemates were opened up from above, the decks being added later, thereby concealing my free-style drilling ! Much of the cast deck structure was also ground away. The funnel and vent bases that were cast level with the top deck in the kit had to be lowered, the fwd conning tower removed and the vent base made smaller, which required repairing and re-scribing the wooden deck. All 'Aztec' cast on stairs were removed and the deck 'repaired' and re-scored. The twin staircases for the stairs fore-and-aft for access down below were also opened up--as well as the aperture for the large engine room skylight. The overlay deck also needed work with parts being removed, slimmed down, and the whole deck being thinned at the edges. The pilothouse was moved aft on the bridge deck; this deck being repaired with a previously removed section of resin deck to match! |
 |
|||||||||||||||||||||||||||||||||
 |
||||||||||||||||||||||||||||||||||
 |
||||||||||||||||||||||||||||||||||
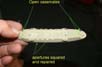
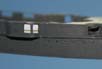
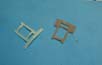
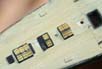
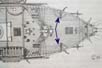
| The drilled out aperture for the engine room skylights was now a gaping
hole that needed to be made a feature of! The kit surface of the skylight
had been simplified with a few portholes. The real thing, according to
my drawings, had two sets of hinged skylight-hatches per side with 6 portholes
per hatch.
This was going to be tricky to replicate exactly right without a piece of custom relief etched PE! I elected to represent the outer set of hatches open as seen on a photo of Dmitry Donskoi -and represented the 4 portholes per hatch with some fine mesh--with the hatches themselves being cut from old stock 1/350 scale stairs. |
 |
|||||||||||||||||||||||||||||||||
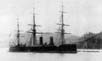
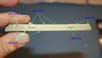
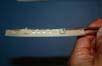
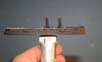
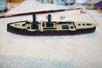
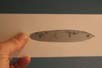
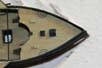
| The vertical hull sides were a bit dished, so I removed
the cast-on strakes( neatly done, alas over-scale and having the
wrong profile). This allowed me to pare away the resin with a blade to
give a flat side and add the very slight tumblehome shown on a plan cross-section.
I replaced the now missing strakes with some fine nickel silver wire bent in situ and glued with CA step by step. The new strakes were much finer--and the casemates now had the rounded rather than angular profile with a completely flat bottom as per photos. Paper tops to the ground down and smoothed ventilator bases and some paint on the deck and hull made the model look more encouraging! |
 |
|||||||||||||||||||||||||||||||||
 |
||||||||||||||||||||||||||||||||||
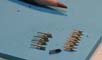
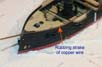
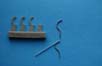
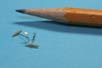
| The making and installation of the tracks for the rotating
broadside guns as fitted when she was built needed a bit of thought. I
made these of gunmetal coloured copper wire wound around a piece of appropriate
size tubing to form a tight spiral. This spiral was cut into a number of
small circles. The small circles were then cut in half to make semicircles.
These semicircles of wire were then squashed between the jaws of smooth-faced
Jewellers pliers; the process was repeated for each circle until they all
had a flat profile.
The one on-deck photo of the ship I had showed a deck view with a portion of a gun track showed the track rail and flange plate were quite substantial. The effect was pleasing; painting the tracks with a black wash dulled them and removed the visual starkness. |
 |
|||||||||||||||||||||||||||||||||
 |
||||||||||||||||||||||||||||||||||
| I was dissatisfied with the flying bridge casting, even
after paring it thinner with a blade; it lacked some cutouts, and appeared
the wrong shape in a number of areas. Having checked the plans, graphic
renders and photos, the flying bridge edges appeared to be quite thick
metal-faced timber. I was able to use some evergreen styrene plank sheet,
and cut a fresh deck from the paper template I had made and cut (folded
in half for checking of symmetry!)
It was cut so as to incorporate the bridge overhangs as per photos. This deck was supported by a large array of vertical supporting legs. These were drilled all the way through the hull and had brass wire dropped in from underneath the hull until they rested up against the underside of the deck, which had been clamped in place temporarily. Once these wires had been glued, they were snipped off with side cutters and the legs bent around from spar-deck level to be as plumb as possible in every plane. |
 |
|||||||||||||||||||||||||||||||||
 |
||||||||||||||||||||||||||||||||||
 |
||||||||||||||||||||||||||||||||||
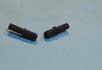
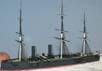
| I had previously drilled out the kit's resin funnels--but I became
increasingly unhappy with their shape and height -so made two all new funnels
of copper and brass tubing.
On the real ship in her early years when she the full sailing rig these funnels were telescopic and could be lowered when the lower sails were set. |
 |
|||||||||||||||||||||||||||||||||
| The little deckhouses and skylights have had their glass
window hatches added.
( WEM brass 1/350 DKM hatches ). The main engine skylight was removed, passed through a flame to remove all glue residues and rebuilt better using matt varnish to tack the parts together prior to re-applying CA glue using capillary action to draw into the joins without clogging. |
 |
|||||||||||||||||||||||||||||||||
 |
||||||||||||||||||||||||||||||||||
 |
||||||||||||||||||||||||||||||||||
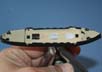
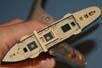
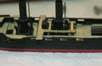
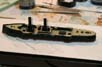
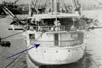
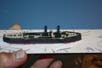
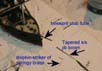
| Much minor detailing was done, adding railings, stairs into the hull voids, the fwd boatskids, drilling out the mouths and installing the eight cowl vents around the funnels and making the distinctive free-standing telescopic steam pipes. The lower blockhouse had been made and installed which was still to be topped with the flying bridge and the oval conning tower. At this stage the model began to give a glimpse of the end result the mean reverse sheer bow and the brutal black sides being most appealing to my eyes. | 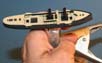 |
|||||||||||||||||||||||||||||||||
 |
||||||||||||||||||||||||||||||||||
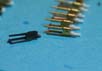
| The 8 in and 6 in guns respectively which were mounted
on the aforementioned semi-circular tracks, had differing shaped gun carriage,
both looking much like the recoil slide carriage found on land coastal
forts.
I based the appearance of these on photos of the type on similar ships and as they are buried in the shadow depths of the spar deck under an overhang the effect should be sufficient. Quite tricky to make and repetitive...- using NNT barrels and Photo-etch components gleaned from LArsenal depth charge racks and WEM PE boat cradles. |
 |
|||||||||||||||||||||||||||||||||
 |
||||||||||||||||||||||||||||||||||
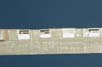
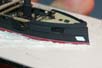
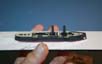
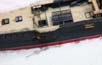
| Contemporary photos showed the vessel to have a very thin
white line with a surprising amount of boot-to showing above the water.
Not having the patience to mask, paint, re-mask and re-paint-- and feeling unable to get a REALLY thin and REALLY sharp white line using paint.... I resorted to my favourite method of red stripe over white, using the tried and tested TC-decals from Germany. |
 |
|||||||||||||||||||||||||||||||||
 |
||||||||||||||||||||||||||||||||||
| Thereafter the ship was mounted on to her sea-baseplate
to prevent any further handling damage.
The ship was mounted to her base-plate using 3 x selftapping No 6 screws into the pre-drilled 3 mm holes. The underside of the mounting plate was deep-countersunk so that I could fine-tune the ships sheer-line using small washers. The sea was created using my favourite water method of artists watercolour paper with Acrylic matt paste as described here: http://www.shipmodels.info/mws_forum/viewtopic.php?f=4&t=37223 and here: http://www.shipmodels.info/mws_forum/viewtopic.php?f=4&t=37406 |
 |
|||||||||||||||||||||||||||||||||
 |
||||||||||||||||||||||||||||||||||
 |
||||||||||||||||||||||||||||||||||
 |
||||||||||||||||||||||||||||||||||
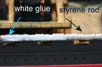
| The hammocks stowed along the midships bulwark were a bit of a dilemma
to replicate, some contemporary photos show these to be exposed to the
elements when in port, however these often had a cover sheet for when the
vessel was underway as rain/sea-spray would have made the hammocks a very
unpleasant place to sleep for the crew.
Although the stowed hammocks have a reasonably even profile there are nevertheless some irregularities in the shape when covered with the canvas cover sheet. I elected to make lots of small hammocks of .20 thou styrene rod and then used white glue to homogenise the shapes and create a cover 'sheet'. |
 |
|||||||||||||||||||||||||||||||||
| The remaining 6 in guns were fitted to the casemates and
anchor hawse-plate details, torpedo tubes etc were added from brass scraps,
paper and wire, as well as making a start on the various sizes and shapes
of railings.
A lot of time was spent making the new flying bridge deck and even more time taken to apply the railings; taking care to ensure symmetrical stanchion placement so as to get stanchions on the corners. |
 |
|||||||||||||||||||||||||||||||||
 |
||||||||||||||||||||||||||||||||||
 |
||||||||||||||||||||||||||||||||||
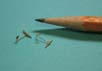
| On the fore and aft decks there were additional guns on
tracks
These were made of copper wire would into a spiral, cut and then flattened between two Stanley blades with a pair of pincers giving the compression. I had to make the tracks about 10% under scale as the cast bulkheads are overscale in thickness, a point that bears watching on my next build.... ). |
 |
|||||||||||||||||||||||||||||||||
 |
||||||||||||||||||||||||||||||||||
 |
||||||||||||||||||||||||||||||||||
 |
||||||||||||||||||||||||||||||||||
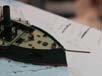
| The curved sternwalk railing required some lateral thinking
There was nothing remotely suitable in my PE stash.
The solution came in the form 1991 GMM 1/600 Merchant ship PE in stainless
steel chunky ratlines...
|
 |
|||||||||||||||||||||||||||||||||
 |
||||||||||||||||||||||||||||||||||
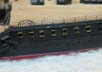
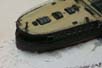
| The opened gun ports and casemates required lids top and
bottom. Normally I make these of paper as they are easily cut. Because
they were long rectangles the paper did not have sufficient longitudinal
strength and tended to bow and was not satisfactory. I also wanted some
texture on the inboard faces to indicate the fastening mechanisms. The
flaps needed to be consistent in length as well as width. I realized that
I would have to add and make the Gun port flaps - for the embrasures I
had depicted open....
Hunting high and low through my PE stash elicited nothing useful or repeatable.. Using my normal favourite method-paper-- was unsuccessful in this instance- the strips were very narrow and prone to curling... in addition as I wanted the inside of the flaps to have some texture I cut up some spare WEM RMS Queen Elizabeth liner PE boat interiors... The thwarts had surface etched knees on the ends, which worked well for giving the desired relief texture to the insides of the flaps |
 |
|||||||||||||||||||||||||||||||||
 |
||||||||||||||||||||||||||||||||||
 |
||||||||||||||||||||||||||||||||||
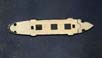
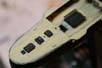
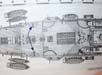
| Much of the small detailing took up a lot of times, virtually
unnoticeable individually, these small bits do add to the collective whole
effect.
A = the conning tower which was reshaped, lowered and had the windows made narrower using decals strips. B = The anchor hawse-pipes with their lids sanded to shape of brass PE fret scrap. C = Torpedo tube door--made of a piece of 1/350 PE stud chain link -then in-filled with white glue to level. D = The large gash shutes both are sides made of two strips of styrene-cut-to get over the rubbing strakes. E = Accommodation ladder door. F = Very fiddly,..... The top and bottom halves of the hatches--cut from 1/350 stair treads to gain repeatability and square The hatches aft on both sides took nearly four hours per side. They were cut with at least 50% wasted... They were attached with matt varnish to tack on --and backfilled with CA glue afterwards for strength. |
 |
|||||||||||||||||||||||||||||||||
 |
||||||||||||||||||||||||||||||||||
 |
||||||||||||||||||||||||||||||||||
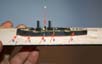
|
Lots of scratchbuilt small details such as small gun carriages made of PE boat cradles, Fife (pin) rails around the masts ( made of heavy old PE ladders from model Railway sources) small searchlights, small compass platforms as well as applying some figures, interdeck struts, boat skid support stanchions, torpedo net booms; it did indeed seem endless. |
 |
|||||||||||||||||||||||||||||||||
 |
||||||||||||||||||||||||||||||||||
 |
||||||||||||||||||||||||||||||||||
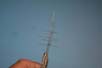
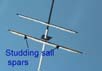
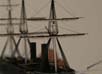
| The masts were of all metal tubular construction with the
upper spar being a finely tapered brass rod from BMK ( Wehrmacht 1/32 antenna)
Their construction was made much easier by having each mast held firmly by its lower mounting stub in individual pin-chucks with large heads so that they could be stood up The platforms were made of paper with the supporting cheeks. The joins in the spars had the strapping simulated suing decal strip over-varnished prior to paint application. I experimented with tapering the spars myselfbut my results looked a bit clunkymore practice needed! I surmised that, as the furled sails would visually occupy the lower half of the spar anyhow that in this instance it might look ok. I will plan further ahead on my next sailing rig project! The furled sails were simulated by repeated applications of white glue.
|
 |
|||||||||||||||||||||||||||||||||
 |
||||||||||||||||||||||||||||||||||
 |
||||||||||||||||||||||||||||||||||
 |
||||||||||||||||||||||||||||||||||
 |
||||||||||||||||||||||||||||||||||
 |
||||||||||||||||||||||||||||||||||
 |
||||||||||||||||||||||||||||||||||
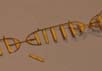
| The rigging of this vessel was always going to be an involved task,
all of which is made of stretched sprue with my usual method described
in detail here:
http://www.shipmodels.info/mws_forum/viewtopic.php?f=4&t=37536 A long but often overlooked task in miniature sailing ships is the creation of foot-ropes along the back edge of the spars, used for the crew members to transit the spars athwart ships for the tasks of making sail or furling the sails These were all made of stretched sprue; the technique being to create equal size bows each side. Once the cement set one then needs bisect the centre with another piece of stretched sprue with some liquid poly on it; attach to the bow and once the poly melts the bow draw it upwards and secure the end to the spar. Repeat this until a feasible representation of the footrope on one side of the spar has been achieved. Then repeat ! I placed a 1/700 PE figure on each the yards to ensure that he would be able to stand on the footrope and furl the sails with his waist in the correct pace so as to ensure they stayed within acceptable scale boundaries. |
 |
|||||||||||||||||||||||||||||||||
|
Full of good intentions I tried to make my own ratlines as I have done on large scale wooden sailing ships; doing them in-situ using wire for the shrouds and stretched sprue for the footropes, which gave a credible result and a correct size relationship between the vertical and the horizontal. Faced with the number of shrouds and the need to keep them looking even and repeatable, I took the obvious sideways step and used the brass items from Atlantic Models( WEM). Prior to the installation of these I rigged most of the vertical halyards
and hoists and fastened them to the previously installed pin-rails surrounding
the masts. Whilst still accessible.
Despite the apparent ease of using readymade PE for this otherwise near
impossible task; it was nevertheless a challenging process to get right
and looking sharp. The Futtock shrouds (below the platforms) were simulated
with short lengths of ratline waste and stretched sprue.
|
 |
|||||||||||||||||||||||||||||||||
 |
||||||||||||||||||||||||||||||||||
 |
||||||||||||||||||||||||||||||||||
|
As light relief I turned my attention to the bow-sprit. Previous models of mine had always suffered from a fragile Dolphin striker. (Perpendicular spar on lower edge of the bowsprit.) I took a fresh approach and made the inner bowsprit of hollow tube, into which I inserted some springy brass wire bent at a nominal right angle. This allowed some fine-tuning to achieve the correct angle once installed
as well as being much stronger.
|
 |
|||||||||||||||||||||||||||||||||
| The yard hoists ( all of which were double-purchase tackles)
had been installed along with a few supports for the gaffs and boat
hoist boom.
I was unable to install further shrouds or yard bracing tackles or similar until I had installed davits and boats along with final crewmembers. |
 |
|||||||||||||||||||||||||||||||||
 |
||||||||||||||||||||||||||||||||||
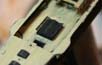
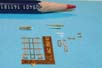
| Fortunately I was quite well furnished with a selection of Russian
pulling boats from a variety of sources such as WSW, WEM Combrig
etc, from my spares box, merely the large steam launch carried on
the massive midships davits needing to be scratch-built.
The aforementioned davits were included in the kit castings; however were rather crude as well as being too brittle and fragile to reshape. These were challenging, being square in section, curved and tapered. I made four identical formers of brass strip PEand then added some styrene strip, which was glued and sanded to a tapered shape. The brass allowed for final tweaking of the outline and with the large pulleys added they were quite pleasing to the eye. |
 |
|||||||||||||||||||||||||||||||||
|
The 4 x stocked anchors were scratch-built of brass wire, resin sanded to shape, styrene strip and brass triangles for the flukes |
 |
|||||||||||||||||||||||||||||||||
 |
||||||||||||||||||||||||||||||||||
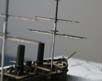
| The remainder of the build consisted in the ain of adding the remaining
boat davits and more seemingly endless rigging; ensuring that I worked
from inside out and making sure that more was added then destroyed in each
rigging session. !
The tight-furled headsails were again simulated with white glue. The crew safety net was made of fine floral veil, coloured with an indelible marker pen on tissue to absorb the excess ink and prevent clogging the fine holes. It was glued to the spar using matt varnish and edged with stretched
sprue.
|
 |
|||||||||||||||||||||||||||||||||
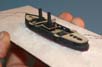
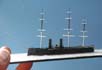
| The total rigging time was around 40 hours or so, which does seem like
utter madness in retrospect.
In conclusion this was a fascinating project. I cannot really criticise the kit as a starting point, as it is an older casting and in any case the kit was intended to portray the ship 20 years later in her career. Navsoure Russia had a number of fine photos in good resolution The Russian language paperback monograph by Sergy Suliga was very useful as the plans within depicted the vessel in her as built condition. |
 |
|||||||||||||||||||||||||||||||||
More
of Jim Baumann's work.
Updated 2011

© ModelWarships.com