|
Building the Brooklyn Steam Tug By Felix R. Bustelo
Part II: How Resin Kits Are Produced Part III: Selecting Your First Resin Kit Part IV: Preparing the Hull and Resin Parts Part V: Painting The Model Part VI: Adding Decals, Photoetch & Extra Details Part VII: Finishing Touches & Conclusion Part I: Introduction Ship modeling is enjoying a renaissance thanks largely to the "cottage" firms that produce resin kits and photoetch detail parts. Resin kits have filled the void left by the producers of injection-molded kits by making available as subjects that have been ignored or do not meet mass appeal. Resin kits are produced by small firms, which many times are actually based in someone's home. The appeal of resin kits is that they are usually of good quality, very detailed and offers modelers with a variety of subjects. However resin kits are more expensive than injection-molded kits for several reasons: the materials are expensive, the process labor intensive and the kits are limited runs. A question often asked by modelers looking to try a resin kit is: What is a good model to get as your first one? This article will hopefully shed some light on this topic and cover the construction of what I think is an excellent first kit. Part II: How Resin Kits Are Produced In order to understand why resin kits are expensive and to appreciate the economics behind this cottage industry, let's examine what actually goes into producing such a kit. Resin is a form of plastic that starts off as a two-part liquid. One liquid is called the filler and the other is called the catalyst. When both are mixed together, a heat producing chemical reaction is generated, with the heat causing the mixture to harden or cure. There are different versions of each liquid that can be used to control how fast the curing will be and the degree of hardness. How fast the resin needs to cure is a factor of the size of the part being molded; the larger the part (a 1/350 scale battleship hull) the faster the cure rate should be. A resin kit is based upon a scratch built model called the master. The master is basically the completed components of the kit being produced. The components are built in a variety of materials, wood or plastic or whatever works, and are based on specifications from detailed plans. A master is created for each resin part that comes in a kit. It is from the master that molds are made. The molds are made from a liquid rubber known as RTV (room temperature vulcanizing). RTV also comes in two parts and when the parts are mixed vulcanization will occur without the usual need for heat and the end product is a form of rubber. There are three common types of molds used in producing resin kits: a one piece or glove mold, a two-part mold and an open-faced mold. Which type is used depends on the part being cast. The glove mold is used for such parts as the hull or superstructure components. A box structure is made and the master is glued to a strip of wood or plastic. Let's say that a full hull is being cast; in this case the strip of wood or plastic is glued along the keel. The hull master is placed right side up into the box and then the RTV is poured over the master. After letting the RTV harden for 24 hours, the box is unassembled, the master is removed and the mold is ready. The opening made by the strip along the bottom of the master component will allow the resin to be poured into the mold during casting, hence the casting block found on some components. A two-part mold, typically used for smaller parts, is created in a similar fashion. RTV is poured into a box and one side of the smaller master component is pressed into it to make an impression. After the mold is hardened, the master is removed and the process repeated for the other side of the master. In this case, a dowel or rod is used to create a duct through which the resin will be poured into the mold. When the apart is actually cast, the two halves are clamped together to form the mold. An open-faced mold is used to cast parts that have no detail on one of its sides, such as gun tubs. An impression of the master is made in the RTV, into which the resin is poured. This is the simplest type of mold used. During casting, the mold is placed into a pressure pot, a metal container that resembles a pressure cooker. After the resin is poured into the mold, the pressure pot is sealed and air is pumped into the pot to create pressure that will compact the resin and force any air trapped in the mold to the surface. Most if not all of the air trapped in the mold is removed to eliminate or at least minimize imperfections, such as tiny holes, in the part. With two part molds, the resin is sometimes poured into the mold with some pressure, which is similar to how injected-molded kits are made. The life expectancy of a mold is about 25 castings before it is no longer any good. At this point, a new mold is created from the master and the cycle begins again. The major reason that resin kits are expensive is that RTV is a very expensive material and several generations of molds need to be created for a particular kit's run. Depending on the popularity of the subject and the asking price of the kit, a typical production run can be as low as 100 to as much as 400 to 500 kits. Compare this to the thousands of injection-molded kits produced by firms like Revell and Airfix. While resin is a form of plastic, you cannot use standard model cement to glue parts together. Model cement is designed to react with styrene plastic to cause it to soften and sort of weld the parts as the cement dries. Model cement will not cause resin to react in the same way, therefore rendering it useless. Instead, you will need to use cyanoacrylate (ca) glue or some other contact cement to join resin parts together. Personally I use both standard and gap filling ca glue. Resin, however, will accept the same paints that styrene will use, just make sure to first clean all parts thoroughly with soap and water. Some questions have been raised about health concerns when working with resin. Inhaling resin dust, created while sanding parts, is thought to be extremely hazardous. While there is some truth to this, it is true of a lot of other materials that we use in building models. Inhaling fumes from paints or glue can also be hazardous to your health. Caution should be exercised when working with just about any material in your workshop. Working in well-ventilated areas and wearing a dust mask, which can be purchased in a hardware or home improvement store, are good practices. Packages containing resin in its two raw forms do not carry any specific warning labels, unlike modeling putty and Testors Dullcote, which contain Toluene, a substance linked to birth defects. Again, use common sense and good judgement when building you model and working with the variety of materials and supplies utilized in complete your project. Part III: Selecting Your First Resin Kit Now that we have a little better understanding on how resin kits are produced, let's discuss several factors that I would consider on selecting your first resin model. 1) Price - resin kits, due to the manufacturing process and cost of materials, are typically expensive when compared to the injection-molded kits that most of us are accustomed to building. Resin kits usually include photoetch rails and detail, but after adding the cost of an aftermarket photoetch set for your plastic kit, resin kits are still much more expensive. 2) Complexity of Build- You may not wish to tackle a battleship or a cruiser as your first resin build, as these subjects will contain many parts and perhaps some tricky assembly steps. While this will also apply to injection-molded kits, it may be wise not to get in over your head with a kit that costs somewhere between $250 - $500. An easier build may be a better option to working with a new medium. 3) Experience with Photoetch - This factor is related to the previous one but it will also help you decide what you may wish to tackle. A simple kit in terms of resin parts may have a somewhat complex photoetch detail set. If you have experience with photoetch in building styrene kits, then you may opt for something with more brass. If not, opt for a kit with a very basic photoetch set. In some cases, this may be your introduction to using photoetch as well. 4) Subject matter - I mean this in the broadest sense; what type of vessel do you want to build? Do you prefer military or civil subjects or are you looking for a change? After reviewing these factors and applying these to resin kits that are available, I decided that an excellent kit for a first endeavor would be the Iron Shipwright 1/350 scale Brooklyn steam tugboat. The kit is inexpensive, with a suggested retail price of $35 US, and you actually get two complete models for this price. The kit is also a very simple build, with a total of 5 resin parts for each model and a basic photoetch set, with rails and ladders. The simplicity of the photoetch also makes it an attractive first resin project. Finally, the subject matter appealed to me. After building a couple of warships, I wanted to build a civilian vessel. Also, I was planning to exhibit some models at the New York Ship & Boat Model Festival, hosted by the South Street Seaport Museum, so the tugs would fit into the nicely with the surroundings. Part IV: Preparing the Hull and Resin Parts O.K., so enough talking about this kit, lets get into building it. But first one more order of business; let me confess right here that this is actually my second resin kit. My first had a more complex photoetch detail set, but my approach to this article is the famed K.I.S.S. Principal - Kept It Simple, Stupid. I usually like to research my subjects thoroughly,
but it is case I decided to use basic references as it is a simple build.
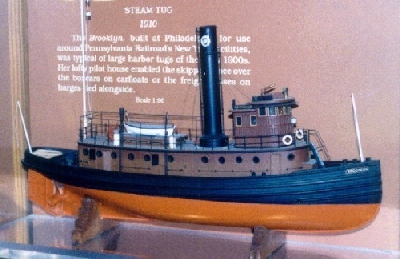
I found a full color photograph of a very large scale model of the Brooklyn
that is housed in the Smithsonian Institution that is available on the
Warship site. This excellent photo was my only reference.
Most of the time, the hull of a resin kit is resting
on the casting block. To remove it, I scored the seam where it meets the
keel with a #11 Exacto knife blade. I made several passes on each side
of the seam until I had cut enough so that the block could be easily snapped
of by hand. Once the block is removed along with the thin film at the bow
and stern, some sanding was needed along the keel to smooth out the rough
edges left by the block. While sanding, I wore my dust mask and used wet
sanding to minimize the amount of resin dust that enters into the air.
Once I was satisfied that the keel was smooth, I set this hull aside to
work on modifying the other one into a waterline model.
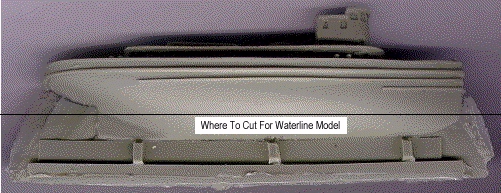
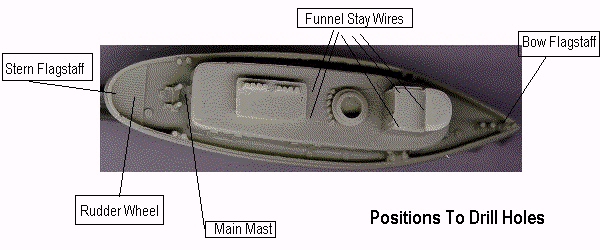
I placed the hull on my workbench and I proceeded to cut into the hull just below the edge of the masking tape. I used the casting block to help hold the hull into position. I went slowly in order to keep the cut straight. Since the hull is solid and resin is dense, it took a little while to make progress. When I reached the halfway point, I flipped the hull over and started from the other side. I thought that this would facilitate keeping the cut straight. I eventually met the other cut and the bottom came off with a snap. I ran the bottom portion of the modified hull over some 220 grit sandpaper glue to a piece of cardboard to remove a slight peak that formed where the two cuts met. At this point I also drilled holes into certain points
of the hulls using micro bits in a pin vise. The holes where made for the
mast, flagstaffs, funnel stays and rudder wheel. While making the opening
for the rudder wheel, I drilled completely through the hull. I then made
that opening on the underside of the hull wider to accommodate the pin
for the rudder. Finally, on the full hull version, I used a 1/8 inch bit
and a Black & Decker drill to make two holes along the keel to accommodate
the brass rod I was planning to use to display the model.
The kit provides photoetch funnel rings, which were used to as an attachment point for the funnel stays, as a photoetch part. The part is a thin ring with short supports along the inside that offset the ring from the stack. I carefully removed the rings with an Exacto knife and carefully slipped them over the top of the funnels. I slid them down about 1/4 of the way from the top, just below the shorter of the two pipes cast into the funnel. The ring may bend a bit, which really cannot be helped. Once in place and fairly straight, I applied tiny drops of CA to where the supports met the stack. Once the glue dried, I used my needle-nosed tweezers to try to straighten the rings out where they were a little out of whack. Now that all of the resin parts have been prepared, it was time for a bath. I washed all to the parts using dishwashing liquid and warm water and scrubbed them with an old toothbrush. This helps to remove any mold release agents as well as the dust and residue from the sanding. A clean model will accept the paint much better - I speak from experience. I let the parts dry overnight. Based on the Smithsonian model, the colors and paints I chose for the tugs is: Badger Anti-Fouling Red Oxide (#16-401) for the
hull below the waterline and the rudder
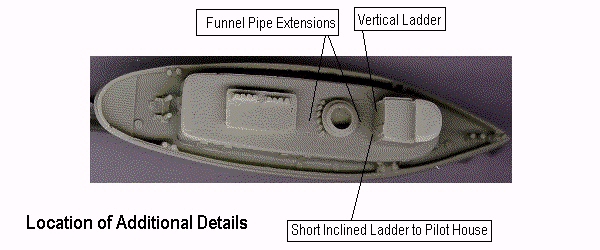
Since it is a small model and the gap between the bulwarks and the deckhouse is so narrow, it would be difficult to mask these sections for airbrushing. So I decided to use a combination of airbrushing and hand brushing to paint the models. The hull would be airbrushed and the rest of the model, including the deck side portions of the bulwarks, would be painted with a brush. To paint the hull below the waterline, I had to judge the position of the waterline using the photo of the Smithsonian model as a reference point. I carefully masked off the upper portion of the hulls using masking tape and keeping the demarcation line a straight as possible. Since the hull is about 4 inches long, it was not a daunting a task to use my eye to judge how even the masking was. Once I was satisfied with the taping, I airbrushed the anti-fouling red. I also painted the rudders as this point. An important note: even though I was building one of the kits as a waterline version, the upper portion of this rudder is still visible. So I cut one of them down with a sprue cutter where it would be "underwater". To airbrush the upper portion of the hull black, I masked off the anti- fouling red using low tack drafting tape to minimize paint lift off. I masked the deck level and above with masking tape. Since I had the airbrush ready with black paint, I also took this opportunity to paint the stacks. The rest of the model was painted using brushes. I also had one minor painting correction to make; The way I masked the hull at the stern made the spot where the black and red meet come to a sharp point when it should be rounded off. With a little black paint, I carefully rounded the off the area with a brush. Part VI: Adding Decals, Photoetch & Extra Details The kit does not come with decals, which is my only real complaint. I was fortunate enough to receive a set custom made by Bob Santos, who used them on his build of the Brooklyn tug. The symbol on the funnels is the Pennsylvania Rail Road logo, as the Brooklyn was owned and operated by this firm. The decals also included the tug's name for use at the bow and on the transom. Decals will adhere better to a gloss surface than to a flat one, so brushed on a little bit of Tamiya Clear gloss to the locations where the decals were to go. Once in place, I brushed on a little bit of Testors Dullcote, to seal them on and to remove the glossy shine. The funnel logo was actually a two step process: first I had to set the decal of the outer ring in place and later I had to center the Pennsylvania Rail Road keystone symbol within the ring. I brushed on some clear gloss over the ring to seal it prior to applying the keystone. Although I couldn't actually tell from the reference, I was certain that ladder leading to the pilothouse door would be present. Also I felt like adding a vertical ladder on the back of the pilothouse providing access to the roof. The kit did not provide these parts on the photo etch fret, but since I had some spares from another project, I added these to the locations noted below. It is easier to add these before the stack is in place, which would block access. With these in place, I glued the funnels in place with gap filling super glue. You will have to be careful as the funnels rest upon their bases and you will have to make sure that they sit straight up. There was no rake to these funnels and this was one of the distinguishing features of they type of tug. I looked at the funnels from all sides to make sure that they were straight. The funnels come with piping on each side, which end where the funnels meet the base. These pipes would continue through the deck, probably leading to the engine room. To extend these, I took some thin brass rod that matched the piping on the funnels and it into sort of a blunt 's' shape and cut them down it down to proper length. I repeated this process three more times. With a tiny drop of super glue at the tips I placed them into position at the base of the funnels. It was a tight squeeze between the funnel and pilothouse, especially with the photoetch ladders I added there. But I was persistent and the vent pipes extended. I then painted them black with a very small and pointed brush. I realize now that I should have drilled a couple of holes in the deck house roof at the correct spots to facilitate placing these bits of brass rod. The addition of these extras really added a nice level of detail and realism to the model.
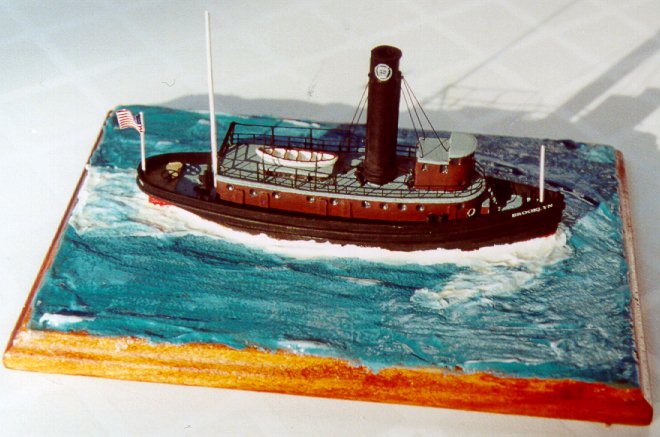
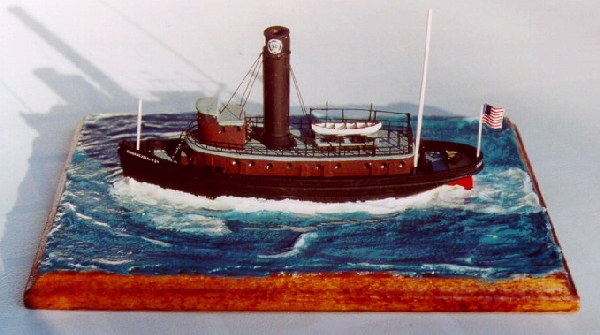
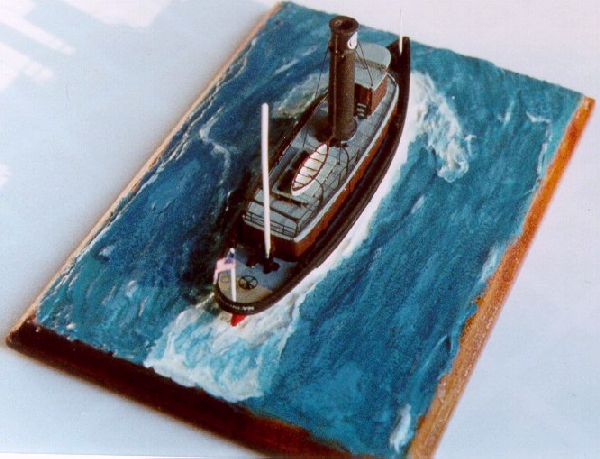
For the funnel stay wires, I used 2-pound test monofilament clear fishing line. I ran a black permanent marker over the strand of fishing line to give it the proper color and I cut it into smaller pieces. A tiny drop of superglue on each end of the line is all you need to attach the lines. One end goes into one of the holes I drilled earlier on and the other is attached to the photoetch funnel ring. To tighten the lines, I ran a very small soldering iron close enough to the monofilament to make the heat shrink the lines taut without melting them. The photoetch that comes with the kit is very basic, providing the necessary rails, main inclined ladder, davits and optional bracing. The rails go along the edge of the deckhouse roof. For the most part, these are straight runs, but the deck rounds off as it goes around the pilothouse. One full length of rail will exactly fit the distance from the aft corner of the deck to just in front of the pilothouse, leaving just enough space for the ladder. I wrapped one end of each rail around a 35mm-film roll canister to give it just enough curve. The ladders require that the handrails are folded up to a right angle and the individual steps are twisted 90 degrees as well. To glue the rails in place, I first tacked the rails down with drops of Elmer's white glue. This enables me to align the rails correctly with just enough tack to hold them in place without the glue drying immediately. Once dry, I applied some superglue with a pinhead along where the rail met the deck. Capillary action will draw the glue along the bottom of the railing to form a strong bond. The other parts, such as the main ladder, the boats, the davits, the rudder wheel, the mast and flagstaffs, and the brace are glued into position. The rudder wheel is glued to the top of a tiny bit of brass rod. The main masts are cut from brass rod provided in the kit, but the flagstaffs are cut from slightly narrower brass rod that I had. Part VII: Finishing Touches & Conclusion Now that all of the parts are in place, I airbrush
a coat of Testors Dullcote on the models to remove the shine from the dried
superglue and to give them a uniform flat finish. The full hull model is
mounted on two pieces of brass rod on a small display base with I purchased
at an arts and crafts store. I glued the waterline model to its base using
Duco Household Cement. Once dry, I used a wide, flat brush to apply a layer
of acrylic gel around the model. I used an old number 0 brush to apply
the gel closer to the hull. Since the Brooklyn tug would be plying through
New York Harbor waters, I made the water flatter and calmer in contrast
to more open seas. After the first layer of gel dried, I used the number
0 brush to apply some more gel to form some bow waves and the wake. Once
dry, I painted the "water" Model Shipways Dark Blue (# ) as a base color
and added streaks of a lighter turquoise crafts acrylic paint. The waves
and wake were painted white and after the paint was dry, I added to coats
of Future clear acrylic to give the "water" a nice gloss that makes look
a lot like the real thing.
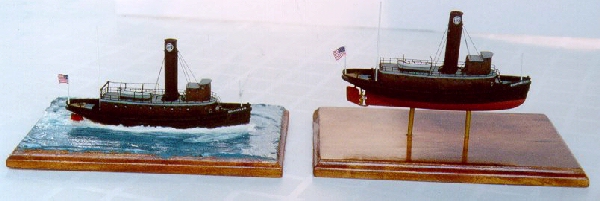
Click on thumbnail for a full-size picture I had a lot of fun building this kit and I am very pleased with the way they came out. A kit doesn't have to be complicated or have a lot of parts to make it good. I think others would also enjoy the Brooklyn tug as a first resin kit. I hope that you found this article of interest and useful in helping you determine what kit is right for you to try your hand with resin. My thanks to Ted Paris of Iron Shipwright for taking the time out of his busy schedule to let me interview on how resin kits are made, to Bob Santos for providing me with the decals used in this project, and Rob Mackie for allowing me to use the photo of the Brooklyn that is housed in the Smithsonian Institution. |