|
| In the 1960s the term Overkill was coined to describe
the ability of the 2 super powers, the United States of America and the
Union of Soviet Socialist Republics to destroy each other not only once
but many times over and over again; due to the sheer number of nuclear
devices each of them had amassed during the years.
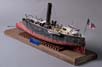
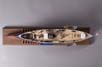
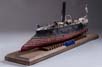
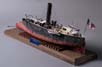
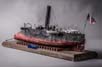
But when I look at this boat, Im pretty sure that this was where this cruel term originated. The designer wanted it to steam abeam an enemy to stick its deployed spar torpedo into his lower hull s and exploding it; then, just to make sure, ram him with this epic bow , and if that poor enemy, foolhardy as he could be, still refused to die a glorious death, complete the annihilation with , at this time the largest gun ever put onto a ship , a 15 Dahlgreen smoothbore gun! Concerning those 4 Gatling guns alongside on the railing, well think of them as some kind of garnish, which could be used in the highly unlikeable event when the surviving crew of the previously violated ship were sufficiently brave or foolhardy enough to try and board the vessel that caused such torment. ....if that is not what one would call overkill,.... nothing is! And for any landlubbers reading, just in case you are still wondering: During the Napoleonic wars, which ended in 1815, a 42pdr gun was considered a real ship killer, as the designation tells, this gun fired a cannon ball weighting 42 pounds, while a 15 Dahlgreen fired a projectile weighting 352 lbs.! Just try to imagine what one solid hit with that monster did to a wooden ship; if the term mincemeat comes into your mind, youre on the right way. A spar torpedo was in fact what we today would call a mine. But back in those glory days it was an explosive charge on the tip of a spar which was rammed into your enemies ship hull, far below the waterline where it was un-armoured and therefore highly vulnerable. On contact it would explode, ripping the guts out of almost any vessel. The damage such a torpedo caused was in most cases fatal . And finally, ramming a ship! Granted this is a very, very desperate measure. Even for the most powerful and most sturdy ships ever built ramming was always the very last option during an attack. The damage caused by ramming with high speed was disastrous, not only were the ships walls ripped wide open, frames were dislocated, seams all over the ship cracked open because of the stress put onto them, large and heavy machinery was dislodged and caused even more carnage, steam and fuel pipes were cracked and could easily cause large fires, in the worst case a keel was ripped apart which spelled certain doom to any ship, in other words total chaos! But the real problem was the fact that such tremendous damage was not only created on the rammed enemy vessel but on your own too, because of the sheer masses involved in such a crash. But this very ship here was playing in a different league or it should have, perhaps, maybe, who knows? As a matter of fact the designer of this maritime nightmare did not stop after creating the mother of all armaments; no he also wanted the ship to have the best possible propulsion system, it should be faster and more agile than anything else around. Well it was fast, sort of The solution for the designers idea was a so called Fowler wheel, a lets call it very special propeller. As already mentioned the ship should have been able not only to outrun any enemy ship but to outmaneuver them too. At least it did the last thing, it could turn on a dime but it never was able to outrun anything, at least not a warship, nor a merchantmen, it was so dead slow it could not even run away from a rowboat, with a crew consisting purely of landlubbers, with no arms and no legs and just to make sure no oars as well! That special propeller was a complete disaster and even after some extensive testing the problem could not be solved, sometime later a far better solution was found in the form of an even more special propeller, after some more money was spent and that new prop installed the result was yup, you got it, still the same! The boat could outturn anyone, even itself but outrun forget it! Just the attempt to leave the harbour turned into an epic voyage. So its armament was second to none but did I mention it was slow? They should have named it USS Ridiculous.... instead of USS Alarm..? So why on earth you may ask did I build this monstrosity? Hey, take a look at it, this thing is so damn cool, so awesome, so outlandish
I had to build it!
|
||||||||||||||||
| The model:
I started with a search on the Internet but this time I was not able to find a set of blueprints, nor anyone who could sell one to me. So in the end I used a plan for a cardboard model of this ship. The plan was in a much smaller scale but that did not hinder me at all. The plan was enlarged in the next copy shop and then the fun started! A few days later I had those plans enlarged and finally a day for me to start the work. The frames were transferred to some 8mm plywood as well as 2 decks. These parts were cut and sanded into the right form and then simply with some white glue fixed together. This whole job took less than half a day and now Im already working on the side walls. |
.jpg) |
|||||||||||||||
.jpg) |
||||||||||||||||
| Modelbuilding is to me some kind of constantly learning
and thats what I like so much. I always try to learn something new, sharpen
my skills, encounter and master new techniques or simply do something in
a complete new way just to see if this way is easier or not. In this particular
case I wanted to try a new technique how to build a hull. I have heard
several people in the shipbuilding community how hard it is to scratch
build a hull, quite to the contrary I always thought this to be the easiest
part, and never had any problems no matter if I built a full hull or only
waterline. Anyway I wanted to try something new. Normally you just built
a hull by cutting all the frames put them on a keel and connect them by
stringers and finally start to plank the entire hull.
Then you give this hull the final form by sanding it to shape. Since this ship is not so big I decided for something new. As you can see I made the frames and anything else but then I filled the structure with ordinary paper after which I covered the entire structure with a good thick layer of filler. On first sight this looks awfully rough but after a first encounter with a grinder down in my basement workshop the result was something different. After less than 8 hours of total work the hull looks, well.... quite good Id say. All imperfections you still can see will be covered by the next step.
|
||||||||||||||||
| So is this "new technique" good or bad? I'd say it's not
a bad idea, its fast (but hey I like building models, so why on earth should
I try do it faster?), its easy and not expensive, (well planking with wood
is not what I would call hard and expensive either)So if you are looking
for a fast way to build a hull, this is it on the minus side is the fact
that some fillers (like the one I used) smell really bad and it takes a
few days up until 2 weeks until this smell is gone. The sanding produces
lots and lots of dust, so you should do this outside or in your basement,
even then you should make sure your wife stays out of sight.... because
that dust will result in some snappy comments.
Another fact is due to this technique the result is heavy, really heavy, my finished hull weighs almost 6 pounds! On the plus side, if you ruin this thing during further progress, at least you've made a proper door stopper ! After some days of work, here is what I have achieved so far: The hull is completely covered with 0, 15 mm thick sheet aluminium. There are 24 pieces for each side of the hull. Each part had to be tailor made to fit properly and to give the right appearance I had to decorate every single sheet with rivets along both sides. After that I started to work on the main deck by putting almost 250 planks on it. These wooden planks are made from veneer, cut and sanded into the right dimensions and shape and then glued one after another into its place. When this is done the less funny part is to sand them all to the same thickness and height. That work is not only quite time consuming but boring as well. Besides of that you have to be quite careful, you dont want to add too much pressure while sanding because those wooden veneer stripes are only 1mm thick, which means you can ruin your whole work in an instant.
|
||||||||||||||||
| After that is done the deck is being coloured by using some special wax which not only gives the wood the right look it also acts as some kind of durst protector. Next in line was the railing around the main deck. This was made from wood on the inner side and aluminium sheet on the outside. They were simply cut into the right dimension and then the inside was planked with the same wooden veneer stripes as for the main deck. | .jpg) |
|||||||||||||||
| The outside was covered with the same aluminium sheet as the entire hull. Then these 2 parts were assembled to the hull and now only a few more minor details are waiting to be added.I cleaned the entire hull with isopropyl, to no avail. Then I used a sanding sponge on the entire hull, with the same result. Then I thought perhaps that new bottle of CA glue is not what its label says, luckily I had another bottle, so I used that one but what can I say, those stripes did not want to be used in this project. After several attempts I finally glued them with white glue which lasted a few hours for each single section until the glue dried .oh the joy of scratch building! | .jpg) |
|||||||||||||||
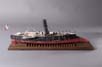
| Finally all of them were attached and more important, stayed
where I had put them, so I decided it was time for some colour. The inside
of the bulwark is white, while the outside is black. The underwater portion
of the hull should be red. I tried what I had available just to see how
it would look. The black is all right but the red is much too bright and
should be flat as well, so the colour you see in these photos is nothing
but a first layer/primer.
From this moment on the whole thing has changed significantly. Until now, the model had an almost toy-like appearance most of all because of the lack of any details. So my main objective for the rest of the entire project is simply details nothing but details. Since this ship has no real superstructure to speak of, only 2 small cabins a few skylights and a smokestack and of course a rather big gun in the front, I have to concentrate on these small parts to bring in as much details as possible. So here we go, now we start the really serious model building. One of the first such small details I had to build was that propeller. It may have ruined the entire career of this ship but it certainly is much more interesting than an ordinary screw. Fortunately I found a very good and clear photo which was obviously taken when the vessel was still under construction. This photo showed all I needed to know, what more could I ask for. Anyhow it took me 2 attempts to get the whole thing correct but finally I had a partly functional miniature of that Fowler Wheel which consists of no less than 71 pcs! Sure I could have made it much easier but as I already said I want as
much details as possible even when this means to completely overdo( or
overkill! ) . The only reason which kept me from building a fully functional
propeller was the fact that no one would ever notice and definitely would
I never, ever allow someone else to try if that thing spins and that the
blades are changing their deflection too.
|
||||||||||||||||
One of the first details I had to build for the main deck
was the small wheelhouse in the front of the smokestack. I made a small
structure out of plastic sheet, which was completely covered with real
wooden veneer in two different colours. I had to add 3 windows in the front
and 2 more to the sides. Now in some photos of a cardboard model one can
see that someone build town ordinary hinged doors to the side of this wheel
house. Im in doubt if this is correct. Since such ships are serving under
harsh conditions which include strong winds, you have to consider that
opening a door like this in a heavy weather with the wind coming from the
front could easily become impossible. Put the hinges to the rear of the
door and even the attempt to open that door under the same condition could
become suicidal. So I opted for sliding doors and thats what Ive build
as you can see. Inside the little cabin is the steering wheel, a machine
telegraph, some speaking tubes and since the wall looked a bit too empty
for me, I added a large map to it. Even the ceiling received some wood
too and a lamp too. Door handles and similar things were made from brass
wire and after a whole day of fiddling around that cabin is finally finished.
|
||||||||||||||||
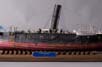
Onto the smokestack, the largest piece to be builds, with
the exception of the hull. It may be big but its fairly simple, just a
few parts made from plastic sheet, the stack itself is rolled from thick
lead-foil. A few more details like grab handles, a steam pipe and so on
and within a few hours to whole thing was ready to be attached to the rest
of the ship.
|
||||||||||||||||
| Did I say I wanted to put as much details in this model as possible?, well here we go: I had to build 2 of those hatchways which when not in use, are closed with canvas, which is attached to the frame with the help of some rope. Thats exactly what I wanted to recreate, literally! I built the hatchway out of plastic sheet and a small wooden frame at its base. So far so good, but then came the tricky part, I had to insert 24 pins around the frame where that rope is being wrapped. After that was done I made the canvas out of some tin foil from a bottle of wine, unfortunately I could not taste the wine, or otherwise I would not been able to do what I did next: I stitched a fine rope through the canvas and around those pins. That lasted about 30 minutes and I cannot remember if I dared to breathe during that work, but boy was I exhausted when I was finished! Now before I start the same with that second hatchway, I will taste that bottle wine and see if I can do anything all after that! | .jpg) |
|||||||||||||||
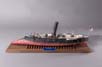
| The entire model is becoming more and more complete. Quite
a few small things were built like the 2 cabins and the smokestack but
also those even smaller parts like the skylights, air vents, davits and
so on. Once again its all about the details, the more the happier you
could say and thats what I really like. So during the last weeks I have
concentrated purely on all those tiny things which take such a long time
to create but which also make the difference, at least for me. The aft
cabin is such a piece, on first look its nothing special but on further
inspection you will notice it is for whatever reason oval. This is something
which makes its construction a bit more difficult but the most challenging
part as the roof of that cabin, which is not only oval too but has this
significant wave-form The problem as how to create such a part. At the
end I used a piece of aluminium sheet which was cut in the right form and
then by using the rounded back end of a small brush to bring it in its
final 3 dimensional from, Quite tricky to do but to my surprise I got it
right on my first try.
Those 2 lifeboats are small kits themselves, which were in both cases enhanced and modified with the help of several self-made parts. |
.jpg) |
|||||||||||||||
.jpg) |
||||||||||||||||
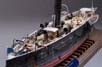
| This project is coming to an end. There were only a few
more details to be added, but before I talk about them, lets start with
the only big thing still missing from the model.
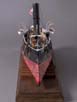
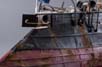
The Alarm carried a fearsome 15 Dahlgreen smoothbore gun in the extreme bow position. This monster of a gun is a small model itself. The gun tube itself was made for me by a friend of mine, because my lathe is simply not suited for working with brass. So after I received the tube I had to add a few more fine details to it and then the only thing missing was the carriage of the gun. This was done of wood and decorated with even more details to make it look right. When all this was done some color was added and finally I only had to add all those lines to make the whole gun look like the real thing. And since the whole thing looks so cool, I did not fix it in its bow position but made it detachable so everybody can have a close look at it.
|
||||||||||||||||
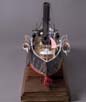
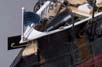
Another, much smaller detail was those 4 Gatling guns.
Actually I could not find any photo showing the exact position and type
of these guns but records show that this vessel was armed with such guns
shortly after being put into service. After some research I came up with
a rather usual design for these guns. I used hypothermic needles for those
gun barrels plus a short bit of an aluminium tube and some self-made parts
for the magazines and the hand-crank. Finally a little pintle mount was
added to the ships railing and the guns could be attached.
|
||||||||||||||||
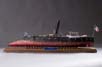
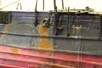
| Some tiny details on the ships deck and a few figures made by Hecker
& Goros.
The rather minor rigging had to be added and that was that. Some colouring and weathering to the hull and that wooden base were the very last touches to this model and now the only problem for me is to find some more space on my shelves for it. !! |
.jpg) |
|||||||||||||||
|
||||||||||||||||
More
of René Hieronymus's work.
Updated 8/6/2019

© ModelWarships.com
.jpg)
.jpg)
.jpg)
.jpg)
.jpg)
.jpg)
.jpg)
.jpg)
.jpg)
.jpg)
.jpg)
.jpg)
.jpg)
.jpg)
.jpg)
.jpg)
.jpg)
.jpg)
.jpg)
.jpg)
.jpg)
.jpg)
.jpg)
.jpg)
.jpg)
.jpg)
.jpg)
.jpg)
.jpg)