|
| How far can you take this hobby? One can only look at the
ever increasing variety of subjects available in 1/700th Scale for so long
before one starts to ask this question. What if a Resin Company decided
to release a 'History of Seapower' Series with the three or four most powerful
warships of any given century all the way back to antiquity, so that a
modeler, if he chose, could model the entire breadth of Naval History and
assemble it all in a miniature museum on his shelf?
I posed that question on this Forum about five years ago, and got the standard response: "No money in it, it'll never happen, etc." For about a year I mulled over the inequities of Life and Model Manufacturing, until one day, cruising the Scratch Building forum, and finding myself entranced by the efforts of "Maxim" and "Tom L", I was suddenly struck with the thought: Maybe I don't have to wait for anyone... Thinking about this one is suddenly captivated with a whole deluge of possibilities, Clippers, Trans-Atlantic Paddle-Steamers, HMS Victory, USS Constitution!!! But there is one antique warship type, that seems to me to captivate the beautiful organic absurdities of the early Age of Sail: the Carrack |
 |
 |
|
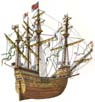
| From a modeler's perspective, the Carrack is the French Pre-Dread of the Age of Sail... antique, improbable, slightly fantastic-looking, and oozing with character. Oh goodness, to scratch build a 1/700th Scale Carrack! Can it be done? Thus began something of an international adventure for me, one that nearly took me into the Model Ship Business, and gave me a lot of new friends along the way. | |
| More from amusement than any hope of success I decided to give it a try and see what happened. I decided, in keeping with the 1/700th scale aesthetic to build in waterline style. So, we begin by creating a waterline plate, two pieces of plastic taped together with double-sided tape, shaped simultaneously and then separated. |  |
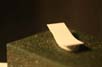
| On top of this we add rough plastic from which the hull will be shaped. | 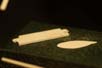 |
| Having no previous experience with creating deck sheer, I decided simply to bend a lump of laminated strips and wedge in bits of styrene underneath, to see if that would work. | 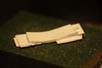 |
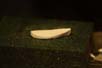
| What emerges is a humble lump of material vaguely resembling a wooden shoe. These shots are from a later build than the original carrack, as it was only after several weeks of work and showing it to my friends at my local IPMS chapter that I realized I was on to something and they convinced me to begin documenting my work. | 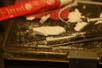 |
 |
|
|
I cut a piece of grooved evergreen styrene out, glued it on top of the 'shoe' and shaped it to the contours. |
 |
| I then added a stem and stern post. | 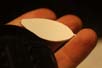 |
| Having seen Tom L. make stunning progress on his Venetian Carrack (a project on the Scratch-Build Forum which predated my carracks and which directly inspired them) with tiny strips of styrene, I decided to attempt to replicate the hull planking by gluing rows of strips to the hull to simulate hull planking. |  |
| These needed to be pre-bent in a compound curve in both vertical and horizontal plane, which is made easier because the rectangular cross section of the strip helps to isolate each dimension as one works it with tweezers. Once that is done, you can begin to lay them down on the 'shoe.' Too much glue? Bad alignment? Rip it off and make another one, no problem. | 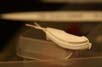 |
| Next comes the creation of the bulwarks and upper hull, requiring larger pieces of styrene shaped at their lower edge to match the sheer of the deck. This first carrack was very much trial and error, and not entirely accurate in her shape, but after several weeks of work, on and off, this is what emerged: | 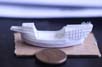 |
| By this point I had taken it to the club and shown it to the fellas there. Rusty White immediately launched into a critique of how this one would be difficult to cast in resin I had no idea of that before he mentioned it! But he really got me thinking. This one would be a 'one-off', but I could create more specifically engineered as casting masters. However, the first task was to get this initial carrack done. | 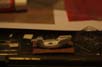 |
| Ribs could be glued in long and trimmed afterwards. The individual hull planks were created by carefully cutting up the plank strips after they had set on the hull. |  |
| Chain-plates and castle-paneling added. | 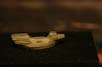 |
| Starting to think about cannon ports... first roughing out of possible locations for armament. | 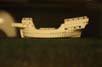 |
| Next came the difficulty of fashioning the fore and after-castle athwartship bulkheads. This is the forward bulkhead during construction. | 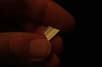 |
| Aft bulkhead dry fit in place. | 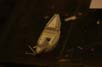 |
| Both bulkheads finished and ready for installation. | 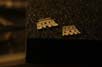 |
| A post-instillation shot. |  |
| Soon she was ready to paint. Would the hull planking be too coarse? But once I had her painted up, the coarseness of the planking didn't seem too noticeable. | 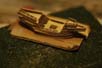 |
| It was strange building a model without a speck of hull-grey anywhere though. | 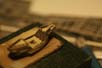 |
| By this point I began to realize I might actually pull it off after all. | 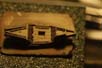 |
| Next step the masts! How to do it? Pins and needles, primed, then add the wolding with fly-tying line. |  |
| Interspersed with this work came the hull paneling details, which required tiny home-made decals. |  |
| Bright colors! | 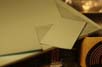 |
| Cut into thin strips, | 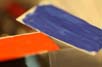 |
| And then tiny triangles. | 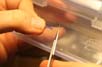 |
| Tricky to apply, many lost in the process, | 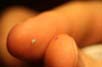 |
| But the novelty of the whole project kept me going. | 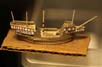 |
| Time to start thinking about crow's nests... | 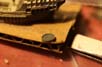 |
| Here is a gun tub from the old-mold Tamiya Yamato. Cutting holes for the shrouds. Looks like a Button. | 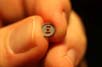 |
| Two needles cut and then super-glued together for a lateen yard. |  |
| Progress... | 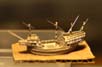 |
| By this point I had been blogging the build for several months and had gained several friends in the process. My buddy Bruno Gire from France had been a great champion of the whole effort from the beginning. He engaged Burkhardt Masch of BMT to create some 1/700th Scale cannons for my project, and for the new resin carracks that would soon be taking shape (see part 2) I was also able to talk my friend, the great Rusty White of Flagship Models into casting the brass masters into resin for me. Here are the brass masters ready for casting. |  |
| Note the one large cannon, slightly blurry here. This was made by my jeweler friend Kevin Holtan, and provided a nice contrast to the others. The results were extremely delicate, and only some of them cast perfectly, but enough to use. Here are the new cast cannon stock painted and separated from the casting gate, looking not unlike a Spanish Empire era Wreck Site, except this wreck site only takes up one four square inches... | 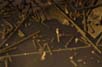 |
| The first gun mount assembled. The wheels are adapted from WEM PE cable reels. |  |
| Note that the Spanish (and Portuguese) used land-style large wheel cannon mounts in their ships during the 16th Century. It was left to the English to develop the gun-truck. A completed cannon+carriage combo. This was the result of several attempts. Penny is for scale. | 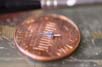 |
| I had decided now that this little ship was a Portuguese Carrack from approximately the 1520s, but that the armament would reflect the older practice of only mounting guns on the upper deck (no gunports below the main deck.) I decided to name her the Santo Amaro de Beja or Beja for short (pronounced "Bay-ha") after a well known shrine-church in Portugal, and in keeping with the naming practices of the period. | 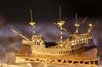 |
| This is technically a fictitious name of a fictitious ship, but the likelihood that there was a carrack with this name at some point during the 16th Century is quite high. Having said that... note the overhanging stern castle. I discovered later this was inaccurate, but decided to complete the ship anyway, as a test-bed for the various techniques I wanted to try. | 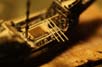 |
| Beginning the anti-boarding netting canopy. The nature of Carrack warfare involved the attempt to board at the waist of the ship. To prevent this, anti-boarding nets were rigged over the deck, particularly in wartime or during combat. This looks a bit strange but is an authentic detail for this type of ship during this time period. However, I decided not to model the net itself, as this would have completely obscured all of my efforts to detail the deck. |  |
| Forecastle netting canopy. Progress... | 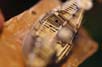 |
| Completed. | 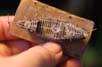 |
| Beginning the Shrouds. | 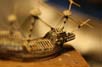 |
| Note the upper masts are in place as are all two-piece yard arms, made from needle-stock not a great solution, as it turned out. I was able to find better materials later. The crow's nests have been given railings of vertical ladders bent to shape and mounted sideways. I actually threaded the shrouds through the mast-heads as in the real ships. This necessitated a decision to create the ratline/shroud combination freehand... a decision I came to regret and have never repeated, more on that in Part 2. | 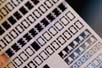 |
| Here are some of the materials I used to create details for the ship. These are GMM watertight doors. One of these trimmed to the shape of a shield and stripped of paint served as the centerpiece for the coat of arms of the Municipality of Beja. The Coat of Arms is made from Decal Paper+watertight door/shield, with single pieces of glitter to represent the various elements of the Actual Beja Coat of Arms. | 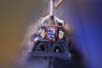 |
| The two golden shields flanking the Coat of Arms are the ends of floatation net baskets for USN warships. | 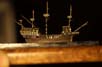 |
| Note the shields along the gunwales, alternating silver and brass. These are more adapted watertight doors, two corners trimmed to give them a shield shape. Beginning the upper shrouds. Note the additional shields ornamenting the crow's nest. | 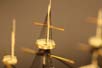 |
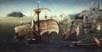
| The Beja is now mounted in a water base. I had to put a piece of white paper behind the shrouds as I worked in order to see the ratlines as I threaded them in. This is the most unpleasant task I have ever done in modeling. It took weeks, with much doing-over, and the end results were less than satisfactory. |  |
| The Beja semi-complete. I rushed to finish this build with only very
basic rigging in order to compete in the local Soonercon 2011 Regional
Model Show. The year before I had won Best Ship and Best of Show my first
time out of the gate with a build of the 1/700th Scale Niko USS Vermont.
Since the Beja was easily six times as much work, and scratch built to
boot, I felt confident that I would again place...
But in the end, the Beja won nothing at all. I was completely deflated. Afterwards I went over to Rusty's house and asked him what was wrong with the build. He was very complimentary of my little carrack in general, but pointed out that the masts were not quite in perfect vertical alignment. In all the efforts at details, I had forgotten some very basic things. However, this is not the end of the story. By this time Bruno Gire from France and Rusty White had both gotten heavily involved (or sucked in?) to the Carrack Effort. In addition to the Beja I had begun numerous other carrack models, |
 |
| this time from resin casts of masters I had created myself which Rusty had cast. | 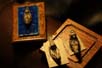 |
| Bruno meanwhile created two entire suites of custom photo-etch for the Carracks and had sent them from France. What had begun as whim on my part was becoming serious indeed. There was talk of launching a new model company "New World Modelworks".... But that's all in Part 2. Stay Tuned!!! |  |
More
of Neal Callen Clarke's work.
Updated 2013

© ModelWarships.com