| |
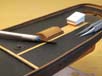
| Kit #05416-0379 175 brown styrene parts / tan and black
rigging thread / anchor chain / vac-formed sails / paper flag Retail price
@ 40 EUR
The Yacht America achieved instant and long-lasting fame by winning the prestigious 100 Sovereign Cup of the Royal Yacht Squadron on 22 August, 1851, off the Isle of Wight. Later, the trophy was renamed America´s Cup in her honour. Today, it is still one of the most prestigious sailing trophies in the world. |
||||||
| The vessel was built in Long Island, NY, with the express purpose of competing against European racing yachts and promoting American shipbuilding. After winning the cup, she was soon sold off and then had a chequered later career. She went through various European hands, was used as a Confederate blockade runner, scuttled, raised by the Union, armed, employed to intercept blockade runners, returned to yachting and occasional racing, until she fell into disrepair. During that time, her rig was modified several times. She was finally donated to the US Naval Academy, but never received proper care. In 1942, she was damaged beyond saving when her storage shed collapsed in a snowstorm. Today, there are several replicas of the Yacht, one of them, the Skythia, in Germany. |  |
|||||
| The kit was first produced by Revell in 1969 and has been
re-issued several times under various names. Originally named Yacht America,
the 1974 armed re-issue was called Civil War Blockader, whilst the current
(armed) incarnation is called USS America, respective of the vessel´s
service on the Union side.
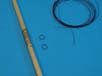
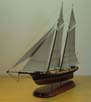
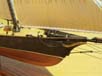
It is a pretty large model, at around 75 cm overall length and a height (stand included) of around 55 cm. The comparatively large scale and the limited rig of six sails make it the one of the easier Revell sailing ship kits. The styrene parts are nicely and crisply molded with fine copper sheathing detail on the lower hull, but lackluster deck planking. Some sink marks are found on the stronger parts, such as the masts and the guns. The kit has some nice details, but lacks any boat gear or hawsepipes, to name two items the original most probably had. The rigging thread is your typical Revell sort, I don´t like the inevitable kinks in the material due to how it´s rolled up. The provided anchor chain looks too strong for me. It surely is a nice kit to be built straight from the box, but also a most helpful starting point for anyone aiming at more detail. Those who abhor the vacformed sails may take what is provided as templates, and the scale fits in with the widely available 54 mm figures if a crew is wanted. |
||||||
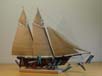
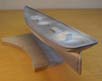
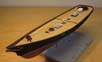
| I decided to build the model full hull on a display stand. That would save on display space and also display the elegant lines of the hull (and the copper sheathing) to advantage. When I display models like this, I omit the crew and weathering, as opposed to displaying them waterlined in a seascape. | ||||||
| I also decided to add deck planking as I didn´t see how I could make what was provided in the kit look the part. The detail was raised, and there were no demarcations between individual planks. It looked a bit like your Evergreen V-groove sheet. Moreover, I decided to replace the rigging thread and also buy wooden deadeyes for a more realistic look. I would retain the vacform sails, even though many serious modelers deeply dislike them. I expected them to be easier to work with than any replacement I could imagine. |  |
|||||
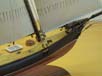
| I started the build by buying 1.5 mm welding wire. The material is quite stiff and I used it as reinforcement for the masts, gluing sections of it between the mast halves. Another piece was bent and glued into the hull to later connect with the stand. I made a building jig on which the hull was placed with its waterline parallel to the desktop. At a model show, I bought a wooden base of convenient size and fit brass tubing into it. Upon completion the locating wires could just be inserted into the tubing. |  |
|||||
| That done, I added the deck to the hull and proceeded to add the various deck houses. They were built in situ, apart from the round skylight. I took it upon me to open the individual panes with a fine saw. After cleanup the part was painted and the panes filled with clear PVA glue. This would be the very last part to be added to the model. | 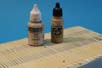 |
|||||
| Parallel to work on the hull, the masts, booms and gaffs were cleaned up, assembled and painted according to the instructions. The numerous blocks were also prepared and pre-painted. |  |
|||||
| When all superstructure items had been added, the hull
was primed. I prefer automotive primer from the rattlecan. After curing,
the white areas (as in the waterline and parts of the superstructure) were
sprayed white. In this project I used Vallejo white PU primer. It followed
a succession of masking and painting, beginning with brown for the bases
of the skylights and hatches and the inside of the bulwarks. The hull and
the deck were then sprayed Vallejo black PU primer. The black deck would
later darken any seams or gaps between the planks and hint at the dark
caulking material.
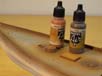
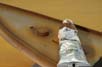
The lower hull was sprayed AK Xtreme Metal Copper. The cockpit area was painted in a wooden shade, with the leather cushions in a wine red washed with black. I tend to use acrylics and then accent with artist´s oils. |
 |
|||||
 |
||||||
 |
||||||
| Now came the real fun part of this project, planking the deck. I had looked up plank sizes and available styrene formats, only to resort to cutting all the planks from .25 mm sheet material. That was for sure the cheapest option. The numerous planks (2.5 mm in width and 100 mm long) were individually cut to size and mounted on kabuki tape on foam blocks. | 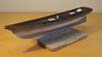 |
|||||
| They were then scored lengthwise with a coarse-grained sanding stick, to add some surface texture and allow the oil paint to grip. The planks were then primed and sprayed in two acrylic shades, to add some variation. Finally, they were drybrushed with artist´s oils to achieve a restrained wooden look. I aimed at a blonde look of the deck planking. | 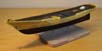 |
|||||
| That done, all points where blocks would have to mounted on the deck were marked, and I started planking. The planks were glued with CA glue, in order to avoid the glue to destroy the painted surface. They were individually cut to size, over several days, until the deck was done. |  |
|||||
|
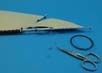
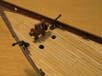
Completing the deck fittings, the blocks to be used on deck were rigged with .3 mm black copper wire from my stash, and glued in place on the deck with CA. The massive bitt / windlass was placed into a cutout in the planking, same as the two catheads /anchor cranes. I had painted them using AK interactive Tru Metal in Gun metal. The hawsepipe locations were drilled open and sections of plastic tubing inserted representing the hawsepipes. The hawsepipes were also painted Gun metal. The anchors were now also added, and rigged using a thinner chain than the one supplied in the kit. |
 |
|||||
| I had sprayed the six sails in a canvas colour, and cut them out of their sheets. The next tedious but necessary work was to add reefing points to the sails. They are indicated in the vacform, but I felt having them for real would improve the look of the model. So off I went, drilling more than a hundred holes, tying the reefing points, cutting them to size and fixing them. That did take some effort until it was done. | 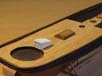 |
|||||
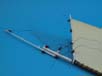
| Now it was time to test fit the pre-painted bowsprit and the two masts.
I then properly realized how large and tall this model would be, and I
was dissatisfied with the bowsprit´s angle. It was to be mounted
into a cutout in the windlass and would only fit this way, but end up parallel
to the waterline. That did not look right to me.
I did not feel comfortable with the model´s look, and at this point the project stalled for several months. For a variety of reasons I did not feel up to continuing the build. |
 |
|||||
| In the end, there came a point when I forced myself to continue the
project. I started by rigging the sails to the masts, only to find out
that the mainsail would not fit between its boom and gaff. I definitely
hadn´t expected that. In the end I removed the gaff and re-attached
it lower down the mast to achieve a better fit. That meant a good amount
of work: Sawing, drilling, adding reinforcements from wire, supergluing
and puttying, until it was done.
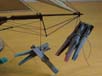
Attaching the sails meant drilling yet more holes into them and kind of sewing them to the gaffs. Where the sails were attached to the masts, I used circles I had wound and cut from blackened wire. That looked better than what the instructions recommended, as in tying the sail to several eyelets molded on to the mast. I removed most of those, just retained a few to enhance stability. |
 |
|||||
| Now I needed to start rigging seriously. I started with the bowsprit
I had securely glued to the windlass, sat back, revisited it and liked
it even less than before. So off I went to the computer screen and looked
at scores of images of the America. In all of them the bowsprit followed
the graceful lines of the hull and rose from the waterline by a few degrees.
I have no idea where I went wrong, but there was no way I could have mounted
that bowsprit differently.
But it had to be corrected, so I broke it off and reattached it so that it sat on the deck. Now it had a much more right looking and pleasing angle, and I felt confident to continue. |
 |
|||||
| But upon starting the rigging, I found that I had somehow lost rigging blocks and wouldn´t be able to complete the project. I wrote to Revell and they helped me out - free of charge and in under two weeks, thanks a lot for that! | 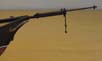 |
|||||
| The rest of the project went surprisingly well and fast, with only minor glitches. I´ve always been unhappy with plastic sailing ship models due to the lack of stability of masts and yardarms. They so easily bend and misalign. So in this case I added the standing and then the running rigging successively, but did not finally belay it. I added clothes-pegs to the loose ends to give some pull on them and concentrated on counterbalancing the pull of the various rigging threads. I really did get the masts and yardarms / gaffs / booms properly aligned, but nonetheless found that both gaffs had broken under the strain. Surreptitious administration of liberal doses of CA glue fixed the problem. | 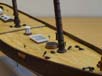 |
|||||
| Having added all the rigging, I started belaying individual threads using CA glue, and then cut them off. That went quite well, and pretty soon all the clothes-pegs were gone. I then spent an afternoon making coils of rigging thread, which I added to the belaying points. That done, the model received a final flat coat (save the lower hull) to hide any glue stains, and the skylight was added using flat-curing PVA glue. The model was then placed on its permanent base, and an acrylic display box ordered at considerable cost. |  |
|||||
|
||||||
| Conclusions | ||||||
This is a large and decorative model, and well worth building
almost 50 years after the kit was designed. I´d recommend adding
a planked deck as it´s quite a large deck space and the result looks
better than what is provided, but like most corrections, it´s not
a must. Those with more nautical knowledge and more insight into the subject
vessel may find oodles more to fix or to add. But then once more this is
where any of our models displays our personal approach to a common kit,
and makes it truly ours.
|
||||||
More
of Frank Spahr's work.
Updated 5/3/2019

© ModelWarships.com