|
| page 1 of 2 |
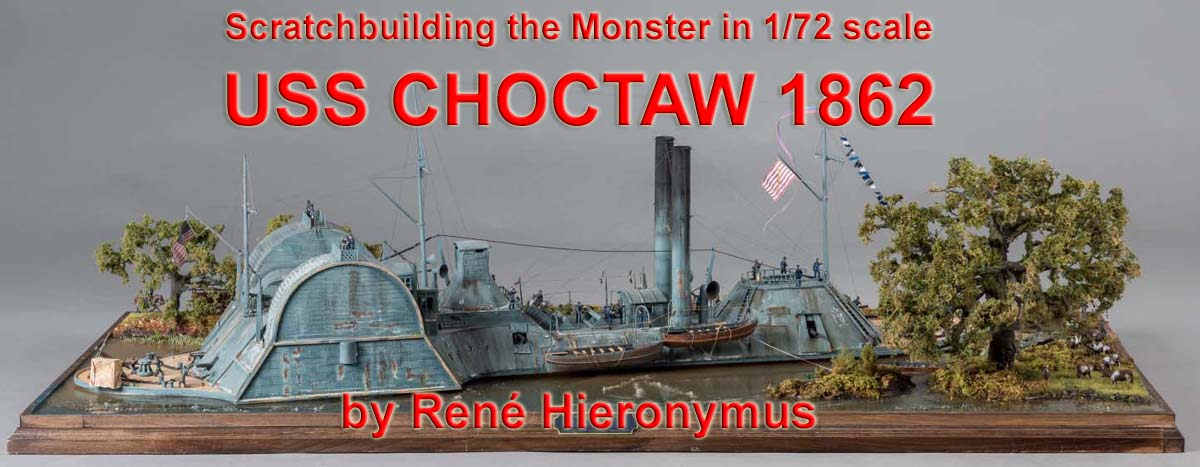
| The original:
She was originally built in 1853 as a sidewheel merchant steamer named Nebraska. In 1862 she was acquired by the government renamed USS Choctaw and converted into a gunboat and ram. Carrying a battery of 3 x 9 Dahlgreen smooth-bore guns, a single 100pdr Parrot Rifle, 2 x 30pdr Parrot Rifles and 2 x 24pdr Howitzers made her a rather well armed ship but in reality she was weakly armoured and underpowered. At a length of 260ft, and a beam of 69ft she displaced 1.004 tons and had a crew of 106 men. From April 1863 until the end of the war Choctaw operated in the Mississippi River and its tributaries. Between 29 April and 1 May 1863, she stood up the Yazoo for a feigned attack on Haynes' Bluff designed to prevent the Confederates from reinforcing Grand Gulf. During this action she was struck 53 times. Remaining in the Yazoo, she took part in attacks with the Army which led to the destruction of Confederate works at Haynes' Bluff and the burning of the navy yard and ships lying there at Yazoo City between 18 and 23 May. On 6 and 7 June, she joined in repelling a Confederate attack at Millkin's Bend, Louisiana, after which she rescued a large number of Confederates from the river and sent them in as prisoners. Between 7 March and 15 May 1864 she took part in the operations leading to the capture of Fort DeRussy. In July 1865 she was placed out of commission and sold. Her further fate is unknown. The model: I ran across a picture of this obscure vessel several years ago and I knew instantly that I had to build a model of this. Honestly, just take a look at these unusual lines those towering smokestacks and the huge wheelhouses; it looked like something from a comic book, definitely nothing like a proper warship even if you count those French heavy metal absurdities of the pre WWI era. As luck would have it, I found a shipbuilding magazine which had a plan of this very vessel in it. Even though these plans turned out rather crude and not highly accurate but I still could use them and just to make sure I found another set of plans of acceptable quality too. As it turned out there are quite a few cardboard models available and I also found a few small scale short run resin kits of this apparently not so less known ship. But as usual, my idea of a model was the usual much bigger and highly detailed version in the one true scale of 1:72.(!! ) |
|||||||||||||
| So here I am at the very beginning of building this model. Just to
have a little more fun I decided for a small change, this time I did not
start with the hull but instead with all those small details which I usually
add much later in the build to the earlier finished hull and superstructure.
The very first parts I started to build were those 4 rowboats, a work that went pretty fast, since I used resin cast boat hulls which I simply covered with wooden veneer. A rather time consuming job but easy and simple. The final result looks quite good. |
.jpg) |
||||||||||||
| Even easier than that were the next parts; I needed several 9
Dahlgreen smoothbore guns.
According to my first plan there were at least 6 such pieces aboard the vessel. I found a set of them at Shapeways, 12 pcs. of these guns for 66 euro ,not exactly cheap but the picture looked good and I would have a few of them left for another project and it would help me to save some time. So I went ahead and ordered them ;they reached me within 2 weeks. Turned out I should have waited a bit longer with this order. Dont get me wrong, the 3D printed parts turned out pretty good, they need a bit more details but this is something to achieve rather easily but a new set of plans for this vessel and more detailed informations revealed the fact that this ship only carried 3 of these Dahlgreen guns while the rest were of different origins....!! |
.jpg) |
||||||||||||
| With that knowledge in advance I would have built them
by my self just like the rest of these guns and saved a lot of money
instead of only a bit of time. Ah well... next time... !
And learning I did, so for the 100pdr Parrot Rifle I decided to build it entirely scratch. The gun tube was made on my little lathe from a wooden dowel; the rest is a pile of plastic bits cut from small strips and profiles plus a few self-made PE parts from my spare box. The rest of the armament was done the same way, well more or less. The gun tubes were made from wood.
|
|||||||||||||
| I needed 2 different types, 2 pcs for the 24pdr Howitzers and 2 pcs for the 30pdr Parrot rifles. I found the right dimensions in some books and the internet delivered the proof that these were indeed right, all that was left which kind of carriages I would build. To be honest, I do not know if exactly these carriages were used on this very ship, I just tried to build different types to make it a bit more interesting, while this may not be totally historic accurate I can say at least that such weapons were used and that they all appeared in such a form on various ships of the Union at this time. At the end I had 8 guns of 4 different types, 3x 9 Dahlgreen smoothbore guns, 1x 100pdr Parrot Rifle, 2x 30pdr Parrot Rifles and 2x 24pdr Howitzers. | .jpg) |
||||||||||||
|
|||||||||||||
| At the last moment I decided just for the fun of it, to
add one of those Gatling guns on a horse drawn carriage. These guns were
used outside the casemate on the open main deck to keep away enemy boarders.
This particular carriage was scratch build too, from plastic profiles and
some tin foil, a few PE parts, the wheels came from the spare box and the
gun itself was made by using hollow needles. It took me about 9 hours to
build this Gatling gun, except painting
Building all these guns was quite some fun,as there is only one simple problem with them, that no one will ever see them again , aside from the muzzle . |
.jpg) |
||||||||||||
.jpg) |
|||||||||||||
.jpg) |
|||||||||||||
| The vessel had 3 wooden masts on its main deck, building them was just
as easy. With the right dimensions and a few photos of similar masts
I was able to add a few details to them; altogether it took me less than a day to build all 3 of them. |
|
||||||||||||
| Next in line were 2 capstans, one for the Forecastle and
one for the Back. Once again the desire to buy a set of 3D printed parts
via Shapeways was present but since I needed only 2 of them the decision was instant. a few parts made from plastic sheet in combination with some wooden parts and perhaps 2 hours and they were made. |
.jpg) |
||||||||||||
.jpg) |
|||||||||||||
| The next time is not that much of a detail but already a part of the ships superstructure, if it could be called that. Amidst those 2 towering smokestacks and even larger wheelhouses was the oddly shaped steering house sitting atop of a rounded structure. This needed to be built as well. After constructing the cone shaped base for this structure I made it and the steering house from plastic sheet. | .jpg) |
||||||||||||
|
After all these smaller parts were done I decided it was time to start the work on the hull itself. Building this item was even easier and faster than everything I had done so far. The actual hull of theses river ironclads was a pretty simple shape. Choctaw, like all these river ironclads had a flat bottom hull with a rather shallow draft, otherwise these ships would have been unable to operate along these rivers. Thanks to that, building a model hull is an easy job. Even more because
I had planned to build this model as a waterline model .
|
.jpg) |
||||||||||||
| Building the hull was a job of less than 5 hours.
When finished the forward and stern section were planked and I started to build the superstructure along the midship section. While the midship structure was easy to build, the forward casemate turned out to be a different story.
|
|||||||||||||
| Installing that armament inside this casemate turned out to be quite
an effort. In my ambition to create a rather good and accurate looking
internal structure I did perhaps a bit more than necessary.
Those wooden beams were so close together it proved almost impossible to get those guns inside at their appropriate places. After several attempts I finally succeeded but it did cost me quite a few nerves.! Additional to those guns a lot of tiny details went into the forward casemate, needless to say that you will not be able to see any of them even though I decided to make 2 section on opposite sides removable, so that Im able to prove at least a bit that I installed the entire interior. |
.jpg) |
||||||||||||
|
|||||||||||||
| The forward mast which I have made much earlier could be installed
too as well as a few more details on the outside Amidships the davits were
installed, the boats will have to wait until the ship is finally colored.
Next in line was the midship casemate with its 2x 24pdr Howitzers. These
were the smallest guns aboard and could fire through 2 different gun ports,
either along the broadside or in case of being boarded by some unfriendly
intruders directly to the front. In this case they used canister shots
which kept the damage to the own ship relatively low but played havoc with
any personnel in front of the business end of these 2 smoothbore guns.
As I always like to say: during the good old times the people had a much
closer relation, because their weapons didnt reach that far.
As can be seen on some photos I put those huge smokestacks, some skylights
and a small cabin in their places just to see how this was going to look.
|
.jpg) |
||||||||||||
| Meanwhile a few more weeks have gone by .... Finally I
had been able to build the very last portion of the superstructure on this
vessel, those wheelhouses and the cabin-like structure in between them.
Even though this part looks real simple, it turned out to be quite an
effort. Because of all those different angles and shapes, building this
part was in fact rather complicated and took several more hours than anticipated.
If I only had known at this time!
It took me quite some month to build all this and the work on those smaller details seemed to take no end, so week after week I spent working on those rivet covered iron plates and the more I added the better it looked, |
|||||||||||||
| Now then, the rivets looked great....
The only problem was, it was wrong, totally and utterly wrong. What was it that I said about the joy of model building? I found out the hard way that knowledge can be a curse. I came across a guy who was not only building the same model as I, turned out he was working for the Museum of the US Navy and due to that he had access to some really important information, among them several high quality photos and plans of the real thing. One look at these and I knew instantly I was in deep trouble! The midship section and the forward casemate of my model, in other words almost everything I had built this far, was completely wrong. One of those photos showed clearly that the upper section of the midship section as well as the forward casemate were curved, something I completely missed, and those rivets, well they simply did not exist, not a single one. Now try to imagine my feelings after putting hundreds of those rivets on my model and being so damn proud it because they looked so cool! I spend the next few days trying to figure out if I should place the whole model into the next dumpster, drop the whole idea altogether, or repair it or completely restart it again. Now the dumpster was out of question after the first shock had settled, starting again was no option as well, so repair it was! And just to make sure, it never sounded easy and it sure wasnt. Removing
some parts was no problem at all, but all those beautiful details I had
already added to the model did not survive this kind of reconstruction.
|
.jpg) |
||||||||||||
| No matter what I tried, most of them went into the scrapheap;
what a waste of efforts since I had to build them all once again but by
far the biggest frustration about this whole matter was the fact....,
that I had this particular photo already in my possession but I just
simply ignored it and relied too much on those damned plans which
all 4 different one turned out to be simply wrong.
even so-called ' original ' plans have been drawn by humans, youll
never know if these plans were actually used for construction but if you
got a photo, it tells the truth
|
|||||||||||||
| Since I already knew what I had to do during this phase of the build, progress came fast and only the sheer amount of work involved took so much time. In the end I spent over 6 month just to fix what I had made wrong in my first attempt. Finally all the details were in their places and I could start the coloring. Since there are no color photos of these ships anywhere I had to rely on what books and experts said. According to these sources theses hips were painted in some kind of grey-blueish color and since I had one picture of a painting made by a famous artist which looked exactly that way, I decided to take this route. But I also wanted to show this ship how it looked while in use, a clean and immaculate ship was out of question. These ships were coal fired, which means they had to re-coal every few weeks if not days. Due to the shallow draft these ships simply could not transport many tons of coal so as a result they had to resupply quite often. | .jpg) |
||||||||||||
| This is a work most people today would simply refuse to
do, shovelling a few tons of coal from a barge into the open hatches of
that ship was an All Hands job , and even you started to rinse and swab
the deck afterwards with lots of water there will always remain a lot of
stain and this coal dust will certainly cover the entire ship.
And when those towering smokestacks start belching thick black clouds of smoke the result is quite the same. With this in mind I started the weathering process which of course included rust as some rotten wooden structures too.
Layer after layer were added to recreate a look which simply showed
that this ship was extensively used.
|
|||||||||||||
| Building the diorama was pure fun; the only problem here was the large
tree.
It took me 4 attempts to build until I had the right size and shape but as I said, with this little problem solved the rest was pure fun. The ground work was made with some Styrofoam covered with toilet paper and wallpaper glue. When dry everything was coloured and once again covered with appropriate material to simulate various forms of vegetation, mostly this stuff came from HO railroad department. |
.jpg) |
||||||||||||
All trees were made the same way, by bundling several steel
wires, twisting and bending them just the way I want to be, then covering
them completely with structural medium gel followed by some colour when
dry.
At the end I had about 75 figures plus some animals on the entire diorama just enough to make the whole thing come alive. The water was made by using 2 components resin which was poured in several layers each individually colored to give a bit more depths to the water. The whole diorama took me a bit longer than 1 year to build and once again I can say despite the entire problems I encountered it was a whole lot of fun. |
|||||||||||||
| page 1 of 2 |
More
of René Hieronymus's work.
Updated 3/29/2019

© ModelWarships.com
.jpg)
.jpg)
.jpg)
.jpg)
.jpg)
.jpg)
.jpg)
.jpg)
.jpg)
.jpg)
.jpg)
.jpg)
.jpg)
.jpg)
.jpg)
.jpg)
.jpg)
.jpg)
.jpg)
.jpg)
.jpg)
.jpg)
.jpg)
.jpg)
.jpg)
.jpg)
.jpg)
.jpg)
.jpg)
.jpg)
.jpg)
.jpg)
.jpg)
.jpg)
.jpg)
.jpg)
.jpg)
.jpg)
.jpg)
.jpg)
.jpg)
.jpg)
.jpg)
.jpg)
.jpg)
.jpg)
.jpg)
.jpg)
.jpg)
.jpg)
.jpg)
.jpg)
.jpg)
.jpg)
.jpg)