1/96 USS Monadnock Twin Turret Monitor
by Bradford Chaucer
|
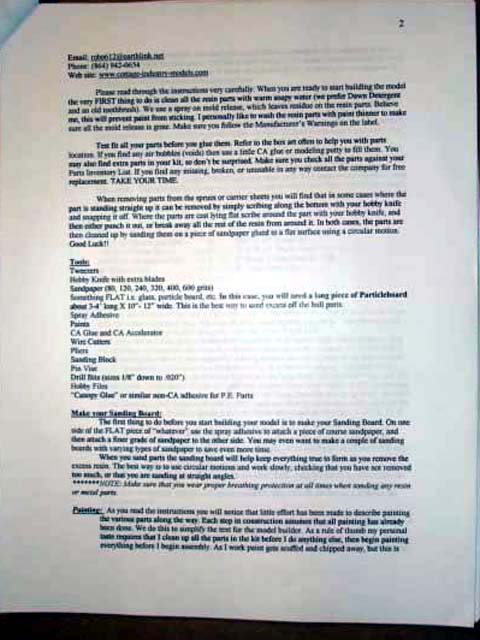
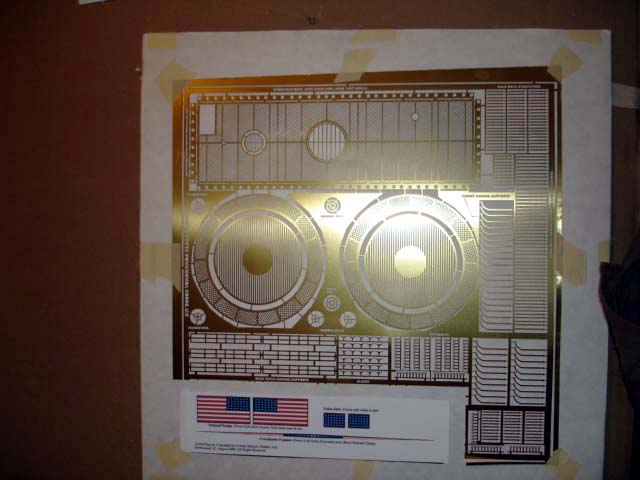
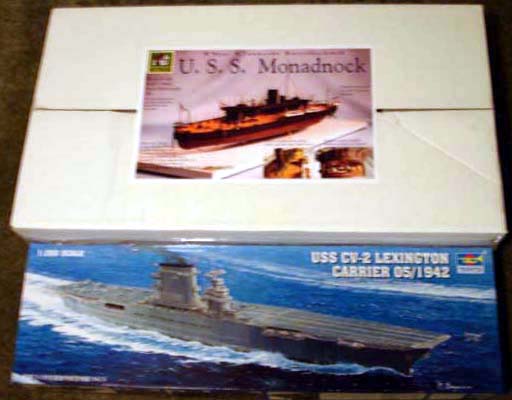
This is an OOB review of the latest effort from Cottage Industries Models, William Blackmore, owner and creator of the kit. This review is based on one of the first production versions. The kit is available directly from CIM or from several vendors. Its time for the attack of the Monster Monitor; folks, this kit is huge! For comparison I have included photos of the kit box and hull along side the box and hull from Trumpeters 1/350 Lexington kit. The hull alone is over 32 inches long and 6-1/2 in wide. It weighs in at 8 pounds of resin in the hull alone! The kit evidences all of the thoughtful design by a master model maker who is also a model builder and the high quality typical of CIM kits. No doubt this kit is pricey, but if you are looking for that super scale Civil War Union Navy ship in large scale to highlight your collection this is it. The model shines with the details provided and with modeling skills of the typical modeler who has a few resin kits under his belt, will build up into a museum quality model. About the USS MonadnockThe USS Monadnock is the only one of the four Tonawanda class twin turret monitors to be completed in time to see action in the Civil War (or recent unfriendliness to some). She was commissioned at the Boston navy Yard on Oct. 4, 1864, and then steamed to Norfolk for final fitting out. Monadnock joined Admiral Porters Blockade squadron on Dec. 13, 1864, in time for the assault on Ft Fisher which guarded the Port of Wilmington NC. Monadnock took up a position to seal the mouth of the Cape Fear River and bombarded Ft Fisher gunnery and assembly areas from close range. For a fantastic diorama and re-enactment of the Battle of Ft Fisher, and info on the preserved site, see their website: Monadnock remained on station through Jan. 15, 1865 for Union Amphibious operations to land troops and take the fort. She was hit at least five times by Confederate Artillery, suffering little or no damage. After the Battle at Ft Fisher, Monadnock steamed to Charleston, SC, moving into the harbor and participating in the capture of CSS Deer. Monadnock returned to Hampton Roads in March of the year and on April 2, 1865 steamed up the James River to support the final assault on Richmond. After supporting the assault, Monadnock took up mine clearing duties on the James River. Monadnock then steamed to Havana Cuba to watch over CSS Stonewall. On June 20, 1865, Monadnock sailed to Philadelphia to be fitted out for a cruise to the west coast. Monadnock steamed down the coast along North and South America, around the cape and up to San Francisco, where she remained till decommissioning on June 30, 1866. THE KIT - Opening the BoxThe CIM Monadnock kit comes well packed, double boxed as befits a kit of the size and weight. Mine survived shipment via the Post Office unscathed. Do beware of the infamous packing peanuts when you open the box. Dont, as I did. Open it over a carpeted floor!!! One of many well thought out items with this kit, when you open the box, you will find the two pieces of the hull wrapped in bubble wrap and shrink wrapped together tightly to prevent any warping of the hull or deck in transit. The small parts in my kit; both resin and white metal, were packed and shrink wrapped in three individual parts trays to further protect them. The large sheet of Photo-etched brass is sandwiched between two pieces of stiff cardboard and a bunch of pieces of brass and aluminum rod, tubing and wire stock needed to make certain parts for the kit are taped to the cardboard PE protector. There is also a sheet of pennants and flags along with the PE. The kit is rounded out by a very well prepared instruction set consisting of 15 pages of text and 43 pictures or diagrams to aid in assembly Little guess work will be needed to build this one! |
|||||||||||
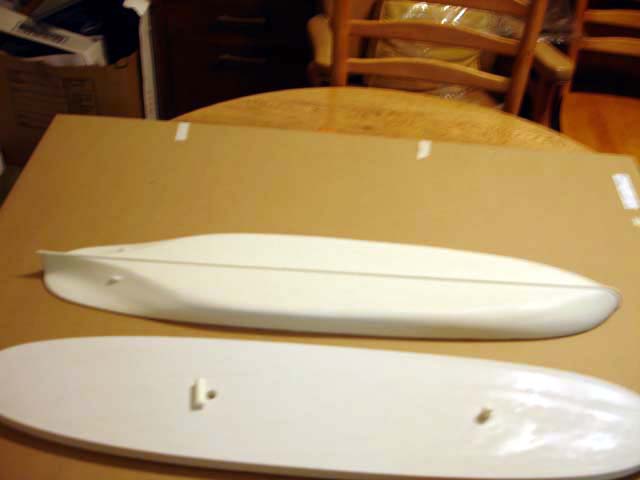
| HULL PARTS | |||||||||||
|
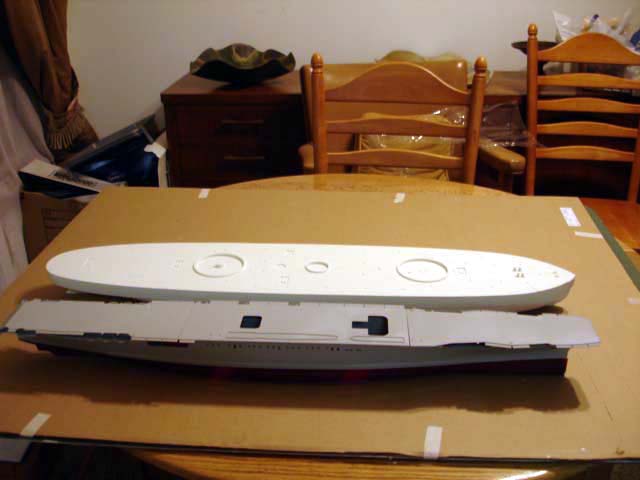
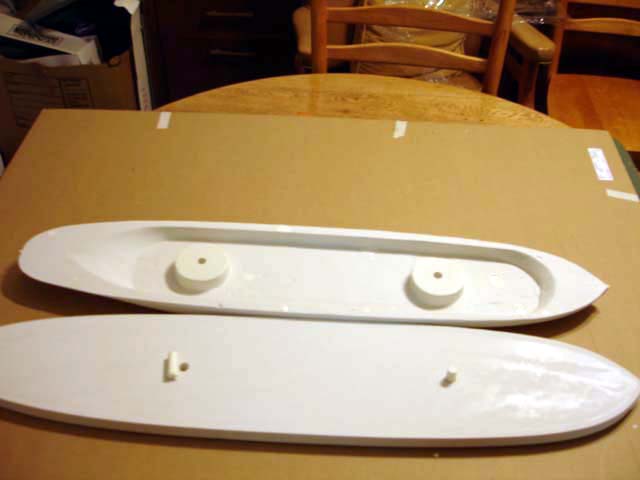
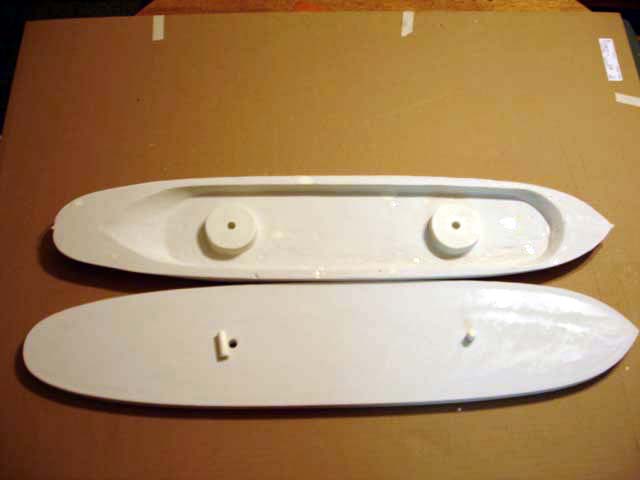
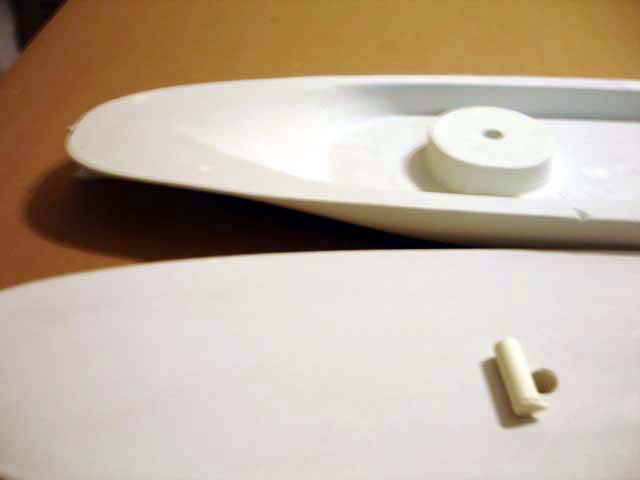
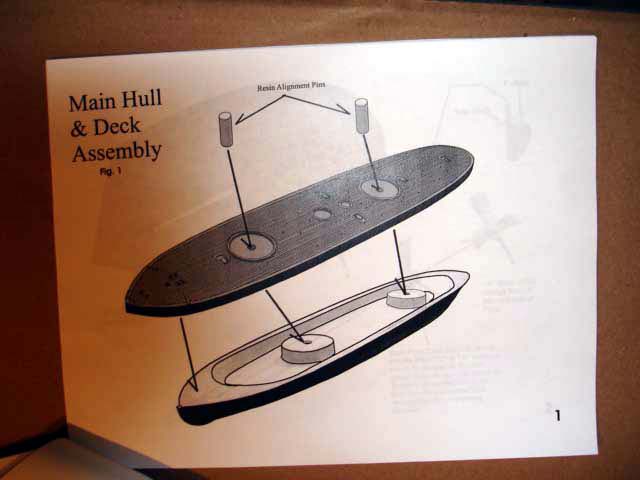
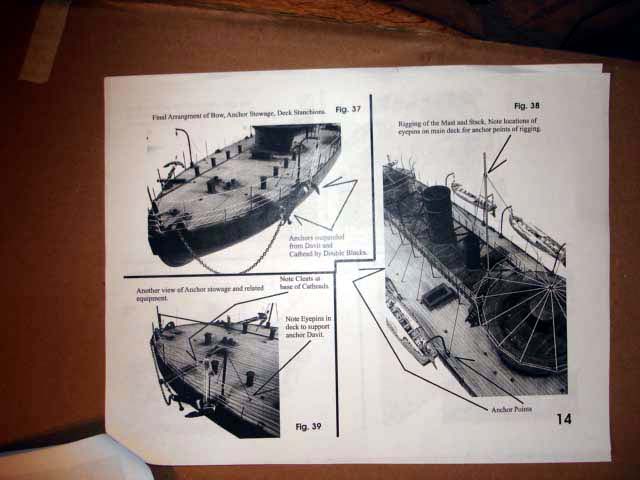
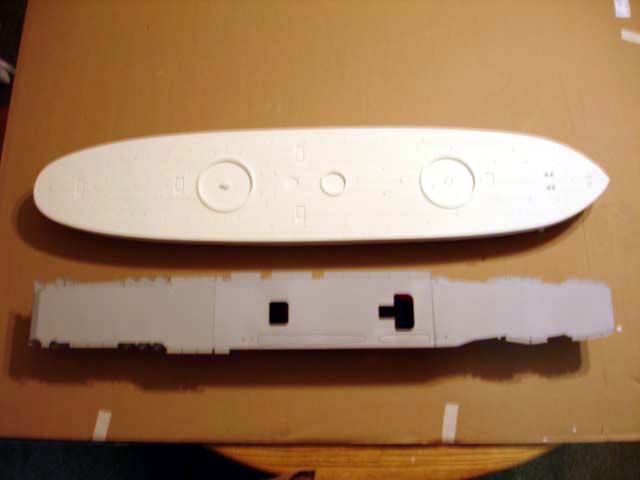
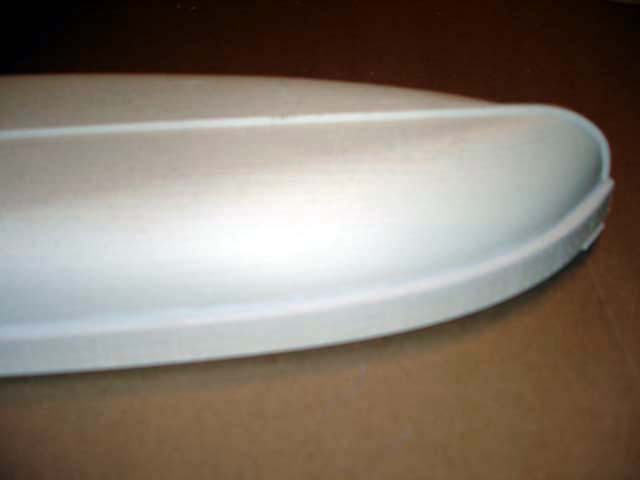
The first thing that strikes your eye is the hull. As mentioned it comes shrink wrapped together to prevent any warpage during transit. As is typical with kits of ironclads, the hull is sectioned at the junction of the hull and raft, but one big difference, these parts will fit together right out of the box. The bottom of the raft was smooth and flat, the upper edge of the hull bottom was also smooth, flat and level. You wont be making a sandpaper company rich preparing this hull for assembly. The castings were clean and free of air bubbles or any defects in ant critical areas. In discussion with Mr. Blackmore, he told me that due to the higher cost of this kit he goes over each hull casting, patching any air holes or problems while the resin is still green (not fully cured) and he even sands the parts flat where needed. Positioning the parts will not be a problem, locating holes and alignment pins are provided to exactly position the hull and raft with respect to each other. Assembling this hull will amount to little more than removing the shrink wrap, applying a bead of glue (I would probably use 5 minute epoxy), placing the raft on the hull and inserting the alignment pins through the turret rings on the deck into the matching bosses molded into the hull. Clamp the hull and hull assembly is done; save the filler for some other kit! The molded in bosses will also provide firm anchorage for mounting pedestals for displaying the model. When you do select or make pedestals, make big ones, this kit is heavy and will not firmly mount of small brass pedestals made from lamp finials. I will probably turn some fairly hefty pedestals out of wood, and Im considering actually drilling out the alignment holes in the hull bottom and arranging tenons of the top of the pedestal to pass through the hull and raft in place of the kit provided alignment pins; a two birds with one stone sort of thing. After several paragraphs of general consideration and preparation, the instructions discuss drilling several holes in the deck and hull for later mounting of parts, You then glue the hull parts together. After the Hull is together, you move on to the rudder and props adding them to the hull bottom. The hull is now ready for painting. Mr. Blackmore does give some guidance for painting, however bear in mind that little accurate information is available on the colors used on either Union or Confederate Ironclads, aside from general comments scattered throughout accounts of battles and contemporaneous reportings on the ships. Many of these comments are questionable. Monadnock had a wood lower hull which was unarmored and had wood planks applied to the top of the main deck; one of the few Union Ironclads to sport wood on decks during the war. So the general color instructions suggest wood color for the deck, weathered black for the armored parts and either White or Red Lead or tar Black for the hull below the water line. It is also suggested that you clean up all the resin and metal parts and paint them before assembly. They can then be touched up after assembly as necessary. |
Click images
to enlarge |
||||||||||
 |
|||||||||||
|
|||||||||||
|
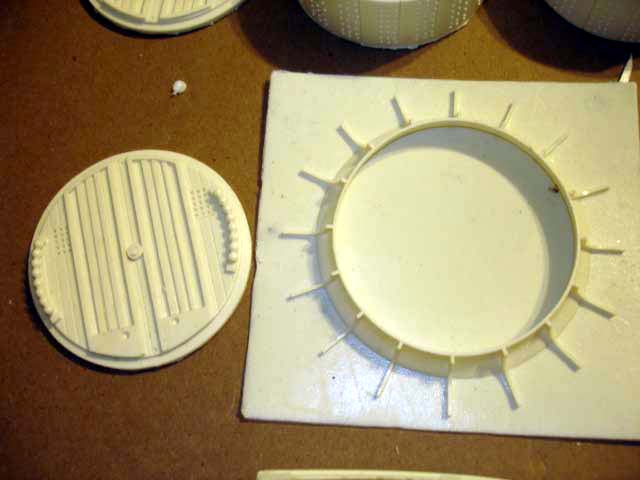
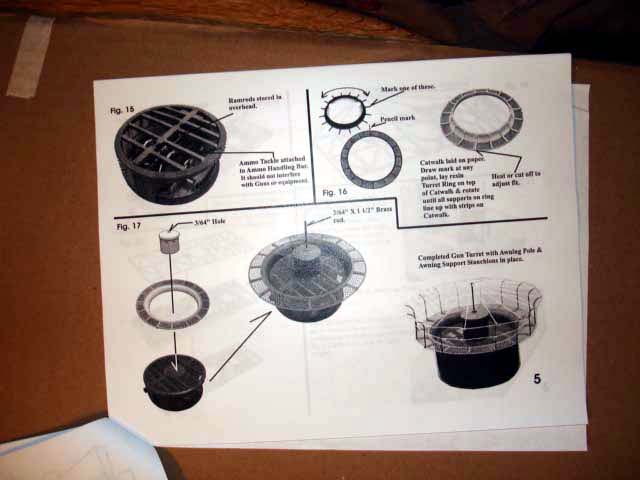
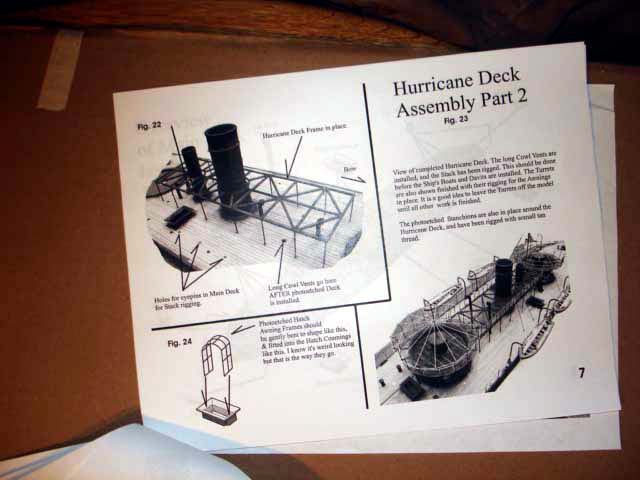
After the hull is complete, the instructions recommend moving on to the turrets as these form complete assemblies. There are two nearly identical turrets, and when fully assembled will have many delicate parts. You can actually keep them off till the model is complete and if you wish, just position them without glue to facilitate later removal if the model needs to be moved or cleaned. The turrets are fully detailed inside, displaying the guns and all rigging and associated gun details. You have the choice of positioning them run out for firing or retracted back for reloading. The instructions recommend cutting away part of the turret sides to allow you to see into the turret. Once the roof is in place, it will be hard to see inside. I havent fully thought it out, but ai suppose you could put one or two grain of wheat bulbs or LEDs into the turrets with wiring running out the bottom of the hull to allow better viewing of the interior. After you complete the interior, you move on to the turret roof and upper works. A BIG WORD OF CAUTION HERE - the instructions strongly caution you not to attempt to use CA or super glue to secure the PR turret roof to the turret. The turret roof consists of a PE, Brass circular grill which must be properly aligned and glued to the top of the turret casting This grill is large and delicate and will be destroyed if you glued it down with CA and then find it misaligned. Mr. Blackmore clearly warns you right at the beginning that due to cost of the PE, replacing the PE is not covered under his normal any part any reason replacement policy. The PE fret costs him $55.00!!! It is strongly recommended that you use something like Testors canopy cement, or white glue or something similar that is slow setting and more easily removable. The one tricky aspect of assembling the turret upper works will be getting the upper coaming and PE catwalk aligned. It is a bit fiddley, but the instructions walk you through the process The conical shaped coaming ring and support braces for the catwalk are molded in one piece and have to be properly aligned to allow the braces to fall directly under the solid spokes in the perforated catwalk. Once you have that together to your satisfaction, you add the railing stanchions and awning supports, rig everything. And the turret is complete. |
 |
||||||||||
|
|||||||||||
|
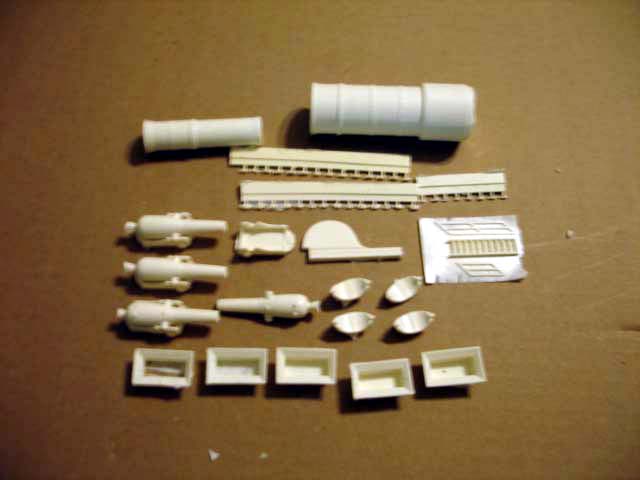
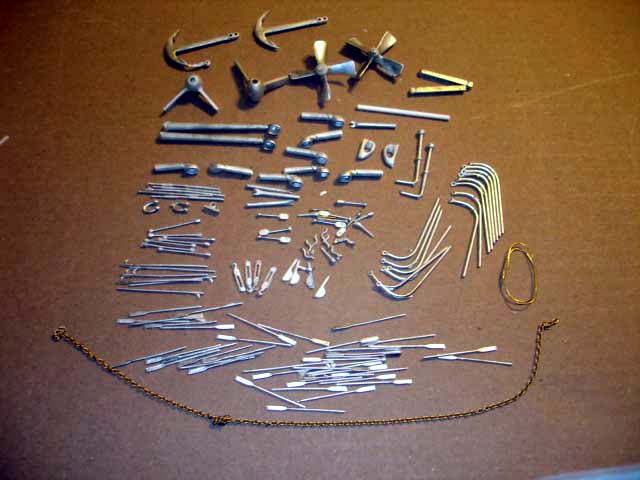
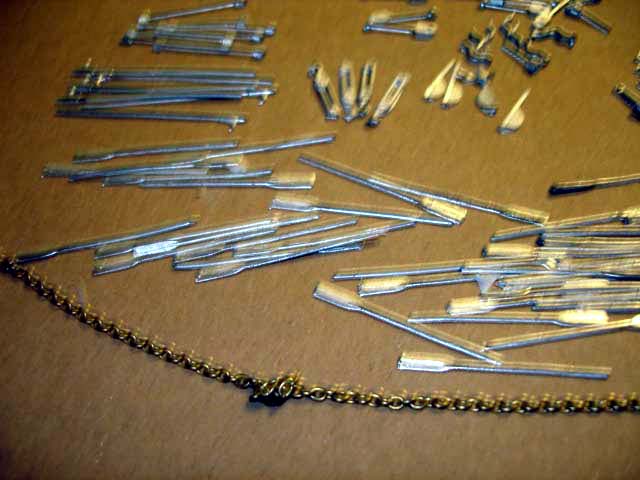
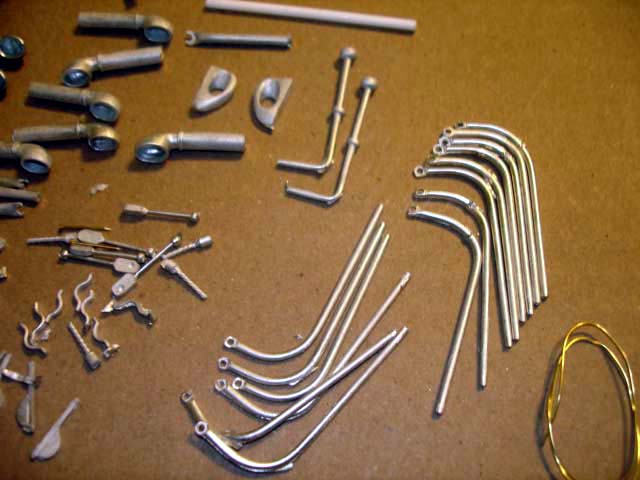
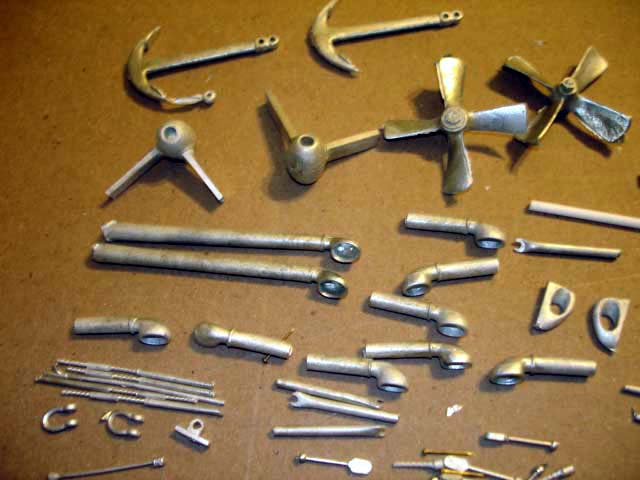
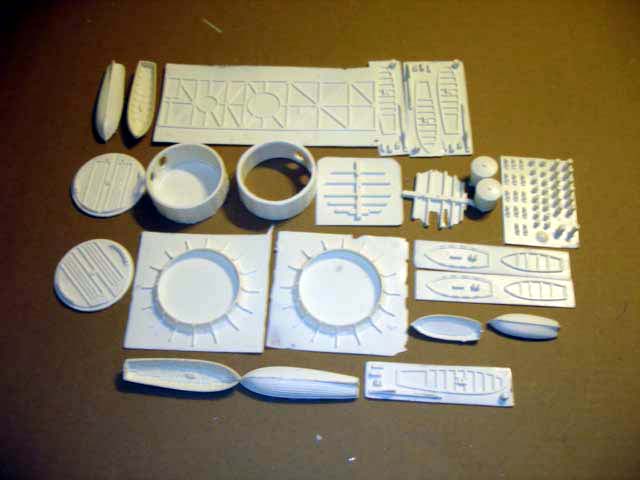
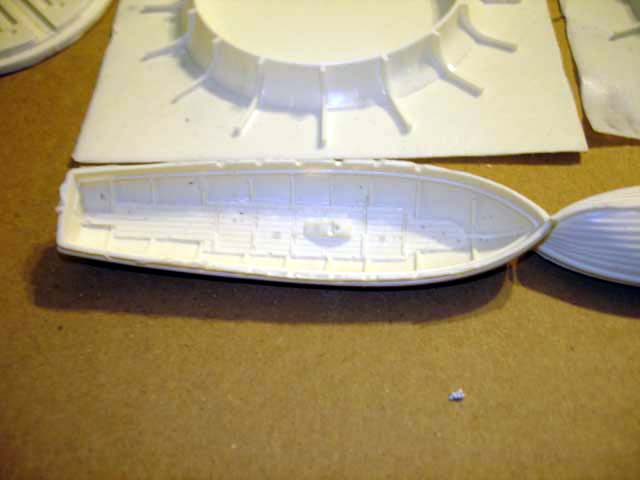
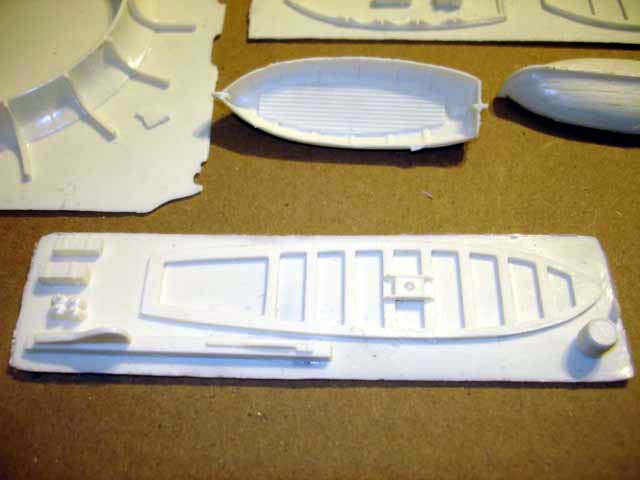
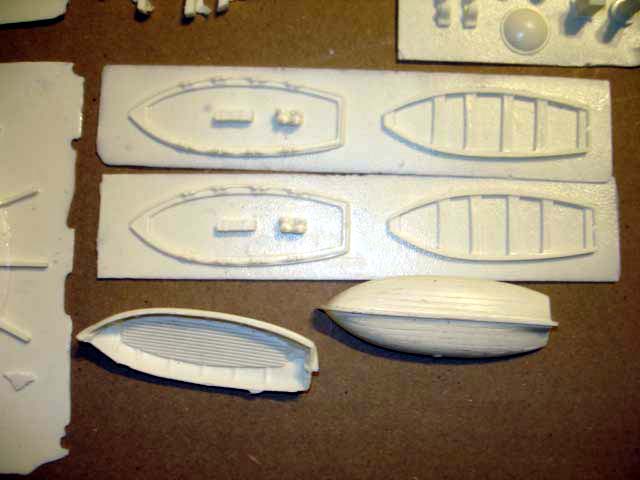
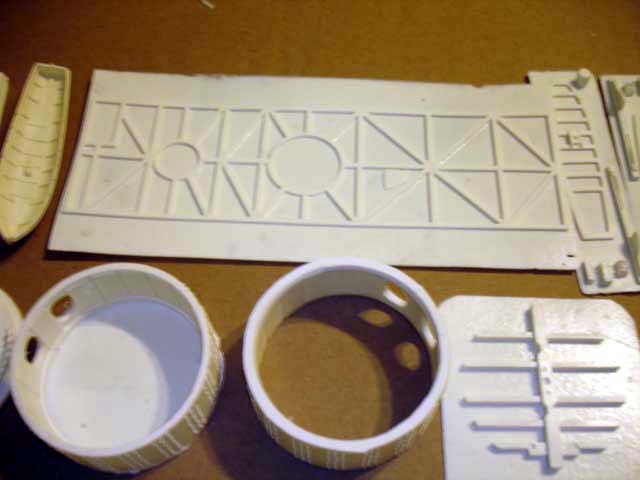
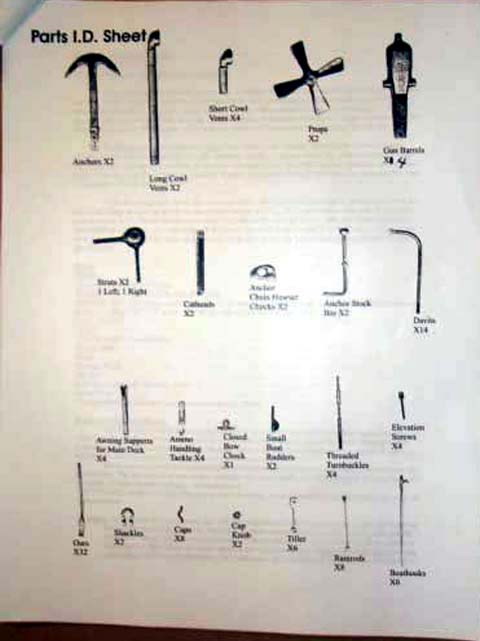
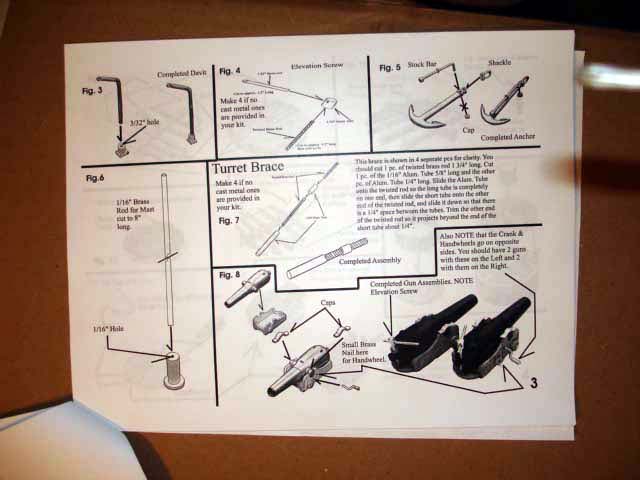
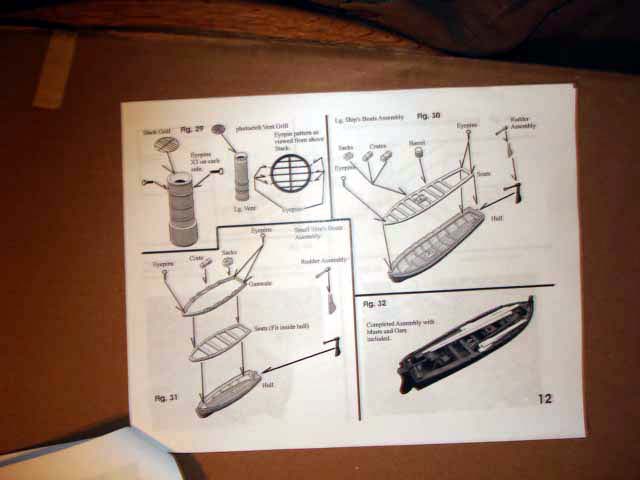
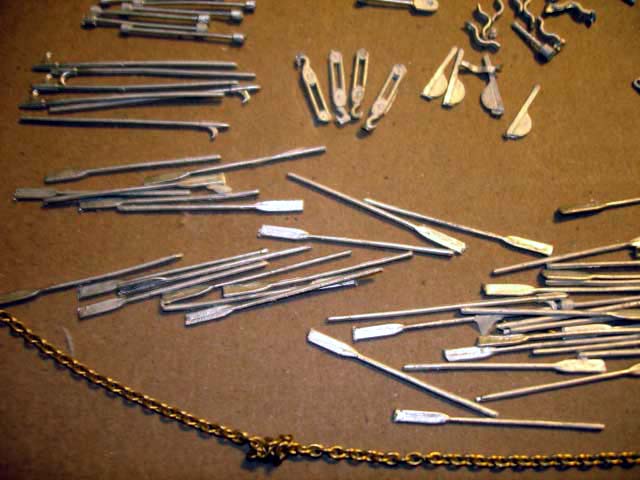
The kit includes two sizes of ships boats. Each is a kit in itself. The boat hulls are exquisitely molded, and look to be of proper wall thickness, with few if any defects or air holes in the resin. Seats, thwarts, rudders, masts and oars are provided as well as small bags and containers for each boat. No crude lumps of plastic here! The boats are hung from davits on either side of the hurricane deck. Beautiful white metal boat davits, with rigging are provided for each boat. The kit comes with several frets of resin single and double blocks for the rigging of the boas and other assemblies. I have included photos of all of the kit parts. You get Resin and white metal parts, a fret of PE Brass and several lengths of tubing and solid rod stock. All of the parts are cleanly molded with little flash and small seam lines. The white metal parts are very cleanly molded and at most will require a few licks with a file or sanding stick to remove very petite mold lines. Many of the resin parts are on either pouring sprues or thin carrier films, The sprues will have to be cut off, none are particularly large or thick. Where the parts are on carrier films, the instructions suggest cutting most of the web away and then sanding the parts on a flat sanding block to remove the unwanted part of the resin. Fortunately most of these carriers are thin so sanding shouldnt be much of a problem. Most of the pictures are self explanatory, anyone who has built a few models should be able to identify most of them by sight. The instructions clearly show where they all go. The usual procedures for assembling a multi-media resin kit apply. One thought - there have recently come on the market a line of so called flexible CA glues. I think I will give them a try. They are a little slower setting than regular CA but may do a better job. They are available in black and clear. I have been using them in several woodworking projects (in one of my other incarnations I am a wood turner) and have been doing some segmented turnings, and have been very happy with the flexible CA in that application. If Flex CA can hold six pieces of Cocobolo segments together while they are being turned into a bowl rim, they will hold anything on a model together! If you cant find the stuff at a hobby shop try Packard Wood Works, Hartville Tool, TheWooden Post, or Rockler Woodworking. Do a Google search on Flexible CA. |
 |
||||||||||
|
|||||||||||
| INSTRUCTIONS | |||||||||||
| |||||||||||
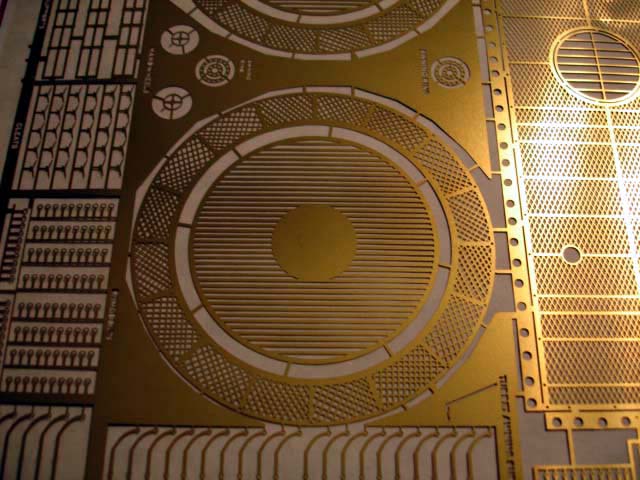
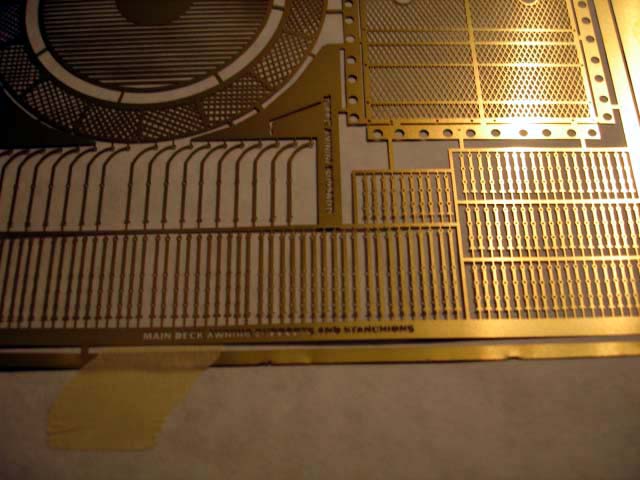
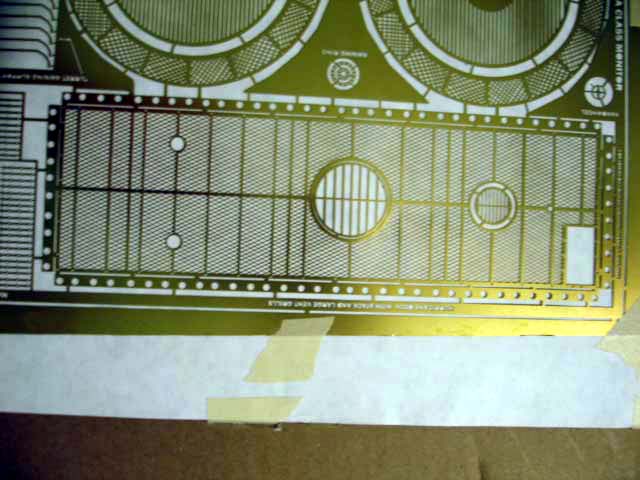
| PHOTOETCH | |||||||||||
| |||||||||||
| CONCLUSIONS: | |||||||||||
|
As you can see from the photos that were recently posted of the completed model, This is one awesome model. Its expensive, but when completed, you will have something different and something to be proud of. I have known Mr. Blackmore for something like ten years. I first met him in about 1995 at the IPMS Nats at Virginia Beach after previously hearing about his first kit, a solid hull CSS Hunley, and have watched him progress as a kit manufacturer since. His kits were always really good, and each has been better than the last. This latest is an out of the park home run. Im already nagging him about the next one!! SRP is $649.95 plus $25.00 handling and shipping via UPS ground or USPS. |
|||||||||||