 |
|||||||||||||||||
|
I did aqquire this kit for a song from NNT models to reach their minimum order. I had had ideas about a battle of the atlantic dio using a tanker plus some escort vessel and maybe even a U-boat. In the end, the model turned out differently. I didn't use other than web resources in finding out more about the
T2 tankers. The project wasn't meant to be historically accurate but more
as a training, using a less expensive kit. I meant to improve it and I
meant to try weathering techniques, plus an ocean base. The weird hull
design neither full hull nor waterline - looked believable to me when
used as a waterline model of an empty ship, either riding at anchor or
sailing without cargo.
|
|||||||||||||||||
| So here's what I did. | |||||||||||||||||
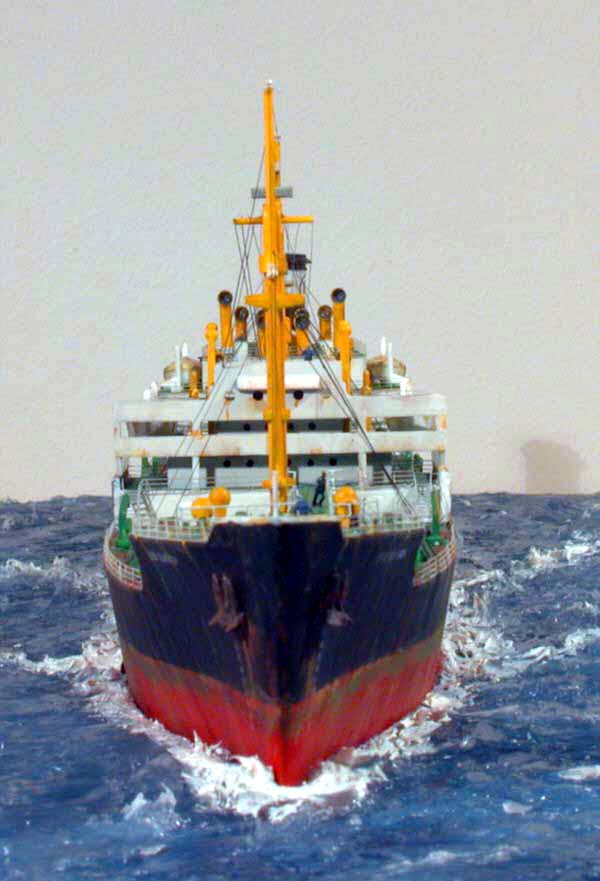
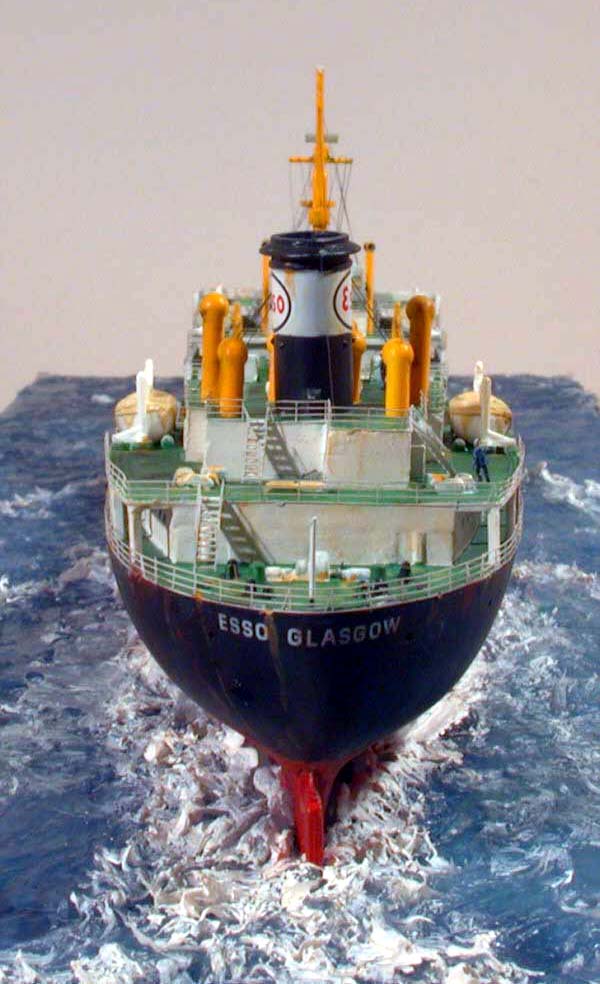
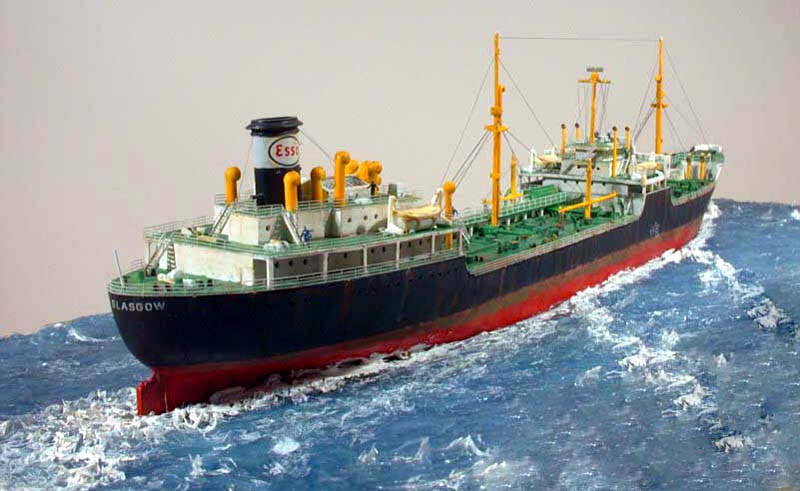
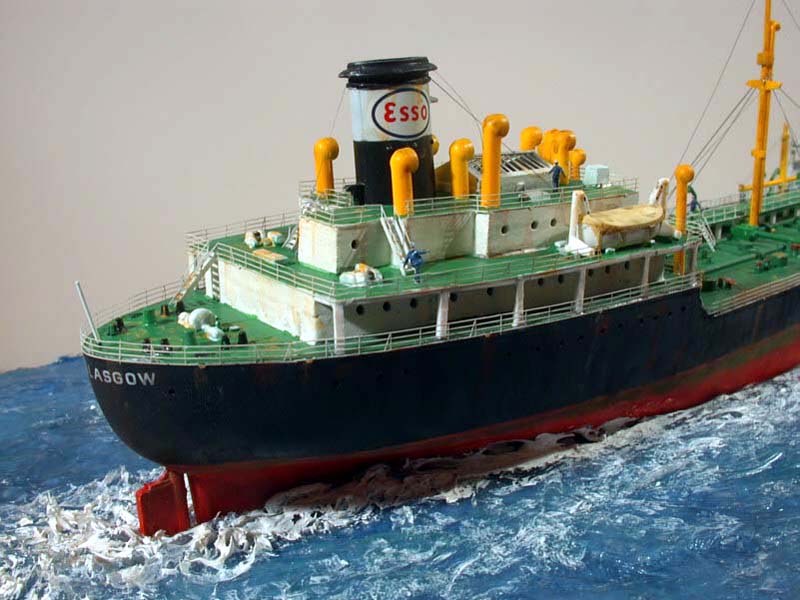
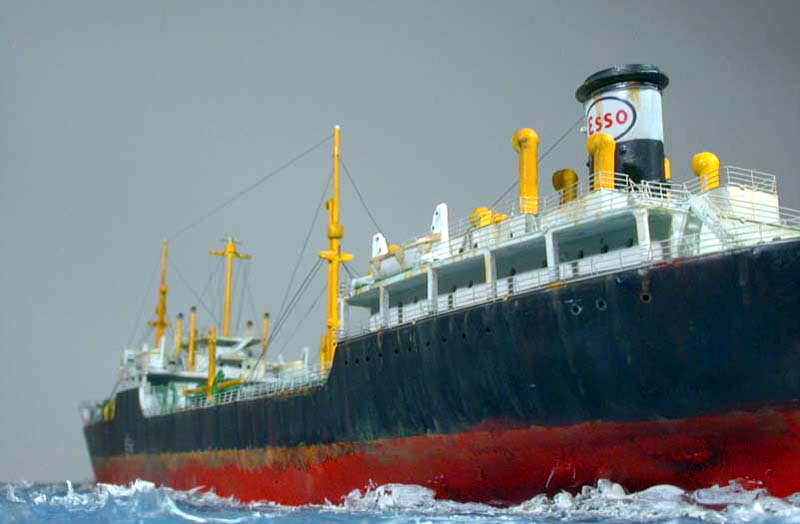
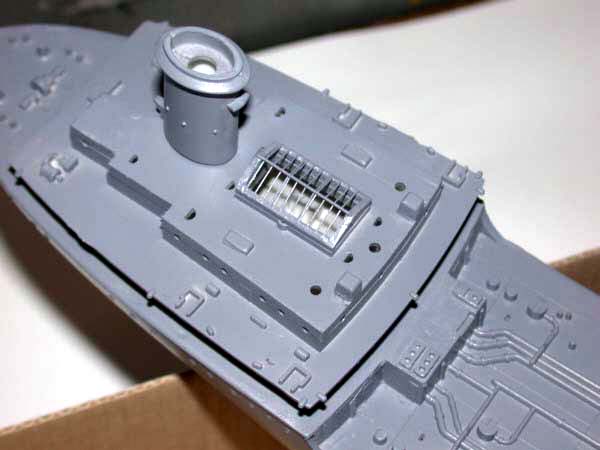
| I checked up on the Esso Glasgow and found some meager pics. A walk around of a T2 tanker showed some more details, but not the area I was mostly interested in, the big skylight on the aft superstructure. Whereas the rest of the kit looked pretty nice, especially given the age of the molds (c. 1959), that skylight looked crude and oversized. | Click images
to Enlarge |
||||||||||||||||
 |
|||||||||||||||||
|
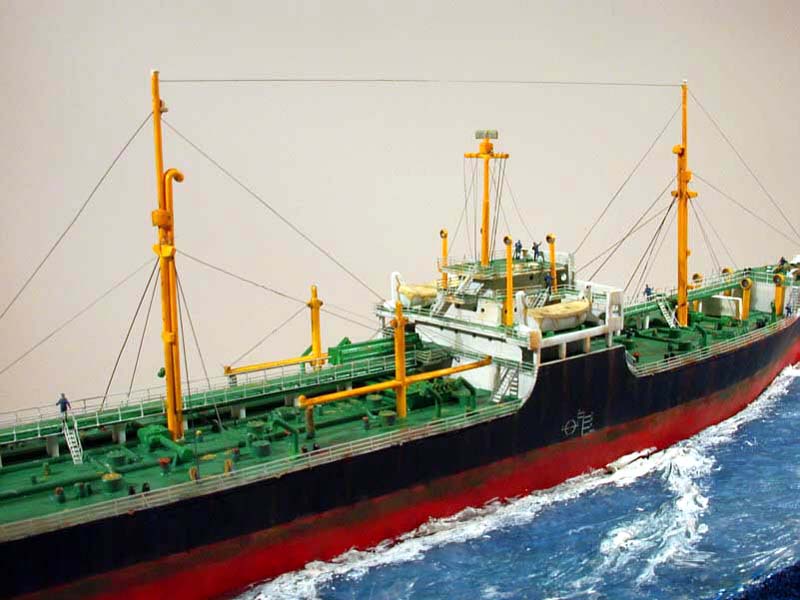
So I started to chop plastic exactly there, sawing away the framing and replacing it with scrap PE railing. Then I decided where to replace the molded on stairs with PE items. I traced the various kit deck level parts, labeling them A through G and noting where the stairs would have to be. Removing the stairs was done with a razor saw and needle files. I also removed the entire molded on railings around the ship, using a dremel and the above mentioned tools. That was especially demanding on the flying bridges. I might have built them from scratch, and I guess that wouldn't have been much more work than grinding off and evening out and filling and sanding as I did. The vertical deck supports along the bridge and aft superstructure had to be replaced from Evergreen stock, as they did rest on the molded on railings and ended in midair after removal of the railings. Generally, the kit's fit was good, a bit surprising in respect to its vintage origin. The only thing that was really annoying was the design Revell chose for reproducing the portholes in the superstructures. That was achieved by molding one half of the bulkhead with each deck, leaving semicircular dents that together made the porthole. That forces you to glue the entire assemblage before any serious painting, and I'm sure not good at that! Oh, and I did I mention the beautiful seam along each bulkhead that was achieved at no extra cost with this method? I did spend some sanding and filling and sanding at those, er, numerous seams, before I could even think of painting the decks. But in the end I arrived at a point where I decided it was either tossing the model against a wall or proceeding from here. I did try some masking and painting as I'm not really good in brush painting and prefer the airbrush a lot. |
|||||||||||||||||
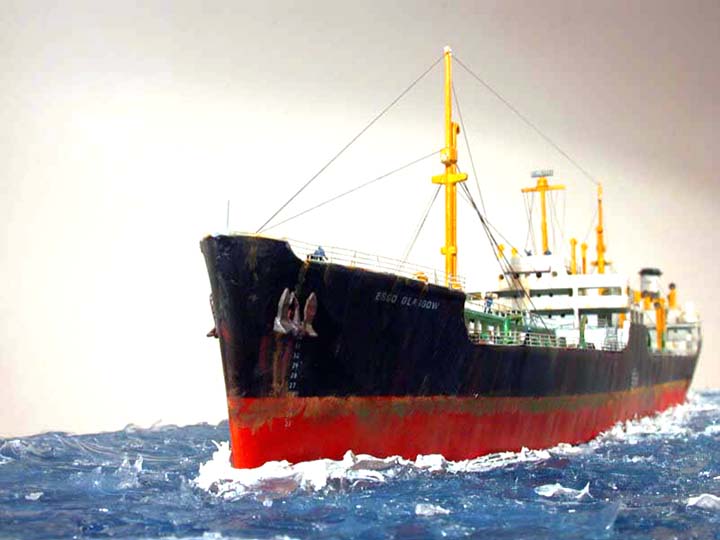
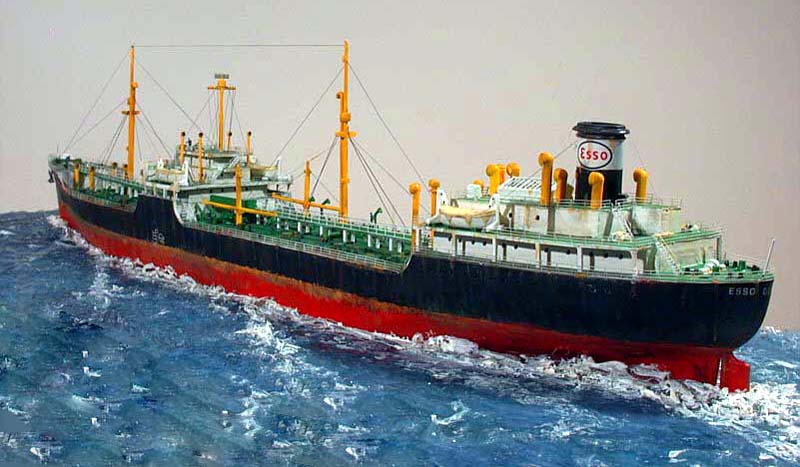
| As regards the color scheme, I skipped Revell´s instructions and painted all the decks in green instead of painting some in wood color. I surmised (and you out there are sure more in the know than me, so please feel free to correct me) that expedited war construction would first of all have skipped posh wooden decks, so I didn't use them either. The hull was sprayed flat black, the underwater area a shade of red that seemed appropriate to me. Superstructure was sprayed white, and I really did try to achieve a clean look in the beginning. The numerous vents were cleaned up and painted Lufthansa yellow touched up on the insides with red. | 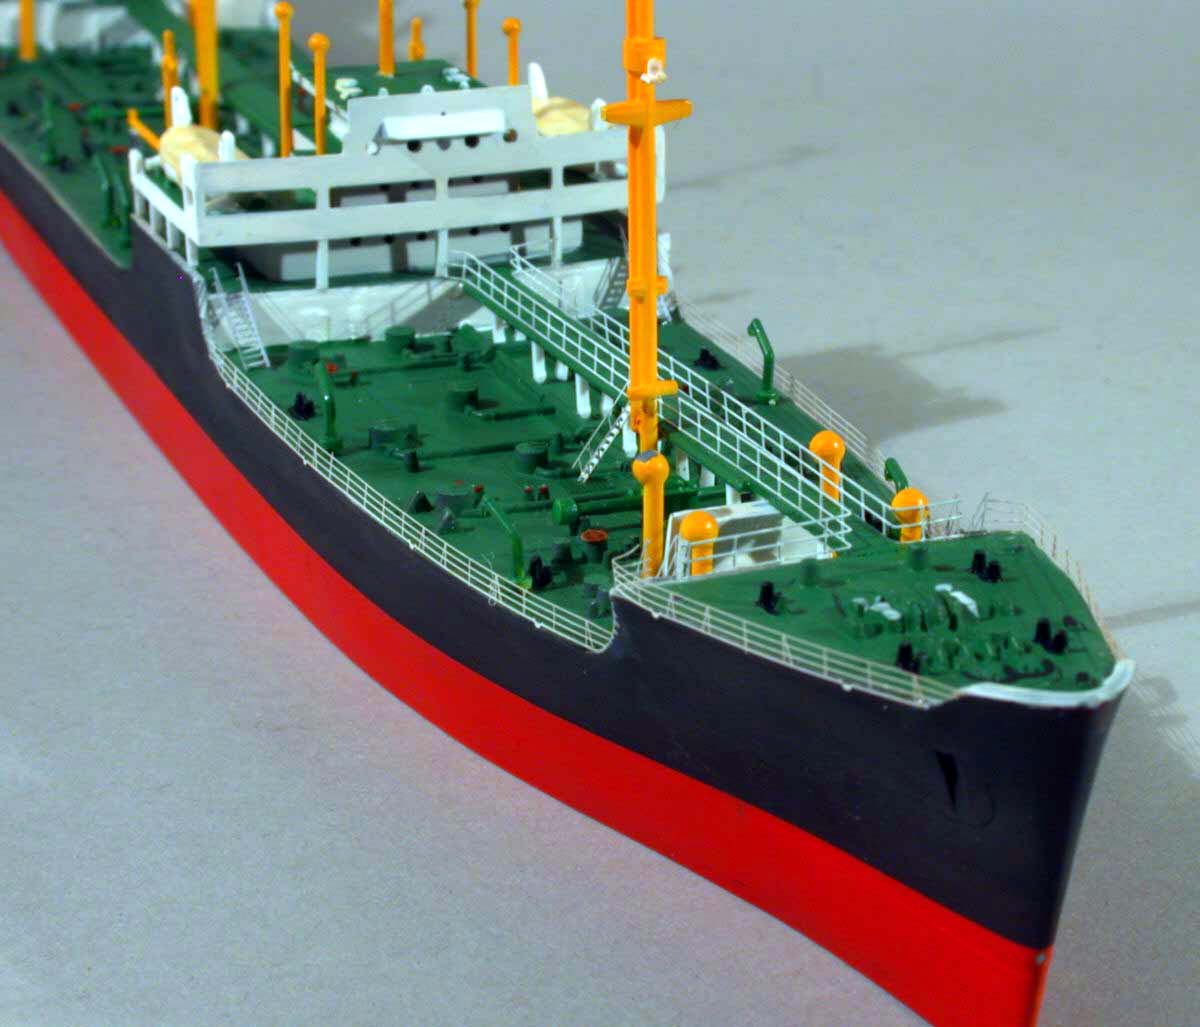 |
||||||||||||||||
| I must mention my trouble with Revell of Germany
#8. The flat black, sprayed using Revell thinners in my usual fashion,
WOULD NOT DRY PROPERLY. Instead, small sooty black crumbs formed and annoyed
me even more. In the end, I washed the entire paint job away and started
afresh using Model Master paints. That was of course after the red had
been masked and painted, so it ALL had to be redone ...
Later on I learned that Revell of Germany has troubles not only with some of their paint but also with their glue, using a new formula that doesn't quite work out. I can second both of that, having thrown away both glue and several bottles of paint after first having blamed my clumsiness. Having completed basic construction in styrene, I turned to PE. I had decided only to use PE railings and stairs, plus some spare vents. The stairs and the flying bridge rails came from Saemann, whereas the longer stairs and the remaining railings are WEM material from their 1:400 extra fine railing set. These items are markedly more detailed and come with supports and water outlets, but they're a lot more fiddly in handling, too. The Saemann parts, great in my Zvezda Varyag, weren't fine enough for this project, and the stairs´ handrails were decidedly too lofty for 1:400 scale here, hence they were clipped down. So I did work my way through the PE, now rejoicing, now cursing when my fingers got glued a zillion times better than the etched brass again, or when I didn't get the bending accomplished. But hey, it was good training ... I had painted the PE prior to attaching, so only small touchups were needed later on. |
|||||||||||||||||
| The masts were used OOB, only the flagpoles were replaced with wire. For a colorful look, the masts were painted Lufthansa yellow as well. | 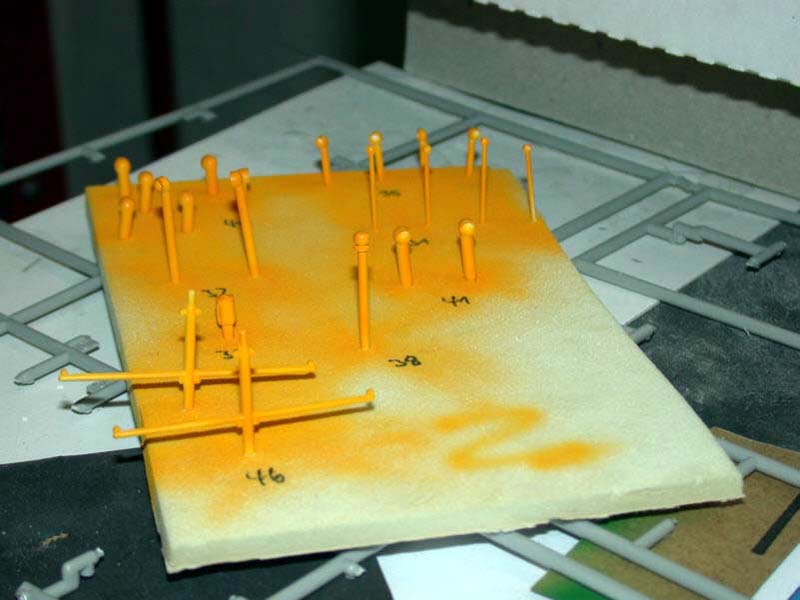 |
||||||||||||||||
| Then I treated the whole ship with Future, meaning to achieve
a glossy surface for decalling. That done, I applied the decals using Micro
Sol and then sealed them with more Future and then with Flat Future, Tom
Cleaver´s mix of Future with Tamiya acrylic flat base.
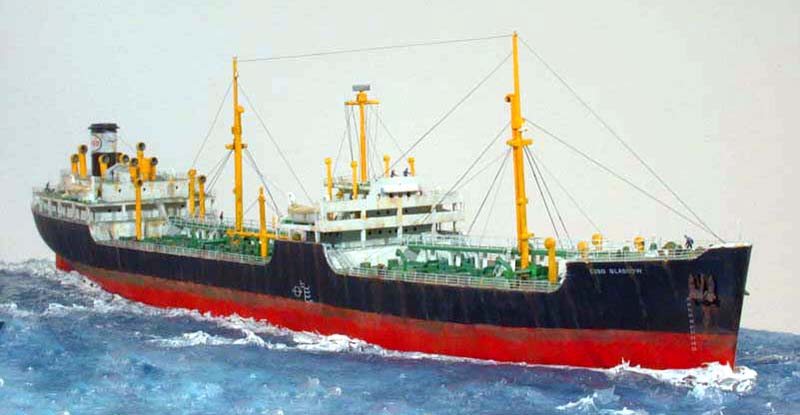
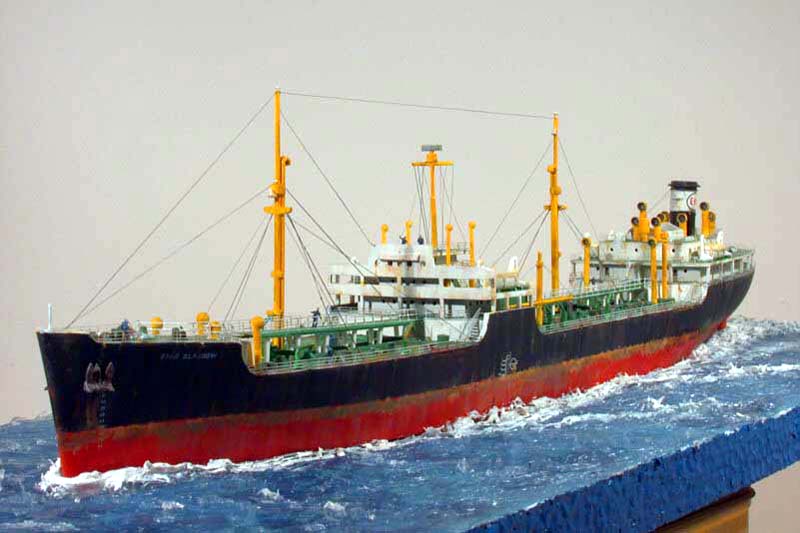
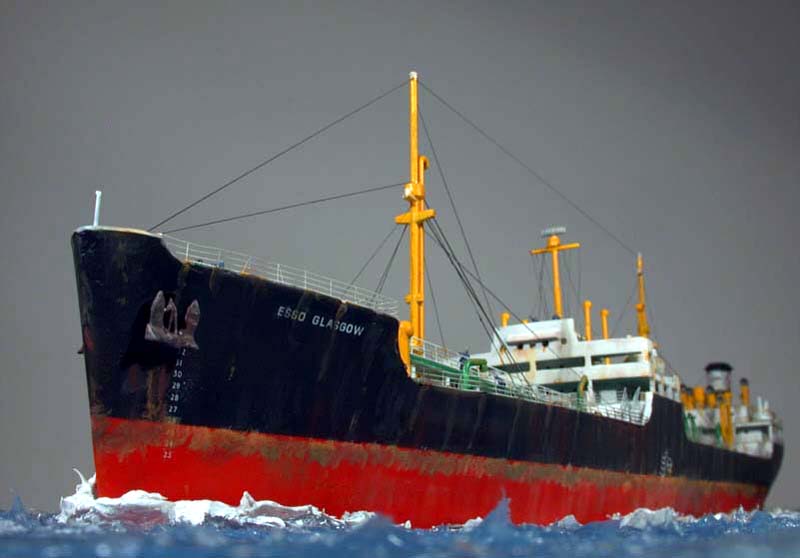
Next came the weathering. I had all those James Bond and other movies in mind with Derek Meddings models used, thinking of used and battered, rust streaked hulls. So I set to work using watercolor washes and pastel chalks. Both methods appealed to me because of their potential for corrections. I tried my hands on them, taking pics after a while, revisiting what I had done and redoing it where needed. I tried to work into that streaky look, using black and red and ochre watercolors. I found the black useful in toning the effects down. The pastel chalks were efficient in filling out corners and in blending the effects yet more. The anchors were only cleaned up after I had decided to model the ship at speed, and not at anchor as originally intended. Then they were painted using MM exhaust metalizer, and weathered using rust colored pastels. I took special care to produce a rusty runoff below the anchors. I had received some unpainted crew figs in 1:350 from Martin Kohring of IG waterline and www.modellversium.de These figs were painted blue, with black boots, flesh faces and hands plus hairs and cap added. The figs were glued to selected sites on board. As I have mentioned before, I had first opted to model the ship at anchor. I had imagined the ship floating near abandoned prior to scrapping, anchored in some equivalent to Portsmouth's rotten row. But somehow I decided against that. I made the ocean base after german master modeler Frank Ilse´s recipe. As it is a first try, it still leaves lots to be desired, but it worked anyway. I cut a piece of styrofoam to size, not having a convenient picture frame I just painted it blue around the borders. Remember this is just a training project. I then made a template of the ship's bottom by tracing it and cutting the template from cardboard. That template was fixed to the styrofoam with pins. I then spray painted the styrofoam in various shades of blue, using darker shades nearer to the ship and trying to bring some life into the base by varying the shades overall. I´ll use cheap kid´s paints in my next project, as they will cover the styrofoam better. After drying, I applied a generous amount of cheap clear silicone caulking to the base using a spatula from the hardware supermarket. I sculpted the material further using a spoon and a toothpick for the wake. Some retouches were necessary, same as some clipping of silicone threads. The wave tops were painted flat white after drying. After removing the template I fitted the ship to the base. That necessitated some adjustments but was accomplished using some more silicone caulking. The ship was glued to the base using more silicone. Finally, the rigging was done using black stretched sprue, glued with liquid styrene glue. After that was completed, a flat clear coat sealed the weathering and covered my usual glossy glue stains. |
|||||||||||||||||
The pictures were taken with my trusty Nikon 995, using as much depth
of field as possible and custom white balance. I tried to achieve believable
perspectives and get "the look of this old and trusty survivor
from the grim battles along Britain's lifeline.
|
|||||||||||||||||
|
|
|||||||||||||||||