Reviewed by Felix Bustelo
| Historical Background
Landing Craft Infantry (LCI) were designed to deliver soldiers and marines quickly during an amphibious assault on enemy territory. These craft, which measured 158 feet long and 23 feet 3 inches in the beam, had flat bottoms and only a two-foot draft forward, which enabled them to land directly on the beach. A stern winch and anchor enabled the LCI to pull itself off the beach and return to its mother ship. Due to their dangerous missions, LCIs were considered to be one trip expendables, so they were not designed with comfort in mind and with the shallow draft for operations in coastal waters. However, due to necessity, many sailed cross-ocean from the United States to the European and Pacific Theaters of operations and every wave was certainly felt by these flat bottom craft. LCIs were definitely tougher than expected and stretched to their limits. WWII LCIs had a crew of 24-60 sailors and could carry up to 200 soldiers, who descended from ramps on each side of the craft. LCIs and their crews proved their worth during invasions in North Africa, Italy, D-Day and in the Pacific. LCIs earned the nickname Waterbug Navy," which was apparently coined by an admiral who observed LCIs scurrying back and forth commenting that they looked like a bunch of waterbugs. LCIs came in essentially two versions: the earlier square bridge and the later round bridge versions. |
||||||
| The Project
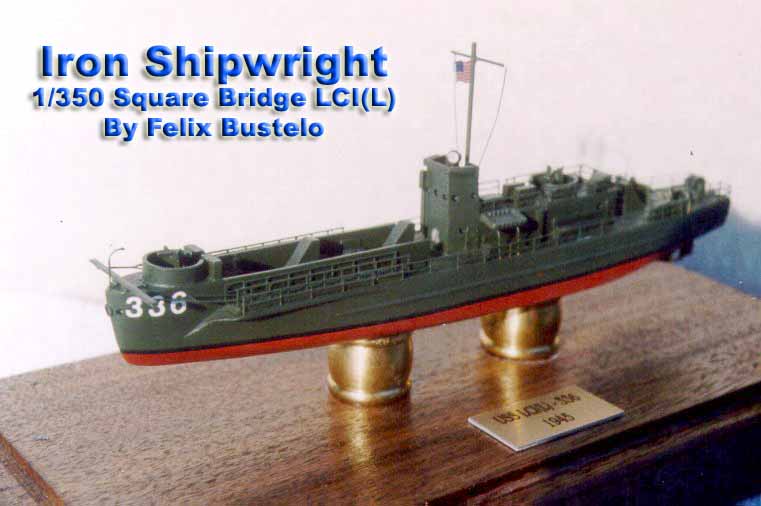
One morning, I struck up a conversation with a fellow commuter on the Long Island Rail Road who observed me reading some ship modeling related material. He mentioned to me that his father was the skipper of a landing craft during WW2 and asked me if I knew of any models of this type of vessel around. He thought that a built-up model would make for a great birthday present for his dad. I told him to find out which ship his dad served on and I would see what was out there. He looked into it and his dad was the commanding officer of LCI(L)-336, which was a square bridge version that served in the Pacific. I advised him that I knew about one kit available and after some discussion, we agreed that for a fee that I would build the model for him. Wow, my first commission! |
||||||
| The Kit
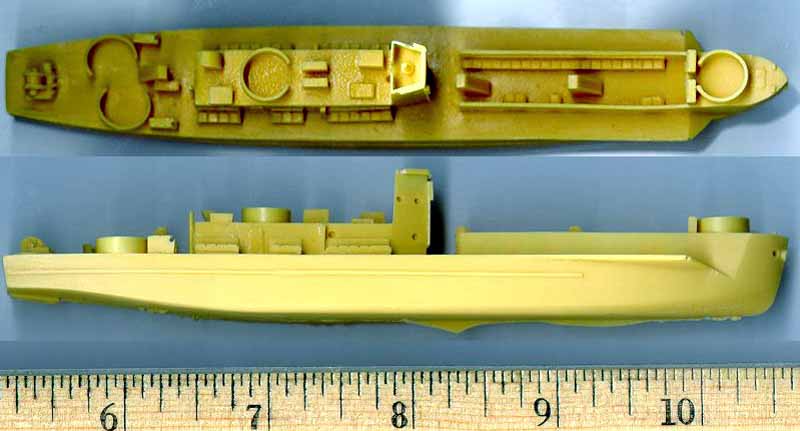
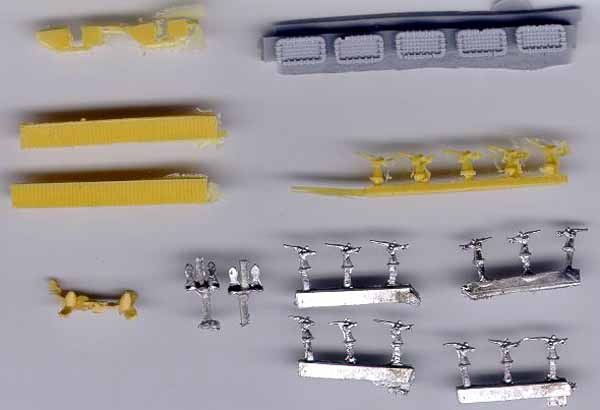
Iron Shipwright produces 1/350 scale kits of both LCI(L) versions. The kit is full hull, with photoetch details and it is a very simple, straightforward build with only a couple of minor nit-picks. In 1/350 scale, this model is small, measuring about 5.25 inches long. The resin parts comprise of the one-piece hull and superstructure, landing ramps, rafts, rudder/propeller skegs, props and 20mm Oerlikons. Also included with my kit were white metal versions of the 20mm guns and a pair of anchors. The photoetch brass fret provides railings (which pre-measured sections for the ramps), vertical ladders, rigging for the ramps, 20mm gun shields, guards for the stern anchors and the life raft stowage racks. The fret also contains what appear to be two types of rudders that are not used with this kit. In addition, there are two types of the anchor guards. Based on the instructions provided with the kit, the photoetch brass is used for both versions of the LCI(L) kits produced by Iron Shipwright. Portions of brass rod in two thicknesses are provided to build the mast. The casting is very well done, with only a couple of minor pin holes that need filling. The edge of the bridge on the port side was damaged, but it was easily repaired with some styrene stock. The remnants of the casting runner along the keel needed to be removed using an Exacto knife with some minor filling and sanding to smooth out the surface. |
click images
to enlarge |
|||||
 |
||||||
 |
||||||
|
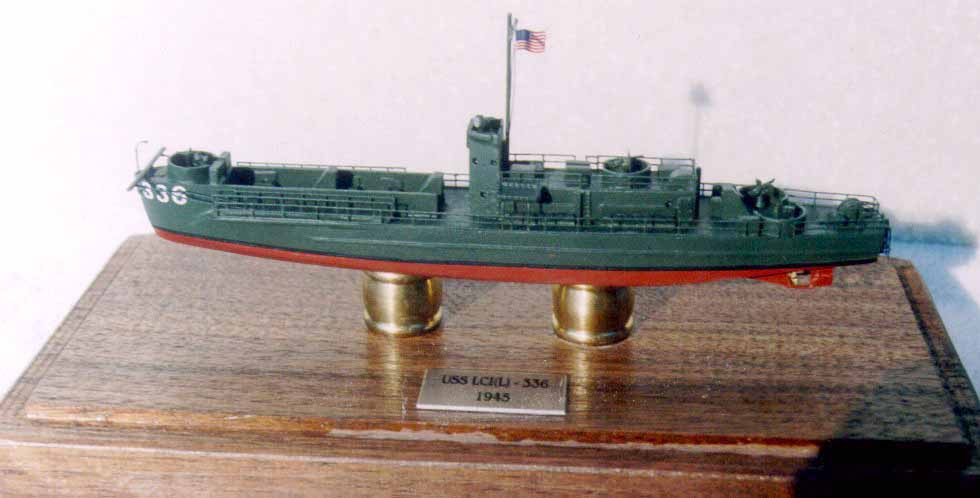
Research I found a great photo of LCI(L)-336 (http://www.navsource.org/archives/10/1015033601.jpg) on the Navsource site that I used as a reference along with some photos of other LCI(L)s available through this great resource. My client was able to get a couple of questions answered for my by an old shipmate of his dads. This was all done clandestinely since the model was supposed to be a surprise gift. The photo shows LCI(L)-336 sailing into San Francisco Harbor after the end of hostilities. The photo shows the letters LCI running diagonally just aft of the very large 336 at the bow. Based on the shipmates information, the LCI was painted on for the return trip home and not present during combat. Also, he recalled the ship being painted a dark hunter green and the same paint was used on the decks as well. This latter bit of information was very important because it meant that at least in this case, that 5-NG Navy Green was used on both the vertical and horizontal surfaces. Typically, the horizontal surfaces would have been painted Deck Green 20-G. My guess is that wherever LCI(L)-336 was last painted they may have run out of 20-G and resorted to painting the entire vessel 5-NG. Armed with this information, I was able to begin the model.
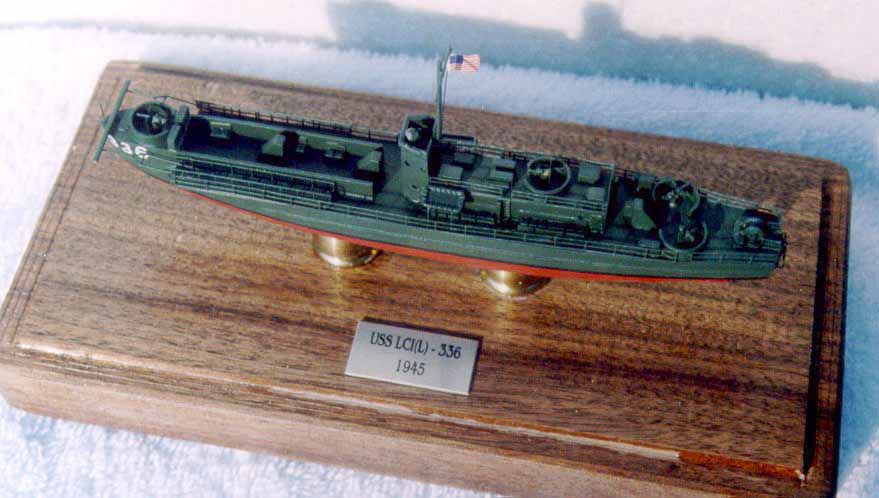
The first order was to fill in the minor voids, clean up the models keel and the damage to the bridge. I found that the rudder/skeg parts provided in the kit were the weakest points. I decided to toss them and make my own. I fashioned my own propeller skegs from sheet styrene. The rudders I took from the Iron Shipwright PC 461 kit since I was planning to build her as a waterline model and wouldnt need them. I cut them done a bit since they were too big. I used brass stock to finish the off. For the propellers, I used a pair from an Airfix kit, which seemed to do the trick. The searchlight was not included in the kits parts most likely due to an oversight, so I got one from the spare parts box. The rest of the model came together very easily. I opted for the white metal versions of the 20mm guns, which I thought looked better. The resin ramps had a very slight bow to them, but this was quickly remedied with a dip in hot water and sandwiching them between a tabletop and a stack of books.
I used White Ensign Models Colourcoats 5-NG Navy Green for the hull and decks, Testors Acrylic Marine Colors Anti-Fouling Red for the lower portion of the hull and black stripe decal for the waterline marking. The props were painted Testors Model Masters Brass and the searchlight with Humbrol Silver. The white number decals are from a Microscale set and the flag was from the Gold Medal Models decals set. I did some light weathering using black pastel dust to bring out such details as the doors, hatches, the rafts and the planks in the ramps. |
||||||
| Conclusion
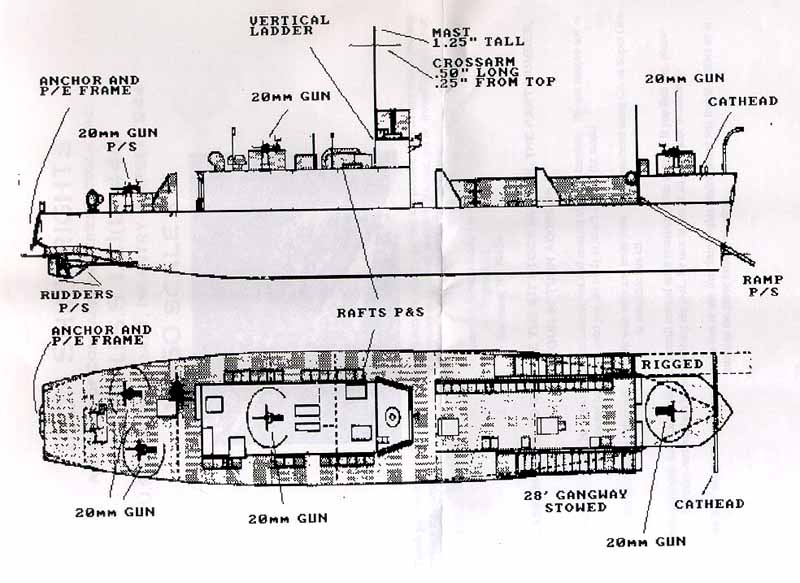
This is a great kit of a very important but largely ignored class of vessel. LCIs played a major and dangerous roll in WWII, but larger ships, such as battleships, aircraft carriers and destroyers have overshadowed them. I would recommend this model to anyone wishing to try his or her hand for the first time on a resin ship model. The build is very straightforward and the photoetch not very difficult at all with mainly straight railing runs. There were many different paint schemes and variants to this class of vessels and some sported wild camouflage patterns, so there are plenty of choices for building this model. My client was very, very pleased with the model and his dad was surprised and bowled over by the miniature version of his old command. My client as had a set of blueprint drawings, which he purchased from the LCI Veterans Association, which he had framed as a companion to the model. I ha a lot of fun building the model and it was a strange feeling giving her up but ultimately satisfying. I am thinking of getting one for myself to build in one of the more elaborate camo schemes. |
||||||

© ModelWarships.com