|
|
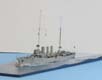
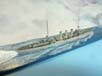
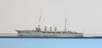
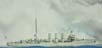
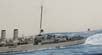
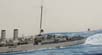
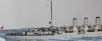
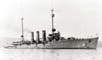
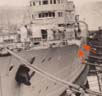
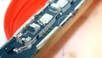
| The cruiser RN Ancona was originally laid down
as the German High Sea fleet light cruiser SMS Graudenz and
joined the German Navy in 1914. At 468 ft (142.7 metres ) and displacing
6382 tons, her machinery produced 26,000 HP
which could drive her at an impressive top speed of 27.5 knots.
Armed with 7 x 15 cm SK L 45 guns as well as 4 x 50 cm Torpedo tubes After the end of WW1 she was ceded to Italy in 1920 and renamed ANCONA. |
 |
||||||||||||||||||||||||
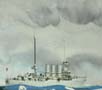
| She remained in service until placed in reserve in 1932; was stricken from the Navy list in 1937 and thereafter broken up for scrap. | 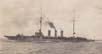 |
||||||||||||||||||||||||
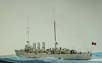
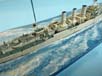
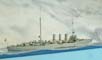
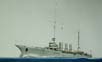
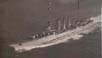
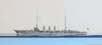
| She was much modified and re-fitted 1921 to
1924. and was was recommissioned into the Italian Navy on 6 May 1925.
In order to be able carry a Macchi M7 Seaplane; from 1928-29 the foredeck and bow were extensively re-modelled to carry the bow catapult track; to which end she gained the rather graceful clipper bow which supported the catapult. |
|||||||||||||||||||||||||
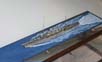
| Building the Model of Ancona | |||||||||||||||||||||||||
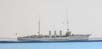
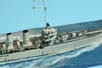
| Despite Ancona in Italian Service with her long overhanging clipper
bow being a unique looking ship,there appear not to be all that many
photos of the ship.!
I spent many hours enlarging and studying the few available images of the ship in both German and Italian service so as to be able to establish some of the detail and layout which I the correlated with thelarge scale plans drawn up by Franco Gay, back in 1962. |
 |
||||||||||||||||||||||||
| These multiple sheets of plans proved to be beautiful artwork--and appear to be dimensionally accurate albeit not perfect in the minutia of detail when compared to the photos. | 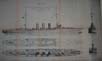 |
||||||||||||||||||||||||
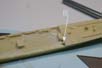
| HP models manufactured this basic resin
kit based on the Franco Gay plans, as far as I could ascertain
dimensionally they did a fair job.
However...I find it most peculiar that they managed
to commit that most basic of errors of furnishing the casting
with a wooden deck, when commonly available photos of the ship in
I therefore-carefully -using a flat Stanley Blade and a Micro chisel --succeeded in paring away the wood deck pattern on the casting and obtain a flat smooth surface. |
 |
||||||||||||||||||||||||
 |
|||||||||||||||||||||||||
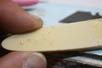
| This was a painstaking and slow process requiring
firmness of action as well as delicacy so as not to cause irrecoverable
damage
This meant that all cast-on deck detail--good as well as bad ( Aztec type steps) was removed. all of which was later reproduced from scratch. |
 |
||||||||||||||||||||||||
 |
|||||||||||||||||||||||||
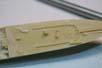
| Eventually a satisfactory result was obtained and the missing torpedo tube apertures cut in. | 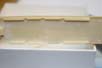 |
||||||||||||||||||||||||
 |
|||||||||||||||||||||||||
| The extensive paring of the foredeck had impaired the height relationship
versus weather deck versus waterline versus the portholes,
therefore I needed to add a styrene shim deck to restore the correct relative levels. |
 |
||||||||||||||||||||||||
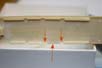
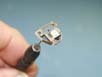
| The plans showed an odd indent on the port bow, | 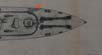 |
||||||||||||||||||||||||
| which photos of the real thing confirmed
I duly cut in this indent into my new flat fore-deck--still without knowing what it was for.! |
 |
||||||||||||||||||||||||
 |
|||||||||||||||||||||||||
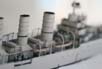
| Making the Funnels | |||||||||||||||||||||||||
| The cast resin funnels in the kit were a rather poor rendition
of the real thing, having no cowl, nor showing the increased width at the
base
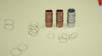
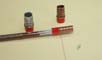
I elected to make my own funnels using aluminium tubing and my miniature tube cutter. |
 |
||||||||||||||||||||||||
| To my eyes many fine 1/700 models are compromised by vastly over-scale
photo-etched funnel rails... ( often being thicker than the torso of a
1:700 scale crew-members and projecting off the funnel as scale 3 - 4 feet!!!
I had been experimenting with using the tube cutter to cut a recess
into which I could lay thin copper wire to simulate the railing
The round funnel was straightforward, the oval flat sided funnels presented other challenges. I found the best approach was using narrower copper tube for the two oval flat-sided funnels which gave the correct cross profile when squeezed in the vice with a wooden former inside to prevent crushing. I first made them all round and then compressed two of them in a small vice to gain the "flatness..." |
 |
||||||||||||||||||||||||
| The lower cowls were made of thicker wire-- I added another layer of
wire balanced (!) and glued to the outside of the first layer--
as the lower sheathing of the funnels was greater of circumference. |
 |
||||||||||||||||||||||||
| I used two layers of Becc vinyl tape to gain the additional thickness... | 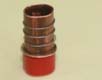 |
||||||||||||||||||||||||
| Making the deck-houses usable | |||||||||||||||||||||||||
| The deck superstructures in the kit were about the correct size and shape (off the Franco Gay plan) but the casting and exact outline detail shape shape and finish and level in many places was poor an example being the square windows in the kit parts casting not good enough... as they were not even square to the deck... |  |
||||||||||||||||||||||||
| Not wishing to completely re-make them all, I sheathed
the superstructure parts in ( BEC's) vinyl tape to get a smooth demarcation
line to deck and a better finish. This also cured some of the soft
and sloppy detail on the casting The joins in the tape were hidden
on the fore and aft sections ,where they are concealed by mast or overhanging
deck section and sealed with a dribble of CA to inhibit any
future shrinkage
The deck houses in photos appeared to have a 'beading' around
them at the join of deck to vertical bulkhead
|
 |
||||||||||||||||||||||||
 |
|||||||||||||||||||||||||
| The Bridge structure | |||||||||||||||||||||||||
| This was a rather daunting part of the build--as it is in effect the
' face ' of the ship.The kitsupplied resin casting of the bridge with the
multiple windows was shockingly bad; roughly executed and poorly cast.
and was quite unusable, in particular the windows require
regularity and a crisp finish
I experimented by piling up ladder stock on styrene strips to improve the look, but while the effect was better--the window rectangles were not in proportion and the result not sharp enough I contemplated making custom- window decals--which would have been regular and sharp enough--albeit lacking the see through-look. Having built models of the pre WW1 Russian cruiser sister-ships Novik and Zhemchug .... I had purchased quite a few additional frets of the North Star PE (so to gain the PE gunshields (!)) I thereby had some spare pilot house photo-etch windows, which had the correct proportions to be usable in this project. With some careful cut-and-shut and some precarious brass edge to edge glueing a fairly sharp and acceptable result with the correct amount of windows resulted. |
 |
||||||||||||||||||||||||
| The bridge level castings were crude and chunky and incorrect
in plan view as well as side elevation.
The rear of the pilot-house was very " soft " in outline--as well as being under-size I chose to remedy this using use brass strip for thin walls as well as sharpness of outline. |
 |
||||||||||||||||||||||||
 |
|||||||||||||||||||||||||
| Works on deck | |||||||||||||||||||||||||
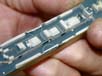
| Into the previously cut in Torpedo tube apertures I fitted the semi-circular running track to the deck. I made the track of very thin copper-wire flattened between two Stanley blades in a vice and then made the tubes utilising some old plastic TT-tubes as a basis. |  |
||||||||||||||||||||||||
| The aft skylights and vent boxes were cast solid
( and crooked! ) and were devoid of any detail...
I simulated the outlines of the apertures using some ladder stock from GMM and made the hatches using a slightly smaller ladder stock from WEM. |
 |
||||||||||||||||||||||||
 |
|||||||||||||||||||||||||
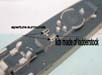
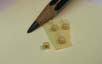
| Munitions boxes and small deck vents and similar box structures were all cut from styrene strip material. The ships boats supporting frames posed a small quandary as they needed to be sharp, fine and most of all repeatable. The boat skids were made of 1/350 handrail adapted and cut with the sharp corners being clipped -so that when painted it gives an impression of the out-board corner having a small round on it.. | 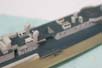 |
||||||||||||||||||||||||
 |
|||||||||||||||||||||||||
 |
|||||||||||||||||||||||||
 |
|||||||||||||||||||||||||
| The overhanging decks aft of the bridge were made of paper- easy to cut and shape--and once tacked in place with matt varnish these were infused with CA --which made them hard and bonded along all edges as well supplanting the grab that the varnish had | 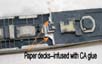 |
||||||||||||||||||||||||
 |
|||||||||||||||||||||||||
| On the foredeck, the anchor chain-ways and catapult track base were made of strips of brass. The catapult rails were made of WEM 1/700 KGV degaussing cable PE--which gave a fair impression of the rails and their supporting gussets. | 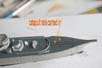 |
||||||||||||||||||||||||
| The previously removed resin breakwater was re-made in brass. | 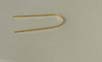 |
||||||||||||||||||||||||
| The gun turret mounting reinforced plates which had all been chiselled off when I converted the decks to steel were made of vinyl tape squares with the corners clipped. | 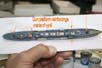 |
||||||||||||||||||||||||
| At the stern there is a tall central fair-lead with the sides of the aft deck being cut away downwards; this was tricky to read off the drawings but can be readily discerned in photos. | 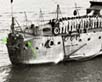 |
||||||||||||||||||||||||
 |
|||||||||||||||||||||||||
 |
|||||||||||||||||||||||||
| Much time was spent making the fair-leads and mooring bits
-- on models these are often represented grossly over-scale.
I used some 1/350 ladderstock-- once painted ( brush) they assume quite a 3-D look |
 |
||||||||||||||||||||||||
 |
|||||||||||||||||||||||||
 |
|||||||||||||||||||||||||
 |
|||||||||||||||||||||||||
| The kit supplied gun-turrets had almost the correct size footprint
in plan view -but were the incorrect shape in side and
frontal elevation being proportionately not quiet high not high enough
, coupled with fragile and clunky resin barrels;lastly being entirely
solid was far from satisfactory I choose to treat the solid resin
block as blanks of a a consistent size
I re-shaped the top and forward faces with a blade, and then carefully drilled and hollowed out the solid from the rear of the turret I drilled the hole for the barrel and inserted some NNT brass barrels and added a small amount of vague detail to the breech end to give some contrast--but is all but invisible on the model. |
 |
||||||||||||||||||||||||
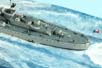
| Making masts and platforms | |||||||||||||||||||||||||
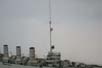
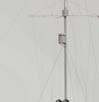
| The masts on ANCONA are outrageously tall, which makes for a visually arresting looking model... The lofty thin poles masts were made using Albion alloys thin brass tubing I insert stainless steel-spring wire into the tubing and drizzled runny CA in to make a sort of laminated strong, bend resistant mast, so as to ensure no issues at the later rigging stages and avoid converging-mast-creep Later in her career Ancona had the open railing upper bridge platform replaced with a (seemingly )circular structure. | 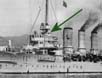 |
||||||||||||||||||||||||
| I used a similar diameter to the mast sacrificial mast tube to align all angles prior to installing the finished masts. | 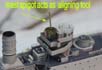 |
||||||||||||||||||||||||
| The upper look-out posts were made of brass tubing-- the viewing slits were made using cut down black decal stripe. |  |
||||||||||||||||||||||||
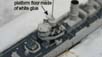
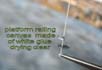
| In my opinion....(!) many a fine model has been compromised and flawed
by having excessively thick ( plastic or resin ) platform floors...In
reality these were often simply sheet steel--usually braced underneath
In 1:scale these are very very thin.... My method which I have successfully used for many years is to bend and create the desired platform shape in PE railing, then brush thinned-with-water white glue across the completed circle or oval across the UNDERSIDE. |
 |
||||||||||||||||||||||||
| Once dry--affix the platform to the mast and paint the floor -if a different colour to the railing from UNDERNEATH; -the white glue when dry is clear and that gives a clean demarcation between the deck and railing. | 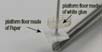 |
||||||||||||||||||||||||
 |
|||||||||||||||||||||||||
 |
|||||||||||||||||||||||||
 |
|||||||||||||||||||||||||
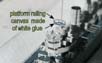
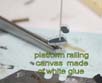
| In this instance I painted the railing and the floor the same shade of colour--as the canvas dodgers are the same colour as the metal railing and teh rest of the superstructure the next step will show the reason for painting the rail the darker colour of the floor...I then applied the white glue to the railing with a paintbrush--relying on the surface tension to span the gaps, and when dry painted the " canvas" on the OUTSIDE only--white glue dries clear and allows the darker railing to be seen with clean demarcation on the inside. This then is intended to simulate the shadow cast by the railing--gives a bit of visual texture and sort of scale shadow... | 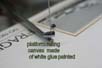 |
||||||||||||||||||||||||
| The various platforms all had extensive strutting support underneath. Rather than try and emulate this in an over-scale manner, I chose to simplify and added stretched sprue struts to give an effect that is pleasing to the eye. | 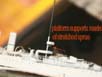 |
||||||||||||||||||||||||
 |
|||||||||||||||||||||||||
| The ships boats were fitted to the boat-racks, chocks simulated
with a dab of white glue. The boats in the kit were very poor so
I substituted with suitable boats from WEM, Combrig and even some
old Modelkrak I added oars, rubbing strakes and rudders all made of brown
stretched sprue
The davit rope falls for the boats I made using black stretched sprue, making the blocks of a small pinpoint of white glue. The davits themselves were made of thicker flat brass strip--with stretched sprue added to the inside to give the paint something to adhere to to bulk up the strips. |
 |
||||||||||||||||||||||||
| Various figures--GMM and Eduard--were twisted and
re-posed, thickened with CA and white glue , and posted around their duty
stations, or in small congregations engaged in conversation or receiving
orders! The rigging of the ship was done entirely in stretched sprue
using my usual method which van be studied in greater detail here.
Rigging was a delicate and arduous affair, requiring total concentration and much held breath' as the 4 legs of each of the diagonal cross-trees were made of very very thin stainless steel wire and were butt glued individually to the underside of the look-out positions to the centreline of the masts rather than incorrectly crossing over ahead or behind the masts Each set of crosstrees, per mast , required 8 x sets of signal halyards--each halyard consisting of two very fine pieces of tan coloured stretched sprue. making 16 strands of spreu in all; and endeavouring to avoid bending the very thin cross-trees. The sprue supporting rigging proved to be structural! |
 |
||||||||||||||||||||||||
 |
|||||||||||||||||||||||||
| Final finishing encompassed adding the awning stanchions at the deck-edges--these were made by cutting the appropriate size lengths from the longitudinal pieces of 1/350 fine handrailing PE and later rigged with stretched sprue | 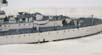 |
||||||||||||||||||||||||
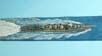
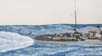
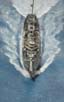
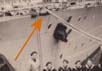
| I had mounted the ship early on in the build for eays handling
and used my tried and trusted method of using artists textured watercolour
paper over wooden cocktail sticks,
glued onto a stainless steel plate and bonded with epoxy .My method of making and painting sea-scape can be read in greater detail here and here. lastly I painted and refined the sea-scape , using a very handy overhead photo of the real ship at speed and tried to emulate the same feel |
 |
||||||||||||||||||||||||
 |
|||||||||||||||||||||||||
| The final task was to fit the ship with her naval ensign, this was drawn up and scaled for me fellow modeller Rui Matos, after receiving the pdf file I I printed this on white decal paper and attached to the sprue halyard with matt varnish | 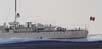 |
||||||||||||||||||||||||
 |
|||||||||||||||||||||||||
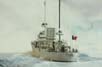
| In summary, I would have been rather unlikely to build a model
of Graudenz in her original configuration as a smart but to
my eyes unspectacular cruiser. It took the Italian Navy
to retrofit a clipper bow to pique my interest sufficiently
for me to simply have to build and possess a model of the ship HP models
are to be commended for choosing to produce such an esoteric and unique
subject
that appears to be dimensionally correct in overall sizes and proportions On the other hand, insufficiently tenacious research resulted in the release of the model with a wholly incorrect wooden deck, along with mostly virtually unusable parts aside from the basic hull. Nevertheless Ancona makes an exciting addition to the modelships in my collection I am grateful to my Italian internet modelchums Peppe and Giampiero in particular who were able to furnish some very useful images which allowed me to build a reasonably accurate model but most thanks go to Rob Kernagahn who supplied the beautiful plans |
 |
||||||||||||||||||||||||
|
|||||||||||||||||||||||||
More
of Jim Baumann 's work.
Updated 11/25/2015

© ModelWarships.com