IJN Repair Ship Akashi
in 1/700 scale
By Sami Arim
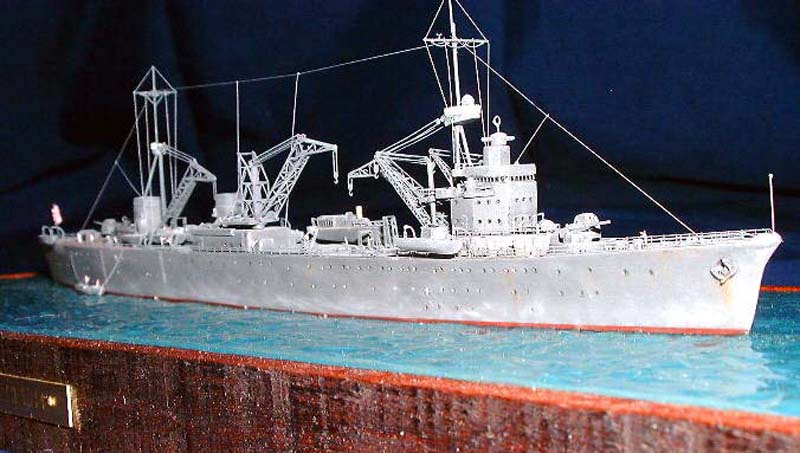
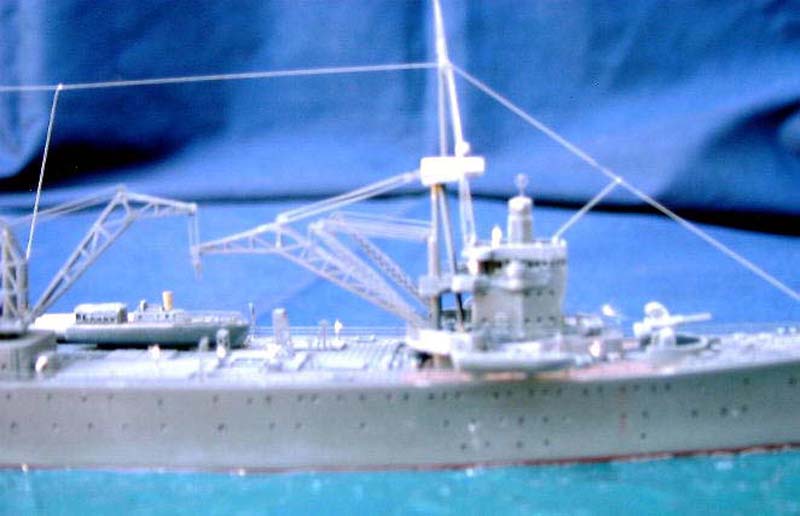
| A repair ship had been requested for a long time from the Japanese Navy. At the time Akashi was the only newly built repair ship. Her keel was laid down in Sasebo dockyard in 1937, launched June 29 1938, and completed July 31 1939. In the same year she was admitted into the Union Fleet. Akashi resembled contemporary British submarine depot ships, but was diesel engined, with two exhaust stacks, and was flush-decked, with a much lower profile. At about 10.000 tons she was 507 feet long at waterline, with a beam of 67 feet. As main armament she had two 127mm (5 inches) Antiaircraft guns. The fore stack was for factories only. Five large cranes were arranged fore and aft to transfer repair parts and replenishment. She had universal class ability as a repair ship at the time, with a machine shop, assembly plant and other factories; castings, forging, welding, copper working and woodworking. Furthermore, she was installed with a tool room and a blueprint room. In March 1944 she was sunk by US Forces at Palau. | |
| Repair ships of WW2 were some of the missing heroes of the war in kit form. Thanks to the resin cottage industries, some of these warships are available. As an example the Vestal, the US repair ship, which was next to battleship Arizona at the Pearl Harbor attack, is available in 1/700 and 1/350 scales in resin. The Japanese version of the Vestal was the repair ship Akashi. About 12 years ago, when the Japanese resin kits started to appear here in the States, Waveline, produced a resin kit of her in 1/700. I dont know the quality of the kit, because it never made it to the U.S. By the time Pacific Front Hobbies started importing the resin kits from Japan, the Akashi kit was out of production. The main reason being, the parent company of the Waveline, Skywave/Pitroad decided to develop an injected molded kit of the Akashi. | 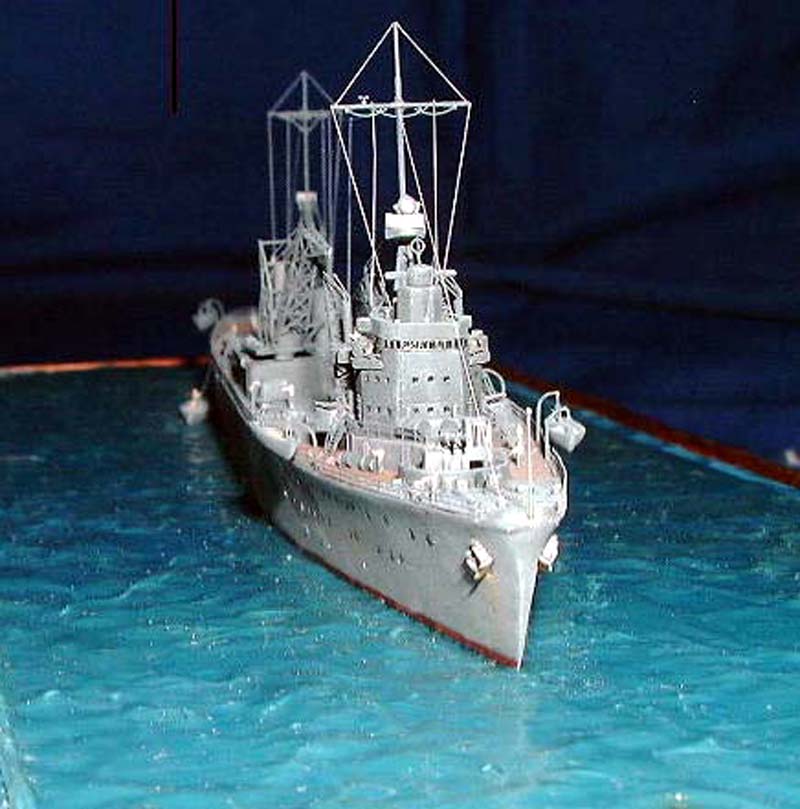 |
| The Pitroad kit of Akashi in 1/700, should be regarded as one of the best warship kits available. It is wonderfully detailed, simple to assemble and straight forward. The only decision I had to make was to choose which photo-etch parts to replace all those cranes on the deck. Toms Modelworks and Gold Medal Models both have very detailed sets for IJN Auxiliary ship kits. I used both sets for different parts. | |
| The improvements to the model: I cut off the molded bridge windows and 17m pinnaces windows and replaced them with photo-etch framing. After the model was completed, I filled the empty PE frames with Micro crystal clear to achieve the realistic window glass look. I redrilled all the portholes and at the end filled them with Micro crystal clear. I cut off 12.7 mm gun barrels, replaced them with fine brass tubing. All the boat davits were replaced with brass wire and completed with photo-etch rigging. I tossed away all the plastic masts and fabricated new masts with brass rods. That was some good practice for soldering. I also fabricated fore and aft flag posts with thin brass rods. I cut off two ships boats funnels and replaced them with fine brass tubing and left them unpainted to give them the realistic brass look. I further improved a couple of parts with brass rods. All the cranes, fittings crane rigging, hooks, railings, yardarms, radars and couple other details were replaced with photo-etch parts. The flag came from Duane Fowlers Dunagain Decal set. Weathering was in a particular order to achieve what I wanted. Once I painted the model and waited for few days for the paint to dry, I sprayed the whole model with Future floor wax. I waited another couple of days for the future to dry and applied a black wash with turpentine to give the model an overall dirty look. With glossy water based future under it the turpentine flows really nicely on the model and wont attack the future. Turpentine takes a long time to dry, so I had to be patient for a week. At this point it is the best time to apply the model rust streaks with pastels, because the turpentine will help you apply very small amounts on this small-scale model. I feathered the pastel rust application with a wash of Windex thinned with water to keep the weathering in control. It is very easy to overdo the weathering in this scale. As a final coat I applied a mix of future with Tamiya flat base. | 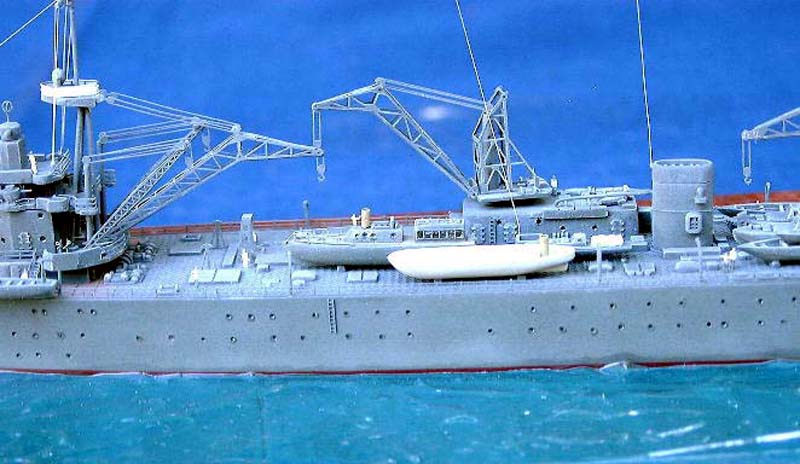 |
 |
|
| Conclusions:
Akashi might not have the gracious lines of a battleship or a heavy cruiser, but she definitely has her own eye appeal. I like to look at my model on the shelf very much. Sami Arim is the owner of Navalis.com providing Photo etch fittings for the Naval modeler. |
|

© ModelWarships.com