Skywave Kit # W213
Reviewed May 2020
by Daniel Kaplan
| Pit-Road/Flyhawk 1/700 Imperial Japanese
Navy Destroyer Kagero
Skywave Kit # W213
Reviewed May 2020 by Daniel Kaplan |
| Background
Japanese naval doctrine leading up to the Pacific War was focused on
the concept of the decisive battle. It was multifaceted, yet all of it
was concerned with whittling down a large enemy fleet, largely through
night attacks using superior weaponry fired from long ranges. While the
traditional battleship and battleline remained a cornerstone of this doctrine,
the preliminaries were to be conducted by massed torpedo attack, particularly
at night, by squadrons of heavily armed, high speed destroyers with torpedoes
of greater range, speed and warhead size than those of other countries.
Accordingly, much attention was given over to new destroyer design.
Design Omitting subclasses, the Kageros were the fifth class of modern destroyers built for the offensive battle doctrine of the IJN, and the class was widely considered by the Japanese to have reached the ideal combination of speed, range, firepower, and stability as required in a destroyer. Nineteen units were built between 1939 and 1941. The Kagero type was an improved version of the preceding Asashio class destroyer, with slightly more powerful engines, a slightly higher top speed, improved turning radius, and a re-positioning of the forward torpedo reloads bays and torpedo reload equipment for improved reload performance and better overall stability. In fact, the Kageros benefitted greatly from the early issues that plagued the Asashios, so much so that the Kageros had essentially none. Aside from the changes to the forward torpedo reloads, they were nearly
identical in appearance to their immediate predecessors; mounting the same
armament of six 5" guns in Type C turrets, two twin 25mm AA and eight 24"
torpedo tubes. Sixteen Type 93 torpedoes were carried, enough for two full
salvos. Eighteen depth charges were dispensed off individual roll off racks
at the stern, and by a Y gun thrower. At 2,023 tons standard displacement,
the Kageros were 72 tons heavier than the Asashios, with a slightly thicker
bridge structure.
A Brief History Kagero (?? Gossamer Haze) was the lead ship of her class of nineteen vessels. Authorized under the 3rd Naval Armaments Supplement Program (also known as the Circle Three Plan), she was laid down at the Maizuru Naval Dockyard on September 3, 1937 and commissioned on November 6, 1939. At the start of the war, she was assigned to Destroyer Division 18 (Shiranui, Kagero, Kasumi, Arare a mix of Kagero and Asashio class ships), and that division was assigned to Destroyer Squadron 2. DesDiv 18 accompanied the Kido Butai as part of the escort for the Pearl Harbor Attack Operation. She and her division mates continued to escort the carriers on numerous strikes and forays throughout the South Pacific and into the Indian Ocean for the first six months of the war. In June, at the Battle of Midway, DesDiv 18 escorted the Midway Troop Convoy. In July, after Midway, she and her division mates were all involved in escort duties in the Aleutians. It so happened that on July 5,1942, she was on a separate escort mission when all three division mates were torpedoed outside Kiska Harbor by USS Growler. Arare was sunk, and both Shiranui and Kasumi lost a substantial portion of their bows. With lengthy repair yard visits ahead of those two ships, the integrity of the division was ruptured and Kagero was re-assigned to DesDiv 15 (Kurushio, Oyashio, Hayashio), also of DesRon 2, which had lost sister Natsushio to a torpedoing earlier in the year. The division soon joined Japanese efforts to retake Guadalcanal.Kagero engaged in several bombardment missions (including that of Henderson Field, twice), and participated inmany troop transport and attack missions. Ultimately, Kagero and her division sisters recorded more escort and attack missions to Guadalcanal than any other Japanese destroyer division. Kagero recorded 14 runs, Kurushio and Oyashio 10 trips apiece, and Hayashio embarked on 7 runs before she was sunk by air attack in late November, 1942. Kagero also fought as part of the troop convoy escort during Battle of the Eastern Solomons, as part of the Vanguard Battle Force at the Battle of Santa Cruz, the Naval Battles of Guadalcanal (where she and Oyashio attempted an unsuccessful torpedo attack upon USS Washington), and in the Battle of Tassafaronga. She also helped cover the subsequent evacuation of Guadalcanal in early February, 1943. Along with her division mates, Kagero returned to Japan in mid-February, 1943 for refit, and the repair of light damage sustained at various times during the Guadalcanal campaign.She gained a new, twin 25mm AA mount on a raised platform in front of her bridge. Also, while not confirmed, it is likely that she and her division sistershad her twin 25mm AA mounts to either side of number two funnel changed to triple mounts. Upon their return to the Solomon Islands in early 1943, Kagero, Kurushio and Oyashio participated in several successful troop transport reinforcement missions around Shortland Island, and to a garrison at Vila on Kolambangara. For many of these missions, the division transited east to west through the relatively narrow waters of Blackett Strait for their return to base. The US Navy had learned of these missions and sent a small force of old DDs converted to minelayers to successfully mine the strait on the evening of May 6/7, 1943. DesDiv 15 reinforced Vila once again, early on May 8th, approaching from the east. After unloading troops and cargo, they again transited to the west through Blackett Strait on the way back to Buinon Bougainville, which lay to the northwest. Within an hour, Oyashio staggered to a halt after hitting a mine. Assuming a submarine attack, Kagero and Kuroshio took up anti-submarine positions around Oyashio. Shortly thereafter, Kagero, and then Kurushio, also struck mines. Kurushio was immediately rent by a number of massive explosions, probably her magazines, and sank immediately. Kagero was rendered immobile. Kagero and Oyashio subsequently drifted helplessly to the west and southwest, respectively, throughout the rest of the day, while enduring further attacks from the air by American divebombers. Both ultimately succumbed to progressive flooding in the early evening, barely 20 minutes apart. Losses for DesDiv 15 included 18 men on Kagero, 91 on Oyashio, and 83 on Kurushio.It was a tragic loss of men and ships that was likely avoidable, had the Japanese command bothered to vary their tactics. Complacency and obstinance on the part of their higher command, with regard to the deployment and use of assets, would continue to plague the IJN throughout the war, with grievous impact. (Note: Background, Design, History are repeated from the MW review of the Tamiya 1/350 Kagero kit of April, 2016) |
||||||||||||||||||||||||||||||||||||||||
| The Kit (and some prehistory) | ||||||||||||||||||||||||||||||||||||||||
|
Kagero class destroyers have been a mainstay of 1/700 scale Imperial Japanese Navy model collections since the original Waterline Consortium banded together to market this scale in the early 1970s. There have been five (!) distinct moldings from various manufacturers prior to the release of this current kit. So, if you want a brief synopsis of their ever-evolving development for some perspective on the current kit, just keep reading. Otherwise, please skip to the sprues. Aoshima 1972 The original Kagero class kit was produced by Aoshima. Dimensionally, it was very close to accurate for overall & waterline length, as well as just being a tad narrow on width. The biggest dimensional issue actually had to do with freeboard, which was significantly higher than it should have been by 1.5mm. Shapes were generally good, particularly the bridge and funnels. One exception was the forecastle deck, which sloped up to the bow in a gently rising curve instead of a straight plane.These kits were devoid of small details: there were no bridge windows, hatches or doors, portholes, degaussing cables, etc., as well missing equipment such as the large paravane winch at the stern. The kits were also equipped with generic or block-like looking weapons, boats, and accessories. However, the shortcomings of the kit were very much a function of the limitations of the injection molding technology of the time, available references, and cost. The kit itself was quite typical of the original waterline series. The box art was generally dynamic and accurate Still, there were those talented modelers who found ways (and references)
to improve the models. In time, Skywave/Pit-road, began producing improved
weapons and accessory kits to add greater detail to these kits as well
as the other 1/700 offerings. Even the Waterline Consortium released new
weapons sets to provide more accurate details by the 1990s.
Pit-Road/Skywave 1992 Twenty years passed. Pit-Road began to fill the growing demand for improved features in the 1/700 range by producing newly tooled 1/700 IJN kits that sought to raise the level of detail and accuracy in this scale. They released a new set of Kagero class kits (Yukikaze and Kagero) in the early 1990s. Still sold today, these are very nice kits with sharp, though slightly overscale, details. (This is how Pit-Road achieved its great reputation.) In the early 90s, better molding technology allowed for improved detail, though not as precise as can be done today. Pit-Road used highly detailed masters that were just slightly overscale that allowed for more and nicer detail on very small parts and surfaces, something that hadnt been available before. Dimensionally, the kits overall length, width and freeboard are correct. The waterline length is slightly undersized, and that impacts on the shape/silhouette of the bow, which is the only thing that I can really fault the kit on.The Japanese DDs have a very specific bow form, and I just dont care for the way Pit-Road has molded it. It shows a more generalized clipper-shape rather than the specific angle changes typical for a Japanese destroyer. The bow can be fine-tuned with some sanding. The forecastle rise to the bow is correct, there is steel treading and linoleum tie-downs on the decks, bridge and funnels are detailed, there are paravanes and a winch as well as separate hawser reels, the turrets have vent shields on top, the main guns have blast bags, and the 25mmAA secondary armament and ships boats are vastly improved over those from the Waterline Consortium. Everything is distinctly molded. Still, the main turrets are oversized, the portholes arent fully formed, no external degaussing cable is present, and some hatches and doorways are not fully developed. Overall, though, these kits are far better than the original Aoshima kits. The Pit Road Kagero kits are all popped from the same mold; some are
now offered with a bottom hull to create a full hull, others with new decals
for different ships in the class, and of course, there are early and late
war versions. Pit-road also developed its own, new NE line of even more
detailed accessories, some of which are also now bundled together with
these kits.
Aoshima 2003 Eventually, Aoshima responded to the Pit-Road challenge with its own new tool Kagero class kits in 2003. Aoshima took a different tack with regard to detail and scale. For the most part, it adhered more closely to actual scale for its details, which meant both a little less fine detailing, and fewer small parts.These kits feature a beautiful hull, forecastle and bow forms, (they even managed the slight turtleback rounding of the forecastle sides as it meets the hull) and accurately scaled detail for what is there. Aoshima also took the care to mold new main turrets and blast bag equipped barrels for the kit while relying on the Waterline Consortiums Small Vessel Ordinance set for the other accessories. Despite these improvements, there are molded-on hawser reels, no portholesor degaussing cable, and little bulkhead detail, among other things. An issue for some modelers is that the detail is scaled so correctly that its almost too small to see (particularly the linoleum tie-down lines after painting), hence a preference for the kits from other manufacturers. Dimensionally, the kit is slightly undersized in length by 1mm, which is a little surprising given the apparent emphasis on scale accuracy. Width and freeboard are fine. Aoshima markets the kit as several ships in various early, mid and late
war fits. Additionally, there are late war, full hull versions for Isokaze
and Yukikaze, as well as a full hull, post-war version of Yukikaze as a
war repatriated destroyer for the Republic of China, renamed Tan Yang.
The hull breakdown is a little different, and the linoleum tiedowns are
erroneously recessed instead of raised, but otherwise, it's the same tooling.
Interestingly, these full hull kits are the proper length.
Fujimi 2010 Fujimi entered the Kagero class fray in 2010. They issued a kit that aimed to match the proper scaling of the Aoshima kit with the detail level of the Pit-Road kit, as they attempt with all of their current kits. I would say that they did so with a moderate amount of success. The kit hull itself is reasonably good with a late war fit of full portholes and some sealed scuttles and a degaussing cable with brackets. The late war hull matches Yukikazes late war fit. The prow is molded separately from the hull with two parts, and this can complicate the lines of the bow. Dimensionally, the kit is spot-on accurate in all respects save, possibly, the freeboard. The kit uses a hidden bottom plate instead of a waterline plate, and the resulting freeboard appears a shade low. The rest of the kit seems over-engineered with too many parts. It is, by far, the most complicated of the 1/700 Kagero kits to build. The bridge has so many pieces that there even more seams to fill than on the Pit-Road version. Still, a higher level of detail has been achieved; the bridge compass deck interior even has a molded wood grating within it. The main turrets and torpedo mounts are also well done. However, the detail molding is not always sharp. In fact, it's inconsistent. Different sprues and assemblies almost appear as if they are from different kits. One only has to compare the excellent aft deck house assembly against the bridge assembly to get a sense of how the sharpness of the moldings can vary. The styrene has a nice matte finish, but seems a little on the soft side. A nice bonus is that there are two ships included in the boxing. Fujimi
has marketed the kits as several sisters in various guises (full hull,
with photoetch) and also included new parts to market some in early war
fit.
Fujimi NEXT 2016 The NEXT series of kits are essentially highly detailed snap-together kits utilizing pre-colored parts, all to ease assembly without glue or paint. The hulls are one-piece upper hulls with a separate, snap-on lower hull. A waterline stance can be achieved without the lower hull, but there is no hidden bottom plate, nor waterline plate, just an internal mounting plate for the lower hull. Dimensionally, the hull is correct, and the hull itself is beautifully molded with very distinct detailing of the portholes and degaussing cable. The bow form is perfect. The linoleum decking comes as separate pieces that snap in place. The bridge and aft deckhouse are also superior in appearance and details. While all the larger housing assemblies are sharply molded, some sinkholes do appear in the smaller ones, like the forward funnel assembly. The combined, black funnel band and grills are bulky, and all the small pieces (ex. masts, davits, searchlights, 25mm AA) are slightly oversized, to bulk them up to allow for the stress of snapping them into place. Conversely, the torpedo tube mounts and main turrets are beautifully molded. These kits are also packaged two to the box and marketed as several
sisters in early and late war fits.
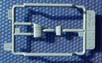
Pit-Road/Flyhawk 2020: This months review subject In what I consider to be a very shrewd move on the part of both companies, Pit-Road and Flyhawk have joined forces to produce this latest kit. Its just my musings, but I would think that Pit-Road gets to take advantage of state-of-the art production and cheaper labor, while Flyhawk gains significant project revenue and a possible addition to its Kajika division product line. The kit is molded in a medium blue-grey, with options for both a waterline plate and underwater portion of the hull for a full hull display. Details are very sharply molded and all the details appear to be extremely well scaled. All the kit surfaces have a nice satin matt finish. On my kit, there was neither plastic flash residue nor sinkholes. The kit comes packaged in a fashion identical with Flyhawk/Kajika kits in that the hull portions, waterline plate, and major decks are all wrapped within a roll of thin foam and secured at the ends by rubber bands. Beyond those components, there is one large, extensive sprue, a mid-sized sprue, two small sprues, and some separately molded parts. Altogether, the kit has approximately 125-130 pieces. There is no degaussing cable and all the components are for an as-built
configuration. So, straight out of the box, this kit can be built
as any of the of the Kagero class destroyers prior to the war.
|
||||||||||||||||||||||||||||||||||||||||
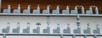
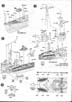
| Sprue B1 (Main Hull) | ||||||||||||||||||||||||||||||||||||||||
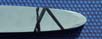
| The hull is a one-piece waterline hull, very cleanly molded in gray
with extraordinarily crisp and properly scaled details. It has alternating
longitudinal bands to replicate the hull plating. The strake molding is
noticeably sharp, and includes the vertical plate joints at the bow. Also
depicted are a bullnose, tiny leadsman platforms to either side of the
bow, properly shaped anchor recesses, recessed portholes with subtle eyebrows,
spurnwaters (with runoff outlets) all around the hull perimeter edge for
both the forecastle and main decks, bollards, and propeller guards that
are solid, but with recesses that highlight their individual support members.
None of the portholes have sealed covers, as befits an early to mid-war fit ship. Im not a fan of porthole eyebrows in this scale, but these are certainly the most impressive Ive ever seen in 1/700. They are so fine that they are easier to feel with ones finger tips than make them out with the Mk.1 eyeball. They become far more apparent in close-up digital photographs. |
 |
|||||||||||||||||||||||||||||||||||||||
Likewise, the hull strakes are exceptional. Admittedly,
I still have mixed feelings about providing them in this scale, as they
would normally be all but invisible unless one were to be close-up to the
vessel. Still, I cant deny how nice their execution is here.The bow profile
is spot-on and the freeboard is correct. The bullnose is small but beautifully
crisp. And, as far as I can remember, this has to be the first 1/700 IJN
DD kit with molded on leadsman platforms. Plus, theyre in scale.
|
||||||||||||||||||||||||||||||||||||||||
| Sprue C1 Lower Hull | ||||||||||||||||||||||||||||||||||||||||
| The lower hull has a series of raised locator nubs around the inner
edge of its perimeter that fit within the corresponding base of the upper
hull. A test fit was very satisfying in that the pieces fit together well.
Some side to side play at the bow and stern is evident but should not be
an issue when finally glued together. Even better is that the lower hull
matches upper perfectly with the upper waterline hull in term of length.
The lower hull also continues the series of alternating hull strakes in a manner that shows no interruption of the pattern. Details on the hull include nicely thinned bilge keels, glands for the propeller shafts, and locating points for the prop shafts, prop struts, and rudder. One last touch is a series of water inlets molded into the bottom of the hull. |
 |
|||||||||||||||||||||||||||||||||||||||
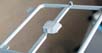
| Sprue A1 Waterline Plate | ||||||||||||||||||||||||||||||||||||||||
| Like-wise, the waterline plate is designed to fit neatly into the base of the upper hull, with a similar sort of locater nubs. The waterline plate itself is thinner than what is typical of the original waterline series kits. Even more interesting, and accurate, is that the very aft end of the plate does not lie flat, but inclines up to meet the knuckle formed by the upper hull at the stern. Theres also a hint of the underwater portion of the hull strakes at this end. |  |
|||||||||||||||||||||||||||||||||||||||
| Sprue D1 Main Deck | ||||||||||||||||||||||||||||||||||||||||
| This is a deceptively simple looking piece, devoid of any standing structures so as to enable easier painting. Its sharply but subtly detailed, with properly scaled fittings including deck treading, linoleum tie-down strips, hatches, engine room skylights, rails for the torpedo trolley, one molded-on hawser reel (medium), the base and ring for turret number three, and single depth charges in their individual racks at the stern. The treading is similar to the porthole eyebrows in that it is incredibly small, but the overall pattern is visible. The deck is meant to fit within the spurnwaters running along the perimeter of the upper hull piece. |  |
|||||||||||||||||||||||||||||||||||||||
| Sprue E1 Forecastle Deck | ||||||||||||||||||||||||||||||||||||||||
| This piece echoes the main deck in its depiction of the metal deck
treading, linoleum tie-downs, small hatches, a breakwater, and the number
one turret ring. Three small hawser reels are molded onto the deck ahead
of the bridge superstructure position. Anchor chains, retaining chains
and chaffing plates complete the piece.
Im a little surprised to see the hawser reels molded on, but they are so tiny (in scale) that I imagine the production consensus was to mold them in. Obviously, they can be replaced with PE versions. The scale of the overall detailing is reminiscent (to me) of the 2003 Aoshima Kagero tooling, but crisper in execution. |
 |
|||||||||||||||||||||||||||||||||||||||
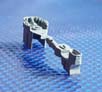
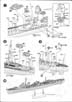
| Sprue F1 Aft Deckhouse | ||||||||||||||||||||||||||||||||||||||||
| Molded with intricately detailed doors and hatches (all with dogs), equipment boxes, treaded metal, small vents, and the like, its an exquisite piece. The detailing and scale here is excellent. The torpedo reload bay hatches are correctly reproduced, and the top of the compartment is devoid of molded on equipment. | 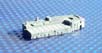 |
|||||||||||||||||||||||||||||||||||||||
I have always looked to this particular structure as a
point of comparison between the various Kagero offerings. I have to say
that this unit is very comparable to the hereto unbeatable version from
the Fujimi NEXT kit. The NEXT kits metal deck treading maybe subtler,
but the new kits torpedo reload hatches are more accurate and detailed.
Plus, finally, the erroneous mushroom vents have been left off the top
of the deck house. These are properly replaced by this kits torpedo adjustment
table housings, which is part O83.
|
||||||||||||||||||||||||||||||||||||||||
| Sprue G1 | ||||||||||||||||||||||||||||||||||||||||
| This is the number one funnel base and housing that sits over all the boiler rooms. It also acts as a raised platform base for torpedo mount number one. Like the aft deckhouse, its finely detailed with hatches, deck treading, and properly shaped and positioned auxiliary air intakes to either side of number one funnel. | 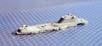 |
|||||||||||||||||||||||||||||||||||||||
 |
||||||||||||||||||||||||||||||||||||||||
| Sprue H1 | ||||||||||||||||||||||||||||||||||||||||
| This single unit encompasses the entire bridge structure up to and including the compass deck level, though not the windows, roof or large compartment on that level that also supports the main gun director. However, its not a solid piece, as with the Fujimi NEXT kits. The back of the bridge is a separate part carried on Sprue O, along with those aforementioned upper bridge parts.This rear bulkhead forms two vertical seams, but unlike the other 1/700 Kagero kits, these are located out of sight under the rear extension of the compass deck. Its a smart configuration. | 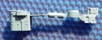 |
|||||||||||||||||||||||||||||||||||||||
The bridge itself is superbly molded, sharply defined and
detailed like the rest of the kit. Its a pre-war/early war type bridge,
without splinter shields on the front of the compass bridge deck fairing,
and the smaller,as-built compass bridge deck extension out back. The bridge
wings have fine supports underneath and navigation light boxes to either
side. The portholes have the same fine eyebrows, the hatches are detailed,
and theres an auxiliary vent and some molded-on ladders and an awning
anchor rail.
|
||||||||||||||||||||||||||||||||||||||||
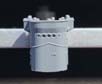
| Sprue I1 | ||||||||||||||||||||||||||||||||||||||||
| Another small, single piece, this unit is comprised of the base of number two funnel and the two-level structure holding the RDF compartment under the searchlight. It exhibits the same, superb, scaled detailing with some hatches with dogs, small equipment boxes, ladder rungs, and treaded metal decking. Most pleasing is that some of the hatches have been molded in the open position, with deep recesses marking the openings. | ||||||||||||||||||||||||||||||||||||||||
| Sprue J | ||||||||||||||||||||||||||||||||||||||||
| These are the two funnels. Each is molded as an entire
piece, with grab rails, vertical access ladder and hollowed interior under
where the funnel cap would be located. Number one funnel also has auxiliary
piping on it. Both units are crisp and sharp.
In my opinion, the only other Kagero kit funnels that are remotely as nice as these are those from the Fujimi 2010 kits, and those are two-part funnels with seams. |
 |
|||||||||||||||||||||||||||||||||||||||
 |
||||||||||||||||||||||||||||||||||||||||
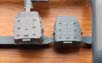
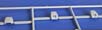
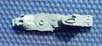
| Sprue L | ||||||||||||||||||||||||||||||||||||||||
| The last of the small sprues, this one holds the main gun director and the front half of the compartment/support upon which it rests atop the compass bridge deck. Both parts are sharply formed. | 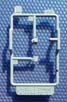 |
|||||||||||||||||||||||||||||||||||||||
 |
||||||||||||||||||||||||||||||||||||||||
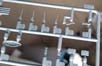
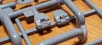
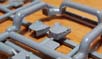
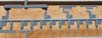
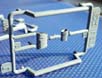
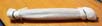
| Sprue M x2 | ||||||||||||||||||||||||||||||||||||||||
| This is predominately the weapons sprue. Each contains one quad Type
92 torpedo mount holding four Type 93 Long Lance torpedoes (molded with
the torpedoes contained in their launch tubes), the shield for the mount,
two Model C main gun turrets, separate rear bulkheads for the turrets,
four 12.7cm main battery barrels with blast bags attached, two bases for
the turrets, ships boats including a 7m cutter, a hull and upper deck
for a 7.5m motor launch, and a hull for a 6m motor launch, a paravane,
a paravane davit, and a two part twin 25mm mount.
The main battery turrets are beautifully executed with very crisp detailing.
The rear bulkhead is molded separately with access hatches. Ventilation
covers are molded on the turret sides as well as the top. No grab rails
are molded on, but stiffening bands do surround the front and sides of
the turret. While thats not entirely accurate (the bands were present
on number one turret, but not the aft two for this class), removing the
bands seems very problematic, and most modelers will be fine with it. Rivets
dot the surface and, while they may be overscale, they are impressively
formed.
|
 |
|||||||||||||||||||||||||||||||||||||||
The torpedo mount benefits from the same crisp detailing.
Ditto the paravanes and paravane davits. The 25mm barrels seem a little
thick as compared to some aftermarket versions, but still very serviceable.
The 6m motor launch is not used for this class. Ive no idea why its included.
It is instructive to compare the Fujimi NEXT turrets and torpedo mount
with these units. Like the deckhouse, the NEXT units are very impressive
bits of molding. Still, the argument can be made that the PitRoad units
are a hair sharper. This seems clearly so with regard to the torpedo
mount.
|
||||||||||||||||||||||||||||||||||||||||
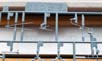
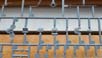
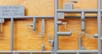
| Sprue O | ||||||||||||||||||||||||||||||||||||||||
| This is the main sprue, carrying close to 100 small parts. Among them: all the components to both masts, the bulkhead at the aft end of the forecastle, auxiliary funnel piping, rudder, propellers and shafts, the AA bandstand holding the twin 25mm mounts to each side of funnel number two, the main air intakes for the engine room as well as funnel number one, the other components for the compass bridge deck, the 3m cupola atop the main gun director, the forward torpedo reload bays, the torpedo reload gantry girders for all three positions, the searchlight platform, a searchlight director, the funnel grills, lifeboat davits, several hawser reels, paravane winch, deck winches, anchors, 90cm searchlight, jack staffs, torpedo davits, mushroom deck vents, Y-thrower for depth charges, aft depth charge rack, small navigation rangefinders, 25mm ammo boxes, 12.7cm gun practice loader, and a host of other small equipment pieces. |  |
|||||||||||||||||||||||||||||||||||||||
Everything is wonderfully molded. The torpedo reload bays
are particularly notable in their detailing, with proper lightening holes,
hatches on tops and sides, and the large openings under their forward ends.
Its the best 1/700 version Ive seen.
The galley pipe that is attached to funnel number one is correctly formed, and all the masts are thinner and truer to scale than any previous Kagero kit. In fact, while beautiful, they are so thin that I would have concerns about their supporting any significant rigging other than that using stretched sprue. The yardarms are molded in a more accurate fashion than previously seen. |
||||||||||||||||||||||||||||||||||||||||
| Base | ||||||||||||||||||||||||||||||||||||||||
| The kit comes with a small, black rectangular base and two support arms, to cradle the completed ship. |  |
|||||||||||||||||||||||||||||||||||||||
| Instructions | ||||||||||||||||||||||||||||||||||||||||
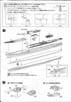
This is one sheet, printed on both sides in black and white,
and folded into panels. The style is more in line with a typical Pit-road
instruction sheet than that from Flyhawk. The front page has both a short
history of the class and of lead ship Kagero, along with an illustrated
parts guide. The pages show a step-by-step progression of assembly using
exploded, three point perspective illustrations.
|
||||||||||||||||||||||||||||||||||||||||
| The color callouts appear on the rear box art and are tied to the Gunze Sangyo Mr. Hobby line of paints. | 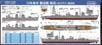 |
|||||||||||||||||||||||||||||||||||||||
| Decals | ||||||||||||||||||||||||||||||||||||||||
| These consist of one sheet with some beautifully reproduced and registered
markings. Markings include division numbers displayed at the ships bow,
ships name in the katakana style for the sides of the hull and the hiragana
style for the stern, funnel striping, individual funnel markings, two Rising
Sun ensigns, and a hinomaru on white flag.
Importantly, these decals apply specifically to sisters Kagero, Shiranui, Kurushio, Oyashio, Hayashio and Natsushio in their pre-war markings. The first two ships were part of DesDiv 18, while the other four vessels fully comprised DesDiv 15. The funnel bands are keyed to those particular divisions. Interestingly, funnel markings used to identify individual ships in lieu of the katakana markings after the war started are also included. The box art on the rear of the box lays out the particular pre-war markings for each ship listed, while the front box art shows the stripped down marking typical of a wartime vessel, but with no degaussing cable showing. Ive always thought well of Pit-road decals but these, like this kit, have gone one step further. The decal material is thinner and cut closer to the lettering than in previous efforts. They are really nice. |
 |
|||||||||||||||||||||||||||||||||||||||
| Final Thoughts | ||||||||||||||||||||||||||||||||||||||||
| All in all, its a very impressive kit.
This kit makes that sort of effort no longer necessary. With a kit equal to their superb renditions of numerous DKM and RN warships, Flyhawk has raised the 1/700 Kagero bar to a substantially higher level. Now, by virtue of Flyhawks partnership with Pit-Road, the Imperial Japanese Navy finally has a 1/700 Kagero class kit worthy of comparison. My opinion seems to be shared by a variety of Japanese reviewers. From what I have gleaned off several Japanese modeling sites using Google Translate, the kit is a major hit. Very highly recommended. This kit was courtesy of my wallet, via HobbyLink Japan. The cost, less shipping, was approximately $25.00. The kit is available from several online retailers. |
||||||||||||||||||||||||||||||||||||||||
More
of Daniel Kaplan's work.
Updated 5/2/2020
| This is an in-box review showing the kit contents. We welcome your input and comments in the review section of the forum especially if you can share details about fit, ease of assembly and accuracy. Click the logo on the right to join in the discussion. |  |


left1.jpg)
left2.jpg)