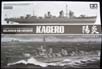
TAM78032 1/350 Ship Series No.32
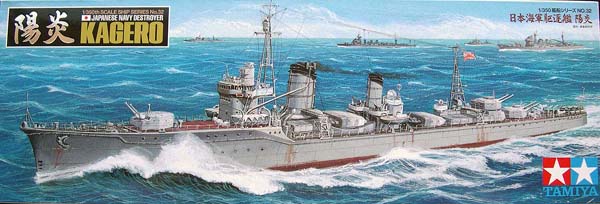
| Tamiya 1/350 Imperial Japanese Navy
Destroyer Kagero
TAM78032 1/350 Ship Series No.32 |
| Background | |||||||||||||||||||||||||||||||||||||
| Japanese naval doctrine leading up to the Pacific War was focused on the concept of the decisive battle. It was multifaceted, yet all of it was concerned with whittling down a large enemy fleet, largely through night attacks using superior weaponry fired from long ranges. While the traditional battleship and battle line remained a cornerstone of this doctrine, the preliminaries were to be conducted by massed torpedo attack, particularly at night, by squadrons of heavily armed, high speed destroyers with torpedoes of greater range, speed and warhead size than those of other countries. Accordingly, much attention was given over to new destroyer design. | |||||||||||||||||||||||||||||||||||||
| Design | |||||||||||||||||||||||||||||||||||||
| Omitting subclasses, the Kageros were the fifth class of
modern destroyers built for the offensive battle doctrine of the IJN, and
the class was widely considered by the Japanese to have reached the ideal
combination of speed, range, firepower, and stability as required in a
destroyer. Nineteen units were built between 1939 and 1941.
The Kagero type was an improved version of the preceeding Asashio class destroyer, with slightly more powerful engines, a slightly higher top speed, improved turning radius, and a re-positioning of the forward torpedo reloads bays and torpedo reload equipment for improved reload performance and better overall stability. In fact, the Kageros benefitted greatly from the early issues that plagued the Asashios, so much so that the Kageros had essentially none. Aside from the changes to the forward torpedo reloads, they were nearly identical in appearance to their immediate predecessors; mounting the same armament of six 5" guns in Type C turrets, two twin 25mm AA and eight 24" torpedo tubes. Sixteen Type 93 torpedoes were carried, enough for two full salvos. Eighteen depth charges were dispensed off individual roll off racks at the stern, and by a Y gun thrower. The Kageros were 72 tons heavier, with a slightly thicker bridge structure. |
|||||||||||||||||||||||||||||||||||||
| A Brief History | |||||||||||||||||||||||||||||||||||||
|
Kagero (Gossamer Haze) was the lead ship of her class of nineteen vessels. Authorized under the 3rd Naval Armaments Supplement Program (also known as the Circle Three Plan), she was laid down at the Maizuru Naval Dockyard on September 3, 1937 and commissioned on November 6, 1939. At the start of the war, she was assigned to Destroyer Division 18 (Shiranui, Kagero, Kasumi, Arare a mix of Kagero and Asashio class ships), and that division was assigned to Destroyer Squadron 2. DesDiv 18 accompanied the Kido Butai as part of the escort for the Pearl Harbor Attack Operation. She and her division mates continued to escort the carriers on numerous strikes and forays throughout the South Pacific and into the Indian Ocean for the first six months of the war. In June, at the Battle of Midway, DesDiv 18 escorted the Midway Troop Convoy. In July, after Midway, she and her division mates were all involved in escort duties in the Aleutians. It so happened that on July 5th, 1942, she was on a separate escort mission when all three division mates were torpedoed outside Kiska Harbor by USS Growler. Arare was sunk, and both Shiranui and Kasumi lost a substantial portion of their bows. With lengthy repair yard visits ahead of those two ships, the integrity of the division was ruptured and Kagero was re-assigned to DesDiv 15 (Kurushio, Oyashio, Hayashio), also of DesRon 2, which had lost sister Natsushio to a torpedoing earlier in the year. The division soon joined Japanese efforts to retake Guadalcanal. Kagero engaged in several bombardment missions (including that of Henderson Field, twice), and participated in many troop transport and attack missions. Ultimately, Kagero and her division sisters recorded more escort and attack missions to Guadalcanal than any other Japanese destroyer division. Kagero recorded 14 runs, Kurushio and Oyashio 10 trips apiece, and Hayashio embarked on 7 runs before she was sunk by air attack in late November, 1942. Kagero also fought as part of the troop convoy escort during Battle of the Eastern Solomons, as part of the Vanguard Battle Force at the Battle of Santa Cruz, the Naval Battles of Guadalcanal (where she and Oyashio attempted an unsuccessful torpedo attack upon USS Washington ), and in the Battle of Tassafaronga. She also helped cover the subsequent evacuation of Guadalcanal in early February, 1943. Along with her division mates, Kagero returned to Japan in mid February, 1943 for refit, and the repair of light damage sustained at various times during the Guadalcanal campaign. She gained a new, twin 25mm AA mount on a raised platform in front of her bridge. Also, while not confirmed, it is likely that she and her division sisters had her twin 25mm AA mounts to either side of number two funnel changed to triple mounts. Upon their return to the Solomon Islands in early 1943, Kagero, Kurushio and Oyashio participated in several successful troop transport reinforcement missions around Shortland Island, and to a garrison at Vila on Kolambangara. For many of these missions, the division transited east to west through the relatively narrow waters of Blackett Strait for their return to base. The US Navy had learned of these missions and sent a small force of old DDs converted to minelayers to successfully mine the strait on the evening of May 6/7, 1943. DesDiv 15 reinforced Vila once again, early on May 8th, approaching from the east. After unloading troops and cargo, they again transited to the west through Blackett Strait on the way back to Buin on Bougainville, which lay to the northwest. Within an hour, Oyashio staggered to a halt after hitting a mine. Assuming a submarine attack, Kagero and Kuroshio took up anti-submarine positions around Oyashio. Shortly thereafter, Kagero, and then Kurushio, also struck mines. Kurushio was immediately rent by a number of massive explosions, probably her magazines, and sank immediately. Kagero was rendered immobile. Kagero and Oyashio subsequently drifted helplessly to the west and southwest, respectively, throughout the rest of the day, while enduring further attacks from the air by American dive bombers. Both ultimately succumbed to progressive flooding in the early evening, barely 20 minutes apart. Losses for DesDiv 15 included 18 men on Kagero, 91 on Oyashio, and 83 on Kurushio. It was a tragic loss of men and ships that was likely avoidable, had the Japanese command bothered to vary their tactics. Complacency and obstinance on the part of their higher command, with regard to the deployment and use of assets, would continue to plague the IJN throughout the war, with grievous impact. |
|||||||||||||||||||||||||||||||||||||
| The Kit | |||||||||||||||||||||||||||||||||||||
| Finally, a mere eight years after releasing its 1/350 late
war version kit of a Kagero class destroyer in the guise of Yukikaze, Tamiya
has seen fit to release an early war version kit of the class. Im not
sure why this release was anything other than a no-brainer, given that
less than 10% of the parts are different, and that the design and layout
of the original Yukikaze kit was clearly meant to enable an early war version.
Undoubtedly, some sort of corporate marketing and cost-benefit analysis
came into the decision, but at least its here now. (Perhaps the
hopeful 1/350 Shinano fans can take some heart from this.)
The kit is molded in light grey & red plastic, with both a waterline option plate and the underwater portion of the hull for a full hull option. Details are very sharply molded. All the kit surfaces have a nice matt finish. On my kit, there was neither plastic flash residue nor sinkholes. All details appear to be properly scaled. This kit reminds me why Tamiya is still, in my eyes, the best of the model ship manufacturers, even with a mold that is predominantly eight years old. Straight out of the box, this kit can be built as one of several of the Kagero class destroyers, though not all, given the particular pattern of degaussing cable molded onto the hull (more on that below). The fit of the kit out-of-the-box is immediate pre-war, from late 1941 and early war fit on through to the end of 1942. Some minor modifications would be required to build the kit in 1943 fit. |
|||||||||||||||||||||||||||||||||||||
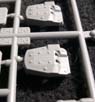
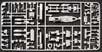
| Sprue A (Main Hull) | |||||||||||||||||||||||||||||||||||||
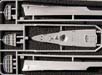
| This sprue contains the above waterline portion of the hull, molded in two halves with 3 rigid inner trusses for hull support. Each truss is molded with an upper and lower portion that can be separated for use to support a waterline version of the hull. Also included are the forecastle and main decks. The sprue is carried over intact and unchanged from the Yukikaze kit. | |||||||||||||||||||||||||||||||||||||
| The hull is beautifully modeled, with subtle, alternating
longitudinal strake bands to replicate hull plating. The subtlety of the
strake molding is superb, in my opinion. Tamiya also took care to mold
in and retain the fineness of the bow by molding the vertical stem portion
of the bow as a complete part, not in halves, joined to the starboard hull
half. The port hull half meets this part at what becomes a vertical joint,
where this parts trailing edge meets the horizontal strakes of the port
side of the hull. Builders will have to be careful to use glue sparingly
in this area. Otherwise, any excess will fill and obscure the joint.
The bow profile shape itself is perfect.
Also depicted are properly shaped anchor recesses, recessed portholes with subtle eyebrows, and a degaussing cable with brackets. None of the portholes have sealed covers, as befits an early to mid war fit ship. Booms for the ships small boats have been molded at the stern, close to where the propeller guards would be located. The forecastle and main decks are molded sharply, with plenty of detail including mooring bits, beautifully scaled treaded deck plating and linoleum tie-down strips, anchor capstan, hatches, some vents, and some skylights. Unfortunately, as typical of many kits just a few years ago, three small hawser reels are molded onto the forecastle deck. The detail is good but, dedicated modelers are likely to want to remove them and replace with PE versions. The outer border that rims the linoleum covered portion of the decks has also been molded, with a slightly raised edging (spurnwaters) all the way around. This rim properly marks where the railings go (on the outside edge) and is a good guide for attaching PE railings. Aside from some placement runners, all the deckhouses have been molded separately, which makes for a much easier time in masking off the deck for painting of the linoleum coverings. The hull scales out exceptionally well. My overall length measurement of the kit is a partial estimate, because the kit has a separate prow piece that contains the bull nose. I found it difficult to measure the entire length with this part on the sprue, so I was only able to estimate OAL. The overall length of the hull without the prow is 337mm; depending on how well the prow fits over its seating will determine its actual length. Admittedly, Im eyeballing the additional length that the prow adds, and it doesnt seem that it can be much more than 1mm to 1.5mm. I could easily be off by .5mm or more. Regardless, its pretty close. Kageros particulars versus the scale and kit:
|
|||||||||||||||||||||||||||||||||||||
The pattern on this kit is the best known of all of them, as it was worn by Yukikaze, the only Kagero class ship to survive the war. Sisters Nowaki and Akigumo are also known to have carried this pattern. High resolution photographs of Amatsukaze during the attack that sank her in April, 1945, also reveal her stern pattern to be identical to Yukikazes. Chances are good that her bow matched as well. Kurushio also was likely to have worn this complete pattern, based on photos of her bow. Isokaze had a notably different cable pattern. Tanikaze and Urakaze had patterns that likely matched those of Isokaze. Shiranui carried a third, documented pattern. And, there is a mild chance that Hamakaze carried a pattern that was a mix of Yukikazes and Isokazes, given the available photo record. Unfortunately, no other documentation has surfaced publicly to further identify the pattern for any of the remaining Kageros, including Kagero herself. Tamiyas re-use of the Yukikaze tooling for this kit is merely an expedient and cost-saving device to enable this kit, and is not an endorsement of Kageros actual appearance. That said, with no documentation either way, no modeler can be faulted for using the kit as is to represent Kagero. |
|||||||||||||||||||||||||||||||||||||
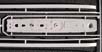
| Lower Hull and Waterline Plate | |||||||||||||||||||||||||||||||||||||
| Both are molded separately in dark red styrene. The lower hull has
a raised but recessed rim that fits within the edges of the upper hull.
It also has nicely thinned bilge keels as well as locating points for the
prop shafts, prop struts, and rudder. Internally, locater holes and
recesses have been molded in to aid in placing the kit supplied screws
and nuts to attach the hull to its base. Or, on a different base, for that
matter.
Like-wise, the waterline plate is designed to fit neatly into the upper hull, with the same type locater holes and raised ridges for screws and nuts to attach the plate to a base. |
|||||||||||||||||||||||||||||||||||||
|
|
|||||||||||||||||||||||||||||||||||||
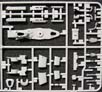
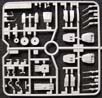
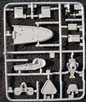
| Sprue B | |||||||||||||||||||||||||||||||||||||
| This is one of the main sprues and is carried over intact and unchanged
from the Yukikaze kit. Included are components for the aft deckhouse
and aft torpedo reload bays, the forward torpedo reload bays, all torpedo
reload gantries and davit, the torpedo aiming/rangefinding control device
and platform, the main engine/boiler housing upon which the forward torpedo
tube and both funnels are mounted, the searchlight, searchlight/RDF compartment
and platforms, all the funnel components including intakes, grills and
auxiliary piping, the rudder, propellers, prop struts, Y-gun, paravane
davits, paravane winch, deck winch, jig base for aligning the legs of the
mainmast, 9m launches with covers, and the main gun director that sits
atop the bridge. Also included is an insert for the face of a late war
bridge, but that is unneeded for this particular version.
All details are very sharply molded and scaled. The funnel grills still look pretty good, though better when viewed from the top than the sides. The limitations of injection technology, particularly in a slightly older kit, make this a challenging detail to execute in a fully convincing way. PE versions will certainly produce a more realistic result, but many will be happy with the kit piece just the same. The forward torpedo bays should have squared apertures in place of the molded-on large access hatches at the forward, outside end of each bay. This is another one of those small accuracy errors that have been carried down over time through various kits, scales and manufacturers, but it is a minor quibble. |
 |
||||||||||||||||||||||||||||||||||||
|
|||||||||||||||||||||||||||||||||||||
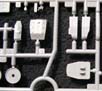
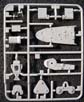
| Sprue D (New Sprue) | |||||||||||||||||||||||||||||||||||||
| This sprue carries all the major components of an early
war fit for the ships bridge, the stern deck, the roof insert for the
aft deckhouse, the bandstand platform that holds the twin 25mm AA guns
to either side of funnel #2, a 2m rangefinder, a practice re-loader for
the 12.7cm main guns, and a jig for placement of the bottom of the legs
of the foremasts when building it.
Everything is nicely detailed. The new kit bridge omits the light armor plating surrounding the bridge windows on the Yukikaze kit. The bridge base has four components, and seams, so careful gluing is required. The compass bridge deck has a nicely formed grating forward, with integrated stubs representing the 12cm search binocular stanchions and compass binnacle that were mounted within this area. Some aftermarket pieces like those made by FineMolds or a resin manufacturer would help detail this area. Oddly, Tamiya has provided 12cm binoculars on another sprue for positions outside the bridge enclosure, but has not seen fit to provide additional pieces for the bridge interior. The aft portion of the compass bridge deck has been molded with a space for a deck insert (see notes on PE further down). The stern deck piece is correct for an early war fit, including six individual depth charge roll- off rack locators, linoleum tie-downs, deck treading, spurnwaters, deck hatches and bases for paravane davits. The aft deck house insert is correct for early war with its base for the superimposed 12.7cm mount. The AA bandstand carries metal treading and 25mm ammo boxes. Thankfully, and correctly, the platform has been molded without the solid siding that has too often come with this piece. Instead, the area has been left open for easy attachment of PE railings. |
 |
||||||||||||||||||||||||||||||||||||
 |
|||||||||||||||||||||||||||||||||||||
| Sprue E (formerly Sprue C) | |||||||||||||||||||||||||||||||||||||
| This sprue is identical to the same sprue in the Yukikaze kit. Here are the fore and aft legs of the mainmast, the maneuvering light array, both jack staffs, and the galley pipe. The galley pipe is properly depicted, with three vertical feeds into the main exhaust pipe. | 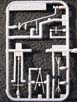 |
||||||||||||||||||||||||||||||||||||
| Sprue G (New Sprue) | |||||||||||||||||||||||||||||||||||||
| This is another very small sprue that replaces its late war equivalent (Sprue F) from the Yukikaze kit. Contained is the foremast foreleg, the foremast trailing legs integrated as one piece, both sections with yardarms. Also included is the crows nest and 2kw signal light that appeared upon a light platform under the yardarms. The mast legs are sharply molded, detailed with some bracing and the couplings that helped hold platforms and yardarms in place. The main yardarm has tiny extensions meant to represent pulleys for the halyards. The foremast looks great, but I doubt it will resist any bending stresses brought on by taut rigging material other than stretched sprue. Brass rod replacements are the most obvious alternative. | 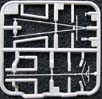 |
||||||||||||||||||||||||||||||||||||
| Sprue H | |||||||||||||||||||||||||||||||||||||
| Is a clear plastic sprue with the lens of the 90cm searchlight and the window insert, with vertical bars, for the compass bridge deck. The lens has some nice detailing, and the vertical frames will have to be painted over. | 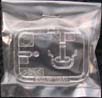 |
||||||||||||||||||||||||||||||||||||
| Sprue P x 2 | |||||||||||||||||||||||||||||||||||||
| This is primarily a weapons and equipment sprue, carried over directly from the Yukikaze kit. Each of the sprues holds two main turrets with all of the attendant bases, turntables and guns, all the components for one of the quad 61cm torpedo tube mounts, including a piece depicting the warheads and upper torpedo body, anchor, davits, hawser reels, and some vent piping. | 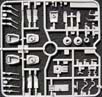 |
||||||||||||||||||||||||||||||||||||
Another minor kit error involves part P5. The actual ships
sported one to two pieces of specialized equipment known as torpedo adjustment
tables atop the aft deckhouse roof, between the superimposed #2 turret
and the mainmast. These were a sort of protected workbench or table used
to fine tune certain components. They were square in shape, and stood
about chest high. It was a tight fit up there, but I believe the positioning
was meant to keep them as dry as possible from spray and seas. These were
removed from this position when the #2 turret was replaced by two triple
25mm AA mounts and their platforms.
|
|||||||||||||||||||||||||||||||||||||
| Sprue R x 2 (New) | |||||||||||||||||||||||||||||||||||||
| This sprue carries more of the early war fit parts, including a paravane and paravane davit, three single depth charges, a 7m cutter, davits for the same, and a twin 25mm AA with mount. There is also one half of the athwartship depth charge rack, which looks like it has been carried over unchanged from Yukikaze kit. | |||||||||||||||||||||||||||||||||||||
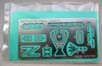
| Photo Etch Fret | |||||||||||||||||||||||||||||||||||||
| Tamiya has made a practice of including a small, stainless steel fret
with its 1/350 scale ship models. By no mean comprehensive, it just adds
some nice details. On this particular fret, some pieces are carried
over from the similar fret contained in the Yukikaze set. Those would
include a pair of access ladders that lead up from the main deck to the
forecastle on either side of the foremast, a pair of large braces for the
foremast, a small platform that attaches to the aft end of the forecastle
deck behind the bridge, the RDF antennae and supporting tripod, two pair
of braces to support the compass deck bridge wing extensions, and the grill
cover for the large air intake sited just ahead of number one funnel.
New for the Kagero kit includes propeller guards, six (6) individual roll-off racks for the single depth charges that were carried at the stern, a pair of claw grasps mounted on the top of the davits used to hold the paravanes and, most interestingly, a deck insert with linoleum tie-downs meant for the compass bridge deck. I find this last detail puzzling. Some photo etch manufacturers, FlyHawk and Rainbow among them, have been issuing metal IJN decking in brass that allows a modeler to spray the entire piece with linoleum colored paint, and then gently scrape the paint off the tie-down strips, supposedly to get an easier/ cleaner result. I suppose that is the intent here, but an insert made of steel means that one still has to paint the tie-done strip afterward in brass or gold color. So, I see no advantage. Perhaps a brass piece was meant to be used all along, but eliminated due to cost. Or, maybe, its been done with an eye for brass versions by various aftermarket PE manufacturers. What I do find disappointing is the lack of a PE depth charge rack to replace the athwartship plastic version carried at the stern. No plastic version of a depth charge rack in this scale ever comes close to a decent representation, in my view. That would have been a very welcome addition. |
 |
||||||||||||||||||||||||||||||||||||
| Clear Bag of parts | |||||||||||||||||||||||||||||||||||||
| Included with the kit is a clear bag that includes two steel propeller shafts, 2 black metal anchor chains, poly caps that allow for freely turning turrets and torpedo tube mounts, and long screws and bolts to enable the modeler to securely affix either the full hull to the plastic stand or the waterline hull plate to a flat base. | 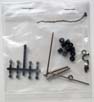 |
||||||||||||||||||||||||||||||||||||
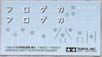
| Decals | |||||||||||||||||||||||||||||||||||||
| There are actually three sheets of material. The first
is the decal sheet itself, which is clearly printed, with no registration
issues. The ships name, Kagero, is rendered in large Katakana characters.
This is for the application of the name on the sides of the hull for those
wish to depict the ship in its immediate, pre-war appearance. (note: coupled
with the degaussing cable, this depiction would correspond to the last
few months of 1941. For her appearance prior to that, the degaussing
cable should be removed from the hull.) Much smaller versions of the Katakana
characters are included for use on the bows of the ships boats. Another
rendering of her name using Hiragana characters, is meant for her stern;
again, for her pre-war appearance. All of these characters were painted
over come wartime. Lastly, there are hull draft markings in both white
and black.
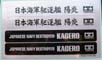
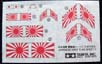
The second sheet is comprised of printed metal foil . There are four peel-off strips with black lettering, two each in English and Japanese Kanji with Kageros name meant to be placed on either side of the black plastic stand as a name plate. The third sheet is the flag sheet. Its printed on very thin, fine white paper. The Japanese Naval Ensign is depicted in varying sizes and shapes. Its not a decal sheet; everything is meant to be carefully cut out and folded over for use, then affixed with glue. |
 |
||||||||||||||||||||||||||||||||||||
 |
|||||||||||||||||||||||||||||||||||||
 |
|||||||||||||||||||||||||||||||||||||
| Kit Base | |||||||||||||||||||||||||||||||||||||
| This is a simple, black, rectangular plastic box with pre=positioned holes for screws, and some plastic mounting hardware, including two finials. | 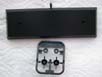 |
||||||||||||||||||||||||||||||||||||
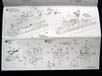
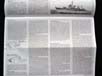
| Instructions | |||||||||||||||||||||||||||||||||||||
|
No surprises here. Tamiya maintains its high standards in kit instructions with a thorough, 16 page booklet printed in black and white. There are cover art and profile illustrations, the ships history in several languages, a class list history, color call outs tied to Tamiya paints, and some guidelines to assembly. The rest of the pages show a step-by-step progression of assembly using exploded, three point perspective illustrations. |
 |
||||||||||||||||||||||||||||||||||||
|
|||||||||||||||||||||||||||||||||||||
| Final Thoughts | |
| I really like the kit, but that should be no surprise.
I am predisposed toward favoring both Tamiya, and the ships of the Imperial
Japanese Navy. Ive also been waiting on it for the eight years its been
gestating.
Its very much all that I had hoped it would be. Its flaws and omissions are few, its detailing, molding and scale remain superb, the fit of the parts from the Yukikaze kit has proven themselves to be first class, the rendering of its new parts are excellent, and it fills a gap in both my line-up of IJN ships, and that of Tamiyas. Its true that Hasegawa has offered an alternative 1/350 kit for the
early war Kagero class for several years but, despite the excellence of
its moldings, that kit is both over scale and full hull only. I feel the
Tamiya kit a bit more accurate outside of the scale issue, but one really
couldnt go wrong with either choice; its just a matter of preferences.
This kit was courtesy of my wallet, via HobbyLink Japan. The cost, less shipping, was $41.66. The kit is offered on sale in the US from $49.99 and up, shipping not included. |
|
| This is an in-box review showing the kit contents. We welcome your input and comments in the review section of the forum especially if you can share details about fit, ease of assembly and accuracy. Click the logo on the right to join in the discussion. |  |