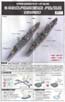
(Set of 2) Fune NEXT kit # 10
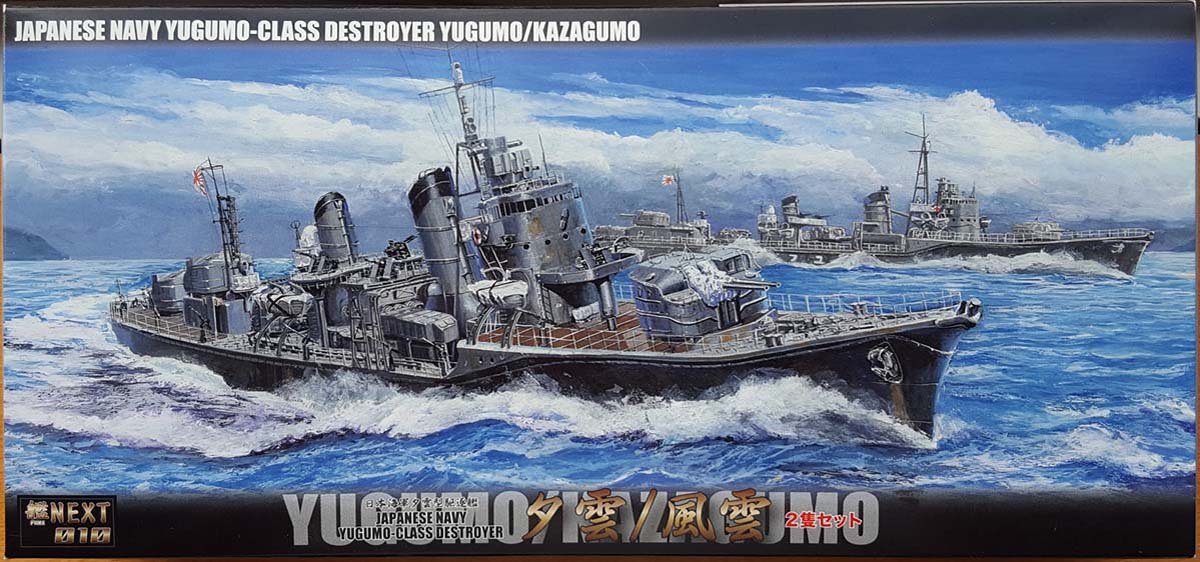
| Fujimi 1/700 Yugumo Class
Destroyers: Yugumo 1941/Kazagumo 1944
(Set of 2) Fune NEXT kit # 10 |
| Background
Japanese battle doctrine was focused on the concept of the decisive battle, with lighter forces whittling down an approaching enemy until the battle line could be engaged. As a signatory of the various naval disarmament and limitation treaties of the 1920s and 1930s, Japan had to tailor its doctrine within the boundaries of the treaties. Accordingly, a greater emphasis was placed on maximizing the impact of the lighter forces upon an approaching enemy. Japanese destroyer design evolved from the late 1920s through the very
early 1940s as a manifestation of the effort to diminish an enemy force
by engaging them at night with superior ships of longer range, high speed,
and weaponry (i.e. torpedoes). The Yugumo class was the final production
iteration of what began with the Fubuki Special Type destroyer.
Design The Yugumos were a further refinement of the previous Kagero class ships; the Kageros were themselves considered the perfect mix of speed, range, and weaponry in a destroyer by the Japanese. Still, they felt it worthwhile to hone the design with a mix of small enhancements. To improve stability, the forward 12.7cm main mount was moved back 4.75ft/1.5meters. To reduce the wake at high speeds, the extreme stern was extended 2.5 ft/0.8m at the waterline, thereby presenting a slope to the aft end of the hull from the main deck on down to the waterline. The change also produced a pronounced waterline knuckle at the very stern. The bridge was redesigned to lessen wind resistance and increase the internal space. The facing was inclined slightly aft, off the vertical, and the forward surfaces of the compass bridge deck faired within the structure to a greater degree. While the placement of the bridge began at the same frame number as the proceeding Kagero class, the bridge was extended aft of the forecastle break by 1.5 meters to provide more room. The entire aft end of the bridge sat upon a set of raised trestles over the main deck for support. The forecastle was extended aft slightly over the main deck to accommodate new type davits for the 7m cutters. Small changes were also given to shape of the main director, the cupola atop it (for the later batch of eight ships), and in the design and location of the aft mast. The main battery still consisted of three, twin 12.7cm 50 cal. guns in fully shielded turrets, but the mount was improved to allow the barrels to elevate to 75* for better AA effectiveness. All the turrets were reinforced with two horizontal stiffener bars. The ships had improved stability over the previous class, which allowed them to retain their full main battery while accommodating the inclusion of several additional 25mm AA mounts as the war progressed. The ships retained the same 52,000shp power plant of the previous class. Eleven units were planned and constructed under the 4th Naval Armaments
Supplement Program (also known as the Circle 4 program) of 1939. Another
eight units were completed out of sixteen planned under the 5th Naval Armaments
Supplemental Program (Circle 5). The rest of the units were cancelled in
lieu of simpler destroyer construction. A further batch of eight ships
was also cancelled on Nov 8, 1943.
|
|||||||||||||||||||||||||||||||||||||
| Ship histories | |||||||||||||||||||||||||||||||||||||
| Yugumo
Namesake of her class, she was laid down at the Maizuru Naval Dockyard on June 12, 1940 and commissioned into service on December 5, 1941. After training, she joined the newly formed DesDiv10 (Kazagumo, Makigumo, Yugumo, Akigumo), which was then attached to Destroyer Squadron 10 and served as escort to the First Air Fleet in April, 1941. Yugumo escorted the Kido Butai at Midway, and was a constant participant during the Guadalcanal campaign and further operations in the mid and upper Solomons islands. She underwent a refit in May, 1943, gaining radar and greater AA. During the subsequent evacuation of Kiska, she acted as temporary flagship of the division until Kazegumos return from repairs. Ultimately, DesDiv 10 returned to the Central Solomon Islands for more escort and troop transport missions. At the Battle of Vella LaVella in October, 1943, she charged a line of US destroyers seeking to intercept the Japanese mission. Yugumo was sunk by concentrated gunfire and torpedoes after torpedoing (and eventually sinking) USS Chevalier. Kazegumo Laid down at the Uraga Dockyard on December 23, 1940 and commissioned on March 28, 1942, Kazagumo was the flagship of the aforementioned DesDiv 10, beginning with that division escorting the Kido Butai at Midway. She was used heavily during the Guadalcanal and Solomons campaigns, the evacuation of Kiska, and in operations throughout the SW Pacific. She incurred mine damage in mid-1943 but returned to service soon enough with changes to her fit including a Type 22 radar and increased AA. She was torpedoed by USS Hake in Philippine waters in June, 1944. (Reviewers note: I am reprising the background, design of the class, and portions of the kit histories as posted in the Hasegawa 1-700 Yugumo review of January, 2018, as this new kit is of the same class destroyer, just from a different manufacturer.) |
|||||||||||||||||||||||||||||||||||||
| The kit | |||||||||||||||||||||||||||||||||||||
| This is the fourth generation 1/700 offering of the class,
the second new such kit within a seven-month span during 2017-18, and the
first Yugumo class kit from Fujimi.
The original Yugumo class kits came from Hasegawa as part of the original Waterline Consortium range introduced in the early 1970s. Those models were fairly typical of the original waterline kits in that they were relatively simplistic in appearance, with a mix of positive and negative features. Those Yugumos had a good, basic hull shape, and generally correct bridge and structures in terms of size and scale. The kits were woefully short on details, excepting linoleum tie-down strips, while weapons and boats were somewhat crude and generic. The sterns were incorrect, with no slope. Still, they may have been among the most accurate of the original waterline destroyers. Second generation kits were issued by Pit-Road in the mid-1990s. While these kits provided the much-desired level of detail of the typical Pit-Road kits of that period, the model itself was a bit of a disappointment when compared to the other Pit-Road issued Type A destroyers, namely their Asashio and Kagero class kits. Their Yugumo kits were rife with outright errors: poor bow profile, a bridge too short in length and improperly positioned on the forecastle, with a compromised shape that did not truly reflect either configuration of the early or late war bridges, and a stern that did not extend and slope down towards the waterline. Over time, some photo etch sets were issued by Five Star and FlyHawk to address some of these errors. Even PitRoad eventually issued a small PE fret (PE-196) to address some of the superstructure issues. However, these options still come down to more corrective efforts without necessarily satisfying all the problems. Hasegawa updated its Yugumo class offerings in 2017 with brand new kits. These new kits benefit from more extensive research and modern injection molding technologies, offering vastly improved models of extremely high detail, all properly scaled. However, there have been issues with the hull tending to bow upwards at the bow and stern. This has certainly been true with the initial production run(s) and its not clear whether or not the issue has been since corrected. Hull issues notwithstanding, these were still the most accurate of the class kits upon their release. Fujimi saw fit to release its own version of the class in early 2018. They have differentiated their kit by offering it as one of their NEXT version kits. The NEXT kits are re-engineered or newly designed kits that are meant to dispense with glues where possible (though not entirely) and paint, by offering pre-colored, snap-together parts and stickered decals. Ever improving technology has enabled a high level of detail and finish, so these type kits have proven to be very popular, particularly among their target audience. Keep in mind that the snap-together parts require some degree of robustness to avoid breaking or bending when emplaced. So, many of the small parts and masts are thicker and more overscale than their counterparts in a regular assembly kit. In my opinion, Fujimi has been rather astute about its assessment of the current state of the hobby. It has recognized that many new modelers or potential modelers are coming to the hobby from other venues, typically electronic or anime related games. As such, they arrive with less modeling skills and/ or time, or patience, for assembling and detailing a kit than traditional model builders. So, Fujimi has added NEXT ship kit lines in 1/700 and 1/350 scale to offer what is essentially upscale, snap-together assembly type model kits. (Fujimi has also begun introducing NEXT automotive kits.) The one thing I do find puzzling about this line is Fujimis offering of specific, photoetch Grade-Up sets for these same kits. It seems counterintuitive. I mean, if youre offering pre-colored, snap-together kits to ease assembly, then why introduce the intricacy of a far more complicated glue, paint, and labor-intensive add-on? Plus, to my way of thinking, once you add photoetch, you are forced to paint the kit in its entirety. So, aside from getting potentially sharper molded parts, how is this better than their standard line of kits? I must be missing something in my reasoning, so I would appreciate any insights here. This particular set of two destroyers is the tenth such release in Fujimis 1/700 line of NEXT ships. One ship is offered as an early war version of the class, namely Yugumo, the other as a mid-war variant with a revised foremast and radar, here as Kazagumo. There are two full sets of sprues, with some divergence to accommodate the two different fits. Normally, I might point out here if various sisters and variants can be built from the boxing, but there are accuracy issues with the kit (covered below), which makes doing so difficult. I will say that, as a general rule, the sharpness and scale of the detailing is excellent. This is particularly true of things like metal deck treading, hatches with hinges and even molded on railings. Some spot comparisons with Fujimis regular assembly Kagero class kits really brought this home. On the other hand, there is some flash on some of the smaller pieces, along with some unfortunate sinkholes. |
|||||||||||||||||||||||||||||||||||||
| Sprue A - Hull | |||||||||||||||||||||||||||||||||||||
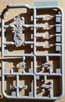
| Two hulls are provided for in the kit. One is an early war hull with
a complete set of portholes and the other is a late war hull with raised,
sealed covers over many of the portholes, particularly the lower row. The
differentiation between types is a very nice touch, and extremely well
executed. There are no lines or strakes to depict any hull plating, nor
is there a waterline plate, much less a waterline weight. There is a separate
piece for the underwater portion of the hull. The bow profile is
excellent, there is the proper amount of freeboard, and the entire hull
lies absolutely flat.
Each hull is a one-piece waterline hull, very cleanly molded in gray with extremely sharp and properly scaled details including portholes or sealed covers, porthole eyebrows where applicable, properly shaped anchor recesses with an anchor molded into the recess, a degaussing cable with brackets, spurnwaters (with runoff outlets) all around the perimeter edge of the decks, bollards, and solid propeller guards. The top of the hull has been engineered to separately accept the forecastle deck and the other molded, linoleum covered deck sections. Numerous mounting holes for smaller snap-in pieces and assemblies are everywhere. Otherwise, the portion of the main deck amidships is included where the deck is metal plated with treading, along with hatches, deck level skylights for the engineering spaces, and torpedo trolley rails. Aft, the number three turret base is also included as its also set on plated metal. Otherwise, there are no superstructure components other than the base for funnel number one and a portion of the structure underlying torpedo mount number one. The numerous tertiary air intakes that are typical of both the Kagero and Yugumo class destroyers atop the forward funnel base are included, though the shapes are slightly simplistic. The simplification applies mostly to the portion of each that faces the bow; otherwise, the shapes are fine. These pieces could be fully shaped with a little sanding and carving work, or, replaced with brass rod. Given that these are largely hidden once all the other structures are in place, I think it likely that most modelers wont notice the simplified shapes. Note that Fujimi did an excellent job on the tiny pair of intakes at the front of the base of funnel number one and those should be left as is. So, at this point, the reader has to be thinking that these hulls sound
wonderful. And they are, except for one small, nagging, and yet highly
significant point: these are not Yugumo class hulls at all, but those of
Fujimis preceding Kagero class NEXT kits. Theres no sloped stern with
a correspondingly longer hull, the forecastle decks are laid out incorrectly
and have no extensions aft, and, oh, the inside of the hull has 1/700
NX Kagero Class distinctly molded within. To repeat: these are not Yugumo
class hulls.
|
|||||||||||||||||||||||||||||||||||||
| As much as I hate to write this, it seems clear and unequivocal that Fujimi has pulled something of a bait-and-switch on the hulls. This cannot be considered a matter of ignorance. The IJN certainly considered them two distinct classes and the differences between the two classes are fully documented. Not to mention that all the other Japanese ship kit manufacturers have long managed to differentiate between the two classes. IJN fans, knowledgeable modelers and like-minded armchair naval historians would be very aware of the contrasts between the types. Im guessing that Fujimi felt their target audience, and casual modelers, wouldnt know the difference. It certainly saves on new tooling costs for Fujimi. | 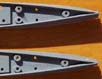 |
||||||||||||||||||||||||||||||||||||
| Caveat emptor.
That brings us to scale accuracy. The hull scales out beautifully for
a Kagero type. Those class particulars versus the scale and this kit:
Obviously, scale accuracy suffers when comparing this kits hull to
the Yugumo class particulars:
|
|||||||||||||||||||||||||||||||||||||
| Notes on the kit degaussing cable pattern - (rivet counter alert: If
youre an accuracy freak and you still intend to use this kit, then these
points still apply.)
The construction of the Yugumo class was evenly divided between three shipyards: Maizuru, Fujinagata and Uraga Dock. As these vessels were all completed just as or after the war began, each came out of its yard with an external degaussing cable already installed on the hull. Each shipyard produced its own pattern, though none were that dramatically dissimilar from one another. The biggest point of differentiation came over the last 50 feet of ships length at the stern, where the cable usually dipped in some fashion to accommodate the propeller guards. There were some other, subtle differences forward in the vicinity of the forecastle break as the cables rose one level above the main deck to the forecastle deck. For simplicitys sake, I will focus just on the stern. |
|||||||||||||||||||||||||||||||||||||
| The Maizuru yards stern pattern was the simplest, with the cable mounted
horizontally around the stern at the same level below the main deck as
the rest of the cable. The pattern from Fujinagata dipped downward in a
gently slope along the last 50 feet of length to the very end of the stern.
The pattern from Uraga was the most complicated, with the cable dipping
down, running horizontally for about 20 feet, then angling back up and
resuming a horizontal attitude back to the stern. This was the same pattern
as was seen on the Kagero class ship Yukikaze and is probably the most
familiar to IJN destroyer fans.
Since the Fujimi Yugumo kit hull is actually that of a Kagero type, and since Fujimi used Yukikazes pattern for the kit, then it makes sense that the kit cable follows the pattern set by the Uraga Shipbuilding Yard. Yugumo class ships that utilized this pattern include Kazagumo, Takanami, Kiyonami, Suzunami, Kishinami, and Kiyoshimo. |
|||||||||||||||||||||||||||||||||||||
| Sprue Y Lower Hulls x 2 | |||||||||||||||||||||||||||||||||||||
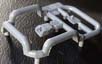
| These are single piece lower hulls, molded in IJN hull red. Stabilizer keels and water intakes are molded as part of the hull. Separate locator holes are present for the rudder, propeller brackets, and propeller shafts. Each has locator pins and an inner lip on the hull joint to allow proper alignment with the upper hull. A test fit snapped together firmly and showed no obvious gaps between the upper and lower hulls. | |||||||||||||||||||||||||||||||||||||
|
|
|||||||||||||||||||||||||||||||||||||
| Sprue B (Yugumo/early war fit only) | |||||||||||||||||||||||||||||||||||||
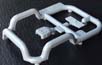
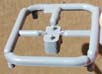
| This is a NEXT Kagero class sprue utilized specifically for Yugumo.
It contains the twin AA platform that sits in front of funnel two, the
foreleg and trailing legs of the mainmast, a main turret base insert for
the superimposed number two turret on Yugumo (or any early war build),
and forward boat davits. The boat davits are not used, as the Yugumos used
a different type davit forward.
The mast parts are a bit thick, as befits the need for strength in a snap-together piece. |
 |
||||||||||||||||||||||||||||||||||||
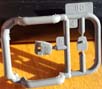
| Sprue BF x 2 | |||||||||||||||||||||||||||||||||||||
| These are the pedestal bases, molded in black. Each ship gets two individual bases, with each of those topped by a small finial with a cradle. Each cradle had a slot for the ships keel. However, the cradles on this sprue are not utilized as there are Kagero NEXT kit specific. | 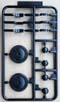 |
||||||||||||||||||||||||||||||||||||
| Sprue C x 2 | |||||||||||||||||||||||||||||||||||||
| This sprue is carried over from the NEXT Kagero class kit.
A larger sprue, it holds the steel plated portion of the forecastle deck
together with the steel base for turret number one, the platform upon which
sits torpedo mount number one, the air intakes for funnel number one, another
air intake at the rear of funnel number two, the galley pipe, the vertical
supports for all three torpedo reload gantries, the winch for the paravanes,
both halves for funnel # 1, and both forward torpedo reload storage bays.
The Kagero class forecastle portion is not used, while the instructions call for the aft air intake to be used only for Yugumo. The torpedo reload bays are well shaped, with proper apertures. Number one funnel is very sharp, even if the auxiliary pipe in the front is a little thick. |
 |
||||||||||||||||||||||||||||||||||||
| Sprue D x 2 | |||||||||||||||||||||||||||||||||||||
| This is a Yugumo class specific fret. This one hold three types of mushroom vents, some latticed support trusses for a mid to late war AA bandstand, and various lengths of splinter shielding. The splinter shielding is only for a late war variation of Kazagumo (which can be modified, according to the instructions). | 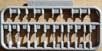 |
||||||||||||||||||||||||||||||||||||
| Sprue E x 2 | |||||||||||||||||||||||||||||||||||||
| These are also Yugumo specific sprues. Each holds the steel plated
portion of the forecastle deck together with the steel base for turret
number one, the proper davits for the forecastle, the 7m cutter held by
those same davits, a 7.5m motor launch, the roof to the compass bridge
deck, the main gun director that was specific to the Yugumos, and a small
cupola that goes atop the director. This type cupola was only applicable
to early war-built ships.
The big issue here has to do with the forecastle deck. While it is nicely detailed and correctly has a small wave shield in front of the turret base (whereas the Kagero class did not), this kit deck is otherwise identical to the one meant for a Kagero NEXT kit. This should not be, as number one turret and its base were actually sited 1.5 meters further back to improve stability in this class. That would translate to moving the main turret base back from its current position by approximately 2 millimeters. I see no way to modify this piece shy of cutting out the turret base and inserting it into some plain styrene sheet in the proper position. |
 |
||||||||||||||||||||||||||||||||||||
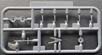
| Sprue F x 2 | |||||||||||||||||||||||||||||||||||||
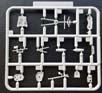
| More NEXT Kagero class sprues, these carry the 12.7cm gun barrels in
twin mountings with blast bags, the main air intake hood, another intake
that sits atop the aft deckhouse, a main gun director for the Kagero class,
a 90cm searchlight, a 2m torpedo director, the athwartship depth charge
rack, a 66cm navigation director, a 12.7cm practice loader, the aft davits
for the 7.5m motor launches, some jack staffs, and some small depth charge,
torpedo warhead, and torpedo handling davits.
Everything except the main gun director is used for these kits. |
 |
||||||||||||||||||||||||||||||||||||
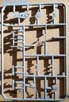
| Sprue G x 2 | |||||||||||||||||||||||||||||||||||||
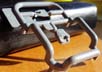
| Another small sprue drawn from the NEXT Kageros, this one
contains only the aft deckhouse and number two funnel with its base housing
and the integrated RDF compartment topped by an RDF antenna. Both are one-piece
units. The detailing is excellent, particularly on the deckhouse.
This deckhouse was one item that I had specifically compared to its counterpart
from the regular Fujimi Kagero class kit as Id always thought that one
to be one of the better formed components of that kit. This NEXT
version is superior in terms of the fidelity and sharpness of the detailing.
The only misgiving with the deckhouse is that two mushroom type ventilators have been molded on top. No such equipment was ever placed on top of the deckhouse. Instead, these spots were occupied by rectangular torpedo adjustment tables. This erroneous detail is not just a Fujimi lapse. In fact, this error has been carried down through the decades by just about every small scale Kagero and Yugumo kit ever produced. Despite some good detailing, the integrated one-piece stack and RDF compartment component comes off comparatively poorly. Both have a lot of flash, the RDF compartment has a bad sinkhole on one side, and the auxiliary piping on the funnel rates just okay. |
|||||||||||||||||||||||||||||||||||||
 |
|||||||||||||||||||||||||||||||||||||
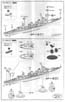
| Sprue H | |||||||||||||||||||||||||||||||||||||
| Drawn from the late war NEXT Yukikaze (Kagero class) kit, these include
the forelegs and aft legs of a late war Kagero class foremast and mainmast,
25mm AA bandstands that sit in front of the bridge, funnel number two,
and on the aft deckhouse (in place of superimposed main mount 2), a portion
of the radar compartment sited under the aft bridge deck, a lattice support
for flotation lumber, a 7 meter cutter, a 7.5 meter motor launch, and the
treaded aft portion of the main deck with roll-off depth charge racks for
a Kagero class ship.
Again, there is some very nice detailing but the nature of a snap-together kit requires thick masts and oversized mounting points on the ships boats. According to the instructions, only the ships boats and the pieces for the main mast are used off of this sprue, while the foremast from Yugumo class Sprue P is to be utilized for this mid-late configuration. However, this representation isnt accurate. (Rivet counter alert.) The only difference between the two classes regarding a late war foremast is the angle of the upper portion of the mast carrying the yardarms, which was raked slightly back for only the mid-to-late war constructed Yugumos. In actuality, the early war Yugumos had the same, as-built tripod foremast configuration as did the preceding Kageros. When these Yugumos underwent refits to carry radar, the revised foremasts were identical to those of the refitted Kageros. Only the mid-to-late war Yugumos had purpose-built masts with a raked back foremast. Understandably, Fujimi has simplified things, but modelers should be aware of the differences. So, for example, in the case of Kazagumo in her Type 22 radar fit, it would actually be more accurate to use the foremast from this Sprue H. |
 |
||||||||||||||||||||||||||||||||||||
| Sprue K - photo | |||||||||||||||||||||||||||||||||||||
| This is a NEXT Kagero sprue containing all the parts to a foremast, an early war stern deck insert, a 90cm searchlight controller, paravanes, and some ships boats. Only the paravanes, searchlight controller and the motor launches are utilized for a Yugumo/early war fit build. | 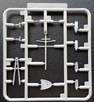 |
||||||||||||||||||||||||||||||||||||
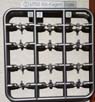
| Sprue L x 4 | |||||||||||||||||||||||||||||||||||||
| This sprue is common to both the NEXT Kagero and Yugumo class kits as it holds the quad Type 92 torpedo mount (with Type 93 Long Lance torpedoes) and the shield for the mount. The torpedoes are molded as part of each tube, with the warheads just slightly exposed. Its particularly well done, with great detailing. Each vessel receives two mounts. | 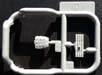 |
||||||||||||||||||||||||||||||||||||
 |
|||||||||||||||||||||||||||||||||||||
| Sprue M x 2 | |||||||||||||||||||||||||||||||||||||
| Molded in black, these are small sprues drawn from the Kagero NEXT kits. They contain the one piece, combination upper funnel (which were painted black for all IJN destroyers) and funnel grill, along with the hull cradles for the base finials. The Kagero and Yugumo class destroyers had identical powerplants and funnels, so the carryover from the Kagero NEXT kit makes perfect sense, as does molding the bands in black. Its unlikely that the seam between the grey portion of the funnel and the black will seem anything more than a color demarcation line. The molded grills are sharp, but nothing beats an actual grill as offered in photoetch. | 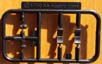 |
||||||||||||||||||||||||||||||||||||
| Sprue N x 2 | |||||||||||||||||||||||||||||||||||||
| Molded in hull red and drawn from the Kagero NEXT kit, these are the propeller shafts, shaft support brackets and rudder. |  |
||||||||||||||||||||||||||||||||||||
| Sprue P | |||||||||||||||||||||||||||||||||||||
| This is a Yugumo class sprue dedicated to late war bits. Included are: the components of the revised foremast for carrying radar, both AA bandstands erected between the funnels, the AA bandstand in front of the bridge, the air intake at the rear of the base of funnel number one, a late war stern decking insert with roll-off depth charge racks, a portion of the radar room added to the rear of the bridge, an insert base for superimposed turret number two, a simplified framework for supporting flotation lumber placed on the starboard side of the aft deckhouse, and another searchlight controller. | 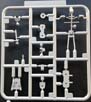 |
||||||||||||||||||||||||||||||||||||
| Everything on this sprue is used. The mast is applicable if one builds a true late war vessel, as opposed to an early war vessel refit to carry radar. | 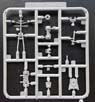 |
||||||||||||||||||||||||||||||||||||
| Sprue Q | |||||||||||||||||||||||||||||||||||||
| A Yugumo specific sprue, this one contains all the linoleum decks, colored in dark red-brown with tie-down strips and hawser reels molded onto the decks. Each ship uses four distinct inserts, and here, the sprue holds one of each section for both ships. The aft section surrounding the paravane winch differs slightly for early vs. mid/late war ships in that a short section of depth charge rails is included on that for the mid/late war ships. |  |
||||||||||||||||||||||||||||||||||||
| Sprue R1 x 2, R2, R3 | |||||||||||||||||||||||||||||||||||||
| These separate, one-piece sprues are all designated R with an embossed
numeral designation.
R-1 is the lower bridge structure, two decks high. Its used on both ships. On the plus side, its sharply molded with an excellent, streamlined shape front facing specific to the Yugumos, portholes and eyebrows, a starboard side full access hatch with hinges, vertical ladder, port side air intake, and awning anchor railing. |
|||||||||||||||||||||||||||||||||||||
Unfortunately, its oddly shaped in the rear. In silhouette,
it has the proper rear rake of an early to mid-war bridge, but the rear
facing is flat like a late war version, not aerodynamically rounded in
a manner that should be even more pronounced than the front. It will
require careful sanding to shape it properly, at the risk of losing some
of the molded detail. Plus, the front facing portholes at the helmsmans
level (deck 2) has only a few portholes, a configuration that was typical
of only the late war ships. The flat facing could be proper to the late
war ships, but only if it were vertical and filled out, like the bridge
of the previous Kagero and Asashio class units. Basically, its a compromise
piece so that two different versions can be avoided.
|
|||||||||||||||||||||||||||||||||||||
| R-2 is the early to mid-war compass bridge deck level (aka command deck). Its sharply molded, with an exposed, linoleum covered extension thats correctly shaped to fit within the tripod foremast of an early war ship. The bridge windows are molded on, as are the port and starboard navigation light boxes. | -front.jpg) |
||||||||||||||||||||||||||||||||||||
|
|||||||||||||||||||||||||||||||||||||
| R-3 is the mid to late-war compass deck bridge level. Ditto the above comments on details, but with characteristics more typical of mid to late war fits including passive radar detectors on the front and sides, as well as some splinter shielding. The shape of the exposed aft deck, covered with linoleum, is also specific to mid and late war ships. Plus, there is a radar compartment molded to the underside of the deck. This fit was only applicable to mid-war ships with the original bridge; certainly not the late war ships, as the radar compartment was included in the expanded lower bridge structure. | -front.jpg) |
||||||||||||||||||||||||||||||||||||
|
|||||||||||||||||||||||||||||||||||||
| Sprue R4-5 x 6 | |||||||||||||||||||||||||||||||||||||
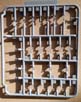
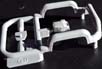
| These are the main 12.7cm main battery Type C/D turrets, also drawn
from the Kagero NEXT kits. The actual turrets were visually identical between
the Kagero and Yugumo classes, though the Yugumos carried an improved Type
D turret that could elevate their guns to 70*. Plus, all three Type D turrets
carried by the Yugumos had horizontal stiffening bands, whereas only number
one mount of the Type Cs for the Kageros carried such bands.
These turrets are beautifully and sharply molded, with proper detailing of ventilation covers on the turret sides as well as the top. The rivets are a nice touch, though clearly overscale. Still, I find them appealing. All three turrets have the requisite horizontal stiffening bands. Interestingly there are no grab rails molded on. |
 |
||||||||||||||||||||||||||||||||||||
|
|||||||||||||||||||||||||||||||||||||
| Sprue W | |||||||||||||||||||||||||||||||||||||
| Still another Kagero NEXT sprue composed primarily of late war components, this one holds two types of a great many 25mm AA ammo boxes, splinter shielding for various single 25mm AA emplacements, a Type 93 Long Lance torpedo, a cart for the same, and two stowed accommodation ladders. | 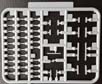 |
||||||||||||||||||||||||||||||||||||
| Sprue T x 2 | |||||||||||||||||||||||||||||||||||||
| Drawn from the Kagero NEXT kit, this is strictly devoted to the 25mm
AA guns. Molded in a shiny gunmetal gray, it contains multiple twin and
triple 25mm AA mounts. The instructions differentiate between fits for
the ships, with the early war Yugumo receiving only the twin 25mm AA.
The guns are okay. Better versions are available from FineMolds, Pit-Roads NanoDread series, and some 3D printers like Shelf Oddity. |
 |
||||||||||||||||||||||||||||||||||||
| Sprue V x 2 | |||||||||||||||||||||||||||||||||||||
| These are the triple bladed propellers, two per ship, molded in bronze colored plastic. The props are molded correctly, to depict turning in opposite directions. | |||||||||||||||||||||||||||||||||||||
| Sprue X | |||||||||||||||||||||||||||||||||||||
| As with the T sprues, these single 25mm AA are drawn from the Kagero NEXT kits and are molded in shiny gunmetal gray styrene. These are applicable only to the late war fit ships. The shapes are pretty good, better than the double or triple mounts, though there are several better aftermarket versions available. | 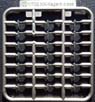 |
||||||||||||||||||||||||||||||||||||
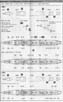
| Decals | |||||||||||||||||||||||||||||||||||||
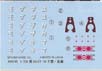
| The kit comes with a decal sheet and two identical, foil-based sticker
sheets.
The decal sheet is quite small and beautifully registered. Just a few things are included: Katakana characters for the ships name on the hull sides and stern (briefly used for the very early war period in home waters) for Yugumo, Kazegumo and, interestingly, Makigumo, linoleum coverings for the aft bridge compass deck, life rings, and some Japanese ensigns. |
 |
||||||||||||||||||||||||||||||||||||
| The foil sheets are adhesive backed. Oddly, all of the above are provided on the foil sheets as well, along with searchlight lenses, decking and canvas covers for the ships boats, bridge windows, and what might be flotation lumber. Im assuming that the presumption here is that the foil applications are supposed to be easier to apply than the decals. Im not sure thats actually true, particularly for the canvas covering the boats. However, it all looks very nice. | 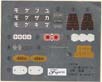 |
||||||||||||||||||||||||||||||||||||
| Instructions | |||||||||||||||||||||||||||||||||||||
|
These consist of one large format sheet printed front and back, then folded several times into eight pages. Portions are printed in color, though the actual assembly steps are printed in black and white. Assembly is shown via the usual step-by-step progression of exploded, three-point perspective illustrations. Theres also an illustrated parts guide, with block outs denoting equipment not used in the respective fits. Some gluing is indicated for the linoleum decking. Im not sure why, as a test fit cleanly and securely snapped into place. Since all the parts are pre-colored, there is no color callout. There is a page of fit illustrations specific to both Yugumo and Kazagumo. A mid war and late war fit are illustrated for Kazagumo, though no dates are given. |
 |
||||||||||||||||||||||||||||||||||||
|
|||||||||||||||||||||||||||||||||||||
| Final Thoughts | |
| Well, I was certainly shocked and very disappointed by
these kits in that they are not truly Yugumo class destroyers. Which is
a pity, because it certainly had the potential to be an excellent kit,
judging from excellence of the hull as well as the detailing and fidelity
of the moldings. It is a bit surprising, given Fujimis penchant for producing
reasonably accurate ship kits over the last decade and a half. I suppose
that these kits will give a passing familiarity with the Yugumo class for
the casual builder or a relatively new armchair admiral.
There is a silver lining, particularly if you are a Kagero class fan AND would appreciate a well-crafted Kagero hull. These will make the basis for an excellent kit-bashing project. In fact, I wish these had been released before I started a recent Aoshima based set of Kageros destroyers. The overall quality of fit of this NEXT type kit is unknown, though I will say that a test fit of the upper and lower hull halves produced a nice, tight seal with no visible seams. The mix of Kagero and Yugumo NEXT class sprues carrying very similar parts requires extra attention in order to be certain of using the correct item. It would be easy to confuse the array of masts, deck inserts, bridge pieces, and platforms. Though the kits come bagged separately, I would advise carefully reviewing and setting aside inappropriate sprues before beginning a build.
|
| This is an in-box review showing the kit contents. We welcome your input and comments in the review section of the forum especially if you can share details about fit, ease of assembly and accuracy. Click the logo on the right to join in the discussion. |  |

-overhead).jpg)
-side.jpg)
-top.jpg)
.jpg)
.jpg)