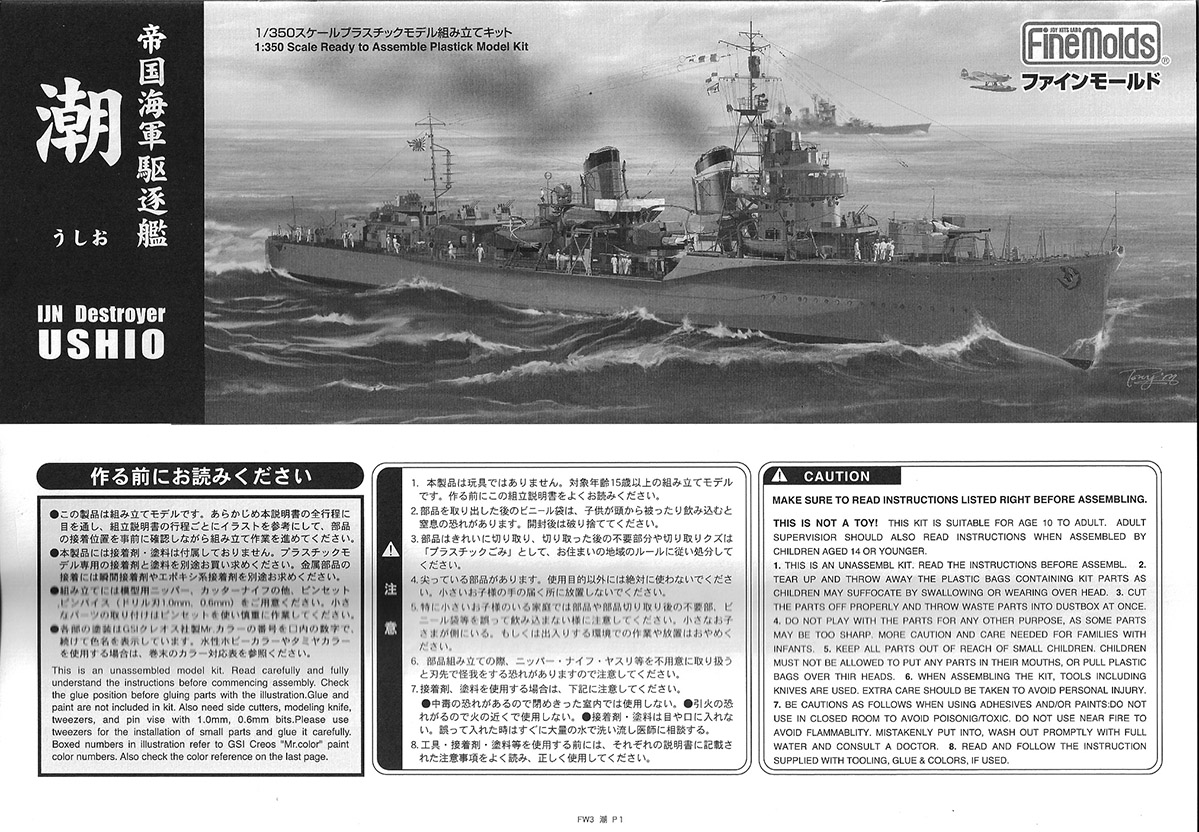
FineMolds
1/350 Imperial Japanese Navy Destroyer Ushio
Fubuki Type II, late war, Kit # FW3

|
Reviewed October 2021 by Dan Kaplan |
||||||
| BACKGROUND | ||||||
|
The Fubuki class of destroyers were a new, enlarged Japanese destroyer design that emerged in the wake of the naval disarmament treaties of the early 1920s. They were meant to be a key component of the Imperial Japanese Navy’s doctrine of whittling down an opposing navy (i.e., the USN), through the long-range engagement of massed torpedo attacks, particularly at night, prior to the engagement of the capital ships. . |
||||||
| DESIGN | ||||||
|
The Fubuki type destroyer (known as the Toku-gata, or
Special Type, in Japanese naval parlance) was revolutionary in naval design,
given its greater size and armament versus other navies’ destroyers at the time
of its introduction in 1929. The design packaged three, twin 12.7cm/ 5inch
mounts in enclosed turrets, a heavy battery of nine Type 90 61cm/24” torpedoes
with reloads, a long range, and a high speed in a powerful package whose
destructive broadside outmatched anything comparable of that time, including
most navies’ light cruisers. Ship specifications and a reasonably accurate
background on the entire class is available on our CASF
Fubuki-class thread. There were three groupings, known as the Special Type I, Type II and Type III. (The groupings are also referred to by the name of the lead ship in each group, respectively: Fubuki, Ayanami & Akatsuki classes.) Each subsequent group saw incremental improvements in their main armament turrets, engine room arrangements, engine air intakes, and command facilities. The Type IIs introduced a revised main turret, known as the Type B turret, an enlarged bridge with a vastly improved main gun director, revised cowlings that streamlined the air intakes placed at the base of the funnels, and adopted the lengthened forecastle that had appeared on several of the Type I ships. A still newer modification to the main air intake cowlings appeared on the fifth Type II sister, Yugiri. The cowling shape was changed from an elongated mushroom shape that surrounded and hung over the base of the funnels to a modified one whose aft end canted up toward the rear of the funnel, similar to a duck tail. Though nominally the fifth Type II ship, Yugiri was actually the eighth sister, as she wasn’t laid down until after the succeeding ships (Asagiri, Amagiri, and Sagiri) were. The change in shape of the air intake cowling was then subsequently carried thorough the last four Type II ships (Oboro, Akebono, Sazanami, and Ushio) and by the following four Type III ships. The last four Type II ships were also built with a funnel approximately 1 meter lower than the earlier sisters, and received a set of windows instead of windshields for the lookout enclosure immediately above the compass bridge deck. Also, the bridge face of the compass bridge deck for the Type IIa ships reverted back to the smooth semicircle as seen in Ayanami and Shikinami. This is opposed to the bridge face in Asagiri, Sagiri, Amagiri, and Yugiri, where it is segmented with flat planes in a rough semicircle. The small changes in the last four Type II ships sometimes denotes them as the Type IIa subclass. All the Type IIs (in fact, all the Fubukis) underwent reconstruction between 1935 and 1937, as a result of issues with hull strength and top heaviness. Hull plating was reinforced with additional plating, and more ballast was added. The torpedo tube mounts were enclosed by a weather and splinter proof shield, and an RDF loop antenna was placed aft the searchlight atop a built-out compartment meant to house the RDF controls. Funnel tops were lowered by approximately one meter for the earlier Type II vessels The main turrets of the Type IIs and IIIs were modified with a lower profile to the gun layer’s position, a stiffening of the structure, and improved ventilation. This mod was known as the Type B1 turret. Sometime later, the forward turrets received additionally stiffening rods placed horizontally to help with heavy seas as well as revised ventilation openings on the turret sides; this modification was referred to as the Type B2 turret. And, finally, a degaussing cable was added in the fall of 1941 to all class members. It was in this improved configuration that all the Type IIs began the Pacific War. As the war progressed, further changes became warranted. To improve their anti-aircraft abilities, additional AA guns began to appear in early 1943. A twin 13mm mount was emplaced atop a bandstand in front of the bridge. This mount was replaced by a heavier, twin 25mm version later in 1943 for most class members. In some cases, twin 25mm mounts also replaced the twin 13mm mounts to either side of number 2 funnel. By late 1943 and into 1944, most, but not all, of the surviving ships had their main # 2 turret replaced by two triple 25mm AA mounts atop the aft deckhouse. Another two triple 25mm mounts were eventually set upon a platform placed athwartship between the second and third torpedo mounts. Single 13mm and 25mm mounts also were added, though their placement varied by ship. Radar was also added to class members beginning in 1943. This necessitated some changes to the tripod foremast to accommodate a platform for a Type 22 radar. By late 1944, a Type 13 radar was added to the mainmast of the few remaining sisters. Plus, the surviving ships had their torpedo tubes modified to handle the Type 93 (Long Lance) torpedo. Up to that point, class members had been utilizing the earlier, conventionally powered Type 90 61cm/24” torpedo. |
||||||
| SHIP HISTORY | ||||||
|
Ushio (潮, "Tide") was the twentieth Fubuki Type, and tenth
Type II vessel laid down, at the Uraga Dock Company on December 24, 1929. She
was subsequently commissioned on November 14, 1931 and assigned to Destroyer
Division (DesDiv) 7 along with Oboro, Akebono and Sazanami. DesDiv 7 was
assigned to Destroyer Squadron (DesRon) 2 and Second Fleet the following month.
As with others of her class, Ushio underwent modernization in the mid-1930s. She had an active and notable war record in Chinese waters in the late 1930s, providing support in several landing operations. DesDiv 7 assignments were rotated between several DesRons and fleets until July, 1941, when DesDiv 7 was directly assigned to the First Air Fleet. Ushio was a very active ship once hostilities commenced, and remained so throughout the war. Detached from DesDiv 7 with sister Sazanami, and accompanied by the tanker Shiriya, she bombarded Midway Atoll on December 7th, 1941, concurrent with the attack on Pearl Harbor. In January, 1942, she was an escort to the aircraft carriers Hiryu and Soryu while they carried out air strikes around the Indonesian archipelago. In late February, she and Sazanami joined other Japanese forces at the Battle of the Java Sea. Several days later, she and Sazanami depth-charged, damaged and then sank USS Perch SS-176, rescuing 59 survivors in the aftermath. In late March, she returned to Japan while escorting convoys. She then underwent some maintenance and repairs at Yokosuka Navy Yard. In early April, Ushio and DesDiv 7 was assigned to DesRon 10, attached to the First Air Fleet. In early May, she and Akebono were part of the direct escort for CarDiv 5’s carriers Shokaku and Zuikaku at the Battle of the Coral Sea. She also escorted Zuikaku home to Japan in the aftermath of the battle. In early June, she and DesDiv 7 escorted Japanese carrier forces in their attacks against Dutch Harbor in the Aleutian Islands while other Japanese forces fought at the Battle of Midway. In July, DesDiv 7 was assigned directly to Combined Fleet Headquarters. As such, she and Sazanami were escorts for several aircraft ferry missions through July into August, as well as escorting Yamato to Truk. By September, she was drawn in action around Guadalcanal where she led three transport missions and a gunfire support mission to the island. The rest of 1942 was spent with Akebono as consorts to escort carrier Unyo on aircraft ferry missions to Truk and various Indonesian locations. She made her way to Yokosuka Naval Base in January, 1943, where she underwent a refit during the latter half of the month. There, she received a twin 13mm AA mount on a bandstand in front of her bridge. Beginning in early February,1943, and continuing on through the end of August, Ushio resumed convoy escort duty for various light and escort carriers on a minimum of thirteen aircraft ferry missions between Yokosuka and Truk. She was often accompanied by Akebono and Sazanami, among other destroyers. She returned to Yokosuka for the month of October in order to receive another refit. This time, her AA fit was radically upgraded. Her superimposed B turret was removed and she received two triple 25mm AA mounts in its place as well as another two mounts superimposed over her auxiliary steering station. Her foremast was altered to handle a Type 22 radar, which was added at the same time. Ushio resumed her role as an escort for aircraft ferry missions for the rest of 1943, then continued into early 1944 escorting several troop convoys. In March, 1944, she returned to Yokosuka for maintenance and the installation of ECM passive radar detection devices on her bridge faces. More escort and patrol duties followed, then another yard visit with Akebono to Yokosuka in late May through early June that saw the addition of several single 13 and 25mm AA mounts. Her torpedo tubes were also modified to handle the Type 93 (Long Lance) torpedo. In August, a Type 13 radar was added to her mainmast at Kure Naval Base. Following that dockyard visit, Ushio and Akebono were designated escorts for heavy cruisers Nachi and Ashigara, where they became the core of Admiral Shima’s Second Striking Force. Other force members included light cruiser Abukuma and destroyers Shiranui and Kasumi. All made their way to Coron in the Philippines and participated in the Battle of Surigao Strait. However, they arrived too late to engage in any meaningful action, and withdrew amongst much confusion, along with elements of the Japanese Southern Force. During the withdrawal, Abukuma was sunk, and Ushio rescued her survivors. Both Fubuki sisters subsequently escorted Nachi to Manila. Ushio and Akebono were then tasked as escorts for the TA 2 troop reinforcement convoys from Manila to Ormoc Bay in early November. Upon their return to Manila, Akebono was heavily damaged in an air raid and towed to Cavite Navy Yard for repairs by Ushio. (Akebono was sunk several days later at Cavite during another air raid.) Ushio was again tasked as an escort for the TA 4 convoy, but was swapped out for escorts from the returning TA 3 convoy, so she uneventfully returned to Manila Bay with TA 3. Still at Manila Bay on November 13th, Ushio was damaged in another American air attack. This time, she was near missed, but the impact was great enough to disable her starboard engine. She left Manila Bay as part of a convoy and made her way to Singapore, where repairs were unsuccessful in bringing that engine back on line. She again became a convoy escort, this time back to Japan, arriving at Yokosuka in early January. There, engine repairs were not successful. She was placed in reserve and moored at Yokosuka until the end of the war. Ushio was finally scrapped in 1948, one of only two Fubuki types (the other was Hibiki) to survive the war intact. |
||||||
| KIT BACKGROUND | ||||||
|
The FineMolds 1/350 Fubuki class Type II destroyer Ayanami
kit was first released in December, 2010 to great fanfare in Japan. It was both
the first 1/350 Fubuki class injection kit to be released as well as the first
ship kit by FineMolds, and it has sold very well since then. It offered, and
still does, a very sharp, fine level of detail and fit for a 1/350 scale kit.
FineMolds released only two more variants of the kit; both Type IIs in slightly different configurations. One is of a pre-war Shikinami, and the other of Amagiri in the 1943 configuration in which she rammed PT-109. In fact, a 1/350 scale PT-109 is included with this kit. Both were released within a year of the Ayanami kit. Unfortunately, no other variants or fits have been released since 2011. Which makes the release of this new kit is a pleasant, and most welcome, surprise. Essentially, it has most of the original kit parts, plus new ones for a late war configuration, including new cowlings at the base of the funnels, platforms for the additional AA guns, revised foremast, and radars, among other things. Of the original parts, only Sprue L holding the early war fit masts has been omitted. The kit is molded in light grey styrene plastic, with both a waterline option plate and the underwater portion of the hull for a full hull option. All details are very sharply molded. All the kit surfaces have a nice matt finish. On my kit, there was just a few, very shallow sinkholes on one set of the smaller ventilator surfaces, though nothing that can’t be easily corrected. Also, there was a hint of flash on the late war mast yardarm tips. Configuration-wise and out-of- the box, this particular kit can be used to build Sazanami, Akebono or Ushio (the remaining Type IIa sisters, as Oboro was sunk in October, 1942) in their mid or late war fits, excepting a degaussing cable. As the original bridge face part from the Ayanami kit (part D3) and the original funnel air cowl intakes are still included with this kit, one could also make a 1943-1944 Shikanami. It's also possible to create a mid to later war Amagiri or Yugiri, but that would require some sanding of the bridge face to flatten aspects of the plates as well as mixing and matching some parts. Good references are a must if one is configuring this kit as one these other sister ships. The sprue breakdown is as follows (new sprues will be indicated): |
||||||
| SPRUE A | ||||||
|
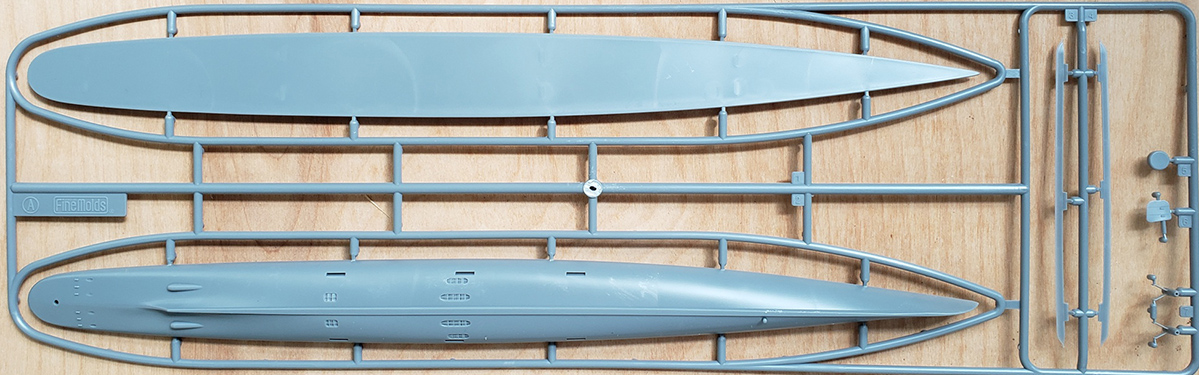
This sprue contains the underwater portion of the hull, bilge keels, waterline plate, two propeller brackets and rudder. Unlike the earlier kits, it’s not molded in a dark red plastic, but the same grey as the rest of the kit. The details are subtle; the underwater hull has molded grillwork for the sea intakes, and the rudder shows what I believe are small counterweights. A cap is included to allow the rudder to turn. |
||||||
 |
||||||
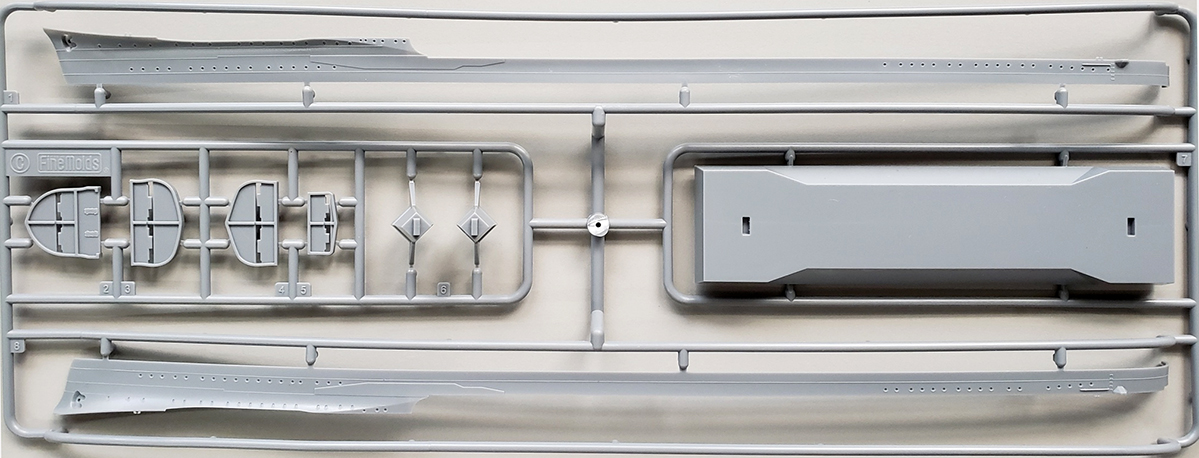
| SPRUE B | ||||||
|
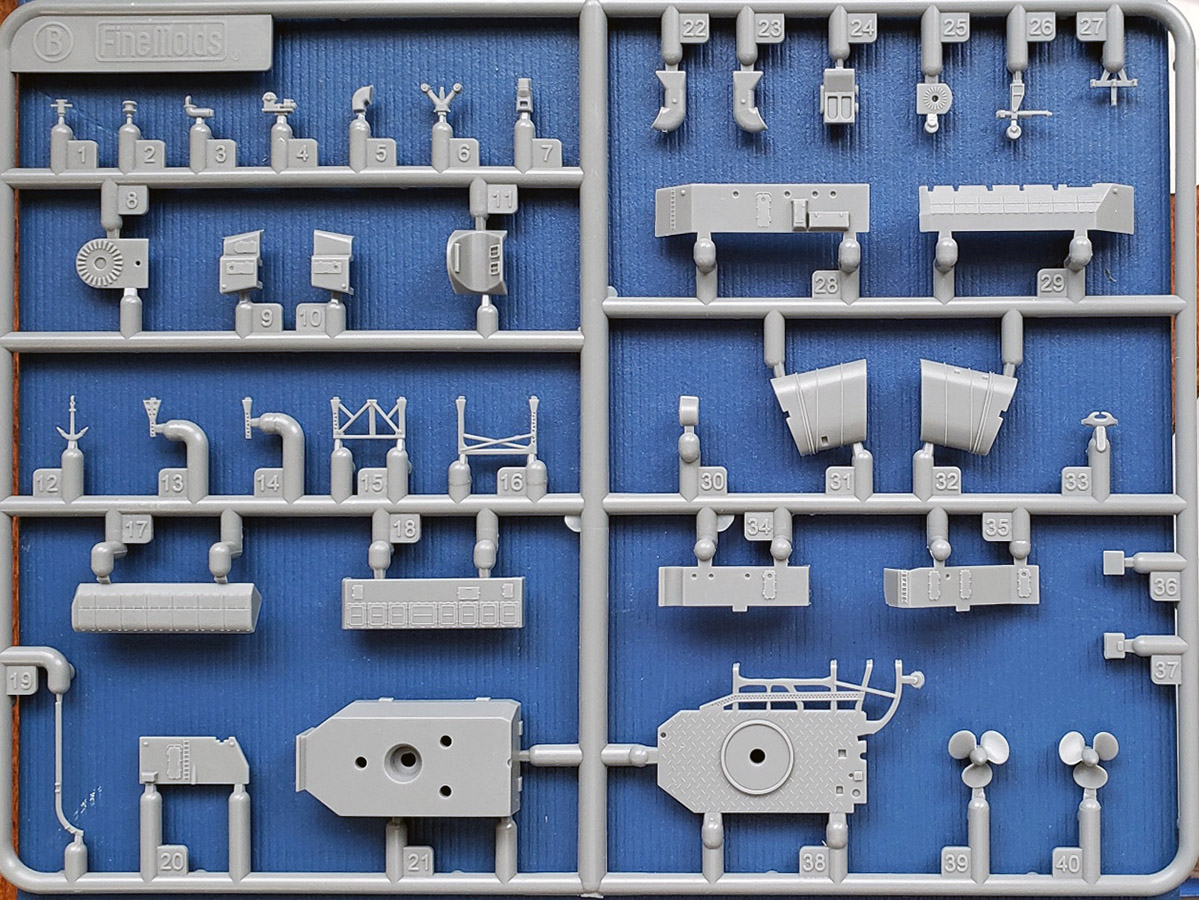
This sprue is comprised of the components of the aft deckhouse, the torpedo stowage compartments with nicely detailed hatches, one set of upper funnel halves, various girder components for the three different sets of truss supports (mostly the upright columns) used for the torpedo reloads, the aft emergency steering station, the RDF compartment, assorted air intakes, vents, the 12.7cm practice loader, the crow’s nest, a deck winch, the depth charge Y-gun, the bullnose, the small stern anchor, a capstan, and the two propellers, which are properly molded with opposing directional blades. |
||||||
 |
||||||
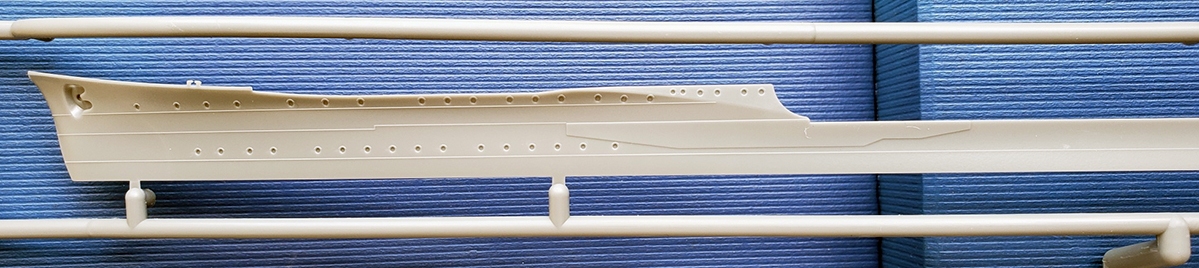
| SPRUE C | ||||||
|
This sprue contains the above waterline portion of the hull. It’s molded in two halves with 4 rigid inner trusses for hull support. Each truss is molded with a complete upper and lower portion that can be separated for use to support a waterline version of the hull. A plastic stand to support the full hull version also comes on this sprue. The hull has nicely scaled, alternating longitudinal bands to replicate hull plating and a correctly formed, slight concavity to the hull sides that are unique to this class. All portholes have fine eyebrows. (Note that late 1943 ships still had open portholes, but later war fits would have had all their lower rows of portholes sealed with covers.) There is no degaussing cable, though a photo etch version for this kit is sold separately as an aftermarket set by FineMolds. Alternatively, one can be made from styrene strip. The kit hull dimensions are unchanged from the Ayanami kit, and again scales out extremely well. Ushio’s particulars versus the scale and kit: Overall Length: 118.41m/388’6” 1/350 OA length: 338.31mm Kit OA length:340.0mm* Waterline Length: 115.3m/378’ 1/700 WL length: 329.4mm Kit WL length:331.0mm Beam: 10.4m/34’1” 1/700 Beam: 29.71mm Kit Beam: 30mm *Includes the bullnose, which is a separate piece. |
||||||
|
||||||
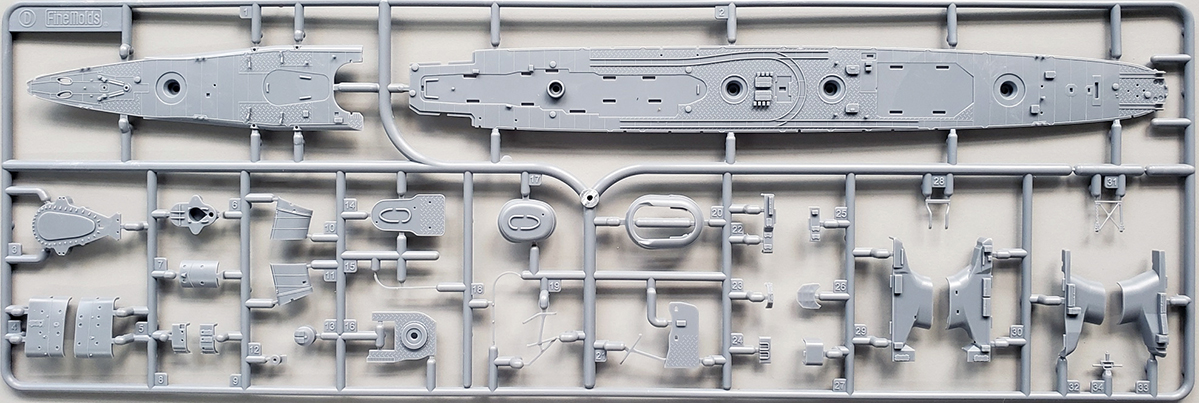
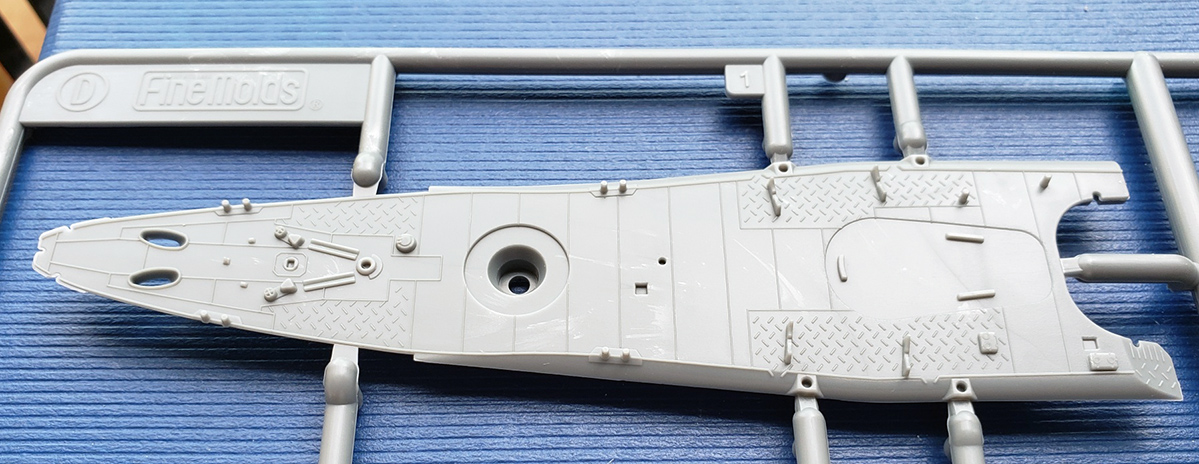
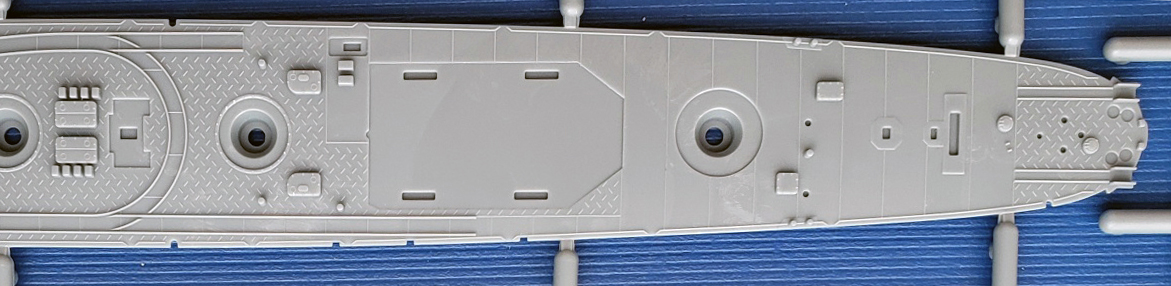
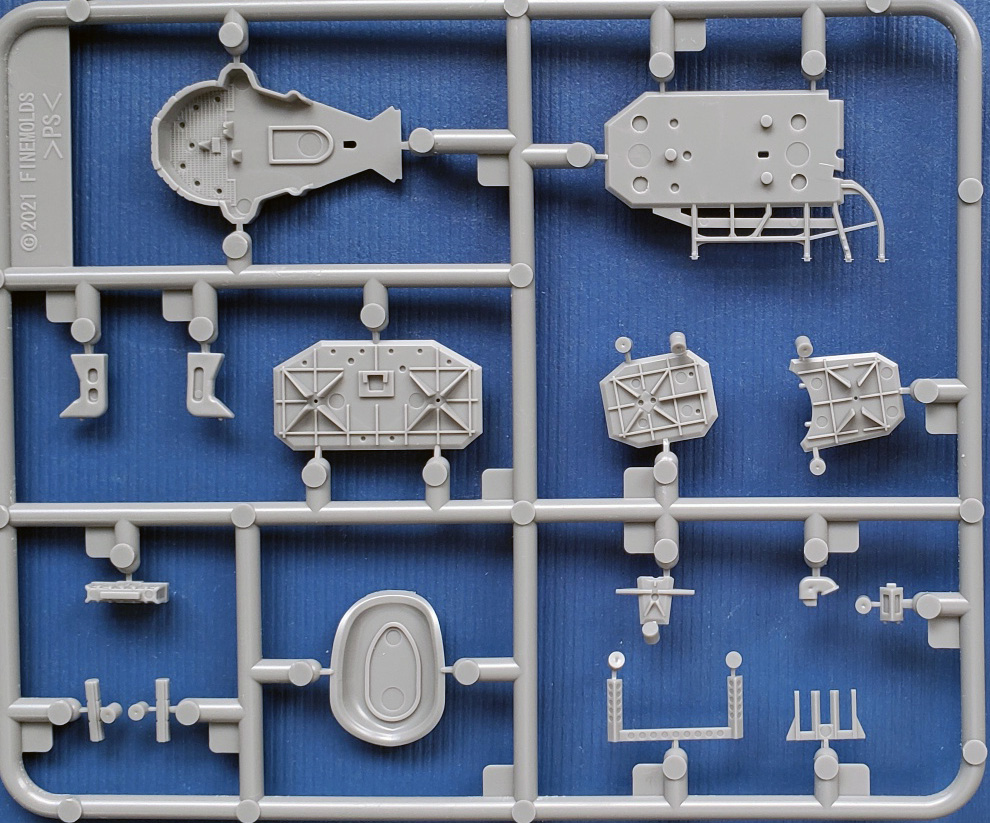
| SPRUE D | ||||||
|
Among the many components on this sprue are the two-piece
deck (forecastle and main decks), another set of upper funnel halves, both lower
funnel assemblies, the funnel air intake cowlings for the earlier Type II ships,
the AA platform in front of the aft funnel meant for early war fits, sections of
the bridge, small decking bits like the base under the #1 torpedo mount, and the
remainder of the torpedo reload gantry girders. The deck is finely molded with fine steel treading patterns and linoleum tie-down strips. Thankfully, molded on fittings are few aside from torpedo trolley and mine rail tracks. Equipment boxes are nicely molded onto the base of the funnels. The deck hatches are equally nice. The detail work on the torpedo girders and trusses is superb. For greater realism, the upper trusses have round drain holes that can be drilled out while the vertical columns have triangular recesses that probably cannot be drilled out, but are certainly deep enough to accommodate a wash for shading. Rivet Counter Note: For absolute accuracy for Ushio or her other Type IIa sisters, part D23, the windshields for the upper bridge lookout enclosure that are suited for earlier Type IIs, should be replaced by a set of window frames that are the same height as D23. |
||||||
|
||||||
| SPRUE E | ||||||
|
This small sprue contains auxiliary funnel piping, the galley pipe, various bridge level braces, and jackstaffs. |
||||||
|
||||||
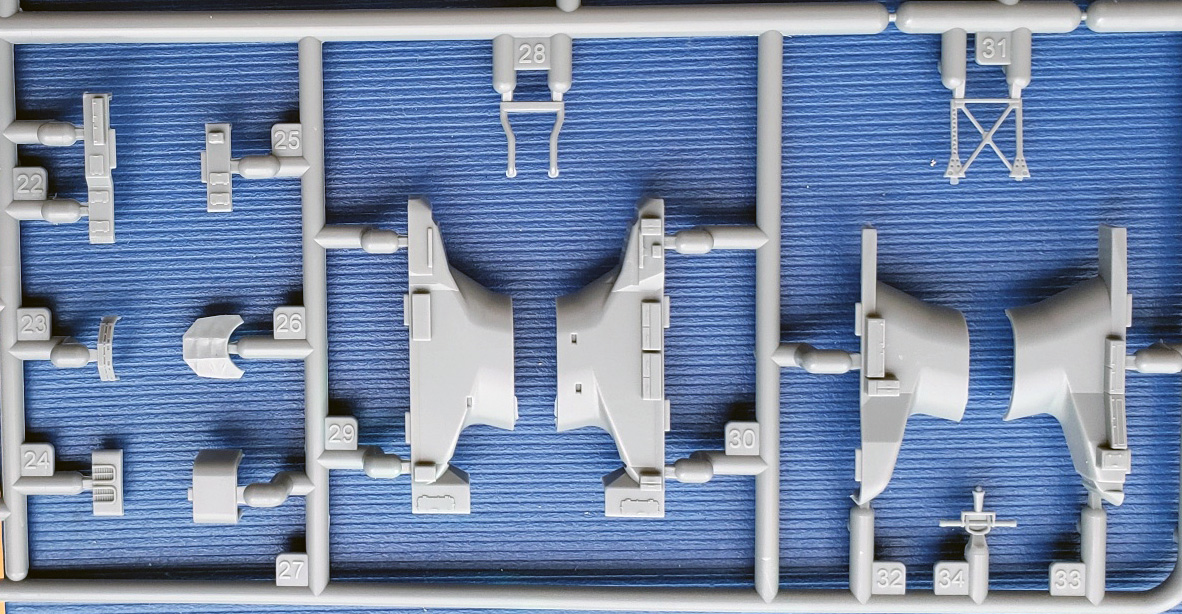
| SPRUE F | ||||||
|
This is one of the new sprues for the late war fit.
Included are the new air intake cowling covering the base of the fore funnel,
the compass bridge deck, the revised roof to the aft deck house along with the
two bandstands for triple 25mm AA mounts that sit atop it, another platform for
two triple AA mounts that sits athwartships between numbers two and three
torpedo mounts, the AA bandstand that sits in front of the bridge, all the
supporting columns for these bandstands, the parts to the aft emergency
maneuvering station, the small platform for the foremast that supports the Type
22 radar, and the late war depth charge rack that sits athwartship at the stern. The front of the compass bridge deck has protective splinter shielding molded on as well as a wood deck grating inside, the depth charge rack has nice recesses (though this might still be better served by a photo etch version), the platform supports have recesses for lightening holes, and the platform surfaces are covered with metal treading. |
||||||
|
||||||
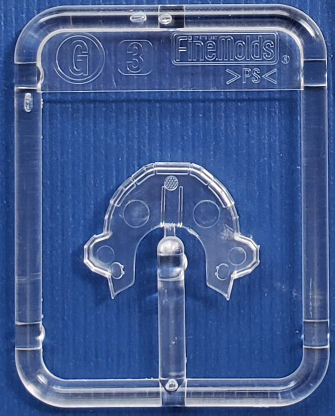
| SPRUE G | ||||||
| This is a one-piece sprue consisting of the compass bridge roof and windows, molded together in one clear piece of plastic The windows have to be masked to prevent paint overspray of gray for the bridge roof, or removed completely to permit PE ladder to be used to depict open windows. | ||||||
 |
||||||
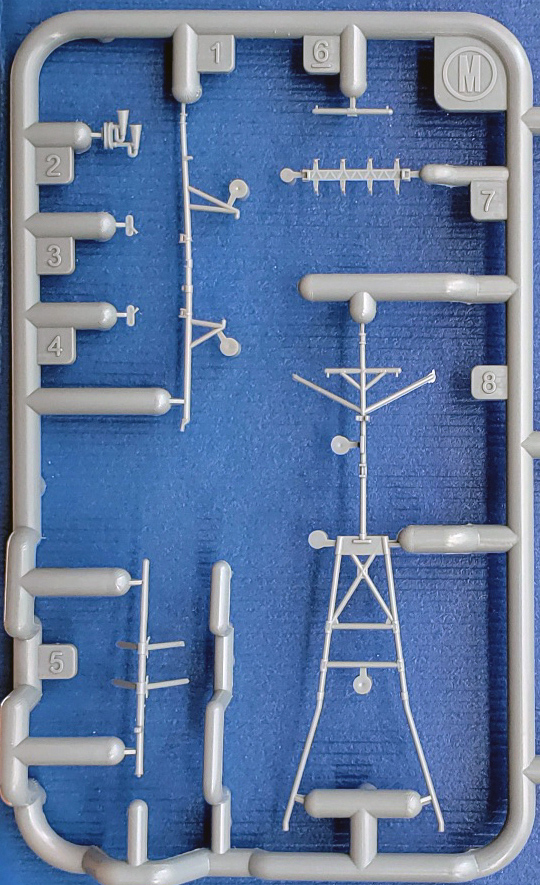
| SPRUE M | ||||||
|
This is another of the late war fit sprues. It contains
both the foreleg and rear leg assembly of the late war foremast, a late war
mainmast and its yardarm, Type 13 and 22 radars, and two passive ECM receptors (gyaku-tan
in Japanese). All the mast legs have nicely detailed joints where the connective bracing goes. Note that the foremast is molded only with the uppermost cross-brace for its rear. Other cross-braces will have to be added by the modeler on their own. FineMolds has also retained the correctly molded the rear legs of the foremast with the lower portion of each leg slightly splayed out. This one of those details that is not noticed by most IJN DD fans, and is ignored completely in the 1/700 scale versions. The mainmast in my kit has a slight bow to it; it should be absolutely straight. I don’t know if this is something that happened along the way, or a result of how it’s been molded. The Type 13 radar has some sharply defined lattice work, but a build would still benefit from a photo etch version. |
||||||
|
|
||||||
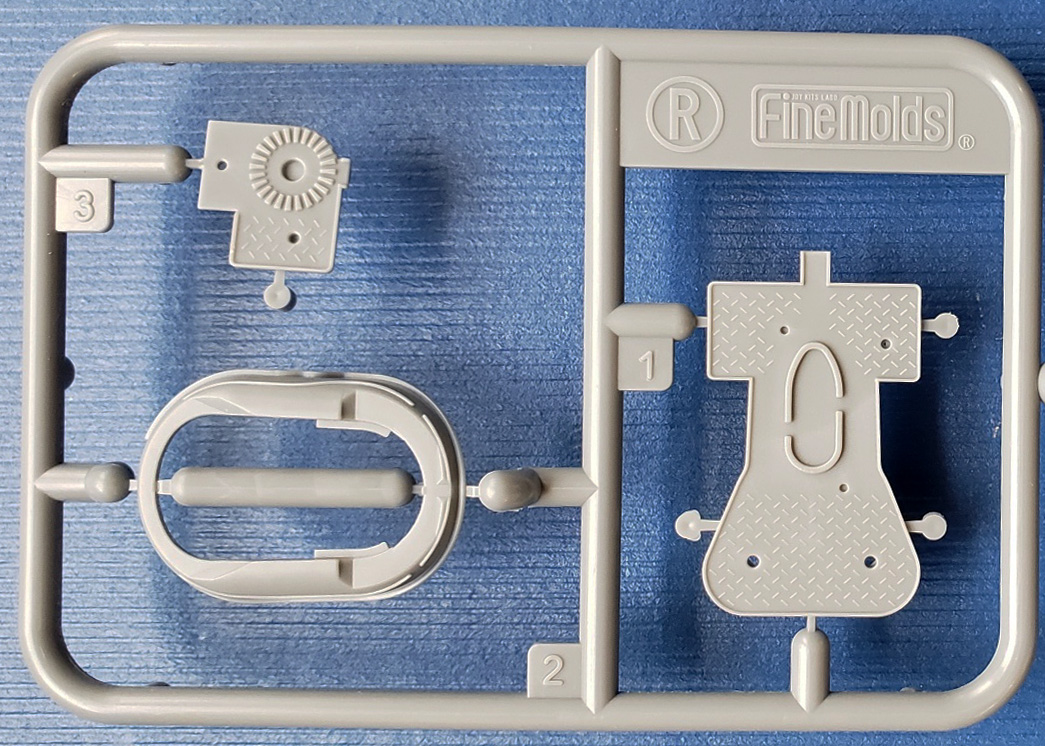
| SPRUE R | ||||||
| This is the third new, late war sprue. It holds the air intake cowling for the aft funnel, the AA platform set in front of the aft funnel, and the expanded RDF/Searchlight platform. | ||||||
|
|
||||||
| SPRUE Vx2 | ||||||
|
It contains deck vents and air intakes, base rings for the
main turrets, an anchor, an access ladder leading from the main to forecastle
decks, several hawser reels of different diameters filled with cables, smoke
generators, life preservers, two solid halves for the early war athwartships
depth charge rack, and the funnel grills. The funnel grills remain among the better renderings that I’ve yet seen in styrene. Their only limitation is a slight lack of open depth at the very top of the grill when viewed from the. Would photo etch versions work better? Yes, of course, but I think I could live with these if I had to. The depth charge rack is replaced by the late war version from Sprue F. |
||||||
|
||||||
| THE W SPRUES | ||||||
| Note: all the following sprues marked with WZ are also offered as aftermarket 1/350 IJN accessory sets by FineMolds | ||||||
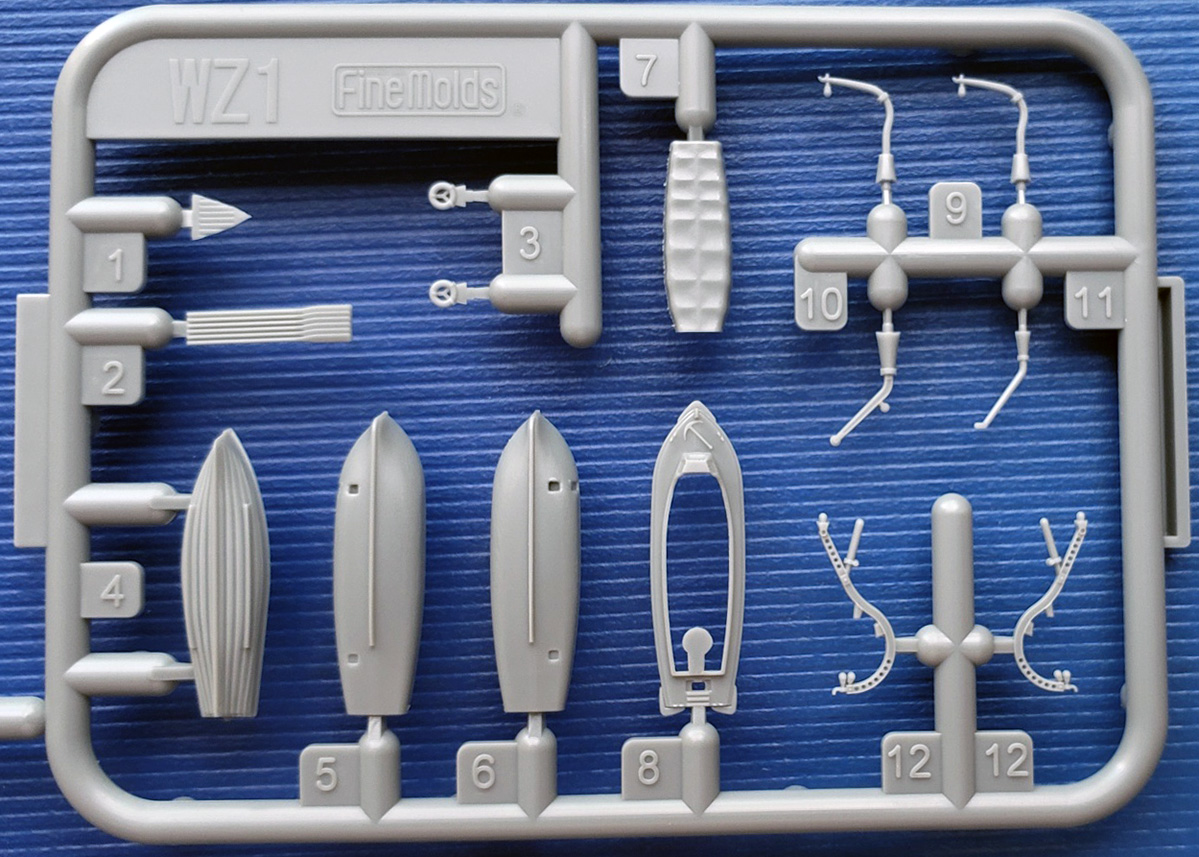
| SPRUE WZ1 x2 | ||||||
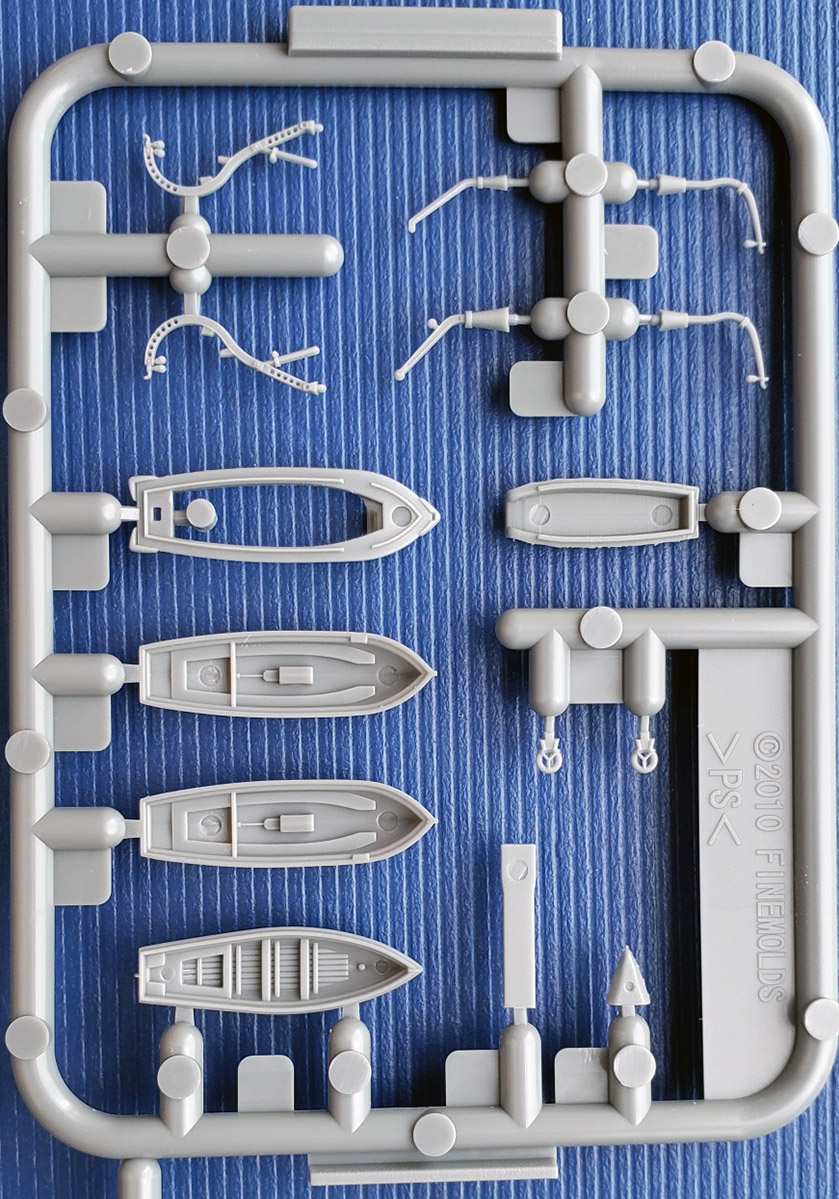
|
This sprue carries the ships boats and davits. Each carries
a 7m cutter, two 7.5m motor launches, canvas cover, one pair of davits that were
used forward to carry the cutters, a different pair of larger davits meant to
carry the launches, a set of oars for the cutters, one torpedo davit and one
depth charge davit. These last two davits were designed to be collapsible but
both are molded in the erect position. The detail here is extraordinary. The larger set of davits had circular lightening holes that can be drilled out for better effect. The motor launches have inner details that can be exposed or hidden. |
||||||
|
||||||
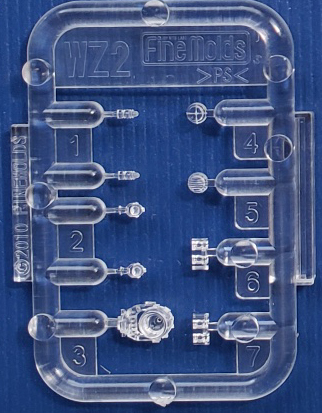
| SPRUE WZ2 | ||||||
|
Molded in clear plastic, this tree carries the port and starboard running lights, a 90cm searchlight with two different covers, two 2kw daylight lights, and two 30cm signaling searchlights. Again, the detail is extraordinary. |
||||||
 |
||||||
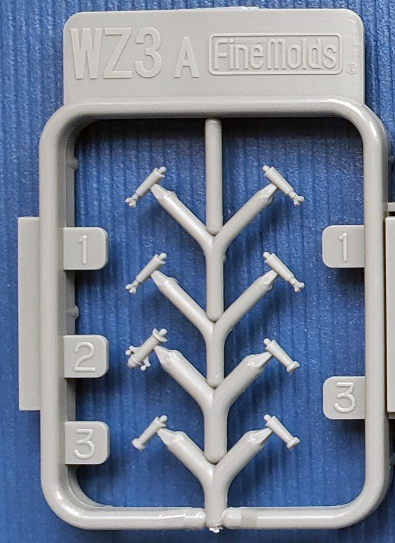
| SPRUE WZA3 x2 | ||||||
|
This sprue contains finely detailed optical equipment such as podium mounted 12cm search binoculars and gyrocompass binnacles for the bridge deck. |
||||||
 |
||||||
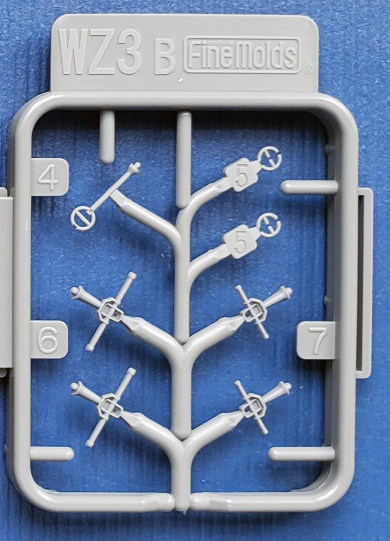
| SPRUE WZ3B | ||||||
| This contains two each of a 3m rangefinder sited on top of the bridge for the main battery and a 2m rangefinder used for the torpedo battery. It also contains an RDF antenna with loops. This last item is nicely rendered but a little thick. A PE or brass rod version is a better scaled alternative, in my opinion. | ||||||
 |
||||||
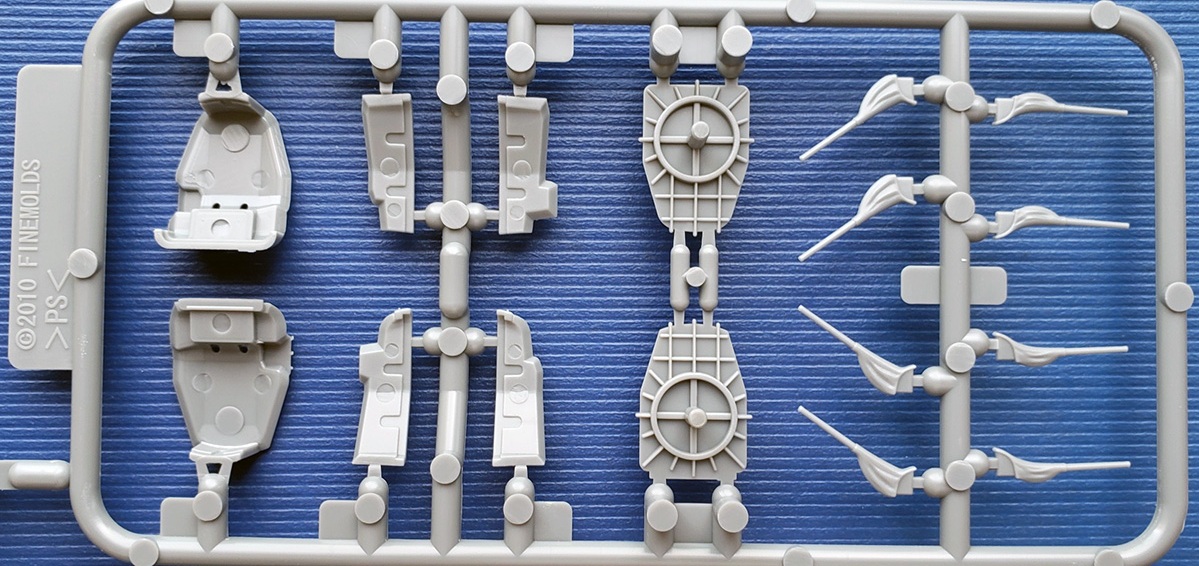
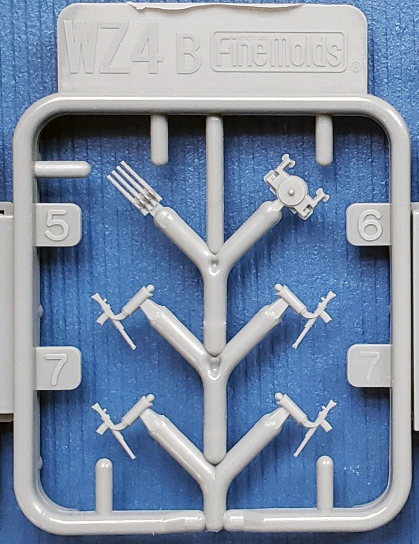
| SPRUE WZ4B x 2 | ||||||
| This holds early fit light AA weapons. Included is one quad 13mm mount, and 4 single pedestals mounted single 13mm mounts. Detail is superb. | ||||||
|
|
||||||
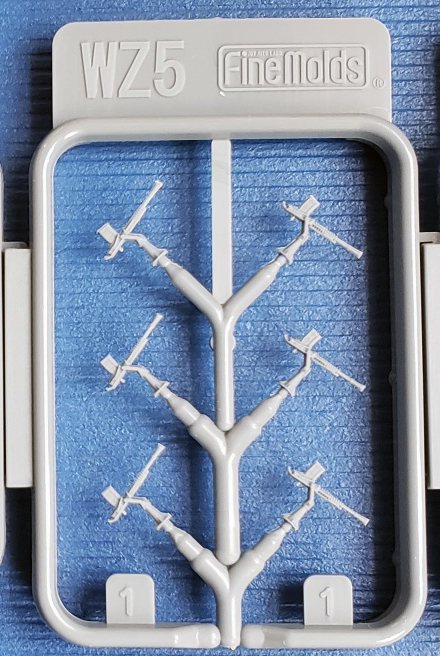
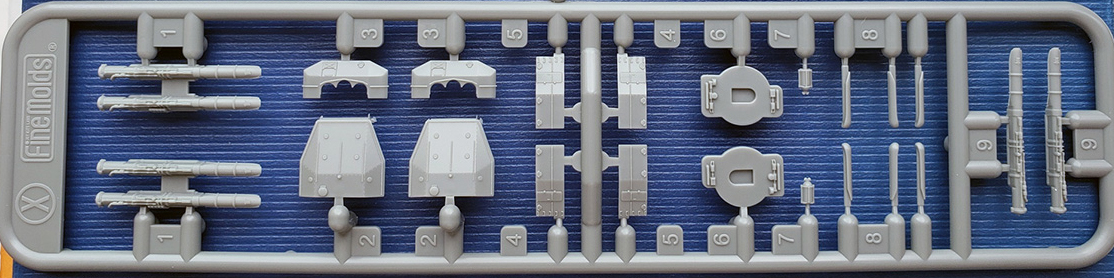
| SPRUE WZ5 x2 | ||||||
| More 1/350 Nanodread aftermarket accessory sets, these are single 25mm AA mounts. Excellent detail, with flared muzzles, recoil tubes, breech and ammo clip details. These are as nice as it gets in styrene for single 25mm guns. | ||||||
|
|
||||||
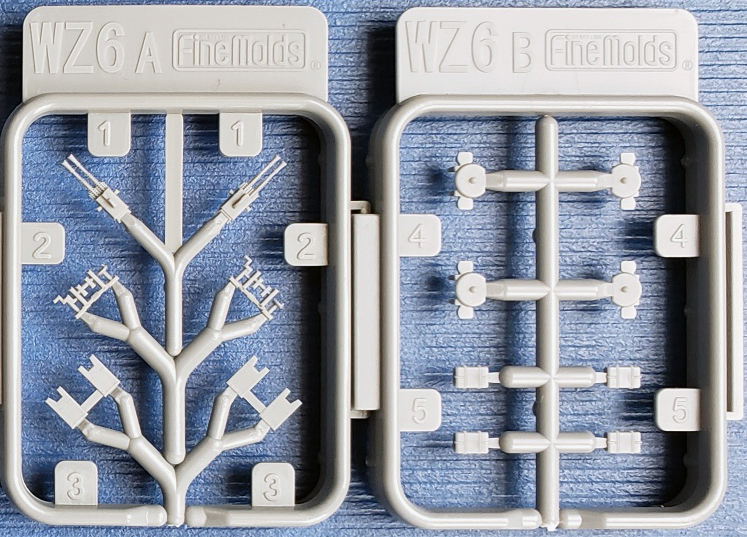
| SPRUE WZ6A&B | ||||||
| These hold the parts for two twin 25mm AA mounts. In addition to a twin set of barrels with flared muzzles and recoil tubes, these include the carriage base with seating, internal structure, and foot pedals, as well as a splinter shield. 25mm ammo boxes are included. As with the single mounts, these as nice a version as can be had in styrene | ||||||
|
|
||||||
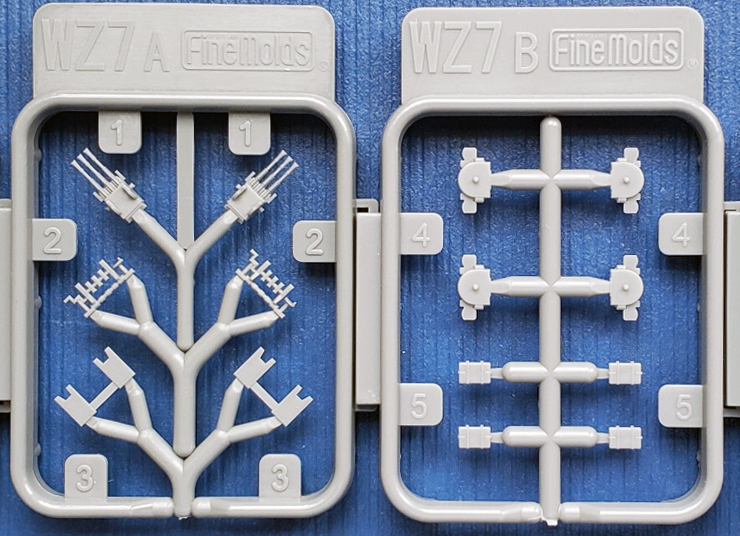
| SPRUE WZ7A X2 & B | ||||||
| The final Nanodread accessory set, these hold parts for four triple 25mm AA mounts. Ditto what was written about the single and twin 25mm AA mounts. It should be pointed out that the shields are optional; a late 1943 Ushio would not have carried them, while a 1944 or later version would have seen them installed. | ||||||
|
|
||||||
| SPRUE X x2 - TORPEDO MOUNTS | ||||||
|
This sprue is comprised of the components that make up the
Type 90 shielded torpedo mounts. Each sprue contains parts for two complete
triple mounts. This included the mount base, a base pair of torpedo tubes with a
third, center tube that gets mounted between them at a slightly higher position,
a four-piece outer housing with fine detailing, and the forward third of the 24”
torpedoes that gets glued to the underside of each tube in an exposed position.
All the tube mounts are designed to be secured with hidden caps to allow turning. I’ve always thought this was a nice feature to have. Three mounts are needed for the ship. |
||||||
|
|
||||||
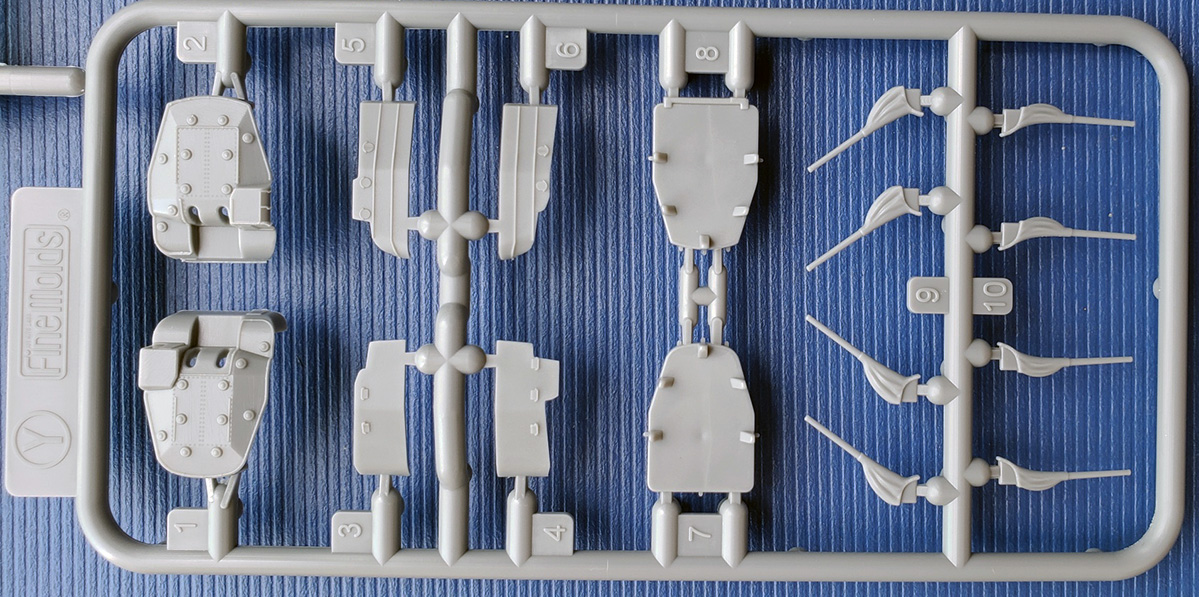
| SPRUE Y - MAIN BATTERY | ||||||
|
This sprue contains nicely detailed components that make up
the main 12.7cm/5” battery. There are two turrets per sprue, each comprised of
four pieces. There are also two sets of barrels, with canvas blast bags for each
barrel. One set of barrels is posed in the typical, level position; the other is
posed as if raised to maximum elevation. As with the torpedo mounts, all the
turrets are designed to be secured with hidden caps to allow turning. Each sprue contains two different turret models: the B1 turret which was used in the aft positions, and the B2 model (the one with round vent holes on the turret sides and stiffeners on the sides), which was strictly in use as number one turret by the very late 1930s. As I as expressed in my original Ayanami review over a decade ago, major kudos should be extended to FineMolds for producing such a high degree of accuracy. They could easily have opted to provide one type of turret with almost no one the wiser. This is a prime example of the attention to detail exhibited throughout the kit. |
||||||
|
||||||
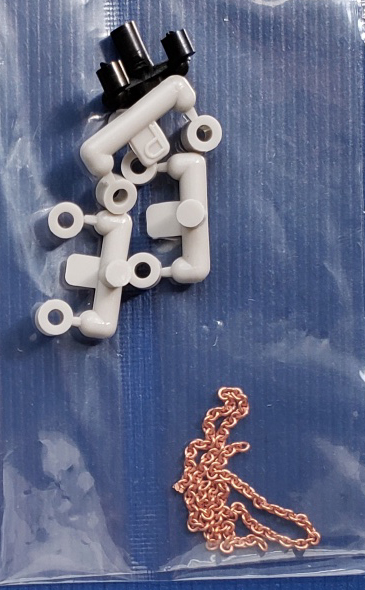
| MISCELLANEOUS PARTS | ||||||
| Copper linked anchor chain for the bow anchors, hidden caps for the turrets and torpedo tube mounts | ||||||
|
|
||||||
| DECALS | ||||||
|
The kit has a small sheet containing several sets of Plimsoll lines for indicating the ship’s draft, ship’s names for the cutters and launches, and a ship identifier symbol (white triangles) used during 1943 and 1944. These are cleanly printed, with no registration issues. |
||||||
 |
||||||
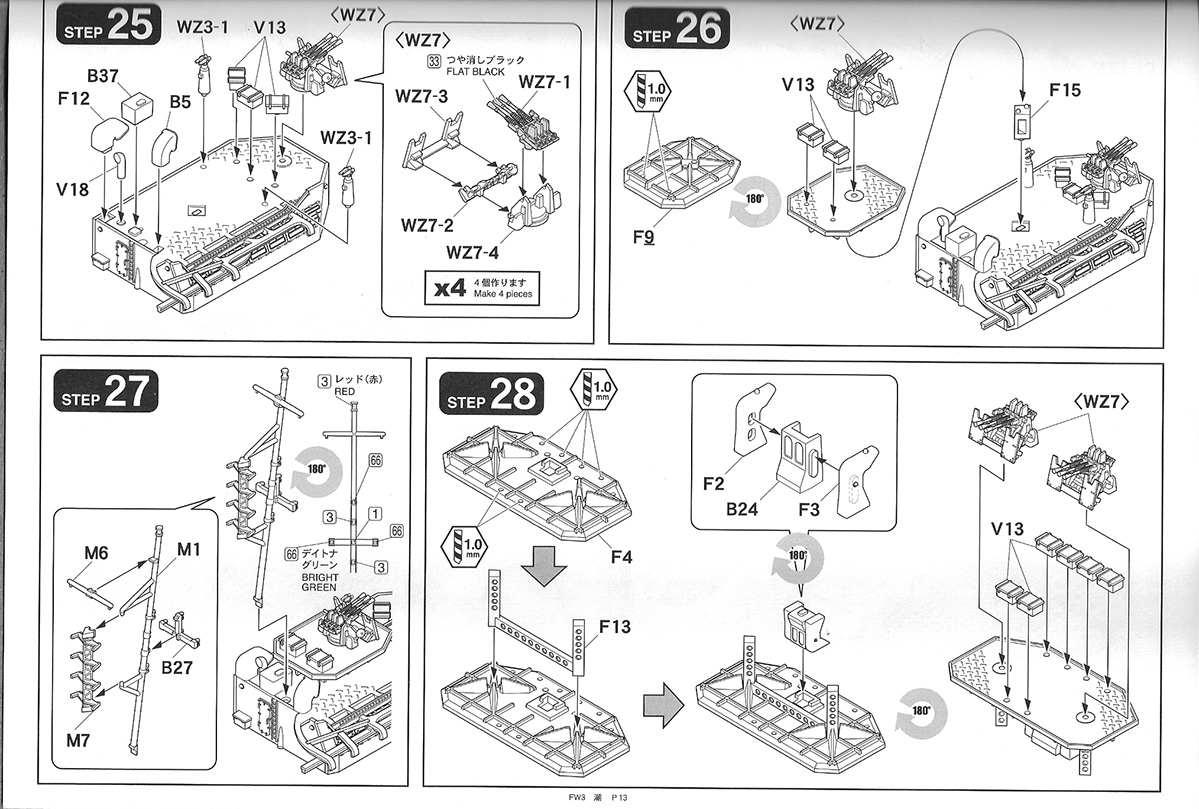
| INSTRUCTIONS | ||||||
|
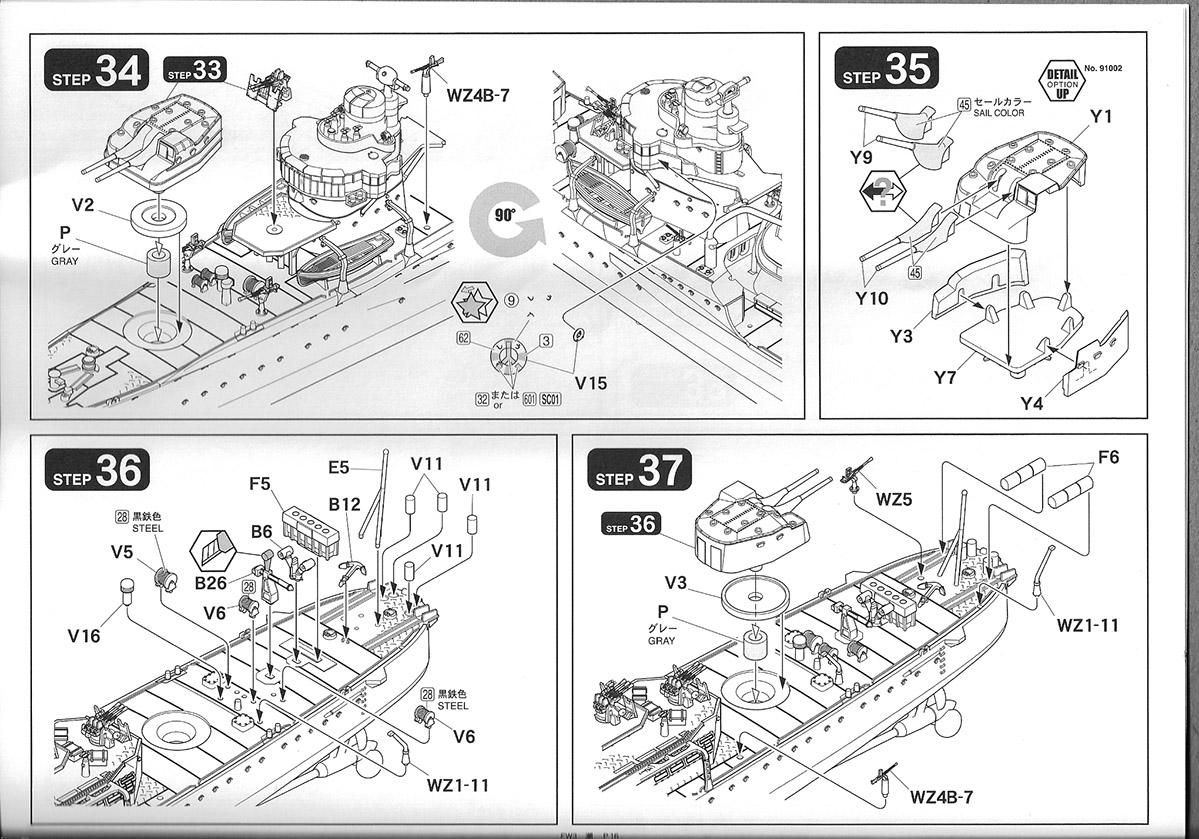
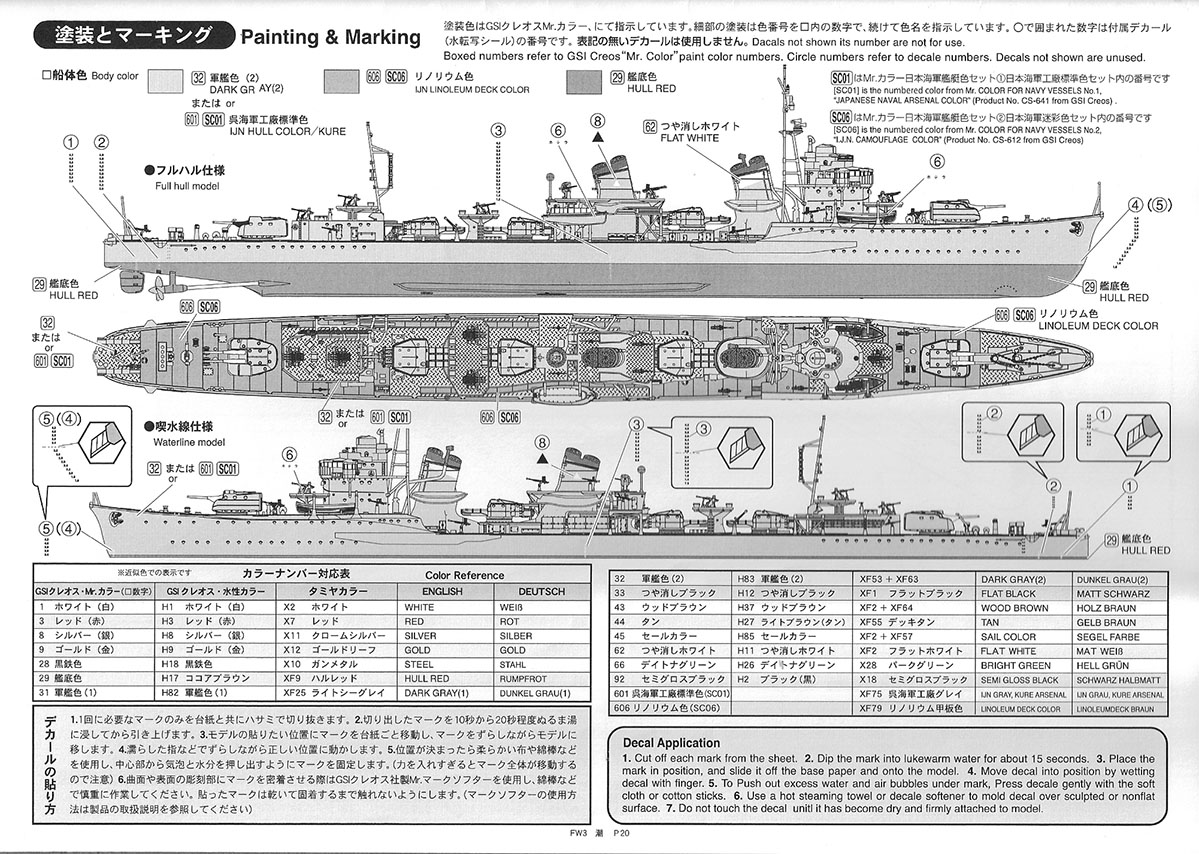
The 20-page instruction booklet is printed in black and
white and is clearly illustrated, though mostly in Japanese. Sub-assemblies are
shown in great detail using exploded, three-point perspectives, and the
construction process appears straightforward. The painting guide is keyed to the
GSI Creos “Mr. Color” and Tamiya paint lines. Interestingly, there is a small box on the second to last page that has a sprue replacement listing, with costs, for all the sprues. One errata page is included as well. |
||||||
|
||||||
| FINAL THOUGHTS | ||||||
|
This kit rounds out the available wartime fits for Fine
Molds 1/350 Fubuki Type II offerings. Now, one can have an early war version (Ayanami),
a mid-war (Amagiri) or a late war (Ushio), not to mention a pre-war version (Shikinami).
While technically just a rebox of a kit with some new sprues, it’s a very
welcome addition for fans of this class, the IJN or 1/350 destroyers in general.
The real wonder is why any new variant took more than a decade to be released, particularly given the prominence and history of the Fubuki types. Still, one mustn’t look a gift horse in the mouth. I for one, I have always hankered for a late war variant of this group. The fit of the earlier kits has been reported as excellent and I would expect the same for this kit. Extensive research and engineering have been extended the new parts in the same manner as the originals; errors are non-existent, while detail and quality are at an extremely high level. Highly Recommended This kit comes courtesy of my wallet. I don’t see this kit currently offered for sale by US distributors, but the cost at Hobbylink Japan is approximately US$60.00, plus shipping. Offers on eBay are considerably higher. |
|
|||||


.jpg)

.jpg)