No. 16, Item # 460376
by By Dan Kaplan
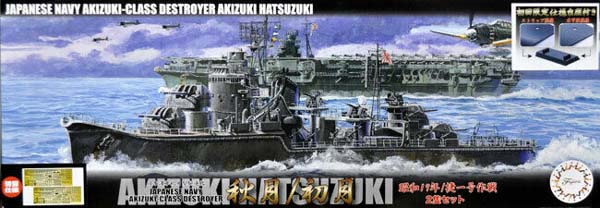
| Fujimi NEXT 1/700 Akizuki Class Destroyers,
Akizuki/Hatsuzuki
No. 16, Item # 460376
by By Dan Kaplan |
| Background | |||||||||||||||||||
| By the mid-1930s, it was recognized in naval circles that
the rapid advance of military aircraft design would soon require improved
weaponry and some specialized ships to defend against them. The Japanese
took note of early plans to develop such a ship type by other navies, notably
the Royal Navys Dido class cruiser and the United States Navys Atlanta
class cruiser. The Japanese had their own plans to modify some existing
light cruisers of the Tenryu and the 5500ton class light cruisers, but
the obsolescence of these ships, coupled with budgetary restraints and
their navys emphasis on offensive-minded torpedo squadrons, rendered such
plans moot.
At the same time, design work had begun in 1935 on a successor to the 12.7cm 40cal HA (high angle) AA gun. Eventually known as the Type 98 10cm 65cal gun, it would be recognized as perhaps the Japanese Navys best secondary weapon design of the war. Adopted in 1939, it was a true dual-purpose gun, and highly regarded by the IJN. By 1938, the foreseeable need for such a vessel had become pressing. Six vessels incorporating the new gun and a new, sizable hull were authorized under the Maru 4 building plan of 1939 as the Akizuki class destroyer. A further ten ships were authorized under the 1941 Additional Naval Armaments Supplemental programs. All six vessels of the first program and six vessels under the second program were completed. The remaining four vessels were cancelled, as were another sixteen vessels that were authorized but never laid down. Construction of the first four ships began prior to the start of the war, but all twelve vessels were completed during wartime. Later construction featured some changes to fit and AA armament. The last four ships were completed too late to see any meaningful action. |
|||||||||||||||||||
| Design | |||||||||||||||||||
| Designated the B type destroyer, the Akizukis utilized
a longer (by 50 feet) and slightly wider hull displacing approximately
40% more than the concurrent A type destroyers (Asashio, Kagero and Yugumo
classes). The powerplant and machinery remained the same as with the Type
A destroyers: two propellers driven by two Kampon geared steam turbines
fed by three boilers and producing 52,000shp. A slight change in the reduction
gearing allowed for a slightly lower RPM. Top speed was 33 knots and the
maximum range was 8000 nautical miles at 18 knots.
These new ships had a long forecastle and a larger bridge than previous destroyers. Though nominally three stories in height, the bridge was built two meters higher than the earlier types to provide better visibility over the superimposed B turret. It also incorporated the helm station on the compass bridge deck level, as opposed to the more common IJN practice of being located one deck lower. The bridge was topped by an open, air defense position and a modern Type 94 High Angle director for the forward main batteries. Another Type 94 HA director was to be emplaced on the aft deckhouse for the rear main batteries. Eight of the Type 98 10cm/65cal guns were carried in twin mountings in four large, fully enclosed turrets, two forward and two aft, with B and C turrets superimposed over A and D turrets. The Japanese Naval General Staff insisted on a torpedo battery to provide for an offensive capability, so one shielded mount of four tubes carrying four 61cm Type 93 (Long Lance) torpedoes was situated amidships, along with one set of four reloads. Defensively, two twin 25mm AA mounts equipped the initial ships, but changes to the AA fit came quickly. Triple mounts replacing the twins, and additional triple mounts were emplaced in port and starboard pairs opposite the bridge, funnel, and aft deck house. Production lags for the Type 94 HA directors led to its deletion from the rear position and replacement by yet another triple 25mm AA mount. By late in the war, numerous single 25mm AA mounts were added as well. For ASW work, two athwartship depth charge racks and two Y throwers were installed aft of D turret. Six individual roll-off racks ringed the stern, three per side. As the war advanced, the single racks were replaced by the more typical, multi-charge roll off racks and a greater number of depth charges carried. The first seven vessels laid down followed the original design and are known as the Akizuki group. Fuyuzuki became the lead ship of a slightly modified second group of four sisters. Originally identical to the first batch, this subgroup featured some simplifications of the design to aid and speed wartime production. Most prominent of these new features was a simplified bow form below the waterline and a re-arrangement of the main engine room air intakes around the funnel with simplified ducts. There were also changes to the layout of torpedo trolley rails on the main deck, repositioned placements and bandstands for the triple 25mm AA mounts, and the elimination of the aft Type 94 HA main gun director. As mentioned, this director was replaced by another triple 25mm AA mount and bandstand. Some changes to the upper foremast to better accommodate new radars was also enacted. The rear of the bridge superstructure was also enlarged, to better accommodate a radar compartment. The design of the last vessel was further simplified, and was considered part of a third batch known as the Michitsuki group. Of these, only Hanazuki was completed. Michitsukis construction was halted when 16% complete and she was broken up after the war. The rest of the group was cancelled. Background and design are drawn directly from the July 2020 review of the Wave 1/350 Fuyuzuki, Akizuki class destroyer |
|||||||||||||||||||
| Ship history - This boxing has labeled the two destroyers as Akizuki and Hatsuzuki | |||||||||||||||||||
| Akizuki (Autumn Moon)
The lead ship of her class, Akizuki had a very full career. She was laid down on July, 1940 at the Maizuru Naval Yard, launched a year later in July, 1941, and commissioned on June 11, 1942. She was not assigned to a specific destroyer division at this point, but was immediately detailed to escort the fleet carrier Zuikaku to the Aleutians a few days later as part of the Japanese reinforcement for the Aleutian attack. Upon her return, she embarked on two convoy missions and was then directed to Rabaul, where she joined the Guadalcanal campaign in late August. Akizuki was attached as an escort to the First Carrier Division (Shokaku, Zuikaku) and participated as such in the Battle of the Eastern Solomons. Afterwards, Akizuki remained officially attached to CarDiv 1 while also running patrols out of Truk and acting as escort for various transport and supply missions in and around the Solomon Islands. At Empress Augusta Bay in late September, she was bombed by B-17s and managed to shoot one down. She was also photographed by another aircraft, revealing the new class of destroyer to the Allies. At the beginning of October, she was assigned to DesDiv 61 in company with her newly commissioned sister ship Teruzuki. Her escort missions to Guadalcanal and surrounding islands continued through mid-October, mostly as an escort for the seaplane carrier Nisshin conducting resupply of heavy arms and men. She also successfully escorted Nisshin and her resupply convoy to Guadalcanal during the Battle for Cape Esperance. Subsequent resupply missions through late October were hard fought and met with mixed success in terms of successful landings and losses. On October 25th, she was part of a gunfire support mission as part of the effort to retake Henderson Field on Guadalcanal. Aircraft from Henderson Field on Guadalcanal attacked the escort group in three waves over several hours. Light cruiser Yura was sunk and Akizuki was damaged by one small hit and two near misses. Her damage was functionally repaired at Rabaul and she returned to Japan via Truk in company of other units of CarDiv 1. She was fully repaired at Yokosuka Naval Base; that being completed by the end of December, 1942. While in dock, an additional triple 25mm AA on a raised bandstand was emplaced to each side of the funnel. Akizuki headed back to Guadalcanal where she resumed a role as escort for more re-supply missions. These new missions were more typically composed of other destroyers and referred to as Rat Runs by the Japanese and the Tokyo Express by the Americans. While responding to a distress call from a cargo ship on January 19th, Akizuki was hit by two torpedoes from USS Nautilus near the Shortland Islands. One did not explode, but the other blew open the hull under the bridge on the starboard side. The flooding was extensive, knocking out #1 boiler and the starboard engine room. The hit also severely strained the keel under the impact point. 14 men were killed and 63 injured. Gingerly, she made it back to the Shortlands for temporary repairs to shore up the keel. She eventually reached Truk and the repair ship Akashi. Akashi managed to make her serviceable for the trip back to Japan via Saipan. She departed Saipan on March 14th, but 40 miles outside the harbor, the bow sagged severely. Fearful of the bow completely breaking off, Akizuki stopped her engines and was towed back to Saipan, where she was temporarily beached. The salvage ship Matsunouri Maru effected a more radical repair. The bridge and forward two turrets were removed to lighten the ship. These were transported separately back to Japan. The weakened bow was then severed and replaced by a temporary bow. A temporary bridge was erected aft the main mast and Akizuki was towed back to Japan in this condition by the auxiliary minelayer Shinko Maru, arriving in very early July, 1943. She entered drydock at Mitsubishis Nagasaki Shipyard and remained there until late October, 1943. This Mitsubishi facility was responsible for the construction of five of the initial seven Akizuki class ships, and it was here that the decision was made to transplant the bow of the recently launched but still incomplete sister ship Shimozuki to expedite Akizukis repair. (This course of action is indicative of how highly regarded these ships were. Surprisingly, the severing and rebuilding of Shimozukis bow does not seem to have delayed her overall construction time. Shimozuki was completed in March, 1944, well within the wartime norm of 21+ months total construction time.) While under repair, Akizuki gained additional 25mm and 13mm AA guns, a Type 21 radar upon the foremast, a Type 93 hydrophone for ASW work, and new roll-off depth charge racks at her stern. Akizuki rejoined DesDiv 61 at the end of the month, but spent most of November and December engaged in training and fleet escort missions to Truk, Kwajalein and Kavieng. At Kavieng in early January, she was subject to an Allied air raid that damaged Noshiro, Oyodo and Yamagumo. She returned to Truk and participated in its evacuation in early February, ahead of the Hailstone Operation. She then relocated to the Singapore -Lingga Roads locale where she rejoined the other units of DesDiv 61 and the first Mobile Fleet. There, she and the division began an intensive period of training as AA escorts for the carriers of the fleet. These sessions were interspersed with stints of ASW work and convoy duty. In mid-May, the fleet relocated to Tawi Tawi, where these routines continued. Toward the end of June, the First Mobil Fleet sortied for battle, to oppose the American landings in the Marianas Islands. Akizuki was part of the screen for Force A and the three fleet carriers of CarDiv1. Akizuki fought hard along with the other escorts but, the battle went very badly for the Japanese and Force A lost the carriers Taiho and Shokaku. Another Carrier from Force B: was lost as well. Akizuki escorted the surviving units, including carrier Zuikaku, back to the mainland. Maintenance and training in Japanese home waters occupied the next three months. In early October, Akizuki underwent a refit, then rejoined DesDiv 61 as they escorted the remaining carriers of the Japanese fleet into battle off the Philippines in late October. At the Battle of Cape Engano, Akizuki was screening carriers Zuikaku and Zuiho from aerial attack. Unfortunately, a direct hit amidships (whether by bomb or torpedo is still uncertain) set her afire. Shortly thereafter, she suffered a massive explosion in the vicinity of her torpedo tubes. She jackknifed, with the two hull halves rotating in opposite directions, and sank. Destroyer Maki came alongside to rescue survivors despite taking a bomb hit herself. Crew losses totaled 183 officers and men. |
|||||||||||||||||||
| Hatsuzuki (New Moon (in Autumn)
Laid down on July 25, 1941 at Maizuru, she was commissioned on December 29, 1942 and assigned to DesDIv61 (Akizuki, Suzutsuki, Hatsuzuki) in January 1943. For the next year and a half, she was busily engaged as a primary escort for both important individual ship and fleet movements as well as some troop transport and convoy assignments. In early 1944, DesDiv 61 (now composed of Akizuki, Wakatsuki, Shimozuki, & Hatsuzuki) was detailed as a key escort component of Vice Admiral Ozawas A Force, centered around the fleet carriers Taiho, Shokaku and Zuikaku. A Force and the rest of the entire Mobile Fleet relocated to Singapore, then the Lingga Roads anchorage south of Singapore. Finally, in mid-May, the fleet relocated again 800 miles ENE to Tawi Tawi off Brunei, to be closer to usable oil reserves and to conduct training in anticipation of meeting American forces in battle. A month later, American amphibious forces invaded the Marianas Island, prompting a vigorous Japanese response, known as Operation A-Go. The battle went very badly for Japan, with the Japanese losing hundreds of aircraft and pilots, as well as three fleet carriers. Hatsuzuki spent a good deal of time assisting the torpedoed Taiho and rescuing survivors. She then returned to Japan where the Japanese fleet regrouped and trained. In October, DesDiv 61 returned to battle at Leyte Gulf, specifically
to the action off Cape Engano, where Hatsuzuki and DesDiv61 were escorting
the remnants of Japans carrier fleet. Carriers Zuikaku, Zuiho and Chitose
were sunk, along with sister Akizuki. Hatsuzuki was acting as a guard ship
for Wakatsuki and another destroyer, Kuwa, as they rescued survivors from
Zuikaku and Zuiho. A group of four US cruisers and nine destroyers
purposely sent to engage remaining Japanese naval units, engaged her after
sinking a fourth carrier, Chitose. After a spirited and skillful two-hour
defense that allowed Wakatsuki and Kuwa to escape with their survivors,
Hatsuzuki was sunk with a loss of most hands, save eight crewmembers and
17 Zuikaku survivors.
|
|||||||||||||||||||
| The Kit | |||||||||||||||||||
| This kit is the fifth tooling of this class in 1/700 scale. Each has
brought forth enhancements over what had been issued before.
The original Akizuki class kits came from Fujimi as part of the original Waterline Consortium range introduced in the early 1970s. Those kits were typical of the original waterline kits in that they were relatively simplistic in appearance, with a mix of positive and negative features. Those Akizukis had a good, basic hull shape, and, surprisingly, a properly shaped bow. The bridge and deckhouses were approximate in size and shape. The kits were woefully short on details no portholes, degaussing cable, or detailing on the superstructures, with minimal deck features and simplistic weapons and. The sterns were incorrect, with no inclined slope down to the waterline. Worst of all, their foremast arrangements were bizarre, with legs and supports that were erroneously and oddly placed. One did not have to be an expert to sense something was a bit off. The set-up was, and is, inexplicable. Fujimi re-released the kit in 2006 with a small PE fret that contained a corrected mast, but this release was short lived. Aoshima issued the next iteration of this class in the mid-1990s, ultimately releasing six versions representing early and late groups in both early and late war fits. Like their Kagero kits of the same vintage, Aoshima adhered closely to scale, rendering many fine details that were wonderful to see molded on, but often obscured by paint or just plain hard to see. The hull was more graceful then the Fujimi version in appearance, but the waterline was approximately 1mm short, resulting in a more clipper-like bow that isnt truly representative of the ship, particularly at the prow. The stern was also lacking the slope down to the waterline. Nor were any portholes provided for except on the bridge, though more deck and superstructure details were provided for. The turrets were better shaped, and the fire control and masts structures wonderfully rendered. The kits also benefitted from the inclusion of a new Waterline Consortium sprue of ordinance and equipment for smaller vessels. These kits remain in the Aoshima line-up. Third generation kits were issued by Pit-Road also in the mid-1990s. For the most part, these kits provided the much-desired level of detail of the typical Pit-Road kits of that period. Shapes were generally good, as was the detail, though some small parts were a little overscale. The turrets were very nicely shaped and detailed, the hulls had semi-recessed portholes, and a slight inclined slope at the rear, while the bridge and aft deckhouse were crisply formed. Releases included mid and late war variants, some with a small PE fret and others a full hull. The kits are still sold today. Fujimi saw fit to release its own, updated version of the class in 2010. These new kits benefitted from new (or better) research and slide molding technology to yield a greatly improved kit over their previous effort. This new kit boxed two sets of hulls and parts for two complete, waterline vessels. Both were in an early war configuration and labeled Akizuki and Terutzuki 1942. Detailing is excellent, with portholes, degaussing cables, well done turrets and superstructures; all with a host of details and small parts that are nicely scaled. Plus, the masts are properly done. Quibbles are few. The styrene seems a little on the soft side, and the hull bows slightly. Most bothersome (to me, anyway) is the shape and size of the wind deflector vane assembly that sits atop the bridge and fronts the AA command position. Its clearly oversized and misshapen, giving the top of the bridge an odd appearance. Otherwise, its a pretty good kit. Fujimi has released several variations: some with a full set of photoetch and others with a full hull. |
|||||||||||||||||||
| The Review Kit | |||||||||||||||||||
| Released in early 2019, this offering is Fujimis sixteenth release
of a NEXT line kit in 1/700 scale. As I have pointed out in earlier reviews,
the NEXT kits are kits that are either newly designed or have been re-engineered
from earlier kits, and are meant to dispense with glues where possible
(though not entirely) and paint, by offering pre-colored, snap-together
parts and stickered decals. Ever improving technology has enabled a high
level of detail and finish, so these type kits have proven to be very popular,
particularly among their target audiences of newer and non-traditional
modelers. Keep in mind that the snap-together parts require some
degree of robustness to avoid breaking or bending when emplaced. So, many
of the small parts and masts are typically thicker and more overscale than
their counterparts in a regular assembly kit.
This kit contains two Akizuki class destroyers of the initial subgroup in their late war fit of June, 1944, as they would have appeared at the Battle of the Philippine Sea. Four of the initial batch ships were present at that battle (Akizuki, Hatsuzuki, Wakatsuki, and Shimozuki, constituting DesDiv 61), while two other sisters had been sunk earlier in the war (Teruzuki, Niizuki), and the last (Suzutsuki) was still under repair from severe torpedo damage incurred early in 1944. Differentiation between those four DesDiv 61 sisters was minor, mostly pertaining to the number and placement of additional 25mm single AA guns, so any of those four can be built from this kit. Additionally, the instructions and markings provided for in the kit indicate that a very late war fit subgroup 2 sister (Fuyuzuki) can be built from this kit. However, this particular kit does not reflect the simplified construction and minor changes of the latter batch of sister ships, so labeling one of these ships as Fuyuzuki would not be entirely accurate. No matter, though, if one is not a rivet counter. There are two full sets of sprues, some nineteen per ship, plus hulls and bases. This works out to approximate 230 pieces per vessel, though not all the pieces are used. The styrene is a medium to dark grey with a matt finish and of a harder consistency than, say, the styrene of the previous Fujimi Akizuki class kits released in 2010. There was neither flash nor sinkholes on the parts of the review kit. As a general rule, the sharpness and scale of the detailing is excellent. This is particularly true of things like metal deck treading, hatches with hinges, grab rails, auxiliary piping and a host of other molded on small bits. Some spot comparisons with Fujimis regular assembly Akizuki class kits really brought this home. (There are some wonderful comparison photos with the regular Fujimi 2010 Akizuki kit available on page 6 of the CASF thread for the Akizuki class, taken by Caledonia. See: http://www.shipmodels.info/mws_forum/viewtopic.php?f=49&t=7495&start=100
)
|
|||||||||||||||||||
| Sprue A Hull x 2 | |||||||||||||||||||
| Two hulls are provided for in the kit. Each hull is a one-piece
waterline hull, plus a separate piece for the underwater portion of the
hull. There is no waterline plate, nor a weight for the hull. These hulls
do have crisp, raised lines denoting hull plating, unlike earlier NEXT
destroyer kits which had none. The bow profile is excellent, and
the stern has the proper amount of inclined slope down to the water.
Both units are early batch hulls in late war configuration, very cleanly molded in gray with extremely sharp and properly scaled details including portholes and sealed porthole covers, porthole eyebrows where applicable, properly shaped anchor recesses with an anchor molded into the recess, a degaussing cable with brackets, spurnwaters (with runoff outlets) all around the perimeter edge of the decks, bollards, the bullnose, and solid propeller guards. Unfortunately, neither of the waterline hulls in my review kit lies completely flat. They bow up at both ends. Strangely, a test fit with the underwater portion of the hull overcorrects the bowing, so that the ends curve down slightly. The fit itself is seamless. Attempting to build the kit as a waterline only display will require corrections, most likely through re-heating the hull. The top of the hull has been engineered to accept the separate forecastle
and aftmost portion of the decks as well as the molded, linoleum covered
deck sections. Numerous mounting holes for smaller snap-in pieces and assemblies
are everywhere. The main deck amidships is included where the deck
is metal plated with treading, along with some equipment and the torpedo
trolley rails. There are no
Interestingly, the two hulls are two noticeably different shades of gray. It wasnt obvious at first glance, but quite clear when the hulls were placed next to each other. I imagine it was due to different batches of styrene, as there is no clear differentiation in the record regarding yard visits. Still, it does make for a nice contrast for two out-of-the-box builds. The hull scales out wonderfully. The class particulars versus the scale
and this kit:
|
|||||||||||||||||||
| Sprue Z Lower Hulls x 2 | |||||||||||||||||||
| These are single piece lower hulls, molded in IJN hull red. A sonar array, bilge keels and water intakes are molded as part of the hull. Additional raised lines denote more hull plating. Separate locator holes are present for the rudder, propeller brackets, and propeller shafts. Each lower hull has locator pins and an inner lip on the hull joint to allow proper alignment with the upper hull. A test fit snapped together firmly and showed no obvious gaps between the upper and lower hulls. | |||||||||||||||||||
|
|
|||||||||||||||||||
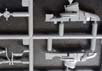
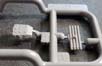
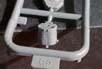
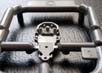
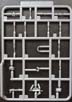
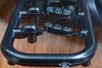
| Sprue B x 2 | |||||||||||||||||||
| This is a large sprue with both halves of the funnel/RDF compartment, the 25mm AA platform that sits atop the RDF compartment, the base structure upon which sits the superimposed B turret, ancillary piping for the funnel, all the components of the foremast, including a Type 21 radar, two component levels at the rear of the bridge that include the rear tripod legs support the main gun director atop the bridge, and a Type 94 HA gun director | 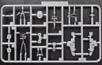 |
||||||||||||||||||
|
|||||||||||||||||||
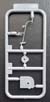
| Sprue C x 2 | |||||||||||||||||||
| This carries the breakwater on the forecastle, the torpedo reloading
girder, an auxiliary air intake pipe, the pillar supports for 25mm AA bandstand
thats situated over the RDF compartment, the RDF antenna, the base of
the rear Type 94 director that is used to support another AA bandstand,
the searchlight and supporting compartment components, several angular
air intakes, the mainmast with Type 13 radar affixed, and the two jack
staffs
Most of these parts are straightforward. The mast and torpedo reload girder are on the bulky side as befits snap-fit type pieces. This is particularly true of the mast, which is a solid piece with the openings recessed partially into the plastic. The nature of the kit dictated this solid form, but the delicacy of the mast is understandably lost. |
 |
||||||||||||||||||
| Sprue D x2 | |||||||||||||||||||
| This one holds a 9m cutter, a 9m motor launch, 2 cutter
davits, 2 motor launch davits, 2 depth charge handling davits, a torpedo
davit, a searchlight controller, one of the two athwartship depth charge
racks, and two sets of the paired 10cm guns.
Considering that the pieces are snap-fit in nature, the davits and controller are surprisingly slim and well scaled. The depth charge racks may be solid, but they do show a lot of detail with deep recesses. The only disappointment is the 10cm barrels. Their appearance is more in line with whats expected from a snap-fit part; theyre on the thick side, so they appear squat and too close together. To their credit, the barrels do have open muzzles. |
 |
||||||||||||||||||
| Sprue E x 2 | |||||||||||||||||||
| This sprue holds only two items, the steel plated and treaded portion
of the forecastle deck (together with the steel base for turret number
one), and the aftmost portion of the main deck, which is also treaded and
sports two roll-off depth charge racks.
Both pieces are sharp with scaled treads, hatches, capstan forward, small vents and molded on anchor chains and depth charge racks. As a rule, molded-on anchor chains dont present quite as well as separate aftermarket metal versions, but these are scaled extremely well, with good recesses. For these size chains, replacement may not be a necessity. The depth charge racks have nice recesses as well, but still, nothing beats a photoetch version for realism. |
|||||||||||||||||||
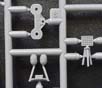
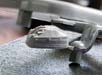
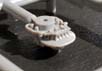
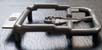
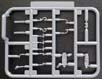
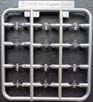
| Sprue F x 8 | |||||||||||||||||||
| This is a two-piece sprue, consisting of the main, Model A turrets for the 10cm/65 Type 98 guns and its base. Each ship receives four turrets, two forward and two aft. These turrets are beautifully molded and the shape is excellent, with proper detailing of ventilation covers on the turret sides as well as the top. Hatches and access points are also detailed. The turrets do have the requisite horizontal stiffening bands and grab rails molded on. These are probably the best rendition of this type turret in 1/700 yet seen. | 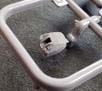 |
||||||||||||||||||
|
|||||||||||||||||||
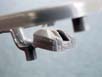
| Sprue G x 2 | |||||||||||||||||||
| A simple sprue of two pieces of clear plastic that are the compass bridge deck windows. The window frames are molded on. | 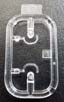 |
||||||||||||||||||
| Sprue H | |||||||||||||||||||
| This one is dedicated solely to Akizuki and has only three pieces, the auxiliary galley piping that runs from the end of the forecastle deck to the top of the funnel, the bandstand that sits atop what was the base of the rear Type 94 HA director, and an insert for the main deck that contains the portion of the torpedo trolley tracks that was unique to the Group 1 ships. All three pieces are sharply done, and scaled properly. The galley pipe is surprisingly delicate and a very marked contrast to the masts. It could easily be used on the regular Fujimi Akizuki kit. | |||||||||||||||||||
| Sprue J | |||||||||||||||||||
| These are the funnel tops and grills, molded in black styrene. This one sprue holds both funnels, one per ship. They are actually molded in the shape of the black band that was painted to follow the rake of the funnel top, as opposed to following the wedge shape of entire funnel top. The grills are nicely done, though solid. While I prefer an actual photoetch grill, this is a nice piece that eliminates what can be a challenging painting step, given the prominent lip that surround the funnel top. | 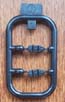 |
||||||||||||||||||
 |
|||||||||||||||||||
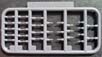
| Sprue K x 2 | |||||||||||||||||||
| Consisting of just two pieces, these are the linoleum covered portions of the forecastle and main decks. Each slips nicely into its appropriate place on the upper hull. There are fine, raised lines to depict the linoleum tie-down strips, some hatches, a couple of very small, molded-on hawser reels, and a set of torpedo trolley rails on the aft sections. | 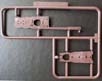 |
||||||||||||||||||
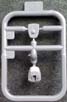
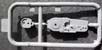
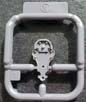
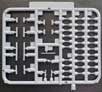
| Sprue L x 2 | |||||||||||||||||||
| Another two-piece sprue, this one holds the quad Type 92 torpedo mount. This sprue is carried over from both the NEXT Kagero and Yugumo class kits as it holds the quad Type 92 torpedo mount (with Type 93 Long Lance torpedoes) and the shield for the mount. The torpedoes are molded as part of each tube, with the warheads just slightly exposed. Its particularly well done, with great detailing. | 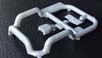 |
||||||||||||||||||
|
|||||||||||||||||||
| Sprue M x 2 | |||||||||||||||||||
| This is a small sprue composed of splinter shielding for combinations of two and three single 25mm AA guns mounted along the edges of the deck. There is some support ribbing. | |||||||||||||||||||
| Sprue N | |||||||||||||||||||
| These are the triple bladed propellers, molded in bronze colored plastic. The props are molded correctly, to depict turning in opposite directions. It holds two sets of propellers, two per destroyer. | |||||||||||||||||||
| Sprue Q x2 | |||||||||||||||||||
| Three types of mushroom vents for the main decks are placed here, along
with two versions of 25mm ammo boxes. Given the nature of snap-fit pieces,
the mushroom vents are surprisingly close to scale, and a nice detail to
add in a kit of this type.
Only one of the two types of ammo boxes here are used, as only the part Q1 version is actually a snap-fit type part. According to the instruction, its only used to depict a late 1944 or 1945 fit version, as the ships boats were supposedly removed and replaced by extra single 25mm AA mounts. The additional mounts required additional ammo boxes. (I would question whether this late war depiction is in fact so for Wakatsuki, Shimozuki, & Hatsuzuki. Photos of Wakatsuki attacked and sunk at Ormoc Bay on November 11, 1944 clearly show her boats in place. The very late war AA fit would be far truer of some of the Group 2 ships in 1945, as well as Suzutsuki, but this kit is not accurate for any Group 2 ship, nor Shimozuki with her simplified bridge and bow.) |
 |
||||||||||||||||||
| Sprue R x 2 | |||||||||||||||||||
| Molded in hull red, these are the propeller shafts, shaft support brackets and rudder. These pieces appear surprisingly delicate for NEXT pieces. They wouldnt appear out of place on a regular, full hull kit. | |||||||||||||||||||
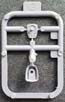
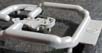
| Sprue S x 2 | |||||||||||||||||||
| Here, there are two runners, with one holding the compass bridge deck roof with AA command position, and the other holding the lower bridge structure and the aft deck house. The compass bridge deck roof is very well done, with the wind deflection vanes and their recesses sharply formed. This particular detail is properly scaled, unlike the previous Fujimi kit version, and far superior to whats been molded previously. | 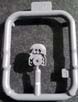 |
||||||||||||||||||
The lower bridge structure is equally sharp in its execution,
with portholes, a starboard side full access hatch, awning anchor railing
and small fittings. It also has an extension at the rear representing the
compartment that was added for the radar operators.
|
|||||||||||||||||||
| Sprue T x 2 | |||||||||||||||||||
| This sprue is carried over from the Kagero and Yugumo NEXT kits. Its
strictly devoted to the 25mm AA guns. Molded in a shiny gunmetal gray,
it contains one twin and eleven triple 25mm AA mounts. Both ships were
sporting only triple 25mmAA at this point in the war, so none of the twin
25mm AA mounts are utilized for these 1944 builds.
The guns are okay. Better versions are available from Finemolds, Pit-Roads NanoDread series, and some 3D printers like Shelf Oddity. |
 |
||||||||||||||||||
| Sprue U and Sprue V | |||||||||||||||||||
| This piece is the compass bridge deck itself. Much of the detail is internal theres a molded-on grating surrounding whats supposed to be a compass binnacle, as well as posts representing pedestals for various 12cm binoculars. The two pieces are differentiated only by the shapes of the overhangs and the respective bulwarks that extend to either side of the bridge. This differentiation is very subtle. U is designated for Akizuki and V is meant for Hatsuzuki. | 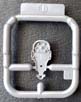 |
||||||||||||||||||
|
|||||||||||||||||||
| Sprue W x 2 | |||||||||||||||||||
| Also carried over from the Kagero (and Yugumo) NEXT kits, this one carries 25mm AA ammo boxes, splinter shields for the single 25mm AA mounts, a Type 93 Long Lance torpedo and a torpedo trolley. All the parts are nicely scaled. Oddly, the instructions do not indicate any placement or positioning of the ammo boxes for the triple 25mm mounts, even though they were installed on the actual vessels. The torpedo and trolley are a nice detail touch. The torpedo is properly sized. | 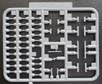 |
||||||||||||||||||
 |
|||||||||||||||||||
| Sprue X | |||||||||||||||||||
| As with the T and W sprues, these single 25mm AA are drawn from the Kagero/Yugumo NEXT kits. This particular sprue is molded in a shiny gunmetal gray styrene. These guns are applicable only to late war fit ships, to which this kits ships qualify. The shapes are pretty good, better than the double or triple mounts, though there are several better aftermarket versions available. | 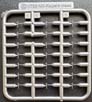 |
||||||||||||||||||
| Sprue Y | |||||||||||||||||||
| This sprue is nearly identical to Sprue H, and is dedicated solely
to Hatsuzuki. Just as with Sprue H for Akizuki, it contains
only three pieces: the auxiliary galley piping that runs from the end of
the forecastle deck to the top of the funnel, the bandstand that sits atop
what was the base of the rear Type 94 HA director, and an insert for the
main deck that contains the portion of the torpedo trolley tracks that
was unique to the Group 1 ships.
Y differs from H in that: a) the AA bandstand is shaped differently as an elongated octagon instead of a hexagon, and b) the trolley track insert has an additional, very short, spur for the tracks. As with the H sprue, all three pieces on Y are sharply done, and scaled properly. The galley pipe is surprisingly delicate and a very marked contrast to the masts. It could easily be used on the regular Fujimi Akizuki kit. |
 |
||||||||||||||||||
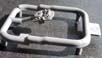
| Sprue Base x 2 | |||||||||||||||||||
| These are the pedestal bases, molded in black. Each ship gets an individual bases, with each of these topped by two small cradles. Each cradle had a slot for the ships keel. Simple and straightforward. | 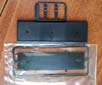 |
||||||||||||||||||
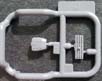
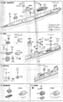
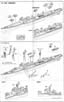
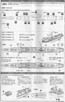
| Instructions | |||||||||||||||||||
| These consist of one large format sheet printed front and back, then folded several times into eight pages. Portions are printed in color, though the actual assembly steps are printed in black and white. Assembly is shown via the usual step-by-step progression of exploded, three-point perspective illustrations. Theres also an illustrated parts guide for each ship, with block outs denoting equipment not used in the respective fits. Some gluing is indicated for the linoleum decking. Im not sure why, as a test fit cleanly and securely snapped into place. | 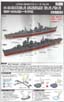 |
||||||||||||||||||
|
|||||||||||||||||||
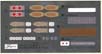
| Decals | |||||||||||||||||||
| Oddly, the kit does not come with a decal sheet, only two identical,
foil-based sticker sheets. The foil sheets are adhesive backed. Items provided
include white surrounds for the tips of the 10cm barrels, bases for the
25mm single AA mounts, wrap-around bronze-brown sleeves for the propeller
shafts, searchlight lenses, decking and canvas covers for the ships boats,
life rings, and surrender markings for Fuyuzuki.
I suppose that the presumption here is that the foil applications are easier to apply than decals. Im not sure thats actually true, particularly for the canvas covering the boats. Nor do I think that foil flags are an improvement over decal ones. However, it all looks very nice. |
 |
||||||||||||||||||
| Final Thoughts | |||||||||||||||||||
 Im impressed by this new kit. The nature of the NEXT line, with its snap-together type assembly and stouter, larger versions of smaller pieces, would seem a more likely source for a toy than a properly scaled destroyer in 1/700. And yet, Fujimi has managed to continually tweak its NEXT production process to give modelers ever better kits. The overall quality of fit of this NEXT type kit is unknown, though I will say that a test fit of the upper and lower hull halves produced a nice, tight seal with no visible seams. The same can be said of the main decks. Excepting the slight bow in the upper hull and some oversized pieces like boat davits and portions of the masts, the kit appears to be exceptionally representative of the Akizuki class in its shapes, details and scale. Waterliners like myself will bemoan the lack of a waterline plate, and aspects of the kit will benefit from certain aftermarket replacement parts, photoetch alternatives, and brass rod to replace the masts, but the kit is otherwise fundamentally sound. Aspects of the kit rate as best of the class in 1/700, while the kit as a whole is exceptionally good. Recommended. The official retail price approaches $45, though the kit is often discounted.
Currently, there seems to be limited availability in the US, so shipping
from overseas will add to the overall cost. Sample kit courtesy of Hobbylink
Japan.
|
|||||||||||||||||||
More
of By Dan Kaplan's work.
Updated 9/2/2020

© ModelWarships.com