Building the 1/700th
scale I.J.N. Battleship Yamato
By Tom Van Dermark
I find it ironic that the country who ended up building the largest Battleships that the world has ever seen also where instrumental in ensuring that the battleships' time as the capital ship of the world’s navies was over. With the attack on Pearl Harbor the Japanese Navy forced the U.S. Navy to go on the “offensive” with the only weapon available to them, the aircraft carrier, and these ships took the title of Queen of the Sea’s from that day on. As a indirect result of the Washington Naval treaty these ships where designed to offset the numerical advantage given to Britain and America, because it was felt that given ideological similarities between the two countries that war with both was inevitable. Japan felt that she could negate the numerical advantages with a class of ship that could withstand anything that was thrown against them. Unlike the U.S. battleships, whose sizes were restricted by Treaties and the lock dimesions of the Panama Canal, Japan placed no restrictions on length and beam. The result was a ship that had a length of 862 feet, a beam of 121 feet and a displacement of 69,900 tons fully loaded. Built in complete secrecy (in fact U.S. Naval intelligence didn’t find out all of her statistics until after the war) the armament she mounted was no less then 9-18.1 inch guns, the largest ever fitted to a warship. Destined never to play the role in which she was intended, the Yamato was finally sent on a Kamikaze mission in April of 1945 to defend the island of Okinawa. She was given only enough fuel to get to Okinawa where she was to engage the U.S. invasion fleet, and once her ammunition was gone, the crew was to beach the ship and help out the land based island defenders. She never made it. Attacked by U.S. Navy Carrier based aircraft, she was hit by at least 11 torpedoes (could be as many as 15) and at least 7 direct hits with bombs, and sank on April 7th 1945. Taking part in many naval battles ranging from the battle of Midway to the battle off Okinawa she mostly served as a Command ship. Her sister Musashi was completed on August 5th 1942 and sunk during the battle off the Philippine’s on October 24th, 1944. The last two ships of the class where ordered as battleships, but were converted to aircraft carriers to make up for the horrible losses at the Battle of Midway. The Shinano was launched in October of 1944 and was lost to the American submarine USS Archfisher while in transit preparing for her workups on November 29th 1944. Her loss was attributed to lack of proper watertight integrity and a poorly trained crew. The last ship of the class never was launched.
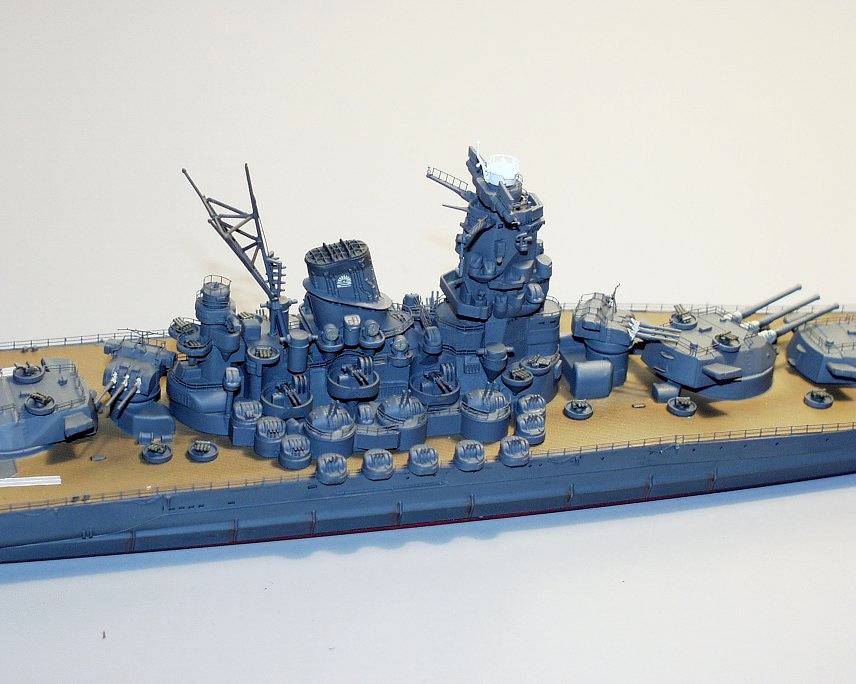
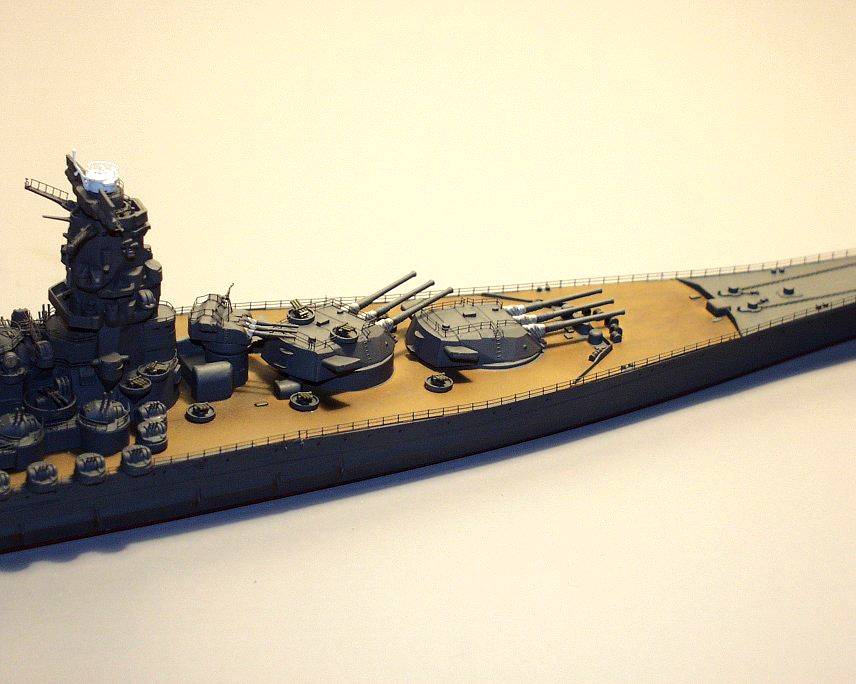
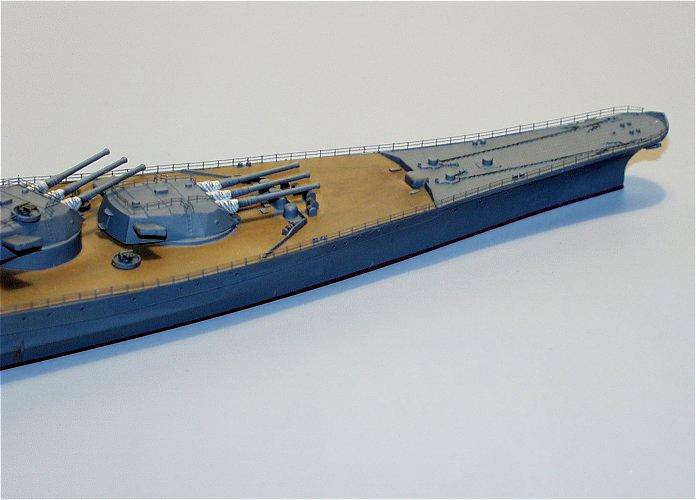
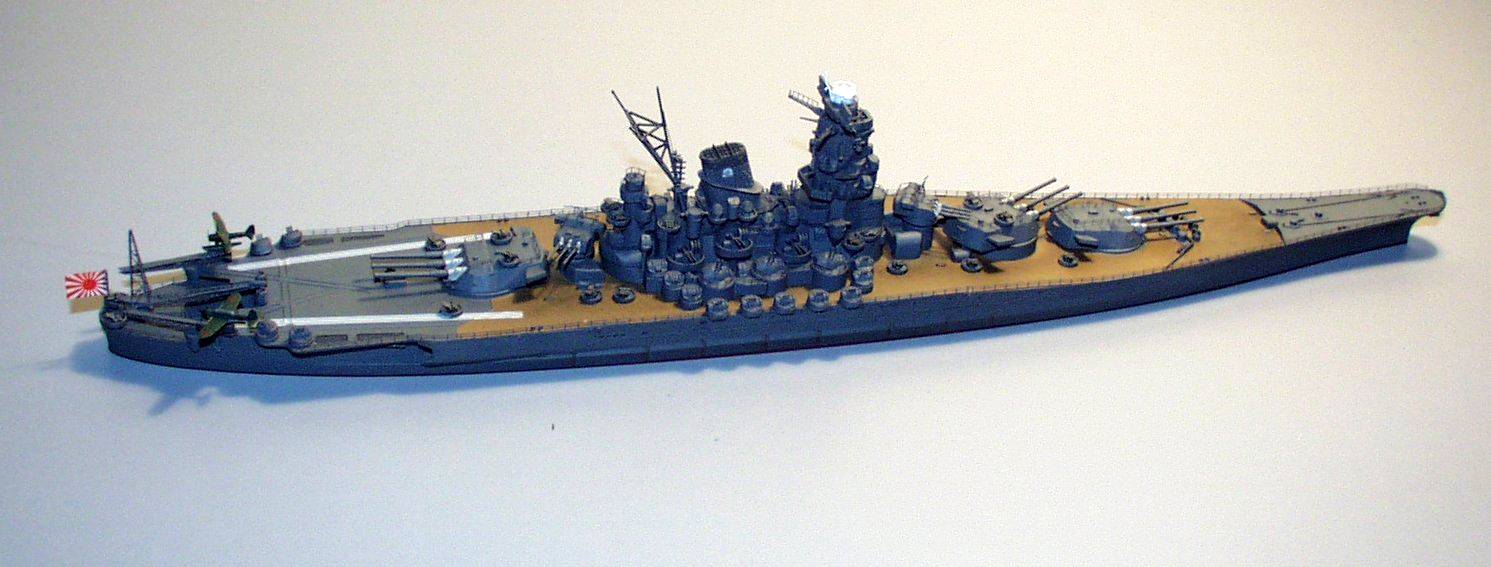
Re-released by Tamiya in 1998 this offering of the Yamato is truly impressive with little to no flash and with little to no clean up necessary for most parts. Construction started of course with the hull, and Tamiya really helps the modeler by putting the seam where the forward part of the main deck and the rest of the hull come together right at a breakwater, so there's no noticeable seam to destroy the deck scribing. When this assembly was dry, I started painting the decks by using Polly scale deck tan, then used Polly scale dirt thinned down considerably and applied in very light coats. Once this was dry I used a mix of black and brown pastel chalks to dirty up the deck, afterwards sealing it with Polly scale flat finish. This gave the deck a very dirty look to it and I have been told by one of the best modelers I know (Jeff or Bob? Editor's note) that this is how she appeared on her way to Okinawa. For the vertical surfaces, I used a mixture of two parts Tamiya neutral gray to one part German Gray as per the instructions. The waterline color hasbeen argued for some time, from hull red red to gray, even a dark green that polluted the harbor waters so badly that it's use was discontinued. In this case I just painted it Tamiya Hull red, and let the experts figure it out what color she actually was. As this was all drying I decided to go ahead and start the main turrets. In this case I am using Gold Medal Models and Eduard photo-etch sets for the Yamato. I really like Gold Medal sets but the Eduard set does offer some things G.M.M. set doesn’t. The turrets were started by drilling the holes in the gun barrels with a #75 drill, be very careful while doing this, as I snapped one of my guns in half, thankfully they provide you with 10 guns and you only need 9. The railing on top of the turrets were different, A turret number didn’t have any antiaircraft guns on top, so the railings are located on the perimeter of the turret, while the tops of the other two turrets have AA guns on them, so the rails are fore and aft of the gun tubs. After painting the turrets the blast bags were painted white and given a small amount of black pastel chalk to dirty them up, providing an illusion of depth. Another word of caution the railings on top of these turrets are very difficult to glue on (in fact I lost some to my model room carpet) but once complete, really add to these monsters. After the turret was complete, I added a couple tiny drops to the drilled out portion of the guns using the 'Detailer Black it Out'. This stuff is water based and easy to apply, wait a couple of seconds and using a damp cloth wipe off the excess. The rest stays in the recesses. The same treatment was done to the secondary turrets except but I didn’t drill out these gun barrels as they are entirely too small. The only problem I had with my kit were the locating pin on two turrets were snapped off and I lost. I cut two pieces of metal rod of the same diameter, and drilled a hole where the remnants of the broken pin were located. I super glued the metal pins in the hole. I had to be careful drilling the hole, if you're off center the turret will not sit properly on the barbette.
Moving on the next assembly that was tackled was the rear bridge and funnel assembly. The funnel assembly was built using the G.M.M. railing that wrap around the bottom half of the assembly. Eduard also gives you details for the searchlights, and these were superglued onto the face of each spotlight, and then the entire assembly was painted. After this was done I used a sharp #11 blade to scrape off the paint on the searchlights and gave them each a coat of SNJ Aluminum polishing powder. I didn’t want to wipe out any detail on these and the powder gives the look I was searching for without destroying any detail. Both photo-etch sets give you funnel grills but I just couldn’t talk myself into doing this in 1/700 scale, instead I painted the funnel tops grimy black and then drybrushed some night black onto the raised portion. The aft bridge assembly was detailed as per the G.M.M. instructions using a drill to form the rounded railing on top and the second level. I was kind of disappointed to see that the railing that goes on the outside of this assembly when painted is barely noticeable but what can you do? While test fitting the assemblies I noticed one major problem using G.M.M. railings on kit part A7 and A8. I noticed that the aft 15cm gun hits the railing if you face that gun aft and glue the above mentioned parts to part A23. My solution was to turn the gun about 45 degrees off center and not to glue these pieces together until the balance of the bridge was done.
At this point I started to assemble the main bridge. The Yamato class of battleships was one the few class of Japanese battleships that did not have the Pagoda type bridge. The Yamato class bridge looked more boxlike and better armored. Construction went pretty much according to the directions, and I decided to add any railings or other photoetch pieces now rather than later. The most daunting section of this kit I have to admit is a little raised walkway between the forward bridge and the funnel that also leads to the gun directors on either side, these had railings surrounding this entire assembly. You don’t have a lot of room to work but I have to admit it came out pretty good in this case.
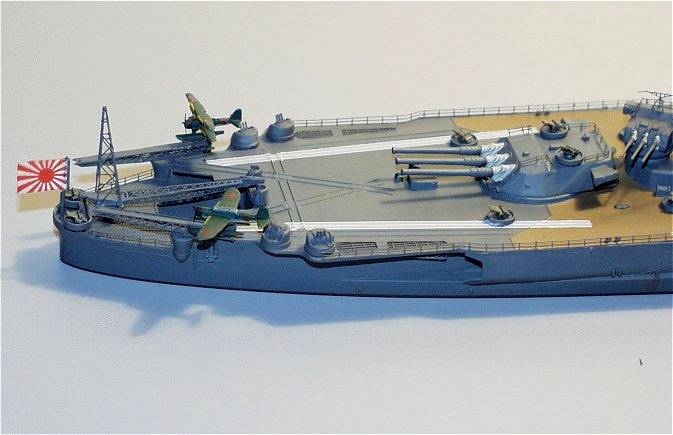
Getting back to kit parts A7 and A8 I also noticed that you couldn’t mount kit part A25 until you glue the first pieces on. As far as the bridge windows are concerned I once again used the detailer to blacken out the recesses for the windows. I used the G.M.M. set for the type 21”GO” Radar and aft crane assembly, as they are much finer then the Eduard radar and crane. Next came the main mast, which is built from the kit parts except for the addition of railings that run up each leg of the mast. The type 13 “GO “ Radar was left as is, G.M.M. gives you a nice version but the kit version is ok by itself, and again, I couldn’t talk myself into replacing it. The aircraft catapults were also added at this stage. G.M.M. really goes nuts with these two assemblies, as they include all the inside bracing for the catapults. To be honest, I got a little tired of looking at the world through my magnifying glasses and decided they looked fine without them. If you decide to super detail them, go ahead, but there was just no way I could do it. Now the Yamato did sail for Okinawa with 2 aircraft aboard but were flown off the day after sailing so I decided to add a little color to the ship by adding these. I took a guess that since she only carried these two aircraft with her that she also left behind the aircraft shuttles that positioned the aircraft on the catapult. This is a shame too because the shuttles G.M.M. gives you are very nice when assembled. Just a little note, none of the various boats where onboard when she set sail.
Overall I cannot recommend this kit enough. I am sure that even without the photoetch this kit is great right out of the box. The fits where well thought out and left seams that where very small and easy to clean up. I have now built the Yamato three times, once with the 1/350th scale, once with the old 1/700th offering, and now this one. I have to say that this one leaves all the others in the dust. Until next time, happy modeling. Tom
Click on the thumbnails for
larger images