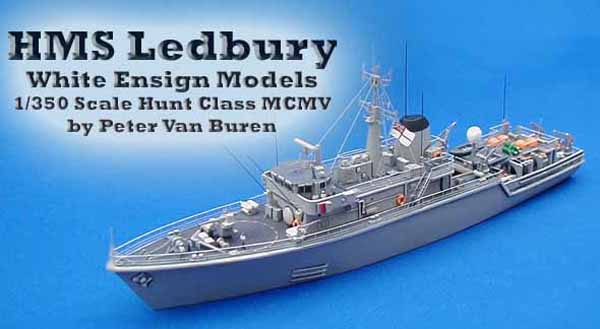
Buildup review of the 1/350 WEM HMS Ledbury
| The Ship
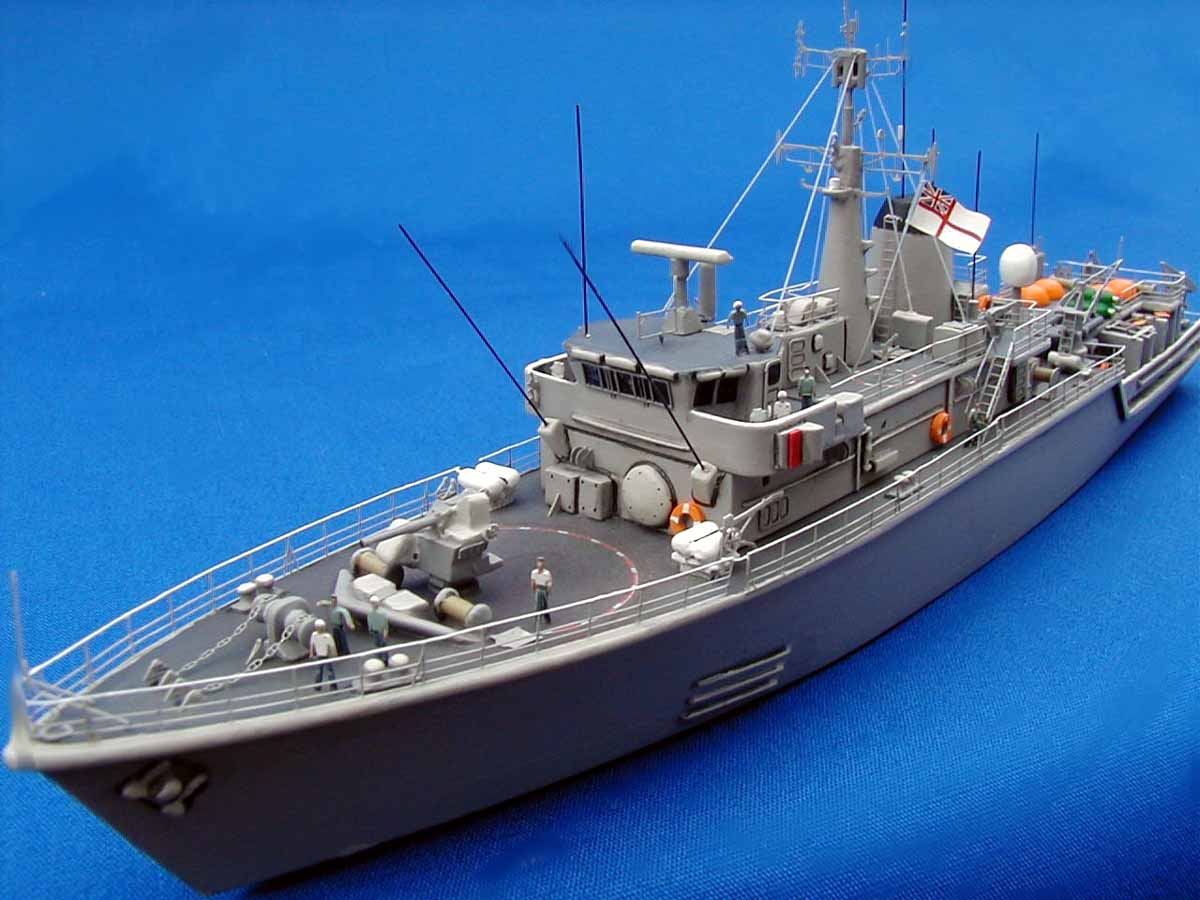
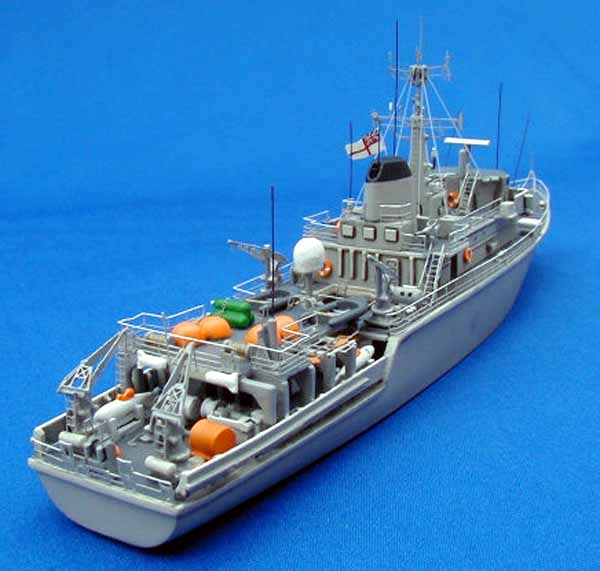
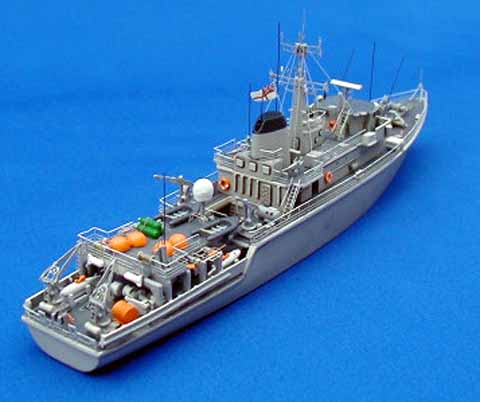
White Ensign Models (WEM) explains in the instructions included with this kit that the Hunt class MCMVs have the ability to operate both as a mine hunter and as a mine sweeper. Traditionally anti-mine warfare was done via minesweepers: vessels would operate in advance of a Task Force, or as a mine sweeping flotilla in a designated area of sea, and would "sweep" mines by using long-wires which would force submerged mines to rise to the surface where they could be destroyed. Modern mine hunting, however, normally uses a high-definition sonar to identify where mines are and then to use explosives planted either by special divers, or using remote vehicles. WEM continues to explain that the Royal Navy has a reputation for being the best at mine-clearance, and even in modern times, the necessity of MCMVs are essential. The Hunt class vessels also have a secondary-role as a Patrol vessel and they are frequently attached to the Fishery Protection Squadron when required. The latter suggests interesting diorama possibilities. |
|||||||||||
| You can take a look at the real ship at these two sites:
|
|||||||||||
| The Kit
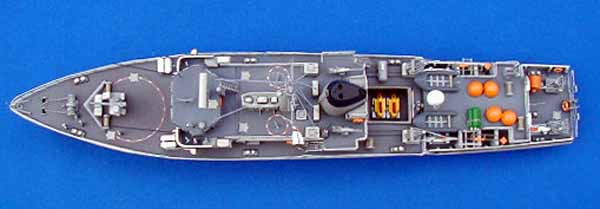
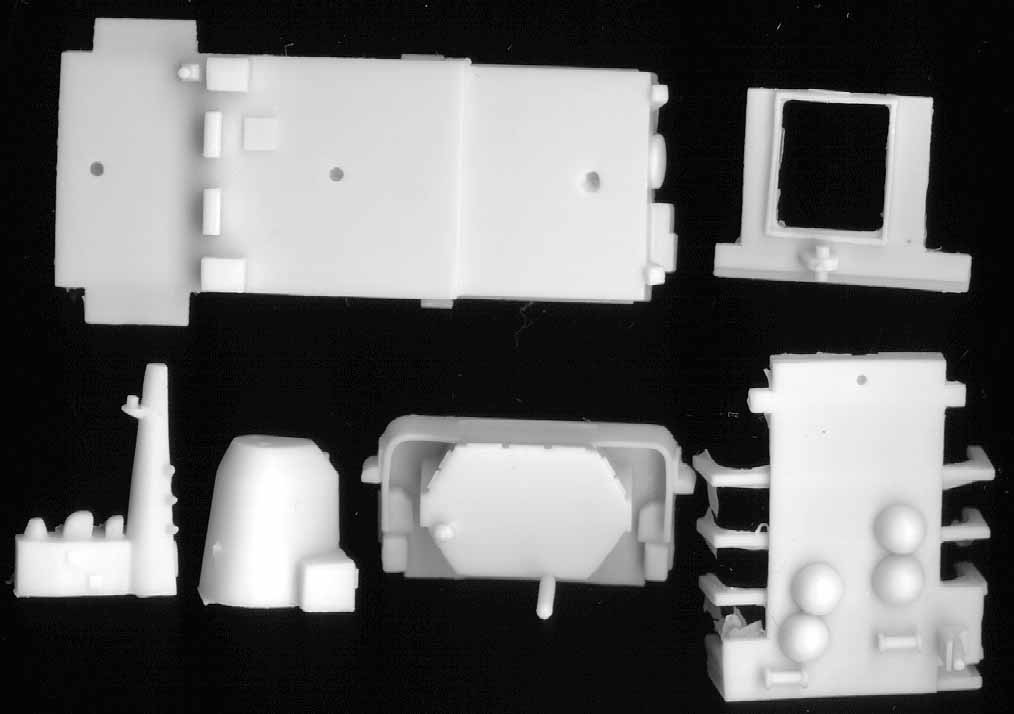
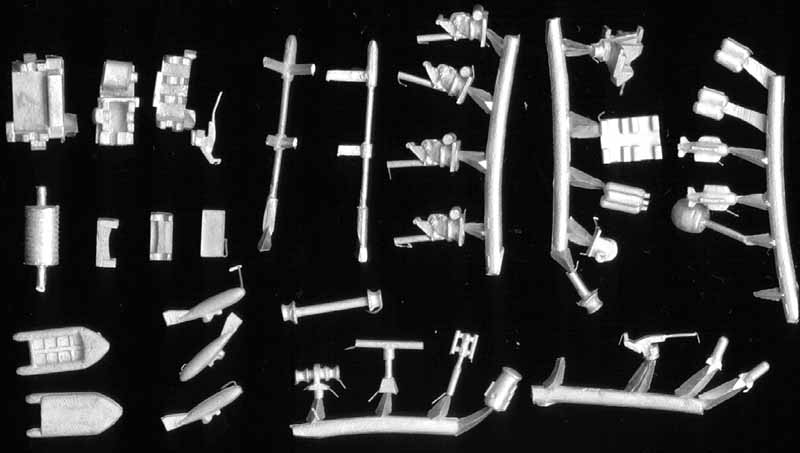
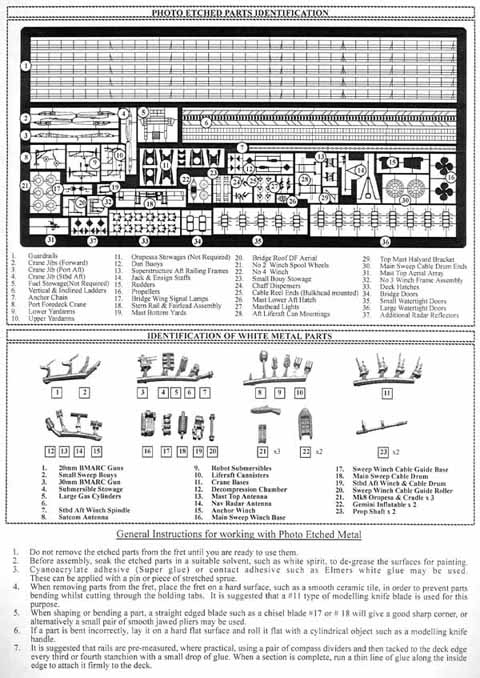
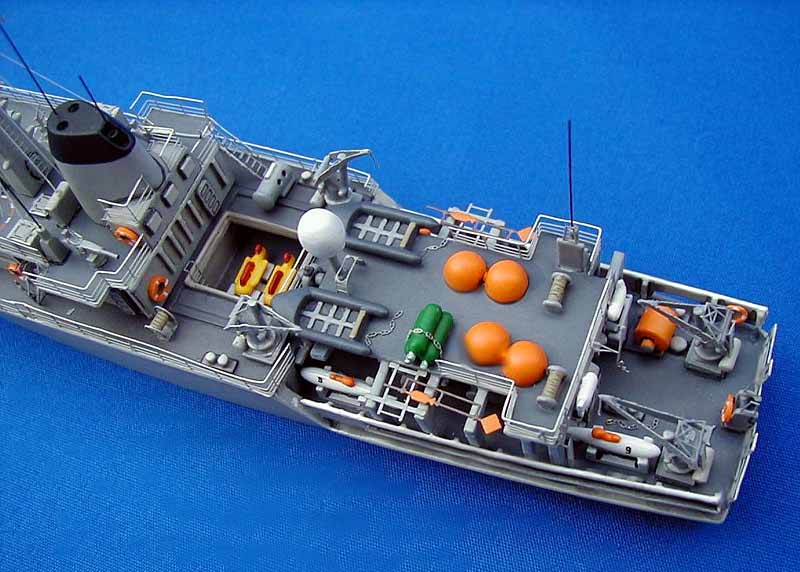
The kit is comprised of eight beautifully cast resin parts, an extensive PE fret with railings, hatches, two types of ladders (the vertical ladders have individual steps to be bent into position), props and many other details other makers typically supply as (out-of-scale) resin parts. Almost all of the other deck gear is supplied cast in soft metal. The only thing you will need to add to the kit are decals-none are supplied with the kit. Photos show that your decal needs are fairly minimal; hull numbers and some warning circles on deck. Your kit will arrive in a sturdy cardboard box, with the main resin parts wrapped in bubble wrap, and the other parts in plastic bags. The PE is in an envelope. My sample arrived undamaged.
|
|||||||||||
| The instructions are first-rate, as good or better than
I have seen from any other resin maker. Well leave out the bottom
feeders on this issue, those resin people whose idea of instructions are
a Grade Z photocopy of a line drawing of the ship. WEM gives you:
-- a short brief on the actual ship -- a full-color (they insist on spelling it as colour of course) top and side view of the ship, with the principal colors named, keyed to their own line of paints. The views also include some of the rigging and markings to give detailers a starting point. --And, best of all for us beginning to intermediate resin modelers, sequenced instructions, similar to what you get with an injection plastic kit. Like many of you, I usually dont follow the sequence when building, but WEMs approach gives you a firm base to deviate from and, as mentioned, will be a big help to newer-to-resin modelers.
|
|||||||||||
| Quality
I am trying not to overdo this, but WEMs stuff, especially the photo etch (PE), is just impressive. The PE here is fine, even elegant, almost to the point of challenging the designer to see how fine a piece can be made and then daring you to assemble it in a way that complements the designer's work. The amount and complexity of the PE provides a very satisfying challenge-- darn it, there are even dogs extending over the edges of the PE hatch pieces that the truly committed modeler can bend into place. Amazing. The down side of this is that this stuff is not for a beginner to photo etch. The PE is made from very soft brass, so the good news is that it is easy to bend. The bad news is also that it is easy to bend. You have to be very careful working with this stuff (I understand that WEM will be switching to a harder brass in the future). |
|||||||||||
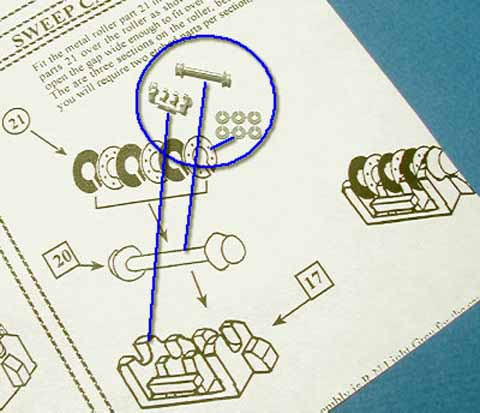
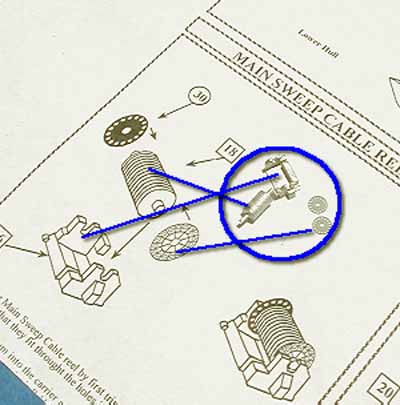
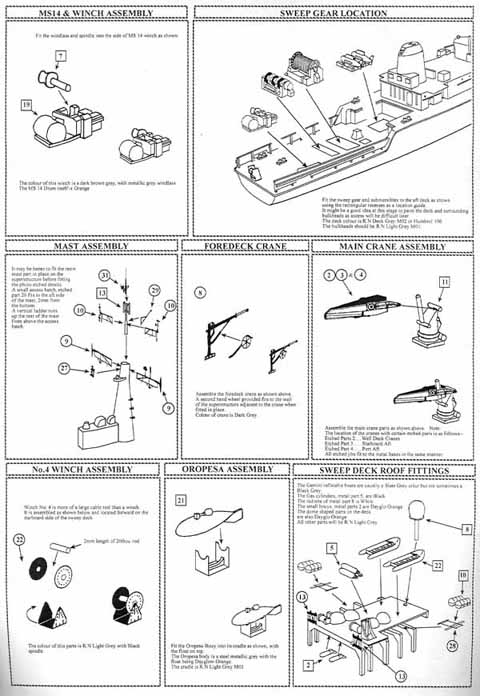
| There are a lot of nice touches here. For example,
the cable drum has grooves cut in it to simulate the actual strand of cable
that would be wrapped around it. The drum apparatus has four parts:
cast metal drum, cast metal base and two PE pieces. A separate unit,
the sweep cable guide, has two cast pieces and six PE. The only bad/sad
news is after you install the "sweep deck" over the aft portion of the
ship, much of this detail is hidden. The builder, however, knows
it is there.
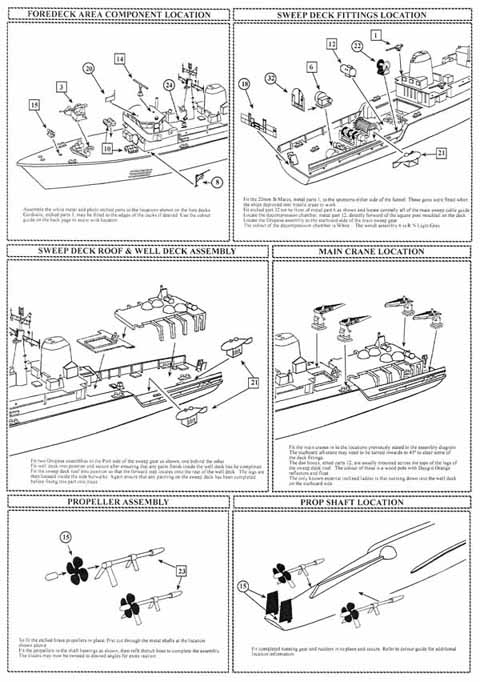
The ship can be built as waterline or full hull with no cutting needed
if you choose waterline as the bottom . The full hull version uses
two cast metal shaft pieces with PE props. Though I built mine as
a waterline version, I dry fitted the lower hull portion and feel that
you will need to some minor filling on the seam running the length of the
hull.
|
 |
||||||||||
 |
|||||||||||
| More on the Build
The resin parts needed a washing in dish soap, and scrubbing with an old toothbrush (naughty mold release! Bad boys with mold release need discipline!). Afterwards, I needed to do just a little sanding on the hull, mostly to remove some flash at the stern. The bottom was pretty flat, and again just needed a few high points leveled out. The other resin parts needed a little cleanup, mostly minor flash. The cast metal parts ranged from no cleanup needed at all to some mild flash work. The parts are indeed soft metalif you are not used to the medium, start cutting and filing with a **very** light touch. |
|||||||||||
 |
|||||||||||
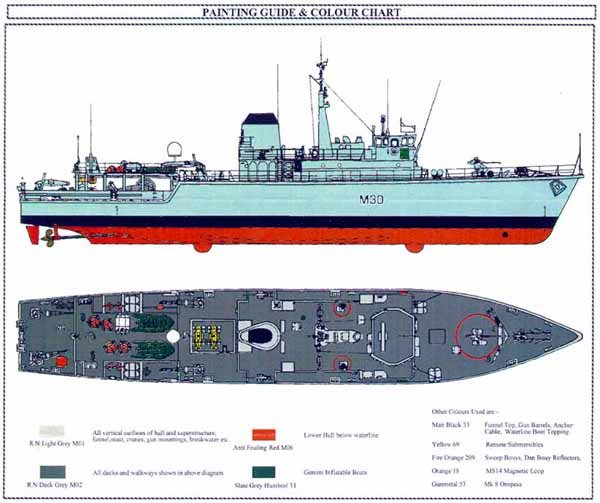
| I prefer to pre-paint the photo etch. I then painted
the hull and main resin parts the appropriate gray, followed by doing the
deck its darker gray to simulate the anti-slip coating. I used chalk
pastels to tone down the deck color a bit.
One suggested change to the assembly sequence is the mast. The mast consists of nine parts, one resin, one white metal and the rest PE. I found it better to glue the main resin piece to the deck first and then add the details towards the end of the overall project. Glued to the deck, the mast is stable and requires no additional handling (and thus no additional chances to bend the PE). I added the PE to the mast at the very end of the project for the same reason. Next up was the assembly of the various subunits that are attached to the deck and superstructure. These can be done in just about any order you wish, and so I switched between detailed, delicate assembles like the main mast with its arms and antennas and sweep deck roofing details, which are more solid and simple, as the mood took me. The clean quality of the casting made for a laid-back assembly. Things fit well and the absence of hours of seam filling made this a pleasant build. |
|||||||||||
| A Couple of Things...
As for complaints, there are a couple of seams where the bridge and the 01 deck join, and on a deck piece aft of the main cabin. I choose a compromise of using strip stock to cover the seams in lieu of filling and sanding in the interest of time and sanity. |
|||||||||||
| One thing I wish would have been done differently is the bridge windows, or more accurately, the absence of bridge windows. The resin piece that includes the bridge has only the faintest outlines of the window panes. I would have preferred something more definite or a decal. On my kit, I used a left over piece of black decal to create the windows. | 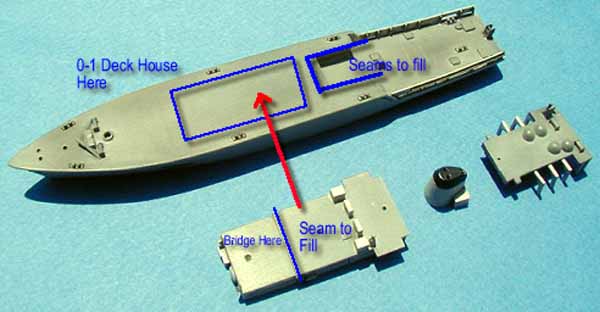 |
||||||||||
|
|||||||||||
| Who Should Buy This Kit?
While the overall parts count is moderate and the color scheme is pretty basic, the level of detail and the fineness of the PE argue that this kit is intended for a more experienced modeler, with the emphasis on PE. If you have a few kits with photo etch under your belt and are looking to try your hand at a challenging resin kit, this would be a good choice. The slightly unusual subject matter also makes for an interesting change of pace if your main interest ships are becoming a blur of paint-the-hull-gray, paint-the-deck-gray, glue the Skywave parts or their resin clones into place. Quite subjectively, I liked this kit quite a bit for its complex, cluttered look, with many shapes and colors not found on the other ships in my collection. This was a fun, challenging kit to build and I think any modeler comfortable with the PE will enjoy this kit. |
|||||||||||
 Links
and References: Links
and References:
|
|||||||||||

© ModelWarships.com
