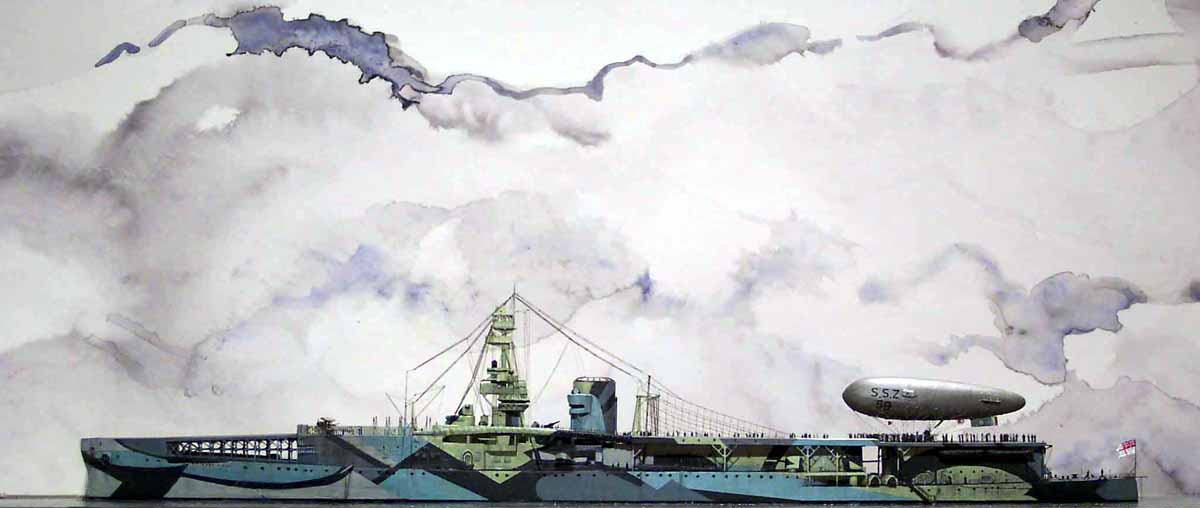
| Having been fascinated for as long as
I can remember by HMS Furious in her early aircraft carrier guise (who
cannot be captivated by a carrier with funnel and superstructure in the
middle of the flight deck...!) I was simply ecstatic when the 1/700 resin
kit produced by Mr. Angelo of Loose Cannon Productions came on the market!
So I immediately set about collecting and cross referencing as much information and documentation as possible. There are many photos of Furious in her 1918 configuration, yet few actual close-up detail photos with really good resolution that allow one to ascertain the actual truth of the shapes and layout 100%. It was suggested that I photograph the famous model in the Imperial
War Museum in London as a reference, I duly had this done BUT....
The illustration in the center while initially being very convincing
is actually full of holes, especially in the precise location of detail
items and the exact positions of the color camouflage bands and angles,
only really close examination of the photos tell the truth...
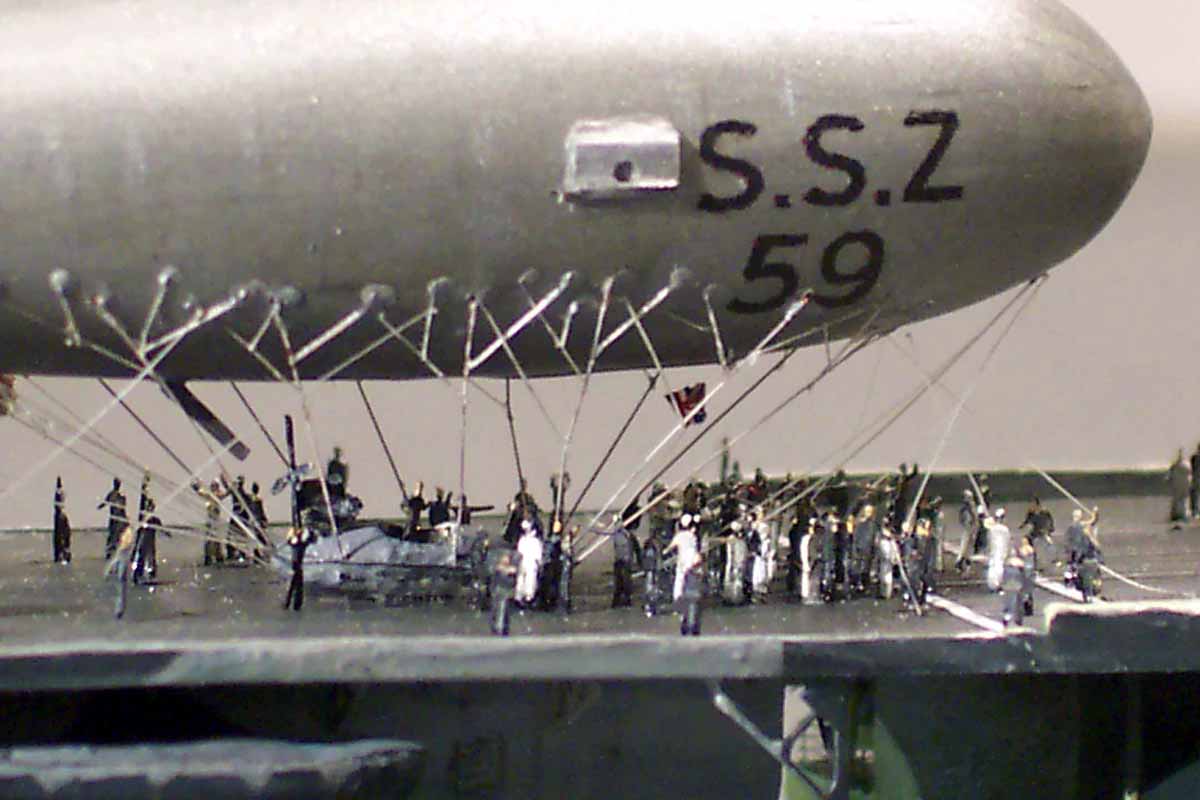
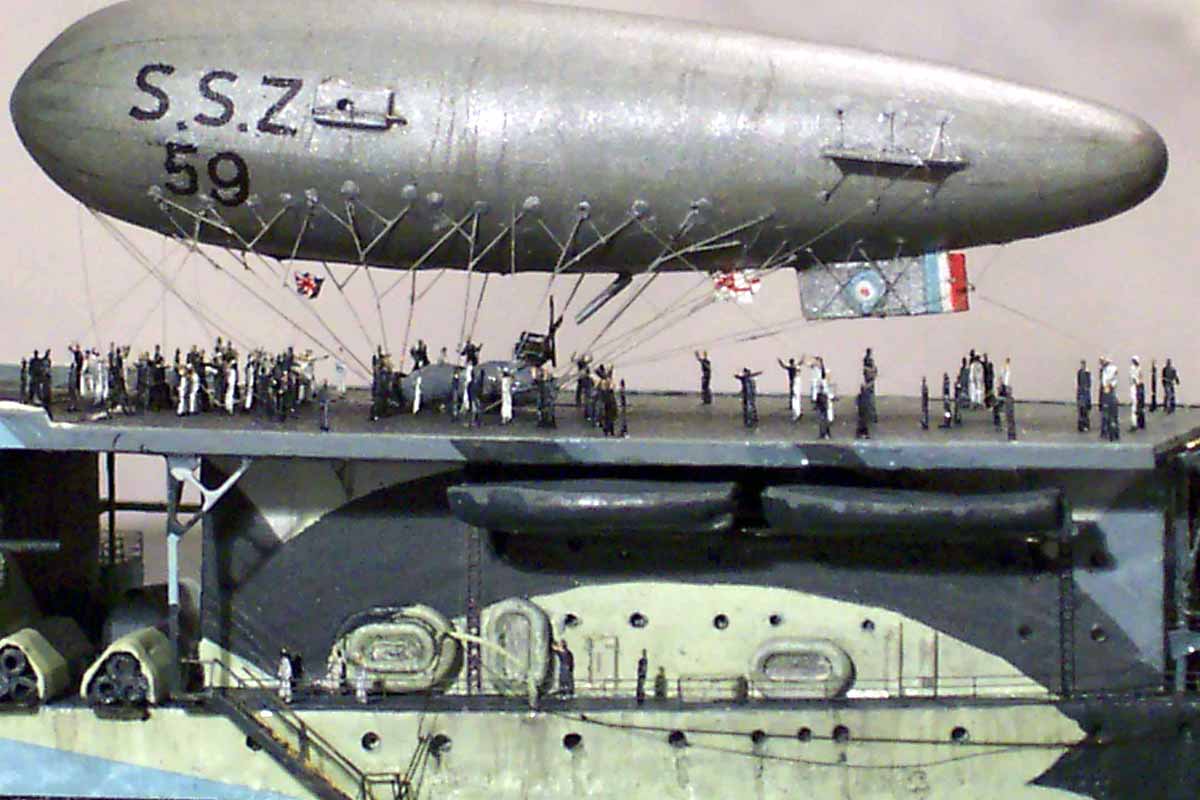
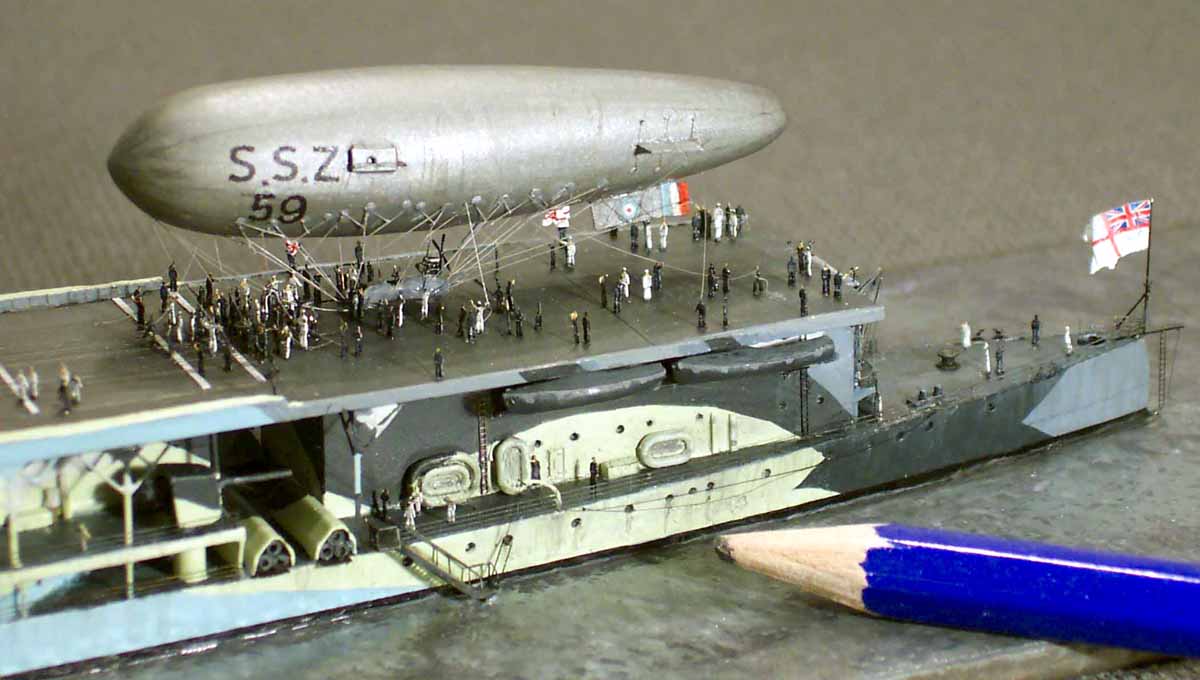
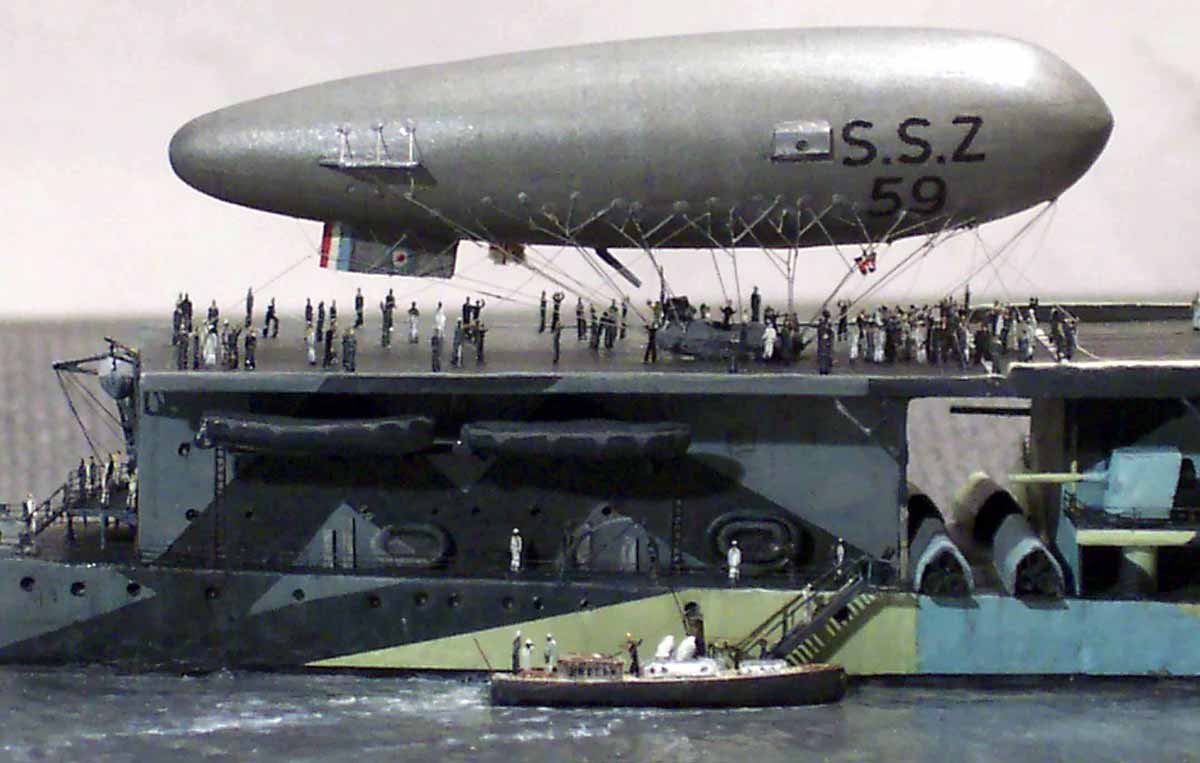
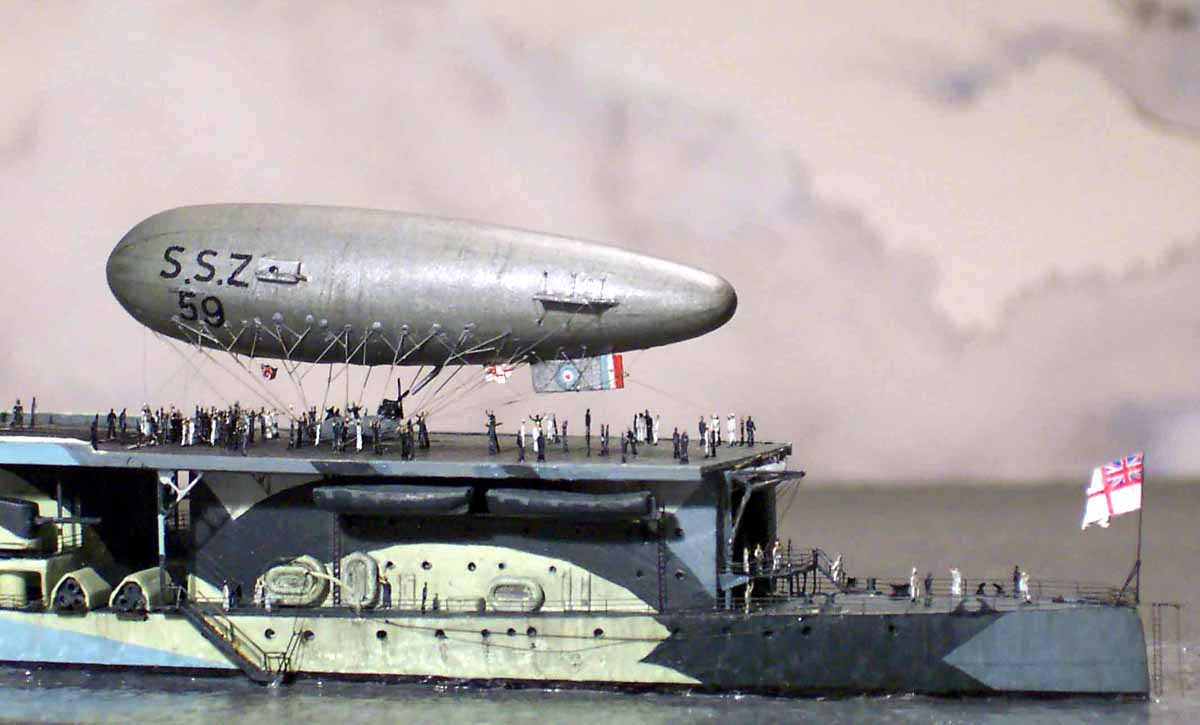
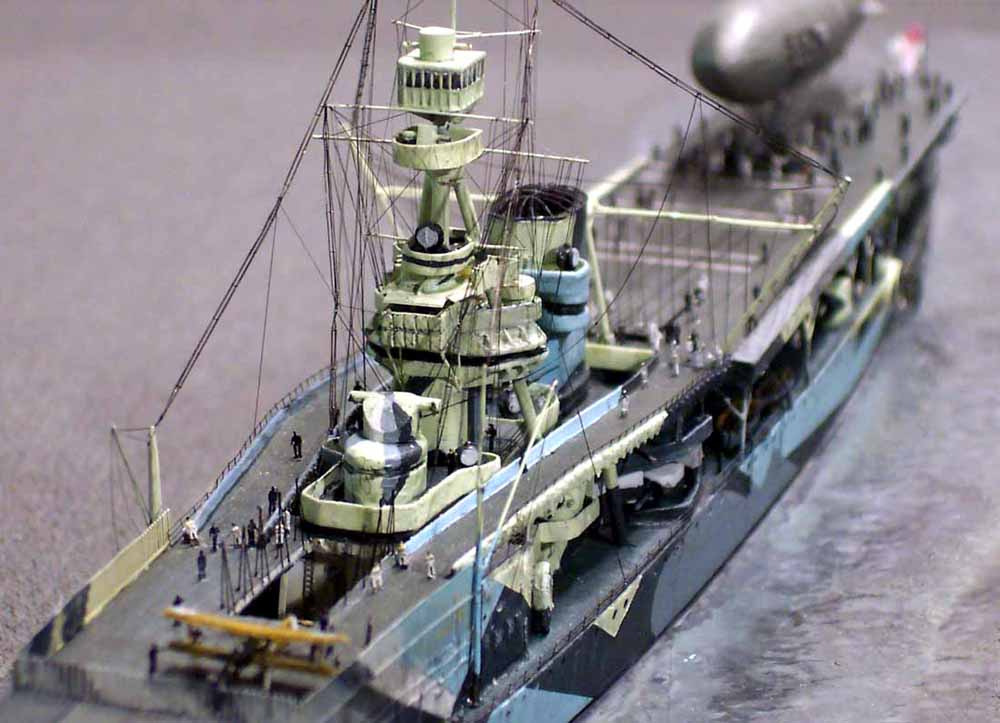
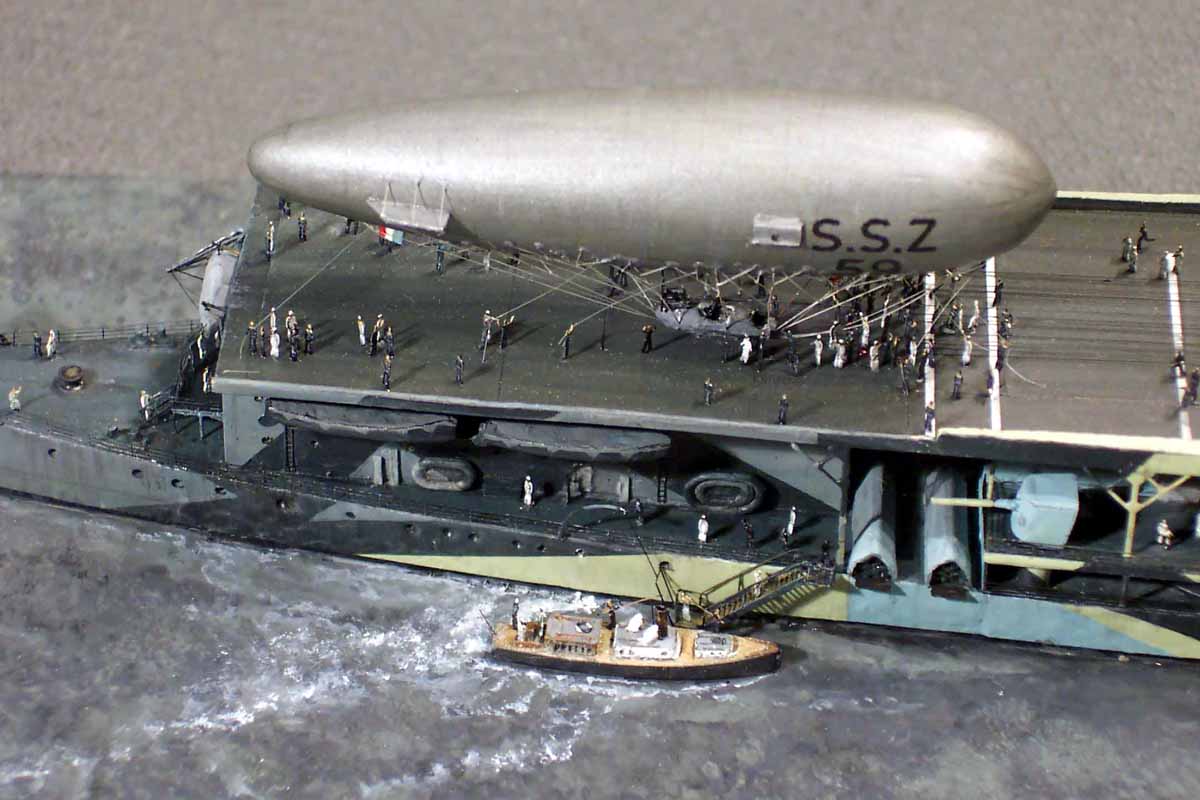
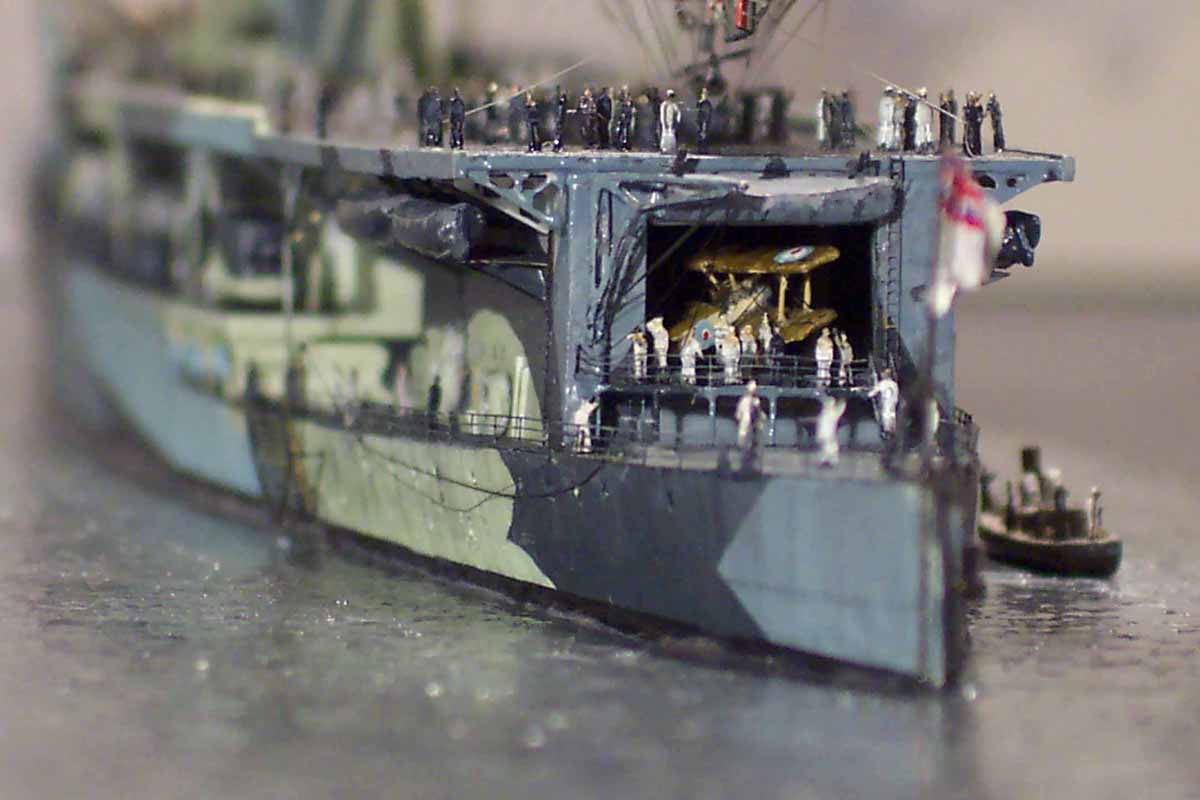
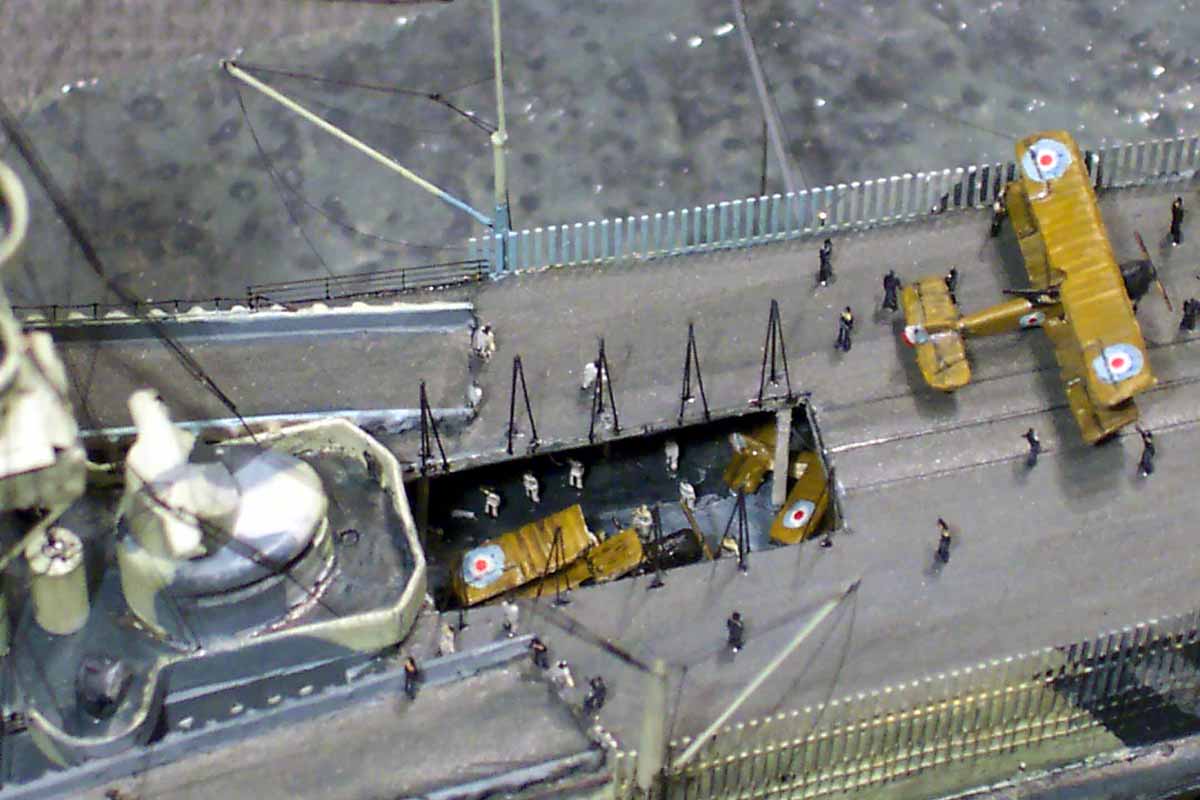
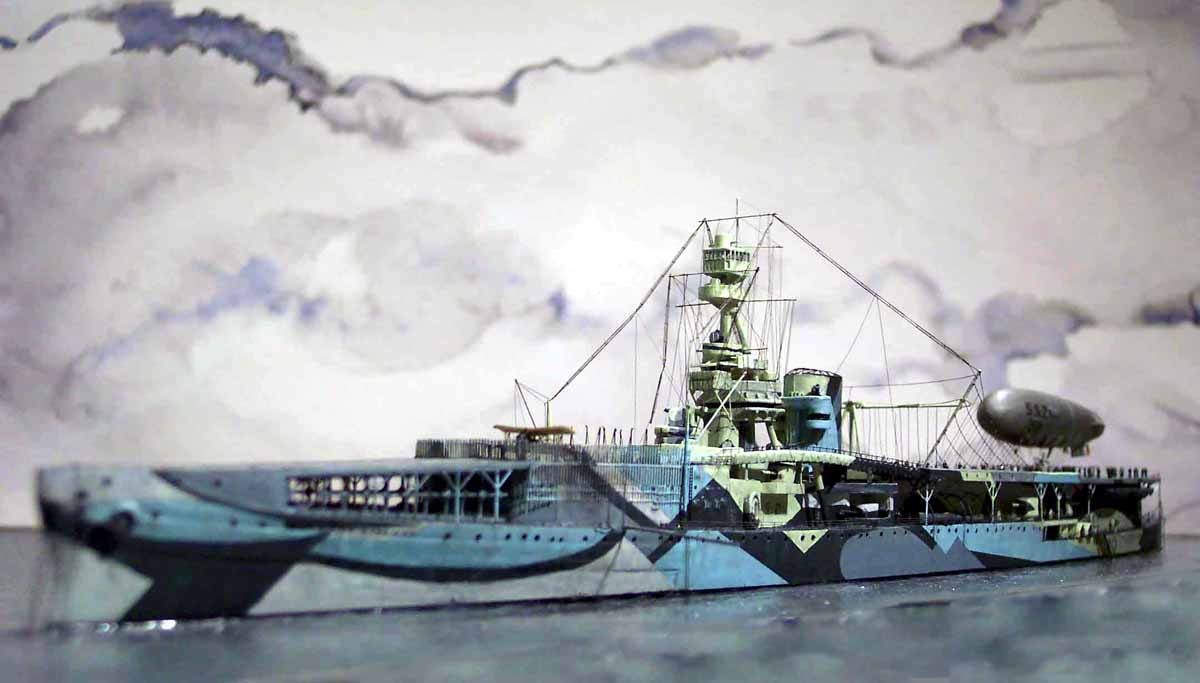
I now wanted to show HMS FURIOUS at anchor, fwd lift down allowing a (limited) view in to the innards while the SSZ 59 airship was being landed on the aft flying deck with hordes of personnel swarming around catching the blimp... But before I could allow myself the pleasure of detailing and scene setting I had to build the ship and tackle THAT dazzle camouflage...
|
||||||||
| First of all I must say I am grateful that a manufacturer
has produced such a fine effort of such a totally esoteric ship. A hearty
well done and please can we see some more! Fundamentally the kit is very
good, although some aspects are a little simplified and there are a couple
of problem areas which I dealt with in absolutely the incorrect order!
The casting was a generally good, the parts being on a 'sprue' similar
to a plastic kit. The edges and hollows were not as sharp as some other
resin producers( some deft blade work rectified this in the hangar to deck
angle) and there was a lot of flash, this however came away very cleanly
and easily. The watchwords with any model ship project has to be:
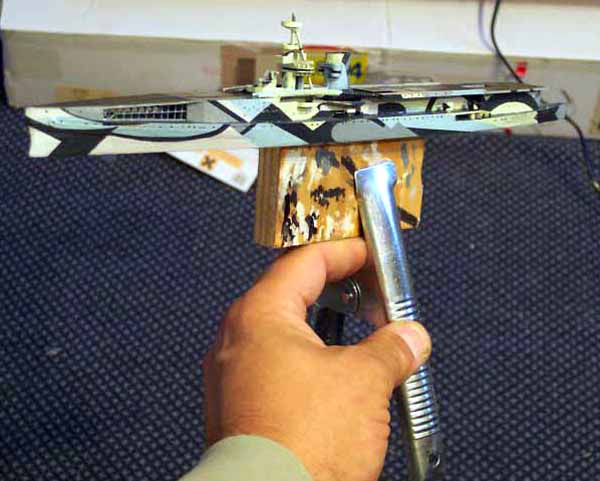
PLAN AHEAD!! Nevertheless I succeed in falling into every hole and retro fixing sometimes major components a long way into the build; hitherto I have got away with it without damage... and HMS FURIOUS was no exception...! So perhaps my experiences may assist others in NOT blundering as I did!! |
||||||||
|
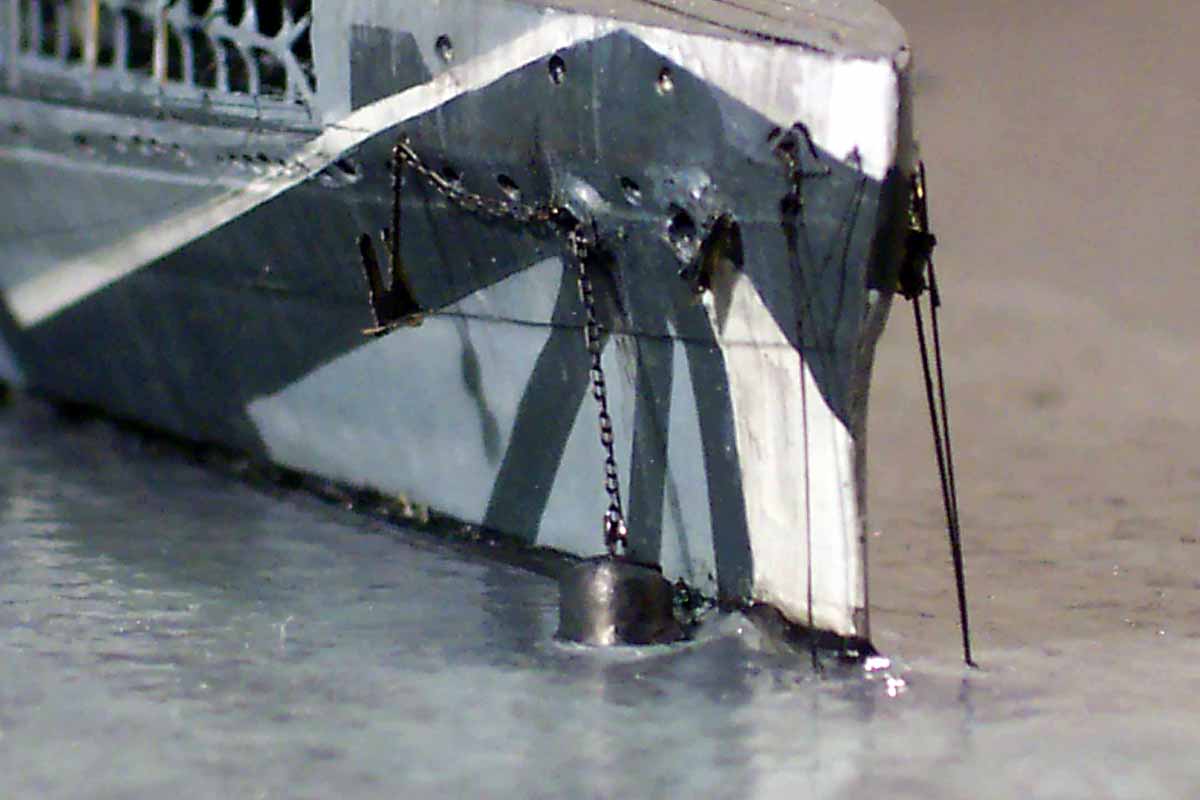
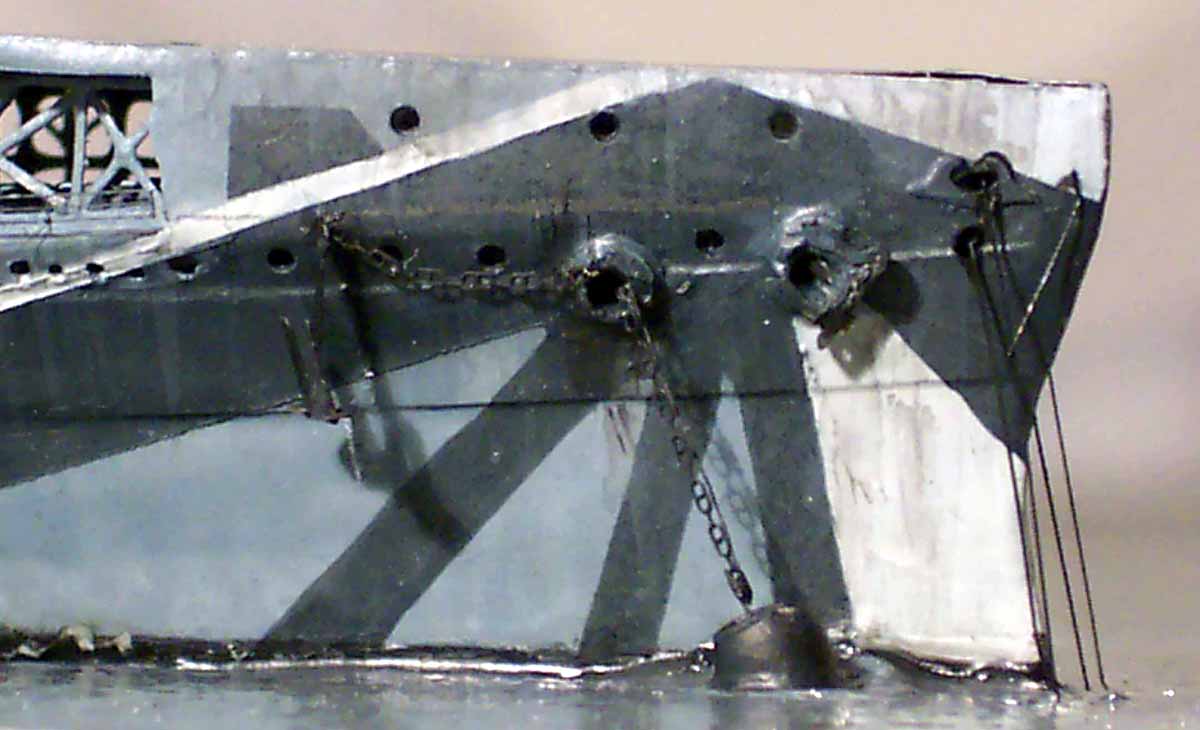
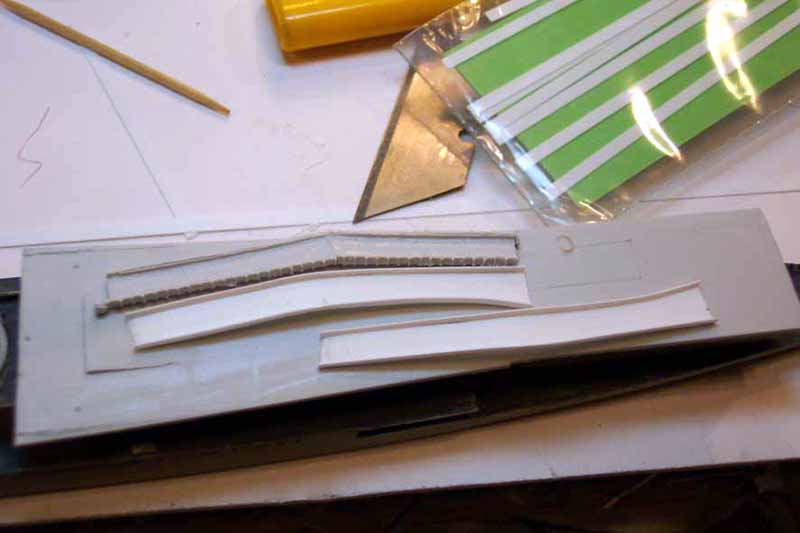
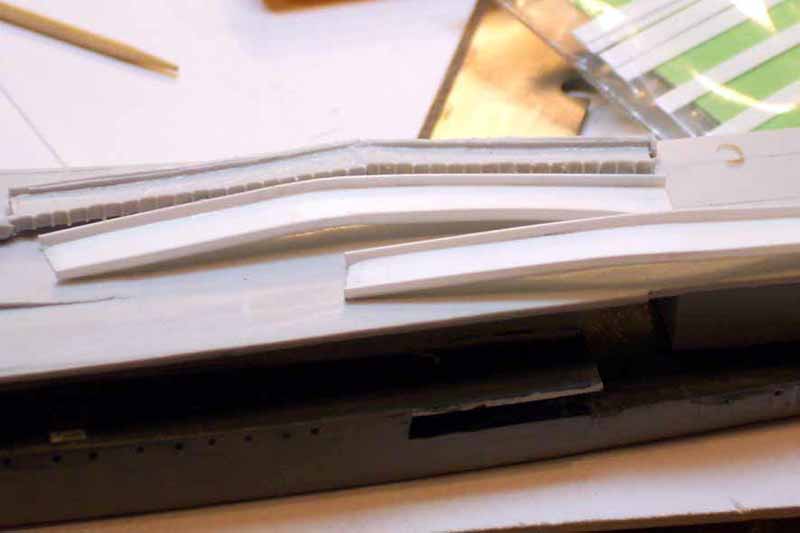
The first problem I encountered was with hull surface plating, this was in my opinion far too hefty and would cast shadows on the camouflage as well as making the masking of straight lines tricky. I elected to scrape off the ridges and bumps until they were almost flush; the layout was correct, just overdone; after painting it added in my opinion just the right amount of texture. The next problem the fwd flight deck supporting PE, at first sight an easy assembly as LCP had helpfully cast on the hull locating 'ridges' to which the PE parts could be stuck, the ridges however in scale were too high and wide, the PE surround hence was too high and clunky and in my opinion was for me not delicate enough; not giving a sufficiently airy look in that area. I therefore did it the hard way, making the entire inner assembly from very thin brass strip and gluing and cutting the individual struts. This required also a new fwd flight deck infill to get rid of the upper locating ridges on the underside of the resin item. |
click images
to enlarge |
|||||||
 |
||||||||
 |
||||||||
|
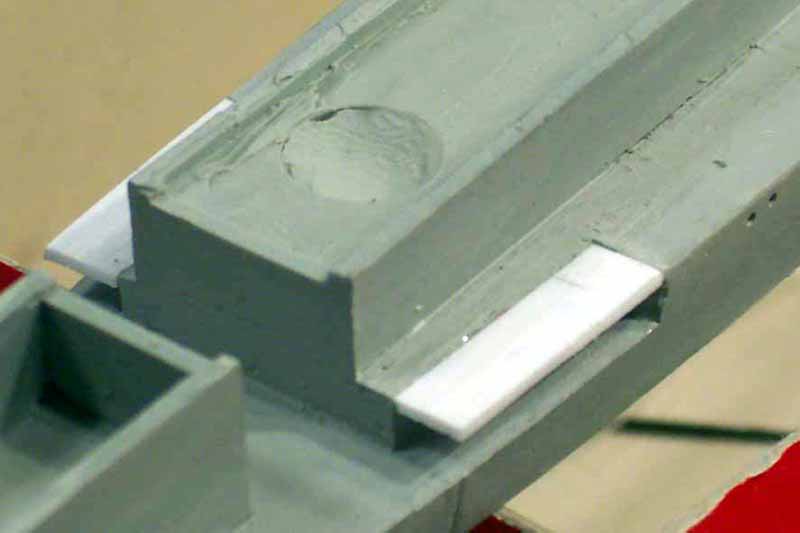
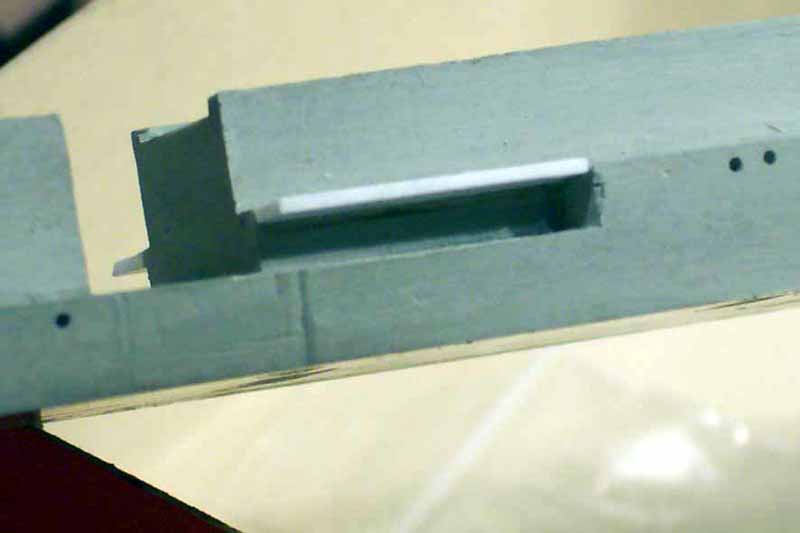
The undercut deck area below the after most 5.5 in gun was not nicely cast and would have been most difficult to represent as nicely as I felt I wanted, so I cut away with a motor tool the deck and resin below into a sharp edged square hollow a new section of deck of styrene sheet and slanted wall section made this area crisp. The turret has the barbette shaft continuing through the deck, alloy tube solved that issue. |
 |
|||||||
 |
||||||||
|
I proceeded to affix flight decks for and aft and started to paint the camouflage scheme, this occupied me for a week or two..!!, I painted it all with a brush and masked, re-masked, re-re-masked and re-repainted it a number of times until I was reasonably satisfied; again check the photos and do NOT trust the color illustration in the Warship Profile, it tells lies about the starboard side shown, the port side is simply wrong and again look and check the photos, for only they tell the truth!! My final paint job is almost absolutely right..... ;^) but there are some proportional flaws, again FWD PLANNING was needed (but not carried out..!). |
 |
|||||||
 |
||||||||
|
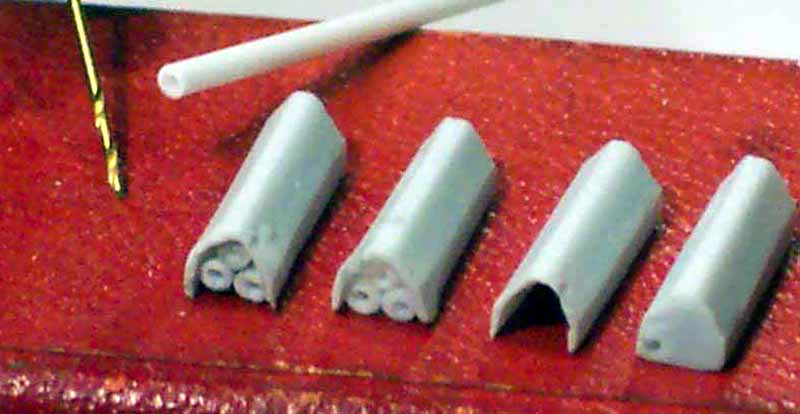
The triple stack torpedo tubes with their triangular tent like structure gave me all sorts of worries; after I hollowed out the supplied resin items (which have the correct shape ) and laboriously constructed three tube mouths out of drilled out small styrene rod I then saw new photos where the outboard face of the stack of tubes was covered with a canvas flap..... So it would have not been incorrect to simply paint the supplied parts....! |
 |
|||||||
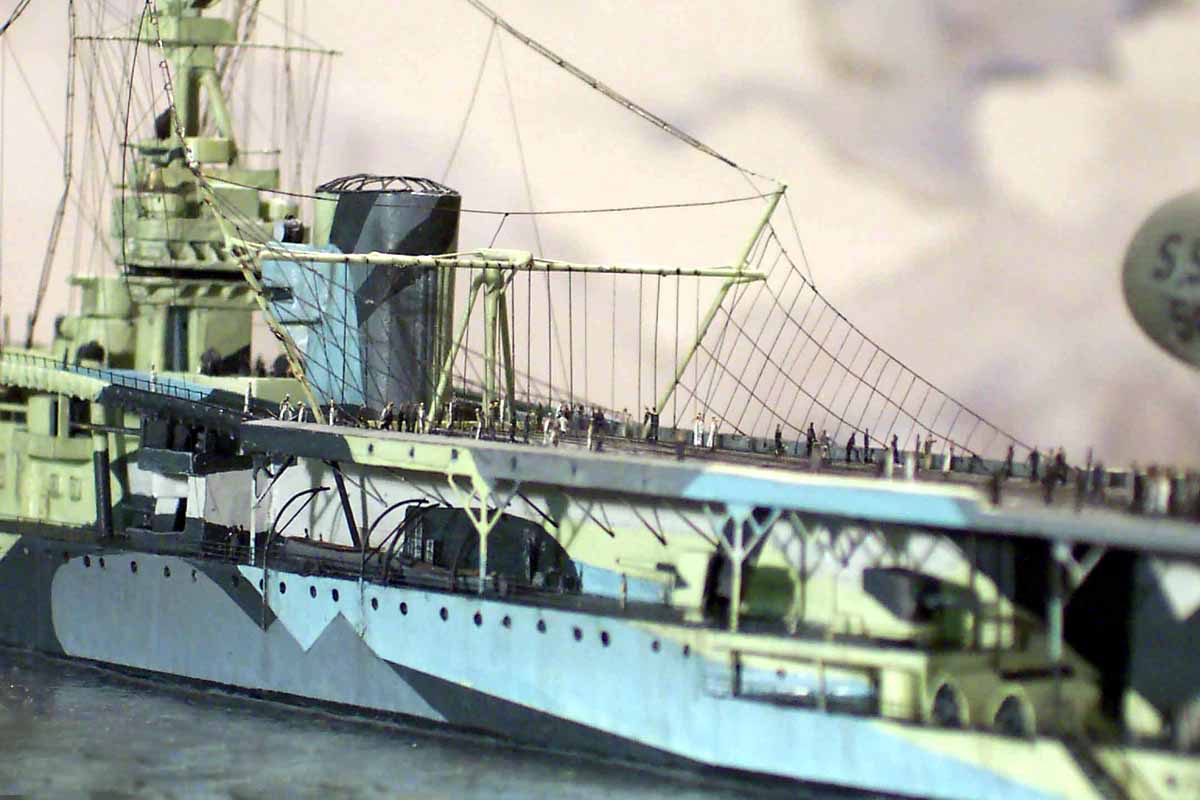
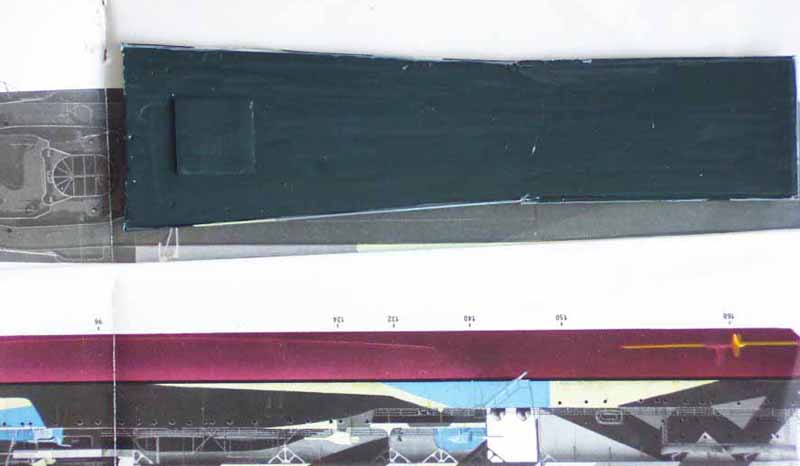
| I was getting ready to apply the rather nice PE vertical flight deck supports when I realized that if I stuck the upper part to the outboard edge of the flight deck the stanchion base would end up well inboard and impede the rotation of the 5.5 in turrets.... a quick look at the plan view in the Warship Profile drawing and subsequent checking of two aerial view photos quickly revealed that the kit item was 'wasted; the fore and aft line should not have any hollow in the plan view....( no plan ahead!) So I proceeded to rip off (ouch!) my very well glued resin deck without noticeable damage and cut a new deck from styrene sheet; I took the opportunity to cut out the aft lift and show it lowered so not all was lost! I then built the tapered box bracing structure at the forward half from thin Evergreen strips which was also not on the original resin part.. | 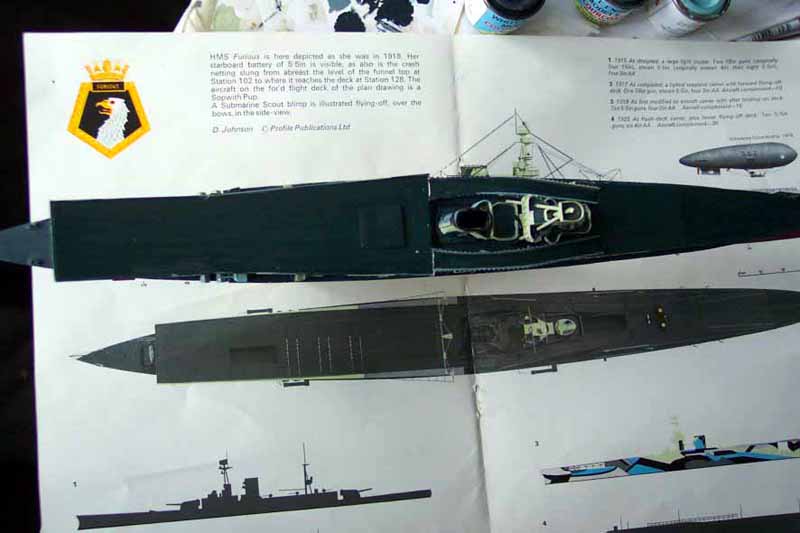 |
|||||||
 |
||||||||
|
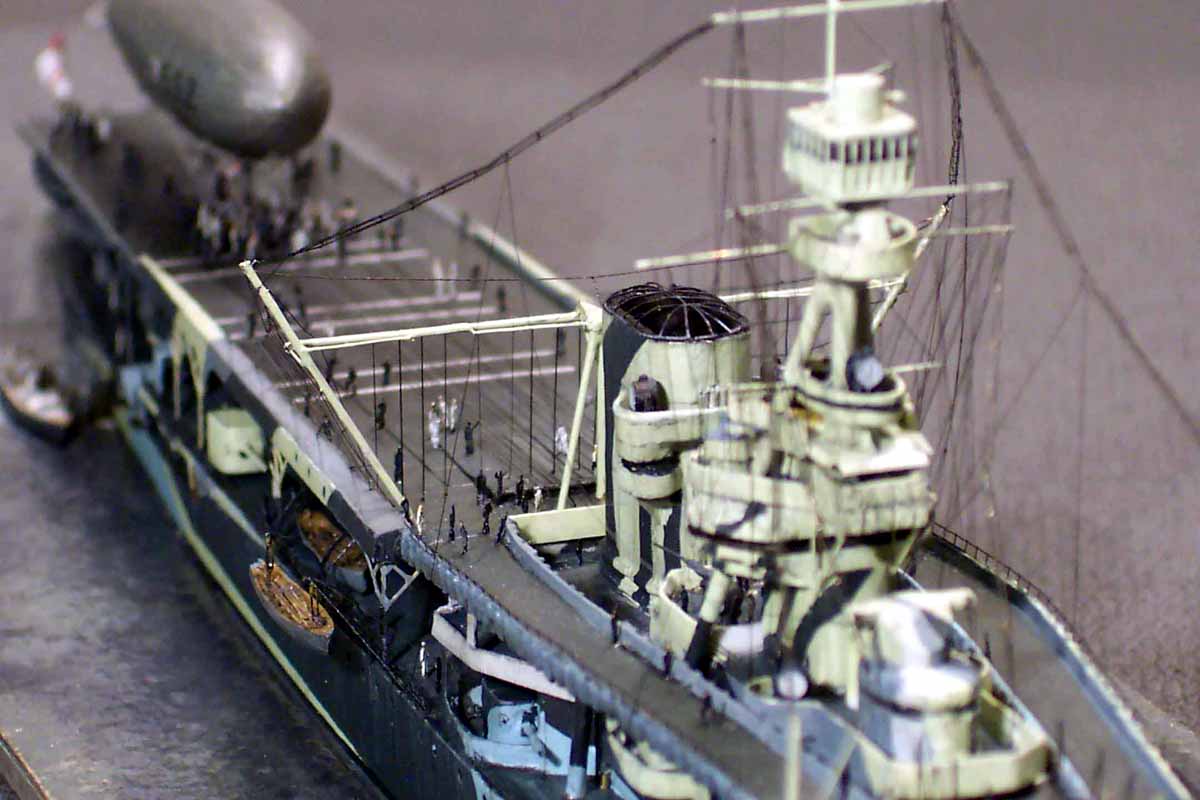
On the real ship aircraft were transferred from the aft hangar to the fwd flying off deck via two 'ramps' either side of the superstructure, in the kit these were made with a hard angle and parallel, in the real ship these were curved and flared out towards the aft end, the vertical elevation was a gentle curve not a kinked angle. I made replacement items from thin styrene sheet with separate wall sections, the hardest part being the application of the vertical bracing strips, VERY fiddly and boring but they cannot be omitted. |
 |
|||||||
 |
||||||||
 |
||||||||
| The 5.5 in turret barrels suffered like many resin guns from being slightly bent and or clunky, I simply cut off the ends and replaced with brass rod. | ||||||||
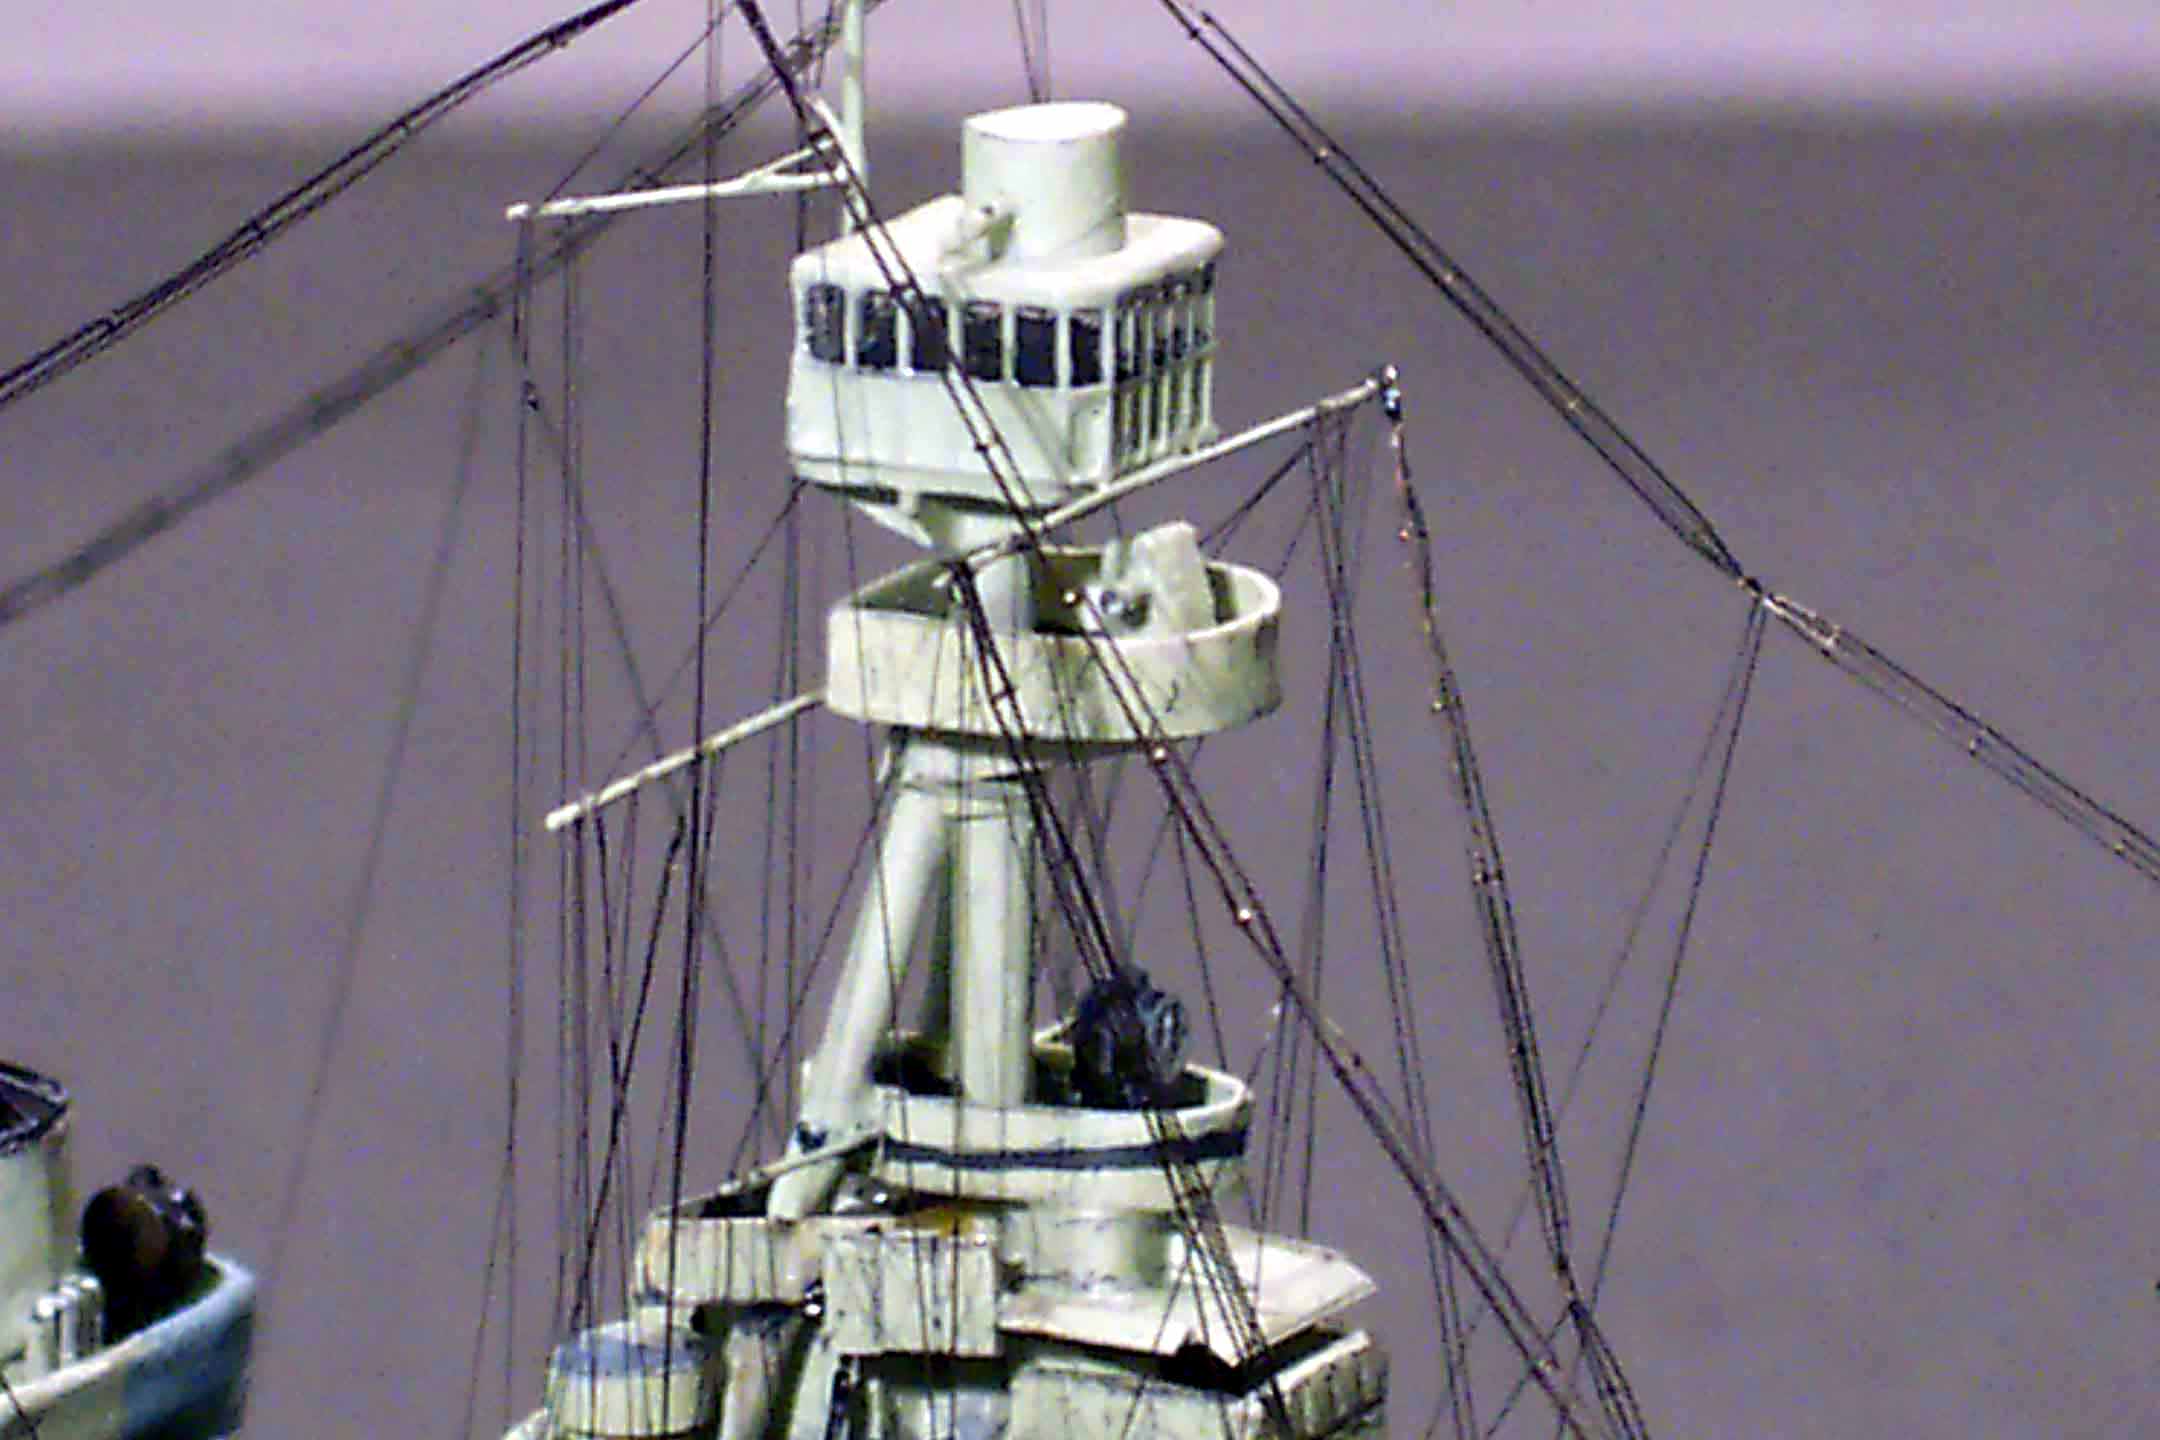
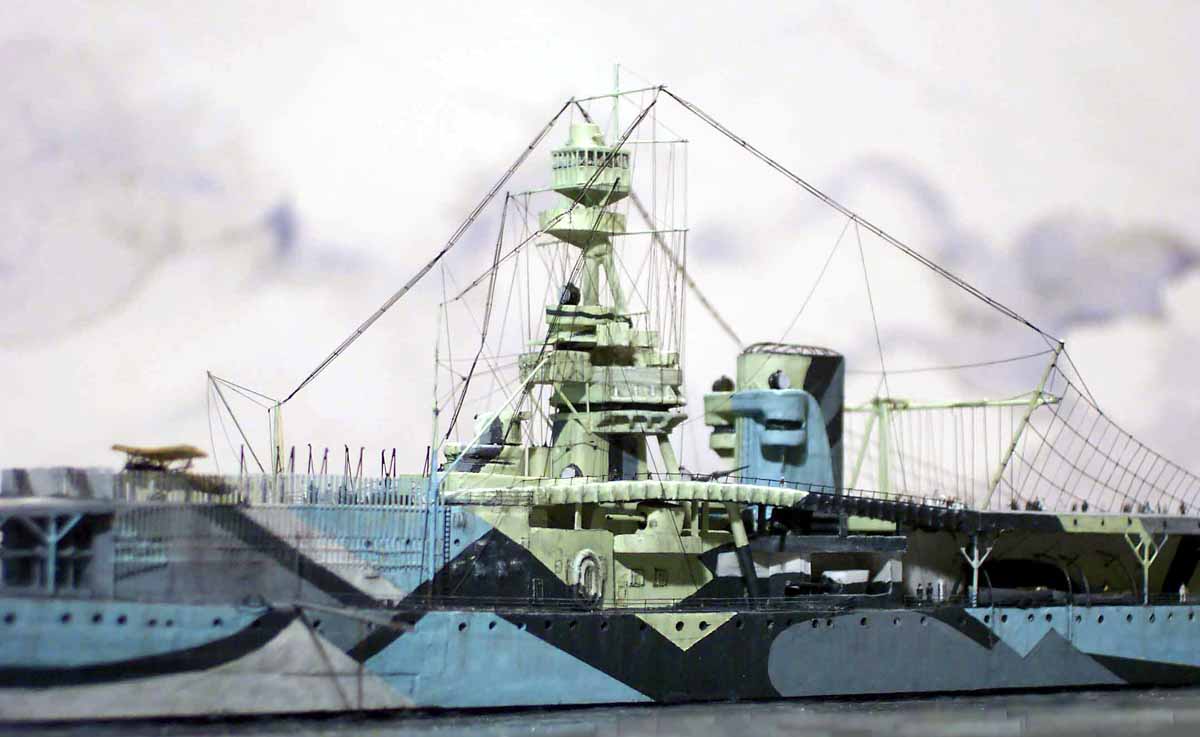
| The spotting top wraparound PE was a true joy to behold, the solid spotting top was the correct shape, the marriage of the two to make a hollow glazed spotting top was too good to miss; I simply ground it down to window level, applied the PE windows and made a new roof; hey presto a hollow, see through, glazed spotting top. The funnel had the plating 'ridges' scraped off, was hollowed out with a Dremel drum sander, the observation 'pods' were crisped up and faired in to the funnel by being partially wrapped in very thin styrene sheet. |  |
|||||||
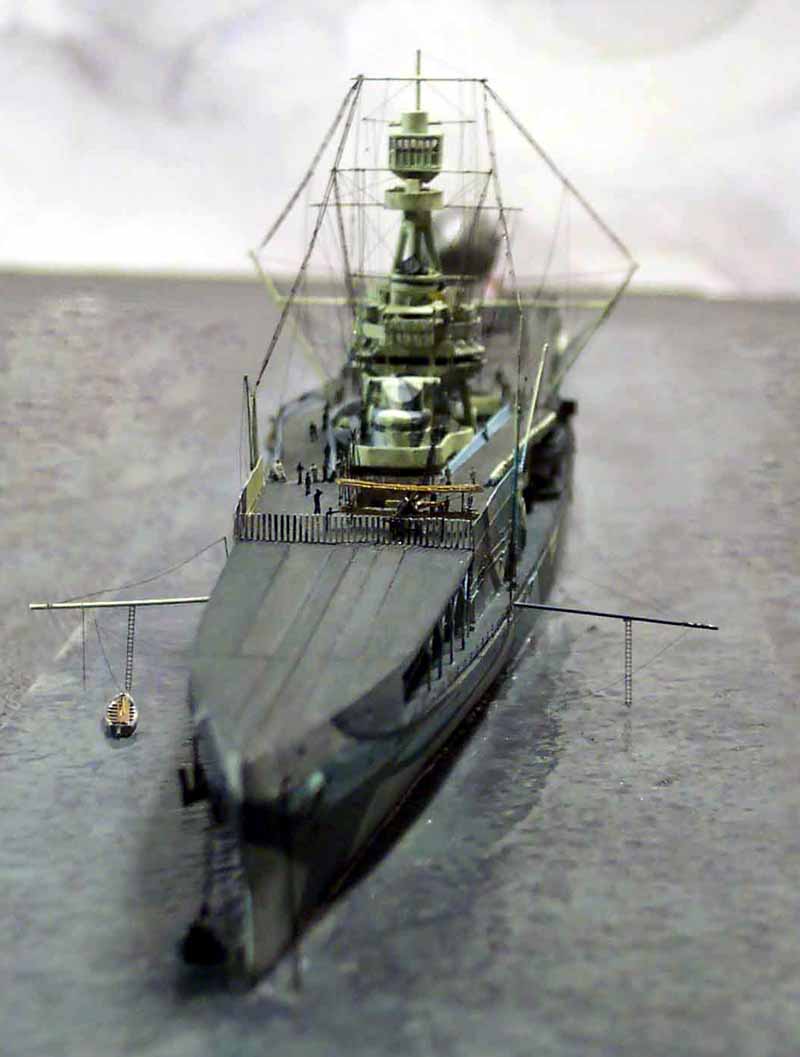
| The tripod mast was constructed from brass rod supplied according to the instructions and worked out well, a new upper platform was made to give thinner floor and sides. Back to the fwd flight deck... the outer braces with the Y pieces were in my opinion not spaced correctly and again had the top and bottom ridges for easy location, again this was not fine enough for me so I cut off the top and bottom edges, cut off the Y pieces and added new legs, spaced out according to my photo interpretation. At last an airy , fine and delicate looking under structure.! | 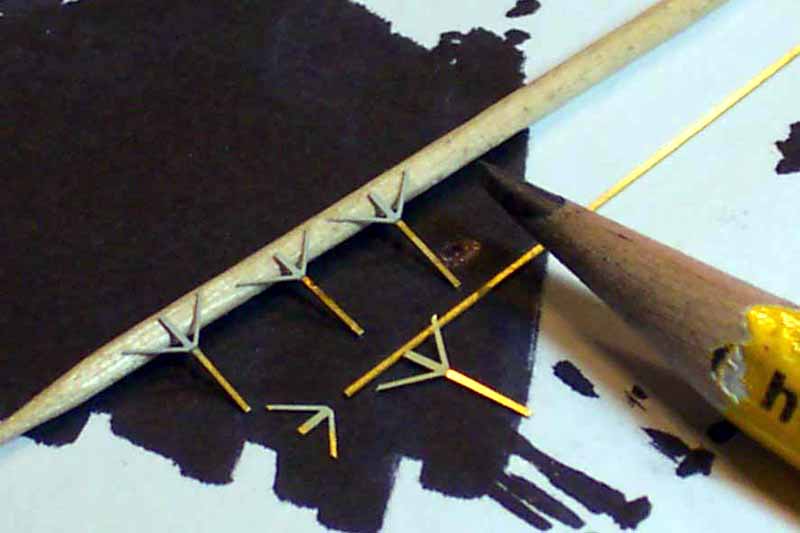 |
|||||||
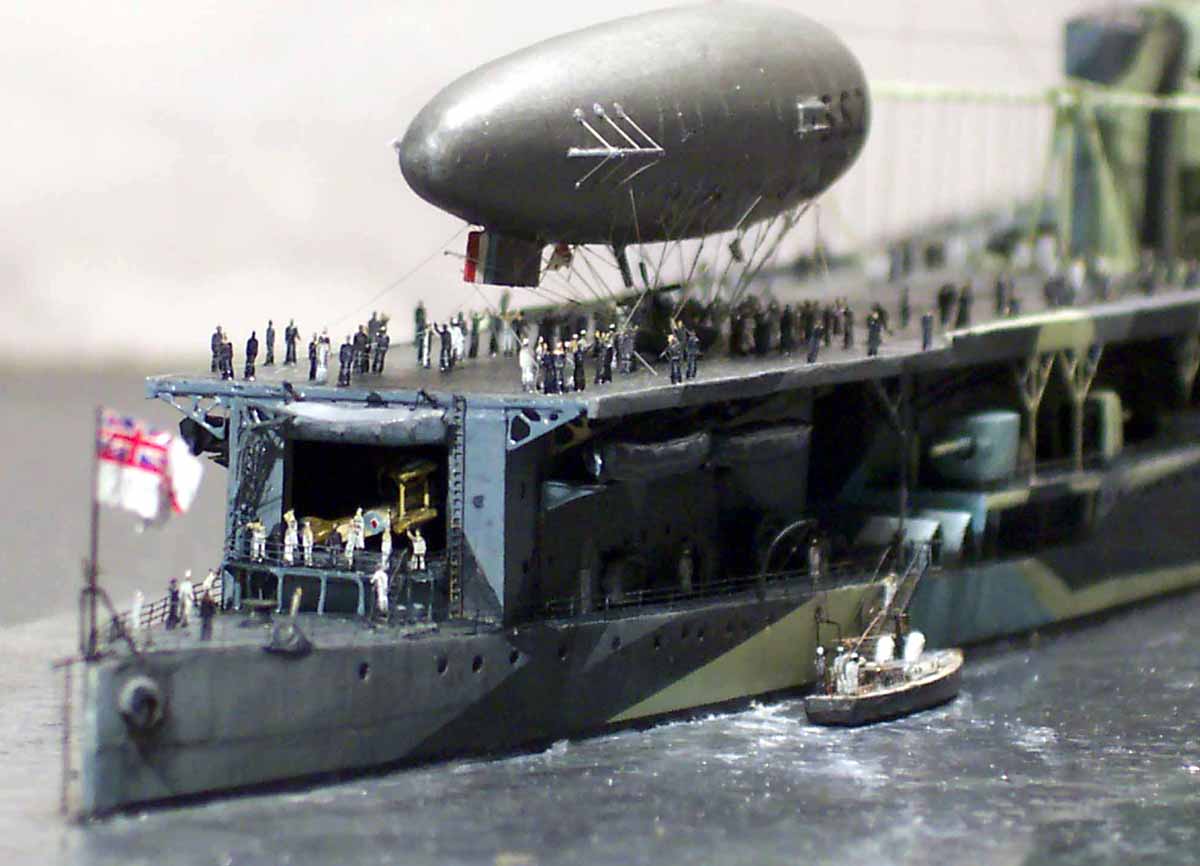
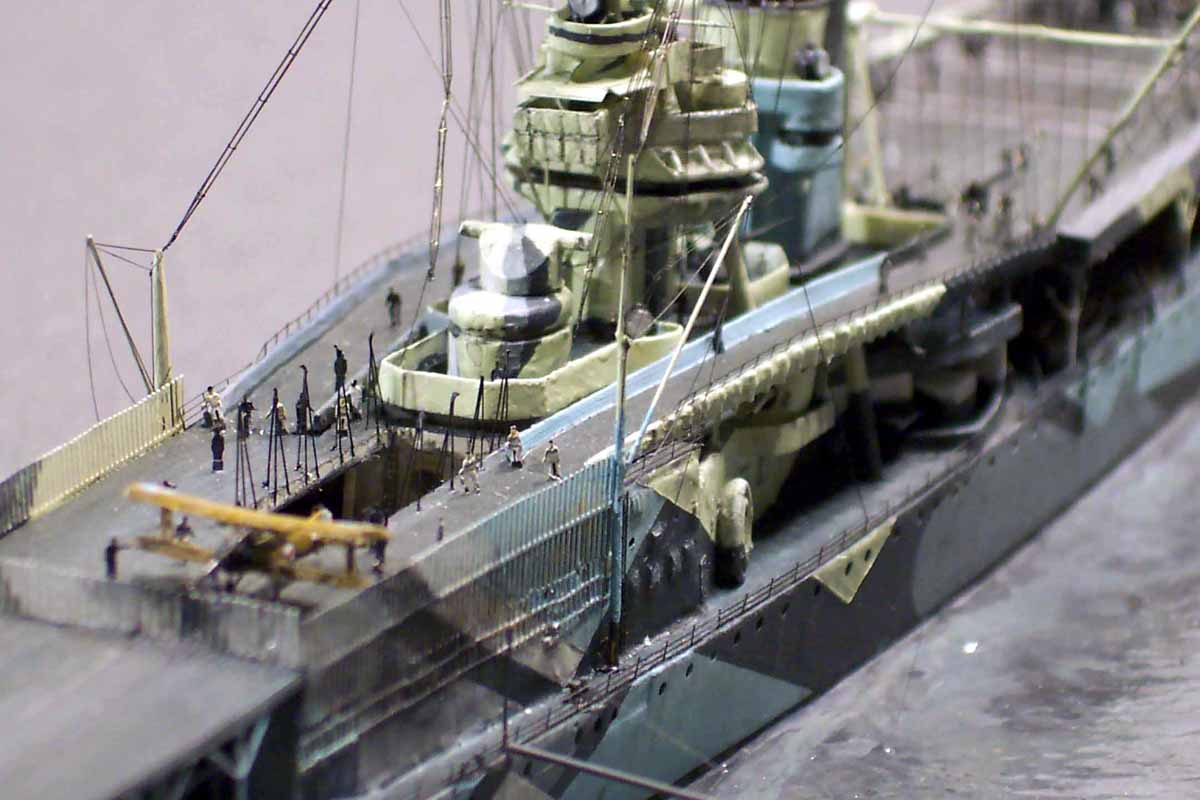
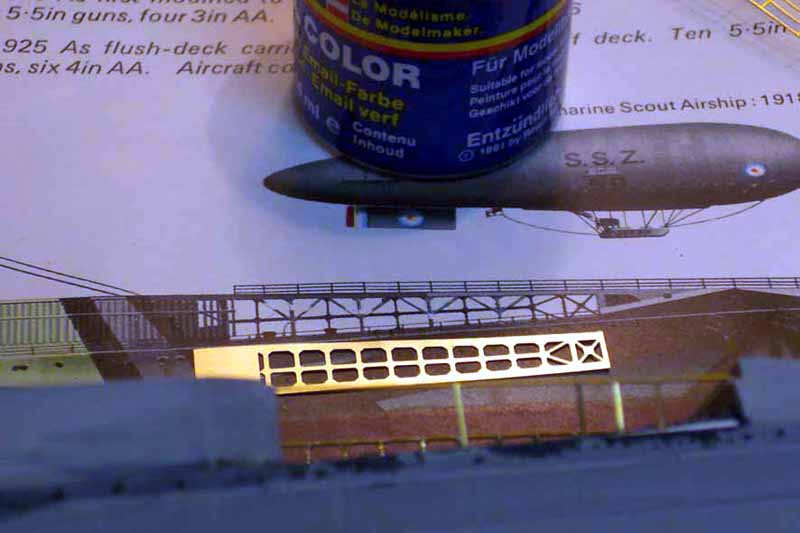
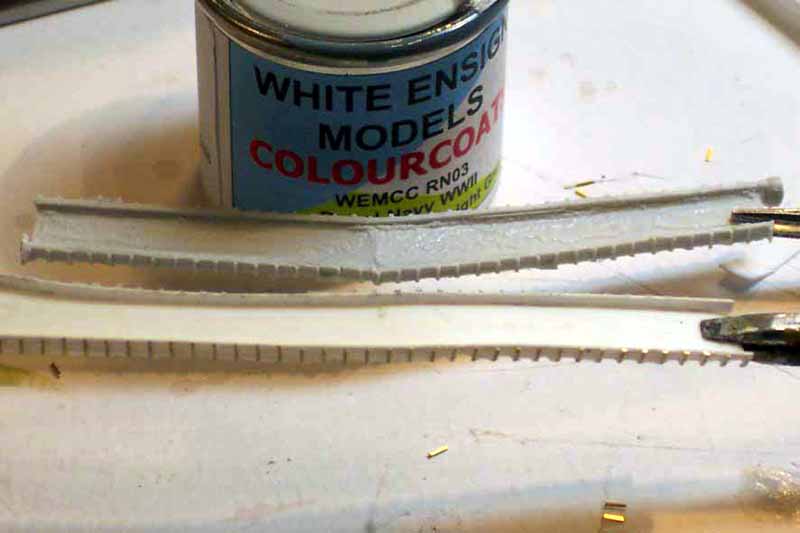
| The ship had a fence around the after part of the fwd flying off deck,
often called palisades or windbreaks, these could be raised and lowered
to permit flying or ranging of aircraft without them being blown overboard.
There was some really nice PE supplied to represent this feature. On the
real ship the palisade 'planks' ran as far as I can ascertain within vertical
guide tracks, I simulated these by using WEM under wing rocket PE( it's
sort of within the theme..!) and in my opinion they look delicate and just
right!
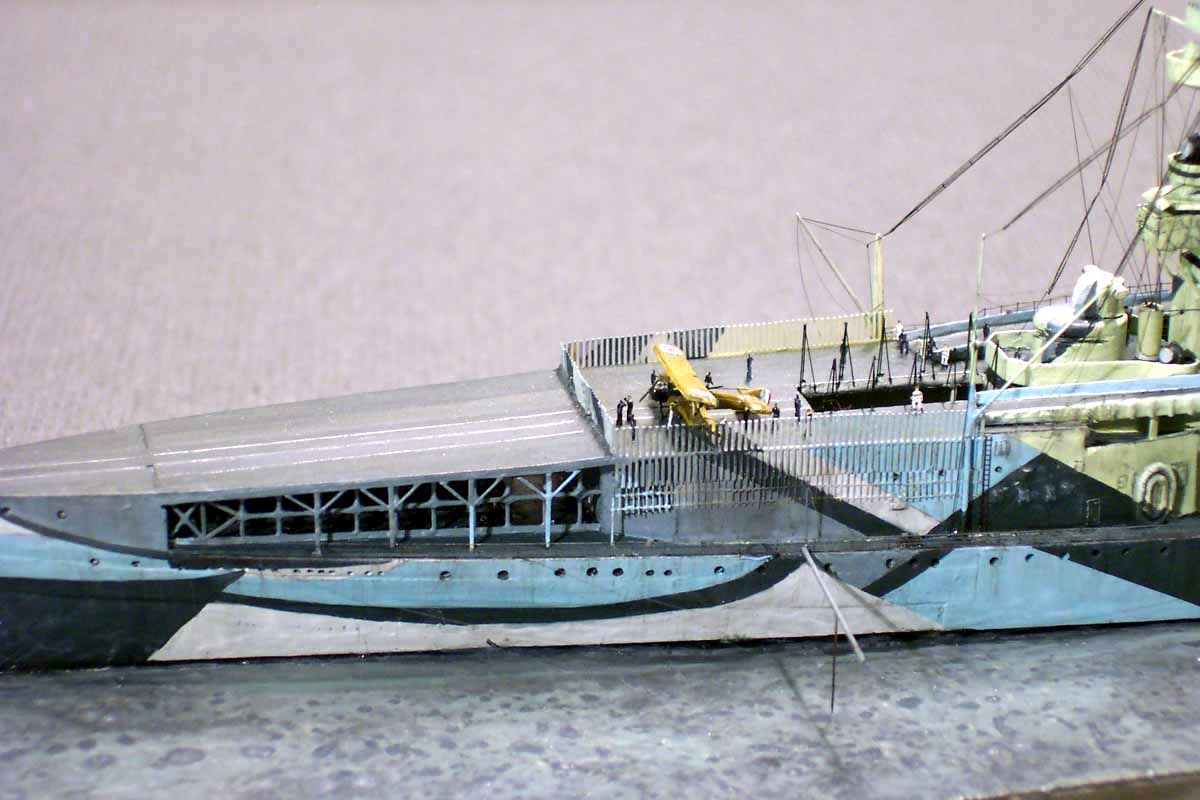
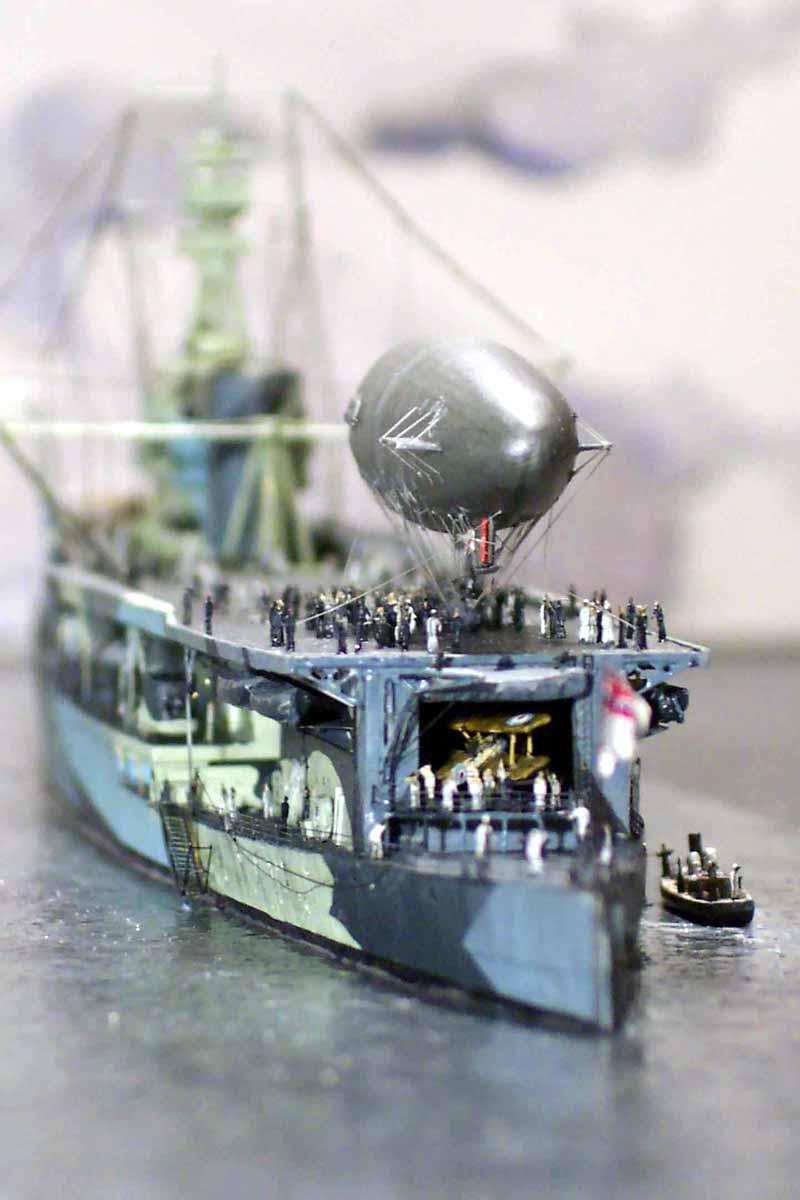
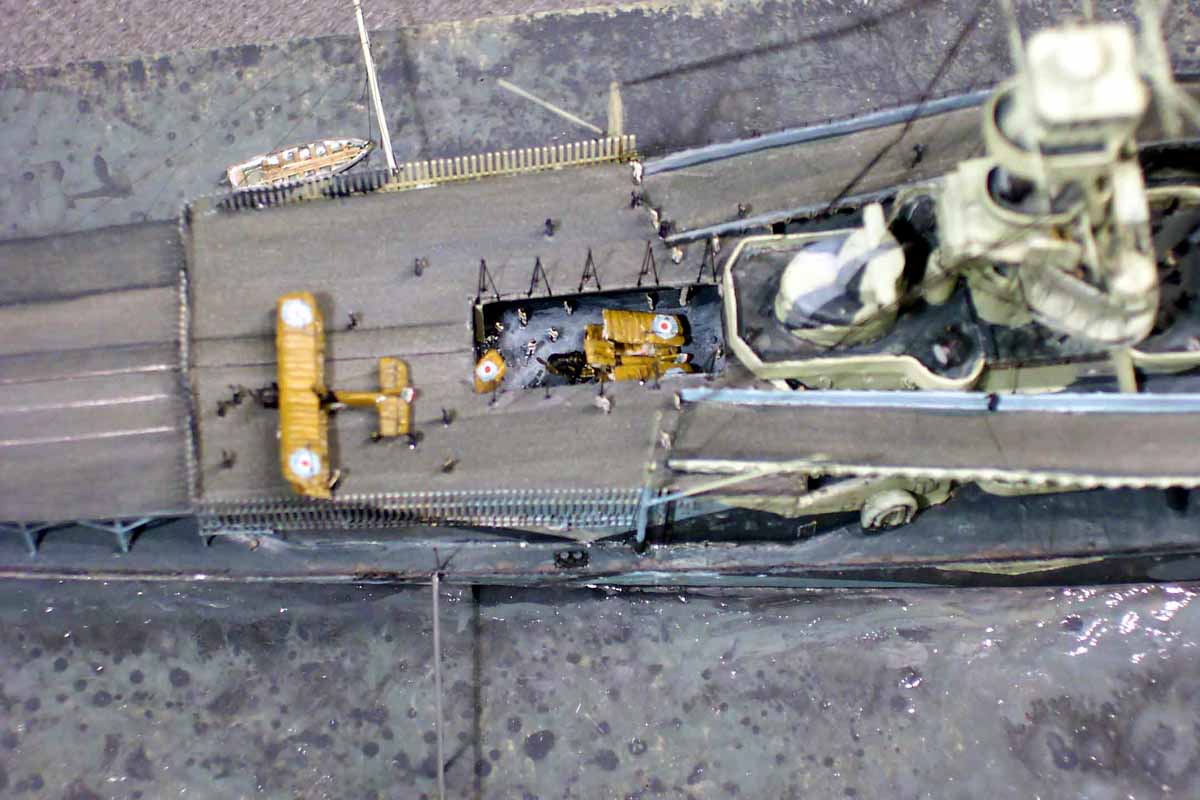
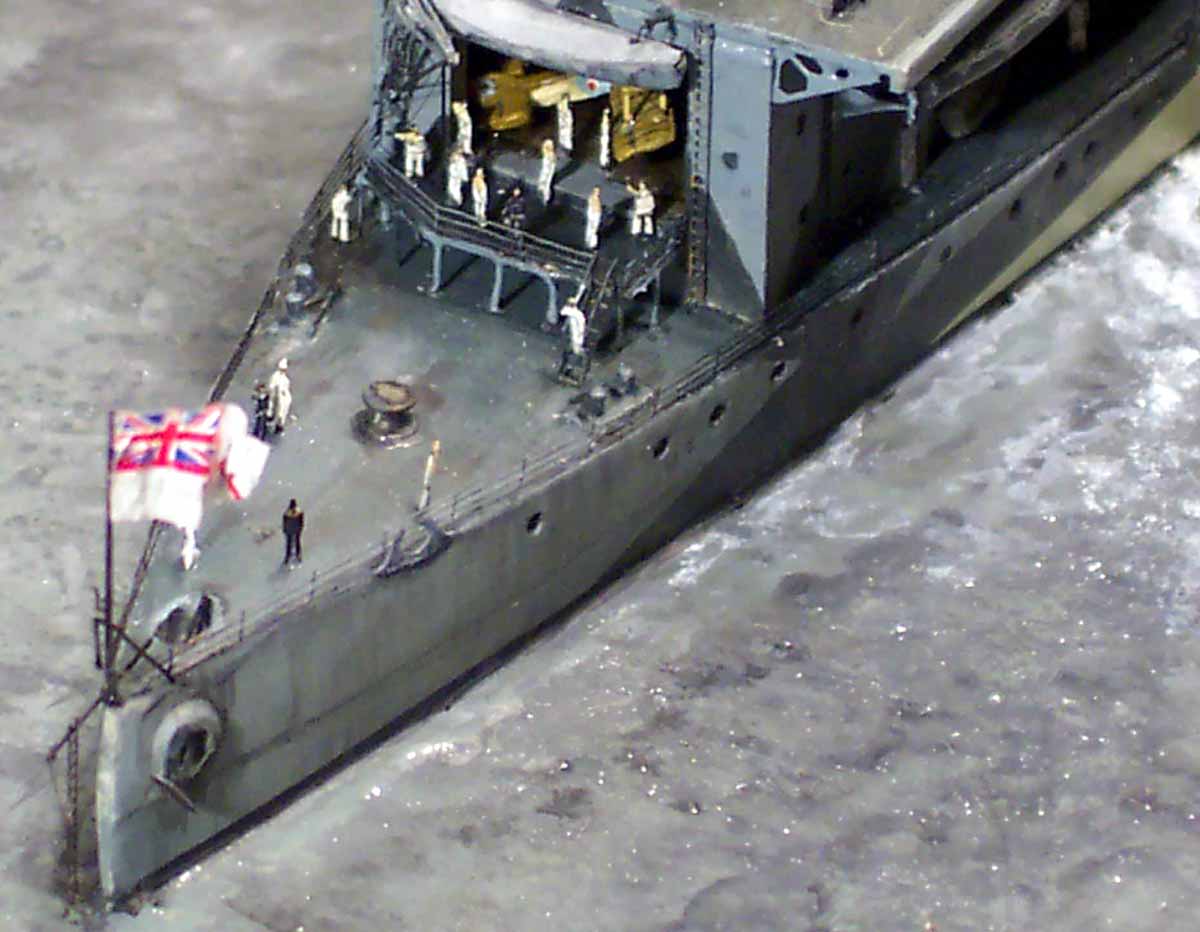
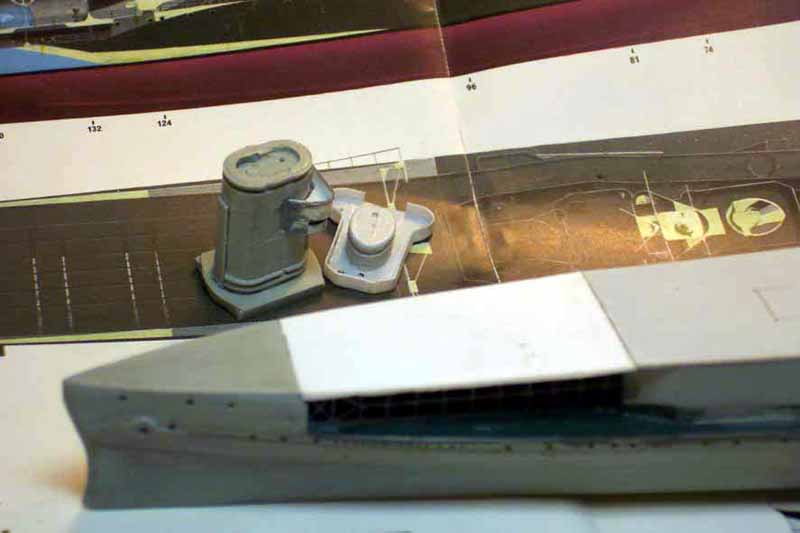
At this stage I decided that she would become a diorama at anchor with the blimp landing aft, so checking photos showed the fwd hangar lift at this time to be down and the aft one up.... so I cut open the fwd lift (within the delicate and fragile palisades..!) and painted the hangar inside (after dropping in a false floor and simulated ramp) and then inserted three aircraft... Plan Ahead!! (I evidently did not!) and then made a new 'lid' for the aft lift which now was up again...! |
 |
|||||||
|
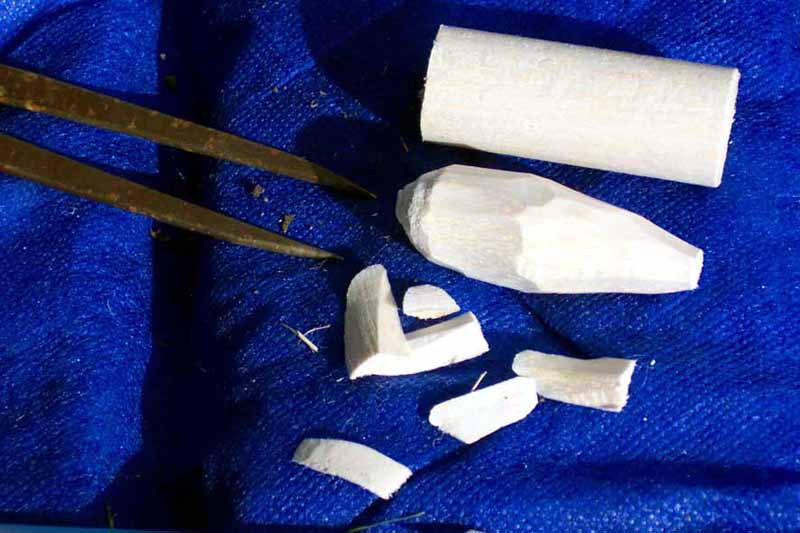
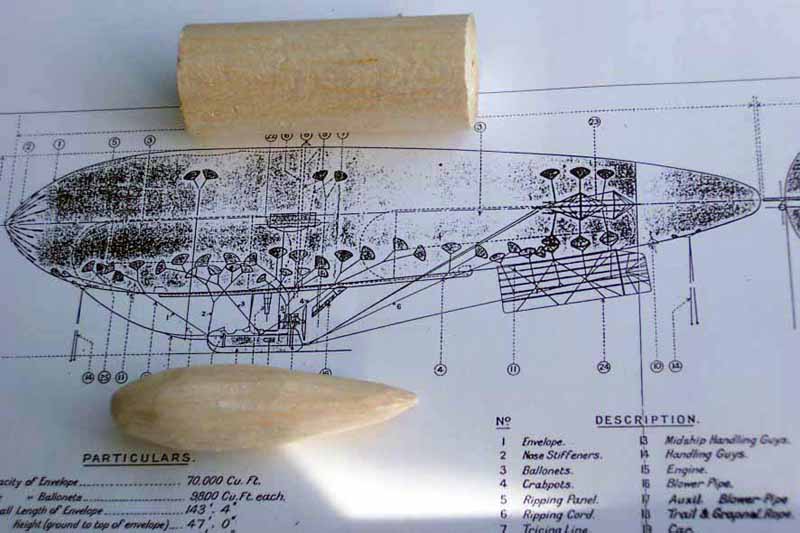
The Blimp was an adventure in itself, having secured a book called Battlebags (great book all about WW1 British airships) within which there is a useful general arrangement drawing of SSZ 59 as well as the vitally needed dimensions; I now was airship enthused! Armed with a Stanley knife and some Balsa dowel I proceeded to whittle the blimp envelope,, when the correct shape was achieved( I had three tries) it was sanded and soaked in CCA to harden the soft Balsa wood, re-sanded and re-sanded between many coats of paint. The panels were drawn on in fine pencil. The gondola was carved from resin scrap and drilled out for he crew, engine and prop made, fins were brass and the decal lettering was designed and drawn on a PC (not a standard font!) and printed onto clear decal sheet on an alps printer, won of e-bay for this very purpose.... Making the envelope stand above the gondola was a true nightmare due to material limitations (bendy wire!) in this scale, in 1/350 this would be EASY...! |
 |
|||||||
 |
||||||||
|
||||||||
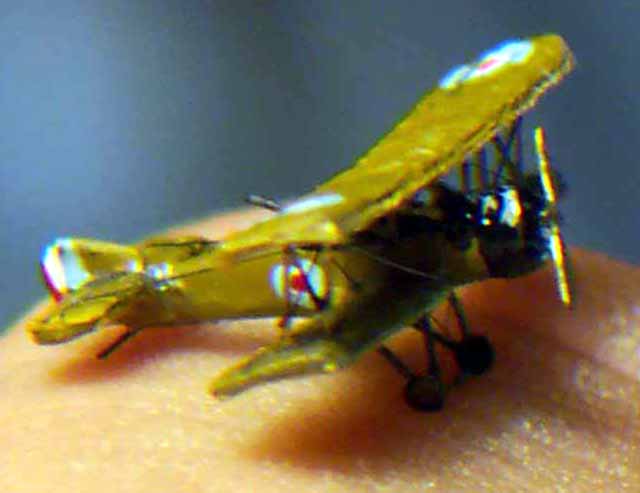
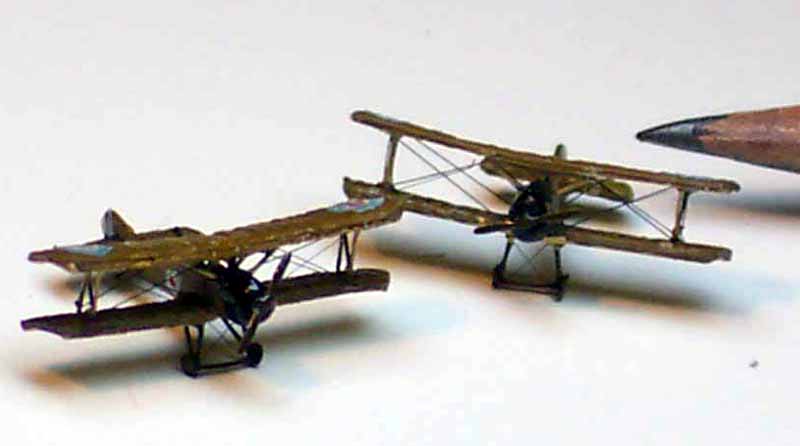
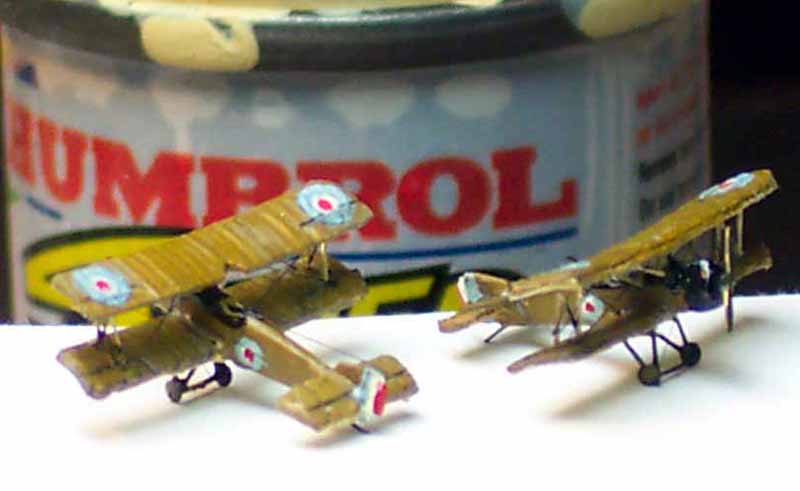
The aircraft were real fun to build and rig, they are very
small but really pretty! I had slight reservations about the wings being
in resin, they were very hard to thin down, perhaps relief etched (ribs)
brass wings which could be curved might be more delicate looking? In my
kit there was no decal sheet for the roundels though I understand that
there usually is .No matter, the roundels on the wings and fuselage are
very small so I simply painted them with small dollops of the appropriate
light blue, white and red, the end effect is really quite convincing!
|
||||||||
| The gallows which supported the aircraft crash barrier was a hoot to build! BUT again check as many photos from as many views as possible, the central post IS vertical, not angled, I built a few versions of the gallows.....! I initially used the vertical PE ropes supplied, but then felt that a finer looking effect could be had with sprue. The nets at the side as supplied in the kit in in PE were great, and initially I used them BUT.... The Warship Profile illustration shows the nets to be exactly as LCP supplied them, with four fore and aft 'cables', however photos show there to be five.... with far more vertical lines also. So off they (regrettably) came to be superseded with sprue items which collapsed many times until I finally gave up with sprue for the fore and aft cables. I eventually used very thin speaker copper speaker wire, heated over a candle and then drawn between pliers while warm to make thinner and straight, these were spanned and curved as appropriate, vertical cables being sprue, this gave a delicate and busy appearance and greatly enhanced the overall look. | 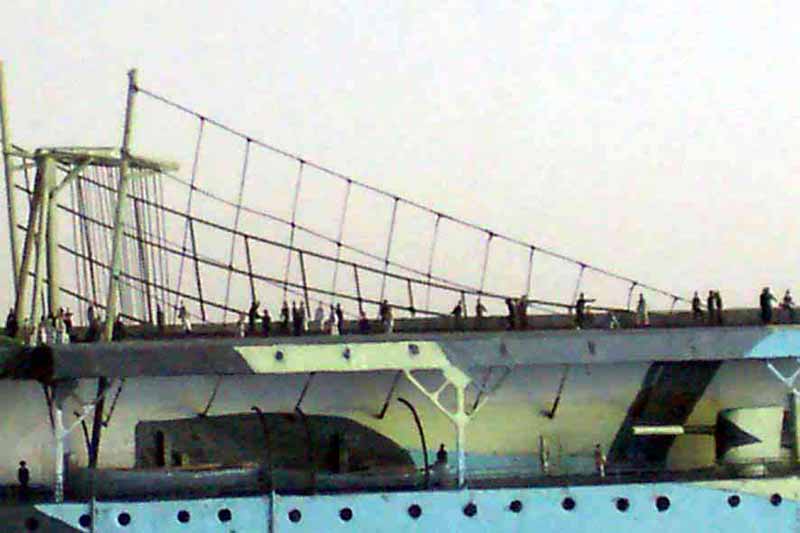 |
|||||||
| The boat access platforms aft were remade in thin brass, the small gussets at each end were made using sprue infilled with white glue. The platform above the aft deck below the aft hangar entrance was extended in width as seen in photos and new legs made. The aircraft handling crane aft was the right shape in side elevation but for my liking rather too wide, I cut out the center lattice work, recent and glued the side members and infilled with a small bit of Tom's Modelworks lattice from a spare IJN set. As far as I can tell at the time of the blimp landings there were no AA guns on the aft deck so I left these off. | ||||||||
|
||||||||
|
||||||||
| Ships boats were partly the kit items (with covers made from filler) and some WEM boats from the Pro 700 range. | ||||||||
|
||||||||
The addition of 400 plus crew members, an aircraft in the
aft hangar aperture, the blimp, and some final detailing with struts and
supports around the flight deck, application of the gorgeous etched fairleads,
supports for the aircraft ramps and 5.5 in platforms, barbette shafts of
alloy tube, rigging of sprue and final touch ups completed the model.
|
||||||||
|
||||||||
| Conclusion:
Overall conclusion is that if built from the box it will assemble into
a reasonable rendition of this unique carrier very quickly, the only problem
being the aft flight deck in plan view; the remaining modifications were
simply my never ending quest for delicacy and fine-ness to which I have
committed so much of my efforts in building small ship models. I look forward
to some more innovative ideas and kits for unusual ships from Loose
Cannon Productions.
|
||||||||