| The Ship | |||||||||
| HMS Arrow was built by Yarrow Shipbuilders Ltd, Glasgow
and launched on 5th February 1974 by Lady Raper, wife of Vice Admiral Sir
George Raper, Arrow was the fifth Type 21 Frigate to be built and the first
to carry Exocet missiles. She was commissioned on 29th July 1976 in Sunderland,
the town to which she was affiliated.
HMS Arrow served along with all her sister ships that made up the 4th
Frigate squadron, during the Falklands campaign in 1982, and was in the
first wave of ships deployed. She claimed the distinction of being the
first ship to fire on the Argentine shore positions as well as the first
ship to be hit by enemy fire after being strafed by a fighter jet.
She operated in and around Falkland sound with HMS Alacrity, keeping the seaway open and providing gunfire support to the troops ashore. After Arrow returned home she went into refit until September 83, after which she headed back to the Falklands as guardship. She also spent time in the West Indies as guardship and carried out anti piracy patrols. HMS Arrow served in the fleet until 1994 after which she was decommissioned and sold to the Pakistan Navy and renamed PNS Khaibar. She remains in service to this day in the Pakistan Navy . |
|||||||||
| The Kit | |||||||||
| This resin kit is what you have come to expect from Peter
Hall, formerly working for White Ensign Models, and now for his own company
Atlantic Models. You get neatly produced and rather well-fitting resin
parts, a full panoply of very neat PE parts, a number of white metal parts,
some metal rods, a decal sheet covering all vessels of the class, and comprehensive
and well-thought-out instructions. The white metal parts are coarser and
need more cleanup than the resin parts, but used where resin would not
work for casting or weight reasons.
The kit is usable virtually for all the ships in class. The limited scope of modernization made it possible to include both a Wasp and Lynx helo, plus parts for the early and late main mast, plus the early and late torpedo deck supports. For an early fit, the Exocet launchers would have to be deleted and the Corvus flare launchers moved ahead of the bridge. Some items are included in the PE fret, but not mentioned in the instructions, such as signal lights for the bridge wings and danbuoys. A machined brass gun barrel, produced by Master of Poland, is available via Atlantic Models. I used this gun barrel plus the very neat Oerlikons from Master, as they are superior to the all-PE assemblies from the kit. |
|||||||||
| Building the Kit | |||||||||
| Having just completed another Atlantic Models resin kit, I was reasonably familiar with the process. The type 21 being a smaller and much simpler vessel, it was an easier build. I especially approved of the lack of any complicated latticework PE assembly in the radar or missile launcher department. Both parts had taxed my skills and especially patience in the HMS Glamorgan build. | 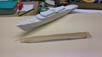 |
||||||||
|
Deciding to model Arrow during her Falklands service, I made sure about her fit. She had the early main mast then, the Lynx helo, and no torpedo tubes yet. I found a nice photo of her returning home after the war to reference her fit as well as markings and wear and tear. |
 |
||||||||
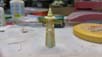
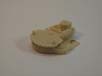
| After cleaning up the resin parts, I assembled the hull parts with liberal amounts of CA glue. Sanding the hull seams was a bit more of an effort than with the County Class, but easily done. Parallel to that, I identified the various subassemblies (again, a much shorter list than with Glamorgan) and set to work on them. I made sure I used the machined brass barrel with the gun, and it worked well. The two kit all-PE Oerlikons were substituted with Master´s superior items combining PE and machined brass. | 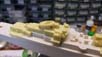 |
||||||||
| I digressed from the kit instructions in only a few places. I chose to replace resin part 9, the Fore Mast radar platform, with the PE underpanels and scratchbuilt the rest of the part instead of grinding away from it to use the PE panels with the kit part. The end result, despite being more work, looks quite nice to me. I also added a railing to the top of resin part 4, the fore mast, having seen it in reference images. For better stability, I augmented the numerous PE mast yardarms with wire. | 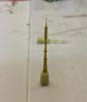 |
||||||||
| I´m always partial to bridge windows. They are the face
of the vessel to me, and need to look good. In this case, they were only
lightly marked in the resin part, and would need a lot of careful masking
and painting. To improve that look a bit, I cut squares from PE ladders
of appropriate size, and glued them to the model as "window frames".
Apart from that, I followed instructions and worked my way through the subassemblies. |
 |
||||||||
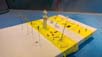
| In this build, I tried a different approach to the railings. I cut
them out of the PE fret, cleaned them up, bent them to shape, and then
placed them on mounting blocks. I use blocks of foam board with a budget
version of Tamiya tape fixed to them by pins for all my subassemblies,
and it worked quite well.
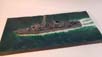
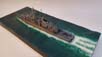
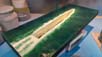
Early on in the project, I made the base for the model in my usual method from 30 mm foam board. A cutout for the hull was made, and the general wave pattern produced by gently applying heat from a gas burner. Adequate ventilation is a must. The model was isolated using clingfilm, and then placed in the cutout on the base. Remaining gaps were filled with acrylic caulking. That cured, the model was removed and the caulking trimmed. The sea surface structure was produced by stippling white wall paint onto the base. Wave effects were sculpted using heavy gloss clear acrylic gel. The surface shade was achieved by irregularly spraying first a green shade away from the ship cutout, and then a blue shade for the further areas. After all this water-based materials had dried, the base was sprayed with a solvent-based clear gloss spray from a rattle can to achieve the desired sheen. Further wave effects were added using acrylic gel, highlighted after curing with white artist´s oil paint. |
 |
||||||||
| Paint and markings | |||||||||
| Arrow had a rather simple paint scheme of R.N. Light Weatherwork
Grey for her vertical and R.N. Light Deck Grey for her horizontal surfaces.
Her boot topping was black, and her lower hull antifouling red. Her hull
and flight deck markings had been hastily overpainted upon the begin of
hostilities, but on the homecoming image it was evident that this paint
was peeling off at the time, revealing her markings again. She had suffered
quite some wear and tear, and her hull was rust-streaked.
I started with priming the model using Stynylrez acrylic primer, which in my experience is quite ahead of the acrylic primers I previously used. There was nearly no paint lift off, and the primer can be sanded and "feathered" virtually like ye aulde enamel stuffe. Spraying the lower hull in black primer, I masked off the boot topping and then sprayed the lower hull Vallejo fire red over it. That ended up in a nicely muted brick red. That also masked, I sprayed the horizontal surfaces in Vallejo ModelAir Grey Primer, which to me is a good approximation for the RN deck grey. I needed to do a lot of masking after that, but it was worth it. Having masked all the decks, I sprayed the vertical surfaces ModelAir Pale Blue Grey aka RLM 76. I only needed some minor touchups and was quite happy with that. Numerous smaller deck items were painted by hand, though. The railings were sprayed light grey, and the bars hand painted dark grey. The bridge windows were painted with thinned dark blue paint at this stage, too. Next, the model was glosscoated using Klear, preparatory to decaling. I then applied the kit decals for the hull, transom and flight deck markings, and again glosscoated them. Now for the interesting part: I applied Marmite, the iconic and tremendously healthy British yeast extract to the markings using a little piece of a sponge. After applying, the surrounding areas were masked and the markings sprayed over with the appropriate paint. After curing, the marmited areas were brushed off and the markings re-appeared in part. Just like the hairspray or salt chipping method, but with a uniquely British touch. I do not know whether the flight deck markings also re-appeared during the end of the deployment, but I liked dabbling with the Marmite and the effect so much that I did it anyway. I also added a Union Flag decal from my stash to the wheelhouse roof, even though I have no hard evidence that it was there. I know Glamorgan had it, and I consider it quite likely that the Type 21´s had it, too. Now it was time to bring things together. |
|||||||||
 |
|||||||||
| Final construction | |||||||||
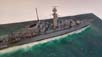
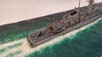
| Having added the superstructure blocks and cleaned up the remaining gaps, I started adding details, always working away from the centre of the model to its periphery. So I began with the equipment for the topmost deck and the masts. I also rigged the model at this early stage, as rigging is always my nightmare and I appreciate having as little risk of accidental damage as possible. UNI Caenis monofilament was used. Continuing to add my prepared subassemblies, I arrived at the boats and finally at the flight deck and the forecastle. Railings were carefully attached with Zap a Gap Medium CA glue, excesses removed with a Q-tip. Some paint touchups were needed, but not overly much. Anchor chains and stoppers were added to the forecastle deck, and the anchors. The helo was built from the box and placed on the flight deck. A number of sailors from my NorthStar supplies were placed aboard. An acrylic flat coat was applied to achieve a uniform surface. | 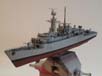 |
||||||||
|
|||||||||
| Conclusions | |||||||||
| This is a good kit, very complete and well produced, that builds into a handsome model of a ship that may not have been the best amongst the RN postwar classes, but performed as well as could be expected and looked good doing so. | |||||||||
| References | |||||||||
Books:
|
|||||||||
More
of Frank Spahr's work.
Updated 9/25/2019

© ModelWarships.com