| |
| The Ship
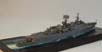
HMS Glamorgan belonged to the eight vessels of the County Class, Britain´s
first guided missile destroyers. The vessels´ main armament was the
Seaslug anti aircraft missile. This very heavy missile was powered by a
sustainer rocket engine and accelerated by four solid fuel boosters that
separated after launch. It needed constant guidance by a type 901 radar,
so only one target could be engaged at a time. A large latticework twin
launcher dominated the ship´s quarterdeck, whilst a large part of
the hull was used for missile storage and launch preparation. Any missile
needed final assembly of its control surfaces and boosters prior
to launch.
The event shown HMS Glamorgan´s involvement in the Falklands war began in late
1981. She was scheduled to serve on the so-called Armilla patrol in the
Persian Gulf. On her way into the area the British task group was granted
time for an exercise with a USN carrier battle group. At the time, Admiral
"Sandy" Woodward flew his flag aboard Glamorgan. Woodward set the exercise
that his task group was to attack the US carrier from outside a circular
exclusion zone.
|
|||||||||||
| The Kit | |||||||||||
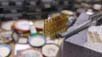
| This resin kit was first offered in 2013, and I got one pretty early on. It is what you have come to expect from Peter Hall, formerly working for White Ensign Models, and now for his own company Atlantic Models. You get neatly produced and rather well-fitting resin parts, a full panoply of very neat PE parts, a number of white metal parts, some metal rods, a decal sheet covering all vessels of the class, and comprehensive and well-thought-out instructions. There are no machined brass items, which some of the subassemblies would benefit from. The white metal parts are coarser and need more cleanup than the resin parts, but used where resin would not work for casting or weight reasons. The kit is mainly usable for Glamorgan in her Falklands fit. The two batches of the class differed in their superstructures, so building a batch 1 vessel would mean some serious scratchbuilding. | |||||||||||
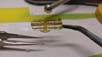
| An additional gun turret for backdating the model to a pre-Exocet fit is available from Atlantic Models. In the meantime, machined brass barrels for the 4.5 inch turret manufactured by Master are available from Atlantic Models. |  |
||||||||||
| I used these gun barrels plus the very neat Oerlikons from Master, as they are superior to the all-PE assemblies from the kit. Wooden gratings for the bridge wings were made from L´Arsénal 1:700 stock. The only other aftermarket item I used were some additional liferaft canisters I got via Shapeways, designed by Model Monkey. |  |
||||||||||
| Building the Kit | |||||||||||
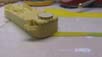
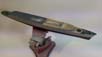
| Having decided on how to display the vessel, the first
step was to assemble the hull parts. After some limited cleanup the parts
fit very well, and they were glued with liberal amounts of CA glue. I also
used screws to apply pressure and secure the parts. After curing, I removed
the bilge keels from the hull to ease fitting it into my base. Sanding
the waterline seam was surprisingly easy, it took much less time than I
had expected.
The other main resin components were cleaned up and test-fit. The two superstructure blocks needed quite some tweaking, and I assume must have warped later on, as I found fresh gaps when they were finally glued to the hull. On the whole, the resin parts worked and fit very nicely. |
 |
||||||||||
 |
|||||||||||
 |
|||||||||||
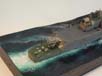
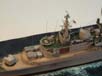
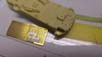
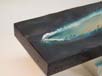
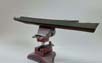
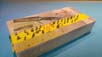
| The base was prepared very early on, after my usual method. It is rather small, as I wanted to use a standard Trumpeter display box. I prepared a wave pattern beyond the later base size using a gas burner (making sure I had adequate ventilation), then made a cutout for the hull and cut the base to size. Some very limited sanding completed the dirty work. The vessel was wrapped in clingfilm and fit on the base with acrylic caulking to close gaps remaining after making the cutout. | 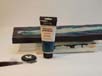 |
||||||||||
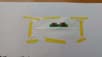
| The base was then painted with white wall paint in a stippling motion
to provide the sligthly irregular surface texture that most closely resembles
water. It was later on sprayed first with a green and then a dark blue
shade of acrylic model paints, providing a transition between the disturbed
water around the vessel and the undisturbed water surrounding it.
This was left to dry for two weeks, to let any residual moisture evaporate. Then the base was sprayed with several coats of gloss clear from a rattlecan, to seal it and provide the necessary reflective surface. Further wave and wake effects were applied using heavy clear gloss acrylic gel, drybrushed and enhanced with white artist´s oil paint. |
 |
||||||||||
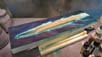
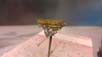
| The bow wave was further enhanced using a mixture of clear gloss acrylic
gel and the small plastic balls meant for use with CA glue. That gives
a nice texture, and when drybrushed with white oil paint, a pleasing result.
Returning to the vessel proper, there followed a lot of work on various subassemblies, as usual. I cleared up the various resin parts and those of the white metal parts I would use, and continued from there. Mostly the model was built OOB, I only replaced the massive bridge with a scratchbuilt replacement that would look transparent. I made a bridge roof patterned after the kit part I had removed, and fashioned framing for the bridge windows from wire and styrene stock. |
 |
||||||||||
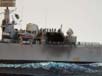
| The most daunting tasks were building the type 965 radar
array and the Seaslug launcher. In retrospect, building the radar array
was the easier task. It only needed nerves of steel and truckloads of patience.
You get a front face and a rear face, and several dozens of mesh screen
plates, which need to be mounted at defined angles to the front face so
they can be glued to the rear face in the right spot. Plus some additional
framing on all four sides. It´s doable, but it takes stamina.
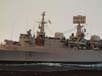
The launcher assembly is a different kettle of fish. The construction sequence takes up a full page of the instructions, to begin with, and still doesn´t quite tell you all. Plus the stuff didn´t fit the way it was supposed to, at least when I tried assembling it. I disassembled the entire thing twice, as in putting it into a dish with acetone, and using a flame to remove any remaining CA glue. I also cut apart the crucial horizontal planes #48 and 49 at some point. That was supposed to be done at the end, and when I had to restart the whole thing, I really had a mound of very iffy parts before me. Somehow I managed to get the thing together and mounted it on its white metal base. I solemnly vowed not to tackle something like that in the foreseeable future again. Many items were easily built and detailed, and I did make some good progress. I had some problems locating all the vent grills, and one or two were left over, but they were easily attached, with some annealing helping with the curved ones. Building the masts and adding the very iffy PE yardarms was quite a daunting task, same as somehow getting the white metal ECM arrays mounted via very iffy PE braces to the mast. The whole yardarm arrays ended up very weak, which boded ill for rigging them. In my project, I now needed to decide how to model the missile damage. Looking through the images available to me, I saw that at the moment I wanted to show, most debris was gone, including the hangar door, the big hole in the deck had been plated over, and a provisional railing had been rigged where the safety netting had been destroyed. The hangar roof had buckled upwards from the blast, and the fire had left traces in and around the hangar and on the hull side. I buckled the hangar roof by carefully applying heat to the part and then pressure from below the roof. That worked quite well, but may have warped the part a bit, so I needed to make it fit to the main deck again. The plating over the hole was made from thin styrene stock. I omitted the port Sea Cat launcher and added a PE disc to where its mounting hole was. I had to reposition the starboard launcher when mounting it, as in its original position it would interfere with the Sea Cat director platform. All this took time, as usual, but having the most difficult parts out of the way, I grew more optimistic. Failure in building the 965 radar or the Seaslug launcher would have meant I could trash the entire project. No pressure ... |
 |
||||||||||
 |
|||||||||||
 |
|||||||||||
 |
|||||||||||
 |
|||||||||||
 |
|||||||||||
| Paint and markings | |||||||||||
| I have had really annoying problems over several years
with paint liftoff. Ships need masking for their boot toppings, so I was
always concerned I hadn´t properly prepared or primed the model.
I washed my kit parts in soapy water, I lightly sanded my surfaces, I de-greased
them using white spirit and the like, I tried various primers, it happened
again and again. It also didn´t matter whether I used acrylic or
solvent-based primers, I simply wasn´t sure about the outcome. After
reading about it on the Modeling Madness forum, I got myself Badger´s
Stynylrez primer in black and white, and tried it on this project. It did
work like a charm, and I had no liftoff whatsoever on the hull sides. I
was very much relieved about that.
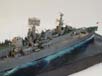
After priming, the hull was sprayed black, the boot topping masked off, and then the lower hull sprayed red. With the black below the red, that made for a dull brick red which I much preferred over a brighter hue. The hull sides and remaining vertical surfaces were sprayed Vallejo Model Air Pale Blue Grey, equivalent to RLM 76, which looks quite allright to me, thank you very much. The wooden deck areas were sprayed from my dwindling supplies of JPS IJN Deck Tan, and then a dark brown oil wash was applied, which left a convincing result. The flight deck was sprayed Vallejo Model Air Grey Primer, and the green deck areas in vallejo Model Air Camo Green. |
 |
||||||||||
 |
|||||||||||
 |
|||||||||||
| Final construction | |||||||||||
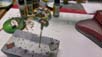
| Basic painting done, I painted the missile damage. I wanted
to do that prior to attaching the rear superstructure, as the hangar was
better accessible that way. Using various greys and reddish browns from
the airbrush and some hues in artist´s oils, I tried to get reasonably
close to the impression the reference images gave. I also started weathering
the hull, using artist´s oils.
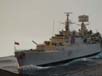
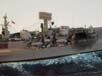
That done, I started assembling the main components. As mentioned above, I needed to do some adjusting and filling on the two superstructure blocks, but it was doable. From then on, it was a succession of adding parts from large to small and from the model´s center to its periphery. I only tackled the forecastle and quarterdeck once the rest was completed, in order to minimize the risk of accidental damage. The PE railings were prepainted on the fret, then cut from the fret, bent to shape, glued with Zap a Gap medium CA glue, and then handpainted, rendering the individual bars in a darker grey. The rigging was a most nerve-wracking experience, as the yardarms were so flimsy. I used .1 mm wire from Albion Alloys for the antenna wires and UNI Caenis for the signal lines. I was tremendously relieved when it was over. I almost ran out of railings, and would have appreciated a bit more spares, but luckily had some stashed from previous projects. The vessel flew several flags on the occasion, one of them a large Welsh flag from her main mast. As I had no Welsh flag, I printed it on cigarette paper, and painted that paper white from the backside. Upon folding the flag, it looked quite all right. The other two flags were sourced from my stash, as I botched the kit flags. They stuck to my fingers, let it remain at that ... Rather late in the project, I realized that I needed more liferaft canisters, so I ordered a batch from Shapeways. These items look the part and are easy to work with. I needed to fashon some supports for the canisters from scratch, which was anything but a big deal. Some additional PE items found their way to the rear of the bridge wings and the long inclined ladders leading to the aft missile deck. Having finally added all the bits and pieces, I started adding the crew, using the very good NorthStar figures. It must be about a hundred of them, surely less than there were in real life, but I hope they do convey the look of the reference image. That done, I very carefully glued the two pièces de résistance to the model, the masttop radar array and the missile launcher. |
 |
||||||||||
 |
|||||||||||
 |
|||||||||||
That done and secured, I added a good flat acrylic coat
of forgetfulness to the model, hopefully obliterating most of the numerous
blemishes. That dry, I added glazing to the bridge window frames, and as
the final touch added the bridge roof, when the glazing was cured clear.
The model was then placed on its base, its fit was so snug I did not glue
it to the base.
|
|||||||||||
| Conclusions | |||||||||||
| This was the single most expensive model kit I ever built
so far. There were moments when I thought I would not be able to adequately
complete crucial subassemblies, and the entire project looked in danger.
So I would rather recommend the kit to those with some experience and the
dedication to complete intricate and demanding PE assemblies.
I did enjoy the process of researching and building and finding solutions to numerous detail issues, and I am quite happy with the completed result. A Falklands veteran I know told me the model did look right to him, and brought back the memories, some of them uncomfortable. I was very impressed with the candid account by the late Ian Inskip of his war experience and the trauma he brought home with him, and seeing the model I feel I can relate to the mixture of emotions the crew must have felt in this moment of release. |
|||||||||||
| References | |||||||||||
Books:
|
|||||||||||
More
of Frank Spahr's work.
Updated 2019

© ModelWarships.com