| |
|
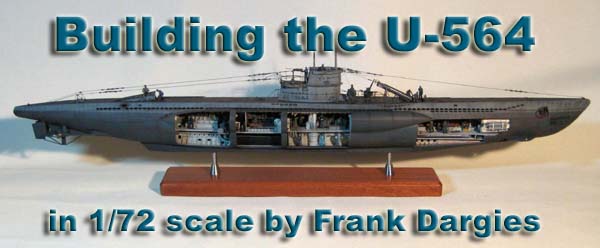
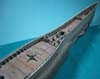
In March 2008 I started my project U-564, a VIIc U-boat under command by Kapitaenleutnant Reinhard "Teddy" Suhren. I decided to build U-564 because I found ideal references in the
book:
|
|||||||||||||
| U-564 Data
Type VIIC
|
 |
||||||||||||
| Commanders
03.04.1941 - 01.10.1942 Oblt.z.S./Kptlt./Korv.Kpt./ Reinhard Suhren (Later Freg.Kpt / FdU Nordmeer) 01.10.1942 - 14.06.1943 Oblt.z.S. Hans Fiedler Flotillas
Operations
U 564 sunk at 14.06.1943 in the Biscay under command of Oblt.z.S. Hans Fiedler northwest Cape Ortegal under attack by depth charges of a Whitley G from British Operational Training Unit Squadron 10. |
|||||||||||||
| In summer 1942 a war correspondent attended a war patrol
of U-564 and took lots of photos of all areas of the Uboat. These photos
were stored in a shoe box and discovered about 60 Years later in England.
Lawrence Paterson collected and presented them in his book.
This is my most complex project, because I've used almost all accessories available on the market |
|||||||||||||
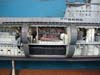
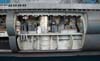
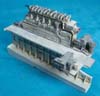
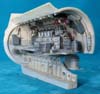
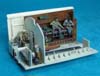
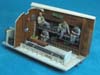
| The Interior | |||||||||||||
|
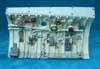
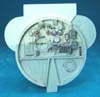
following CMK sets were used: Engine Room
Everything was supplemented by various parts and figures from the CMK sets: Proviant Set
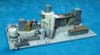
All sections were supplemented by various scratchbuilt parts, for example: The diesel control station including controls, instruments and engine
telegraph.
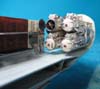
Command and torpedo section with additional valves, handwheels and tubes,
handholds, compass, engine telegraphs, rudder angle indicator, speaking
tubes, helmstand, nautical charts,
For all rooms, an illumination of 16V bulbs was installed.
Not missing of course, the crew at rest, the machine operators, command and torpedo room crew. The following interior colors were used: Interior above floor: RAL 9003 (Revell 5 matt white with 2% Humbrol
41 Ivory)
Engine room, officers and command section were glued into one complete
unit.
|
 |
||||||||||||
 |
|||||||||||||
 |
|||||||||||||
 |
|||||||||||||
 |
|||||||||||||
 |
|||||||||||||
 |
|||||||||||||
 |
|||||||||||||
 |
|||||||||||||
 |
|||||||||||||
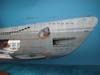
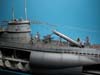
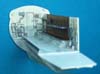
| The Hull | |||||||||||||
|
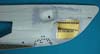
In advance I prepared the cut-outs in the starboard hull half. The halves and interior were fit together without glue at first, to make corrections. Here it had to be kept in mind that the visible part of the pressure hull (Upper Pressure Hull by Yankee Modelworks) would be installed later. Many phases of construction are to plan ahead and you need to think very carefully before you stick something together! Before the interior was glued in, I did all the work on the hull halves: All upper flooding holes were opened, they partially had to be filled
and redrilled.
The indicated doses of the sonar device were sanded off, drilled out and replaced with pieces of copper wire. The anchor bay was moved forward 7 mm, because its position was wrong (left as it was before, the anchor would have fallen onto the forward dive plane ...). The inspection hatches of the saddle tanks (Model Brass Deck Set) were gently countersunk with a hot soldering iron and sanded over, various parts from the Eduard Photoetched Set were used. All sanded rivets were pierced again by using a special tool.
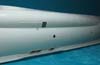
Finally, the two hull halves were primed, some now visible gaps
and errors were corrected and the halves were primed again.
|
 |
||||||||||||
 |
|||||||||||||
 |
|||||||||||||
 |
|||||||||||||
 |
|||||||||||||
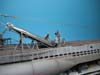
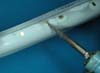
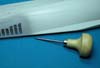
| The Upper Pressure Hull | |||||||||||||
| Next the pressure hull was adjusted. As provided for installation
without interior sections, it had to be adapted completely, ground down
to a thickness of about 3 mm (with a grinder, dust mask ... and do it outdoors
!) and cut into separate pieces.
In addition, parts from the CMK Kit Winch For Loading Torpedoes and
Rear Torpedoes Loading Hatch (by the way, the name is wrong, it is not
at the aft torpedo loading hatch, but a pressure-proof deck tube) were
fit into place. As a result of this, the exhaust system had to be rebuilt
too.
After assembling the individual parts of the upper pressure hull,
89 bars were made from plastic sheet
|
 |
||||||||||||
 |
|||||||||||||
 |
|||||||||||||
 |
|||||||||||||
 |
|||||||||||||
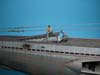
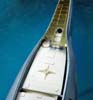
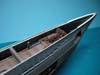
| The Deck | |||||||||||||
|
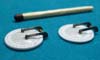
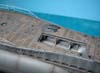
Time for the installation of the deck (Model Brass Deck Set). The three deck parts fit pretty well, but the entire deck had to be underlined with plastic strips, otherwise it would have been too low. To begin at the bow: Here I inserted a brass tube, to represent the bull nose for the tow hook. The cut-outs for the front torpedo loading hatch and the aft torpedo
deck tube had to be done
The hatches of the pressure-resistant container for the Marcks life
rafts have been completely
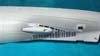
The aft tripod supports for the antenna wires were built new, because the Revell parts were too high, as well as the railings and the two boat hooks. All parts were made of 0.6 mm brass wire. After installation of the deck, the hull was painted: Hull Top: RAL 7000 = Revell 57
The Wooden decks of the original boats were painted with a black wood preservative Teerfirnis TF99 or Carbolineum, the iron deck parts were black. But because of weathering the black wood preservative became a brighter gray-brown, especially at the deck areas, which were entered more frequently by the crew. After painting, the AMP Waterline Decals were applied. Then the hull was filtered, washed and weathered by artist oils, pastel chalk and pigments. Finally, everything was sealed with matt varnish. Two brass propellers from Raboesch were used. They were brought into
the right shape and weathered. Therefore I placed them in a salt
/ vinegar mixture for a few days to produce a slight corrosion.
|
 |
||||||||||||
 |
|||||||||||||
 |
|||||||||||||
 |
|||||||||||||
 |
|||||||||||||
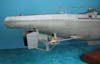
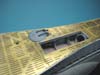
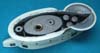
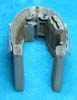
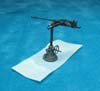
| The 8.8 Deck Gun | |||||||||||||
|
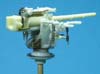
The deck gun is a mix of Revell, CMK and Eduard parts. The gun carriage from the Revell kit was used. This time the CMK part (Exterior Set Part 1 - Turret) was much worse. The gun barrel was taken from CMK. All other parts were scratch-built. (Work load for the gun with prior research took about 10 hours ) |
 |
||||||||||||
 |
|||||||||||||
 |
|||||||||||||
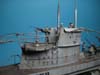
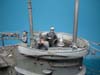
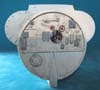
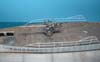
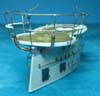
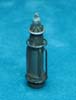
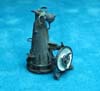
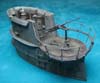
| The Conning Tower | |||||||||||||
| First of all, an inner pressure hull and some air vents
for the inner side of the conning tower were built, because they will later
be visible through the deck.
From the Revell Kit I took only the lower and upper conning tower halves, the rest is unfortunately inadequate and primitive detailed, so I didnt use these parts. The tower halves were completely revised, all doors sanded off and replaced
by Eduard and U-Brass Photo Etched parts.
The eyelets round the rear conning tower deck (called "Wintergarten"),
are designed for the Revell railing, which is much too thick. So they were
sanded off and an outline from plastic sheet was placed around the deck.
You will not find these eyelets on an original boat by the way
After adding some additional details to the conning tower deck area, tower and deck were painted. The two top part walls were sanded from the inside, the upper edges and rigging clamps corrected and holes with arresting eyelets for the bridge crew added. The housing for the loop antenna was extended downward, wood paneling, folding seats, running boards, grilles for Diesel air intakes, a voice tube, rudder indicator and compass were mounted. Outside the walls, the brackets for life rings, the wind deflector and
railings from brass wire were brought in place.
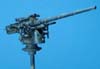
After painting the top parts, the ULAD Decal "Three Times Black Cat", (an old German magic spell) was set. The housing for the observation scope was scratchbuilt; neither Revell nor CMK parts were designed correctly. UZO (U-boat target visor) pillar, main hatch, attack periscope housing and 2cm flak gun were built scratch and supplemented by various Eduard and CMK parts, the gun barrel was taken from Schatton. For the observation scope itself, the Revell part was chosen, the attack
scope was taken from the
Thus, the conning tower was completed and the whole construction was mounted on the hull. |
 |
||||||||||||
 |
|||||||||||||
 |
|||||||||||||
 |
|||||||||||||
 |
|||||||||||||
 |
|||||||||||||
 |
|||||||||||||
 |
|||||||||||||
 |
|||||||||||||
| Completion | |||||||||||||
|
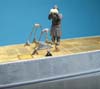
At last, the torpedo-loading tray from the CMK Winch For Loading Torpedoes set was assembled and a Schatton brass torpedo installed. A difficult task was the rigging, this time the supplied blocks / insulators
from Revell were not too large, but too small ... and not constructed
like the original. Again the only solution was to build them from scratch
|
 |
||||||||||||
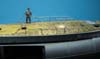
Finally, the boat was supplemented by the deck crew figures from CMK and Hecker&Goros. Now, in July 2011 the project U 564 is finished after a construction time of three years and four months. |
|||||||||||||
| References: | |||||||||||||
| Lawrence Paterson U 564 auf Feindfahrt 70 Tage an Bord ISBN 3-613-02528-0
Fritz Brustat-Naval / Teddy Suhren Nasses Eichenlaub ISBN 3-7822-0734-3 Köhl/Niestle Uboottyp VIIc Vom Original zum Modell ISBN 3-7637-6002-4 You will find more pictures and information about U 564 on my website www.dargies.de |
|||||||||||||
More
of Frank Dargies's work.
Updated 2011

© ModelWarships.com