| The thing that usually intimidates modelers who are
new to the hobby or new to ship building is being overwhelmed by
works of other modelers that are way too far from what these newbies can
achieve. It is no different from teaching a 3rd Grader how to use Calculus
in determining how wide the mouth of his glass should be to fit his mouth.
And what do websites like Modelwarships.com should have? - write-ups for
those who are young ( both in age and in skill ) in this activity. |
|
| For starters, I read the instructions 3 times ( from end to end ).
I studied each segment of the assembly process and determined what I should
build first and what I should leave for last. Remember that the difference
with ships compare to - say... Armor modeling - is that it would
be easier for one to build, and especially paint, ships as SUBASSEMBLIES.
This means that you glue a group of parts that, at your best knowledge,
would make it easier for you to paint them. Ships has so many hard-to-reach
corners and painting them when everything is glued together could be a
new builder's nightmare!!! |
|
| So go to your instruction sheet and encircle the parts or part numbers
which are preferably to be assembled or glued towards the end of the project:
(this is based on the assembly which DOES NOT make the model motorized)
G21, G18, G22, G9, F2, F10, F32, F30, D22, G7, G8, F36, F17, F16, E9,
E10, E11, C7, C9, F31, G5, C5, C4, F11, C6, B1, G4, C23, F25, G28, C11,
C12, G33, G34. |
|
| You can start assembling the following BUT DO NOT GLUE THEM ONTO THE
DECK OR SUPERSTRUCTURE. Maintain them as subassemblies:
Part 5 and Part 6
Part 11
Part 12 - Divide this part into three subassemblies allowing you to
paint the horizontal surfaces
Part 13 - Do not glue C6 subassembly with B25 subassembly
Part 14- Assemble EXCEPT F39 & F38. Hand paint these parts
first then glue.
Divide into three subassemblies
Subassembly 1 - B11/B12 and others
Subassembly 2 - B8/ B9 / B10 and others
Subassembly 3 - B24 |
| Part 15 - Assemble F29, F28 and F24. This part needs putty and
sanding. Remove gaps. Do not glue the superstructure yet.
Part 16 - Glue all boats. Observe the roof tops and the sterns, they
have such large gaps. Fill them and carefully sand. Primer them with gray
paint to see if it is filled and sanded well. You can hand paint these
boats separately with Earth for the decks and bridge, black for the windows
and dark sea gray for the body while black for the boot and hull. I painted
the flooring black.
Part 17 - Glue everything except the boats.
Part 18 - Assemble and make cable lines from stretch sprues connecting
the tip of the crane to the pulley (G36). Paint and detail separately.
Part 19 - You assemble and glue |
| Part 20 - Do not do this until all parts are properly painted and detailed. |
|
| Part 21 up to 23 - Do everything except for gluing of Boats Assemble
boats and paint separately similar to Part 16. Also, do not glue parts
F31 G2 and F32 unless horizontal surfaces are painted correctly. |
|
Part 24 - Do not do unless deck is properly painted and all assemblies
are finished and painted according to instructions. You can assemble
seaplane and detail. If you can buy or ask for aircraft hit-marks from
a 1/48 or 1/72 P-47 kit, it will be good for us as aircraft insignias for
the seaplane instead of painting them. The Flag Pole (C11 and C12) should
be placed when the kit is finished. Multiple handling might accidentally
break this part
off. |
| |
| Go back to Part 5 and Part 7 and paint the deck ( read painting part
). Before you glue the front and the rear deck, you can place Turret 1
and 4 to fit. The turrets must be completely painted at this point. The
Turret tops must be painted Dark Gray or German Gray. The Turret
housing is painted Dark Sea Gray. The barrels are painted black. If you
have a Pin Vise, it looks better if those barrels have bored holed on the
tip to make it realistic. |
|
| WARNING : MAKE SURE THAT F34 IS TIGHTLY GLUED TO E17 OR YOU
ARE IN DEEP TROUBLE WHEN THE DECK IS GLUED ONTO THE HULL. Put a small amount
of grease on the contact area of F34 and F35 to reduce friction. The grease
is supplied in the kit. |
|
| Painting :
Paint the Deck with Tamiya Desert Yellow. If you know how to apply a
wash, you can wash the deck with Burnt Umber Oil paint.. You can fill the
deck-to-hull gaps with putty and carefully sand it. Then spray the sanded
part with Desert Yellow again and inspect the area for remaining gaps.
Paint the swastika in this order 1) Paint the trapezoid and anchor placement
with Tamiya's Dark Sea Gray. Then paint over a white circle to fit using
Tamiya Flat White. Then with masking tape, shape the swastika with Tamiya's
Flat Black. Other modelers prefer to paint the circle Flat Black then work
your way to form the swastika using Flat White. It is your choice.
The Japanese instructions included in the kit has the exact size and shape
for the swastika and the shapes. You can use this as a guide. |
|
| Paint the entire hull with Tamiya's Dark Sea Gray. This will
also serve as your primer. Then mask the camouflage patterns. I started
with Flat White patterns, then Tamiya German Gray ( Dark Gray ), then Flat
Black for the boot and camouflage strip. After the paint has dried ( I
allow it to cure for 1 day ), mask the hull and paint it with Flat Hull
Red. You can mix Tamiya's Hull Red with a little yellow to redden the color.
If you think this is too much for you, you can use it straight out of the
bottle like I did for this project. |
|
| FITTING THE SUPERSTRUCTURE
Now that the hull is done, it is now time to complete the ship. Paint
the middle deck with Desert yellow. Mask the deck when done and paint the
vertical surfaces with Dark Sea Gray. When dry, it this to the hull. Glue
turrets 2 and 3 and all the other smaller turrets into place by following
Part 8. Remember that the turret tops of F22 is also German Gray or Dark
Gray so paint them before gluing them into place. You will see large gaps
between this part and the front and rear deck. I advice you to sand UNDER
the middle deck to align this to the other decks. You can sand off also
the gluing area on the hull to get the best fit. To me, this is the most
difficult part of the project. You cannot sand the deck too much because
you will erase the deck's details. When you think you have achieved the
best fit, put a small amount of putty on these gaps and sand it carefully
when fully dried. Also fill the gaps on the starboard and portside. Spray
it with Desert Yellow and repeat this until you are satisfied that all
the gaps are properly filled. If you rush this part, you will see the gaps
when the model is finished and it wouldn't be a good site!!! |
|
| Paint ALL your subassemblies with Tamiya's Dark Sea Gray. Paint the
inside of the Smoke Stack black as well as C23. |
|
| Now, following the painting instructions for the camouflage, work your
way up the superstructure in painting the stripes. Since your Superstructure
as still in subassemblies, it will be easy to mask and paint them. Fit
them into place and look at the ship from the side and see if you got the
pattern correctly. Them paint the bridge windows with royal blue or black.
It doesn't matter much as to which color you want. When you feel
that you are done with the camouflage pattern, paint the horizontal surfaces
of the balconies with dark gray. I hand painted these parts - not airbrushed
it. |
|
| This is the Fun part! Glue everything in place starting with Part 5,
Part 10, Part 17 - boats up to Part 24. In Part 9, paint F36, F16 and F17
first before you glue them together. Paint and glue those small parts I
wanted you to set aside at first. I drilled holes on the smoke stack with
my Pin Vise to have it open. If you think you can't do this, then don't!!!
Do not paint the area where glue will be applied. Sand it off if paint
has been placed. Not until you have done everything can you glue the propellers
and and the flag pole at the stern. |
|
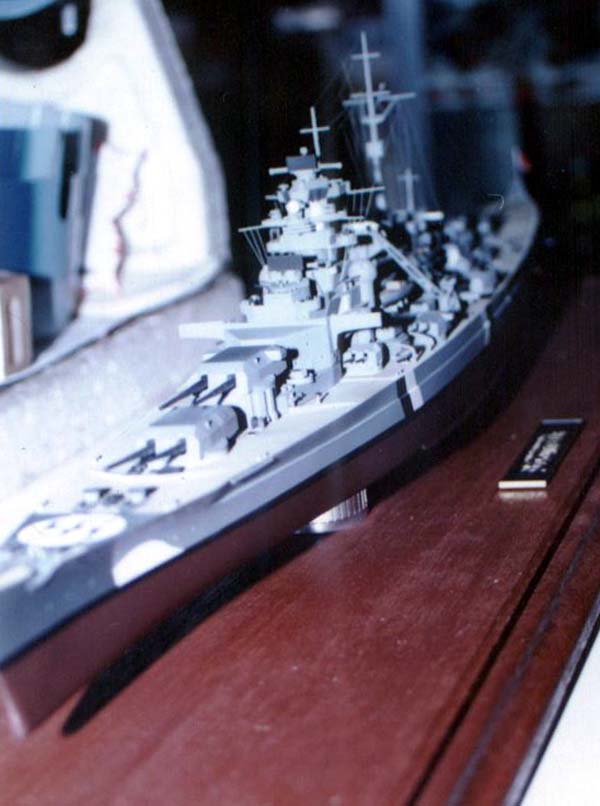
click images to enlarge
|
| There you have it! Your Bismarck - Straight Out of the Box!
Noel Carpio
Contributing Editor
Modelwarships.com |