|
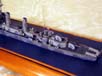
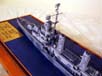
| About two months ago I was challenged to build a 1/350
Dragon Buchanan. I could build it any way I chose, and could make it
as any one of the ships that the dragon model can be made to represent.
Although I rarely venture out of the realm of 1/700 it sounded like a fun
project so I agreed to accept the assignment.
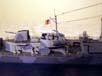
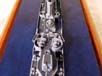
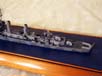
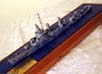
I didnt want to build the kit right out of the box as several people had posted very nice OOB builds on the site already. I also knew that I wanted to use some photo etch details to enable the kit to reach its full potential. After doing some research I decided to build the USS Quick, DD-490 circa late 1942. There are several good photos of the Quick on the Navsource website and there is also a photo and a mention in a camouflage book I have in my research library. The camo scheme is different than the Buchanan even though it is considered a modified measure 12 which is the same as the Buchanan in that same time period. I immediately consulted the resident destroyer guru, Rick E. Davis, for his input and guidance to ensure that I made the build with reasonable accuracy. Rick pointed out that the major difference I would need to address was that the Quick had two 40mm twin AA guns at the rearmost positions where the Buchanan (as provided with the kit) had a quad 1.1 starboard and a single 20mm port. He also sent me several annotated close-up photos of the Quick that showed the emplacements, the weapons, mark 51 directors, and the main searchlight. After deciding on the modifications needed I began to assemble the various detail kits and accessories I wanted to use to spruce up the build. I contacted Kenny Loup from Gatormasks who make an excellent mask set
for the Quicks rather unique camo scheme after I sent him photos of her
starboard side. As I was unable to get any shots of the port side,
Kenny made the scheme symmetrical.
|
|||||||||||
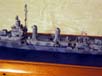
| I had Tony
Bunch from LArsenal U.S.A. send me their very nice products for the
Mk 51 directors, 20mm single and 40mm twin AA guns, 5 brass barrels, 40mm
emplacements with ammo racks, MK 37 gun directors with PE radar, and floater
nets. The railings would be
Gold Medals Ultra Fine for US ships, and the paint WEM
Colourcoat Haze Gray, Ocean Gray, Navy Blue, and Deck Blue .
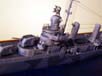
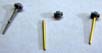
The kit came with some PE details, some of which I used, and others for which I substituted the above-mentioned items. Being a 1/700 waterline builder, I opted to make the Quick with the waterline option rather than full hull which one can choose according to his/her taste. I began construction by sanding off the molded ladders on the deck structures, which would be replaced by PE items later in the process. The searchlight lenses on the bridge wings were drilled out and would be replaced by white glue after painting. All AA guns and directors were assembled and painted and set aside for attachment at final assembly, and the four 5 gun barrels were replaced by the LArsenal brass parts by carefully sawing off the kit barrels at the base, sanding the base flat, and drilling the proper size hole in the base to receive the brass barrel attaching pin. |
Click images
to enlarge |
||||||||||
 |
|||||||||||
 |
|||||||||||
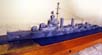
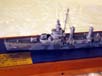
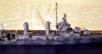
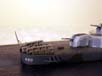
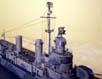
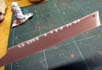
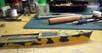
| As all the photos of the Quick did not show portholes, I filled them all in on both sides. | 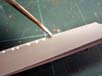 |
||||||||||
 |
|||||||||||
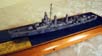
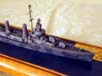
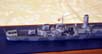
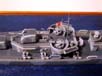
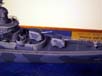
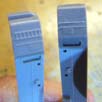
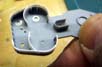
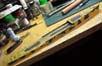
| According to the information Rick Davis sent, I needed to modify the rear gun tubs for the twin 40s on each side. The splinter shields were present on both sides, plus they were slightly higher than originally built. I made the modification using strip styrene and filling any seams with my favorite filler, 3M Blue Acryl Putty (part # 5964), thinned with acetone and brushed into the seams. It wasnt particularly difficult and added made for an interesting departure from the stock kit. | 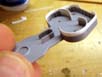 |
||||||||||
 |
|||||||||||
| The deck and bridge structures were assembled next in sub-assemblies,
taking care to dry fit and sand the parts before gluing to ensure that
the vertical seams were as small as possible. After cementing the parts
I sanded and filled the seams, taking care not to destroy the molded electrical
lines that went around the various structures.
I decided to paint each deck and bridge structure separately before assembling, as it would make for less masking and also ensure good paint coverage in all areas. I painted the decks after cementing the main deck pieces to the hull. The smaller deck pieces were painted off the deckhouses and would be attached later at final assembly. After letting the decks dry, I sprayed them with Future clear acrylic and placed the deck decals on all areas, using Micro Sol (the red label, aggressive solvent) to ensure good adhesion to the small diamond pattern molded into the decks. Despite several applications of solvent, however, some areas silvered, and I had to remove the offending decal film from those areas. Luckily, the decals are not really that prominent, so you really cant see where they were removed. The decks were sprayed with Polly S acrylic flat clear after the decal procedure was done. |
|||||||||||
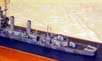
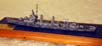
| The next step was spraying the hull and superstructure
and applying the camo scheme. The decks were masked using Tamiya
tape and then the base color applied.
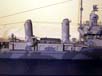
The modified measure 12 on the Quick had Ocean Gray and Navy Blue on the hull, and Haze Gray and Ocean gray on the upper structures. I therefore painted the Ocean Gray on the hull and superstructure parts first. Although its usually best to spray the lighter color first, I made the decision to spray the darker color first, as the masks were easier to use following this sequence. After the base color dried overnight I applied the gatormasks in their correct position on the hull sides, stacks, and 5 gun mounts. I then sprayed the navy Blue on the hull sides and the Haze Gray on the turret sides. I used Silly Putty to mask the areas on the superstructure parts, as they were irregularly shaped, and the putty made the bends more easily than the vinyl masks. |
 |
||||||||||
 |
|||||||||||
| It might be best at this point to clarify that I sprayed the decks, masked them off, and sprayed the hull base color before applying the Future and decals. I applied the 490 decals on the forward and stern hull sides at the same time as the deck decals, and then sprayed everything with the flat coat. The decals were from the Midship Models detail set for US ships. They are really nice to use, were the correct size, and looked perfect with no carrier visible once flat cleared. | |||||||||||
|
|||||||||||
| With the most challenging part of the build done, the rest of the build was mainly assembling the various sub-assemblies and attaching the railings and rigging the ship. | |||||||||||
|
|||||||||||
| I sprayed the railings while they were still attached to the sheet, then cut and bent the sections, attached them with CA glue and touched them up as necessary and brushed the flat clear on the cemented joints as I went. | |||||||||||
|
|||||||||||
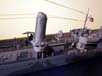
| I used the kit gun director with the LArsenal PE radar, as the LArsenal director body was a later version with a curved rear portion. I also used Toms Modelworks foremast radar and attaching brackets for the stack sides. The rigging was done with stretched sprue attached with white glue, and the port and starboard nav lights are resin details made by CMK for 1/72 aircraft. The bow and stern flagstaffs were made from .015 brass rod with .010 brass rod supports, and the mainmast support was .015 brass rod. I used the kits plastic parts for the base on each. | |||||||||||
|
|||||||||||
| The only negative aspects of the kit, in my opinion, were the tendency of the deck decals to silver, and the attaching mechanism for the two launches. I had so much trouble with the launches that I left them off completely. | |||||||||||
|
|||||||||||
| Overall, however, the Dragon Buchanan build up into an impressive and accurate example of an important ship and class of US destroyers that saw significant action in the Second World War. | |||||||||||
More
of Bob Cicconi's work.
Updated 2009

© ModelWarships.com