 |
|
|
| Intro: Hello again fellow ship modelers. I am back once again with a new update on the USS Kalinin Bay CVE-68 scratchbuilt in 1/96 scale. I have added most all of the fittings on the fore and aft decks and have pretty much completed the bridge/tower assay. The model has been under construction for 7 months now and things are going well, except for the fact that fittings take forever to get to me. Hurry up and wait!! As I said earlier in pt. 1 of the build, the model is being built for the Survivors Assn. of the ship. Their yearly re-union is in Las Vegas this year and my wife and I have been invited to attend. I don't plan on taking the model, rather I will bring along a slide presentation to show the members how things are going. The re-union is in May, and I don't think things will be quite done by then, but I'm going with what is completed by then. Should be fun!! The model is slated for delivery to the National Naval Air Museum in Pensacola, Fla. in Sept. of this year. I am looking fwd. to that!! Anyway, enough of my babbling, lets look at the pics!! | |
| Here is one of the TBM Avenger a/c. These are made by John Haynes of England and are a resin and cast metal kit. They are somewhat tricky to put together as there are some alignment problems with the landing gear and the horiz. stab. Some adjustments must be made so the planes "sit " correctly on the flightdeck. I put the kit together first, making the necessary adjustments before paint and decal work. I was a little disappointed that the kit does not come with a separate clear canopy. All bracing here is hand painted. Very time consuming. With a little tlc, these come out pretty good. A little on the expensive side, too. $37.00 ea. There will be six of these on deck when the ship is completed. | 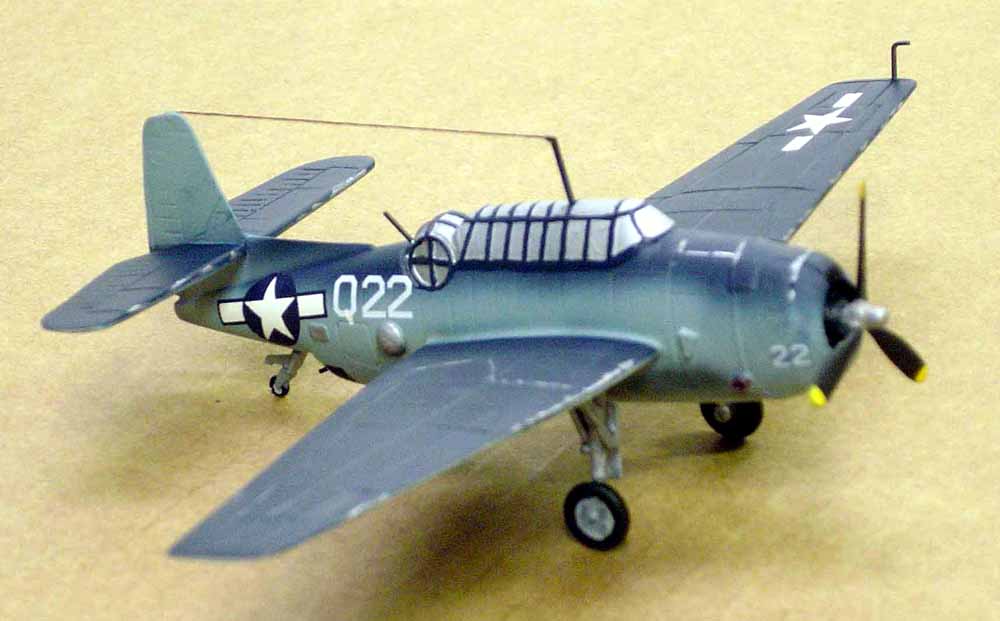 |
| Here are a couple shots of the stern deck. Note all the fittings have been added except for the draped fire hoses and plugs. Railings are p/e brass and are from Scalelink of England. Other fittings are either cast metal or resin. Note I have added the propellers. I used rigging thread on the cable reels. 5" gun is another Haynes product. Again, cast metal and resin parts. | 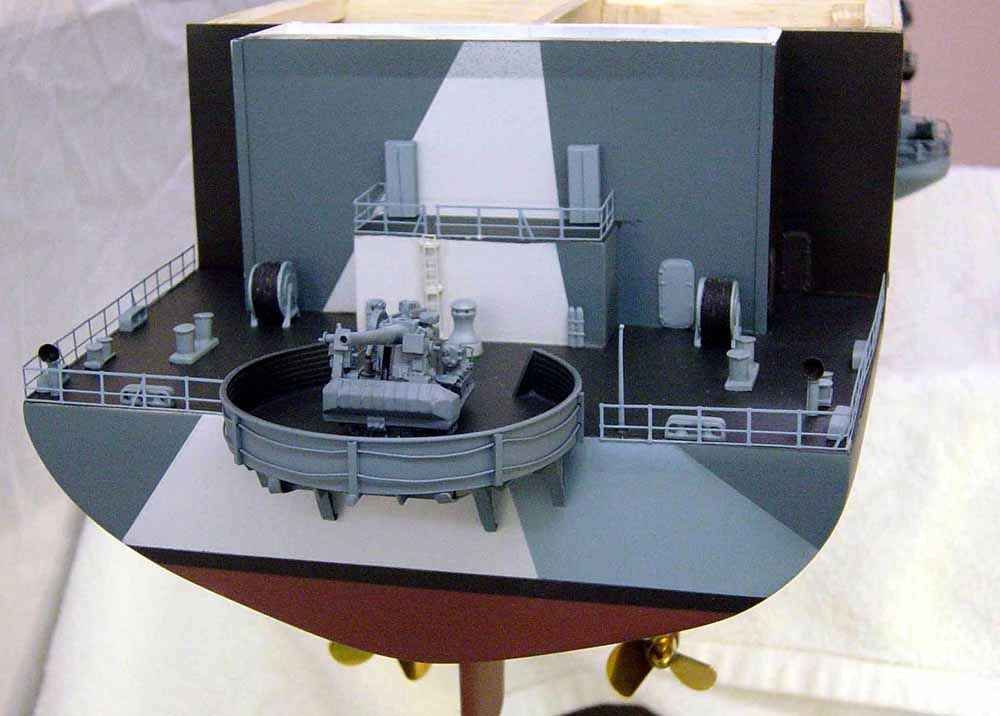 |
 |
|
| Here we have the "tower" assy. This is a rather complicated structure to build as there are many levels. All the radar's are scratchbuilt except for the middle "SG" antenna. Large square one is the SK search radar while the very top one is the YE antenna. Note wind indicator on the outside of the yardarm. I have not added the 24" searchlights yet as I just got them. A couple other small things to add, but otherwise this is completed. Rigging will come last. | 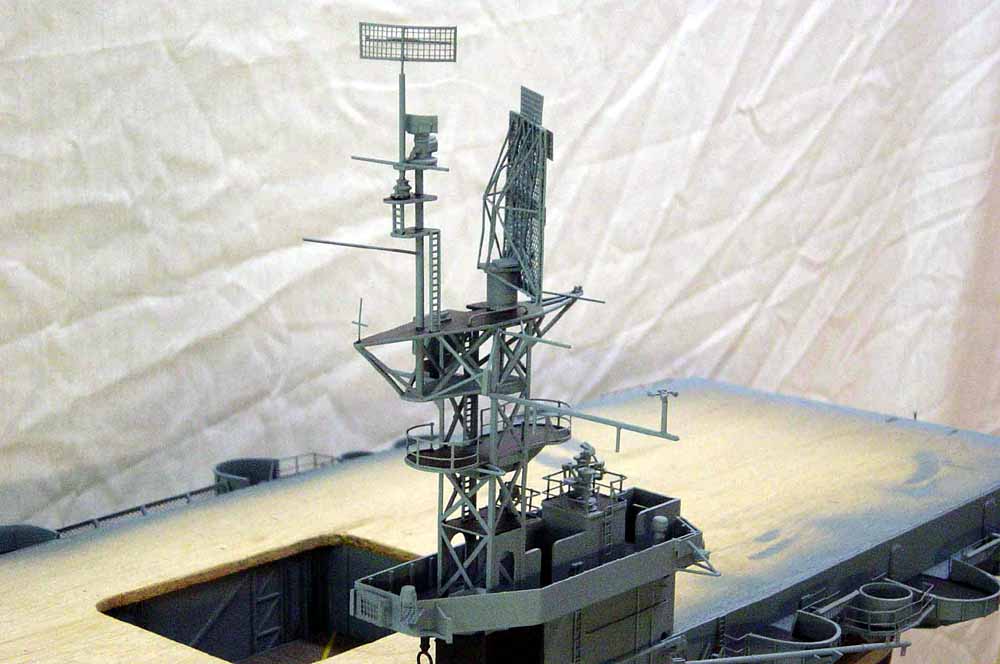 |
| Another view of the tower assy. looking overhead. Note lookout chairs just fwd. of the 24" searchlight platform. These lookouts replaced an optical range finder that was originally installed on the ship. you can see the pelorus' have been added also. The large SK radar is made from galvanized steel mesh, bridal veil, p/e brass mesh and styrene rod. It is not motorized. | 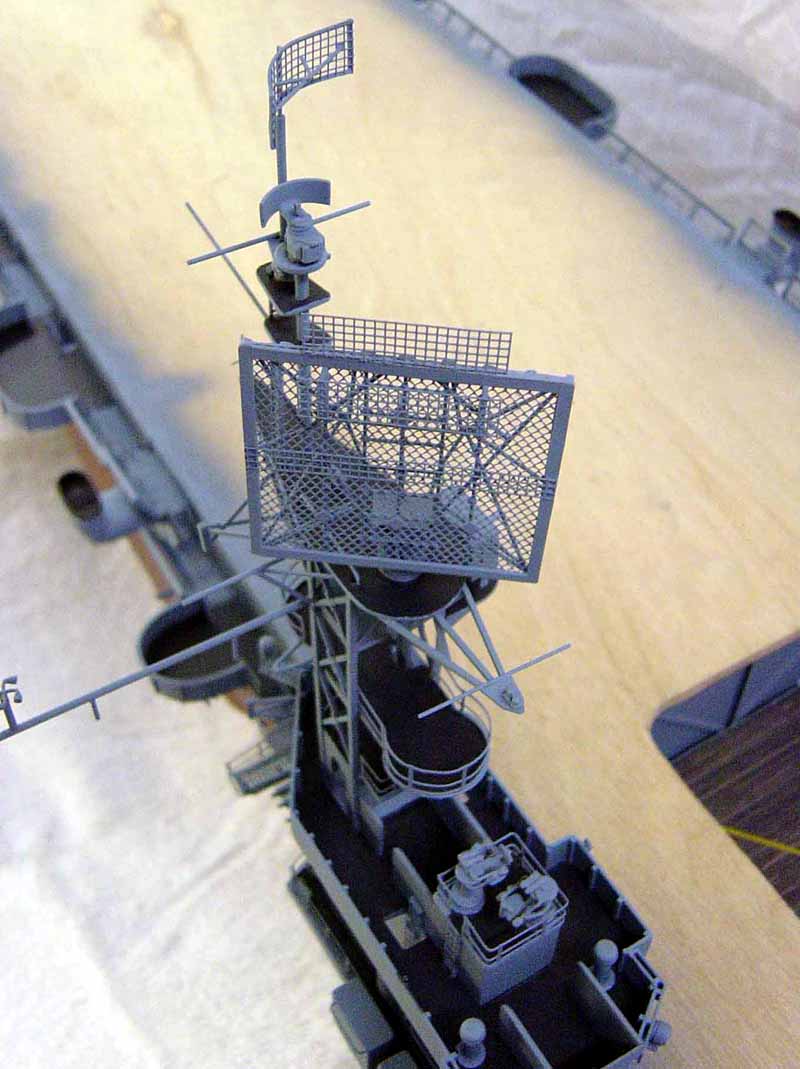 |
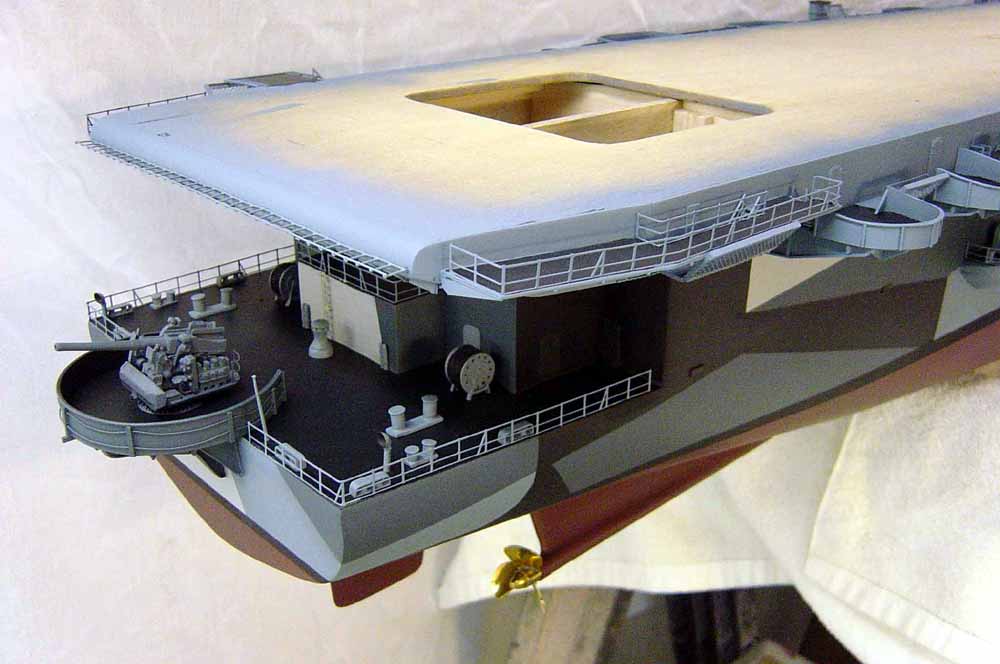
| Starboard side view of the bridge. Note the a/c and cargo booms have been added along with all the various winches, etc. All the sponson details have been added, too. | 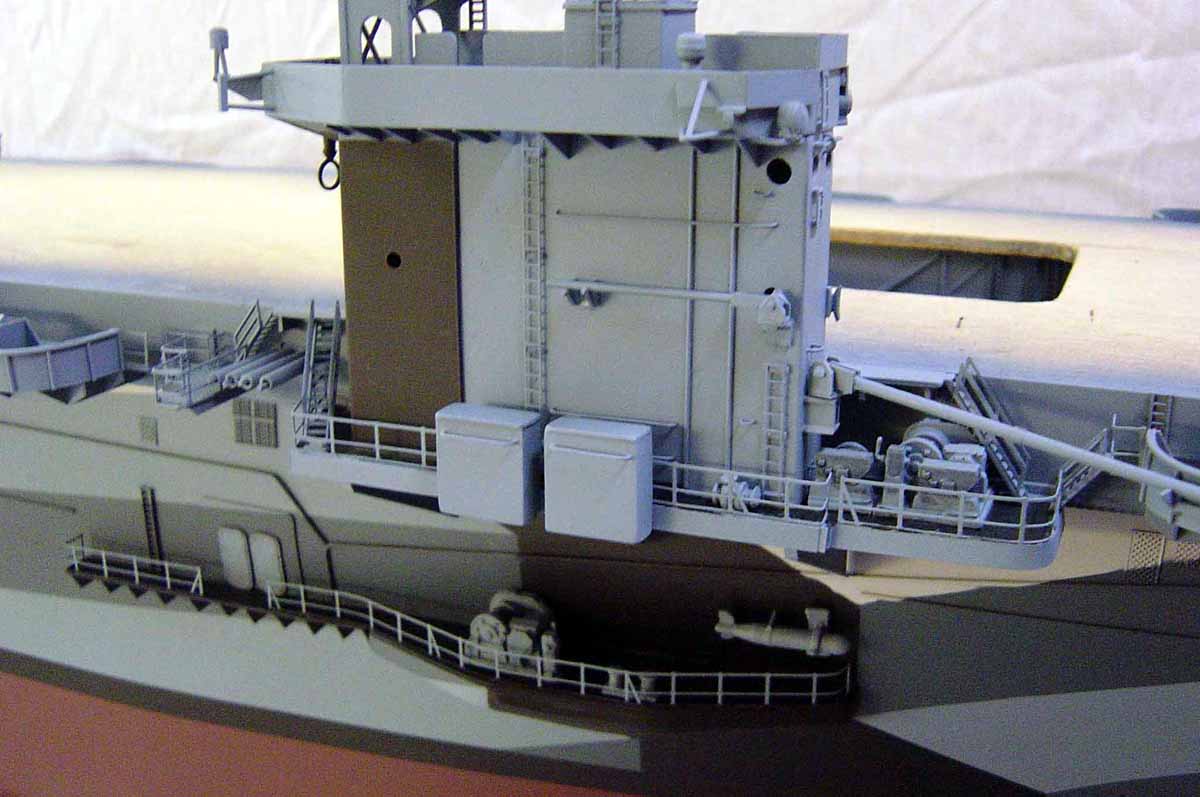 |
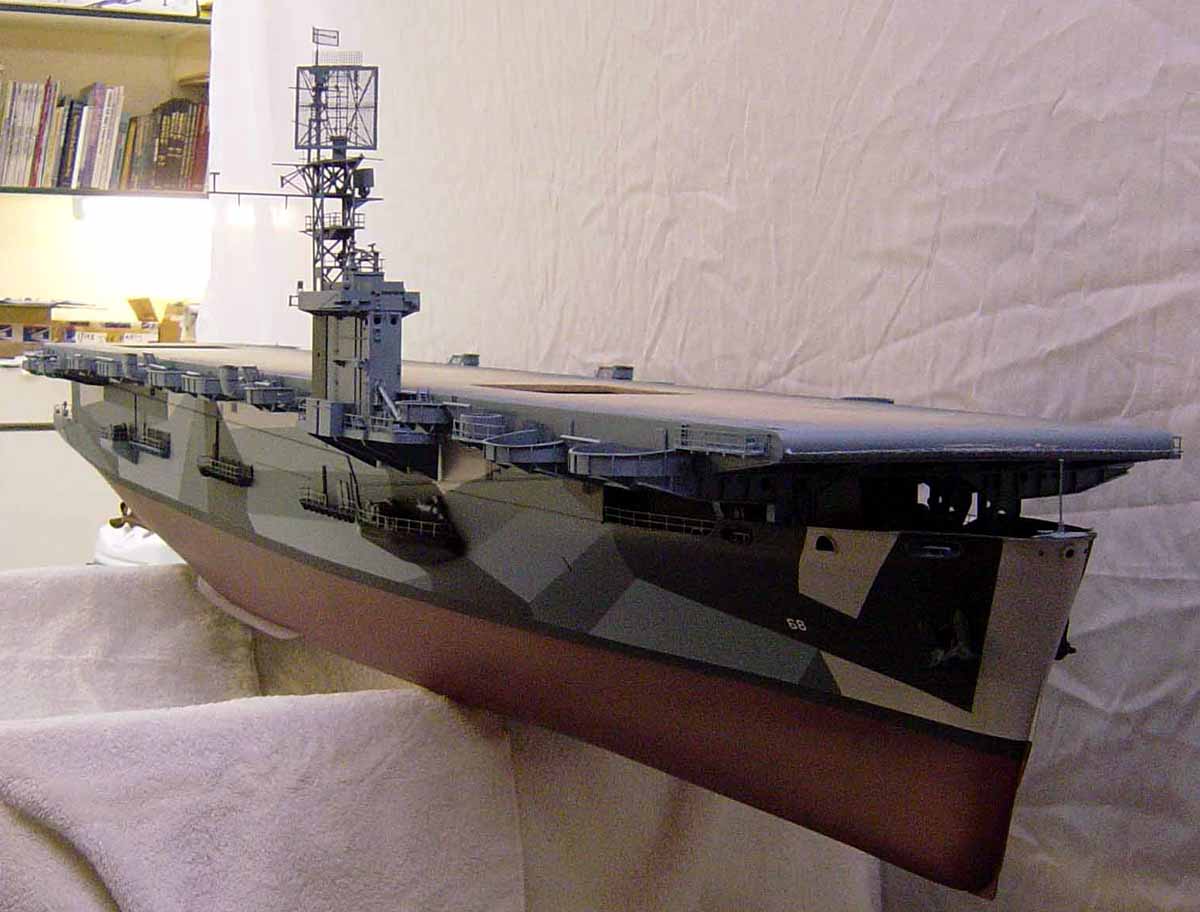
| Starboard side view aft looking fwd. Now that the bridge / tower assy. is nearing completion it really adds to the overall look of the model. | 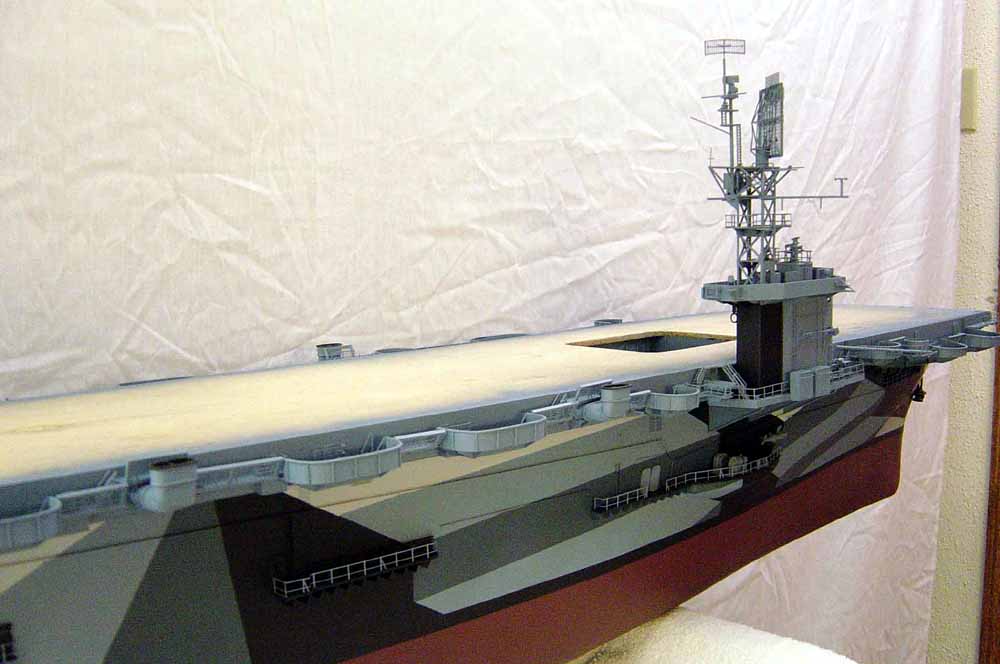 |
| A couple of views of the fwd. elevator area. I have added the walls of the shaft along with some other small details. It is about halfway down to the hanger deck. I'll finish off the opening after I plank the flightdeck. There will be an aircraft added here too with the wings folded. | 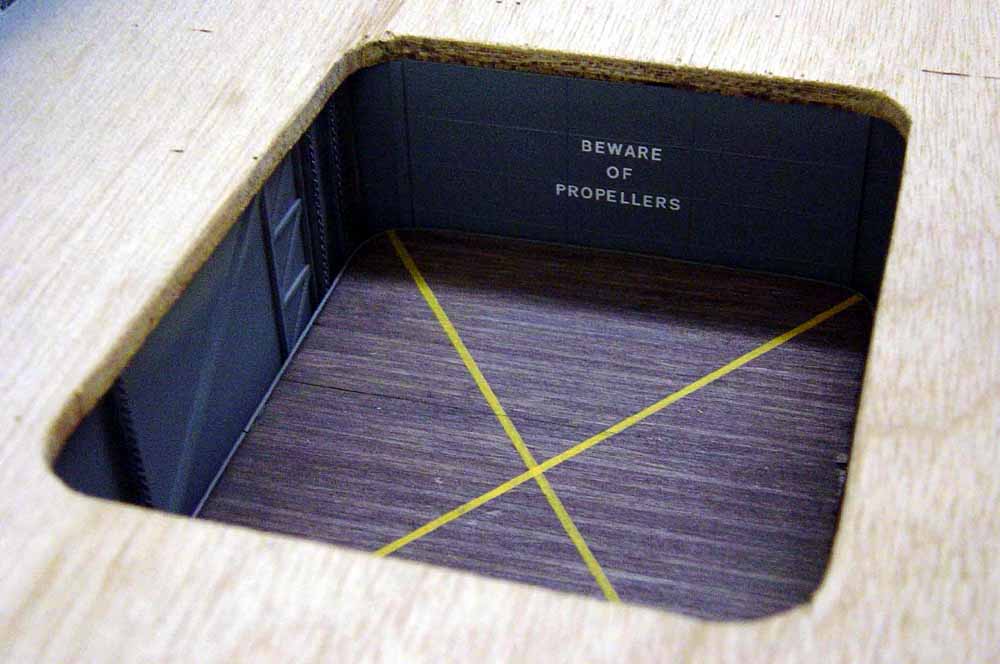 |
 |
|
| Forward view of the aircraft handling boom. Boom is made from wood dowel with cast metal details added. The boom will be displayed as you see it here in the stowed position. It rests on a cradle mounted on the front of the 20 mm gun tub. Again note winch assys. | 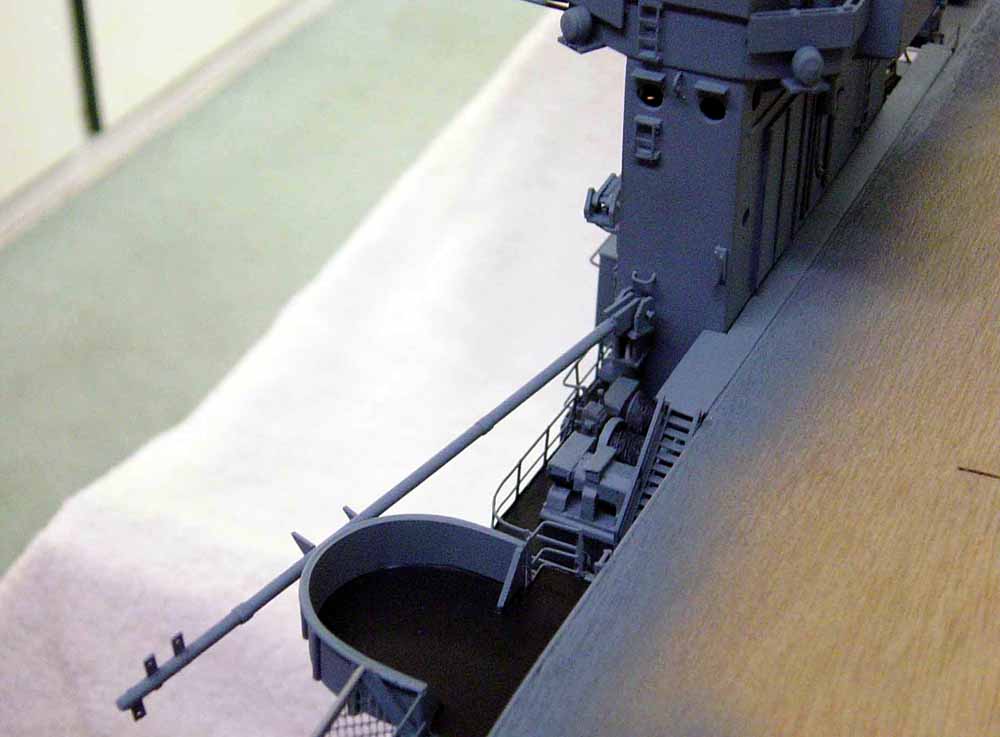 |
| Another stb. side view. Rigging will be one of the last things I do to the model. | 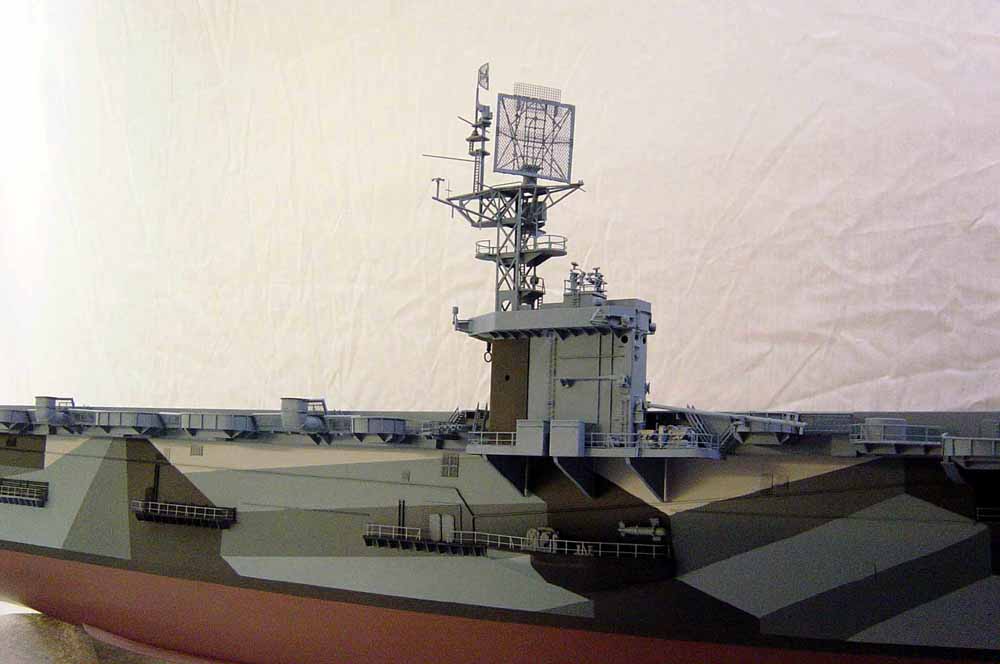 |
| The propulsion end of the ship. Props are from Rivabo and are solid brass and are scale. Rudder is carved balsa as are the prop shaft housings. | 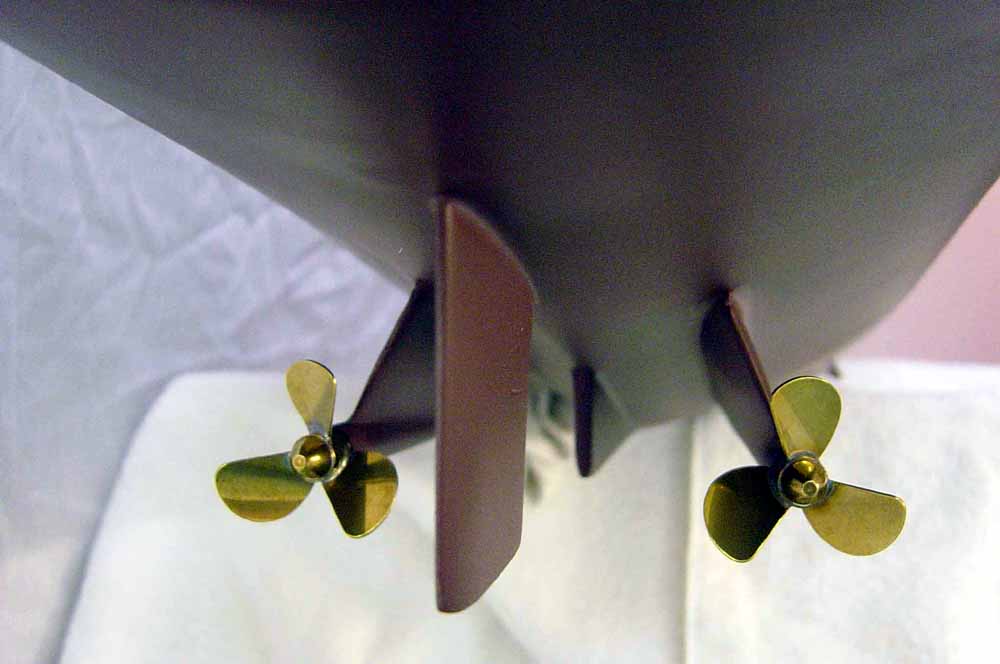 |
| An underneath view of the stb aft 40 mm gun tubs. Note all the bracing here. This is done with strip styrene and is typical of the bracing that runs the entire length of the ship. All platforms are done in this matter. Note the catwalk, perforated brass and the safety netting which is bridal veil. Stairways are ABS plastic from Plastruct Co. | 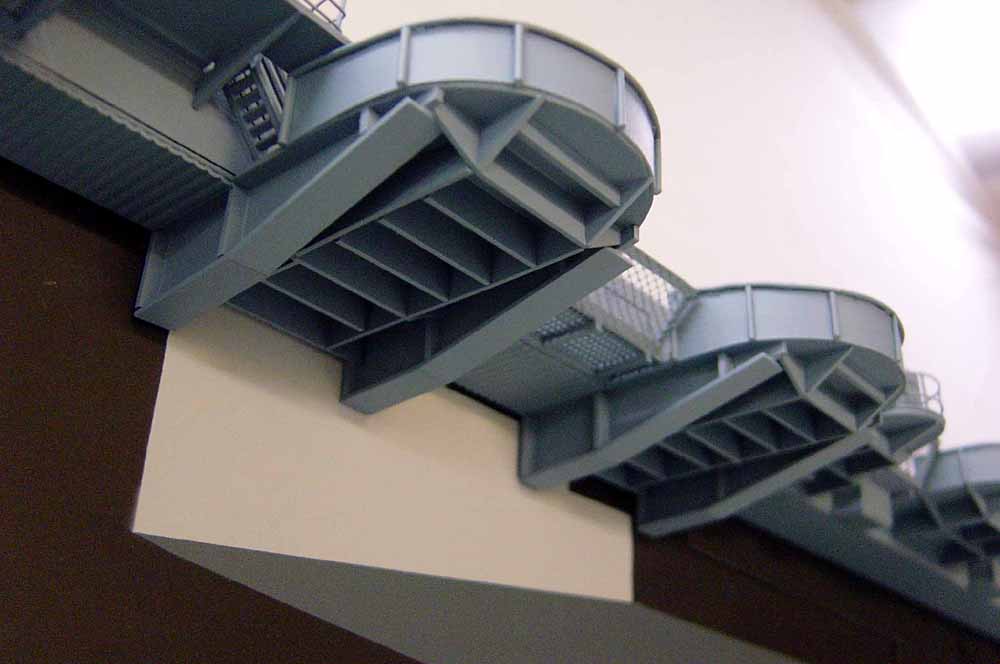 |
| Here is a close up of the wells that go into the sides of the Gallery deck. You can see the catwalk and safety netting a little better here. 25 man life rafts will be added soon and they hang from the edges of the safety net. This configuration is typical along the entire length of the flightdeck. | 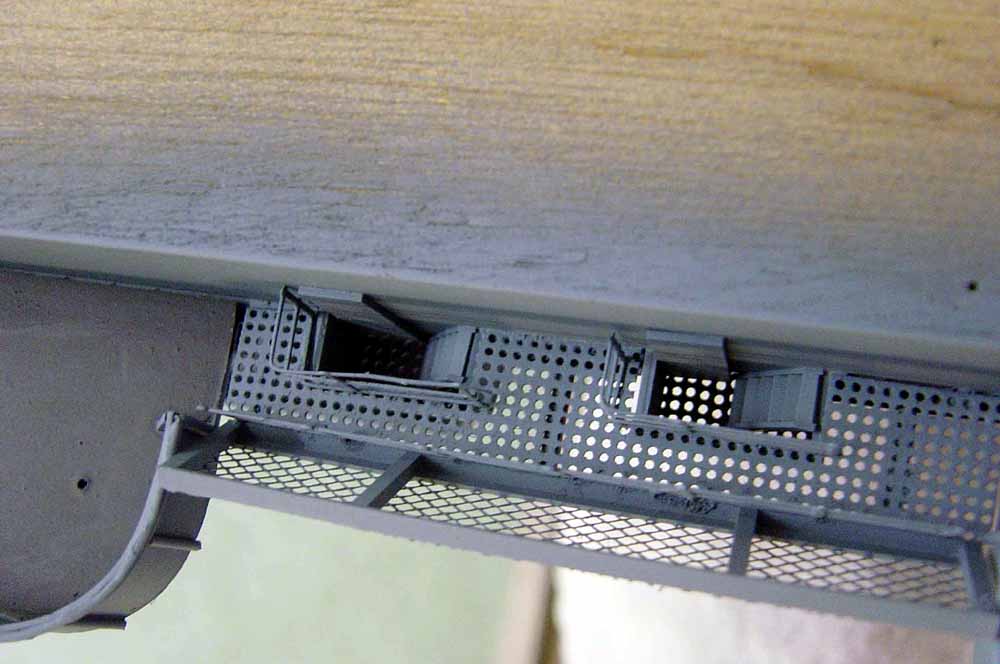 |
| The stb. side aft 40 mm gun director location. There are four of these on the ship, two fwd. and two aft. | 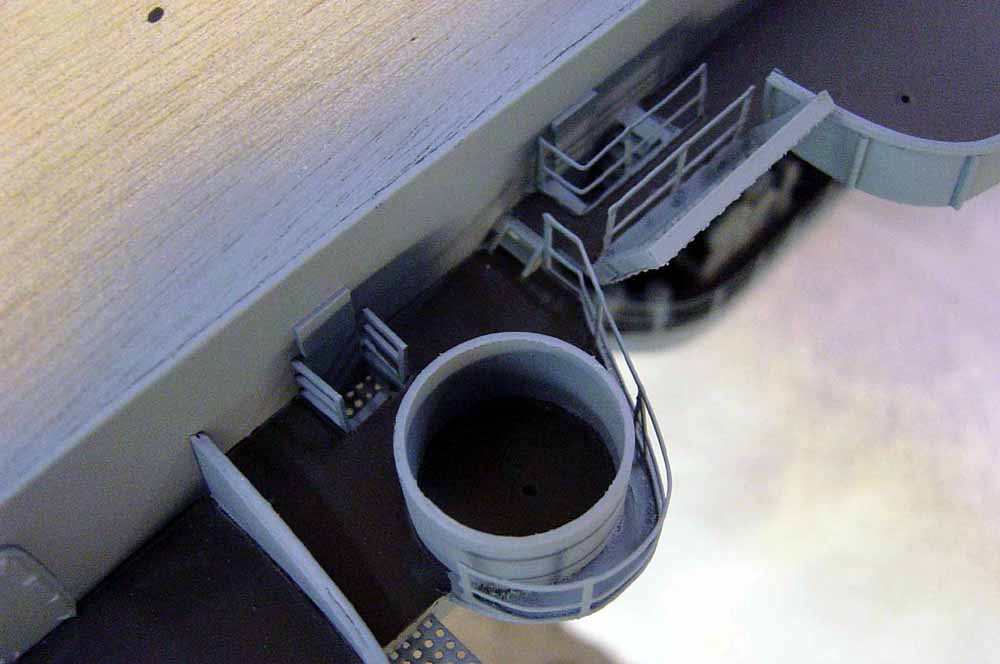 |
| Aft view looking fwd. Awaiting AA guns!! Flightdeck planking to begin soon as well as all the guns and other stuff! | 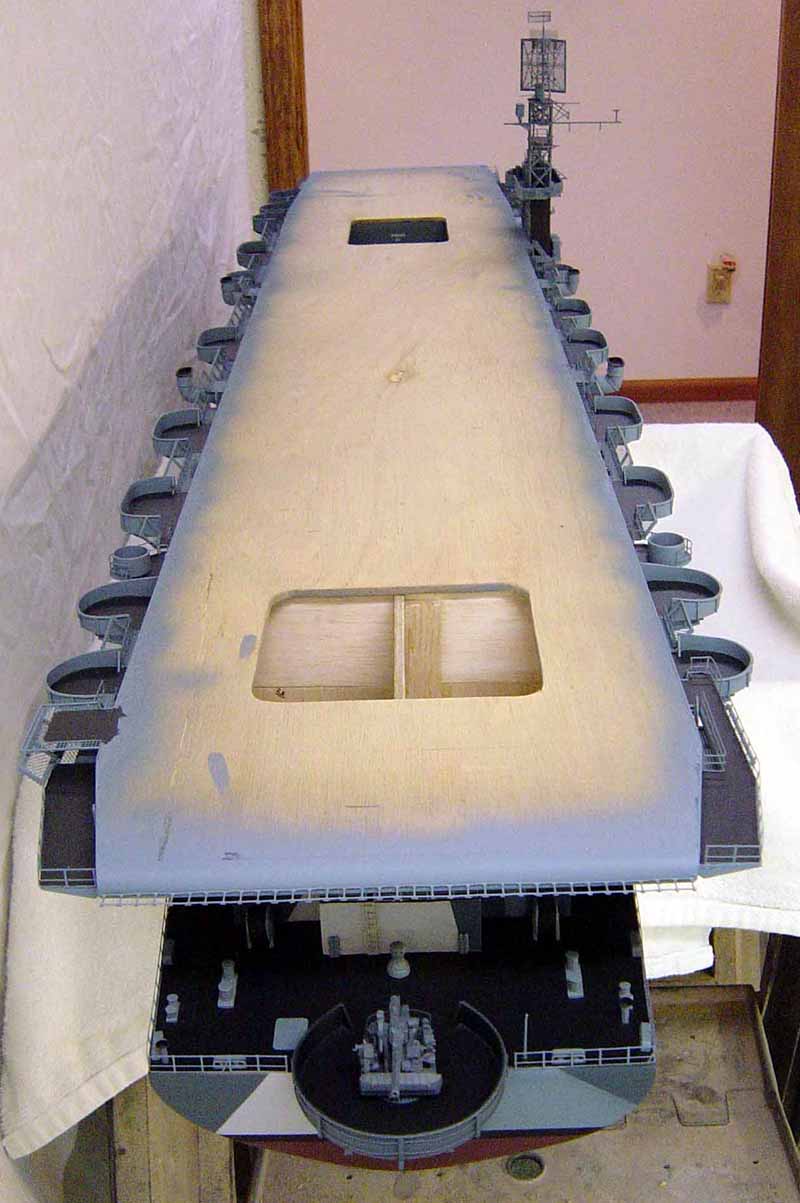 |
| Two more views of the ship from stb. side. Note things are coming together. It won't be long, now!!! | 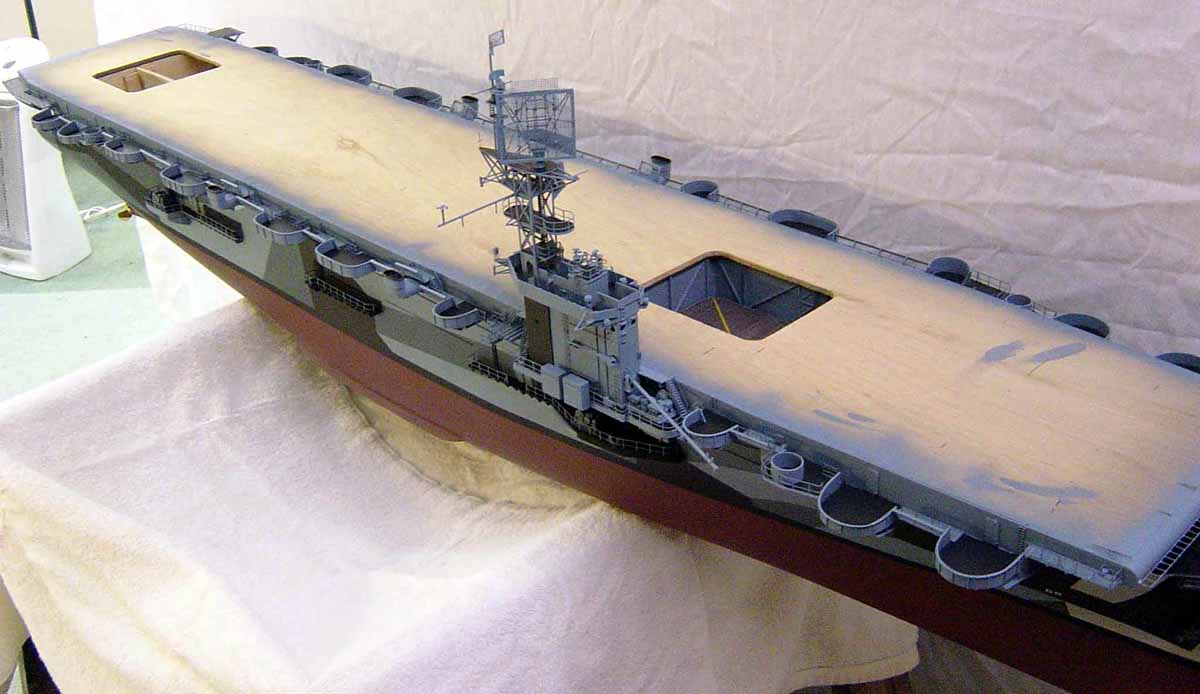 |
 |
|
| Epilog: Well, that's it for part two. Hope you all
enjoyed the photos. In part 3, I should have the flightdeck finished and
all the guns and other things added. There are many parts to an Aircraft
Carrier as you can well imagine. Thanks to Tim Dike once again and all
the staff at ModelWarships.com. for this great forum, #1 on the internet.
Also, many thanks to Loyalhanna Dockyard for assistance in obtaining hard
to get fittings from the US and Europe. This model would not be possible
without their kind assistance and great service. Stay Tuned.
Best Regards, Bill Waldorf, Lowell, Michigan USA. |
|
Back to Menu
On to part 3

© ModelWarships.com