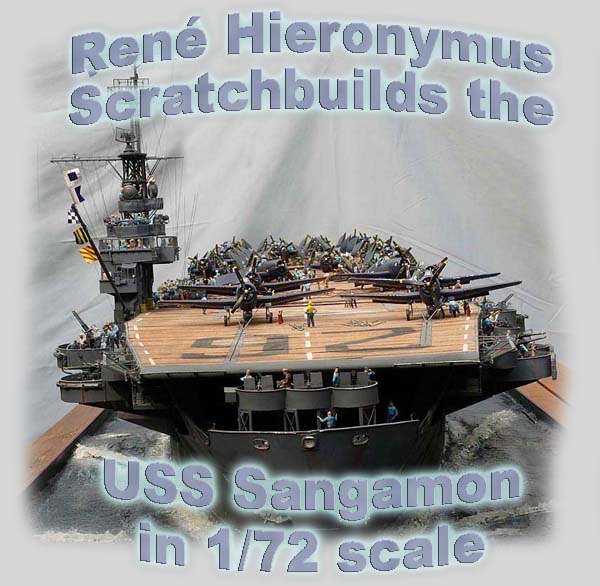
photos by René Hieronymus and Albert Moser
| The model: | |||||||||||||||||||||||||||||||||||||||||||||||||||||||||||||||||||||||||||||||||||||||||||||||||||||
I started building model-kits when I was about 9 years
old and since that time I never stopped. About 10 years later I specialized
myself on US Navy aircrafts and aircraft-carrier. This happened, because
I was simply fascinated in this technology. Only a few years later I had
already the plan to build an aircraft carrier in the same scale as my model-airplanes
in 1:72! Soon after that I started looking around what kind of information
would be available and most of all, where I could get the plans for an
aircraft-carrier. It turned out that the Essex-Class carrier where among
the best documented carrier in the US Navy and sure enough I was able to
obtain some plans for them too. Pictures of almost all various carriers
of this class were no problem at all. But as soon as I started to plan
this project it became clear to me, that such a huge model was far out
of reach for me, not only because of the sheer size but most of all, cause
of my experience in model-building. So I dropped the plan pretty quick.
But the idea remained and sure enough, some years later I gave it another
try but once again with the almost same result, the model would have been
to much for me. I was simply overwhelmed by the number of details which
I would have to build all by myself. Then in the year 2001 I finished my
first all scratch build model ship and I was pretty excited about how easy
it was, so I decided this time I will start with the carrier-model, no
matter how big it will be and no matter how much work.
I still had the plan to build an Essex-class carrier and as soon as I started the pre-planning stage of this model, it became clear to me that not only the size of this model would be overwhelming but most of all, all those tiny details which had to be made. So I took another look at different aircraft-carrier-classes and there was the answer to all my problems! During all the years I had simply never thought about the idea of an escort-carrier. This was nothing unusual, cause almost all books, seem to ignore the fact that there was something like escort carriers. This is even more convincing due to the fact that there were more escort carriers build during WWII, than all large fleet-carriers of all nations combined from the very first crude designs until the current classes of Super-carriers! No wonder I did not knew very much about them too. But here it was and the idea of building something like an escort-carrier became even more interesting, cause as a model-builder I always preferred the somewhat unusual and less known. The only problem was the fact that there really was nothing more detailed available about all those ships. This was a major problem for me, cause without any plans and photos it is at least very hard, if not impossible to build something like that. But during my research I found not only plans, I even got in contact with the so-called ECSAA, the Escort-Carrier, Sailor and Airmen Association. Sure enough they even had a website with lots of email addresses and so I decided to give it a try. At this time I had been able to obtain some plans of the Sangamon-class and one of those addresses got my in contact with Hank Milian.
|
|||||||||||||||||||||||||||||||||||||||||||||||||||||||||||||||||||||||||||||||||||||||||||||||||||||
| The construction: | |||||||||||||||||||||||||||||||||||||||||||||||||||||||||||||||||||||||||||||||||||||||||||||||||||||
| From the very beginning I had decided to build the ship
as a waterline model, this is because I wanted to put the finished model
on some kind of self build water surface. Another feature of the model
is the fact that it was build in 2 sections, a forward and rear part. This
was very helpful when handling the model during certain building-steps,
besides of that transportation was much easier this way. For the final
result I decided to build the model lifelike and in the way she looked
in early 1945. In most cases large scale models of ships, which can be
seen in museums around the world, these models are build in a way which
I like to call idealized. Those ships are looking like brand new, fresh,
like right from at least a major overhaul or maybe straight from the builders
way. But I wanted to show the Sangamon lifelike, that is, right as she
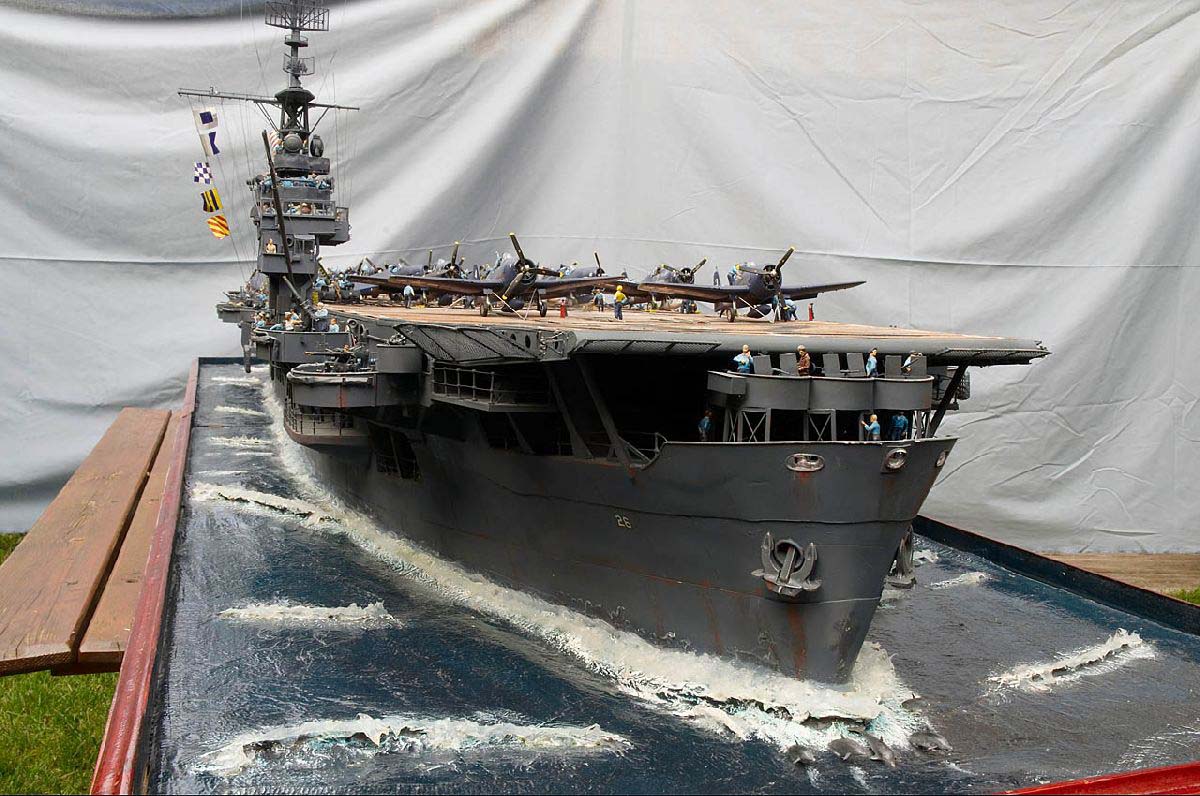
looked during her career during the war. The Sangamon was build in
1942 and as soon as she was commissioned, she went straight to her first
employment only to be in service until the end of WWII. During this time
she underwent several overhauls and repairs but in most cases she had a
look of a ship which was being used extensively. Besides of that I wanted
the onlookers to give the impression of a ship which is alive, that is
with all those aircrafts and most of all, all those crewmembers aboard.
As soon I received the plans for the Sangamon, I was able to start the
actual work on it too. First step was to enlarge the plans to the same
scale as the model would be build. That way I was able to take measurements
directly from the plans itself. After that the frames were drawn and transferred
to plywood, which was cut and sanded. The connections for these frames
were made of wood too. The bow and the stern were made from solid wood,
which was carved and sanded to the appropriate shape. The sidewalls of
the hull were made of 3 layers. First came a solid layer of cardboard 1mm
thick and next were 2 layers of plastic sheet 0,5mm thick. This was carved
showing the several plates the hull is being made of, on the original ship.
These sidewalls were in the height till the later to be added flight deck.
All the openings on these sidewalls were cut in and accordingly modified.
All those sponsons which the Sangamon carriers had were made of solid wood
and later covered with plastic sheet as well. Some of these sponsons had
a fairly complicated form and were pretty tricky to build. One of the most
distinctive feature of the Sangamon-class, are those large openings for
the so-called Main- or Fuel Deck. These openings can be seen on both sides
of the hull and from the right angle one can see through the entire ship
from one side to the other. This Fuel Deck as it was called by the crewmembers
housed all those large fuel pumps and a lot of other material which was
used aboard. The Sangamon-class-carriers were originally large crude oil
tankers and even after their conversion to an aircraft-carrier they retained
most of their oil carrying capacity. So before I could start the work on
the hangar deck I had to finish this part of the ship. All those pipes
and the pumps itself had to be build before any other work could start
and the entire fuel deck had to be coloured as well. The next part of the
ship which was build is the so-called forecastle deck; this section is
right beneath the overhanging flight deck at the bow. Here the anchor winch
and all those small details were made of different materials; the large
structures which support the flight deck were all made of plastic sheet.
After that I decided for better aligning of these structures to construct
the most forward part of the flight deck. The little gallery beneath this
part of the flight deck was going to be a major headache later. As soon
as I finished those parts of the ship, the Forecastle deck and the Fuel
deck, I was able to start the construction on the hangar deck itself. The
floor was plastic sheet again and all those supports inside the hangar
deck on which the flight deck later will be attached had to be made. Every
single beam of these consists of about 75 pcs. each and I had to build
22 of them! The side walls inside the hangar were covered with various
parts and the roller shutter doors of the hangar itself were made too.
Besides of that I had to start the work on those 2 large elevators. The
elevator wells were made and a hydraulic piston was installed for both
of them. At this stage I was still planning to make both elevators
working but later I decided against this and make the whole model only
for static display. In every case I had to make all those parts by myself.
Unfortunately a lot of those self made parts cannot be seen anymore as
soon as the hangar deck was closed. Up to this time almost 1500 hrs had
been spent into the model-construction.
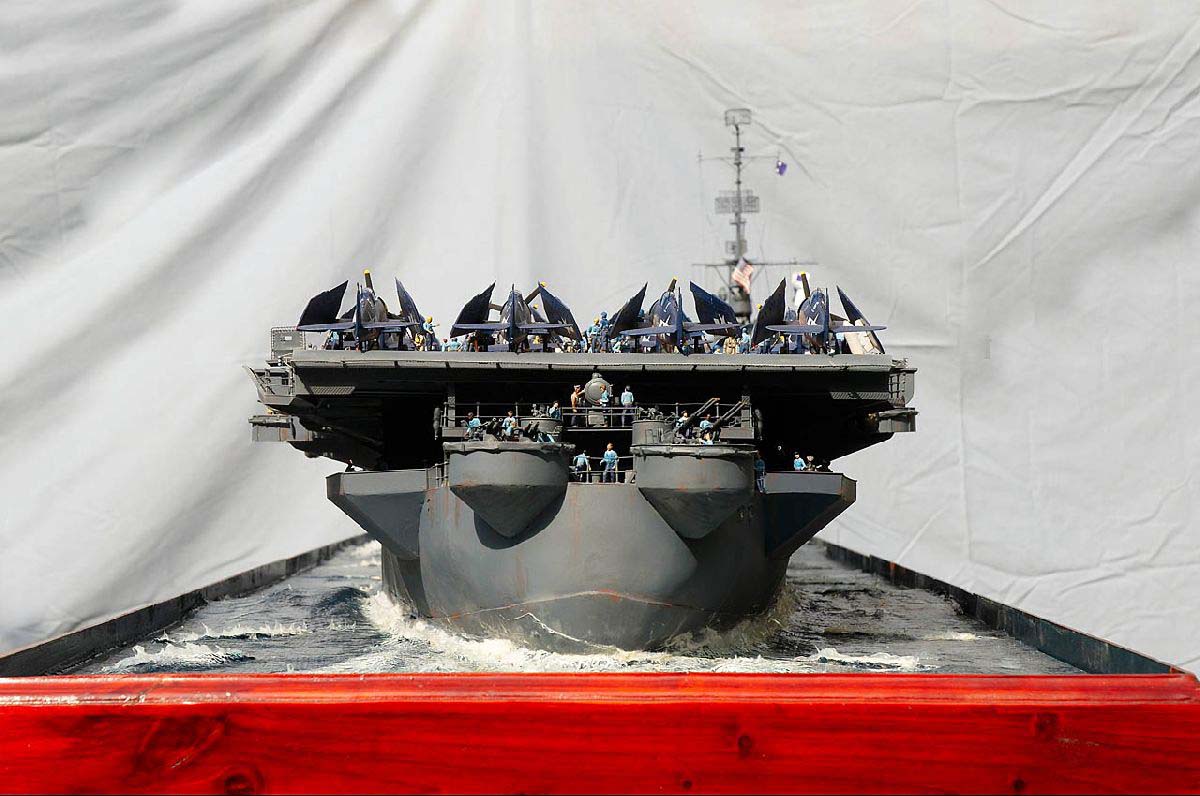
My overall planning at the beginning of the construction had foreseen a working time for the model itself of somewhere around 4000 hrs. At this time everything was going according to this plan and there were no major problems encountered. Nevertheless one problem still existed. For the upcoming construction of the flight deck I needed something special. All large scale aircraft carrier-models I had seen so far had a single wooden base for the flight deck itself, which was coloured and carved to look like the real thing. But I wanted something really special. In reality the flight decks of all WWII US. Navy aircraft carriers were planked with wood. Between those wooden planks were so called Tie-down Tracks a metallic plank with very characteristic openings on top, were the aircrafts which were parked on the flight deck were secured with tie-down chains. Up until this time I had not been able to find anything which even looked like this. All requests to various companies all over the world brought no result. I contacted some companies for special made parts and in most case they either denied to be able to produce something like this or the prices were much too high. After several attempts in finding something appropriate, without any success, I finally decided to make those tie-down-tracks by myself by using the photo-etch-technique. Additional there were some other parts which I was going to need and most of them could be done with this technique as well. So I started to draw all those parts on the computer and sure enough I found a company which could do the etching process for me. Off course I could have done this by my self too, but working with such volatile chemicals is nothing funny and besides of that, it smells terrible and most of all the quality is definitely not the same as if this is being done by an experienced manufacturer with the right and much higher technology. Making your own photo-etched-parts or short, PE-parts is something of an effort. For small parts, especially with tiny details this technique enables one to make ultra-fine parts which can raise the detail-level on any model significantly. On the other side, this technique needs quite some effort so for small numbers of parts I can not recommend to do such parts all by yourself. But if one needs larger numbers of certain tiny parts this is maybe the best way to do them. For the wooden planks itself I choose tiny wooden strips, because they would look exactly like the real thing. Off course this meant, that I would have to glue virtually thousands of them for the entire flight deck. When this was decided I started to concentrate myself on the so called Gallery Deck, also known as catwalks. These are located around the flight deck and are among the most prominent parts of the entire ship model. All those gun tubs, staircases and other details had to be added one after another. Due to the fact that no 2 of those supports on which the gallery deck is mounted have the same shape, this work was very time consuming and the entire catwalks took several month to complete. For these catwalks I was able to use some parts which I could purchase rather than build myself. The stanchions came from a German company and made the construction much easier. On earlier photos it can be seen that they are made of solid brass, so they did not only safe much time in the construction process, they even were very robust, which made the handling of the model at this time much safer. From the same manufacturer came the portholes which were added during this time as well. With the catwalks in place the model was already looking much more than a carrier and it was about time to start the most time consuming effort on the whole model, the flight deck. As soon as the construction of the hangar deck was finished and this part was coloured as well, I started with the construction of the flight deck itself. Meanwhile my efforts in making my own PE-parts were successful and as soon as I had the first batch of those parts in my hands, I knew that the flight deck would become a real eye catcher. About this time I received more photos from the Sangamon and to my horror I had to notice that the gallery beneath the flight deck and above the forecastle deck was wrong. Now this part of the ship was already finished and it took me quite a while to figure out, what to do. In my case the gallery was much smaller as I had been able to identify on some earlier photos. But some when during an overhaul, this gallery was changed and enlarged. So at the end I had no other choice, than to rebuild this part as well. The only problem here was that this part was already permanently fixed to the rest of the model. At the end the reconstruction of this part was an effort which was about the same work than building the entire part itself completely new. But finally I was able to say that my model was looking exactly the right way. The next step was the flight deck. For this I had planned as already
mentioned, to use small wooden strips which I received from an Italian
manufacturer.
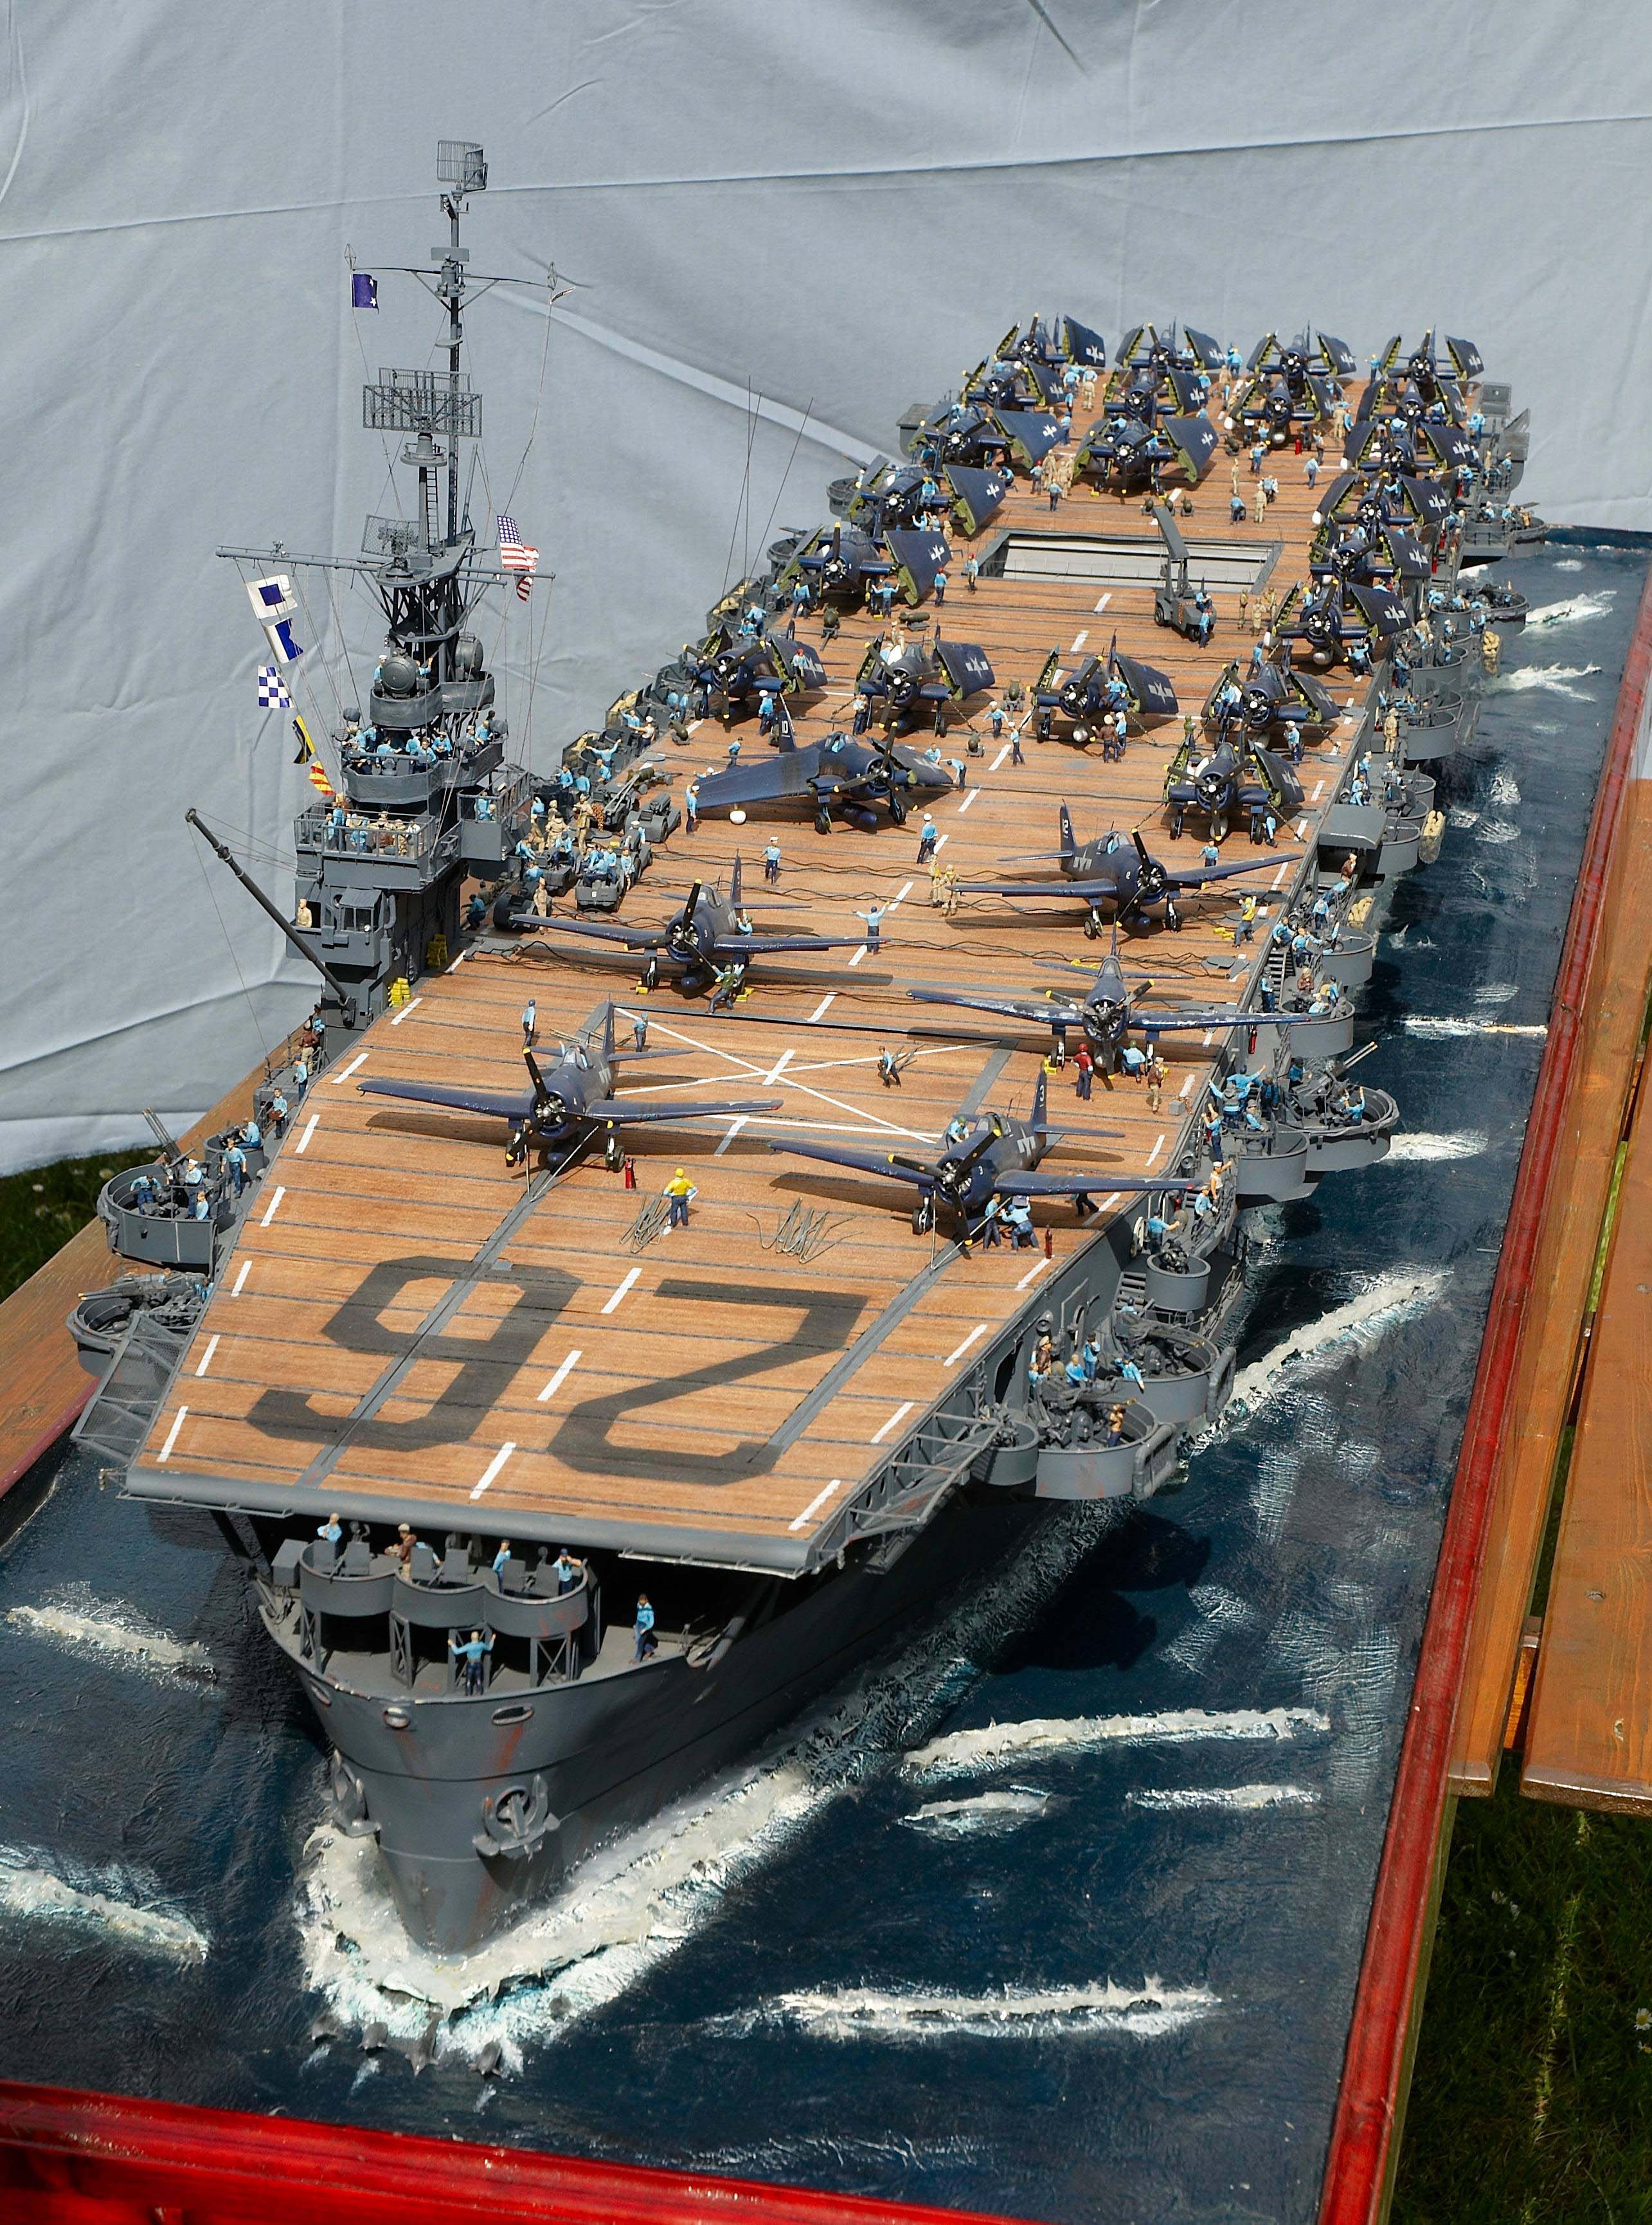
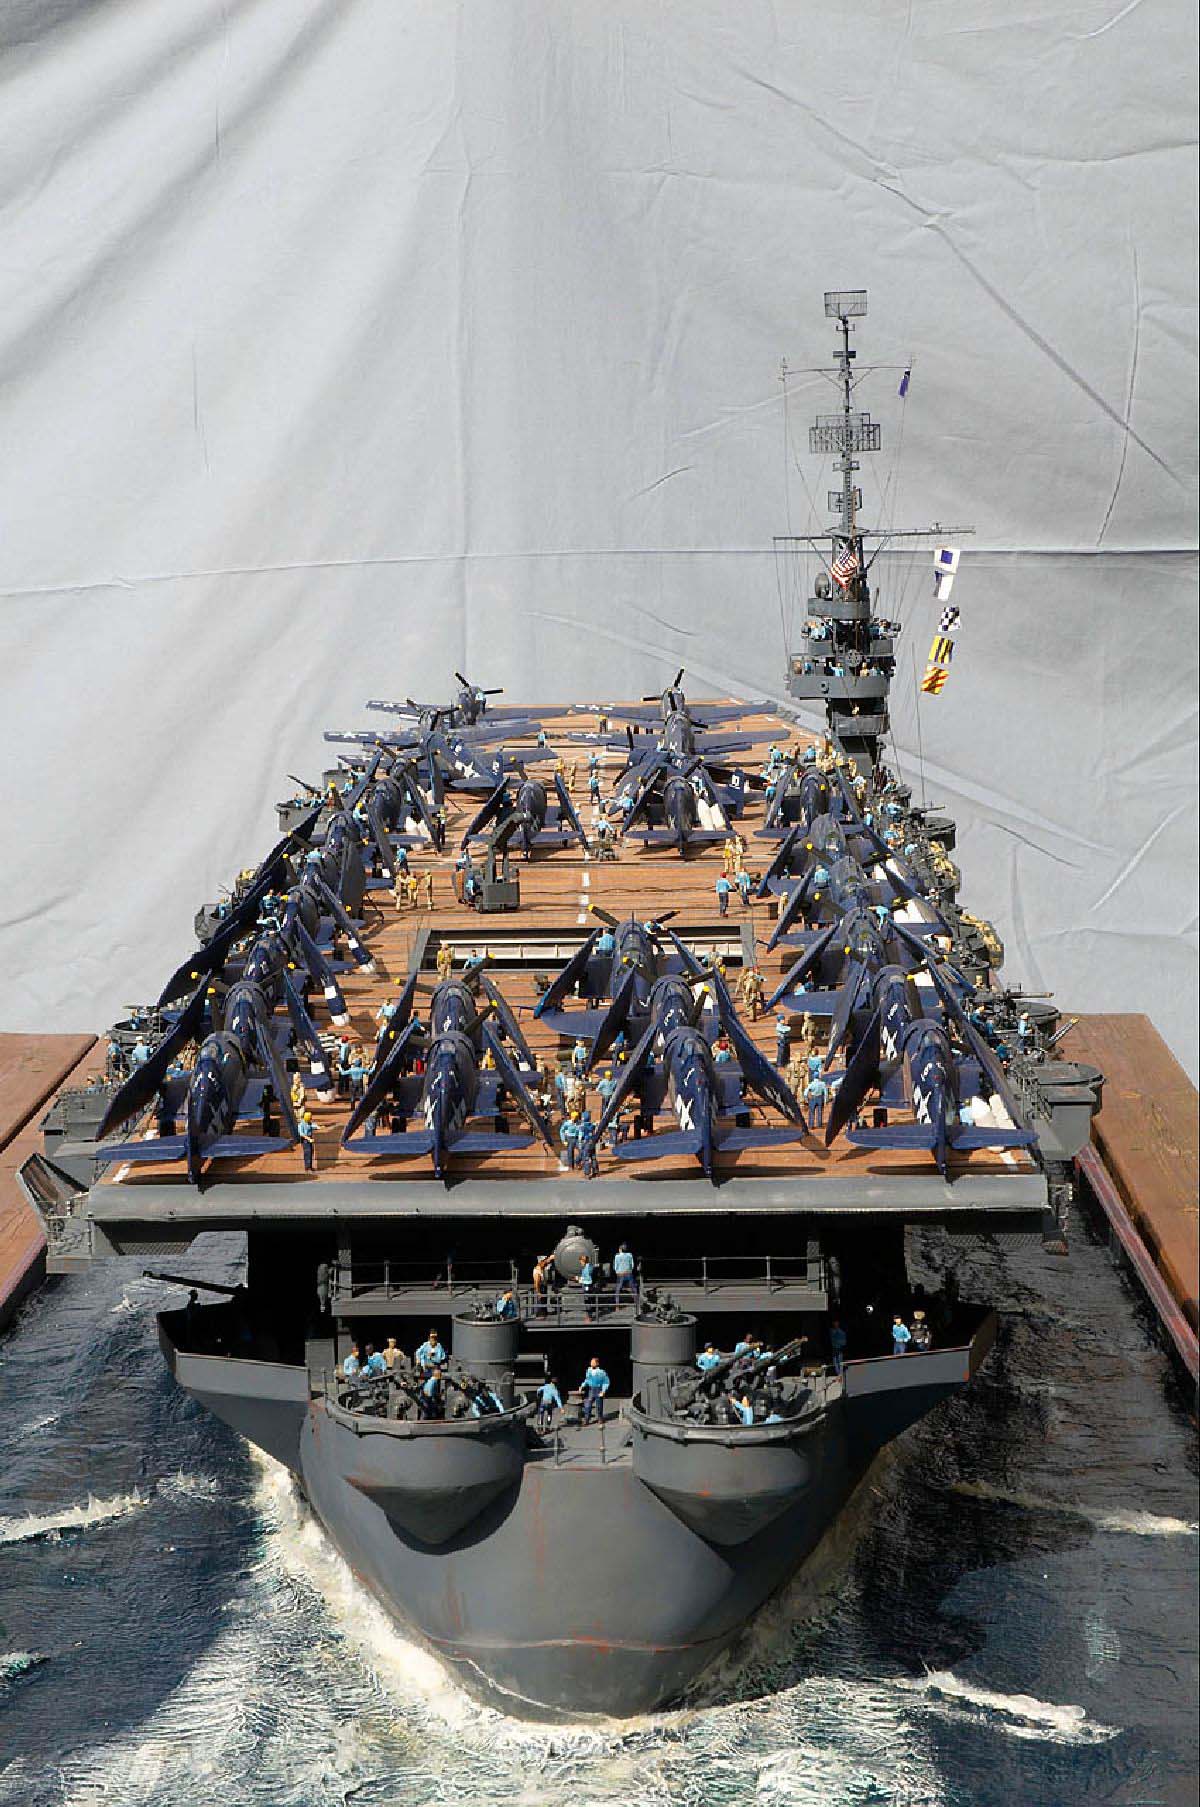
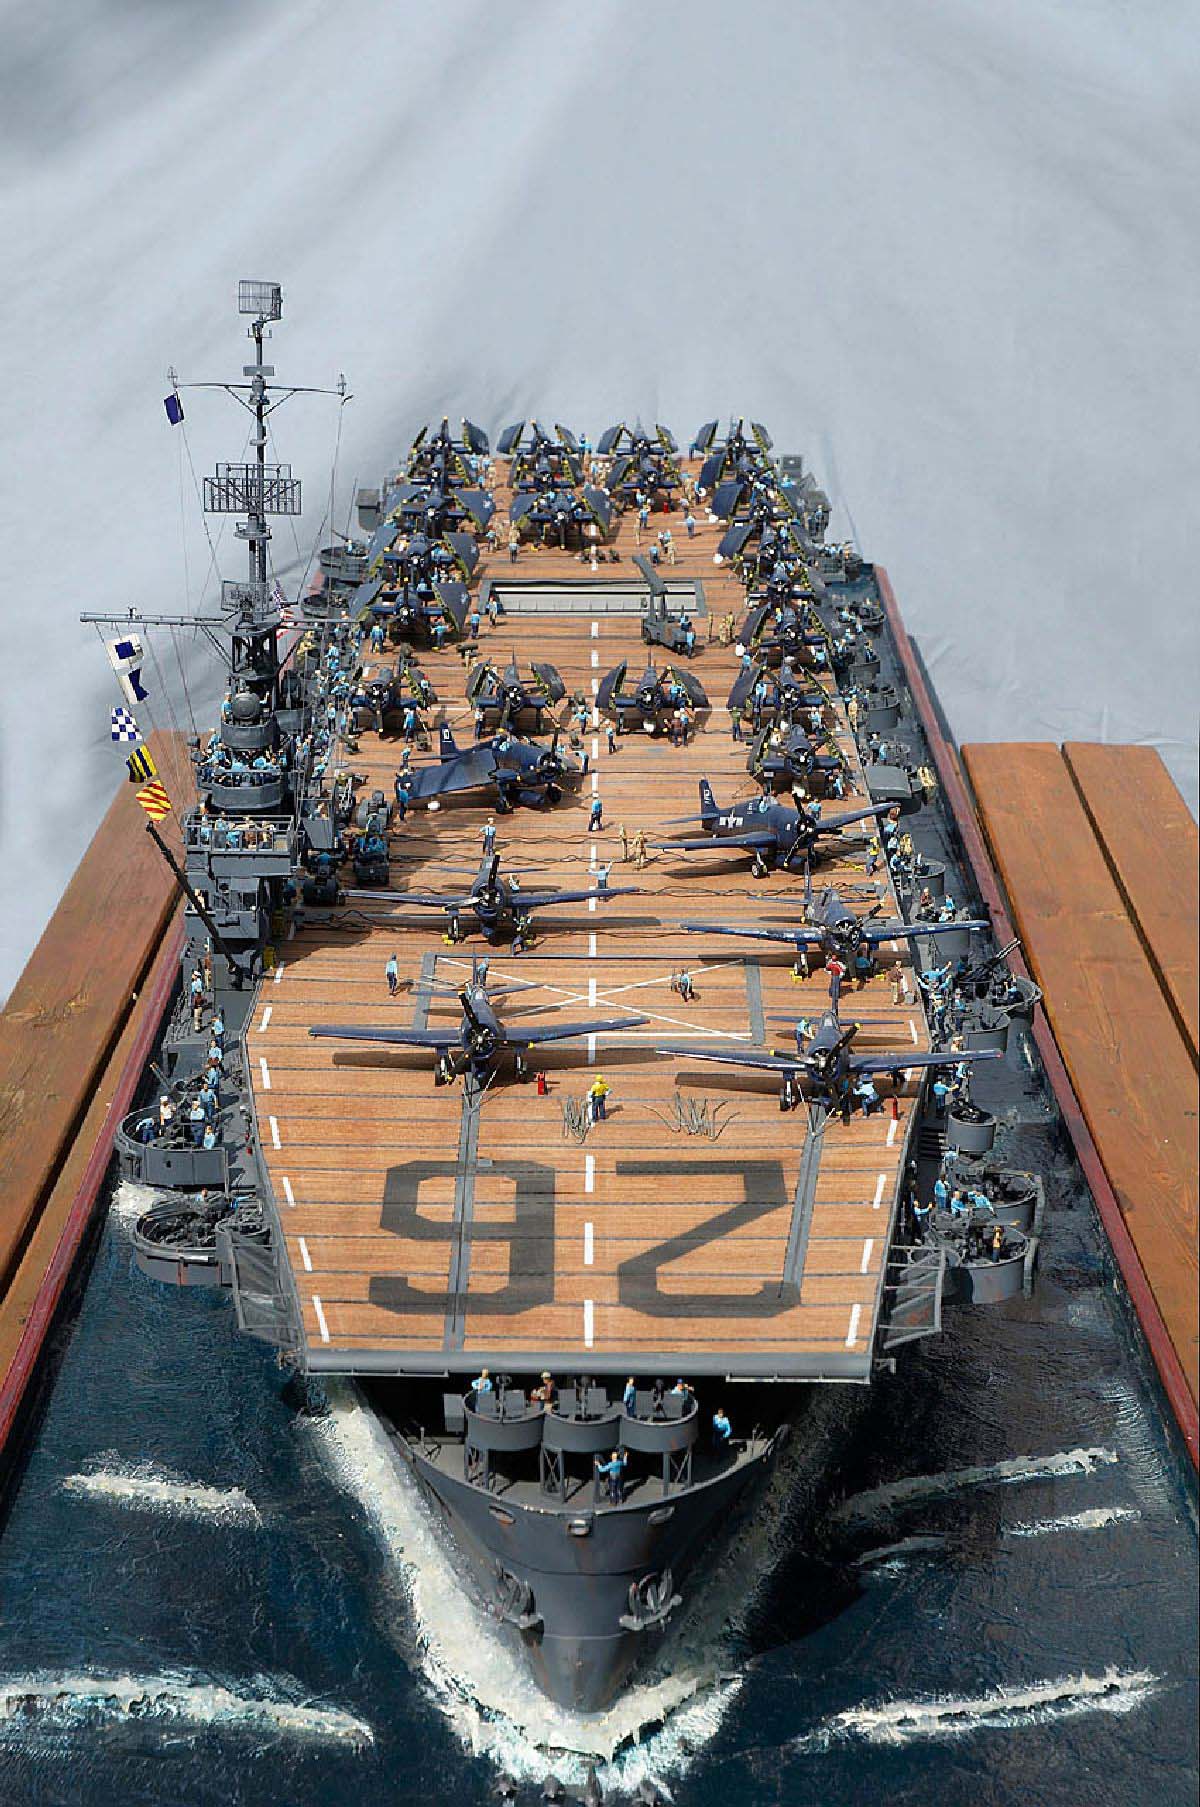
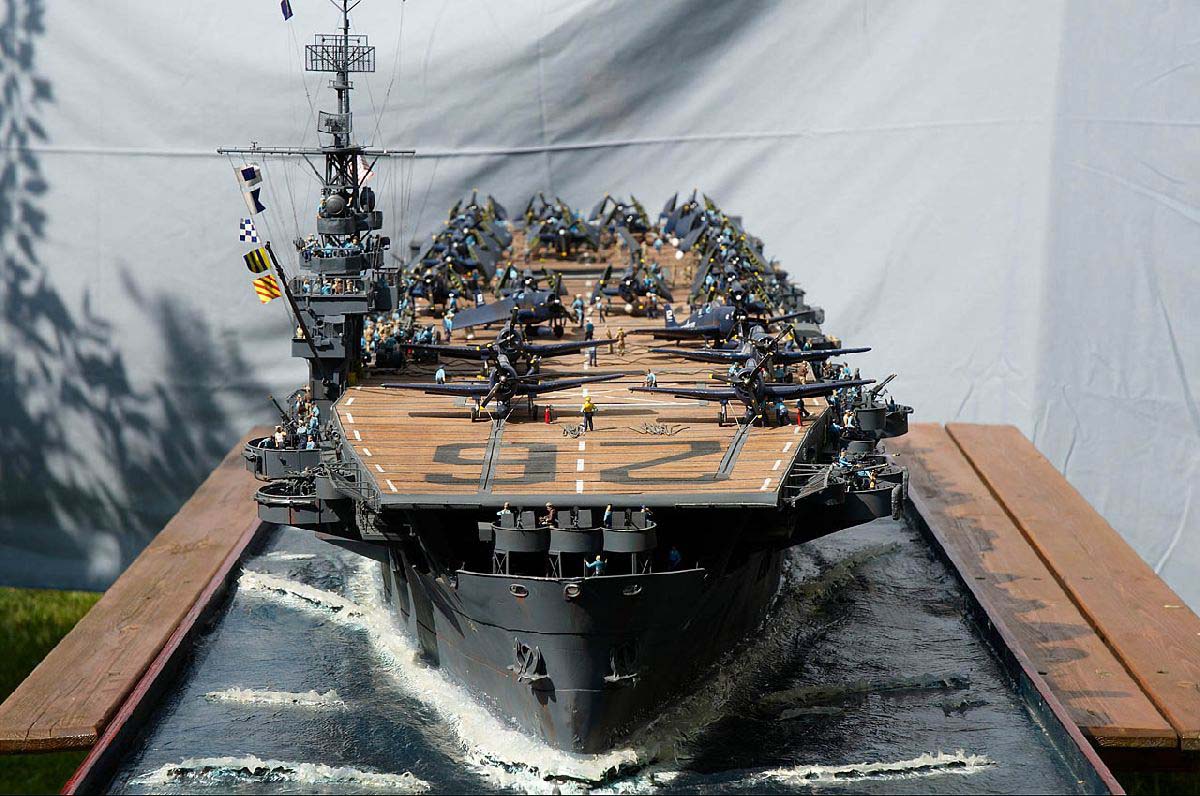
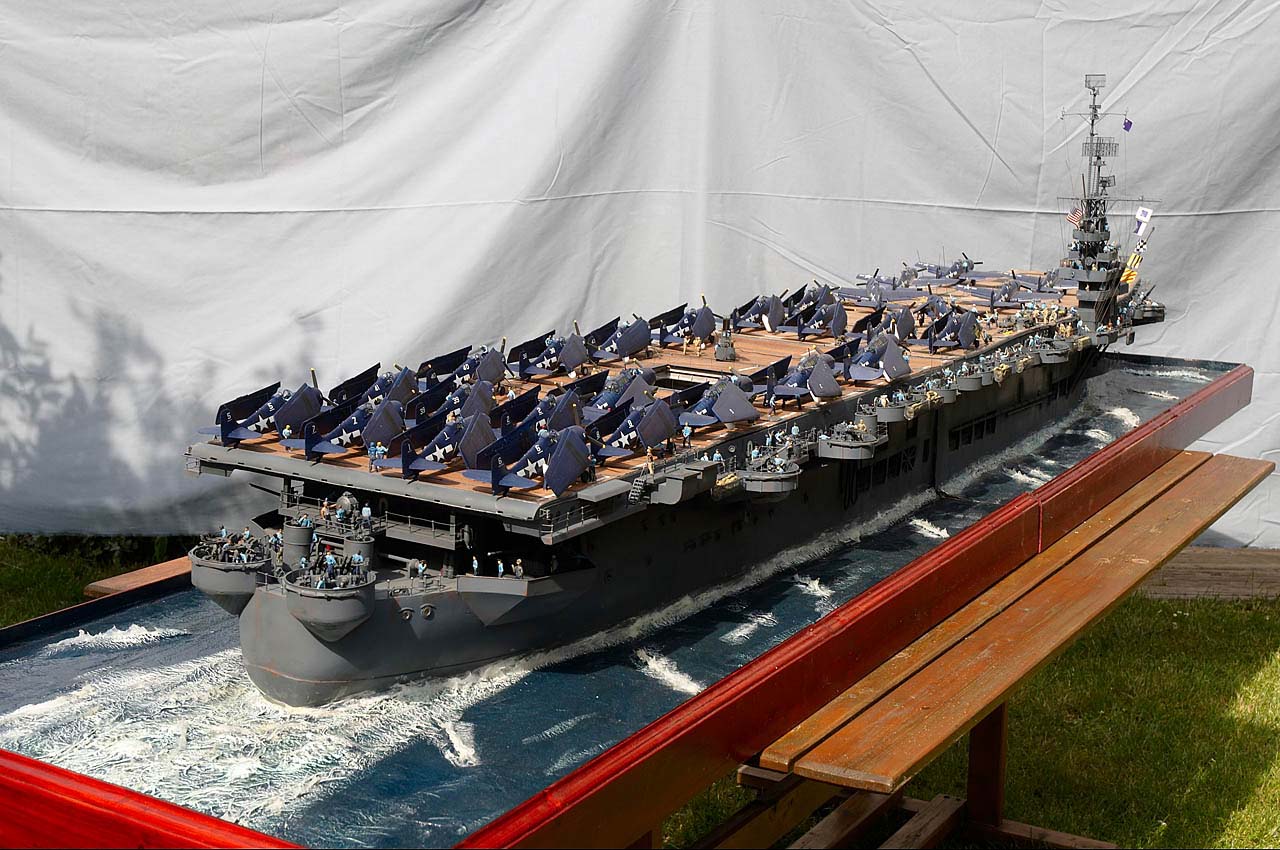
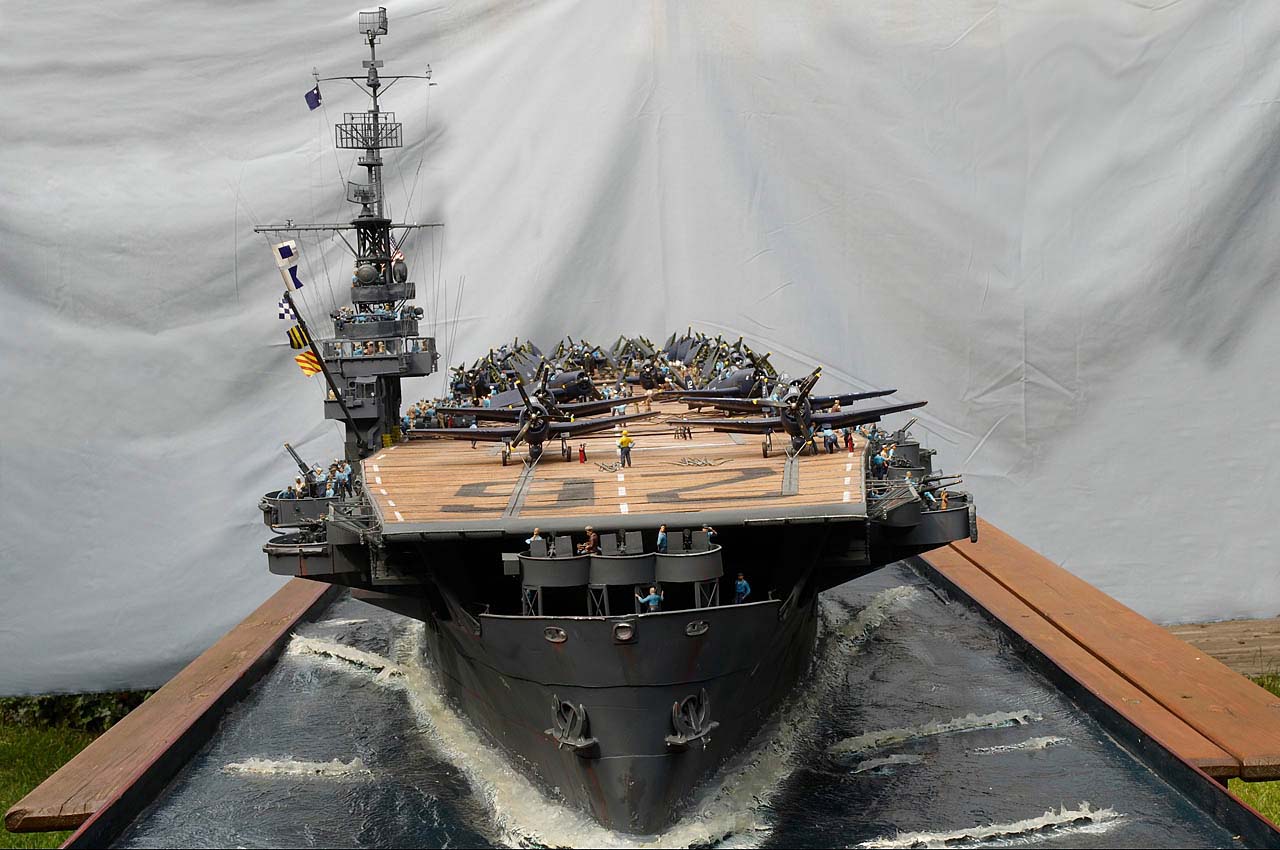
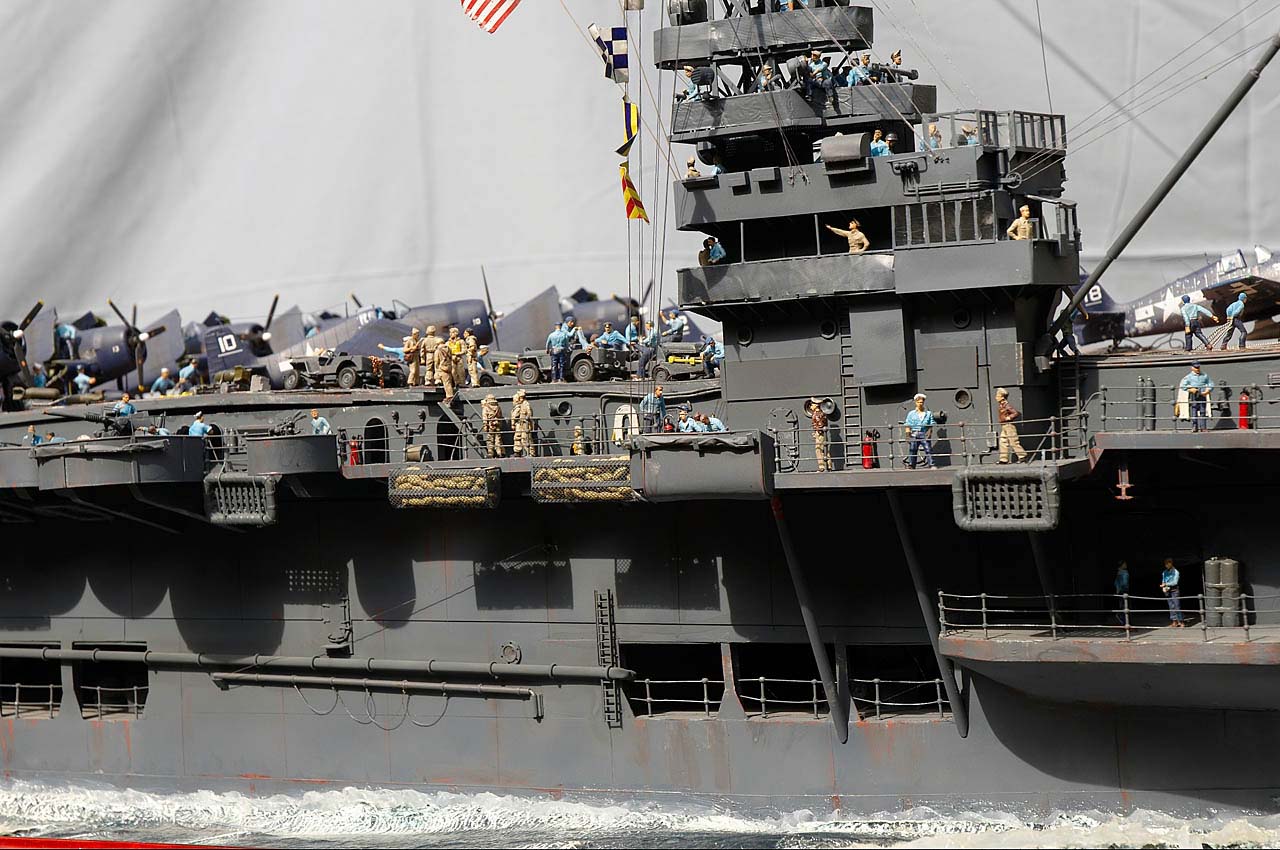
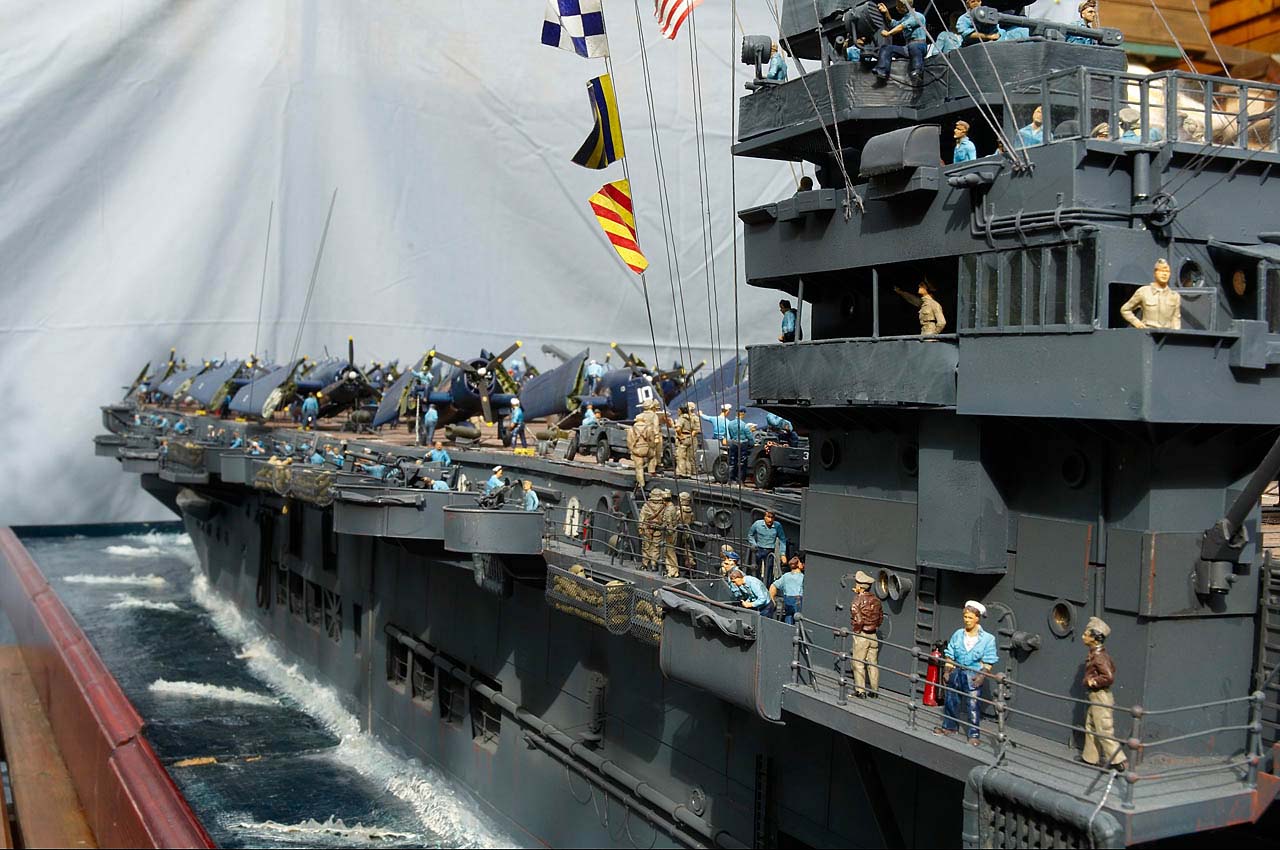
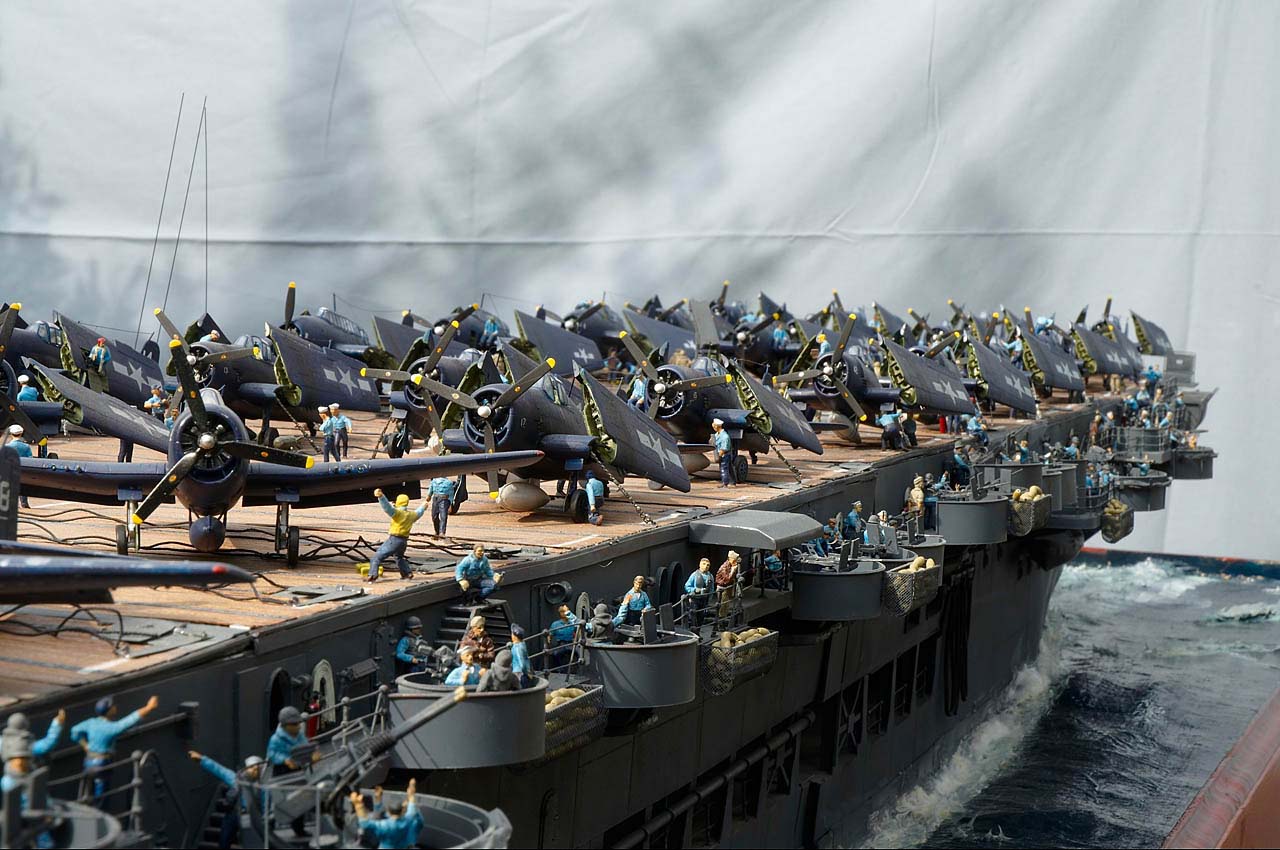
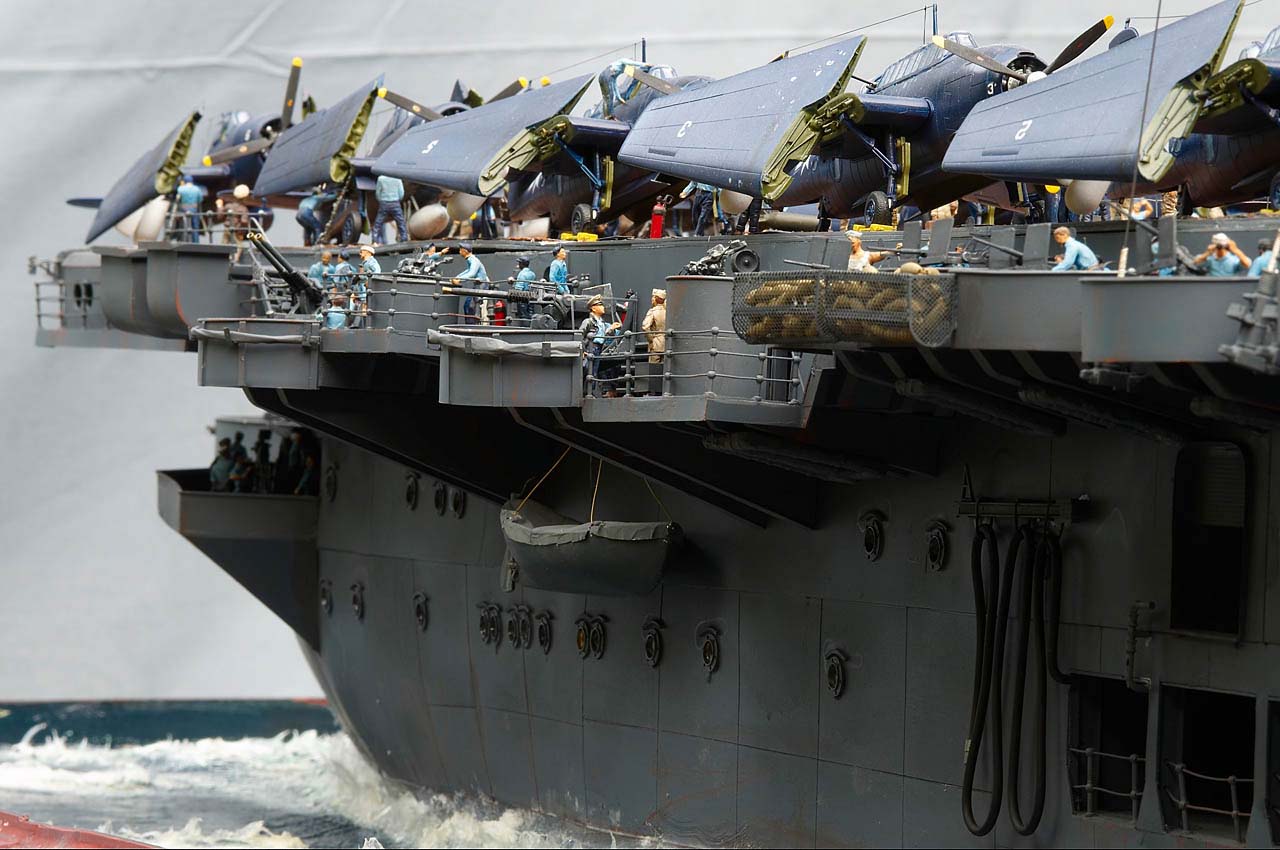
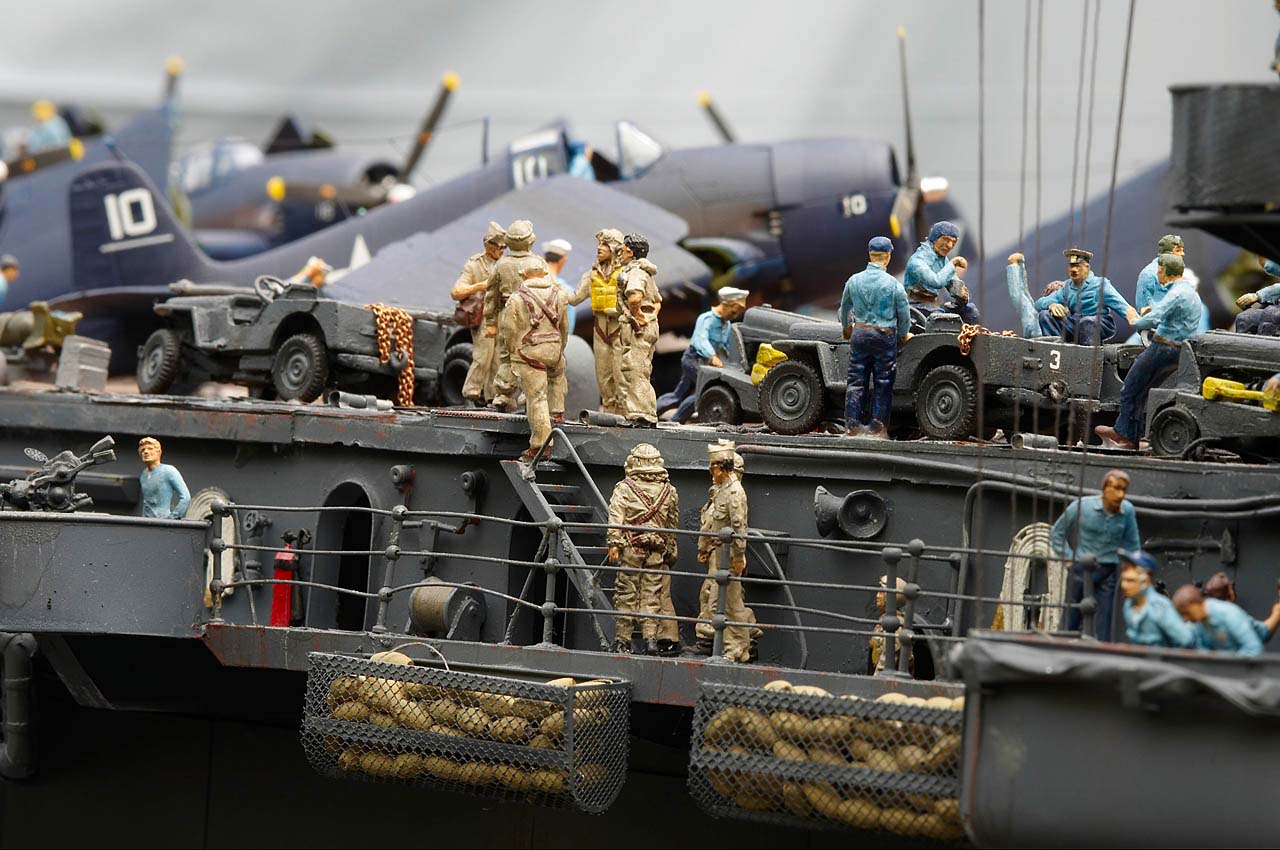
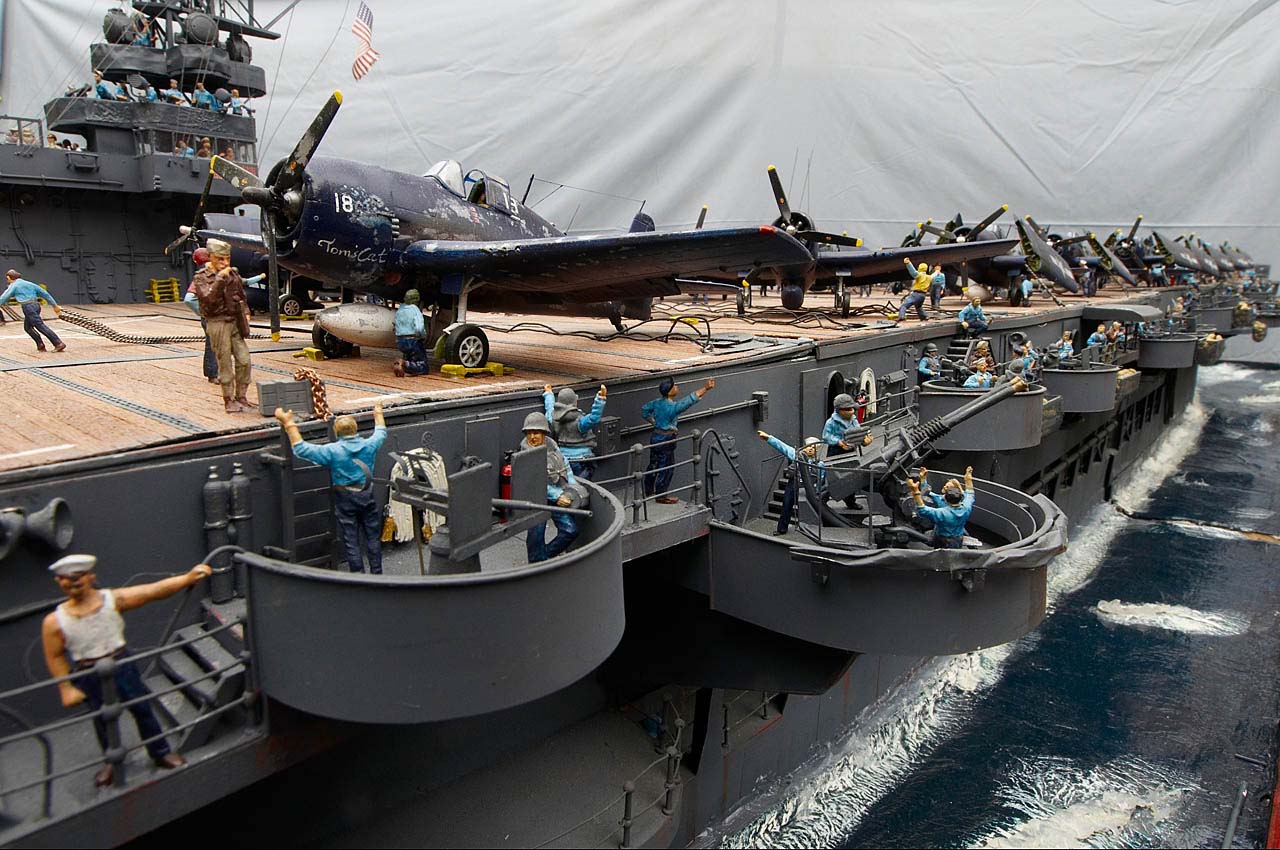
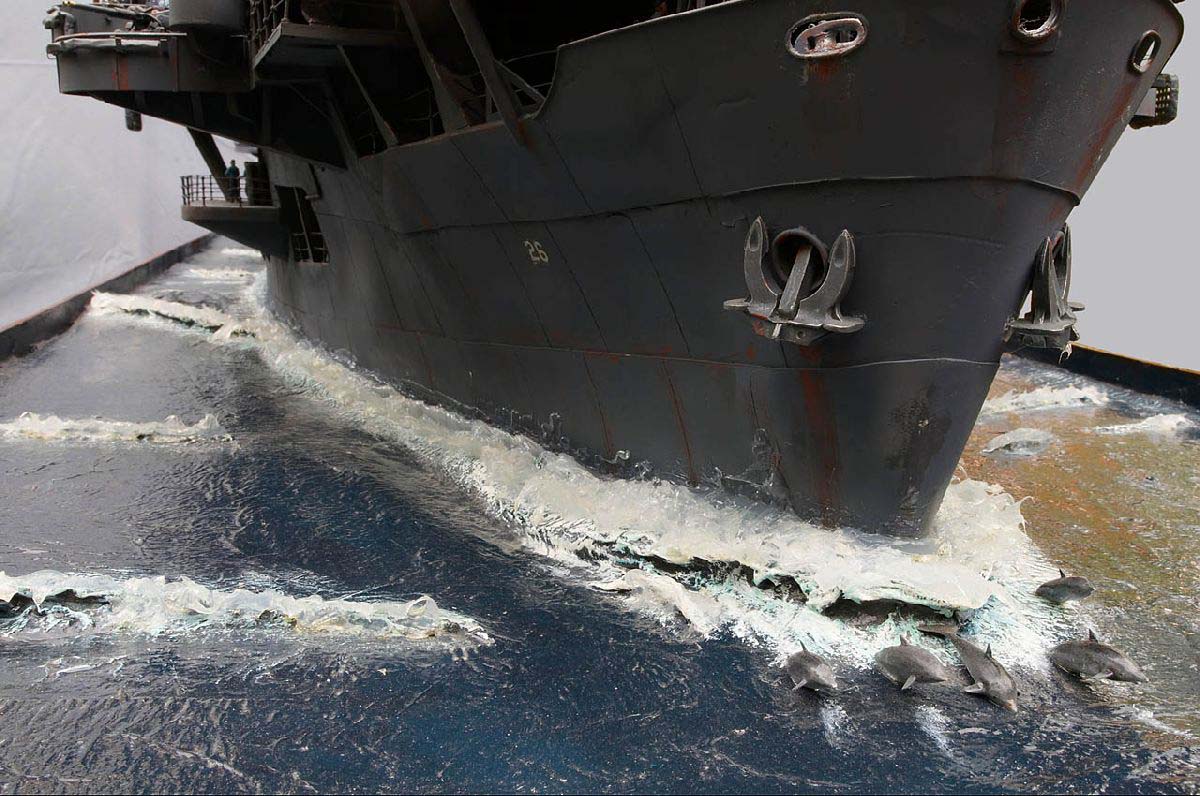
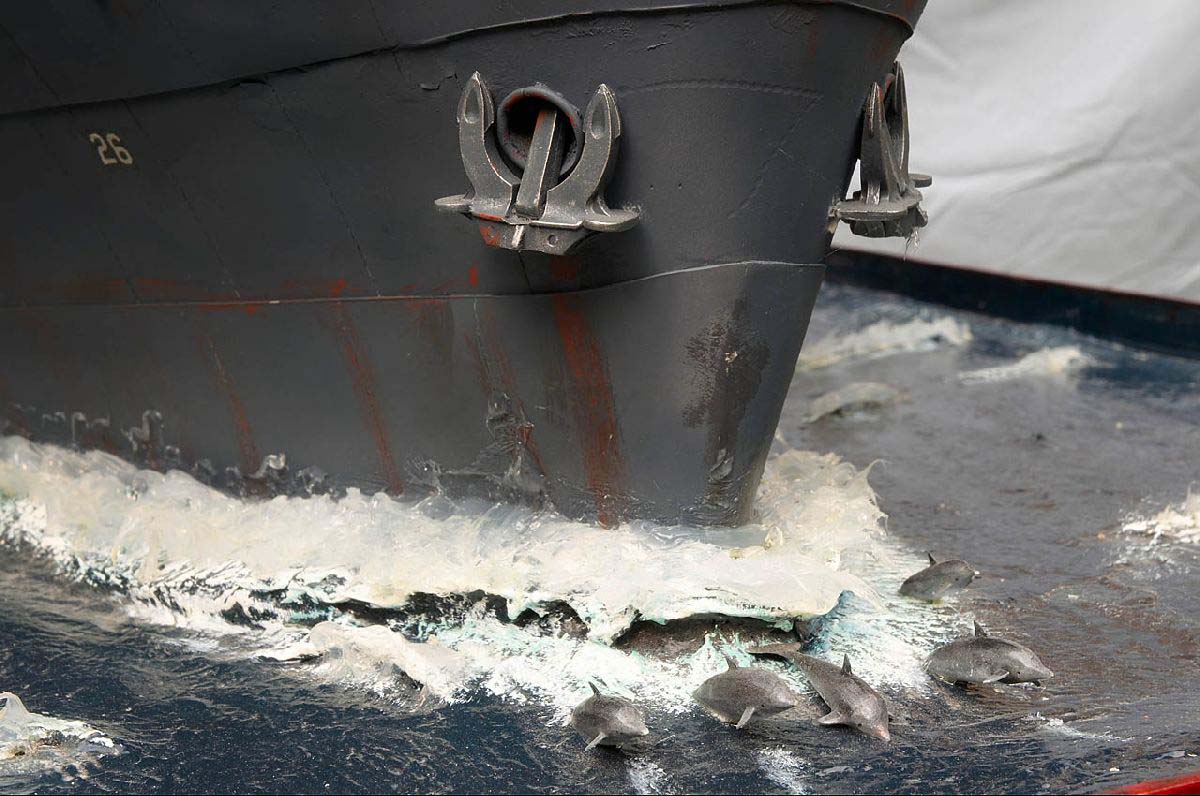
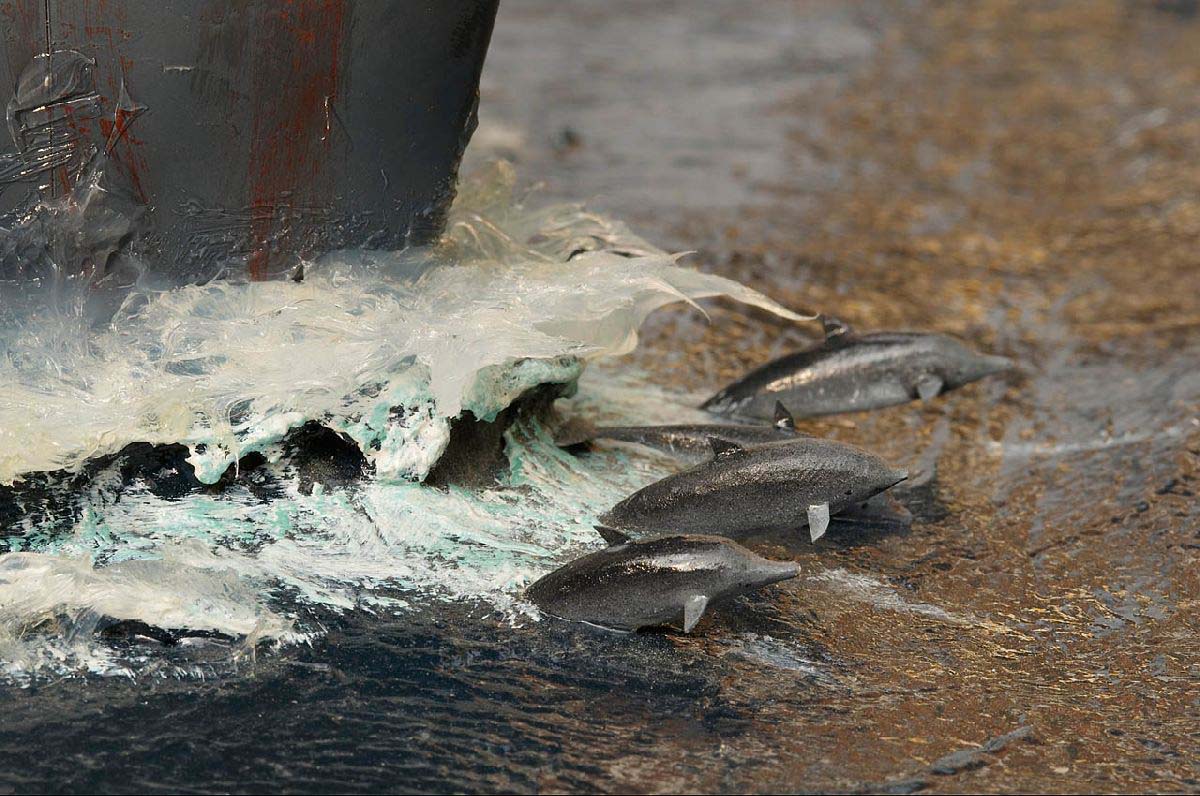
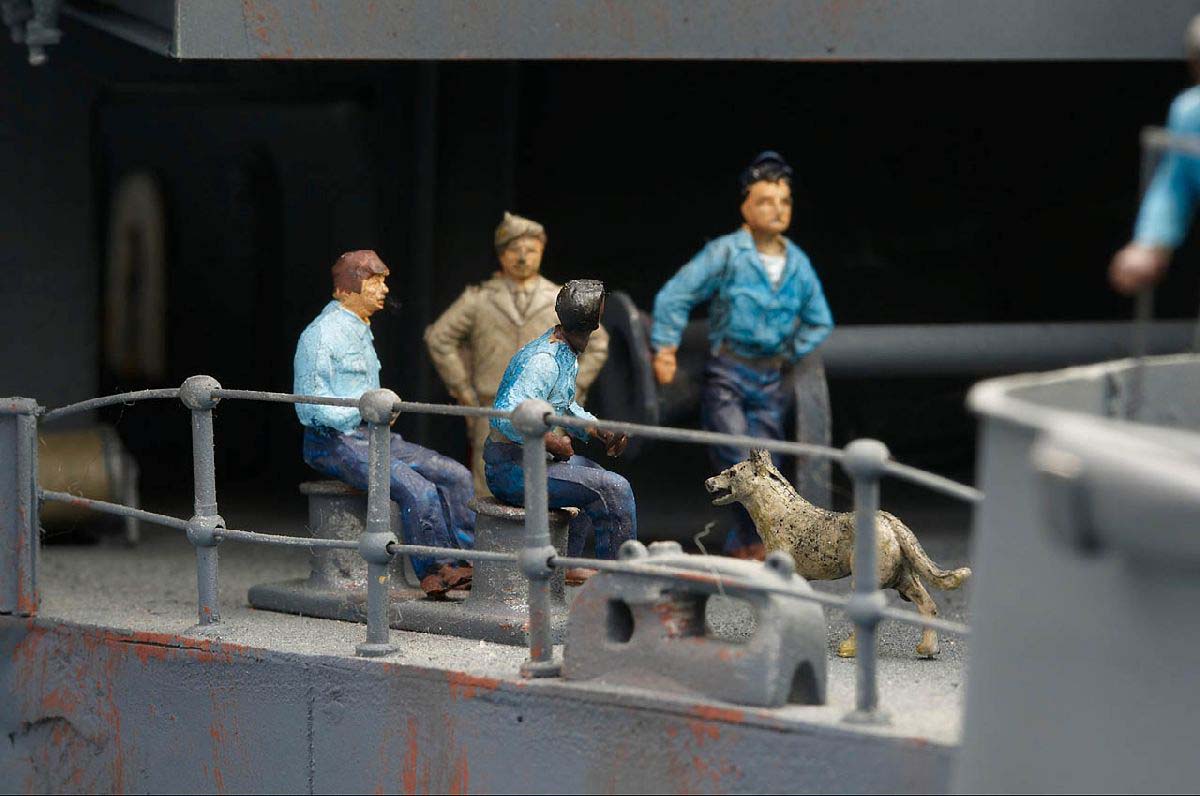
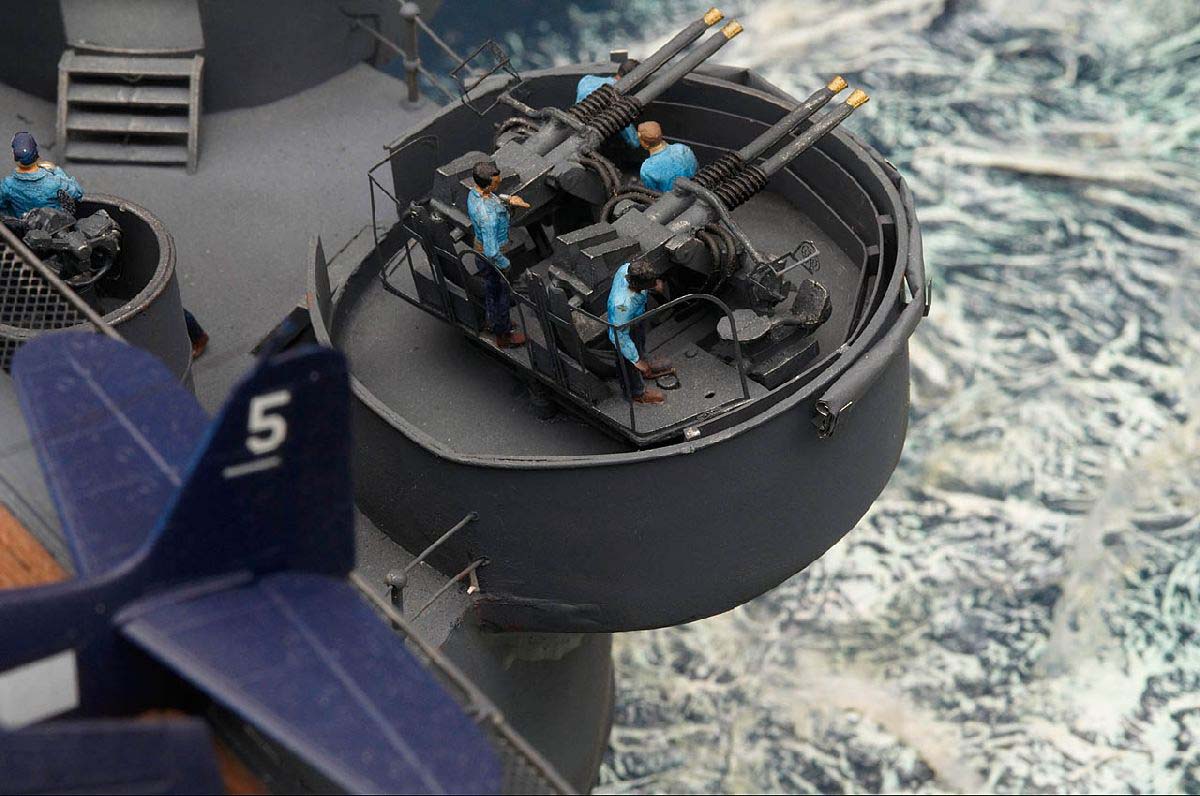
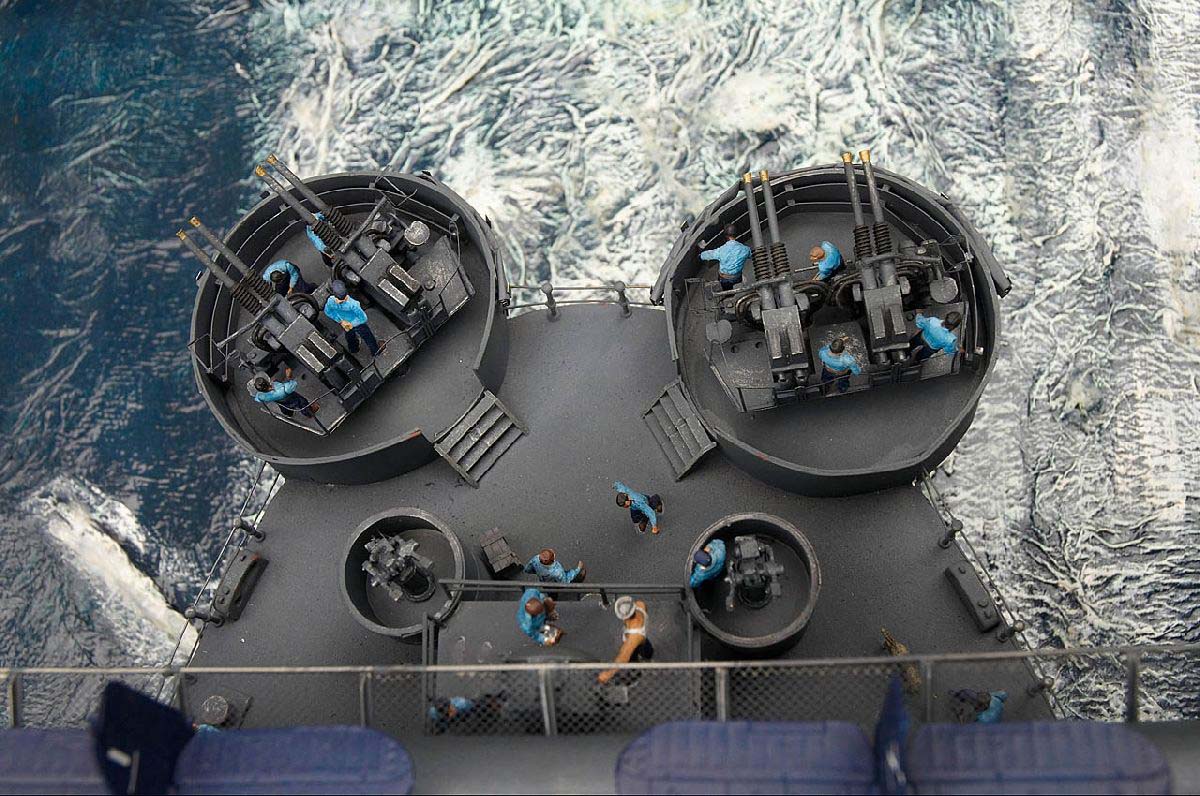
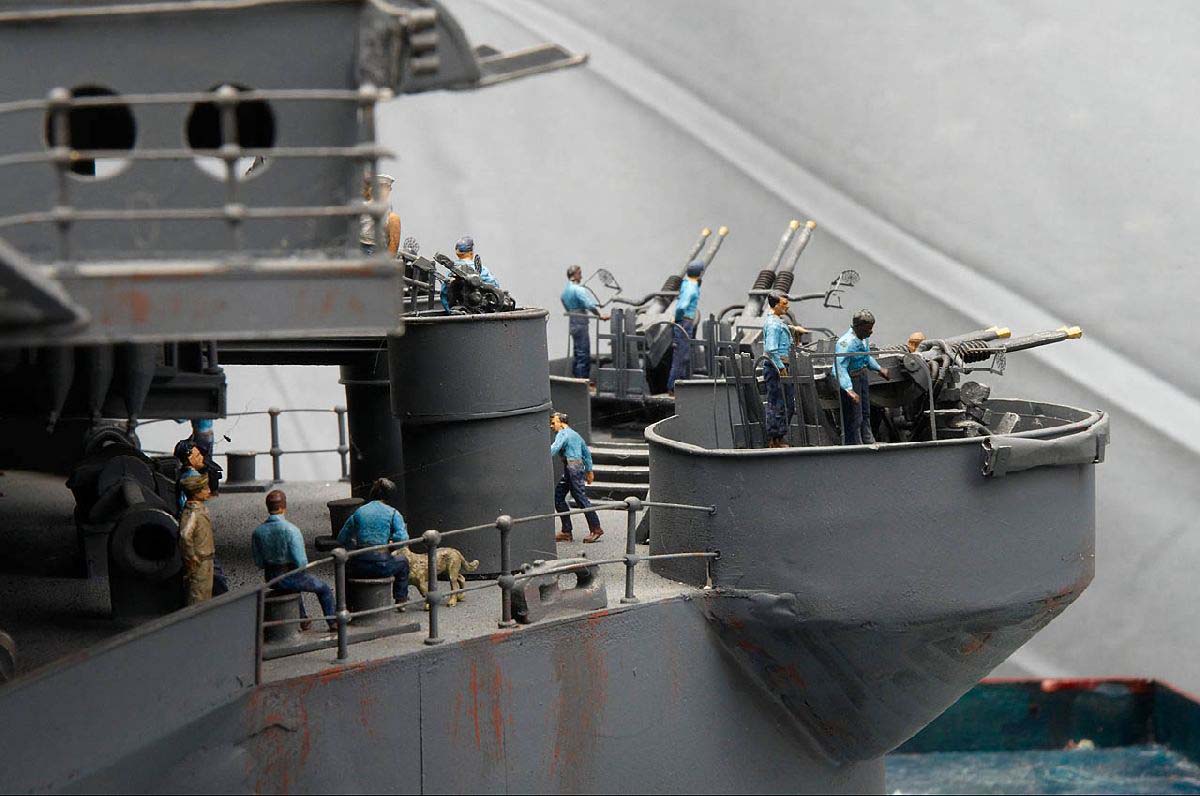
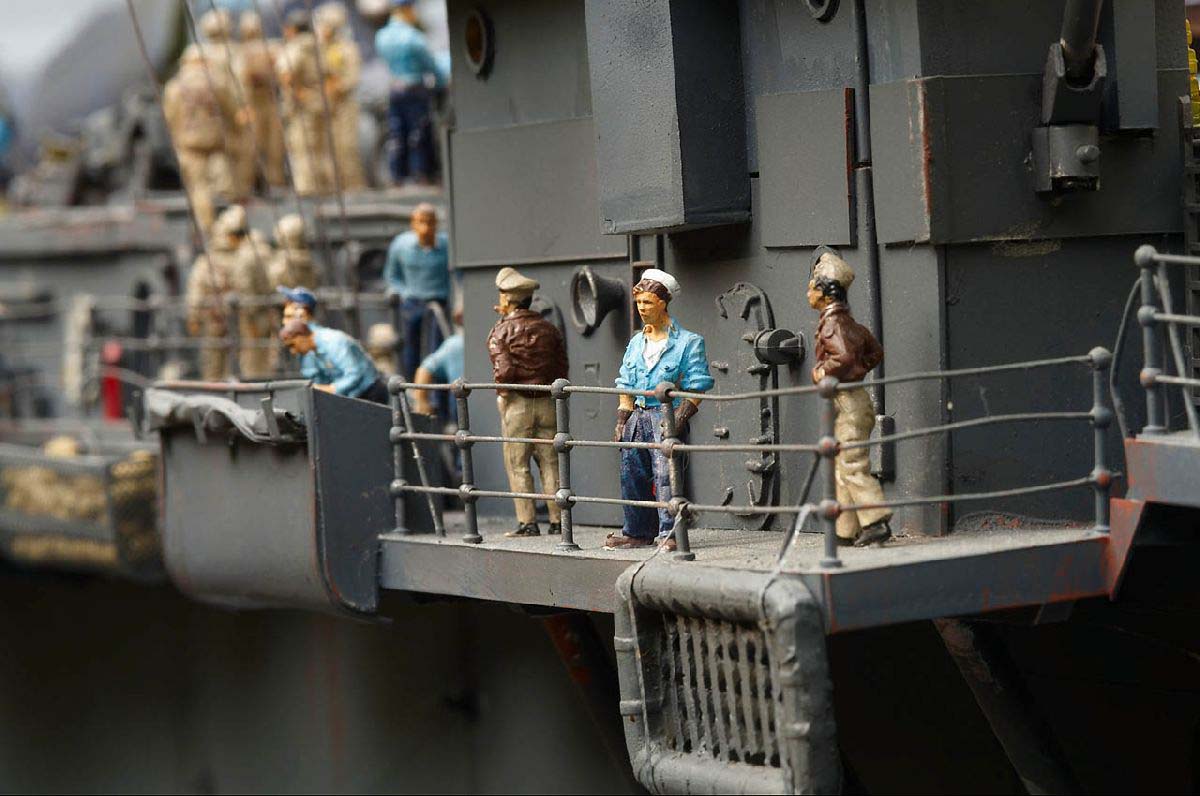
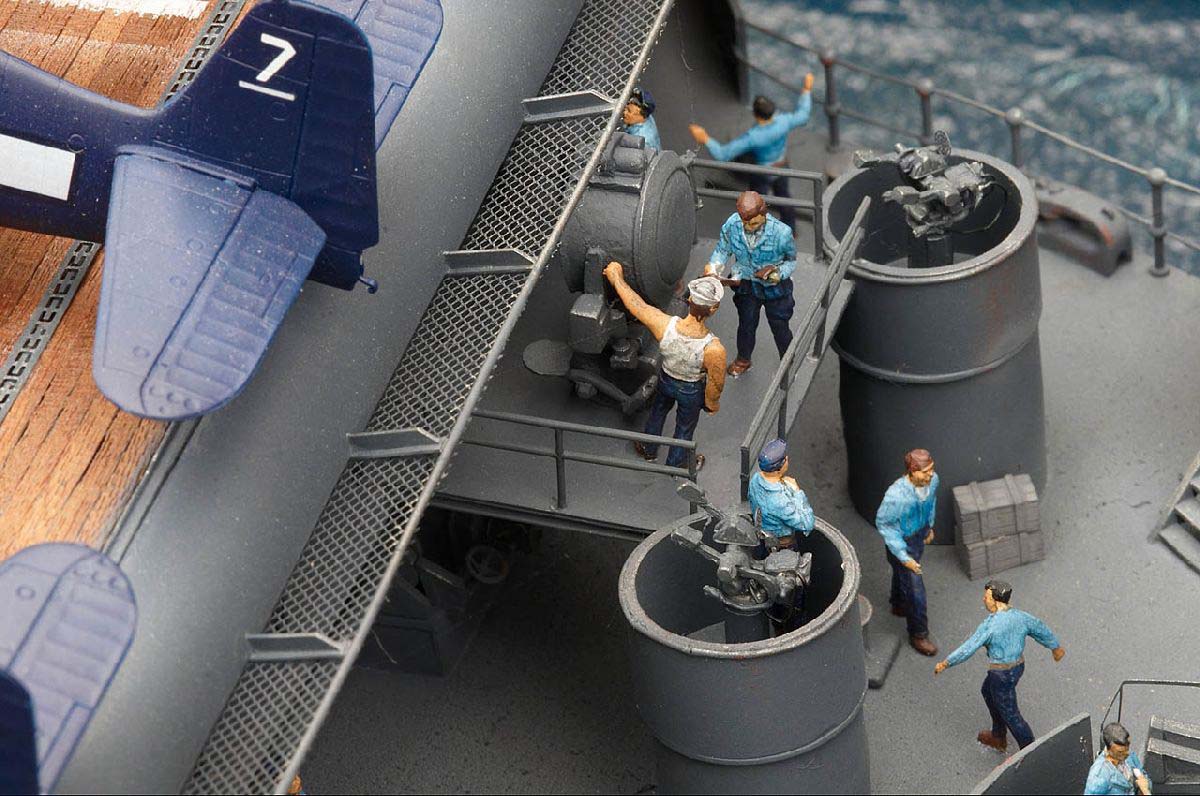
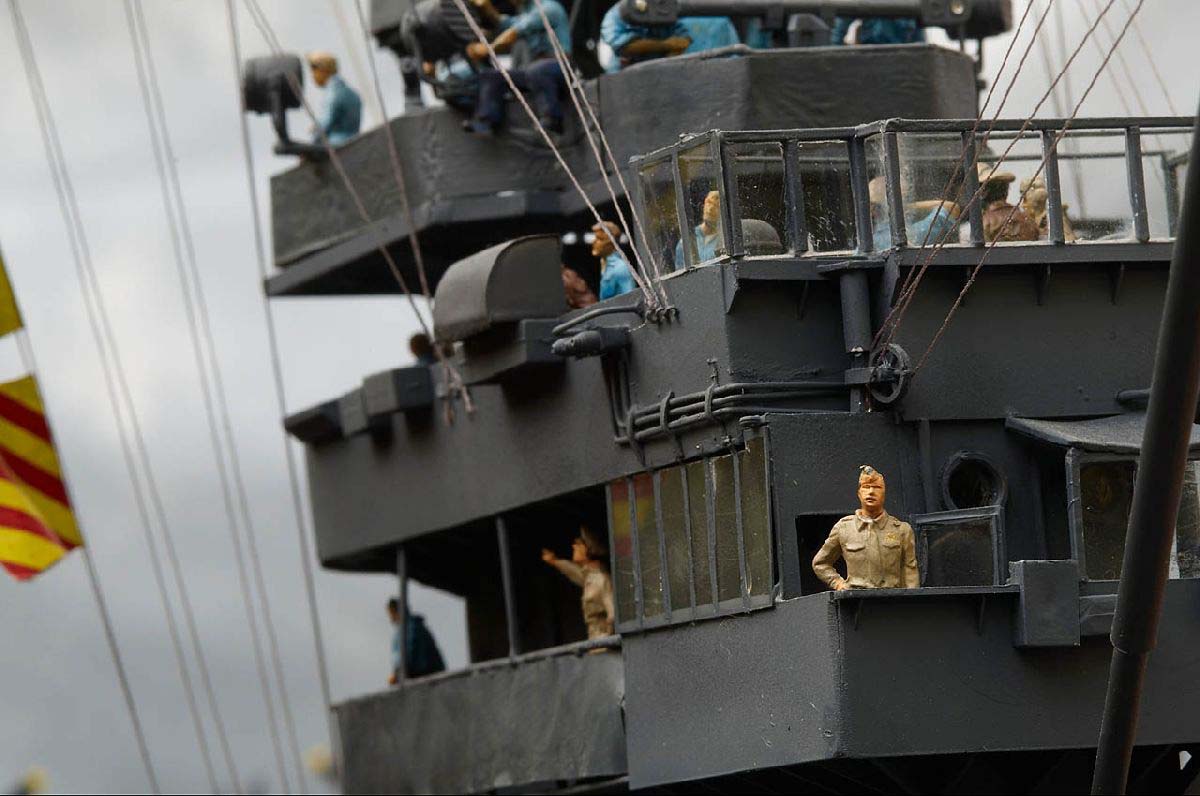
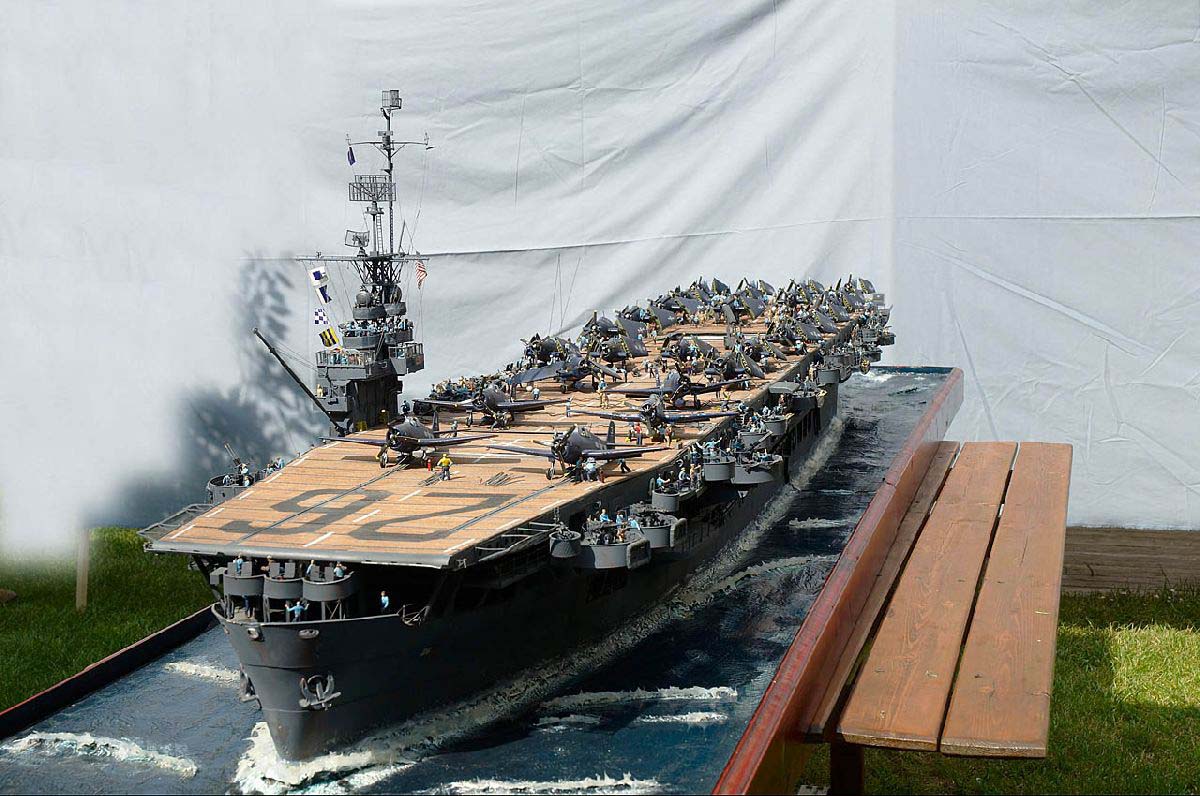
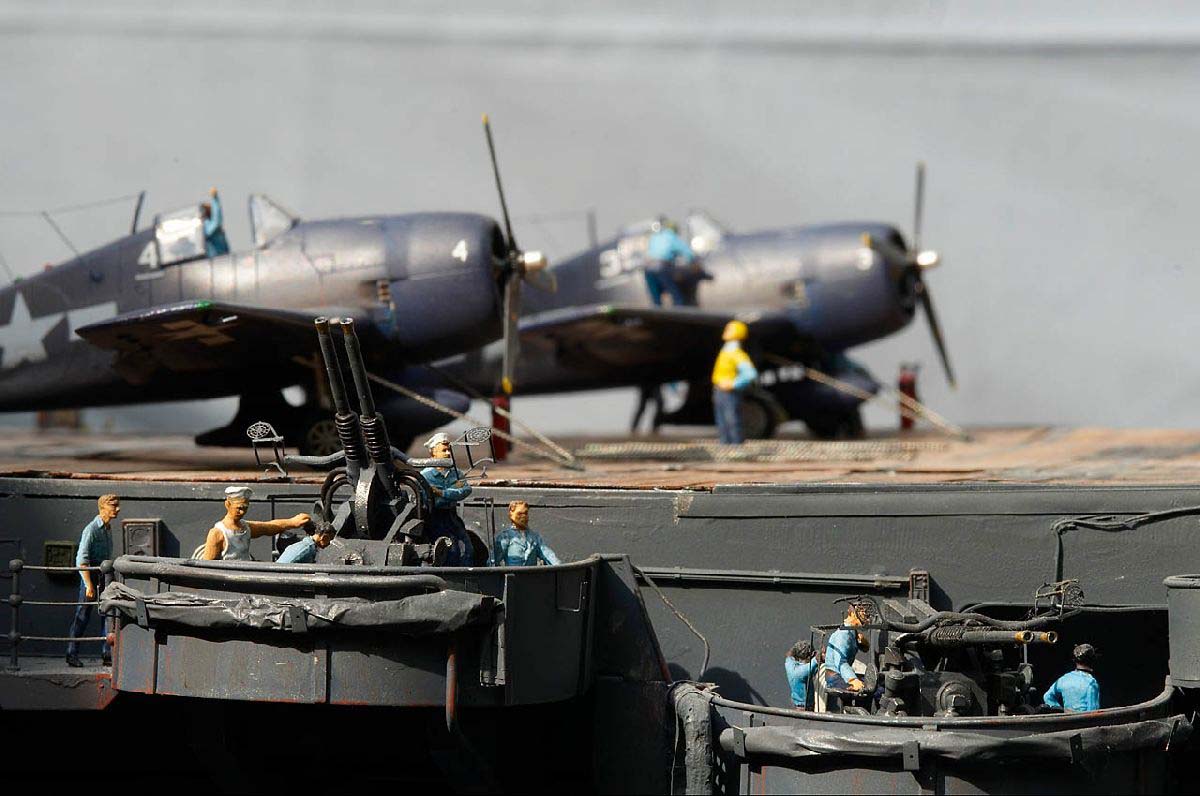
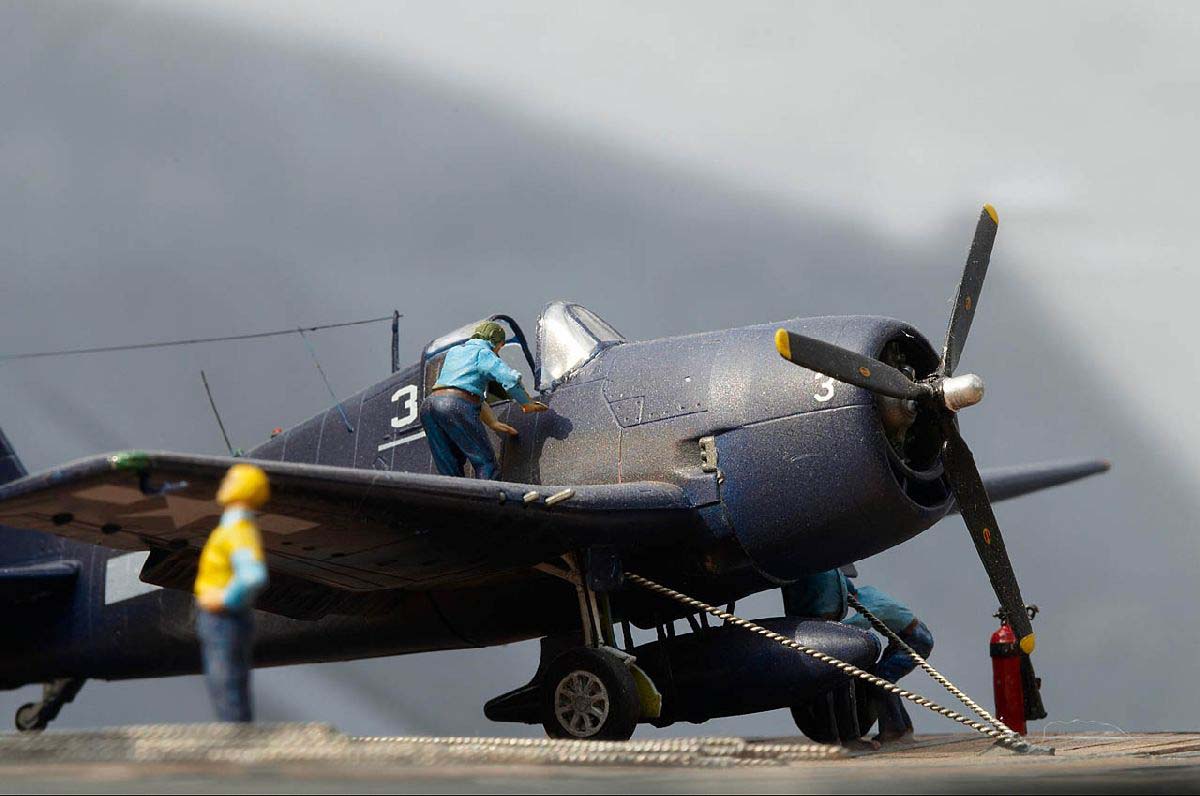
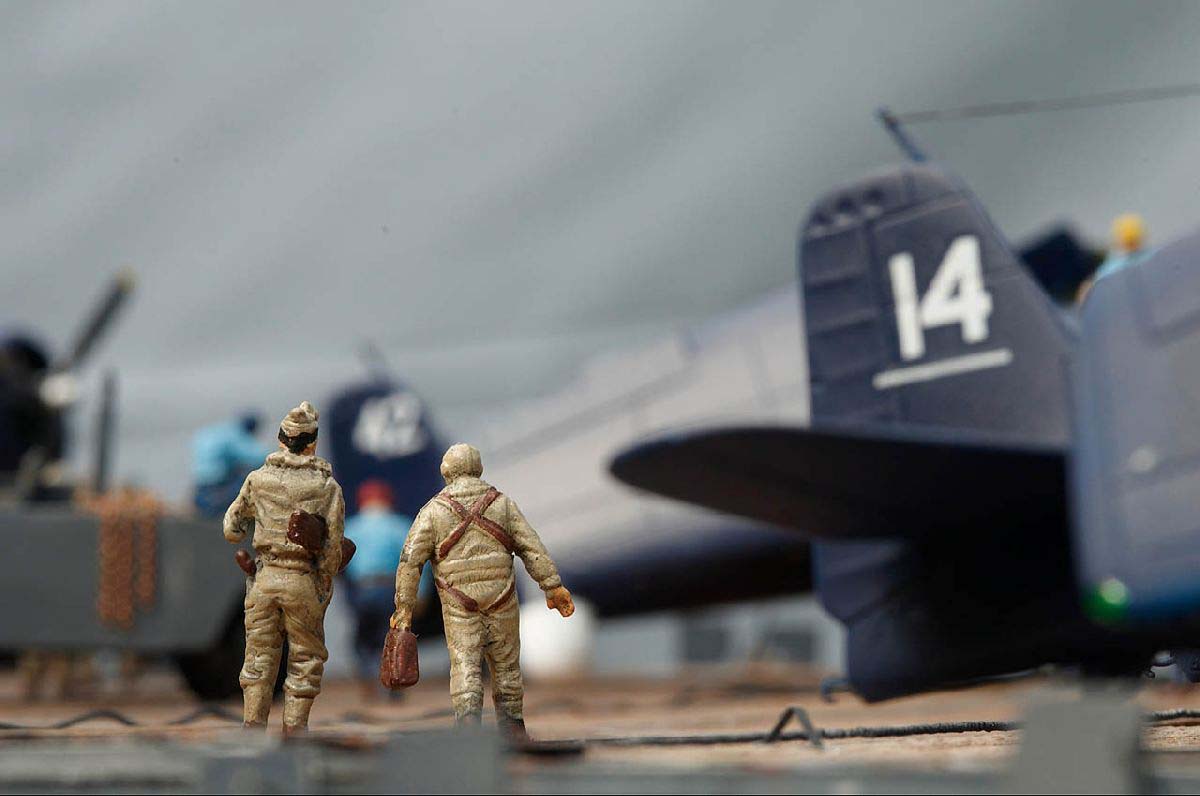
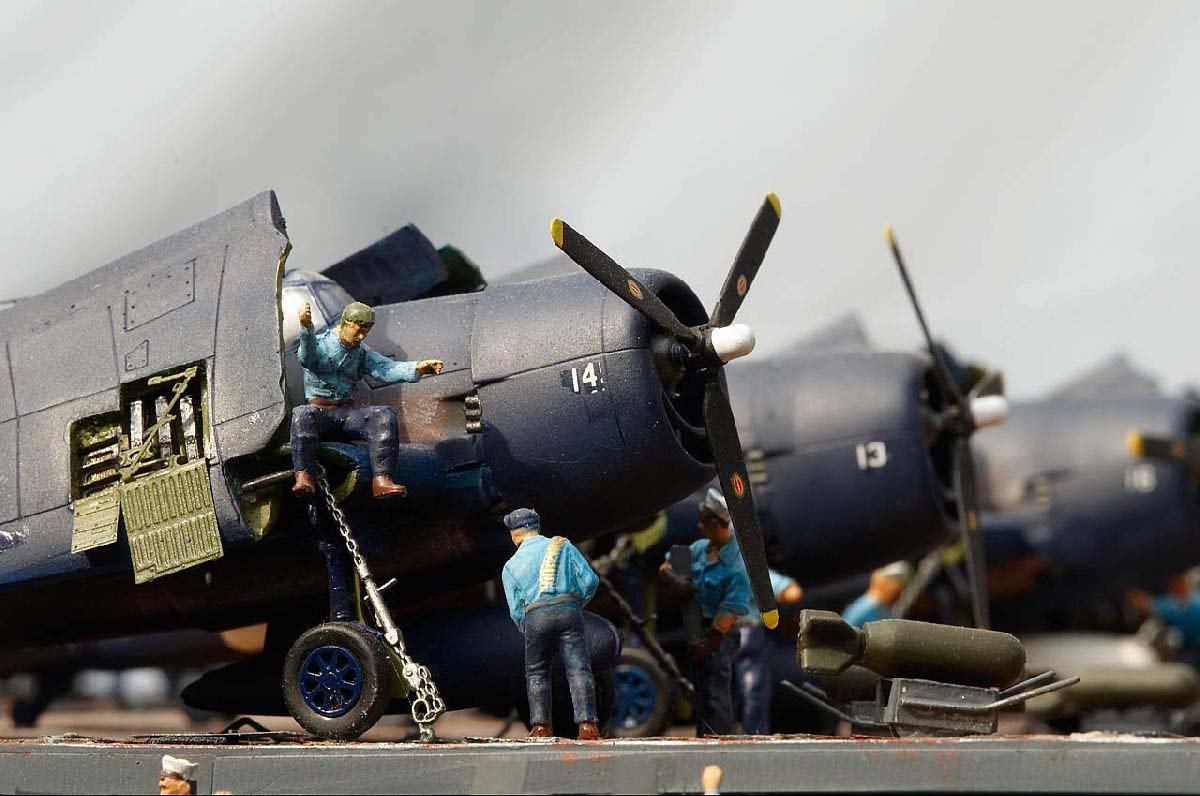
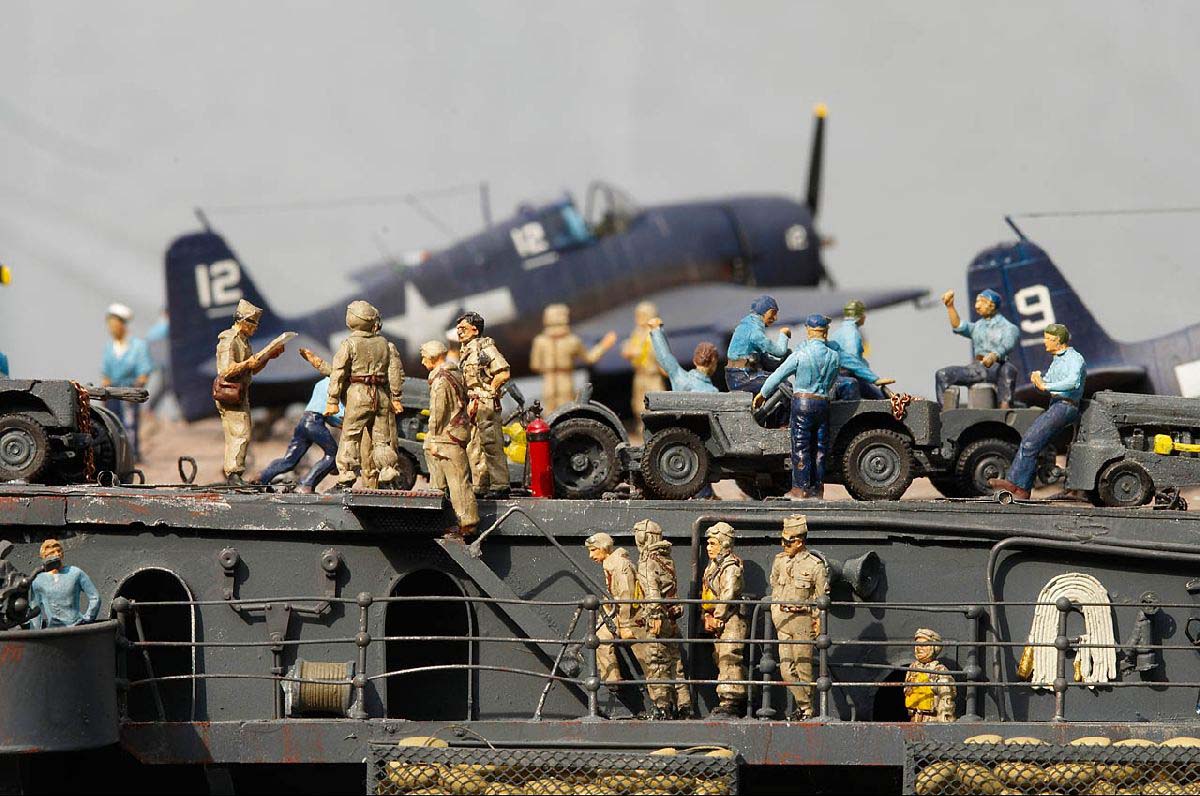
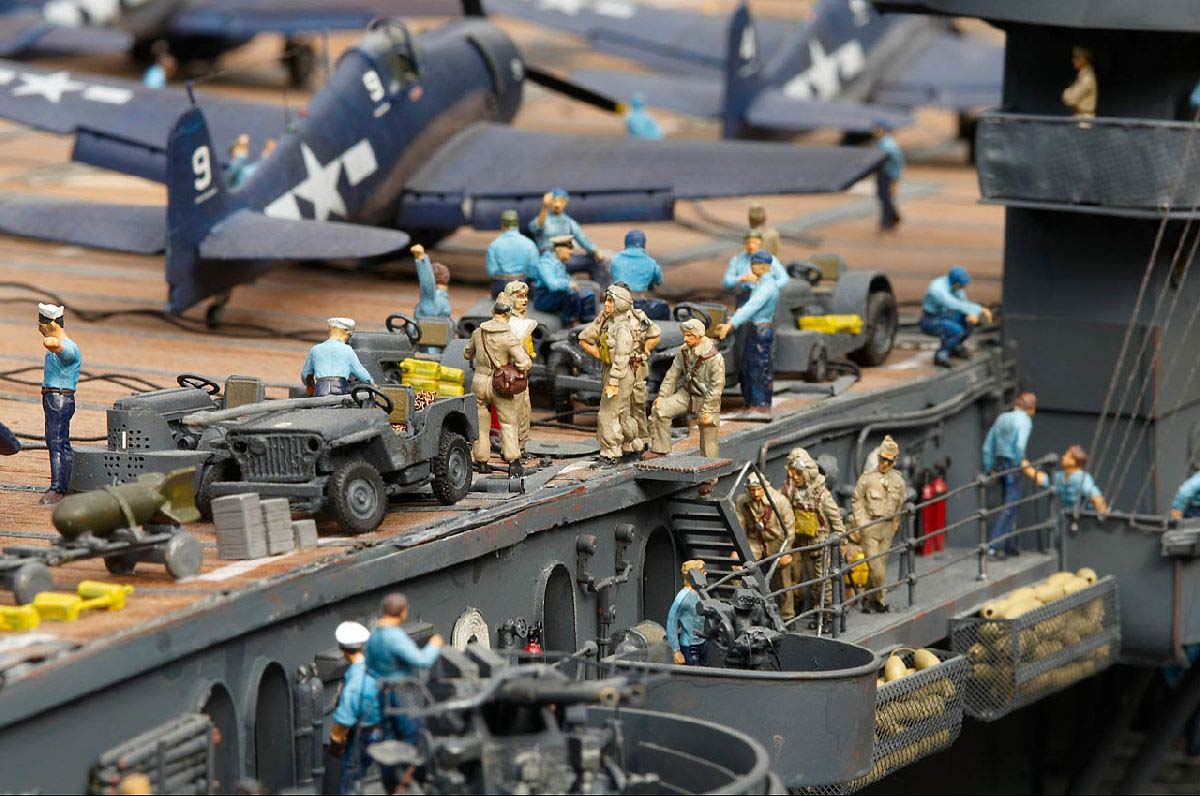
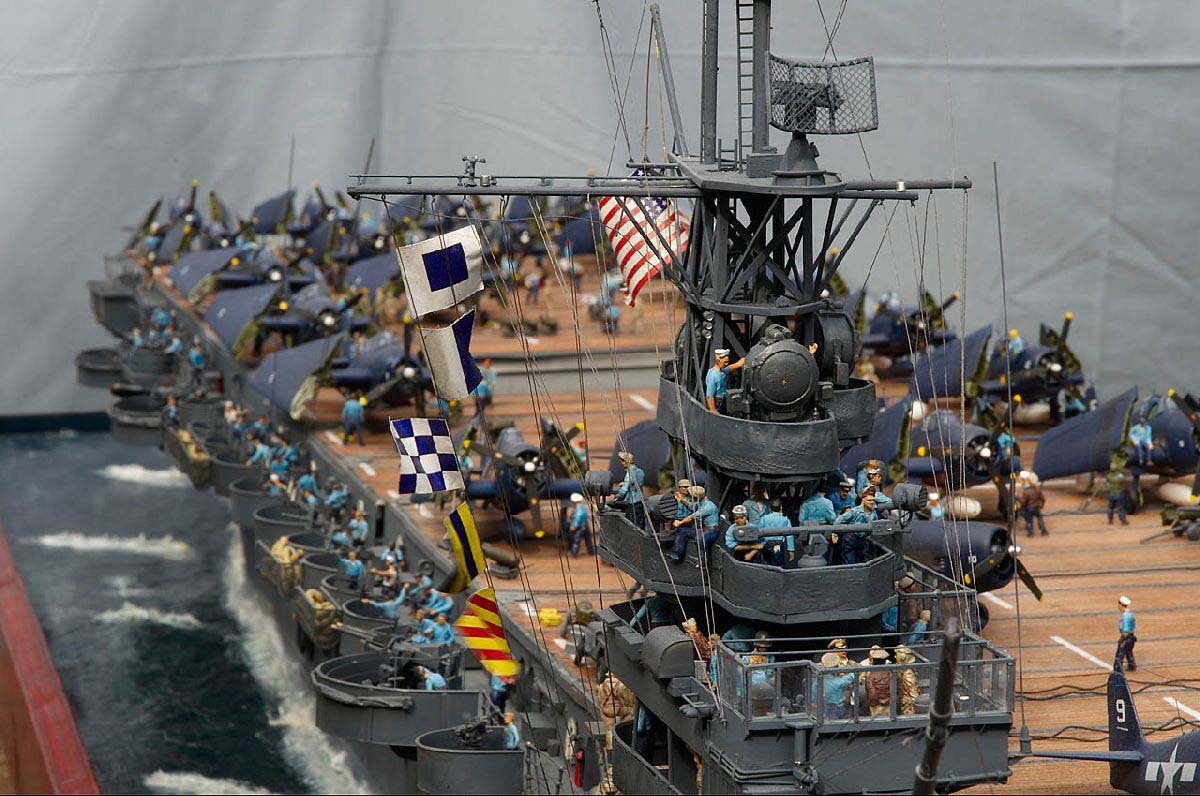
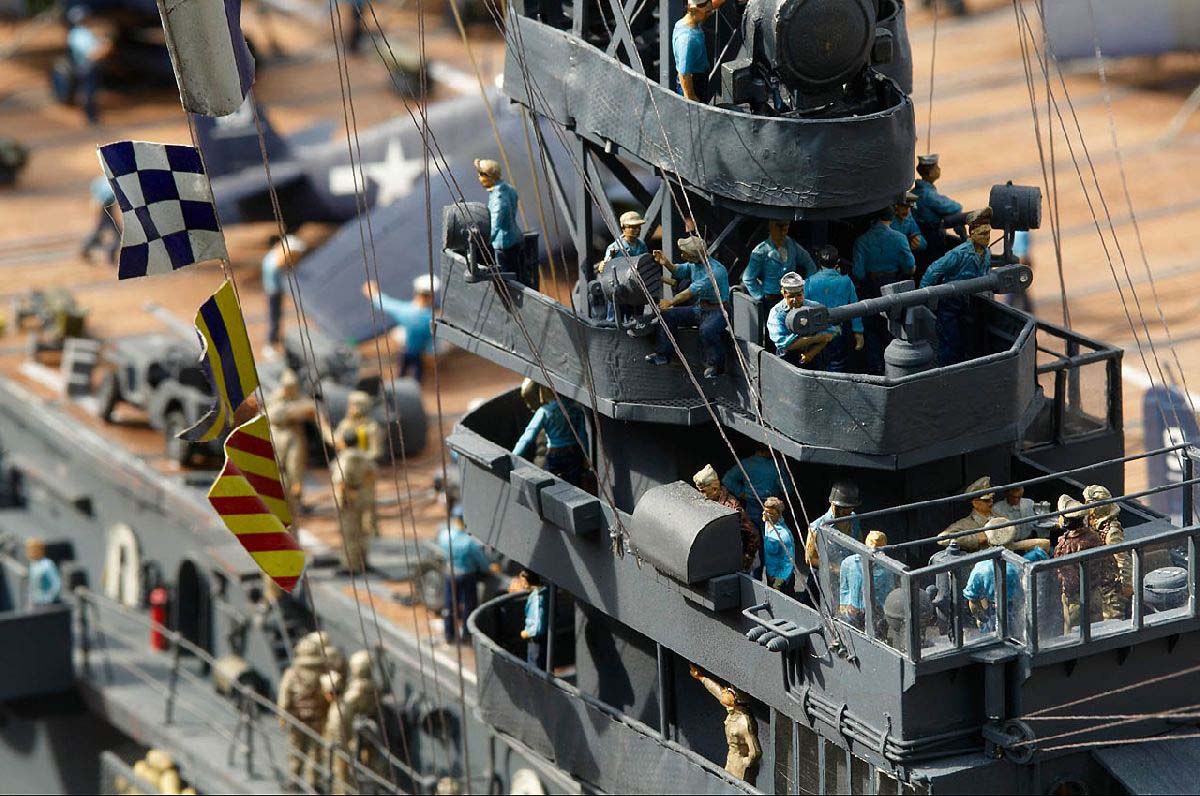
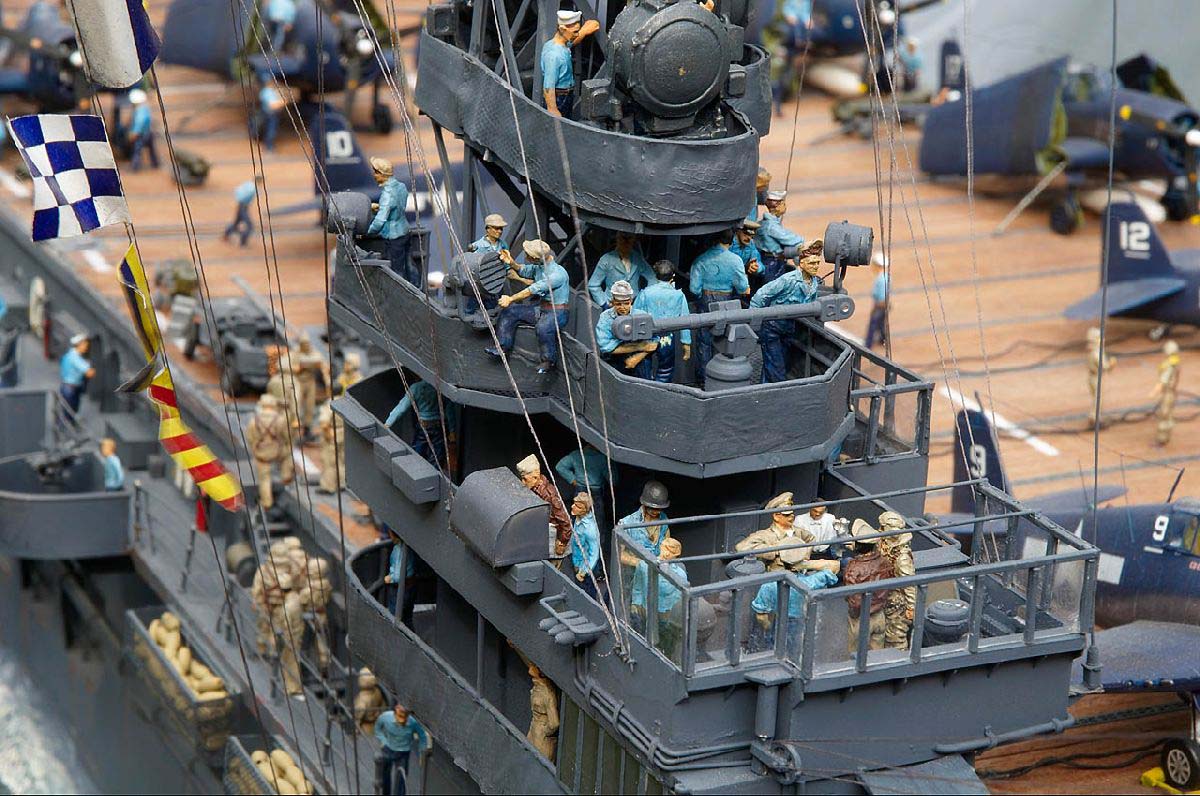
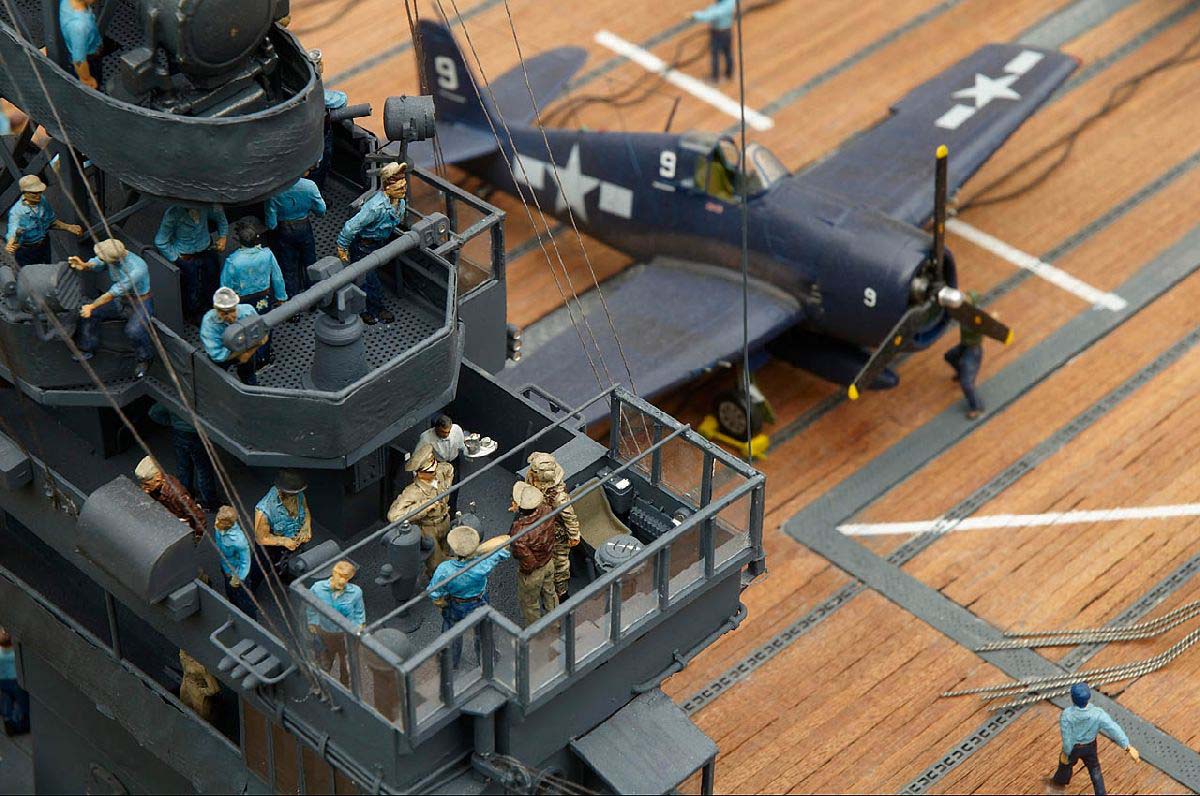
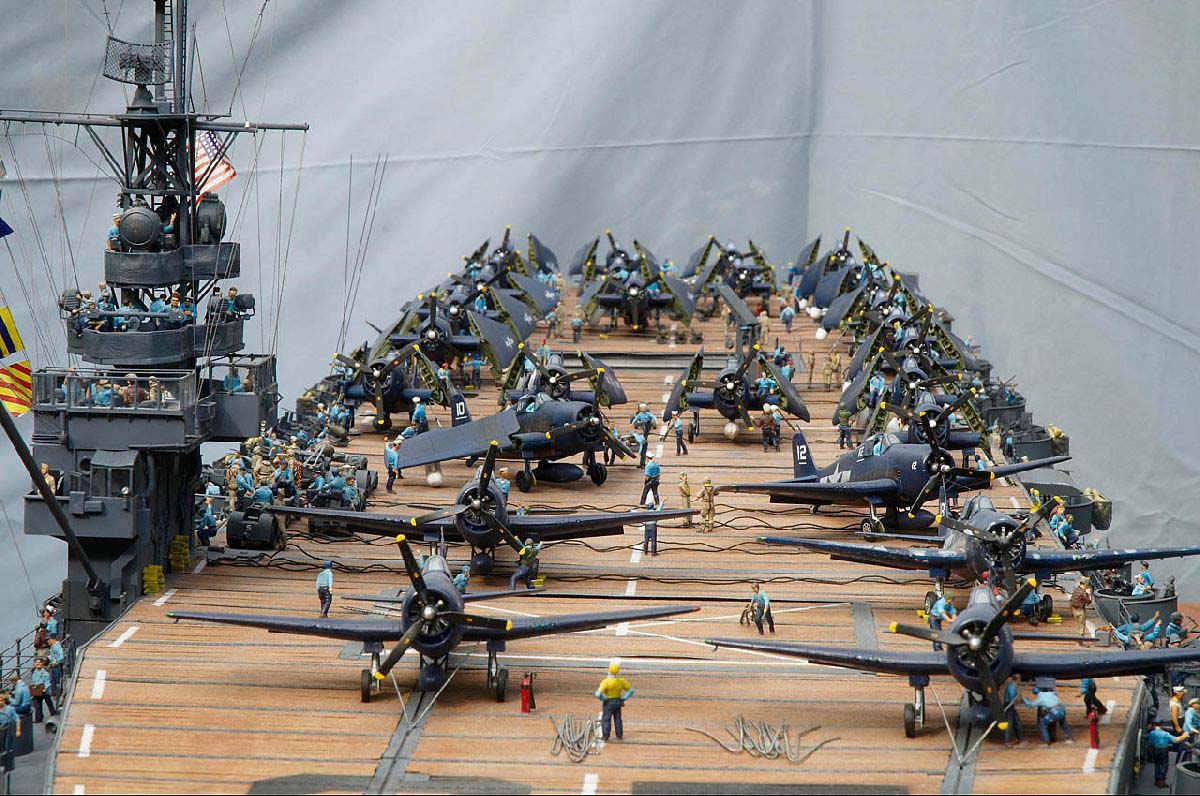
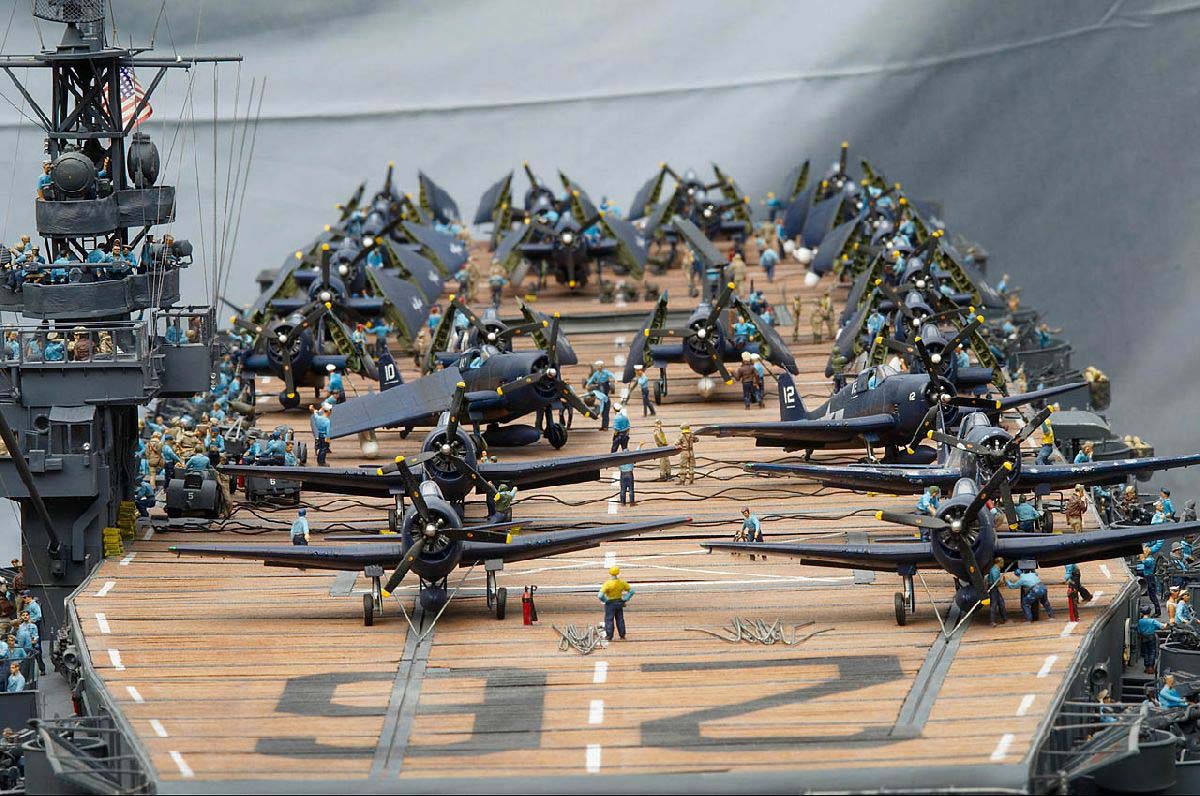
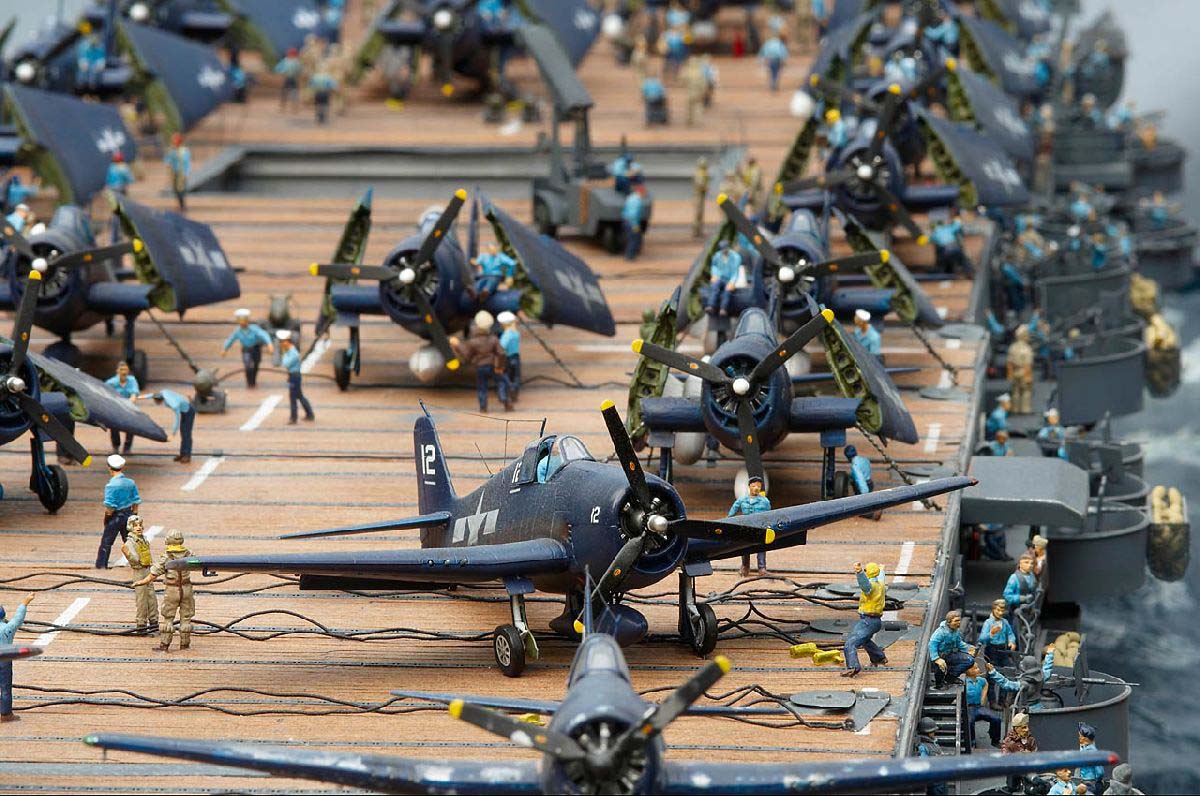
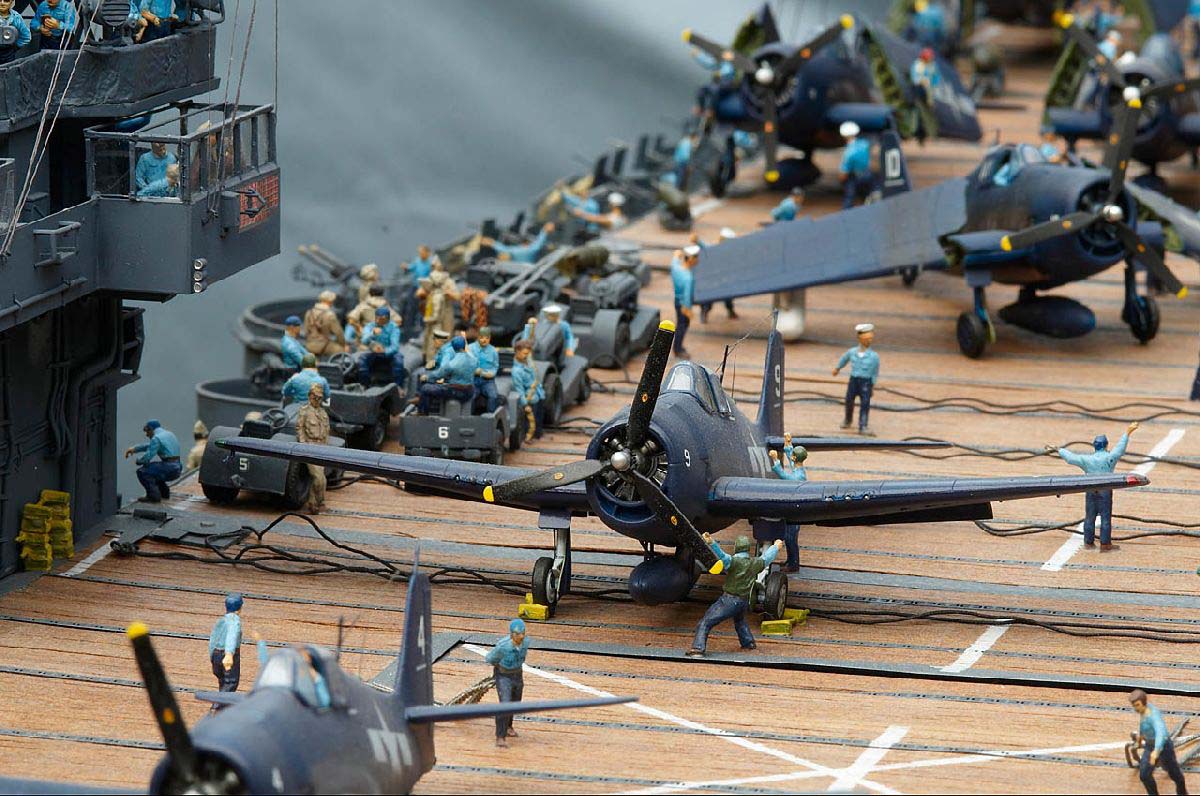
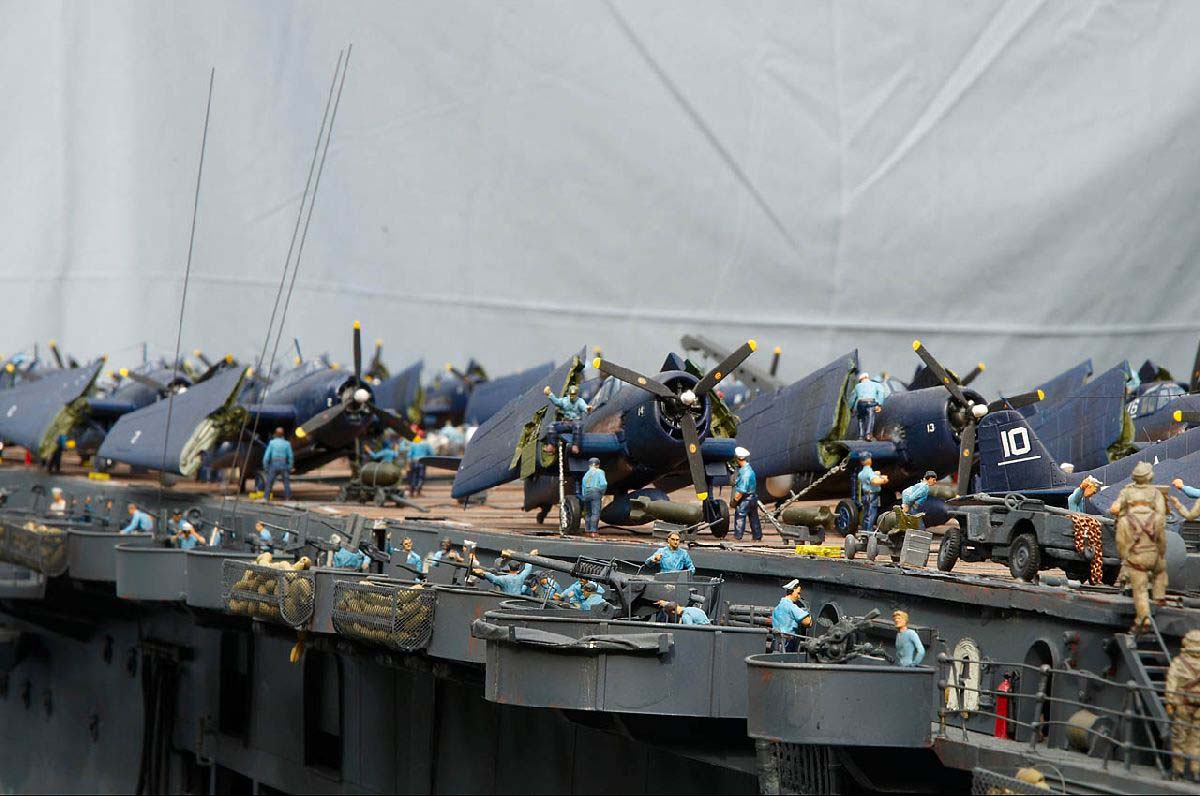
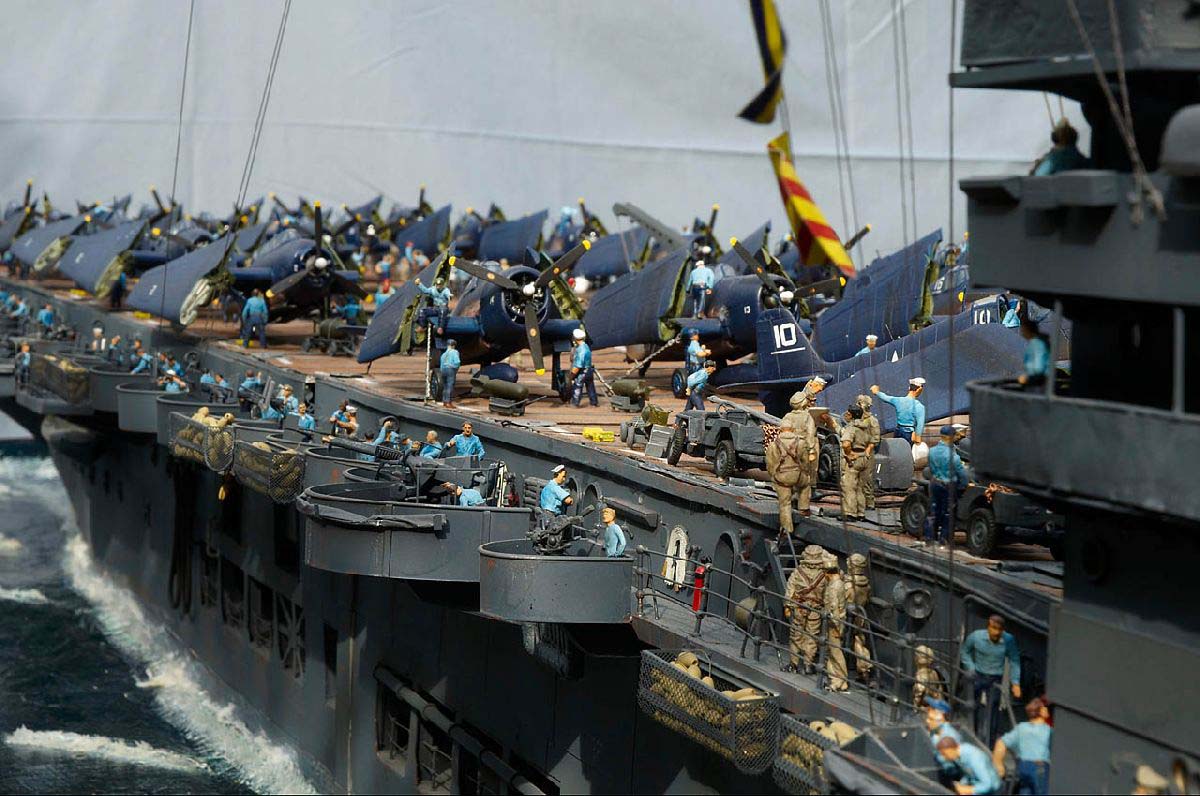
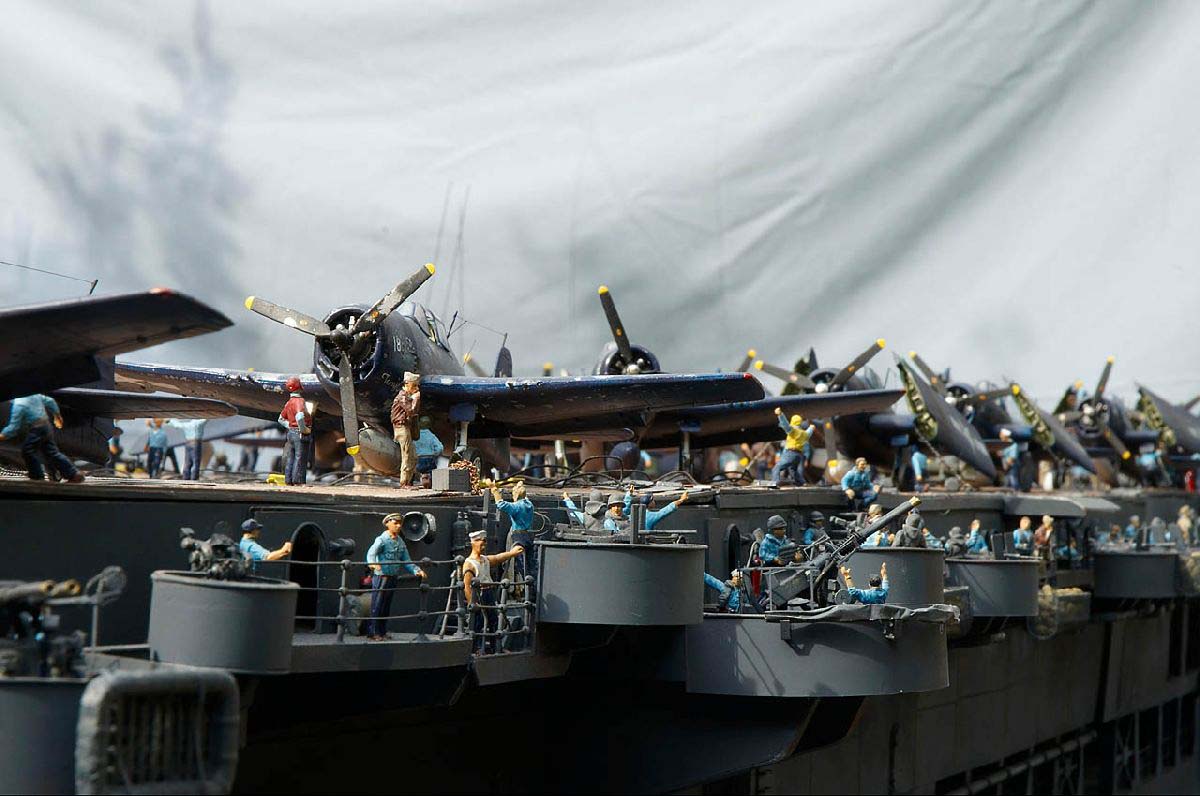
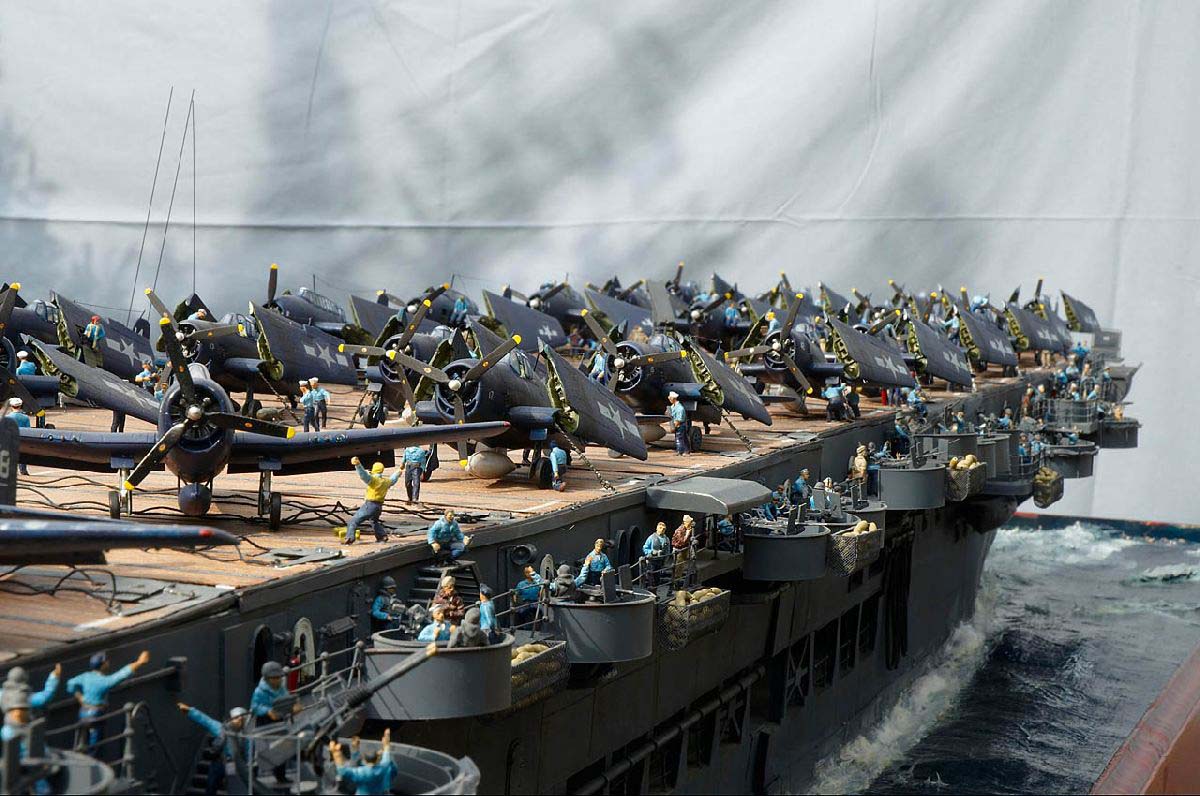
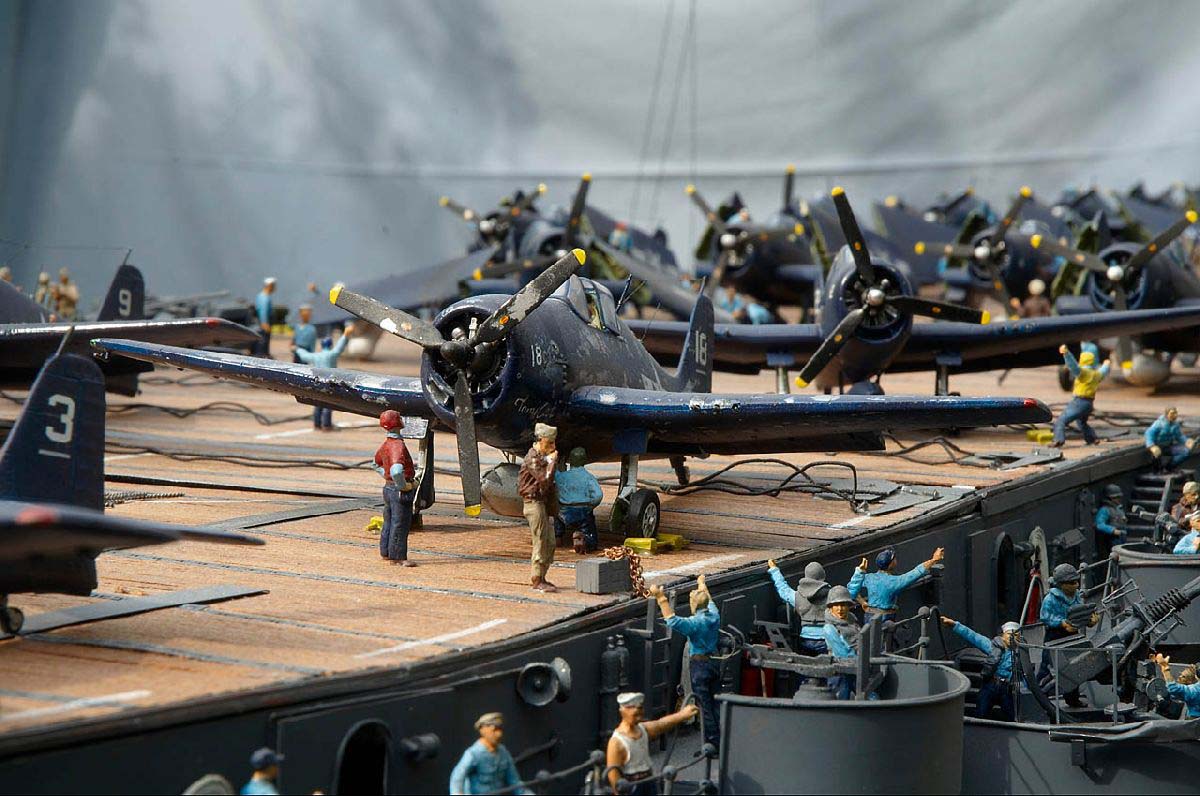
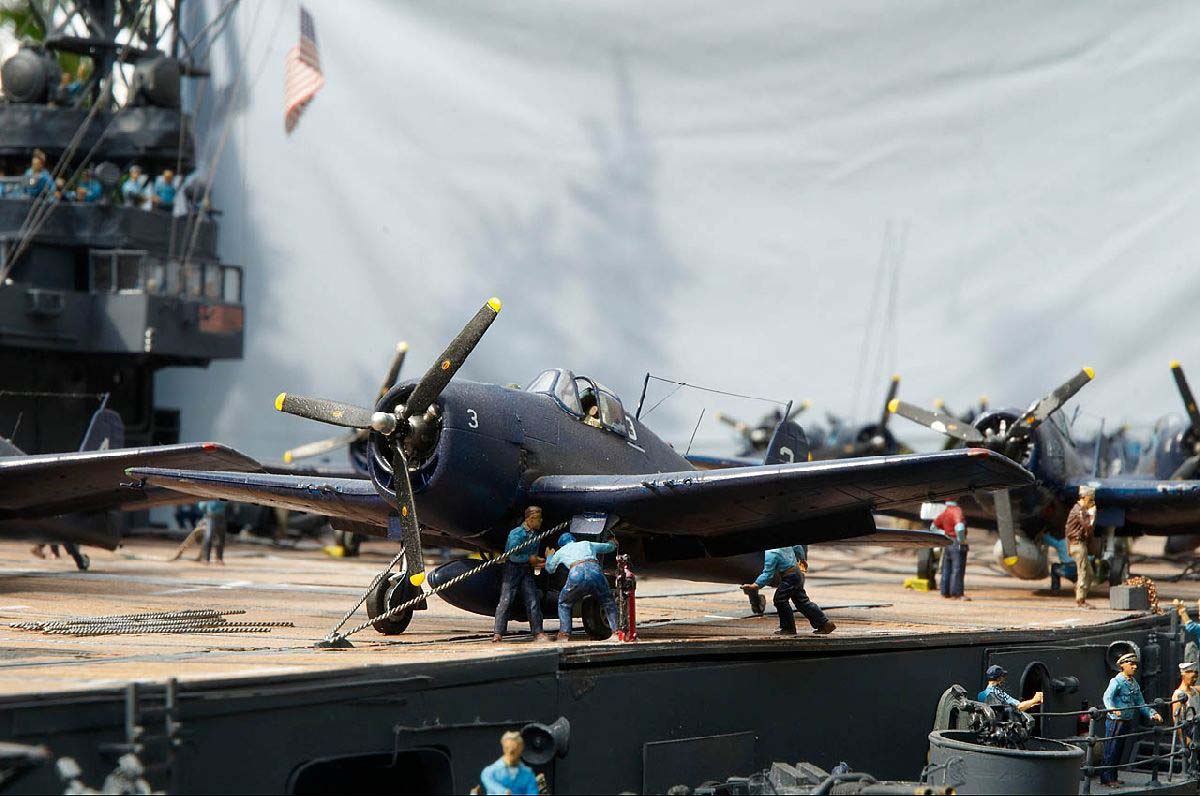
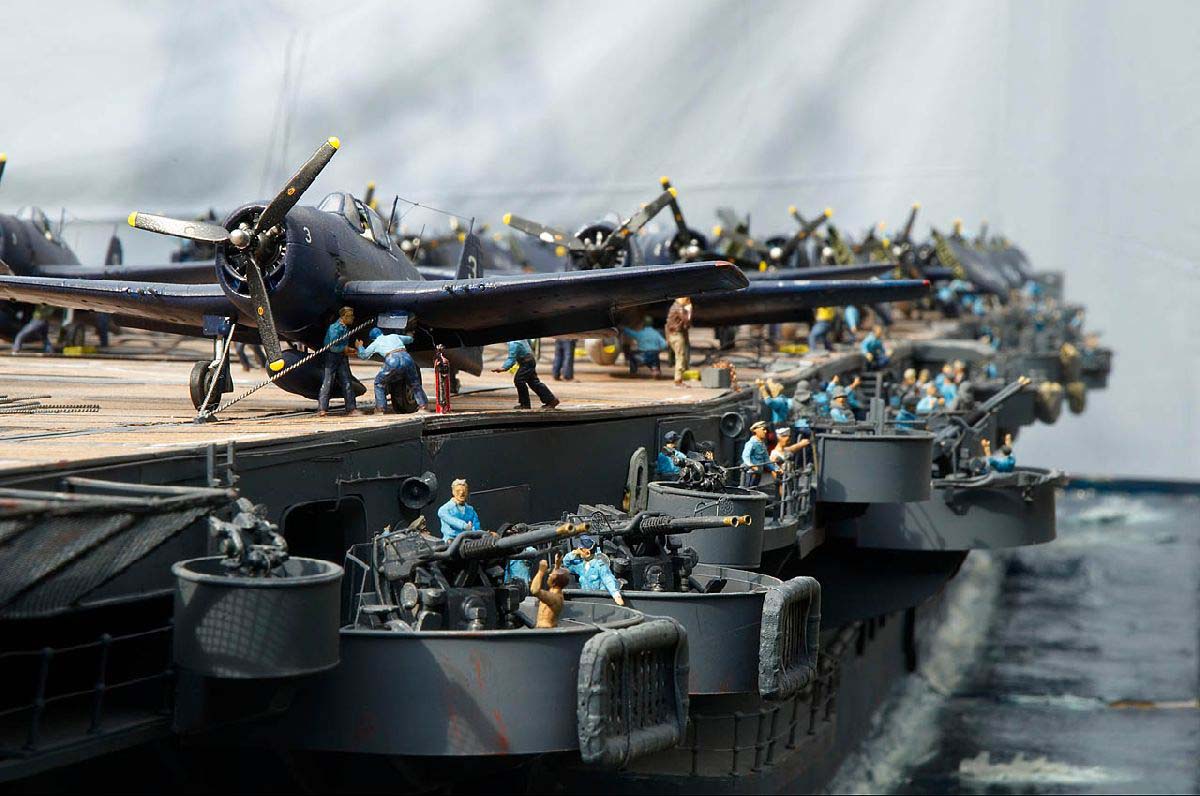
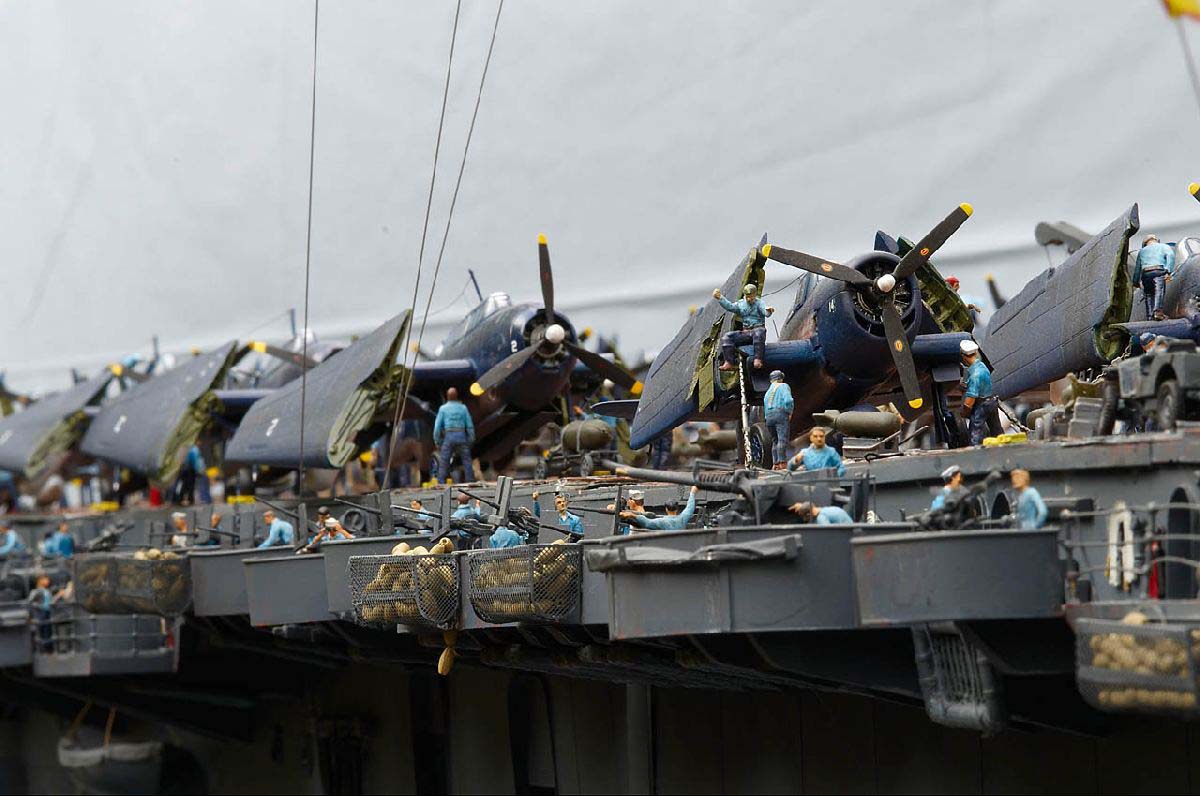
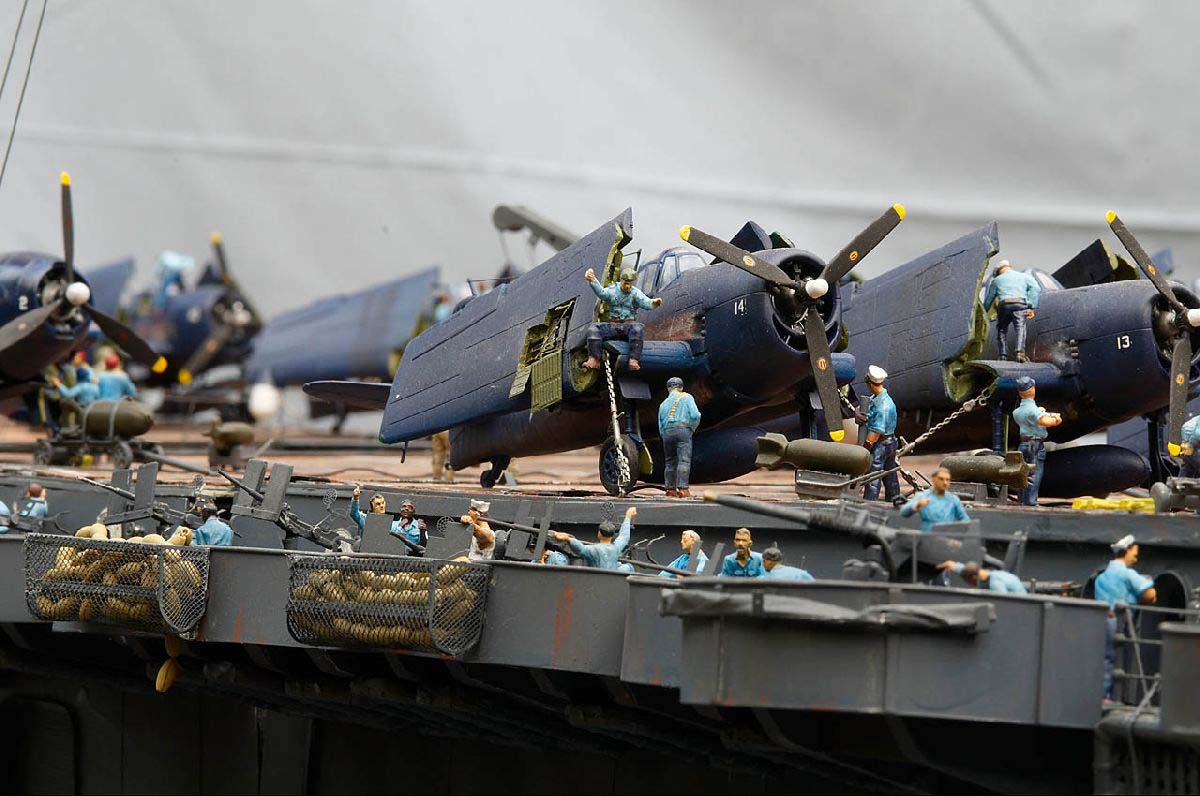
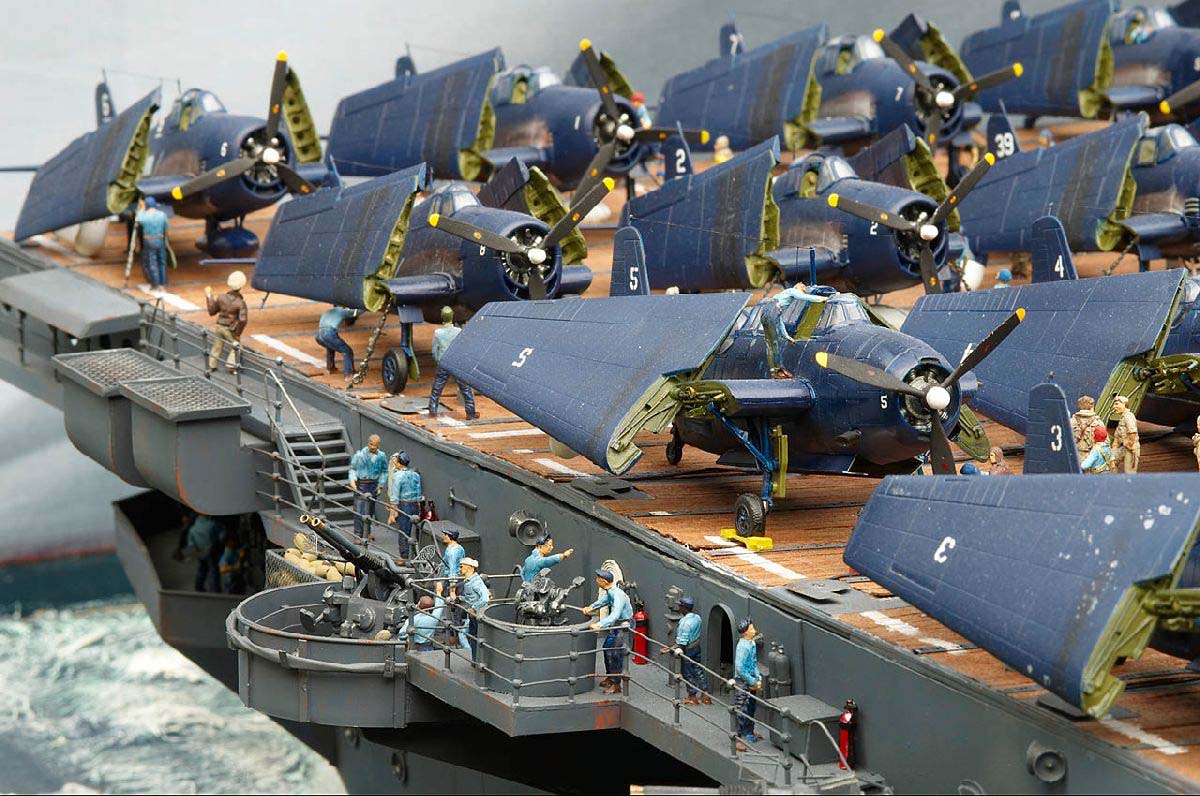
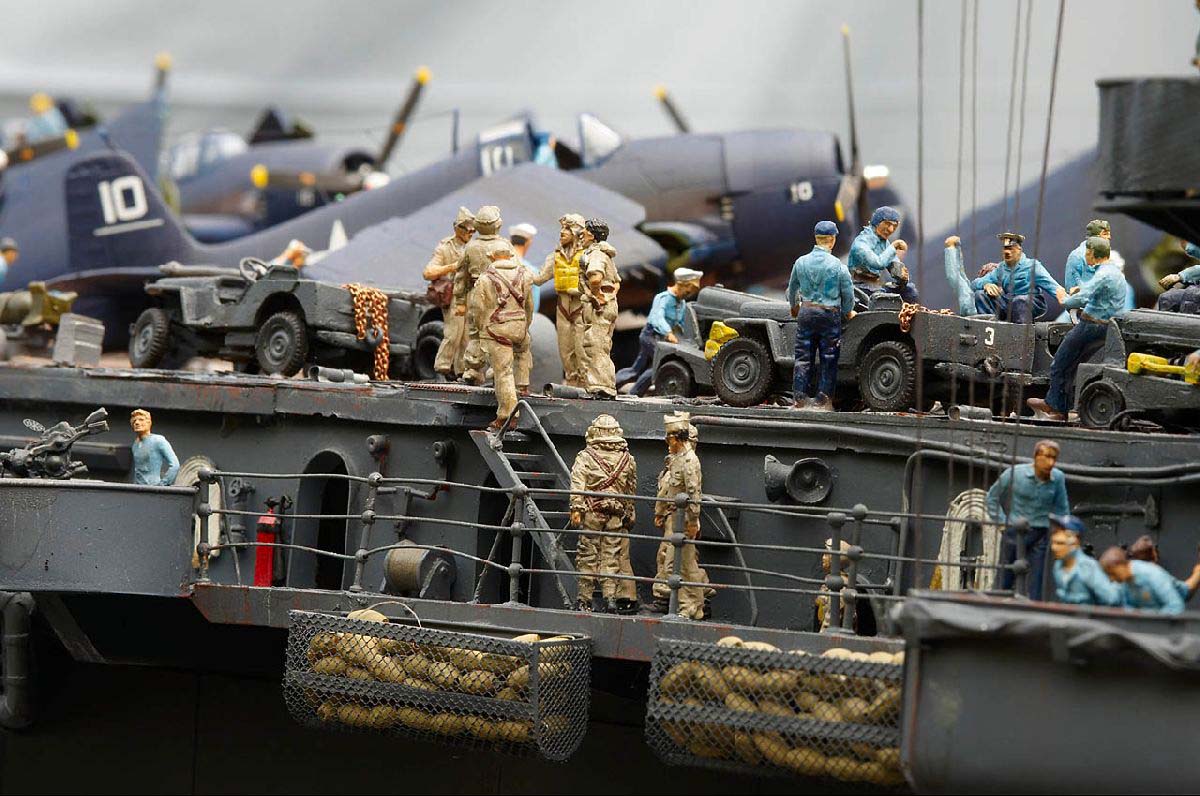
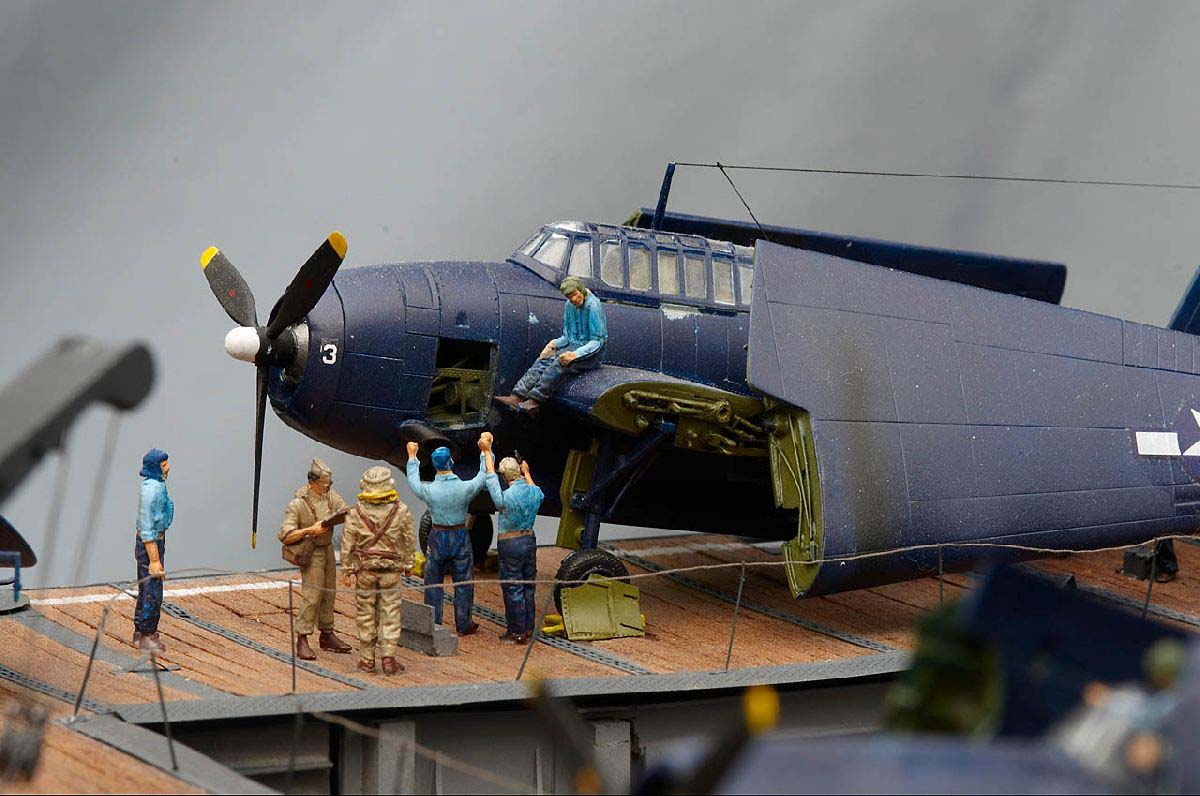
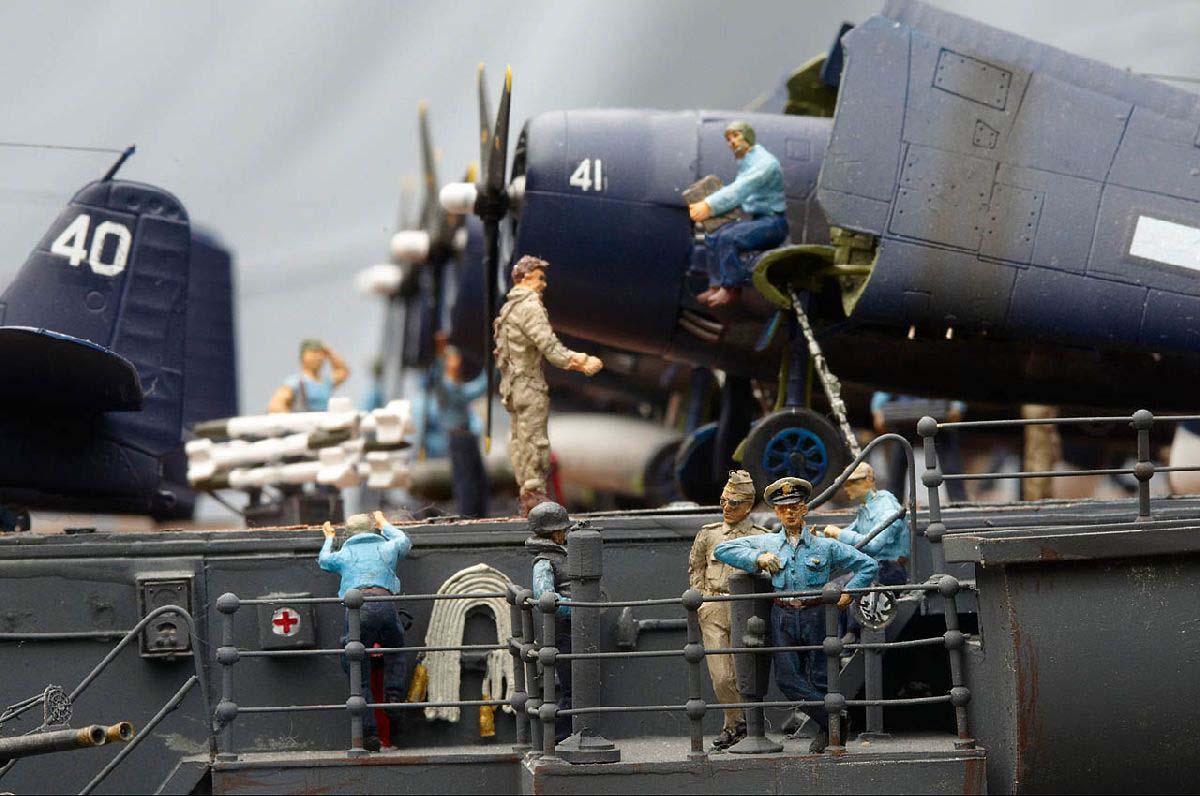
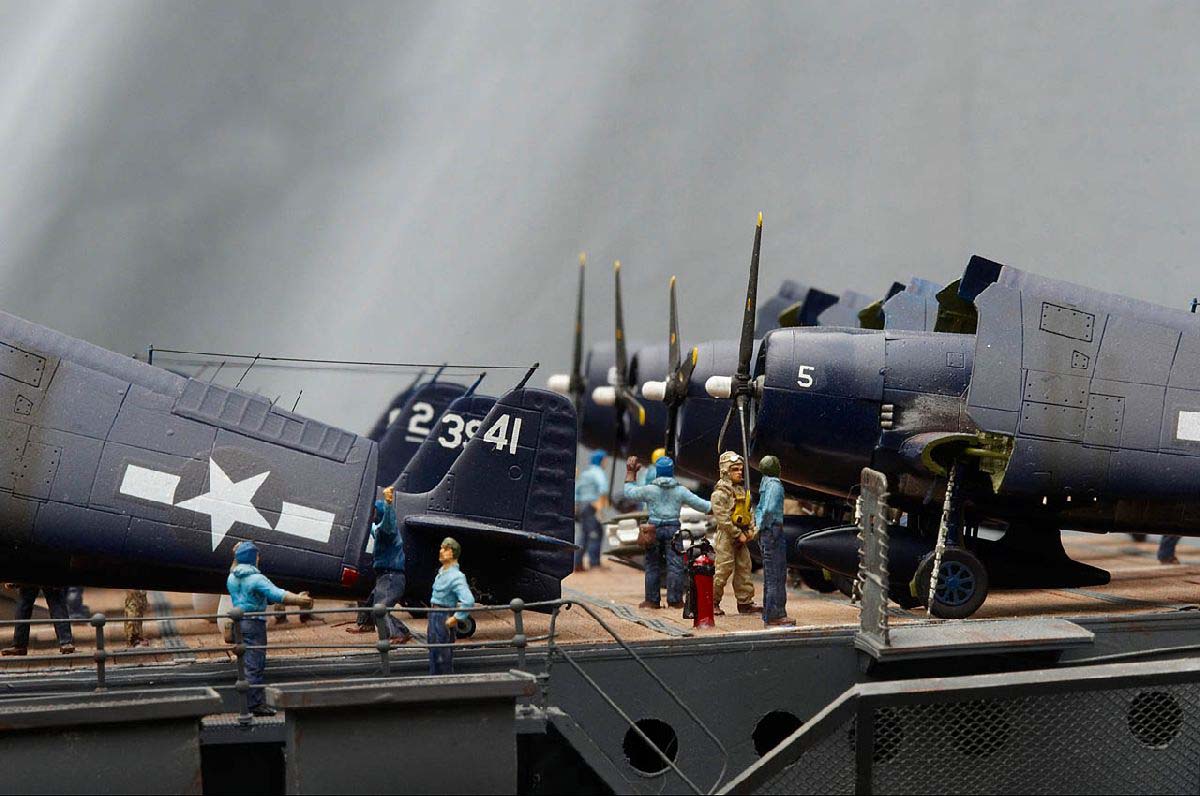
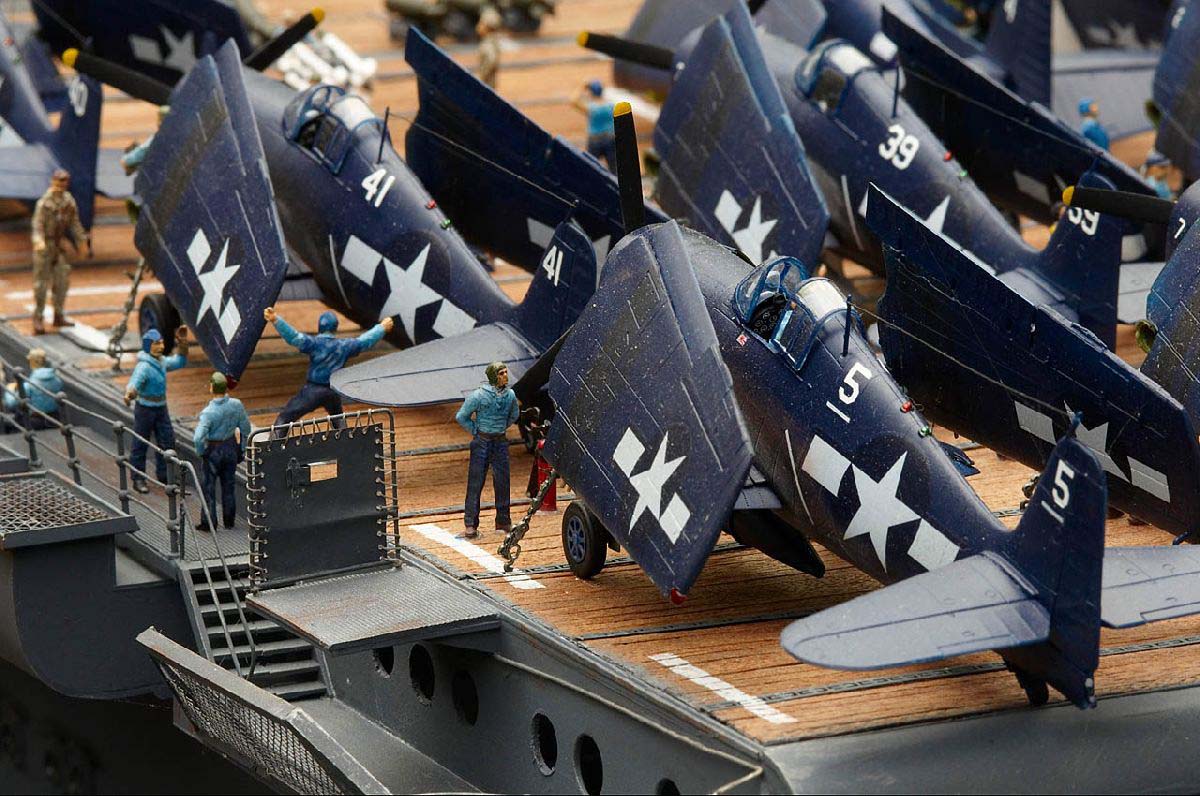
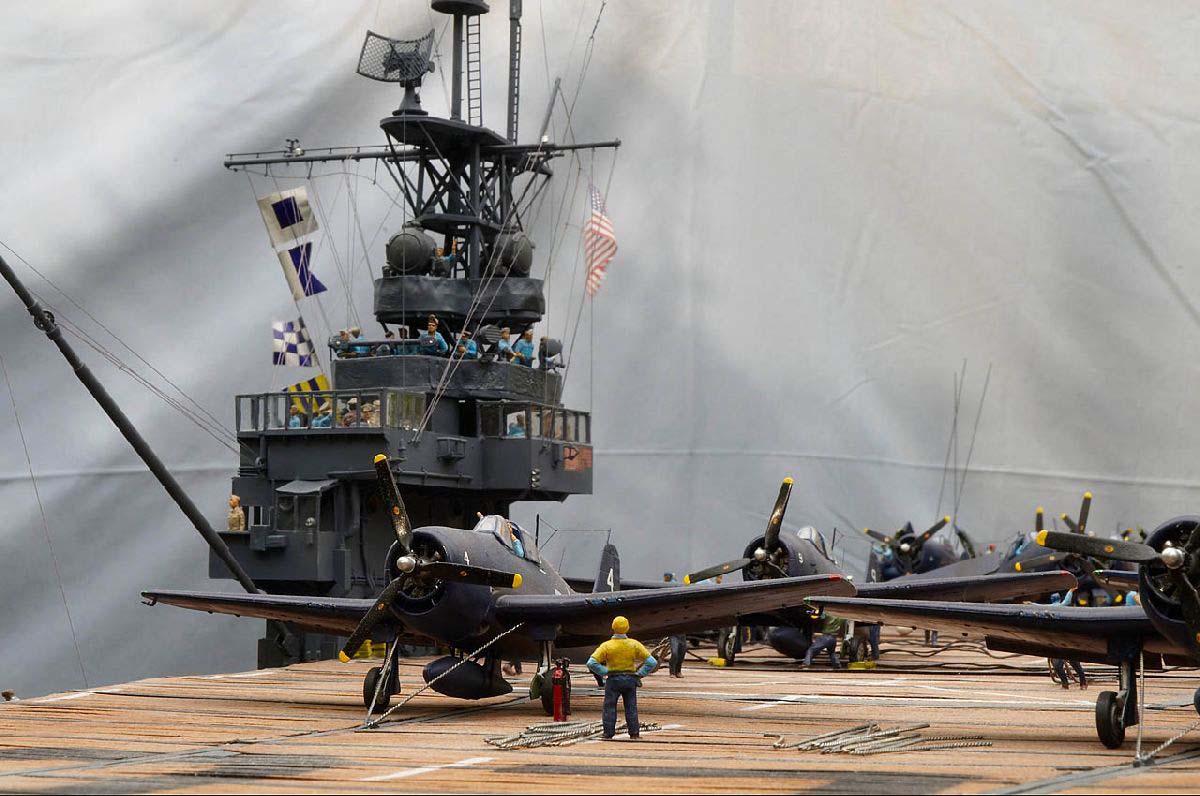
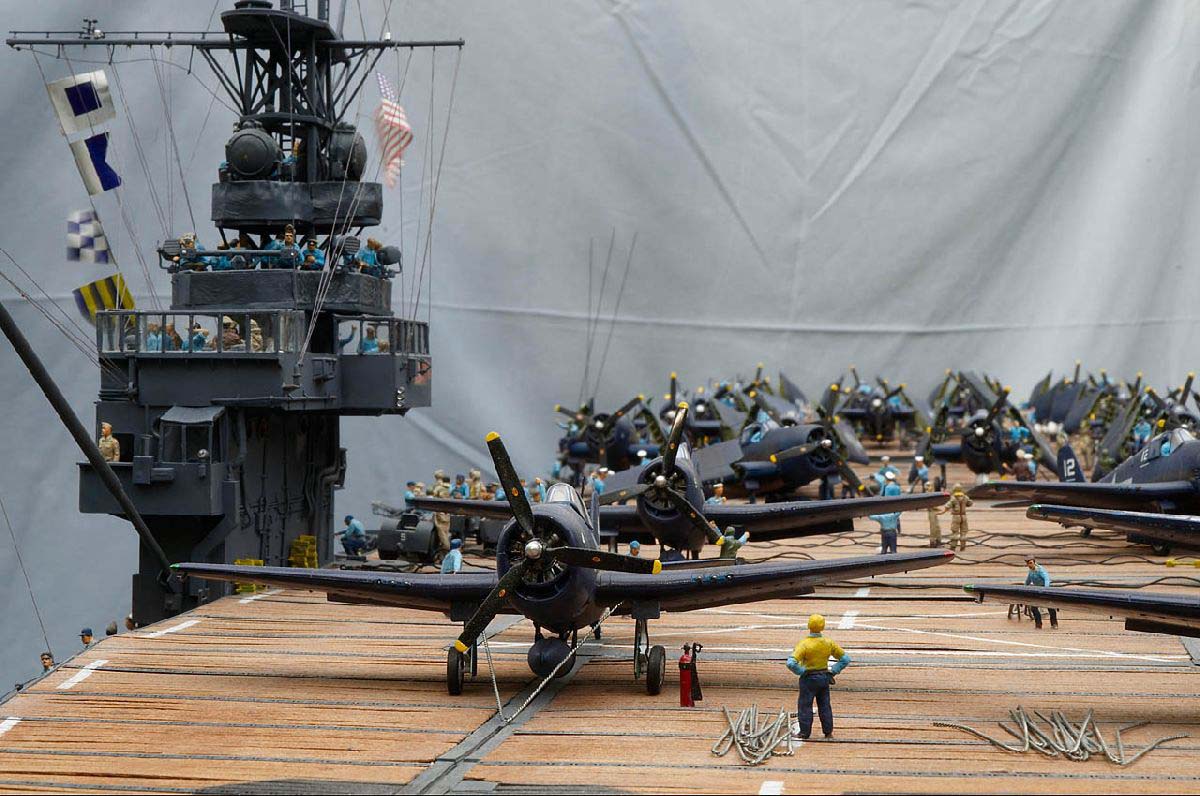
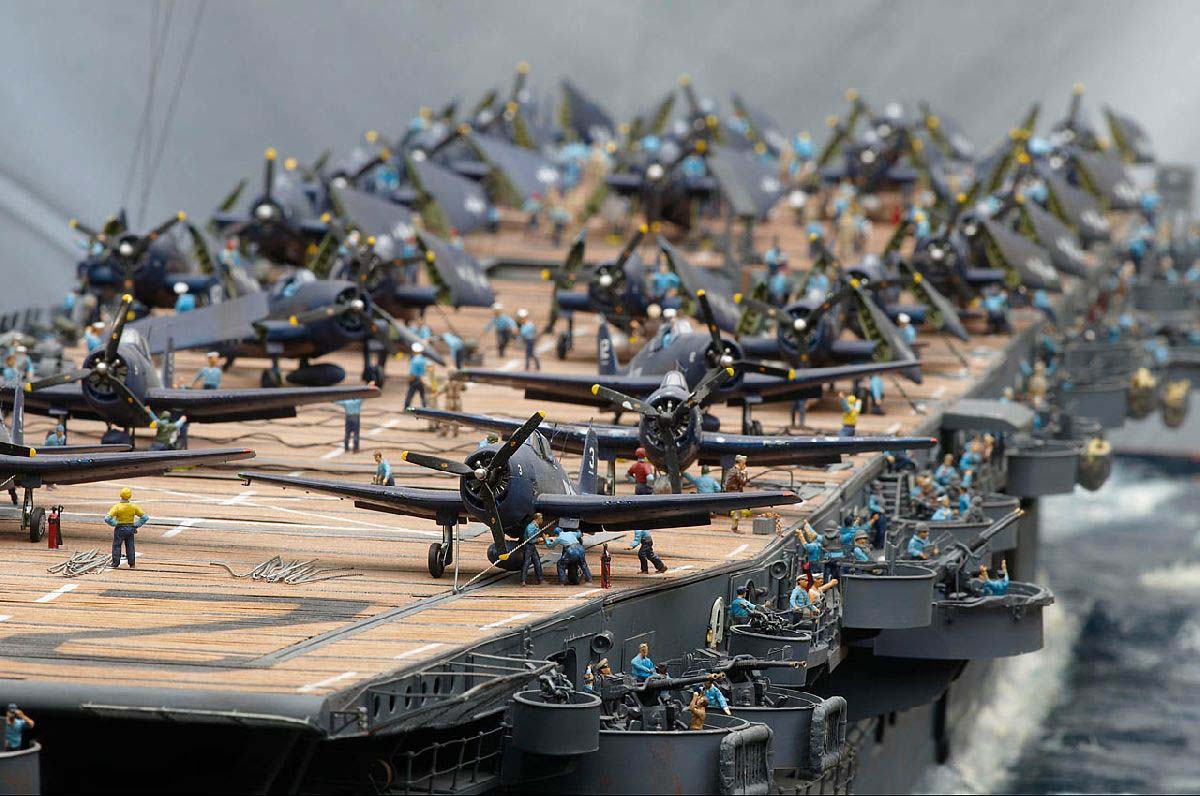
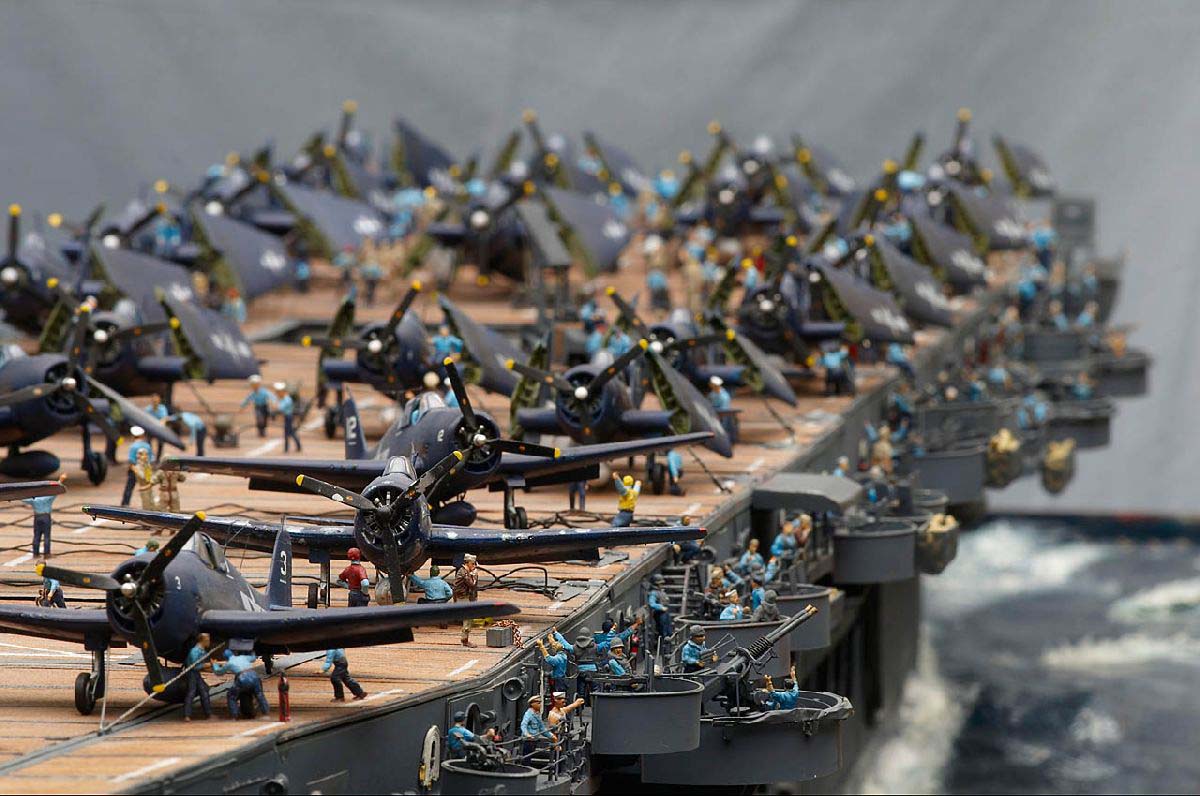
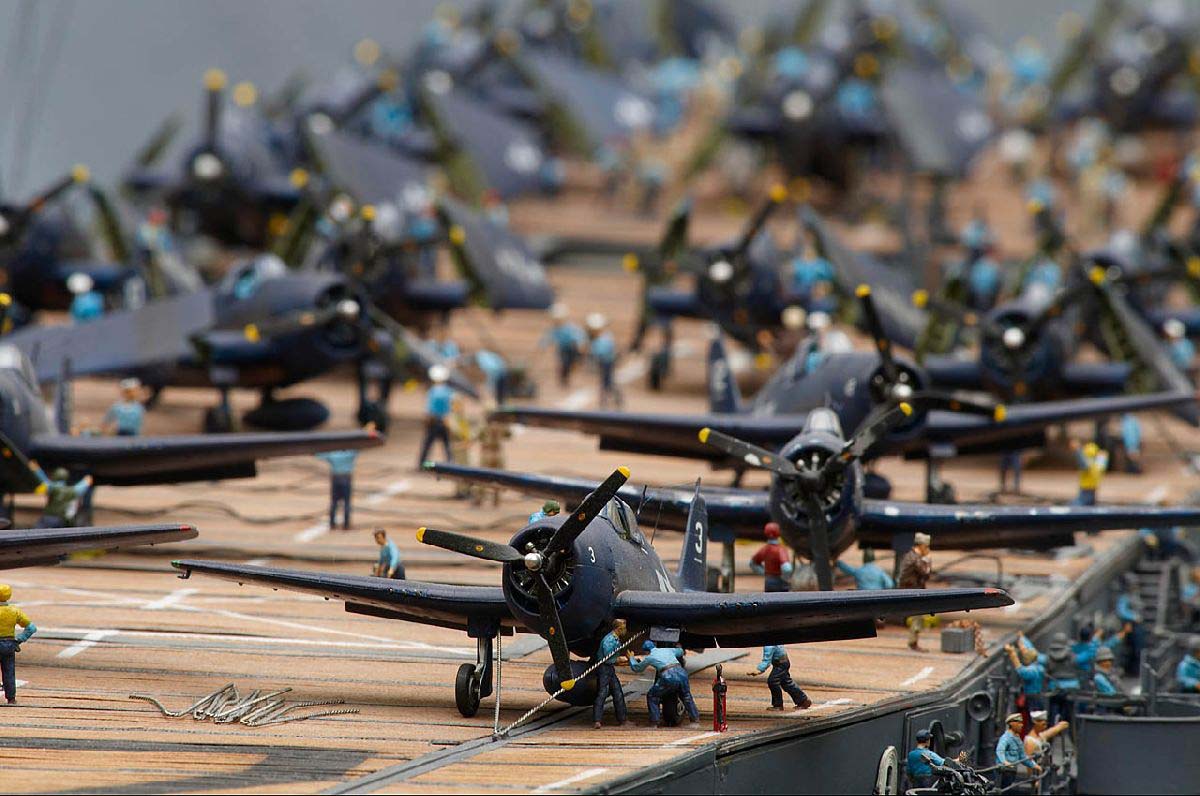
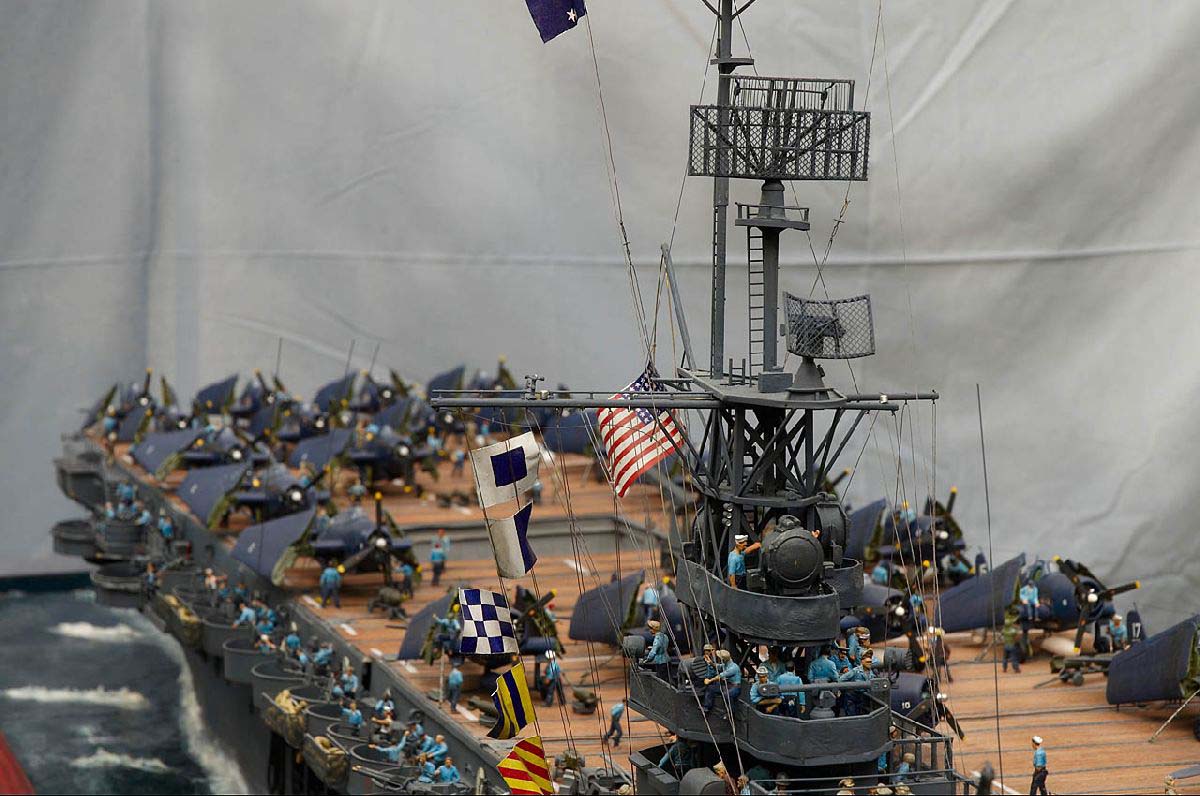
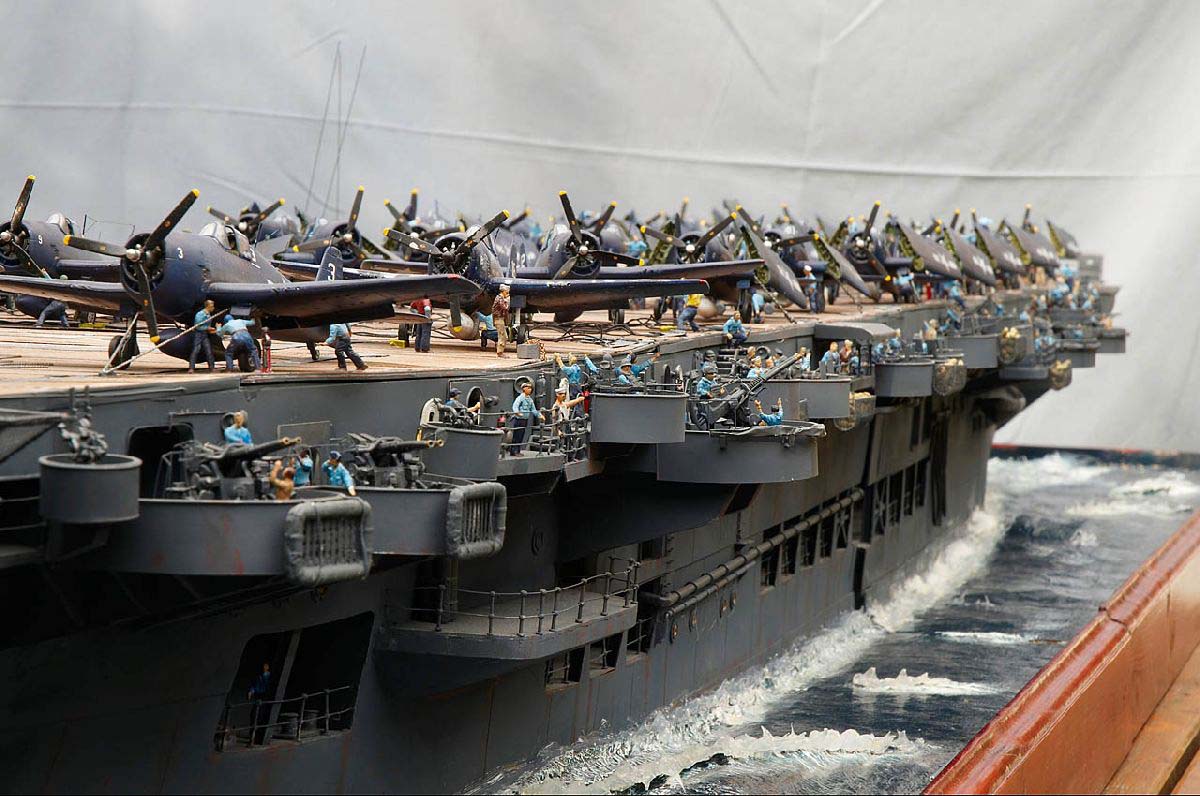
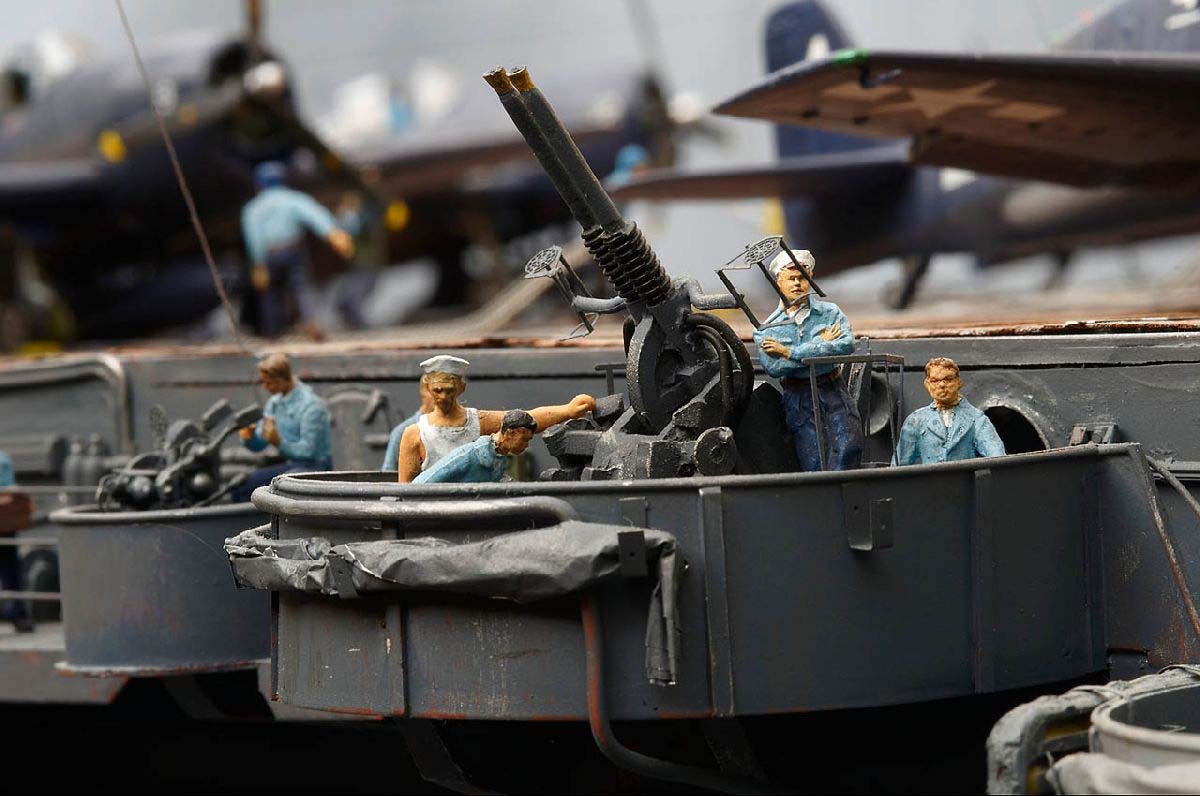
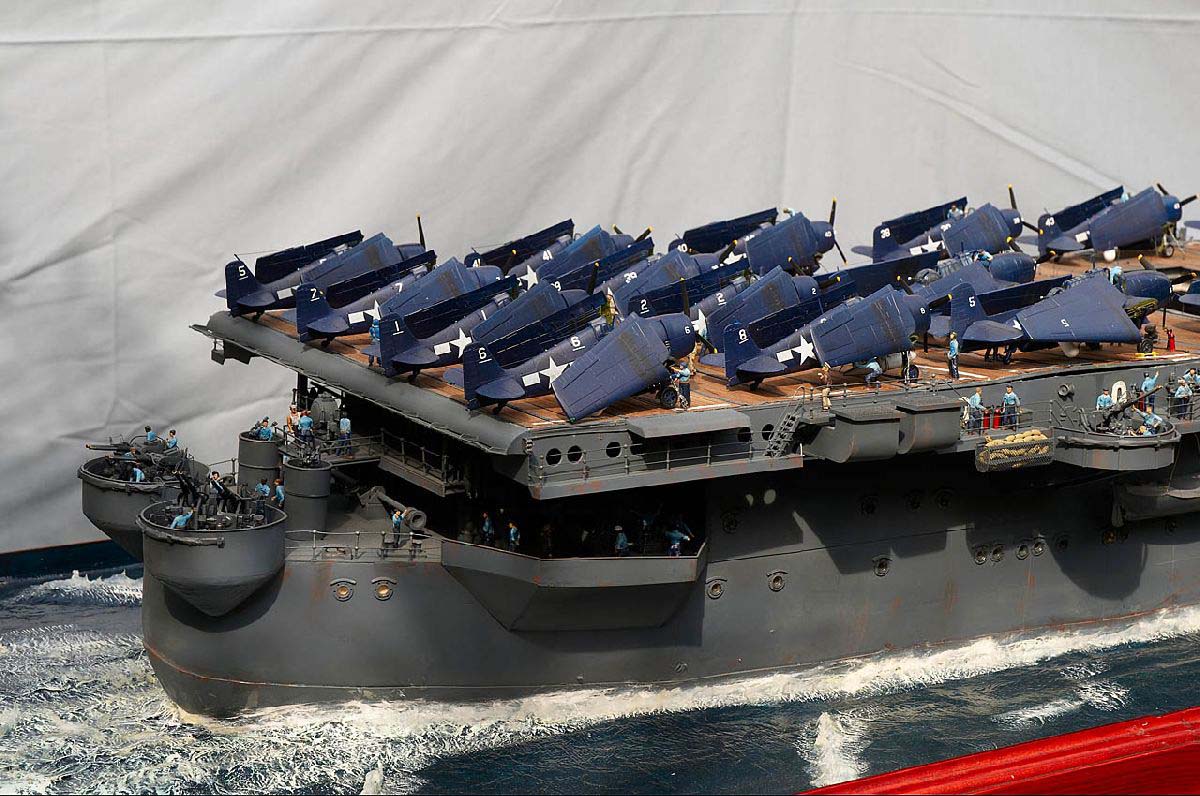
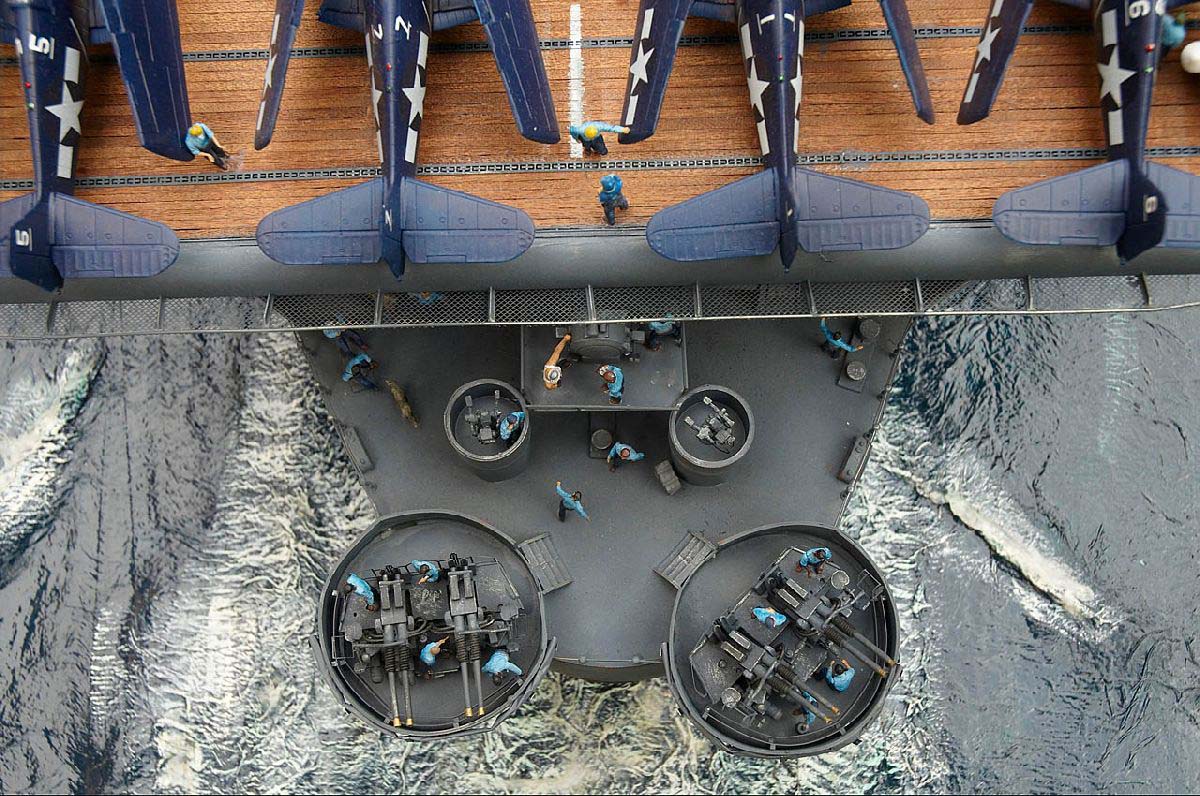
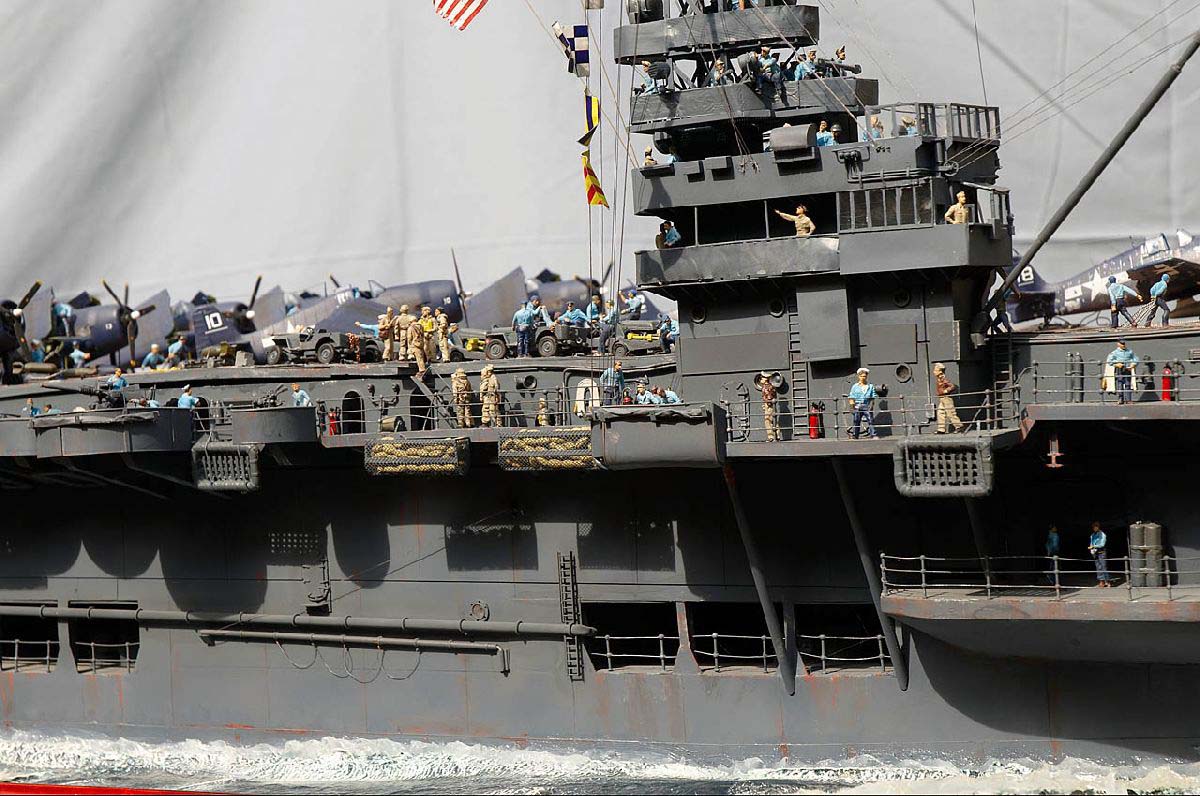
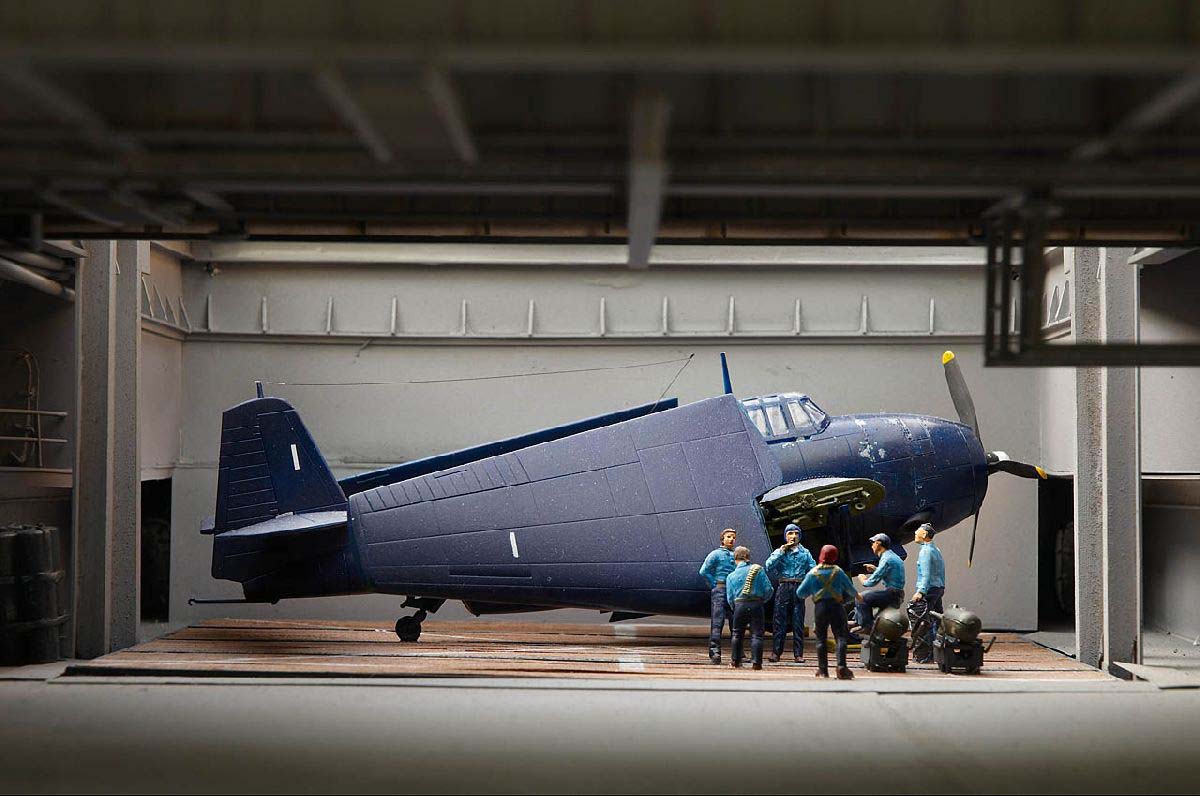
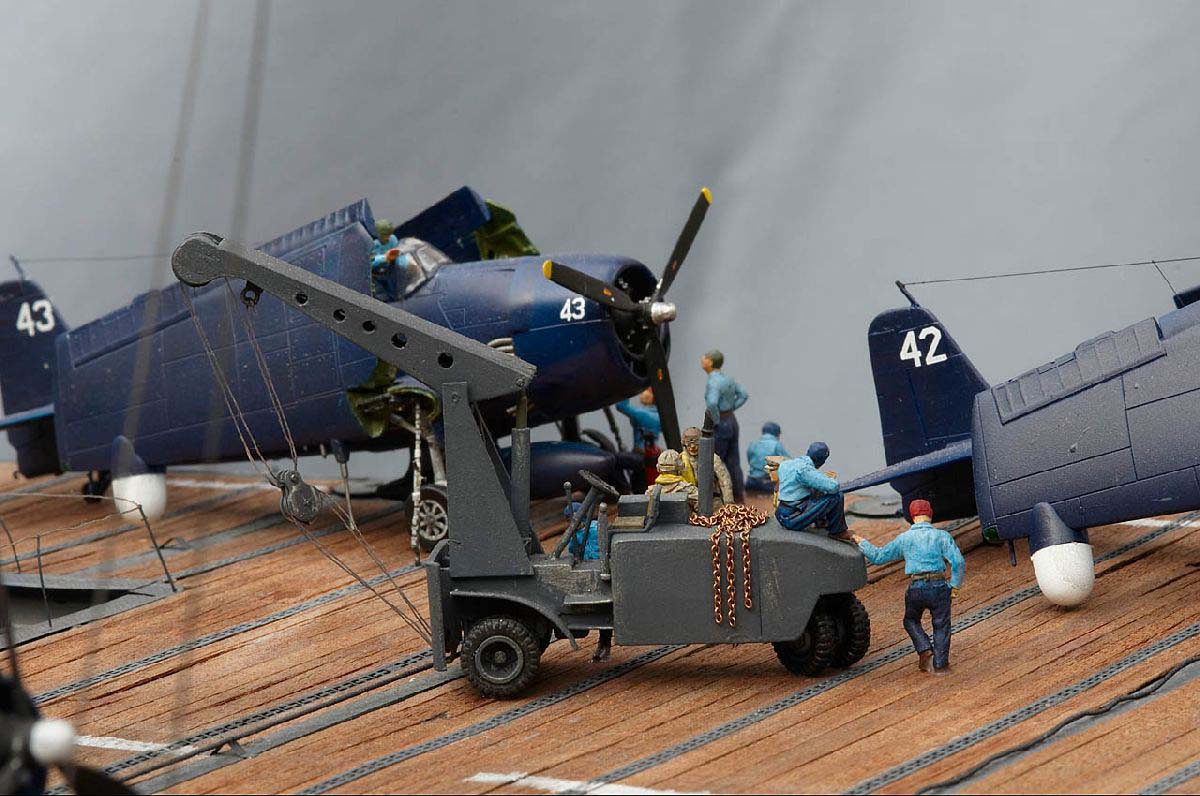
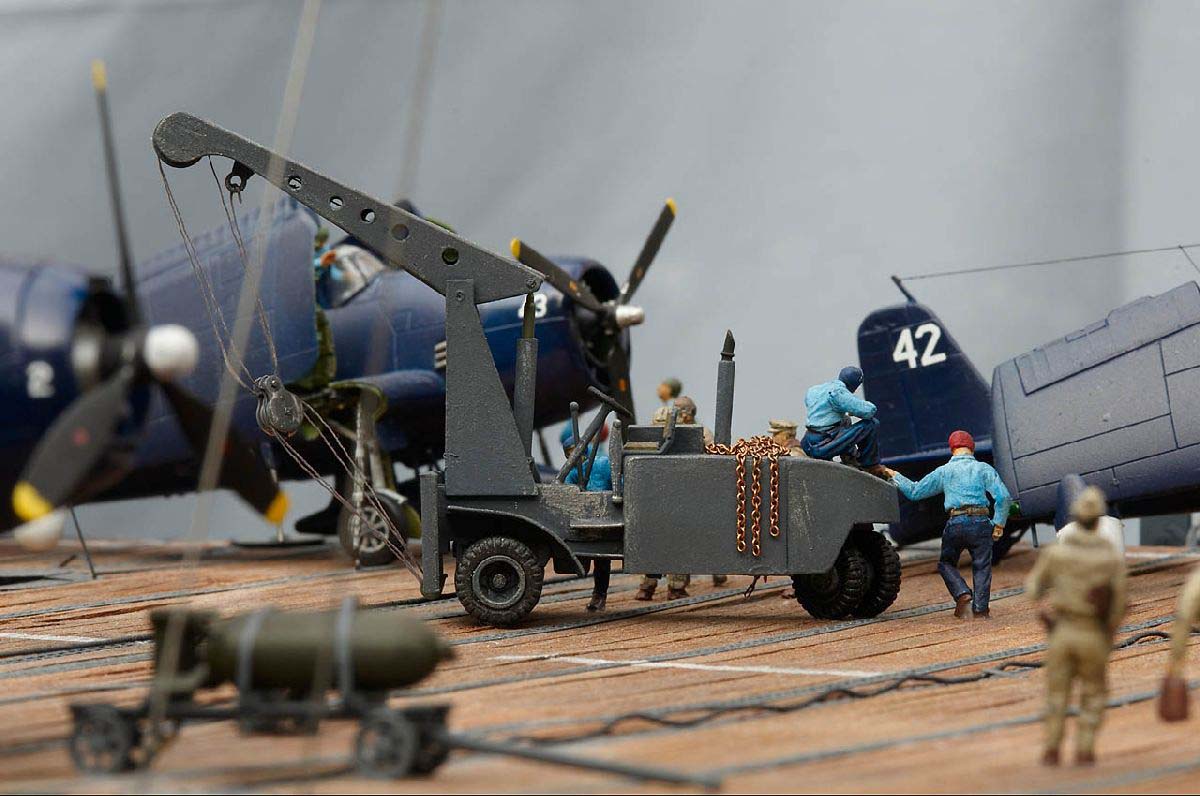
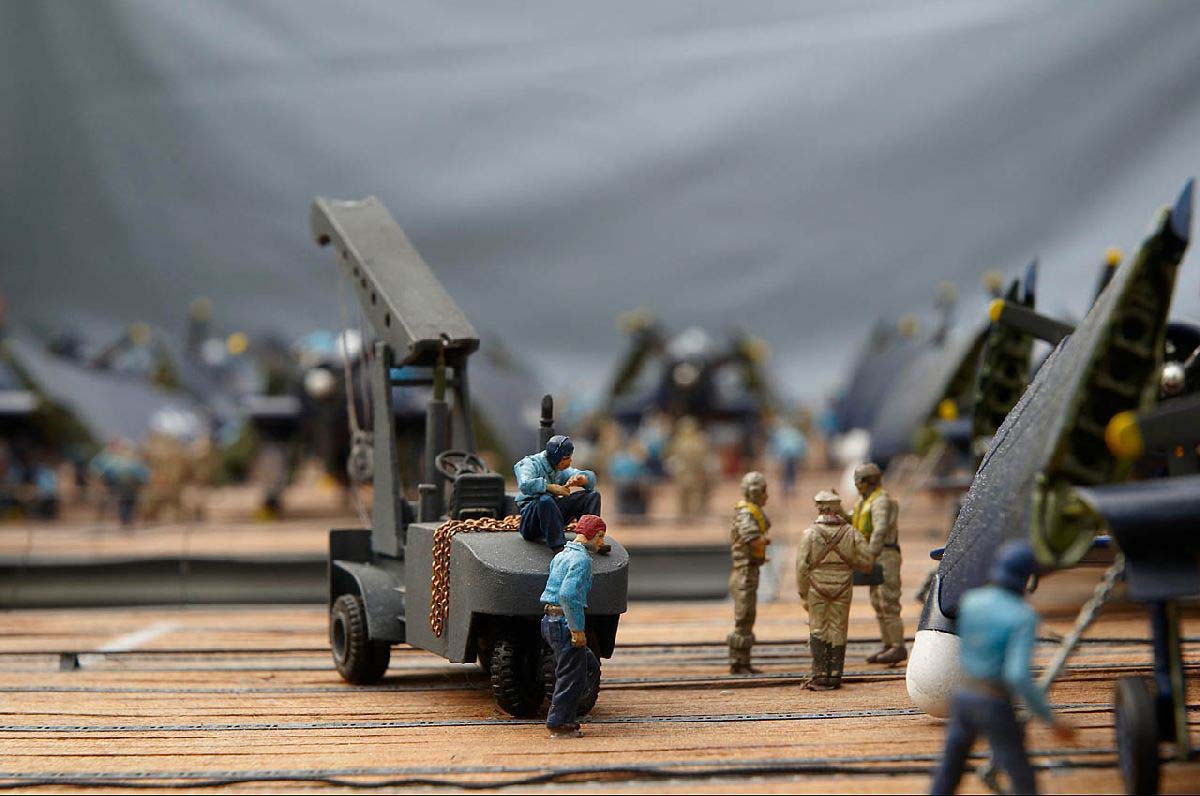
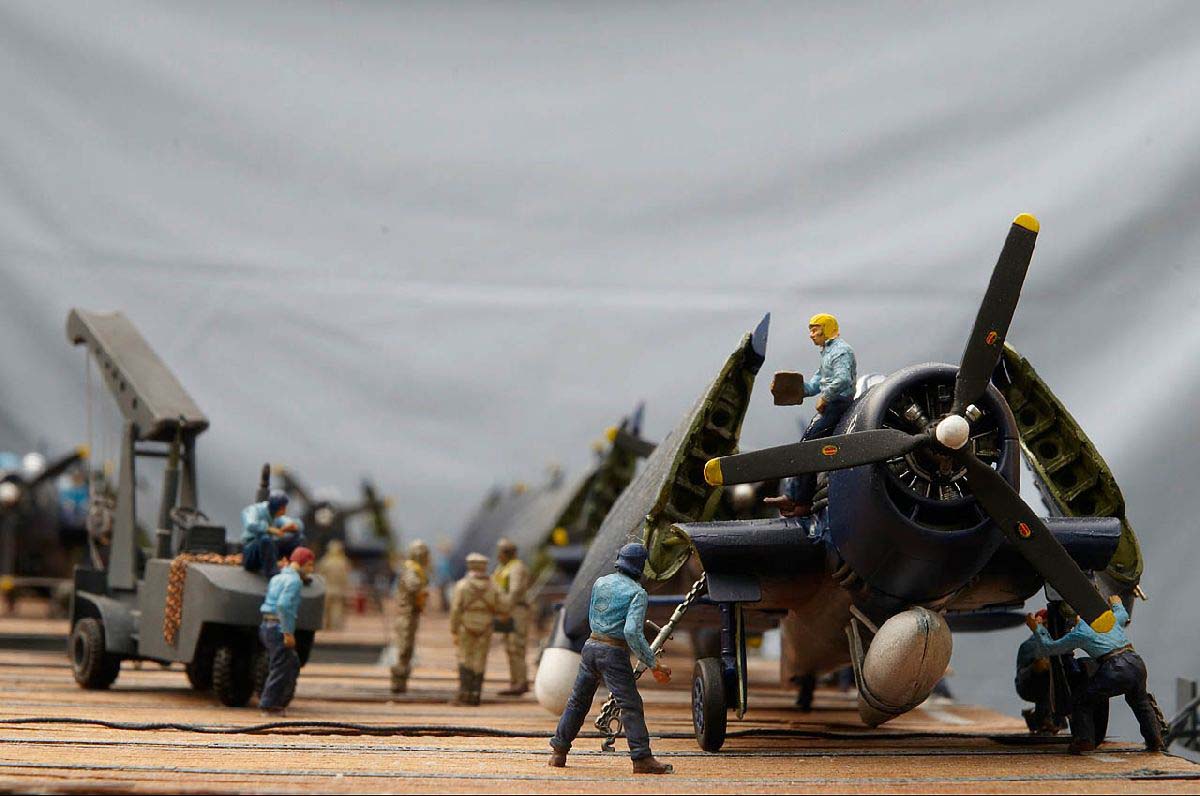
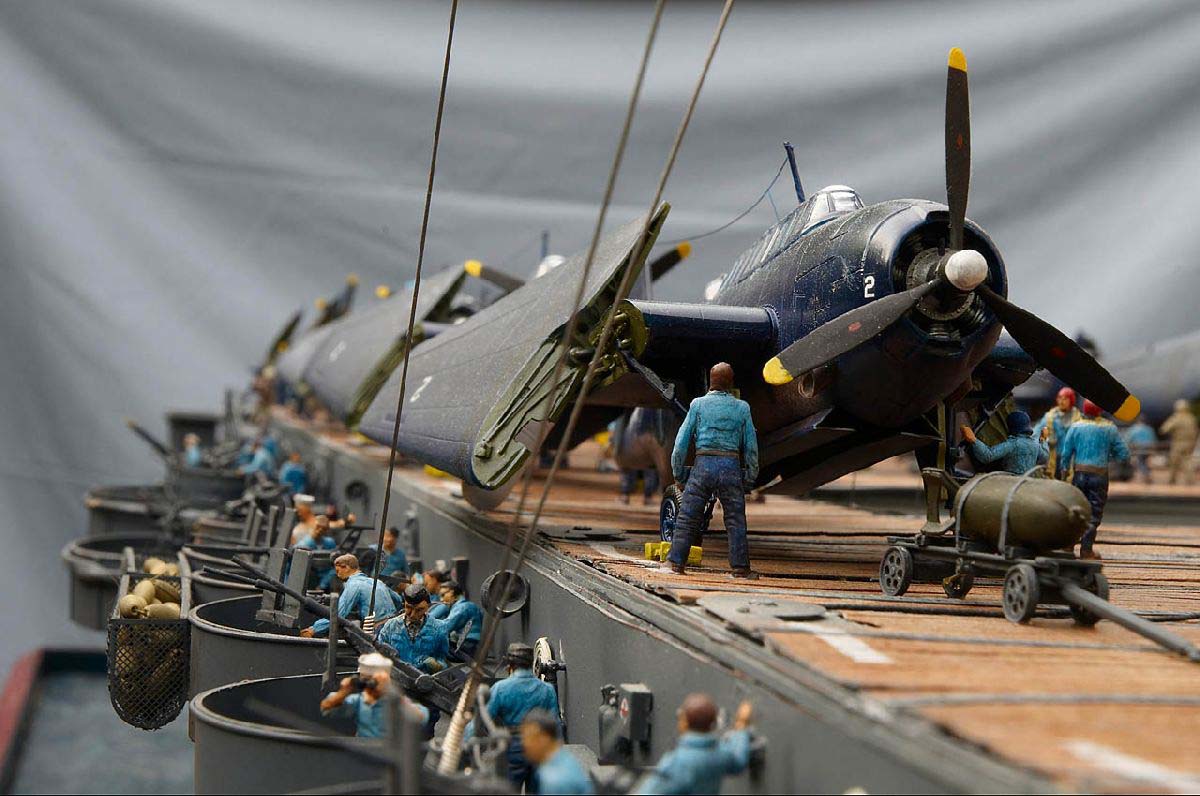
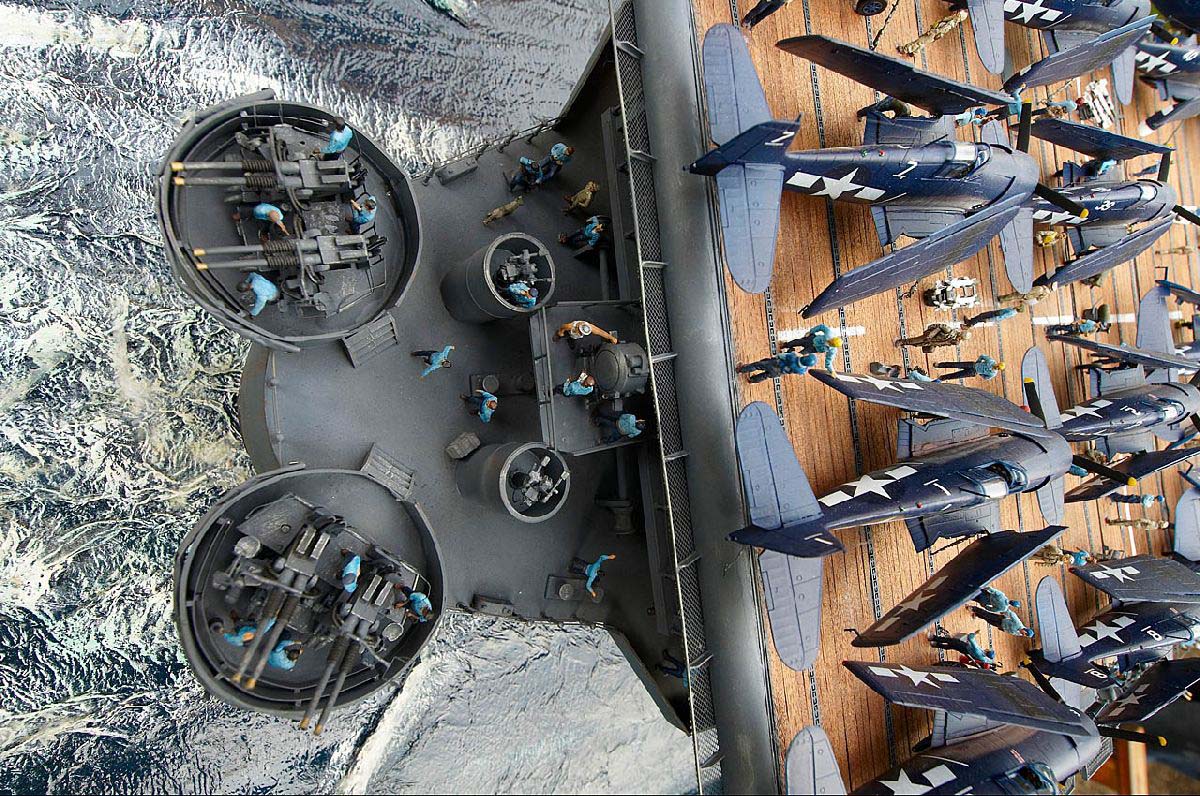
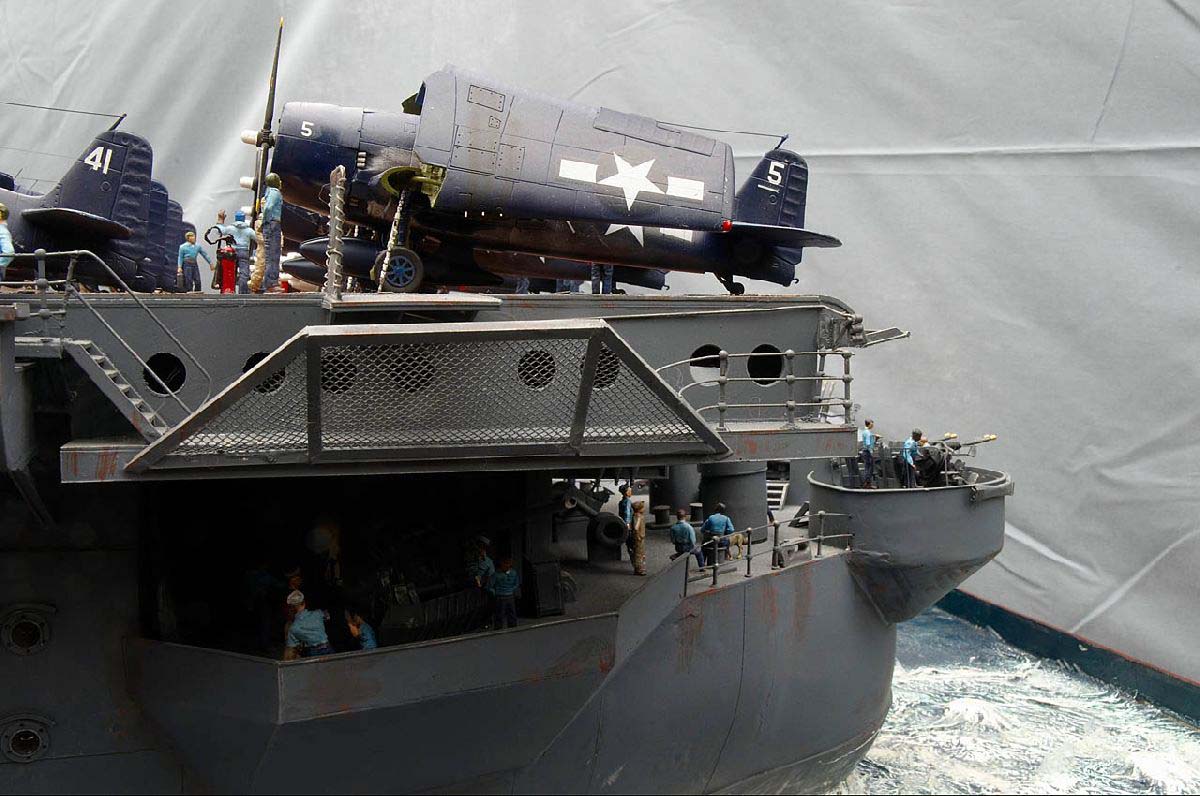
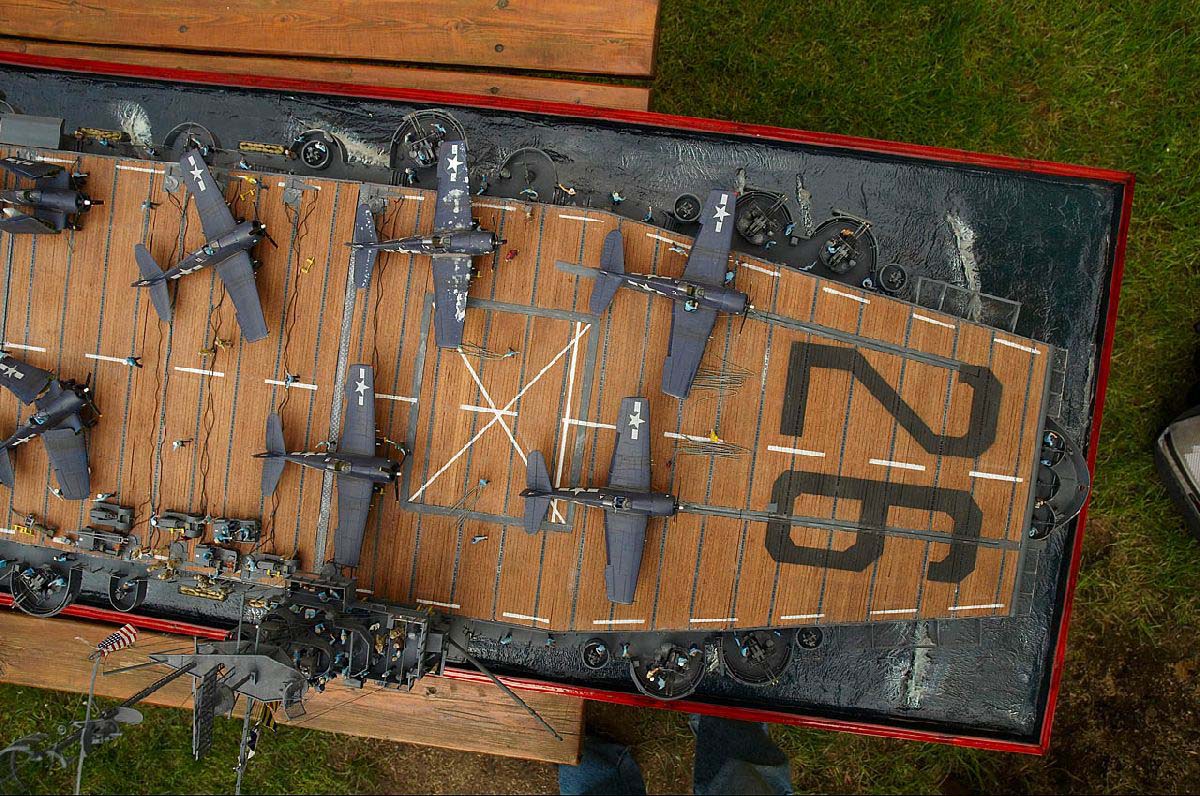
The island of the ship is a project for itself and could easily be used as a single part for a diorama. Fortunately I had several pictures of the island so the construction of this part went pretty fast and without any major problem. The whole structure was once again made of plastic sheet. The only exception to other parts of the ship, except those which were already finished, was the fact that I had to add all the details to this part at this stage. So all tiny parts had to be made and installed to their appropriate places. One problem came up when I started the construction of the radar antennaes. There were not very good pictures available were I could see which antennaes were installed in early 1945 but once again I had the luck that I only had to contact Don Schroeder about this problem and within hours he was in contact to former radar operators on the Sangamon. According to the plans which I had, Sangamon should have carried SK, SG, and YE but even on those photos which were not that good in their quality it was clear that Sangamon did not carry SK but the much smaller SC-2 and on a different position than in the plan as well. Referring to some books no Sangamon class-carrier had the SK Radar installed at any time. So at the end we had figured out where which antenna it had been but there still was the problem that on one photo it seemed that there was another antenna, which I could not identify. Finally and with some help from old friends we were able to identify this mysterious radar as a SP Radar, with a so called 6 ft. cut antenna. Normally this radar had a round dish but the strange shape on those photos came from a rectangular radar dish, so finally we had the solution. SP was a fighter director antenna, which was used by the Sangamon, cause during her last major overhaul in Bremerton she was designated as a night-fighter-escort-carrier, the first CVE which was used in this role. Therefore they needed the additional SP radar. The open bridge received all the details which were needed, steering wheel, engine annunciator, capstan, small windows at the front, captains chair and so on. The same was for the primary flight control on the same deck level but on the port side. One deck below, the admiral had his own little bridge. The lookout level received several big eyes and some signal lights as well. The next level is for the much bigger search lights and the first of the radars, in this case SP. The little mast was made of plastic sheet parts again but here I used some PE parts as well for the floor. The yardarm and some other small details were made from wood, mostly because they are simply stronger and later the small lines can be stretched better. Several details more were added and finally the whole island was coloured and slightly weathered. For colouring I used WEM colours, which were readily available in the right colour code. In 1945 Sangamon was wearing the so called Scheme 21, which consisted of 2 colours, mainly a dark-blue-grey. At last the rigging was done by using a slightly stretchable thread. After that the whole Island was stored inside a wooden box until it could later be fixed to the rest of the ship. Next I turned my attention to the Gallery Deck once again. On that deck I had to do the final detailing. Myriads of tiny parts had to be made and found the final place along that deck on both sides of the ship. Ladders, fire extinguishers, fire axes, fire hoses, tow bars and several other parts had to be added. This work alone took several weeks to accomplish. Finally I was able to start the work on the armament itself. For all those guns I used R-H Fittings which purchased from several sources. These tiny models are not bad at all, but neither are they in a quality I would like. So I decided to give them some more details. In case of the 20mm Oerlikon I made several PE parts by myself and replaced the gun shield, the gun sight and added additional shoulder rests and straps as well as a few other details. The 40mm Bofors received new gun sights as well and new railings on the back side of them. Some cooling hoses for the gun barrels and few other details enhanced those guns much more.. The 5inch guns were mostly build by myself using different materials and various parts from other models. Another detail for those Catwalks was the so called floater nets and baskets. These were made of self made PE parts again. The floater themselves were simply made by using small pearls from a kids toy. (My daughter gave them to me unselfishly) These pearls were put on a thin thread and coloured. As soon as all the guns were put in their places alongside the flight deck, I could start the next part of the model. This time I turned my attention to the aircrafts and the rest of the flight deck equipment. Building those aircrafts was not a real problem to me. First of all Im specialized on aircraft models since many, many years. So the original idea for this carrier model came from the fact that I always had build aircraft models in this scale and I always wanted to build an aircraft carrier in the same scale as my aircraft models. In March 1945 the aircraft contingent of the Sangamon consisted mainly of F6F Hellcats and a few TBF/TBM Avengers. For the Hellcat I took the Italeri kit, which is pretty good detailed and has so far no major fault. The only problem with this kit is that somehow Italeri made a mistake with the engine. The push rods are on the back side, but fortunately this is something which can be pretty easily corrected. The cockpit interior received some self made detail-parts for a better look; cause in most cases the canopy will open and one can easily look inside. Some harness was added as well. I used the Night Fighter F6F-5N version as well as the normal F6F-5. Since Italeri did not add a drop tank for their night fighter kit I had to make them too. Some of the F6F-5 were the E version which used a separate radar pod on the starboard wing, which I also made as well as the small pylon for it in the needed quantity. Altogether, not a big problem, there was only the fact that I had to build those aircrafts in a much larger quantity than I was normally used to. The folding wings on most of the aircrafts were a quite different story. Due to the fact that there is absolutely no kit available for this feature, I had do to what became my motto during this whole project Do it yourself! I used the normal wings from one of the kits and build the inner structure as well as the folding mechanism itself. After that a friend of mine made small mouldings of them and casted them for me. Colouring the aircrafts was only a little challenge, because this is something Im used to. But I wanted to give those aircrafts, at least most of them a somewhat used look, quite the same as the rest of the ship. So I primed the entire aircrafts with Alclad Duraluminium and worked with so called Salt Technique Sounds funny but the result is pretty impressive and here is how it works. The aircraft is primed with the Duraluminium colour; after that paint is dried I used a very small brush and added tiny drops of water where I wanted the original top colour to be chipped away. On these water tiny amounts of ordinary salt is being put. It takes a short time to dry and after that the final colour coat, in my case glossy sea blue was sprayed over the entire model. I let it dry for several hours, at least a whole day, after which I removed the dried salt with my fingertips or a hard small brush. The result is that the Duraluminium comes out again and the look is exactly what it would look in reality. After that the decals, some of them self made were added some stretched sprue for the antennae and finally some light weathering. The same way was used for the 5 Avengers, this time Academy kits, since the much more preferred Hasegawa kits were no longer available. The flight deck equipment like the bomb carts and the tractors, Jeeps and the crash crane, or cherry picker was once again made by me. For the Jeeps I used the Airfix kit which was slightly improved and modified. The tractors are completely scratch build as well as the Cherry Picker and the various bomb carts. Next came the figures or should I say my nightmare? Everyone who knows me knew that I really do like to build models, figures well thats another story. To be honest I do not like to build and paint them very much, but from the very beginning it was clear to me that without a lot and I mean a real lot of them, the ship would look well, dead. So I simply had no other choice to get this done. My first calculation turned up to a mind boggling number of almost 400 figures for the entire model. At the end I even made a few more of them! I used every figure from every manufacturer I could get. Up this time I only used figures for my models in small numbers and I was used to the normally available ones. But this time I needed more, much more! Fortunately during the month before as well as later I had already started to collect them where ever possible. Preiser, Hecker & Goros, Heller, Revell and virtually hundred of other figures found their way to my hobby desk. Additional I had the problem that I wanted as much as possible figures at different poses, so I had no other choice than to modify them as well. Anyone who is not involved with model building would have got some strange thoughts about my person if he would have entered my hobby room during this time. There I was sitting on my desk, cutting heads, arms and legs off from hundreds of figures, Dante´s Inferno alive! Believe it or not all of them survived, well most of them at least and found a new place on my model. Colouring those figures is one hell of a work. In most cases up to 12 different colours on a single figure, so maybe one will understand why this is not my favourite work. I took me several months to finish them all. Altogether I made no less than 423 figures and Im not sure if I will ever make any figures in the next few years! Finally the entire ship was mounted on its water surface. This water was done in my favourite way with a few modifications. I use ordinary toilet paper and wall paper glue. These things are not only pretty cheap but very easy to work with and result looks not that bad. I simply add layer after layer of the paper each soaking it with lots of glue. For creating waves, I simply pile up some more paper in the desired shape with an old brush or sometimes I use my fingers for this as well. Pretty messy but that way I got some better feeling for the shape. After everything is the way I like it, I simply let it fry for several days if not a week or two. After that I use different colours, mostly oil colours of different shades of blue, black and green and some more white for the wakes. After this is dry too, I added several layers (about 7 or 8) of Future to give the whole surface that wet look. When this got dried too I added some transparent silicon to the tip of the waves. The entire model was fixed to that base with that silicon as well. Altogether it took me 4.340 hrs over a period of 5 years and 6 month
to build this model and if someone would ask me, I would definitely to
it again and I can only recommend such an experience to any ship model
builder. Sure this way it will take somewhat longer to finish a single
model but your skills should improve significantly and the result is something
you can really be proud of, cause that way you can really say Im a model
builder
|
|||||||||||||||||||||||||||||||||||||||||||||||||||||||||||||||||||||||||||||||||||||||||||||||||||||
| Some comments to the photos: | |||||||||||||||||||||||||||||||||||||||||||||||||||||||||||||||||||||||||||||||||||||||||||||||||||||
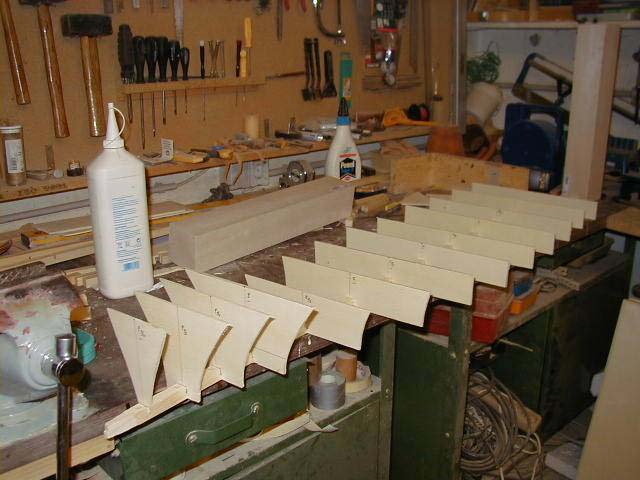
| I. In progress pictures: All photos by René Hieronymus!
Thats the way the hull was build a wooden skeleton onto which the first
layer of stiff
|
to enlarge |
||||||||||||||||||||||||||||||||||||||||||||||||||||||||||||||||||||||||||||||||||||||||||||||||||||
 |
|||||||||||||||||||||||||||||||||||||||||||||||||||||||||||||||||||||||||||||||||||||||||||||||||||||
| Here is the almost finished skeleton for the hull. | 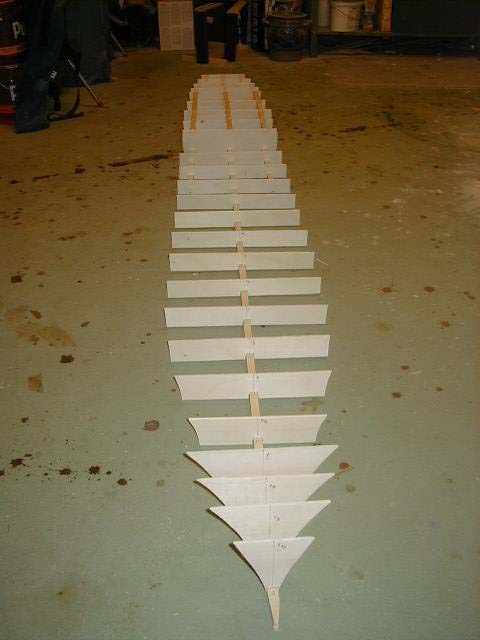 |
||||||||||||||||||||||||||||||||||||||||||||||||||||||||||||||||||||||||||||||||||||||||||||||||||||
| Weeks later the hull is almost finished. The sidewalls are in place. | 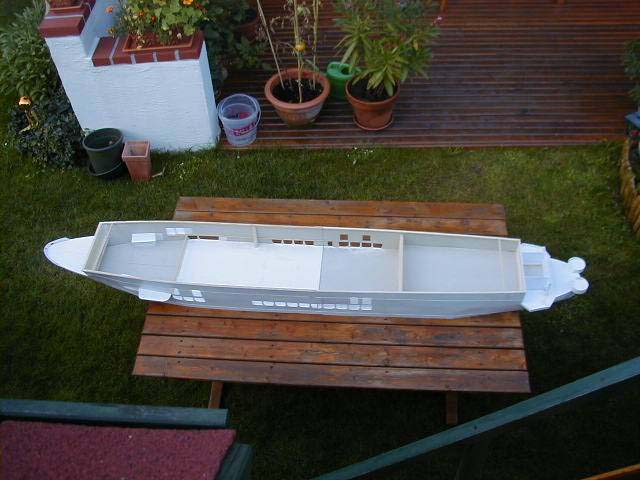 |
||||||||||||||||||||||||||||||||||||||||||||||||||||||||||||||||||||||||||||||||||||||||||||||||||||
| The forecastle at work. | 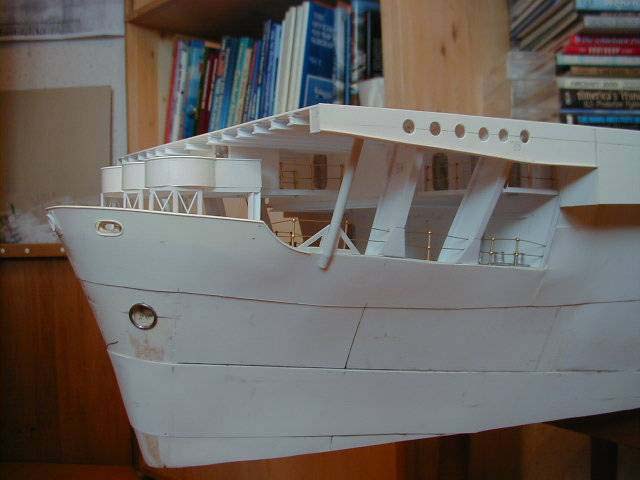 |
||||||||||||||||||||||||||||||||||||||||||||||||||||||||||||||||||||||||||||||||||||||||||||||||||||
| Once again the forecastle this time almost finished and after a first attempt to colour it. | 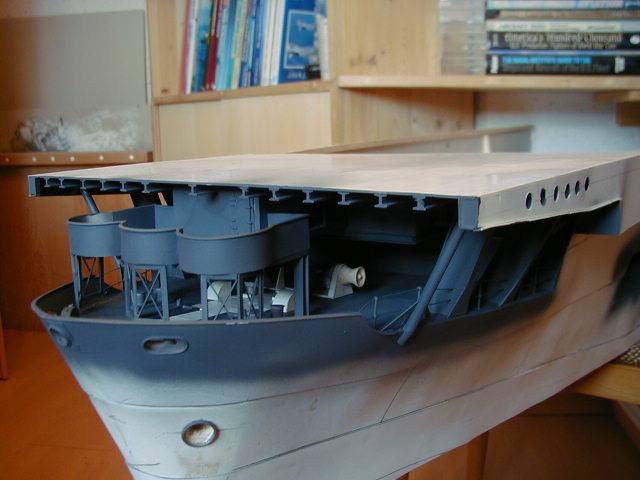 |
||||||||||||||||||||||||||||||||||||||||||||||||||||||||||||||||||||||||||||||||||||||||||||||||||||
| The so called Main- or fuel-deck which was one deck below the hangar deck will be visible so it had to be detailed and coloured. | 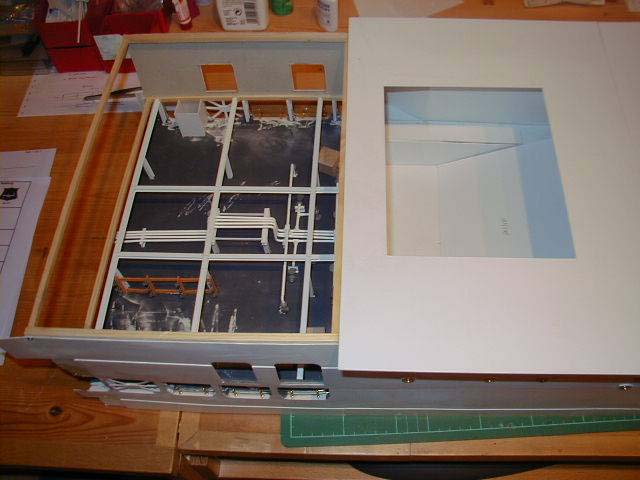 |
||||||||||||||||||||||||||||||||||||||||||||||||||||||||||||||||||||||||||||||||||||||||||||||||||||
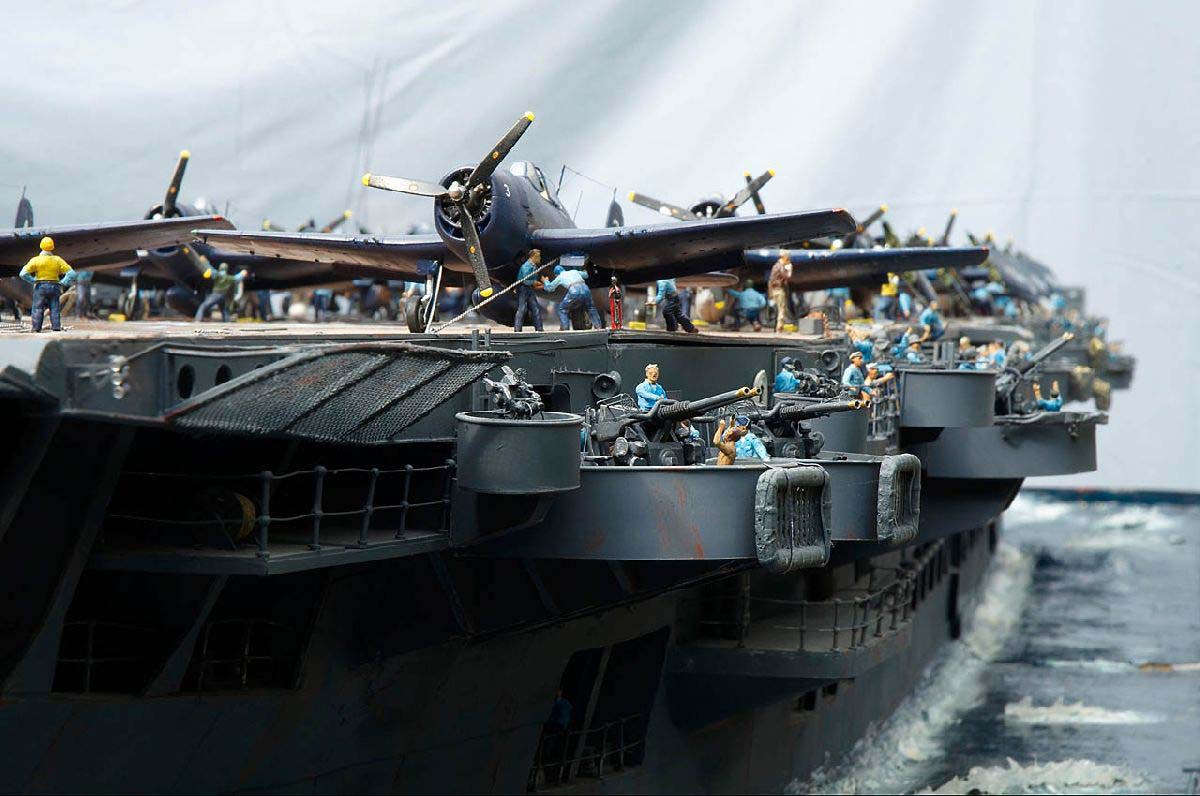
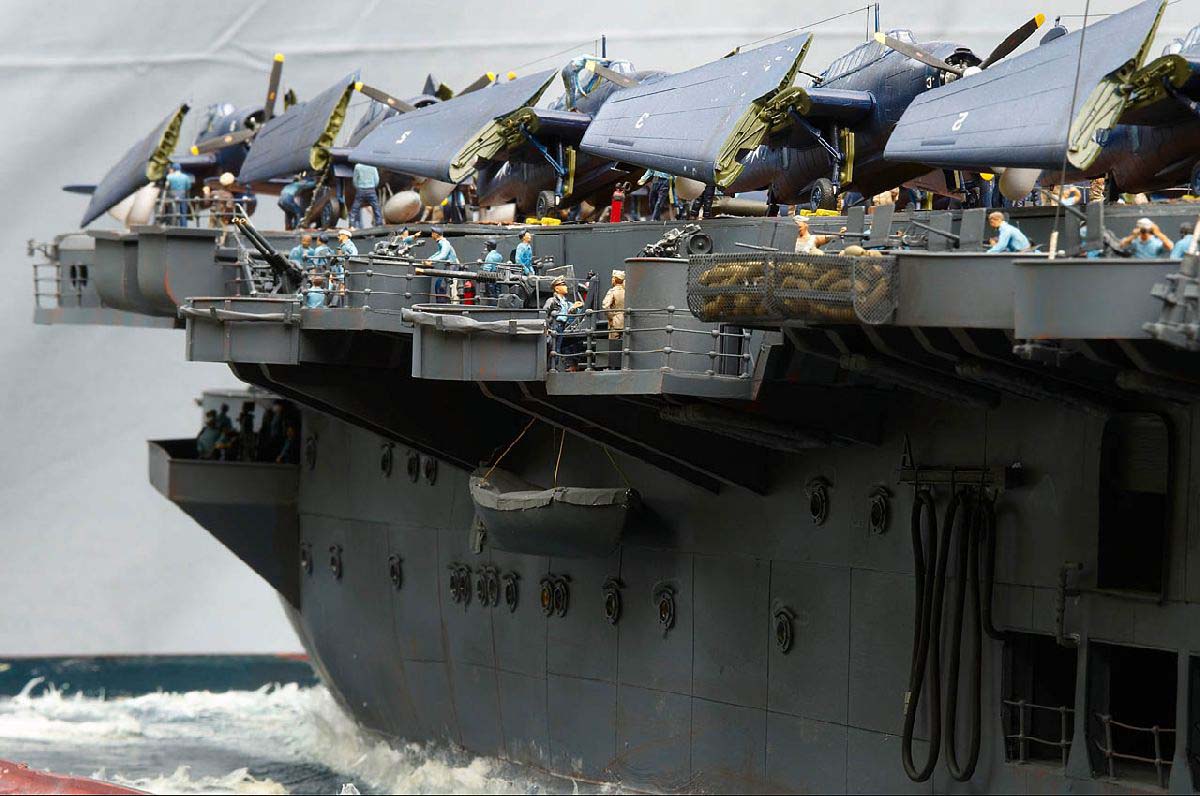
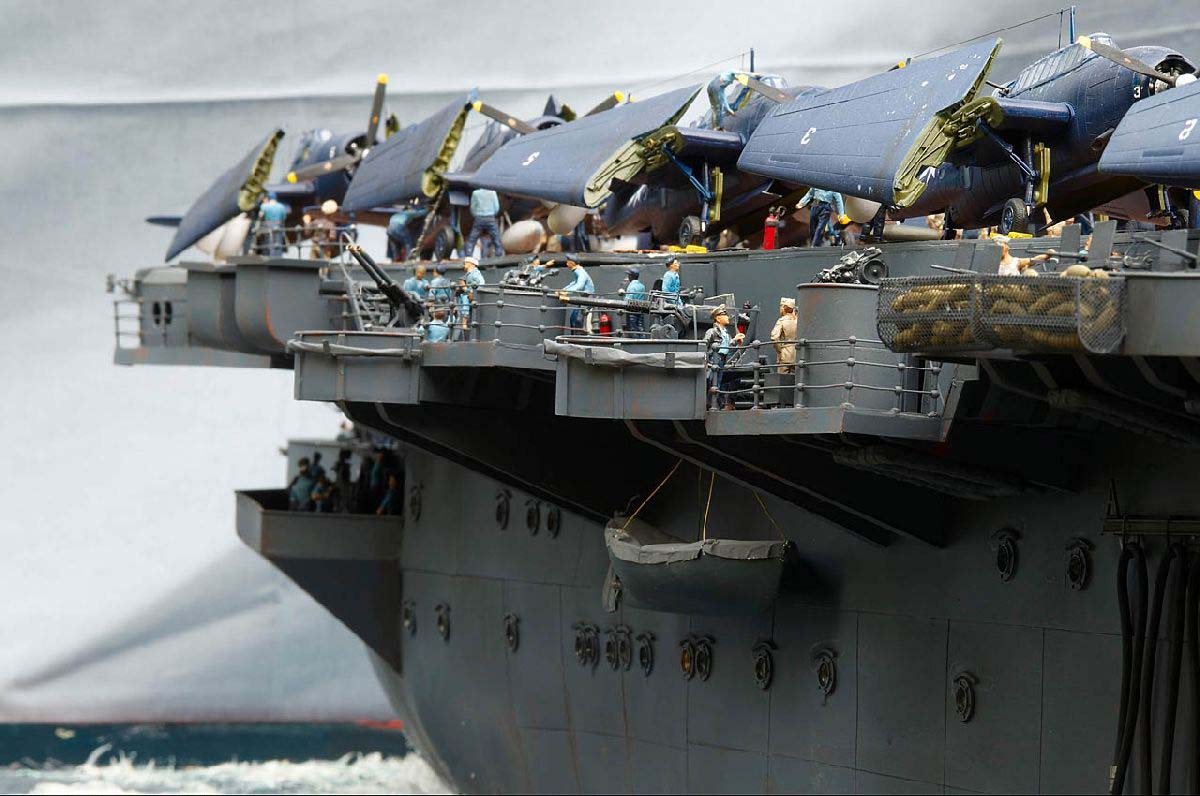
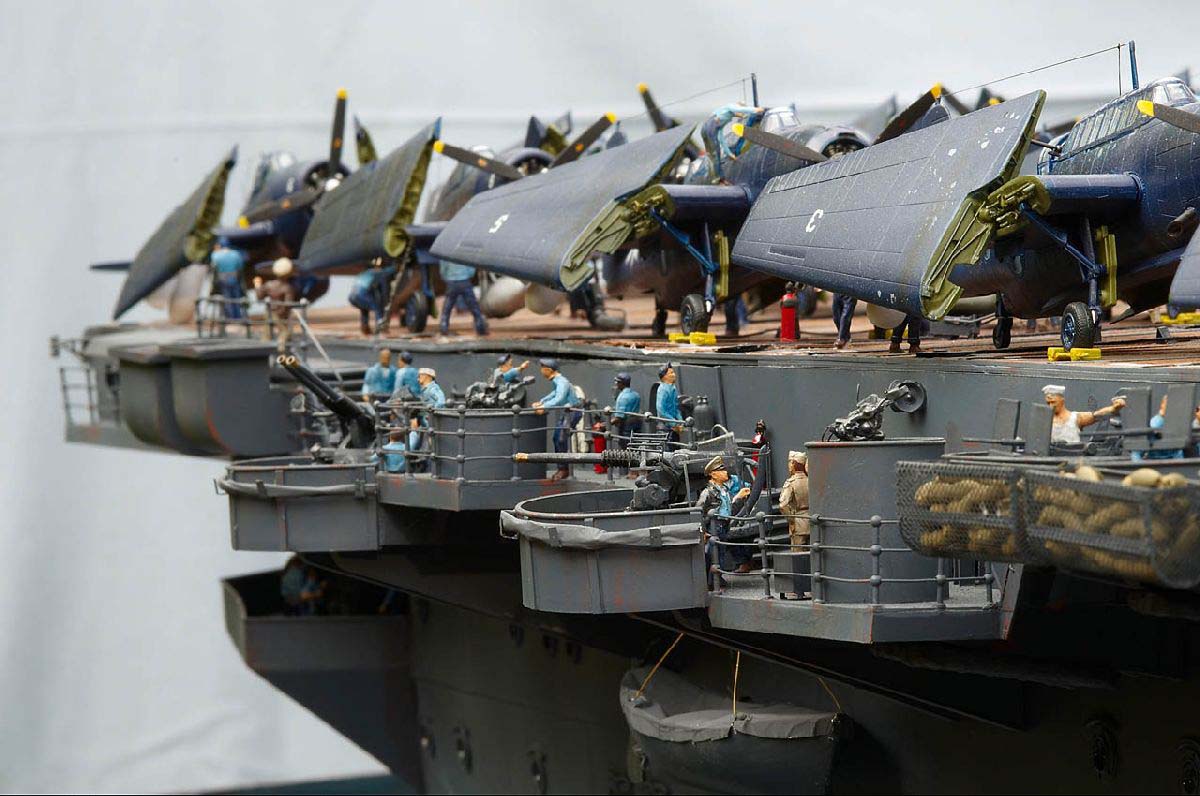
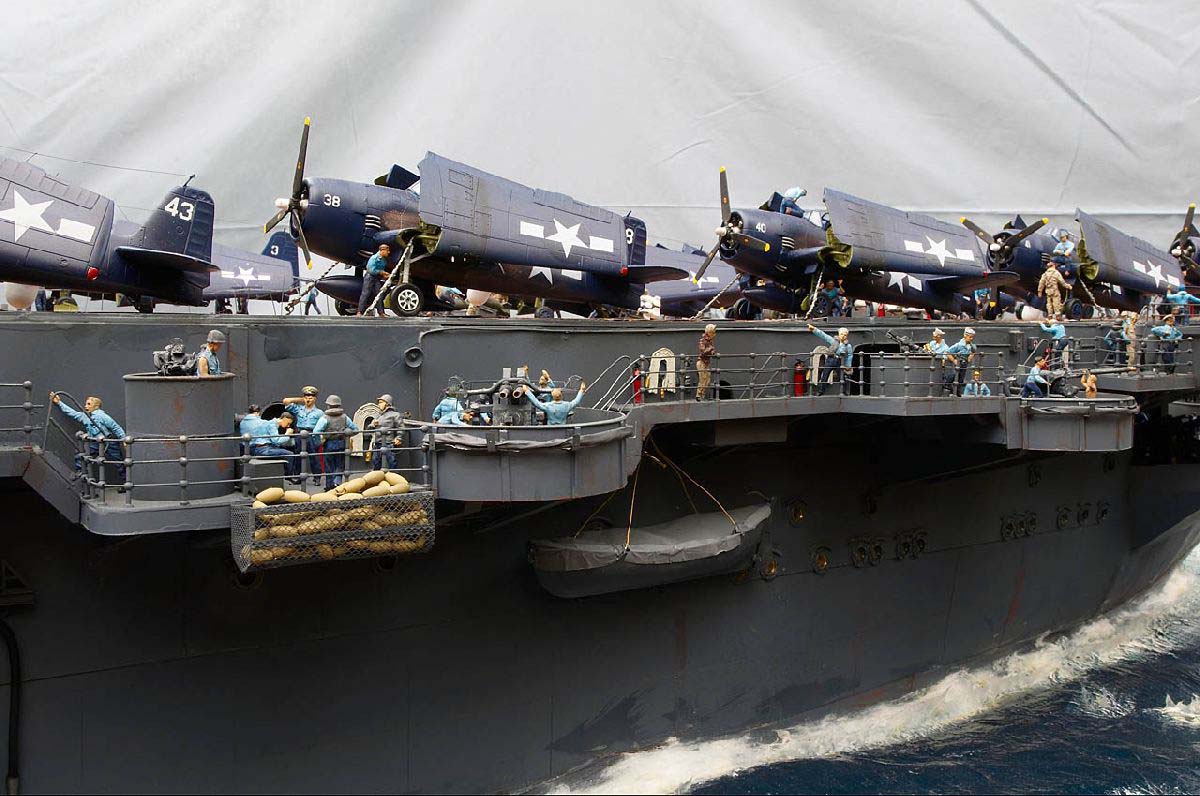
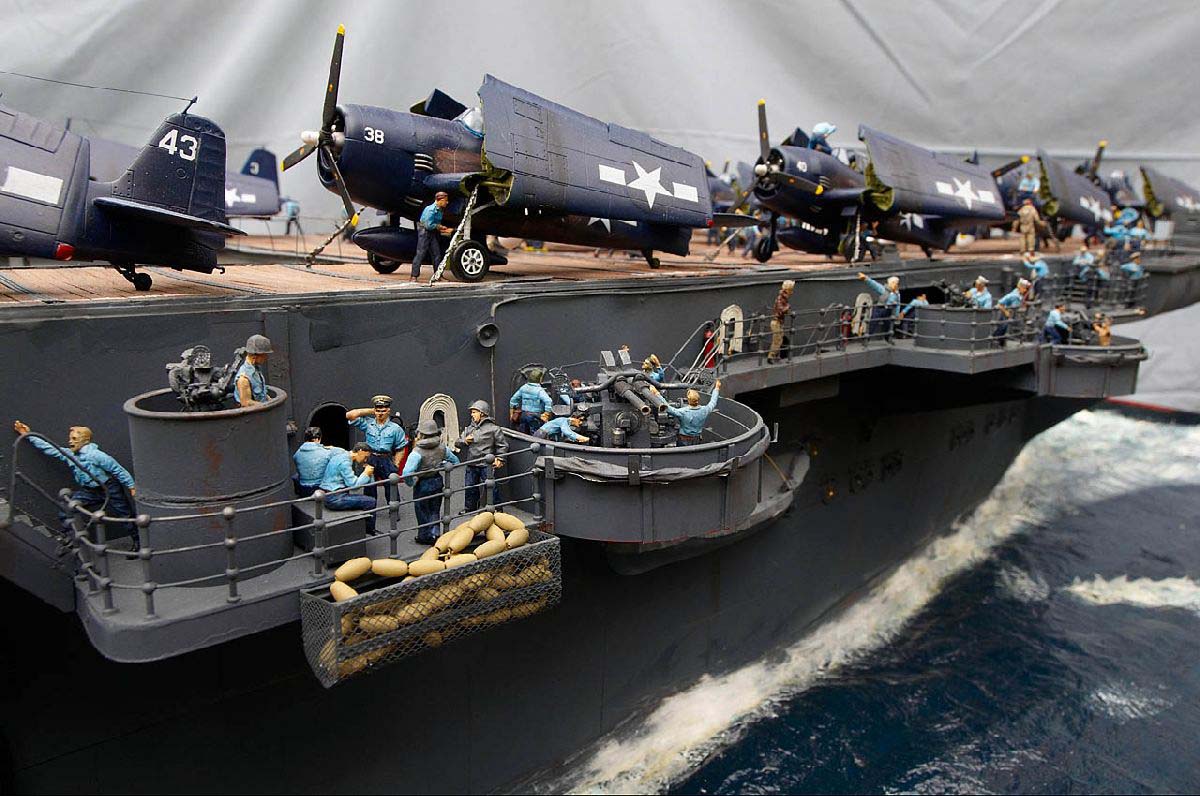
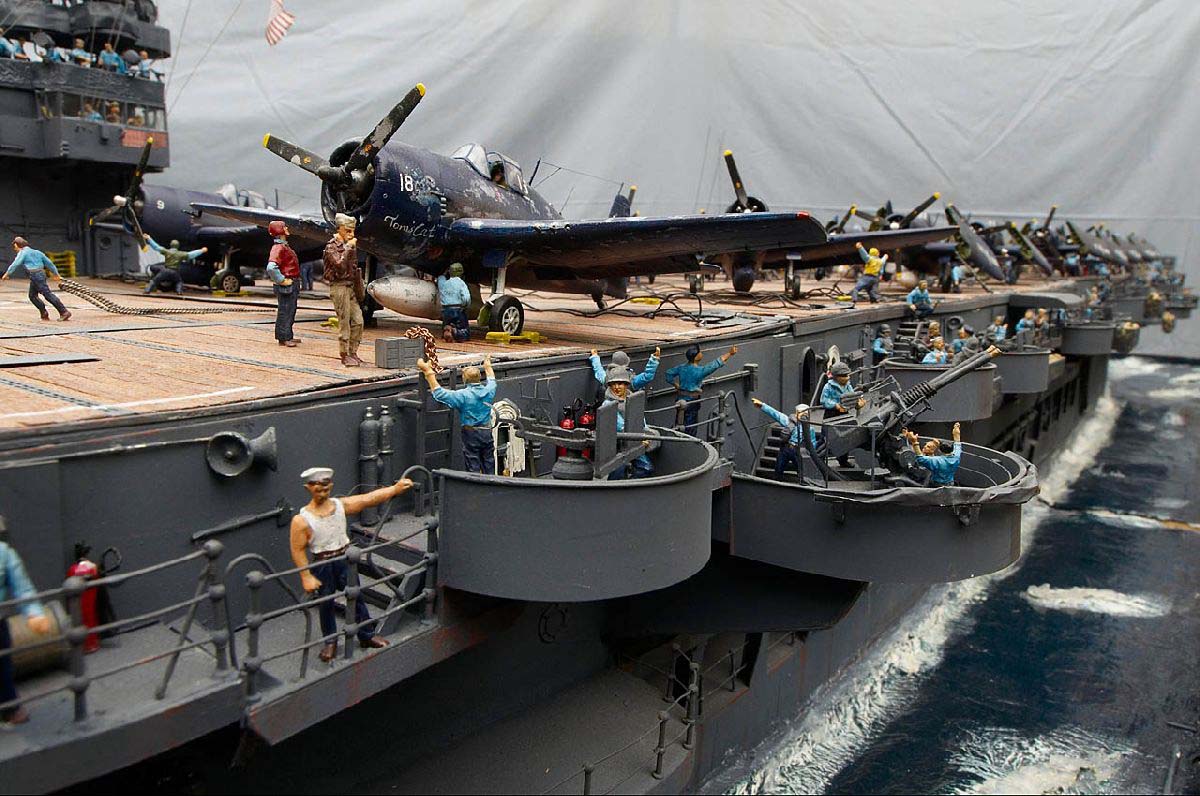
| The gallery deck was perhaps the biggest challenge due to its numerous details all of which would be visible. | 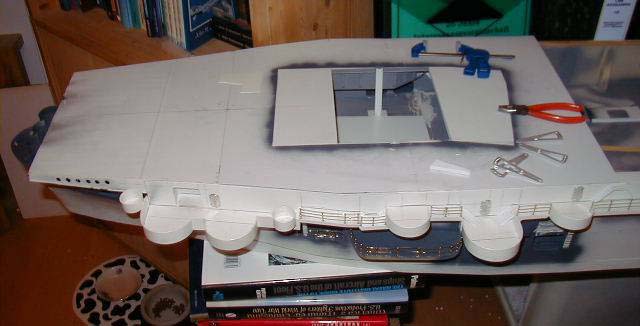 |
||||||||||||||||||||||||||||||||||||||||||||||||||||||||||||||||||||||||||||||||||||||||||||||||||||
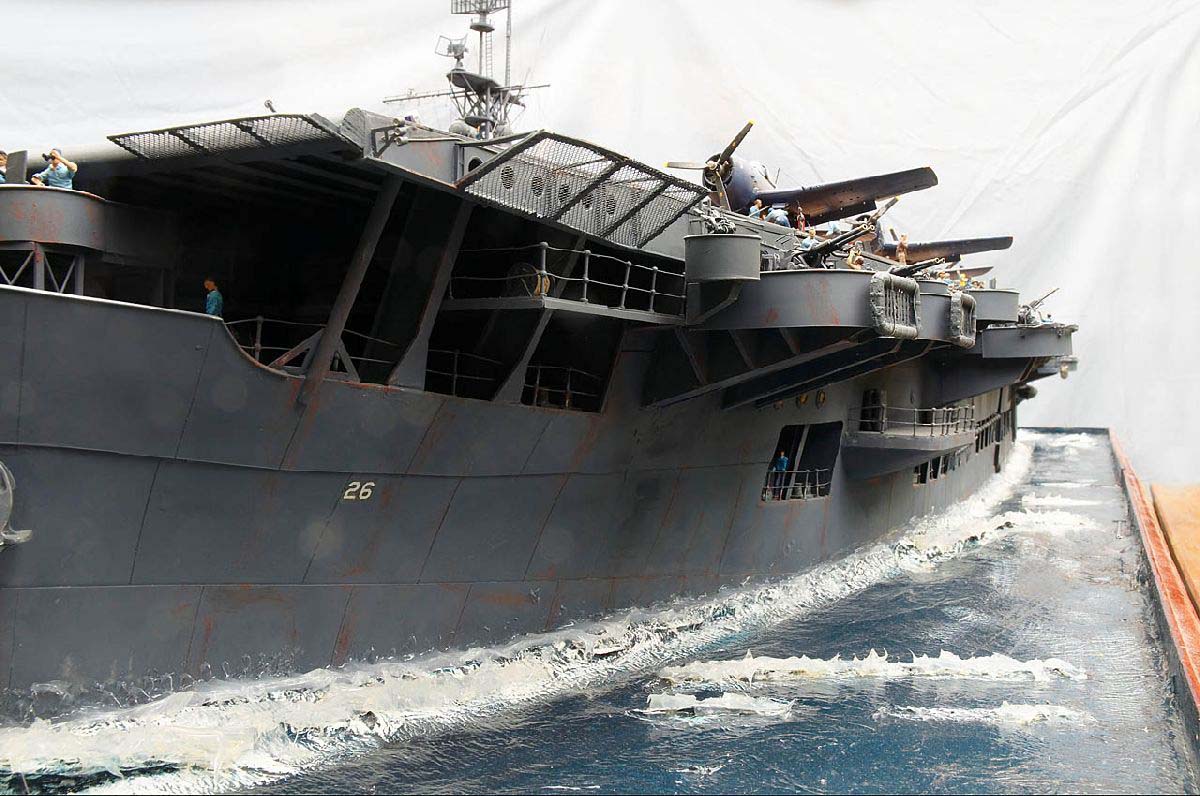
| Due to the fact that the Sangamon was a tanker before its conversion the funnels were on both sides at the aft end of the flight deck. | 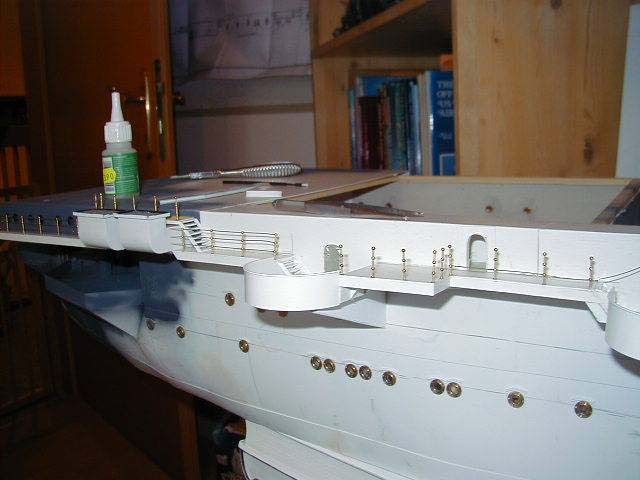 |
||||||||||||||||||||||||||||||||||||||||||||||||||||||||||||||||||||||||||||||||||||||||||||||||||||
| The Sangamon during a model show. | 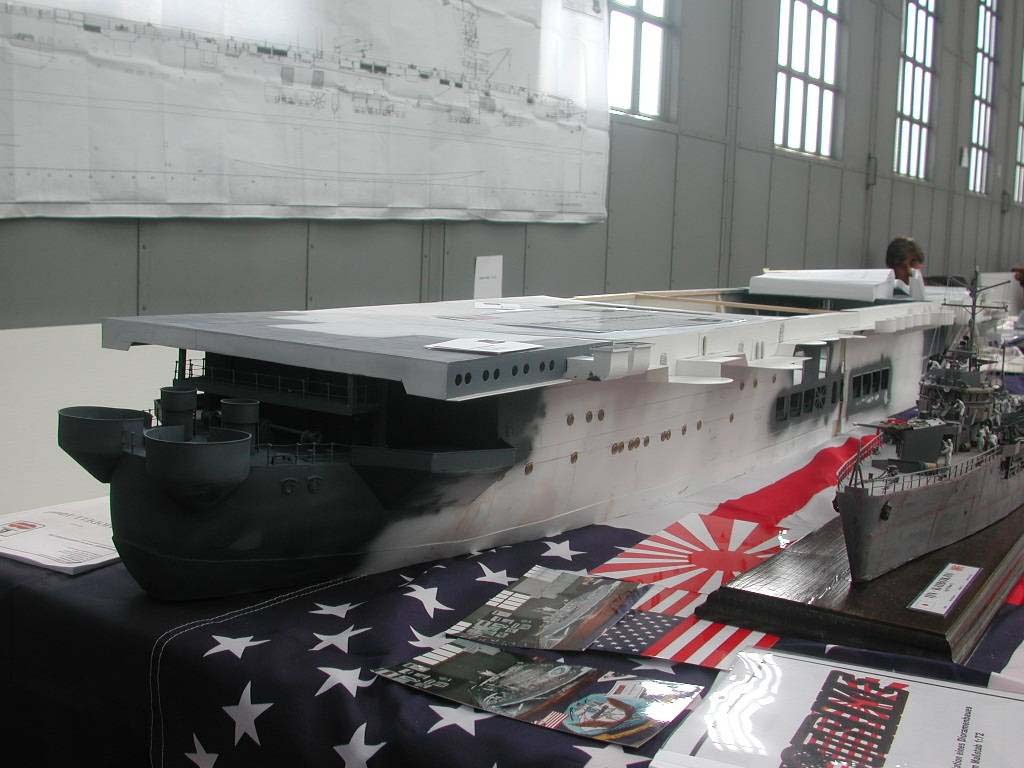 |
||||||||||||||||||||||||||||||||||||||||||||||||||||||||||||||||||||||||||||||||||||||||||||||||||||
| The island was build mostly from styrene-sheet, took me 6 month to complete. |  |
||||||||||||||||||||||||||||||||||||||||||||||||||||||||||||||||||||||||||||||||||||||||||||||||||||
| Some self-made photo-etched parts were used for the different deck levels. | 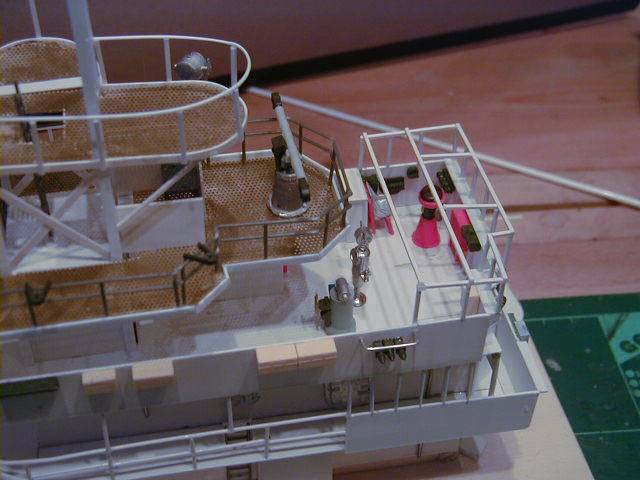 |
||||||||||||||||||||||||||||||||||||||||||||||||||||||||||||||||||||||||||||||||||||||||||||||||||||
| Another look at the island. | 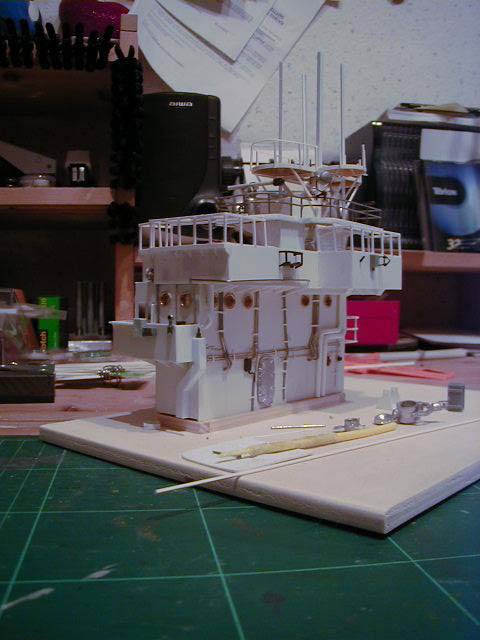 |
||||||||||||||||||||||||||||||||||||||||||||||||||||||||||||||||||||||||||||||||||||||||||||||||||||
| The first time when the island was attached to the rest of the hull just out of curiosity! | 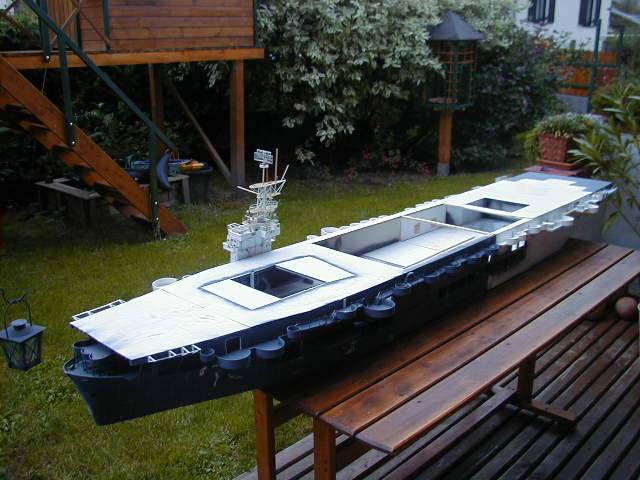 |
||||||||||||||||||||||||||||||||||||||||||||||||||||||||||||||||||||||||||||||||||||||||||||||||||||
| The finished Island still not coloured. | 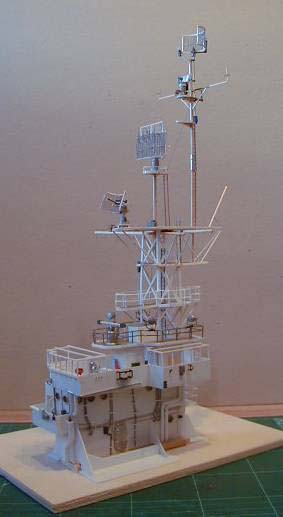 |
||||||||||||||||||||||||||||||||||||||||||||||||||||||||||||||||||||||||||||||||||||||||||||||||||||
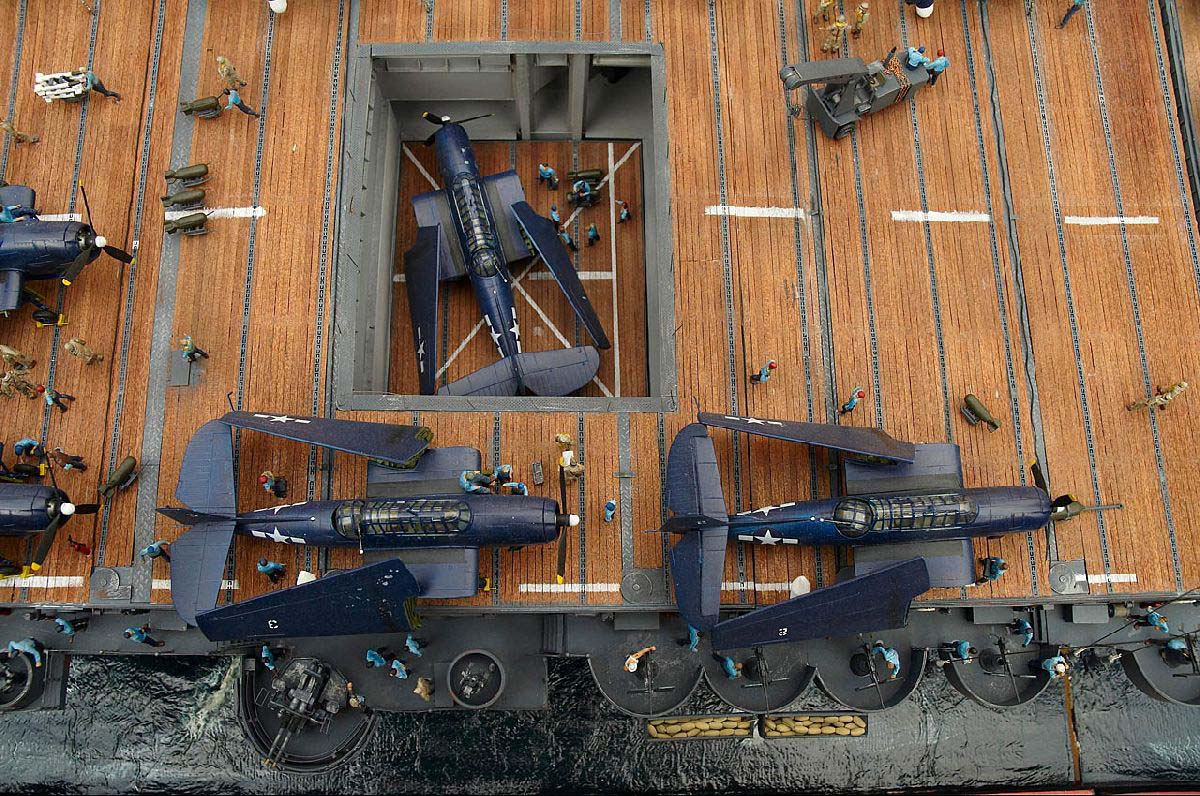
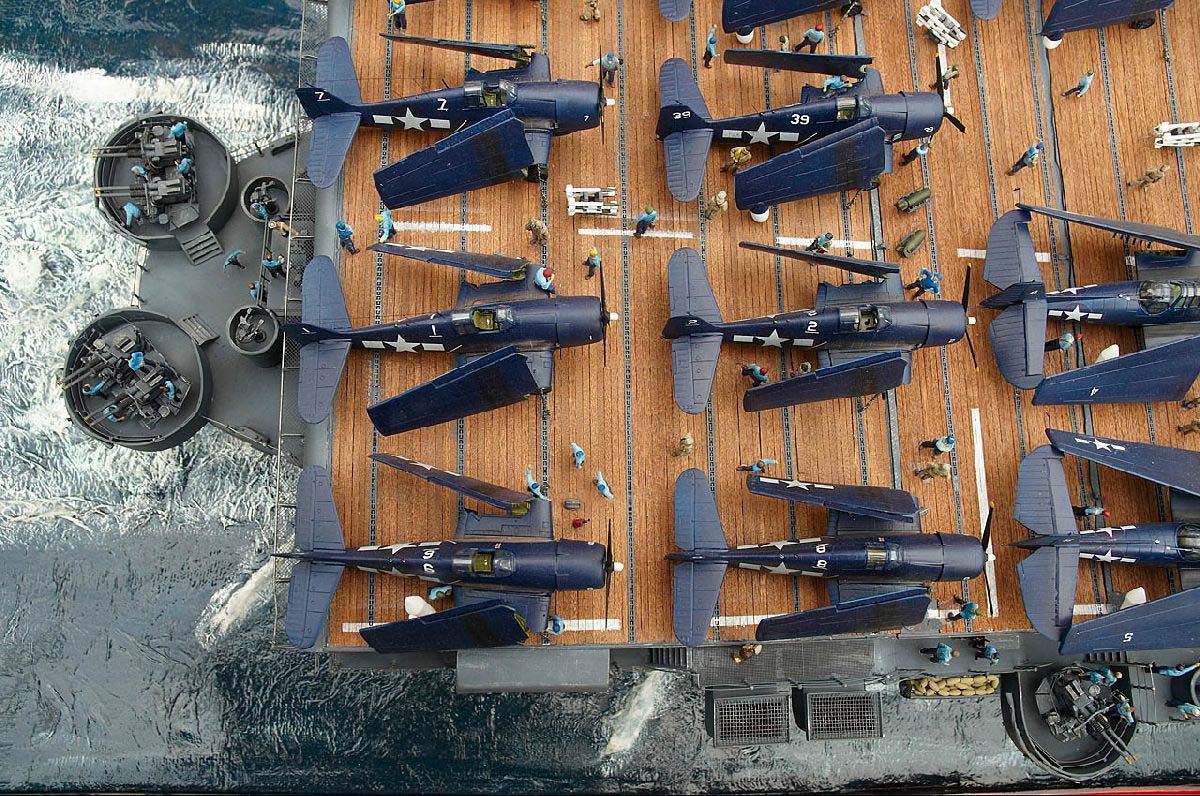
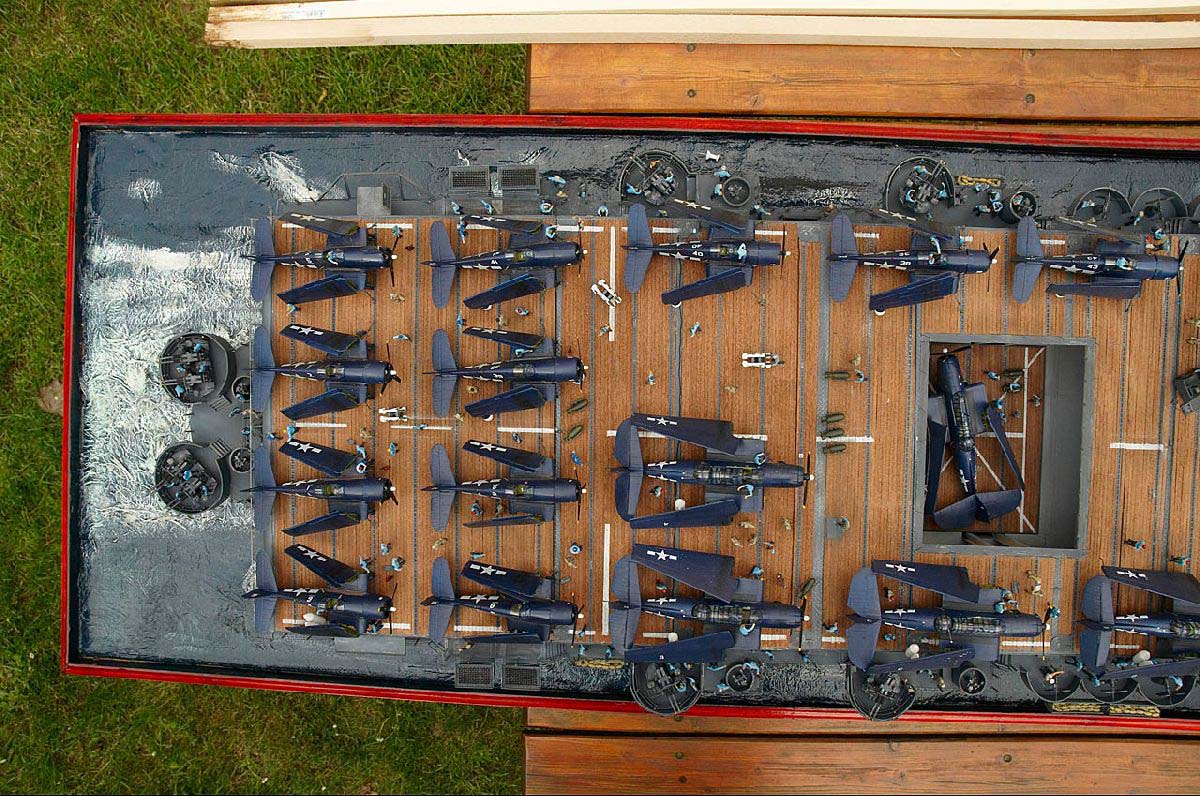
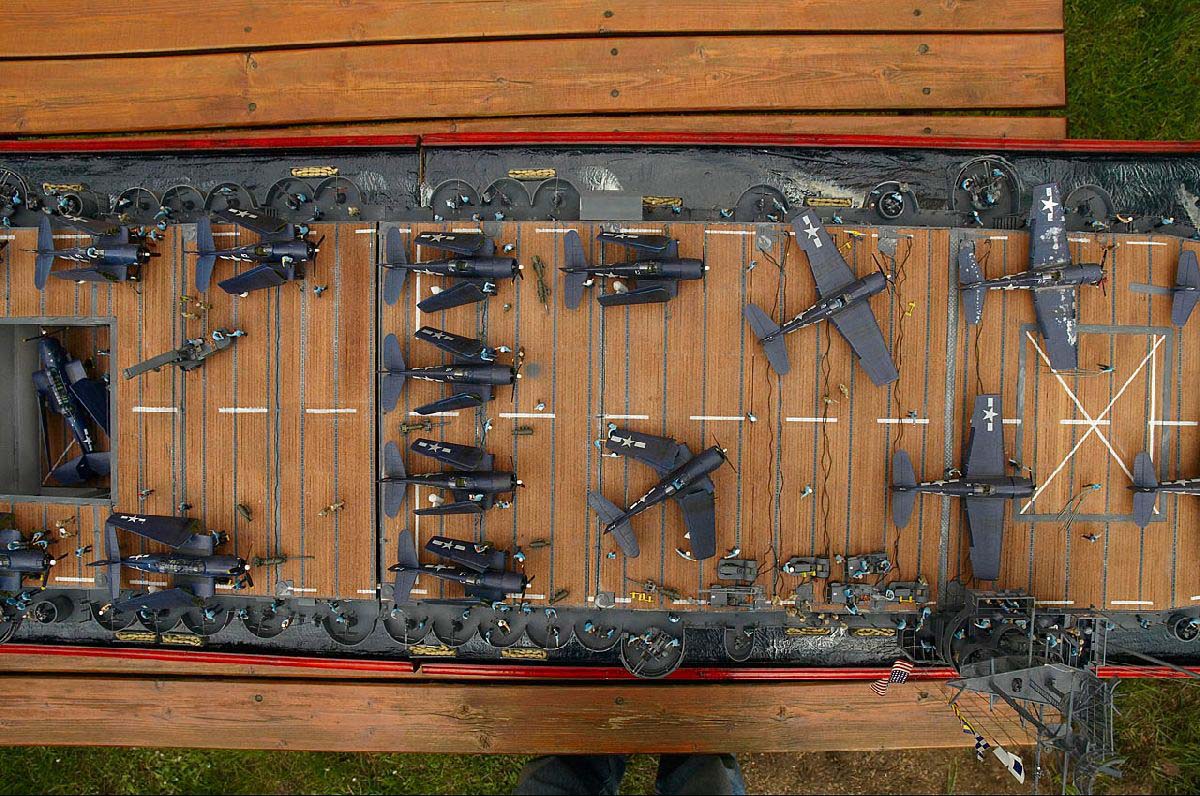
| The flight is made of real wood and quite some self made photo etched parts. | 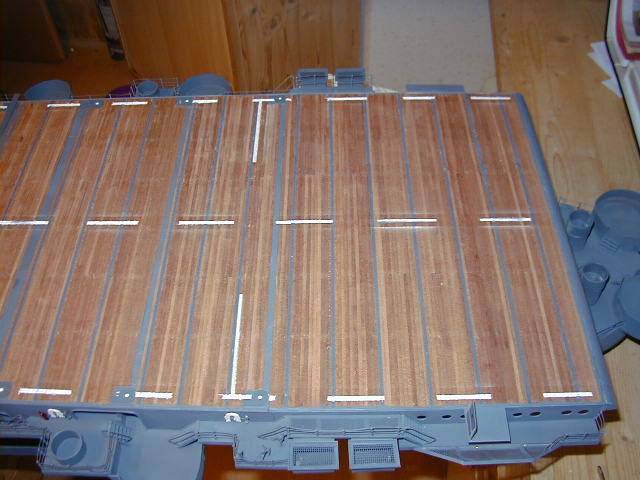 |
||||||||||||||||||||||||||||||||||||||||||||||||||||||||||||||||||||||||||||||||||||||||||||||||||||
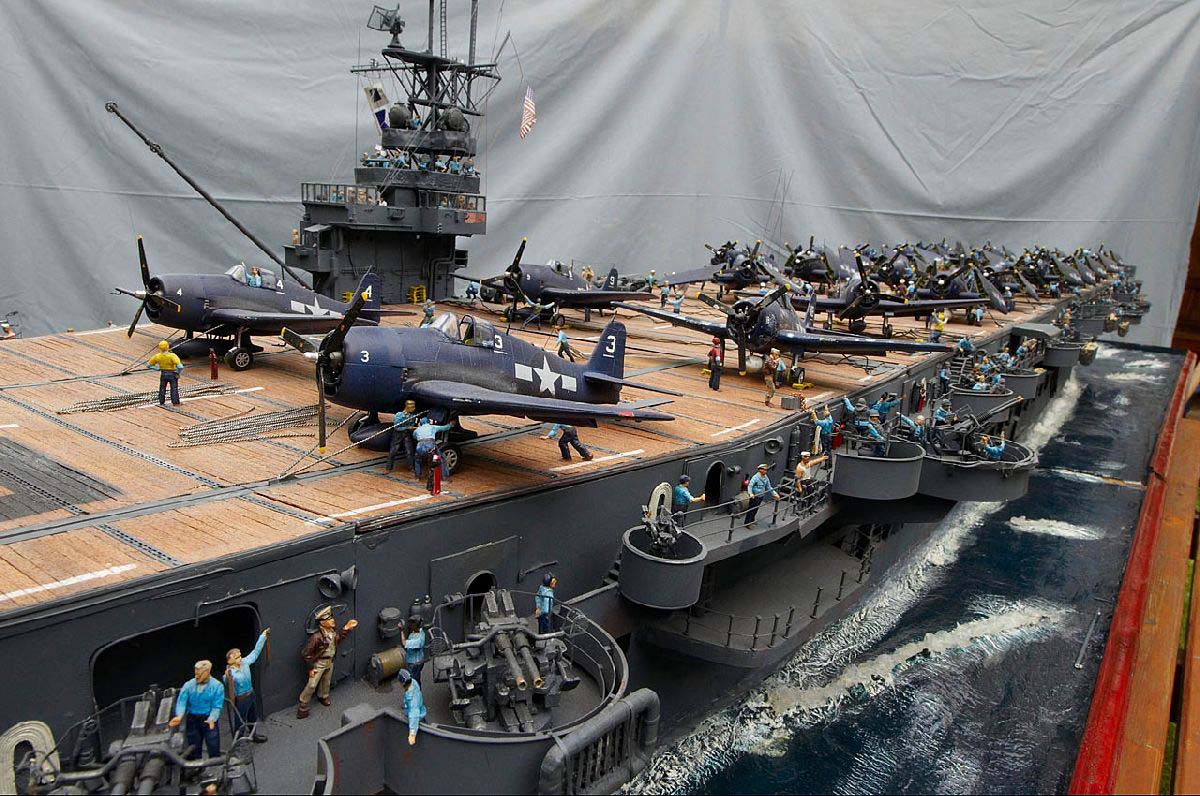
| The entire hangar deck is fully detailed. | 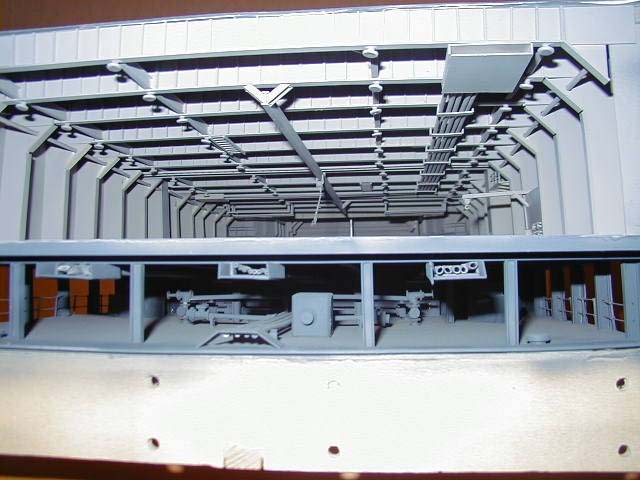 |
||||||||||||||||||||||||||||||||||||||||||||||||||||||||||||||||||||||||||||||||||||||||||||||||||||
| The small 20mm Oerlikon guns came from HR models but I used a lot of self made PE parts to upgrade them. | 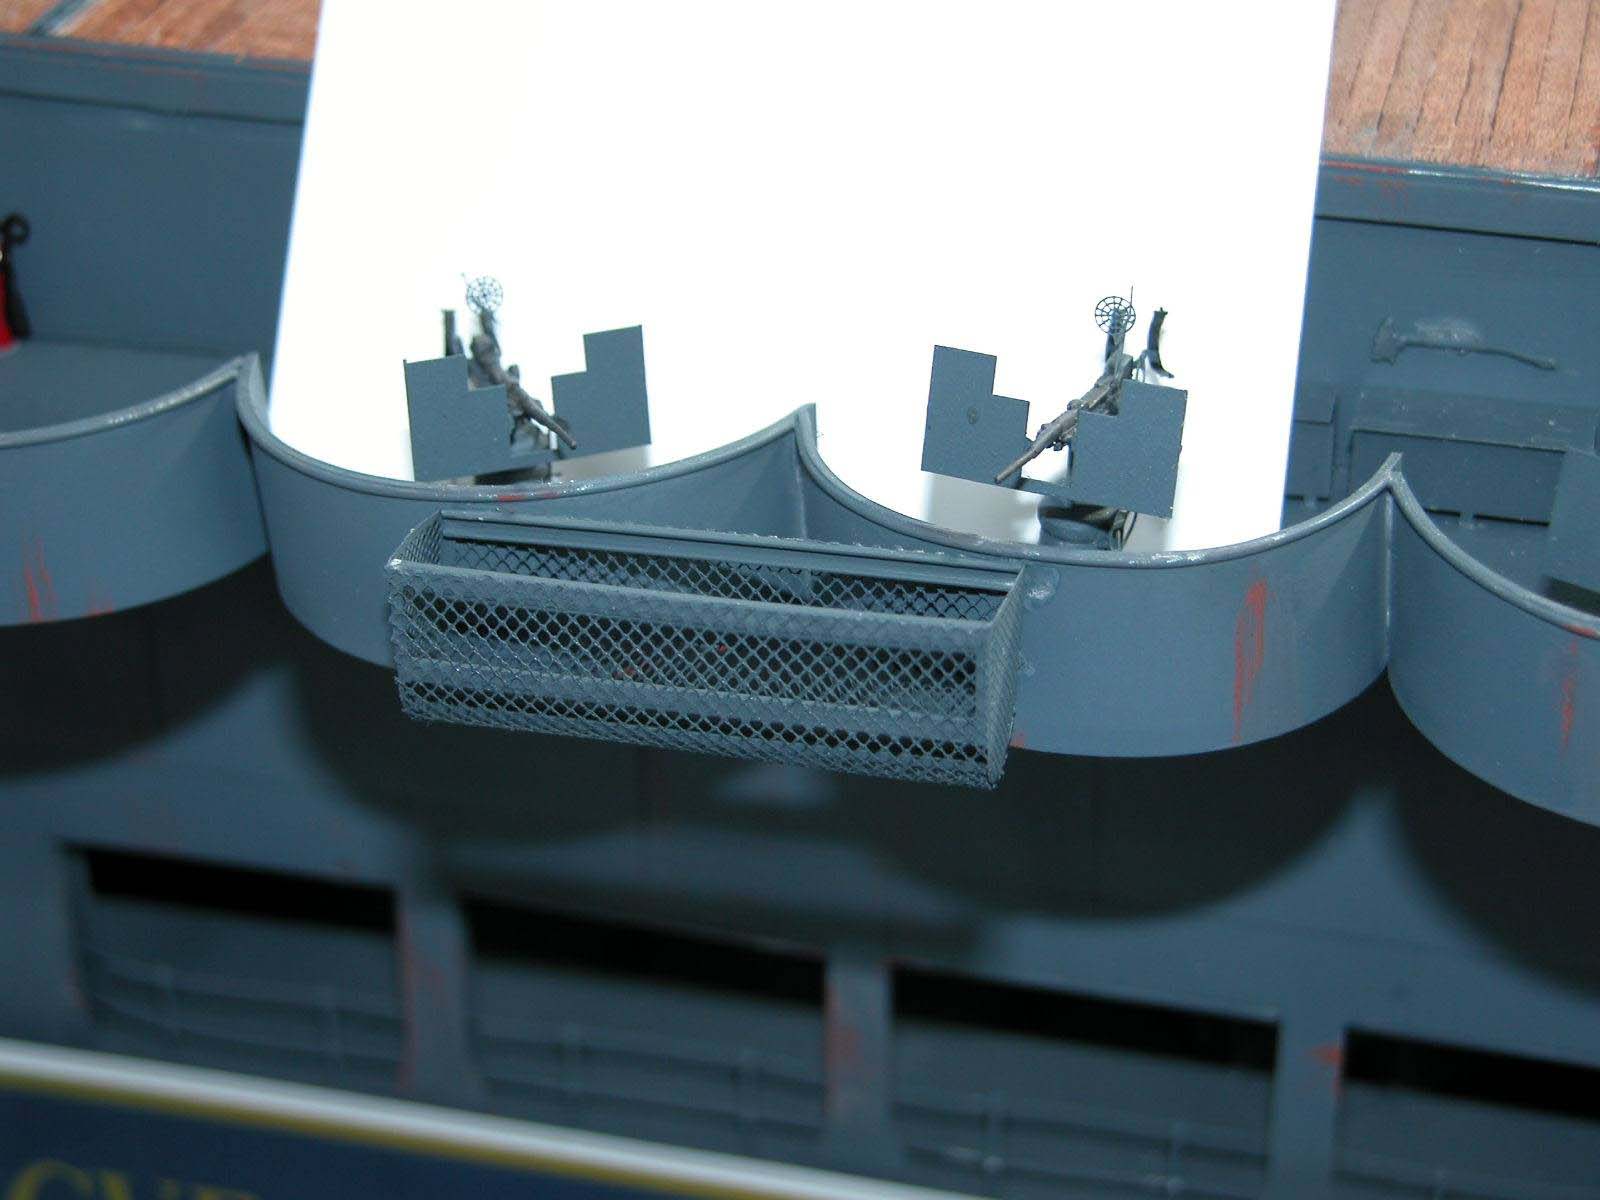 |
||||||||||||||||||||||||||||||||||||||||||||||||||||||||||||||||||||||||||||||||||||||||||||||||||||
| The ship is almost finished, except the guns, aircrafts and some figures. | 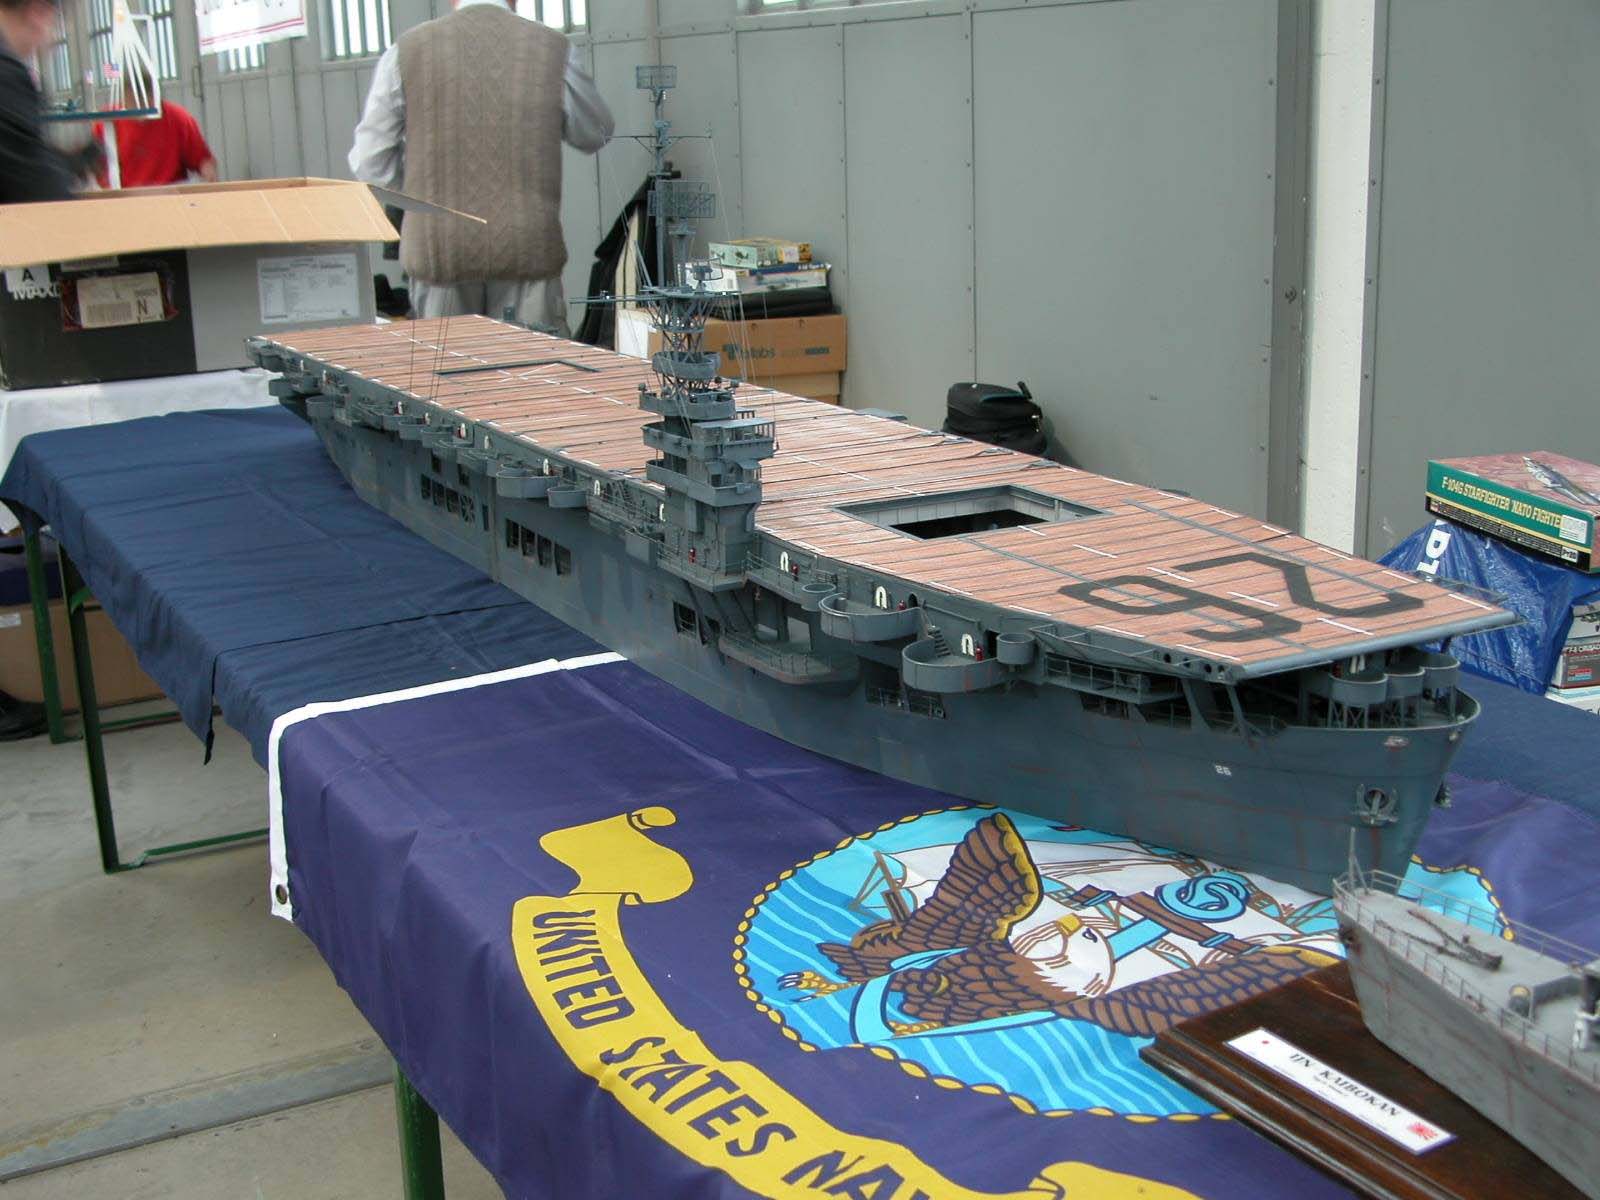 |
||||||||||||||||||||||||||||||||||||||||||||||||||||||||||||||||||||||||||||||||||||||||||||||||||||
| Here are those aircrafts, for the Hellcats I used the Italeri kit minus its wings which were including the folding mechanism self made. | 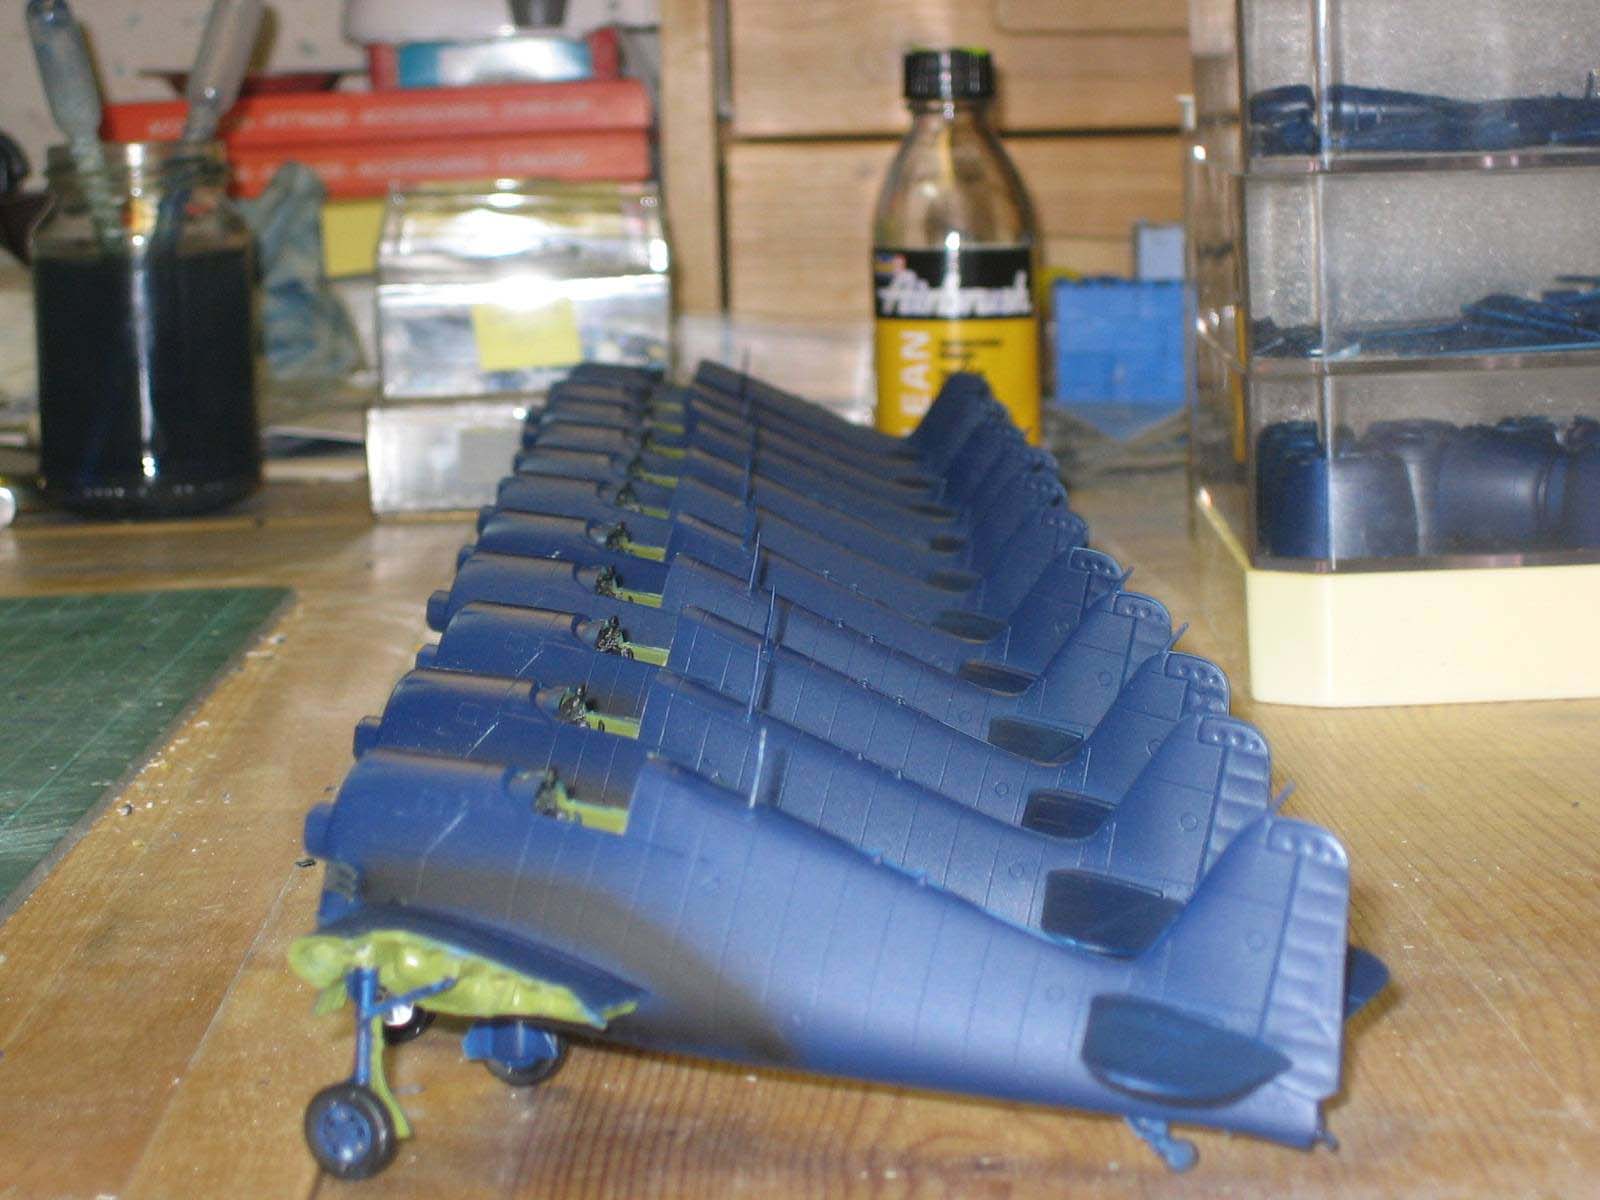 |
||||||||||||||||||||||||||||||||||||||||||||||||||||||||||||||||||||||||||||||||||||||||||||||||||||
Some facts about the finished model:
|
|||||||||||||||||||||||||||||||||||||||||||||||||||||||||||||||||||||||||||||||||||||||||||||||||||||
|
|||||||||||||||||||||||||||||||||||||||||||||||||||||||||||||||||||||||||||||||||||||||||||||||||||||
| Yep, thats me at work on my current project, an Edsall Class Destroyer Escort in the same scale of course; my carrier needs some extra protection! | 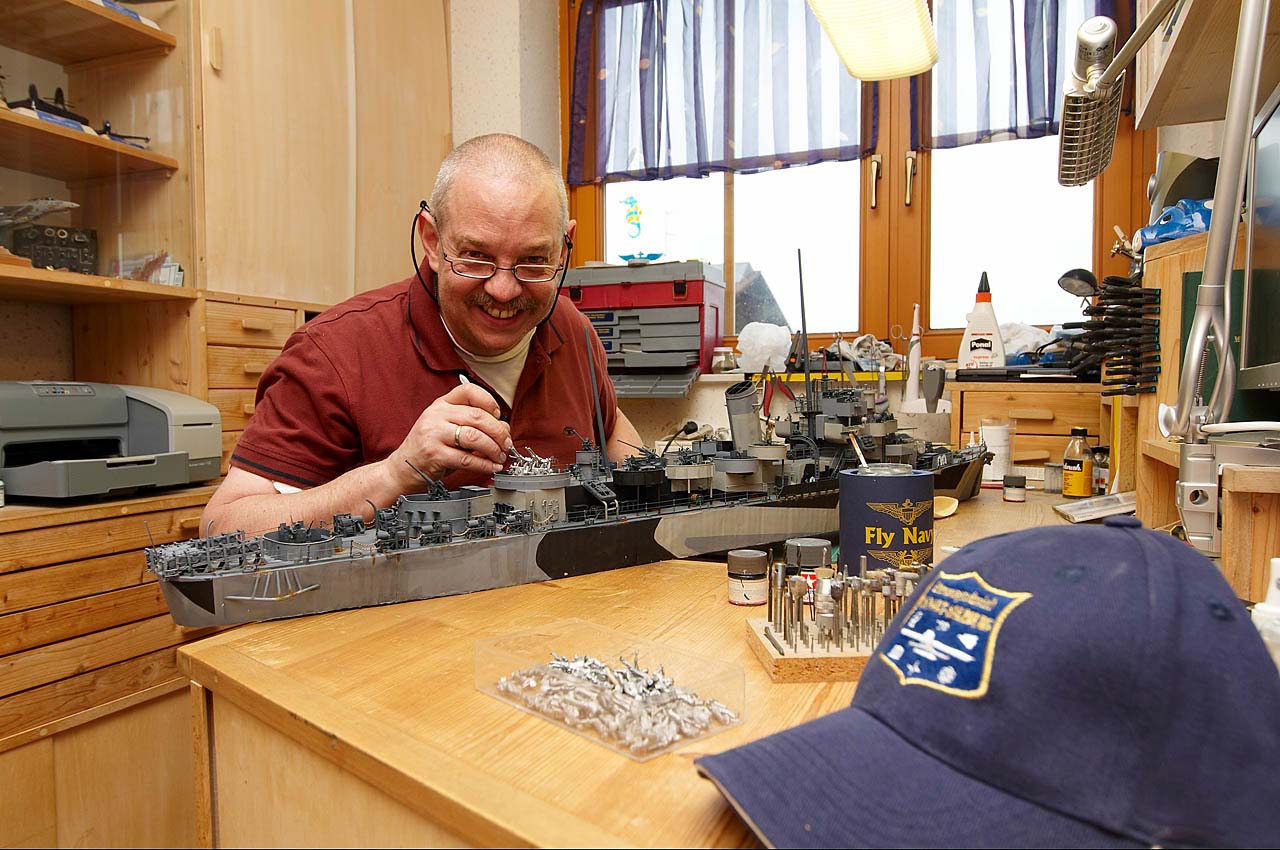 |
||||||||||||||||||||||||||||||||||||||||||||||||||||||||||||||||||||||||||||||||||||||||||||||||||||
| If someone has any questions to ask, feel free to contact me. | 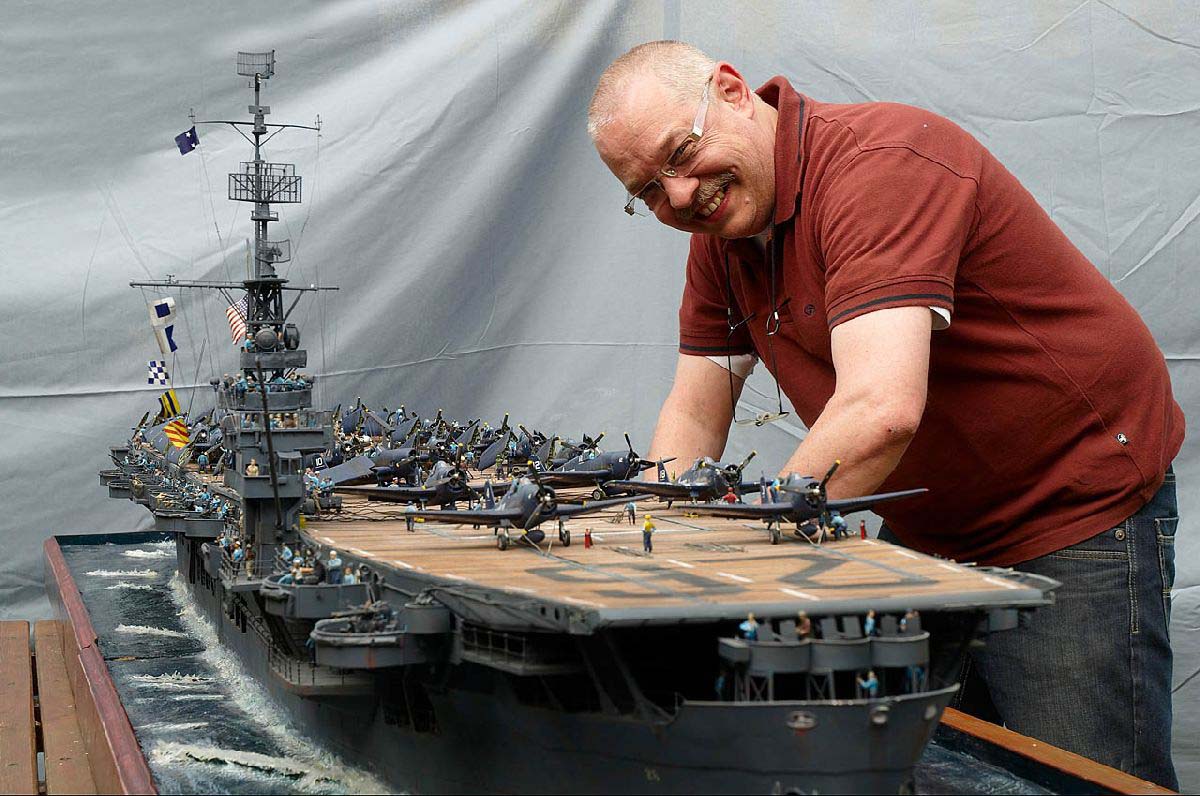 |
||||||||||||||||||||||||||||||||||||||||||||||||||||||||||||||||||||||||||||||||||||||||||||||||||||
|
Keep on modelling René Hieronymus |
|||||||||||||||||||||||||||||||||||||||||||||||||||||||||||||||||||||||||||||||||||||||||||||||||||||

© ModelWarships.com