|
|
| The ship and its mission
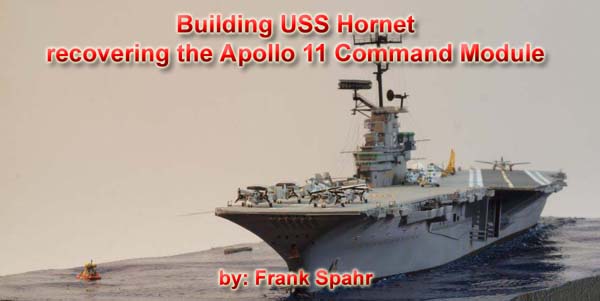
USS Hornet belonged to the Essex class of WW2 US aircraft carriers. Originally laid down as Kearsarge in August of 1942, the ship was renamed CV-12 Hornet after the loss of her predecessor in the Battle of Santa Cruz. She was commissioned in late 1943 and served with great distinction with the fast carrier battle group through the major air-sea battles of the Pacific campaign. In June of 1945, hurricane damage necessitated stateside repairs which lasted until the war ended. After repatriation service, she was deactivated between 1947 and 1951. She was then modernized according to scheme SCB-27A and recommissioned in 1953. She was reclassified CVA-12 as an assault carrier. Between 1955-57 she received the full SCB-125 conversion with hurricane bow, angled flight deck and modified elevators. This conversion enabled the wartime carriers to operate modern jet aircraft, markedly enhancing their capabilities. With the completion of the much larger Forrestal class carriers, the smaller Essex vessels were relegated to secondary tasks. Hornet was converted to an ASW carrier; she was equipped with sonar, depth charge racks and would mainly field ASW aircraft and helicopters. She was reclassified CVS-12 in her new role. In the 1960s she was deployed off the West Coast, in the West Pacific and off Vietnam. In 1969, Hornet gained international fame as the Primary Recovery Vessel for the two first manned moon missions. She both recovered the Command Modules of Apollo 11 and 12. At the time, a main concern was the possible contamination of Earth with lunar pathogens. So elaborate procedures were devised to prevent the astronaut crew and their capsule from introducing some new and devastating disease to our biosphere. Hornet received serious amounts of equipment not only from the NASA detachment supervising the recovery, but also for and from the press and TV pool she embarked to report on the mission. She had to disembark a good part of her air group and crew to make space for the guests and their equipment. A further demand was the presence of some of the navy´s highest ranking officers, including CINCPAC, and President Nixon. It all needed a tremendous amount of planning, preparation, hard work and training, but despite some hair-raising moments, Hornet´s crew pulled through admirably. I can but recommend reading Moon men return for a comprehensive account, it´s even not without its funny moments. In 1970, Hornet was deactivated and transferred to the reserve fleet. In 1989, she was finally decommissioned. In 1991, it was decided to preserve her, and in 1998, the USS Hornet museum was opened in Alameda, CA, where she can be visited today. The origin of this project I have quite intense and lasting childhood memories of the moon program.
I was utterly captivated, glued to the black and white TV screen for the
coverage of the missions, and recreated the spaceflights from Lego bricks.
A most iconic image is the recovery of the Command Module: The huge striped
parachutes, the small capsule, the helicopter with the big #66 hovering
above, and the massive grey aircraft carrier waiting in the background.
Planning an approach As I see it, upgrading an older kit will only work if you achieve a
consistent level of detailing. Leaving some clunky parts visible will make
them stick up like the proverbial sore thumb. That will detract from the
effort spent on the rest, so it´s the overall impression that counts.
It needs some planning and a concept, but it will pay off. So I looked
at the kit parts, at built models on the net, and into my usual aftermarket
sources, to decide how far I had and could go. I especially spent a lot
of time poring through the images of Louis Carrabott´s magnificent
model on this site. I decided against correcting the hull shape, and against
adding lighting to the hangar. Starfighter models has a dedicated set of
resin hangar bulkhead pieces, which need the hull to be cut and re-assembled,
but I didn´t find you could see that much through the various openings.
Moreover, I couldn´t quite find out what had been placed in which
hangar bay at the time. So I couldn´t justify that massive work,
you might also say I couldn´t be that bothered. As the model´s
interior is entirely empty, I decided to add a hangar deck and some sparsely
and spuriously detailed bulkheads, and leave it at that. I have no experience
with adding lighting to models, and didn´t feel I wanted to start
with this project, so any shortcomings would mercifully remain in the dark.
|
|||||||||||
| Building the model | |||||||||||
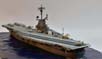
| To me, building an aircraft carrier is the royal class of ship modeling. All right, there´s not that much in the way of a superstructure, but that lack is more than compensated by everything going on inside the hull. You need to know what to build, paint and assemble in which sequence. And the air group, deck vehicles and personnel can be a challenge as formidable as the rest, or even more intense. | 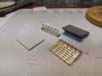 |
||||||||||
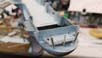
| Armed with a deck plan of Hornet downloaded from navsource.org , I started building. I ended up using the hull, the flight deck, a number of sponsons, the base of the B&A crane and the two C-1 Trader aircraft from the kit. Most of the kit parts were binned. I needed to remove a lot of molded on railings, as well as the two stern gun tubs, making for a lot of cleanup. The RAS platforms to starboard needed some heavy modification and addition to conform with the plan and the photos from Alameda. Styrene stock and Apoxie Sculpt helped here. The hawseholes and various other openings at the bow were drilled open, some were enlarged with a heated screwdriver. The entire structure below the stern flight deck overhang needed to be scratchbuilt, as the kit parts were visibly crude and wrong for this vessel. | |||||||||||
| The base was prepared early on in my usual method. I made a cutout for the hull into a piece of 30 mm insulation board, closing any remaining gaps with acrylic caulking. The general wave pattern was produced with a gas burner (very carefully and with adequate ventilation!) , the surface structure produced by stippling white wall paint onto the base. The base was sprayed with green and a rich blue shade of acrylics to come close to the reference images. As the ship was steaming very slowly and cautiously towards the CM to enable hooking it up to the B&A crane, there was very little disturbed water around the vessel. It was simulated with clear acrylic gel. | |||||||||||
| The hull was mounted to my vise with two screws which in turned were
screwed into a block of wood I had securely glued to the inside of the
bottom of the hull.
Inside the hull, I built a hangar deck and approximations of its various bulkheads, always keeping in mind what would later be seen. As the port aircraft elevator was in the raised position, I closed the rolling doors below it. From what I know, some trucks with TV equipment were mounted in that hangar bay and would have been visible if the doors had been open. But I did not find out where they had been, so decided to close the doors. |
 |
||||||||||
| When the astronauts had been recovered, they were flown to Hornet by helicopter 66. The helicopter was then placed on the starboard aircraft elevator and lowered into the hangar. The astronauts then left the helicopter and walked about 30 ft. into the waiting MQF aka Mobile Quarantine Facility, a converted Airstream trailer. They would remain in it until they could be transferred into the main quarantine unit, the Lunar Receiving Laboratory back in Houston. I assumed the MQF was placed lengthwise to starboard in the hangar bay #2, very close to the elevator. There was no way it would be visible, so I refrained from building it. I also refrained from adding much detail to the hangar bulkheads. | |||||||||||
| After their transfer into the MQF, the astronauts were greeted by President
Nixon, who left the ship in his Marine One helicopter soon after. CINCPAC
followed him in a C-1. The plane had been prepared to launch at a moment´s
notice to spirit away CINCPAC, had there been a contamination incident.
It would have been most untoward had he been quarantined aboard the vessel,
or fallen victim to moon germs.
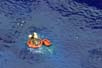
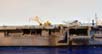
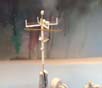
The top brass gone, Hornet carefully closed onto the CM floating in warm, choppy and seriously shark-infested waters. Members of the recovery team, all of them Navy SEAL´s, were waiting for the pickup atop the CM and in their remaining inflatable. This is the moment I have depicted in my model. |
 |
||||||||||
| The floating Command Module would be the focus of my diorama, so I
needed to find out early on how to build it. After some deliberation, I
figured out the approximate dimensions, and built up Apoxie Sculpt around
a piece of brass tubing. After curing, I chucked the tubing into my electric
drill and used it as a lathe. That worked out easier than anticipated.
The surface of the CM was detailed with some generic or leftover PE from
my PE folder. The three righting balloons and the flotation collar were
also made from Apoxie Sculpt. After priming, the capsule was painted a
dark grey, with the partly shedded Kapton foil simulated with gold paint.
AK Interactive´s True Metal worked very well. For the inflatable,
a 1:700 RN carley float was ruthlessly pressed into service. Having come
so far, I had one thing less to worry about.
At that time, I experienced the feeling that I would not be able to complete the project on time. It happens during my every project. This time, there were no particularly nasty subassemblies, and virtually everything I did went smoothly. But at times it looked as if with every completed subassembly, three new ones popped out of the woodwork, making overall progress hardly palpable. I worked my way through the instructions of the GMM PE set, and started with the most tricky stuff as usual. |
 |
||||||||||
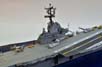
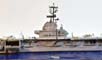
| That was the two aircraft elevators. To port, I removed part of the molded on supports, and replaced them with PE. To starboard, I cut a piece of sheet styrene to size and completely discarded the kit part. Both subassemblies built easy and fast. With the island, I was unable to use the nice PE funnel grille, as it was tailored to fit the incorrect kit part. So I made a replacement from stock PE mesh. The mast and its various assorted radars proved to be quite demanding. I replaced the kit mast with a combo of brass tubing, styrene stock and some generic PE . The radar fit was determined from reference images and the Terzibaschitsch book. I needed to scratchbuild the distinctive SPS-30 array, and the equally distinctive and visible support for the large SPS-43A array. In the end, it went quite well. | |||||||||||
| Building the air group | |||||||||||
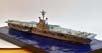
| For the Apollo recovery, Hornet had embarked a reduced air group. It comprised SH-3 Sea King helicopters, E-1 Tracer AEW and S-1 Tracker ASW aircraft plus C-1 Utility aircraft. I got everything but the C-1 from Starfighter, and used the two C-1 from the kit. The resin aircraft weren´t that nicely cast, and they were quite warped in cases. The resin rotors for the helos were inacceptably crude given the general level of detail, so needed replacing. The aircraft had neither undercarriages nor props. I was in for some work. | 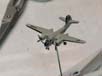 |
||||||||||
| Luckily, the GMM set had a LOT of props of all sorts. So, with some trimming and clipping, I found enough three-bladed props for my aircraft. The undercarriages were produced with my trusty punch & die set, and some styrene stock. The GMM PE set had only one set of folded and deployed rotors for the helos, leaving me short two sets. I tried some leftover 1:700 items, but they were too small, so I trimmed some leftover 1:350 items until they fit. |
 |
||||||||||
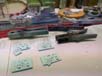
| The props and rotors were sprayed with black Stynylrez primer, with the upper sides of the rotors sprayed medium grey. The tip markings were painted by hand, although not in the proper white-red-white sequence. Stynylrez primer again worked very well and is my white paint of choice these days. |  |
||||||||||
| The aircraft were painted the classic Light Gull Grey and White scheme, the numerous windows painted in blue by hand. After glosscoating the aircraft, I started decaling them. As the Starfighter decals have a continuous carrier film, they need more effort in trimming them. Sadly, my decal sheet wasn´t completely fixated, so there were areas where the paint lifted off the sheet by touch. That brought decaling work to a crunching halt, until I had received a bottle of Microscale Liquid Decal Film. After spraying the sheet with that, the decals worked perfectly fine. | |||||||||||
| So I was able to apply almost all the markings, save those I had lost. I also lacked some national insignia, as there were only enough for the 12 resin aircraft. I had none for the two C-1 from the kit. In the end, I made do with what I had by omitting some insignia that were obscured by folded wings. | 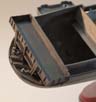 |
||||||||||
| Now I was able to cut the folding wings, assemble the aircraft with
landing gear and props, and give them a proper flat coat. That concluded
a major part of the project. Mind you, I only had a measly 14 aircraft
to do. I could just feel my respect mounting for proper carrier builders,
who sometimes tackle the likes of 60-100 aircraft.
Getting there |
 |
||||||||||
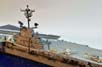
| That done, quite a number of subassemblies needed addressing. Having forgotten to order resin AA directors from Starfighter, I made my own, which wasn´t that hard in retrospect. The very notable mobile Tilly crane was provided as a very clunky kit part, whereas the GMM set had its latticework as PE. Given the poor shape of the kit part, I discarded it and built the body of the crane from scratch. The mules or flight deck tractors also needed replacing. The kit has some crude parts representing agricultural tractors, which weren´t used in the 1960s Navy any more. So I made my own tractors from reference images. I also needed to build the various containers and aerials mounted on the deck for the TV coverage of the mission. Leftover aircraft stencils were used for the lettering. I also had to build the dolly the CM was placed upon after recovery. I needed several attempts to get it broadly correct. In this subassembly, Albion Alloy´s .1 mm wire helped a lot. It was also used to make the numerous folding aerials on starboard. | 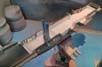 |
||||||||||
| I needed to remove numerous molded-on inclined ladders from the flight deck surrounds. In places, some repairs with styrene stock were needed after the grinding was done. The equally numerous PE replacement ladders needed a lot of concentration and some time, but I got there in the end. Now I was able to prime and paint the flight deck from both sides. The flight deck decals were beautifully printed with individual carrier films. Nonetheless I rather masked and sprayed the runway markings and some of the lines on the deck. For the rest of the markings, the decals were used and worked just fine. I did not weather the flight deck, having found in Carmichael´s book that it had been repainted only the day before recovery to look as smart as possible for the President´s visit. | |||||||||||
| That done, the actual process of assembly began. The hull had been painted beforehand, now I added my scratchbuilt stern details with all the PE railings and other details. Inside the hangar, some of my aircraft were placed, together with some crates and barrels, and a goodly number of PE figures. I had spent several days preparing PE figures. I used 1:700 Lion Roar and Eduard figures. They needed partial cutting from the fret, some application of CA glue to make them a bit more 3D, and obviously quite a lot of painting. Some of the Lion Roar figures were cleverly etched to be posable, so those needed to be bent into the desired pose before CA application. A lot of my figures were sailors in white, but also a lot in work dress, many of them with orange life vests, plus officers and flight deck personnel in their coloured jerseys, and some frogmen for use atop the CM. According to reference images a lot were placed in and around hangar bay #3, as long as that area was easily accessible. |  |
||||||||||
| Having secured everything inside the ship, it was time to mate hull and flight deck. Numerous rubber bands and some tools were used to fix the deck in place. The model was then turned upside down, and thin CA flooded into the gaps between hull and deck. Despite it being CA, I rather let it cure overnight. That worked out very well. I only needed to fill, sand and repaint the seam at he hurricane bow. Now all the remaining subassemblies were mounted to the model. That meant the guns, some of which didn´t fit into their tubs. Duh. So those had to be modified that late into the project. I should have checked that out earlier. It also meant the directors, many life raft canisters, inclined ladders, a LOT of railings, a LOT of figures, the elevators, the island with its associated aerials and rigging, and at the very end the aircraft and the deck vehicles. My usual flat coat of forgiveness covered it all quite nicely. Finally, the bridge windows were filled with a mixture of PVA glue and Vallejo transparent green paint. |  |
||||||||||
| Now I was able to mount a cutter with crew plus the CM with an inflatable and some divers to the prepared base, using gloss clear acrylic gel. As the very last step, the ship was placed into its cutout in the base. | |||||||||||
| Conclusions | |||||||||||
| This was a truly fun project. I enjoyed it virtually throughout its run. There was ample opportunity of finding individual solutions to all sorts of problems, and I had to work with all sorts of materials. I am quite happy with the outcome and think that the completed model, despite the age of the molds, holds up quite well. Going through the project rekindled childhood memories of sitting in front of the TV set and watching the blurry images from the moon. | |||||||||||
|
|||||||||||
Materials used
|
|||||||||||
More
of Frank Spahr's work.
Updated 12/27/2019

© ModelWarships.com