by Rob Weilacher
By looking at the Corsair Armada Louisville and Chicago kits, I realized that the Chester was essentially a blend between the two kits. There were some small modifications, as you will see, but nothing real major, therefore it fell within my modeling skills and I decided to give it a try. Incidentally, the same two kits can probably be used to make a 1945 USS Augusta, but I have only done some cursory research into that. It might be that the parts left over will be almost sufficient, but that might be a future project one day.
I decided I would write this article so other modelers would have a set of instructions to build the USS Chester, if they wanted to. This is my best shot at the USS Chester, but some other knowledgeable people might be able to pick out any errors or misinterpretation of photos I might have made along the way. Their input is welcome, as this is a learning experience for me, and it is my first serious ship kit-bash.
Sources:
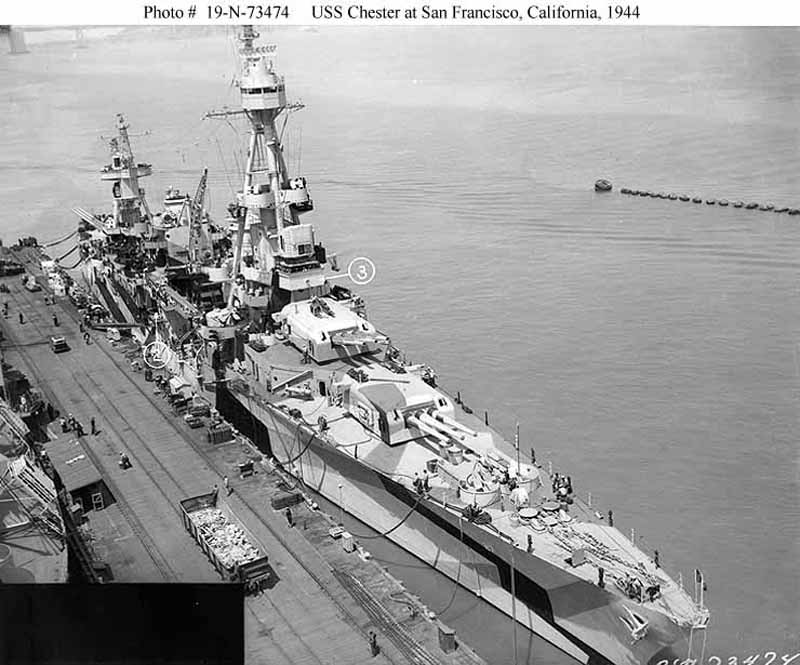
- Navsource USS Chester Page: http://www.navsource.org/archives/04/04027.htm
- Naval Historical Center USS Chester Page: http://www.history.navy.mil/photos/sh-usn/usnsh-c/ca27.htm
- The Floating Drydock: http://www.floatingdrydock.com/ - Camouflage Design Sheet CF-118
- Pacific Front Hobbies: http://www.pacificfront.com - source for Corsair Armada Productions kits
- Corsair Armada Productions USS Louisville
- Corsair Armada Productions USS Chicago
- Toms Modelworks #704 - 3 Rail set with Ladders
- Toms Modelworks #706 - US WWII Miscellaneous Radars SC, SK, Mk4, Mk22, SG
- Toms Modelworks #711 - 20mm Oerlikon guns and mounts
- Toms Modelworks #715 - US Cruiser Aircraft Catapults
- Toms Modelworks #716 - US Heavy Cruiser, Northampton/Portland Class
- White Ensign Models Air Strike 700 Series OS2U Kingfishers (2 required)
Figure 1 The Basic Parts Layout:
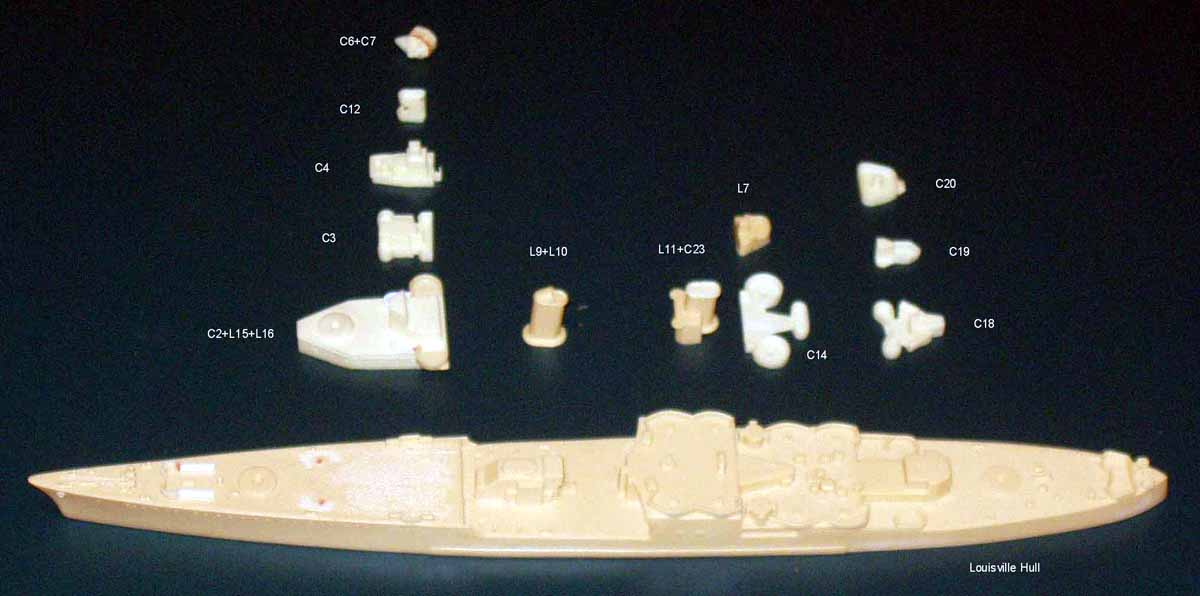
Notes for basic superstructure parts shown in Figure 1:
C2+L15+L16 : Start by sawing off the after part of C2 so it does not overhang into the well deck . Add a 20mm position to the port and starboard of the bridge superstructure and forward of the quad 40 mm positions on part C2 after attaching parts L15 and L16.
C6+C7: Parts are glued together.
L9+L10: Parts are glued together.
L11+C23 Parts are glued together.
Note parts are from different kits.
C14 : Remove the small deck house from this platform.
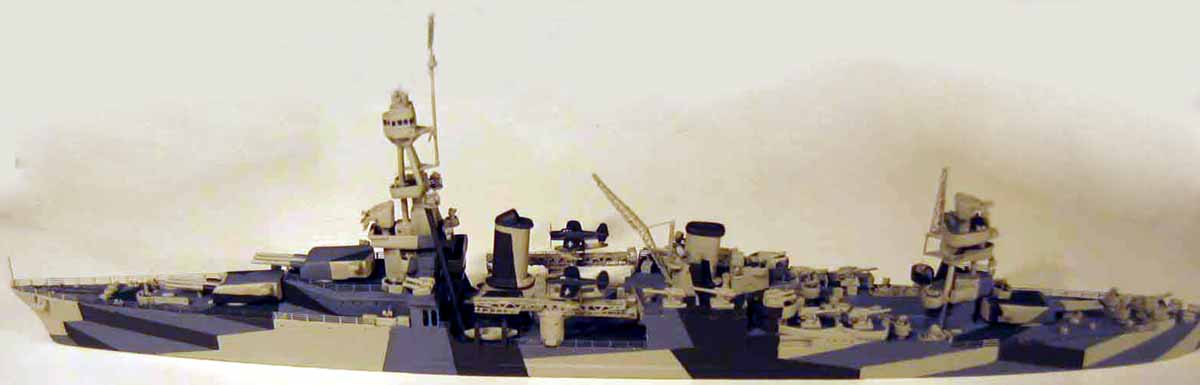
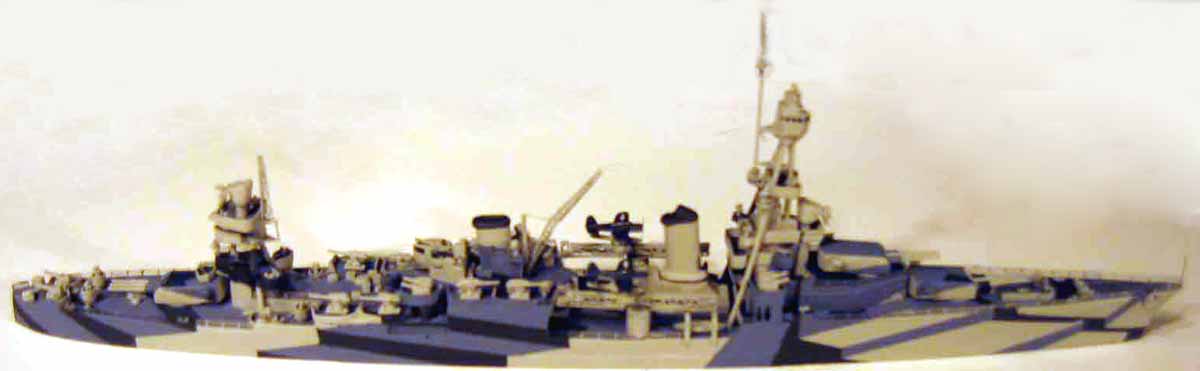
Figure 2 USS Chester circa 1944:
Complete Parts List for the Project (Alpha-Numeric Order):
Once again, parts preceded by an L are from the
Louisville kit, and those preceded by a C are from the Chicago kit.
|
1 x
|
C12 20mm platform, forward mast
|
|
1 x
|
C14 40mm platform, aft
|
|
1 x
|
C18 aft control station, signal platform
|
|
1 x
|
C19 rangefinder platform, aft
|
|
1 x
|
C2 forward superstructure
|
|
1 x
|
C20 main gun director / 20mm tub
|
|
1 x
|
C23 funnel cap, aft
|
|
1 x
|
C26 radar platform
|
|
1 x
|
C28 rangefinder + Photoetch Parts to replace
C66
|
|
1 x
|
C3 communications bridge
|
|
1 x
|
C4 navigation bridge
|
|
1 x
|
C5 director pedestal, main, forward
|
|
1 x
|
C6 masthead, lower supports
|
|
1 x
|
C7 masthead, upper
|
|
1 x
|
L1 hull, USS Louisville
|
|
1 x
|
L10 forward funnel cap
|
|
1 x
|
L11 aft funnel
|
|
1 x
|
L24 gun tub, #3 turret
|
|
2 x
|
L27 catapult pedestal
|
|
2 x
|
L28 anchors
|
|
2 x
|
L29 - paravanes
|
|
2 x
|
L30 - boats
|
|
1 x
|
L31 spare float
|
|
4 x
|
L32 search lights
|
|
4 x
|
L36 director tub
|
|
8 x
|
L47 5/25 cal. guns
|
|
8 x
|
L48 5/25 cal gun bases
|
|
4 x
|
L49 quad 40mm gun
|
|
4 x
|
L50 quad 40mm gun base
|
|
4 x
|
L51 twin 40mm gun
|
|
4 x
|
L52 twin 40mm gun base
|
|
2 x
|
L53 - gun director w/ Photoetch Parts
|
|
4 x
|
L55 or C55 boat davits
|
|
3 x
|
L58 main gun barrels
|
|
3 x
|
L59 main gun turrets
|
|
1 x
|
L7 emergency steering room
|
|
1 x
|
L9 forward funnel
|
|
8 x
|
Mk 51 directors
|
|
2 x
|
Photoetch Catapults (Replaces L60)
|
|
1 x
|
Photoetch Crane (Replaces L39)
|
|
2 x
|
Photoetch Fire Control Radars (Replacing C66)
|
|
1 x
|
Photoetch Part to replace C58
|
|
2 x
|
Photoetch Parts (Replacing L18 and L19)
|
|
1 x
|
Photoetch Tripod Mast
|
|
6 x
|
Tripod Mast Legs
|
|
2 x
|
Catwalks aft of upper deck (See Part 1 in
Louisville building tips)
|
|
2 x
|
Kingfishers
|
|
20 x
|
20 mm Oerlikon AA
Guns (Kit parts or Photoetch)
|
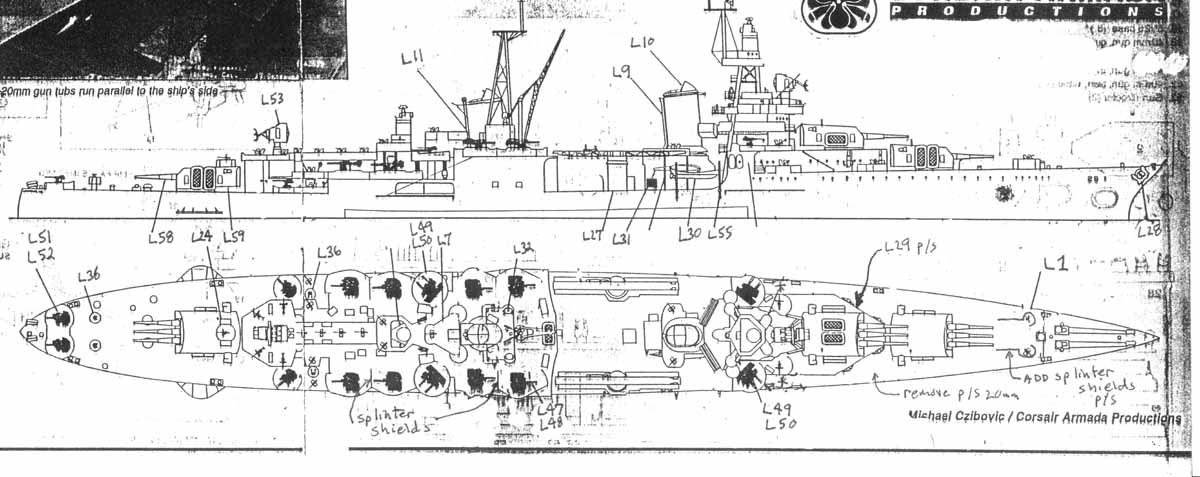
See Figures 3,4,5, and 6 for placement of parts. These figures are modified (with permission) versions of the Corsair Armada instructions to the USS Chicago kit (Figures 3,4, and 5) and the USS Louisville kit (Figure 6).
Figure 3 USS Chicago Instructions (modified):
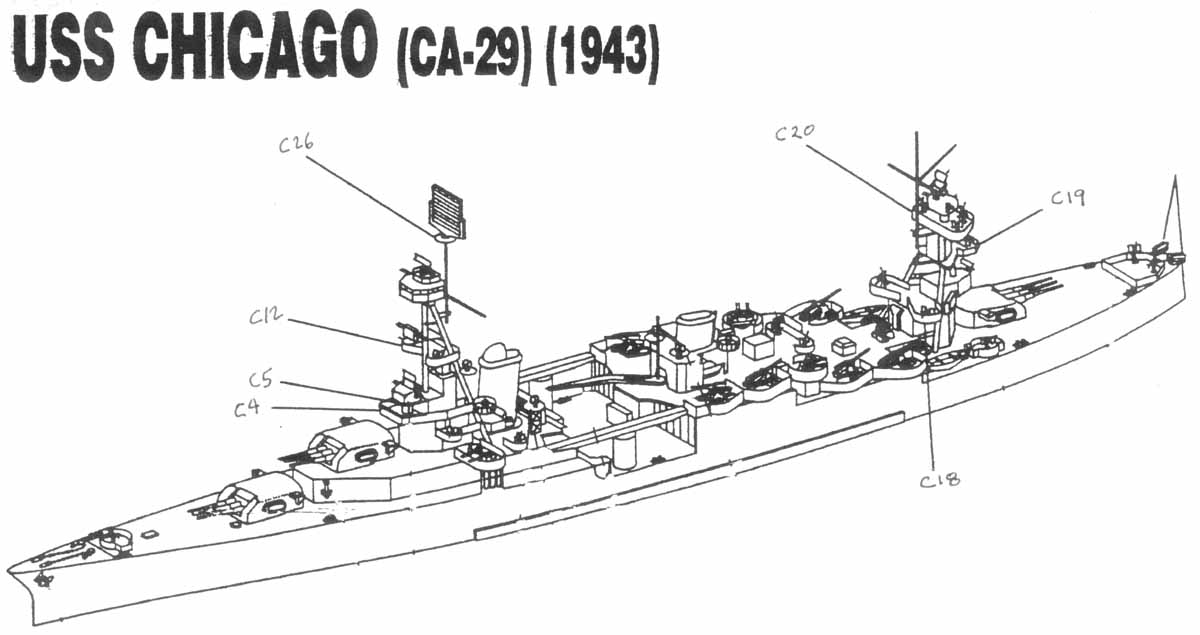
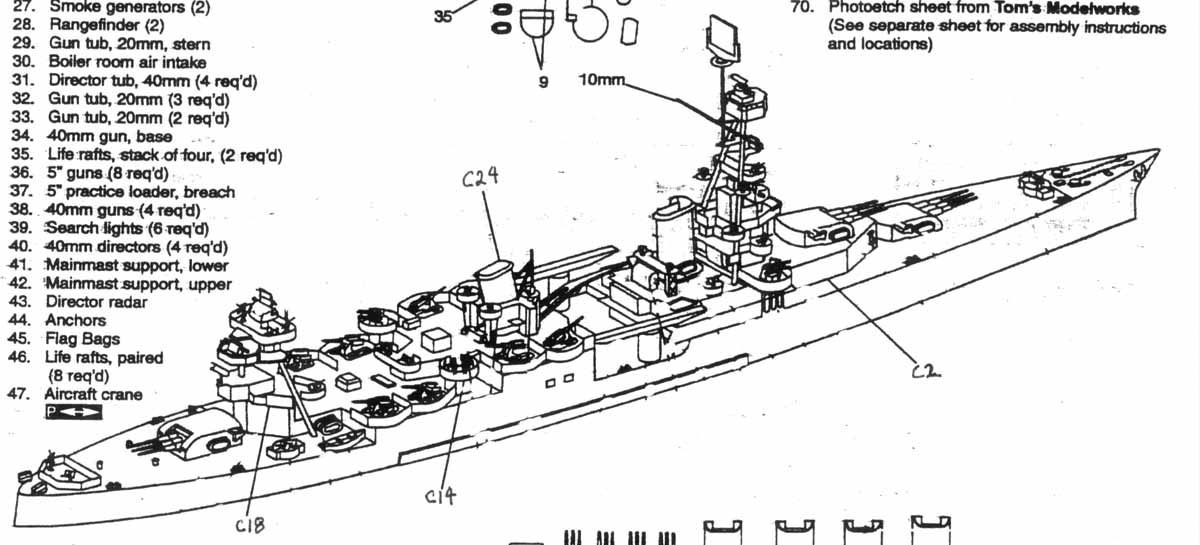
Figure 5 USS Chicago Instructions (modified):
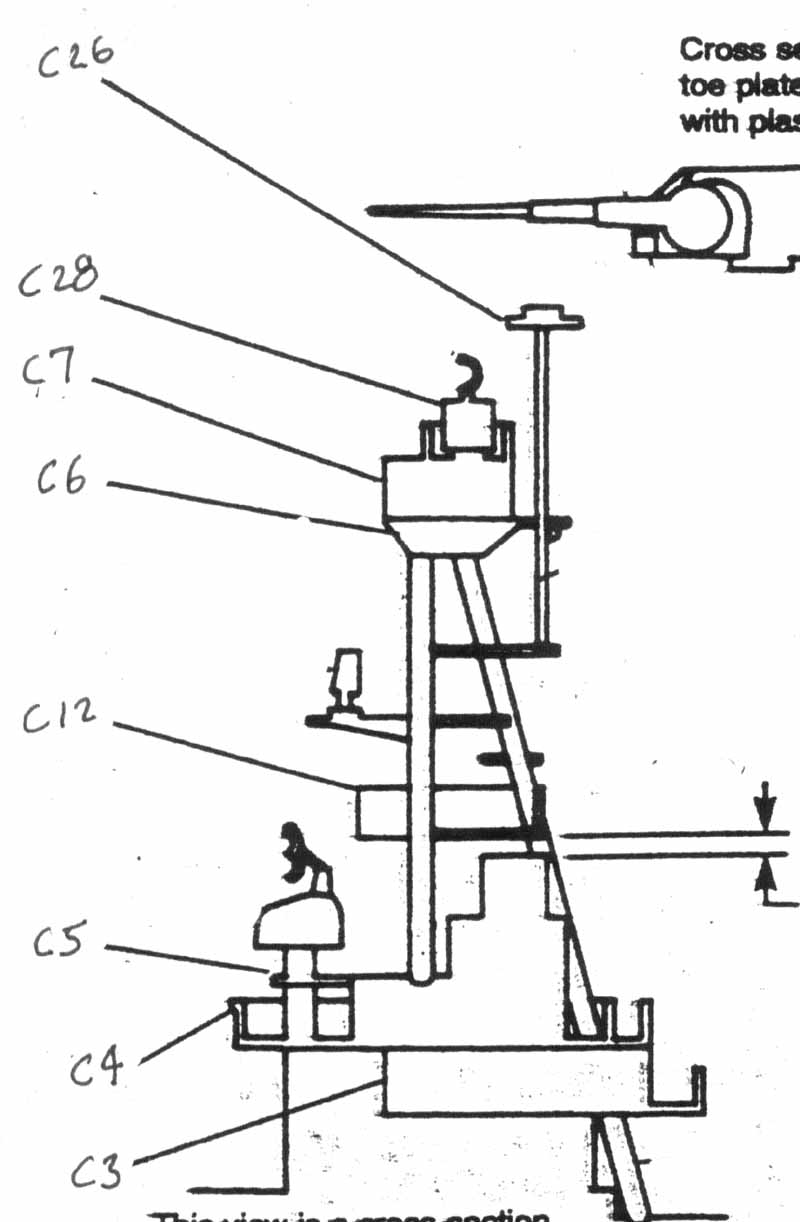
Figure 6 USS Louisville Instructions (modified):
Painting:
For painting I use Pollyscale Paints. For this kit, I used Black, Ocean Gray (5-O), Light Gray (5-L), Deck Blue (20-B) and a few miscellaneous colors for small items. The Kingfishers were painted with the appropriate aircraft colors. I use Pollyscale Paints because I do not like the fumes from solvent paints (even though they are better and more accurate in color) and I like the way Pollyscale brushes on. Camouflage Design Sheet CF-118, from The Floating Drydock, provided the camouflage pattern I needed to paint the USS Chester.
Finished Model: