Reviewed August 2018
by Dan Kaplan
|
Reviewed August 2018 by Dan Kaplan |
| Forty-two years after the original 1/700 kits debut, Hasegawa
released a retooled version of its kit of the Imperial Japanese Navy aircraft
carrier Akagi in July, 2014. They also released two accessory sets
for the kit; one of wood planking for its flight deck, the other a comprehensive
set of photoetch for the ship.
Together, the Hasegawa accessory sets make for a very nicely detailed model, though at an appreciable additional cost. On its own, however, the Hasegawa flight deck set is pretty basic in terms of the details offered. Tetra apparently saw an opportunity and chose to release its own Akagi flight deck set with a more extensive array of photoetch parts, along with the wood deck sticker. Essentially, the Tetra set splits the difference between the two Hasegawa sets, giving a modeler an enhanced flight deck option. Tetra also sells a basic flight deck detail set, as well as a more robust detail set for the hull portion of the ship. |
|||||
| Components | |||||
|
There are three sheets of brass, one of stainless steel, and two comprising the thin wood flight deck planking. The brass sheets are 0.006 thick and relief etched. The stainless-steel fret is also relief etched and 0.012 thick. All are inserted into clear, acrylic sleeve wrappers, then bundled again with all the others in to larger cellophane bag backed by a carboard insert. The flight deck portion has its own cardboard backing as well. |
|||||
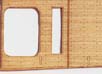
| F- Stainless Steel Flight Deck | |||||
| This is a single piece of heavy duty stainless steel, 0.012 thick. Its meant to replace the kits plastic flight deck. The topside surface is completely smooth, better to accept the adhesive backed wooden veneer flight deck. The underside has relief etched, cross-hatched channels throughout its length and width. Photo etched support trestles are meant to be glued into all the relief etched channels. A really nice feature is that finely etched rain gutters have been provided for at both ends of the flight deck. | |||||
| Scale-wise, the deck measures out perfectly. The actual
flight deck was 8176/249.7m in length and 100/30.48m in width. That
length scales out to 356.7mm in 1/700, and my measurement comes in at 356.5mm.
Widthwise, the deck should measure 43.54mm. My measurement tallied at 43.5mm.
|
|||||
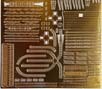
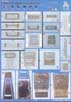
| Brass Fret A | |||||
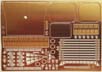
| This is the smallest fret, with approximately fifty individual pieces.
Amongst them are: all three elevators, a large and small windscreen, the
metal surfaced portion of the aft end of the flight deck, five covers for
the hideaway searchlights positioned under the flight deck, nine arrestor
cables with mounting points, three cable crash barriers, multiple sets
of guy wires for the up position, components for three different sized
RDF antennas, and the components of the mainmast.
The elevators and metal decking all have tie-down holes, and the windscreens are relief etched with wonderful detail as well as tiny mesh screens. Note that the cables, guy wires and crash barriers require very delicate handling to avoid bending |
 |
||||
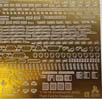
| Brass Fret D | |||||
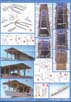
| This is a larger fret, with close to one hundred fifty pieces. A large number of the pieces are the open girders that comprise the grid of support trusses that underlie the aft portion of the flight deck. Its a complicated setup, as the latticed girders are first assembled into several subsets. Then, each assembly is glued in order to the underside of the steel portion of the flight deck. | 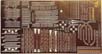 |
||||
| Complicating matters is Akagis unique extension of the
aft round down portion of the flight deck. Rather than completely re-engineer
and rebuild that portion of the flight deck when she was reconstructed
in the mid-1930s, her builders just laid on an extension built over the
original round down that extended even further aft. Tetra has replicated
that extension with additional girders and a flat flight deck insert.
Theres also a set of girders that makes up the rail system that helps move lift the ships boats in and out of the water as well as move them to their storage locations. This rail system is glued in turn to the girder substructure under the flight deck. Unexpectedly, there are alternate versions of the two windscreens included on Brass Fret A. Here, provision has been made to fully create the substructure of interlocking girders placed within a box that is recessed into the flight deck. This is true for both windscreens on this fret.
Its not really covered by the instructions but, as far as I can tell, the versions on Fret A are simplified. The actual windscreens are identical to those on Fret D, but the versions on Fret A just have a simplified base plate that can be glued into place at the deck level instead of integrating a recessed box into the aperture in the flight deck. (Note: A subsequent check of the Tetra website shows a more basic product, S-70002, which is just an offering of the wooden veneer flight deck for the Hasegawa kit with Brass Sprue A. So, yes, the windscreens on Fret A are simplified versions.) |
|||||
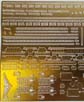
| Brass Fret E | |||||
| This last fret also contains the most pieces, more than three hundred, due to the number of multiple units of the same item. Again, many of these are girders meant to support the flight deck, though these units are meant to be placed either under the forward portion of the flight deck or along its sides. Additional assemblies include all the perforated and latticed support columns (8) that hold up the aft end of the flight deck, the two boat cranes attached to the aft most support columns, and the many small sponsons that hang off either side of the flight deck. Care must be taken, as many of these sponsons have small support girders that must be glued underneath to them. | 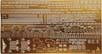 |
||||
|
|||||
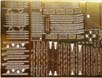
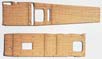
| A & B Wooden Flight Deck Planking | |||||
| A replacement for the kits plastic flight deck is provided, composed of two sections of a very thin, laser cut wood veneer, backed with an adhesive covered by a removable protective barrier. While not a fan of applied wood decking, I will say that the planking is rendered very, very nicely, with thin seams and planks that are 0.015 inches wide, which scales out to a plank 10.5 inches wide. Thats extremely good for this scale, particularly when using a wood veneer. | |||||
The planking pattern is symmetrical in nature, repeating
every fourth plank, which is far closer to actuality than the typical pattern
of repeating every other or every third plank. Tie-down holes are
etched into the planking, as are lines representing cross-deck expansion
joints. Cutouts are provided for all three elevators, the hide-away searchlights,
the wind screens and the bridge island. The color is not bad either, as
the laser etched seams, tie-downs and butt ends all add a nice brown tone.
Plus, the color of the planking has some variation in it, breaking up the
monotony of a uniform tone. Appearance-wise, Id rate this version much
better than average for a 1/700 wood veneer IJN flight deck.
|
|||||
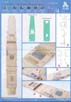
| Instructions | |||||
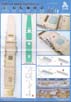
| There are four pages of instructions, each sizable at 8.25 x 11.75.
These are a combination of three- point perspective diagrams, photographs
of some fully assembled components, and photographs of unpainted parts
installed on an unpainted Akagi model. All photos are in full color. Missing
is a listing or graphic of all the individual components on each fret,
which is always helpful in identifying and tracking parts.
I would recommend taking some time to review the instructions, particularly to the order of assembly for the underdeck girder subsections. Doing so will cut down on confusion about the process. I would also recommendvisiting the link to this set on the Tetra website, as it graphically illustrates all of the part placements on an unpainted Akagi kit. |
 |
||||
|
|||||
| Fit | |||||
| I dont have an Akagi kit to spot check anything against, so this is an open question. Perhaps a board member can report in on this point. | |||||
| Closing thoughts | |||||
 While
not a comprehensive PE set, this offering does give a modeler the opportunity
to add a lot of intricate detail to the kit. Even if the focus is
the flight deck, the inclusion of the massive flight deck column supports
and boat cranes will help give the kit the full flavor of what Akagi truly
looked like. (Other details, such as deck railings, anchors, etc. could
be pieced together from a variety of more generic IJN PE sets.) The wood
flight deck sticker is certainly noteworthy in terms of scaled planking
and coloration. While
not a comprehensive PE set, this offering does give a modeler the opportunity
to add a lot of intricate detail to the kit. Even if the focus is
the flight deck, the inclusion of the massive flight deck column supports
and boat cranes will help give the kit the full flavor of what Akagi truly
looked like. (Other details, such as deck railings, anchors, etc. could
be pieced together from a variety of more generic IJN PE sets.) The wood
flight deck sticker is certainly noteworthy in terms of scaled planking
and coloration.
The only thing lacking from a flight deck perspective is the inclusion of the large and small safety nets that typically ringed the flight deck. The instructions do require a bit of study prior to assembly for best results. This set is not recommended for beginners. Thanks to Tetra Model Works for the review sample. They are your US distributors for Hasegawa. Suggested MSRP is $60, though it can be had for less from various sellers. |
|||||
More
of Dan Kaplan's work.
Updated 7/31/2018

© ModelWarships.com