 |
 |
 |
I've been building models for a long time, some times just for the fun, for me they are 3D puzzles (especially when I don't use the instructions), but this not the my only hobby, I like Photography too. A few months ago I found this warships web page and now I was in heaven (did I tell you I love ship modeling); I start to open web pages and find pictures with beautiful models, nice models and others with nice furniture and wall pictures.
To have a clear image in a picture is also an art, this is the matter of focus, to be able to distinguish the object without fuzzy areas. That's why I decide to write this note for regular people, for those that know photography this my be kids tales.
A) The camera.
First is the type of camera you have, it doesn't mater if you have a
digital or a film camera, if you think the camera makes the picture you
are wrong, a nice professional camera helps but you can take beautiful
pictures with disposable cameras. The information you need is in your camera
manual. Consider the following information:
Focusing range: this will tell you the distance to the pictures
to be in focus, check for the minimum distance.
Shutter speeds: this will tell you how much time your camera
uses to take a picture. If you lost your manual go with someone who knows
about cameras or surf the web for it. With this information you now how
far your camera will have to be from the model and if you can take the
picture with your bare hands or if you need a tripod or something steady
to put the camera on. If you have the possibility to change options in
your camera look in your manual how to set the shutter speed and the shutter
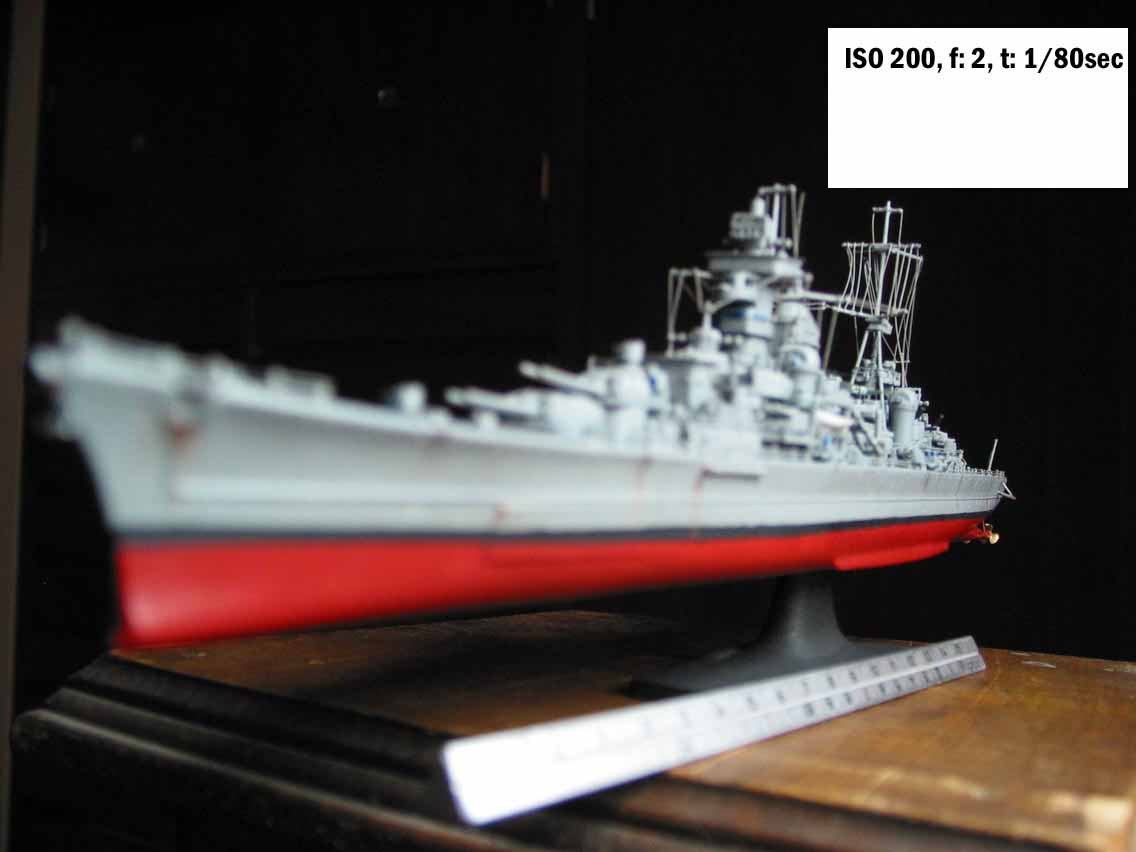
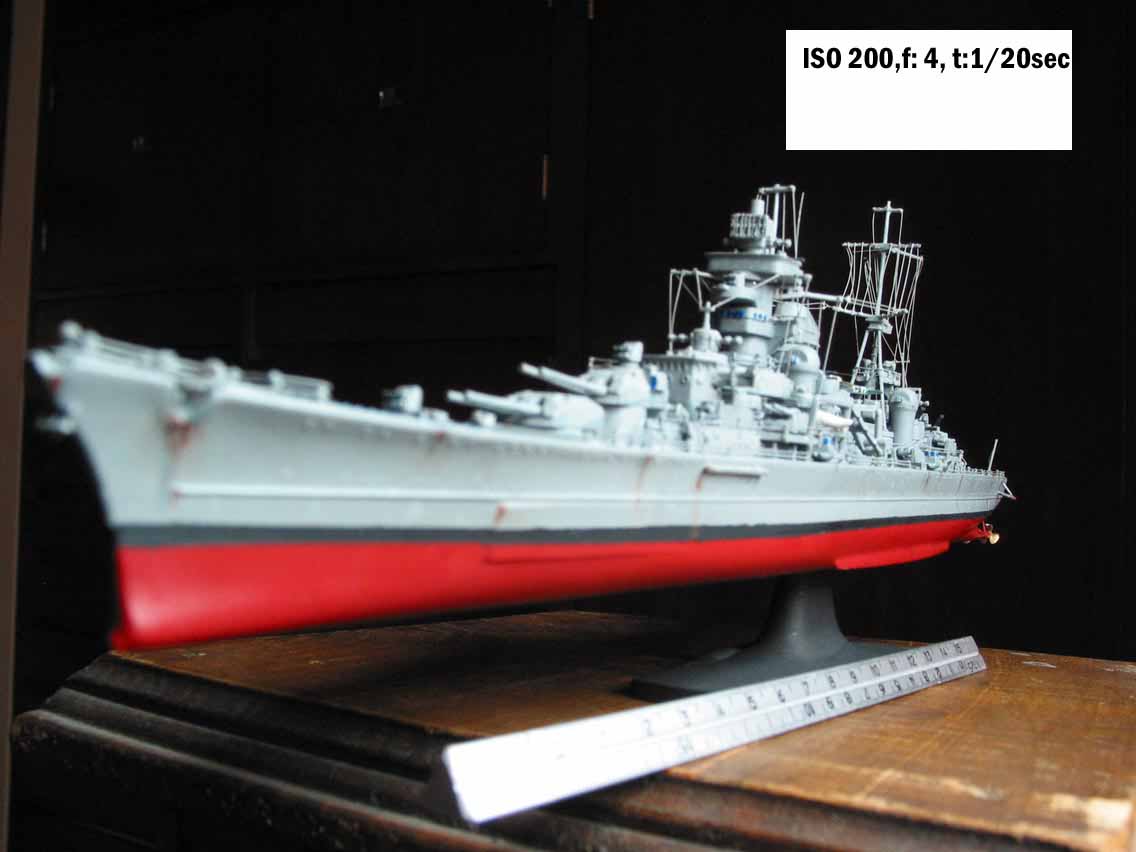
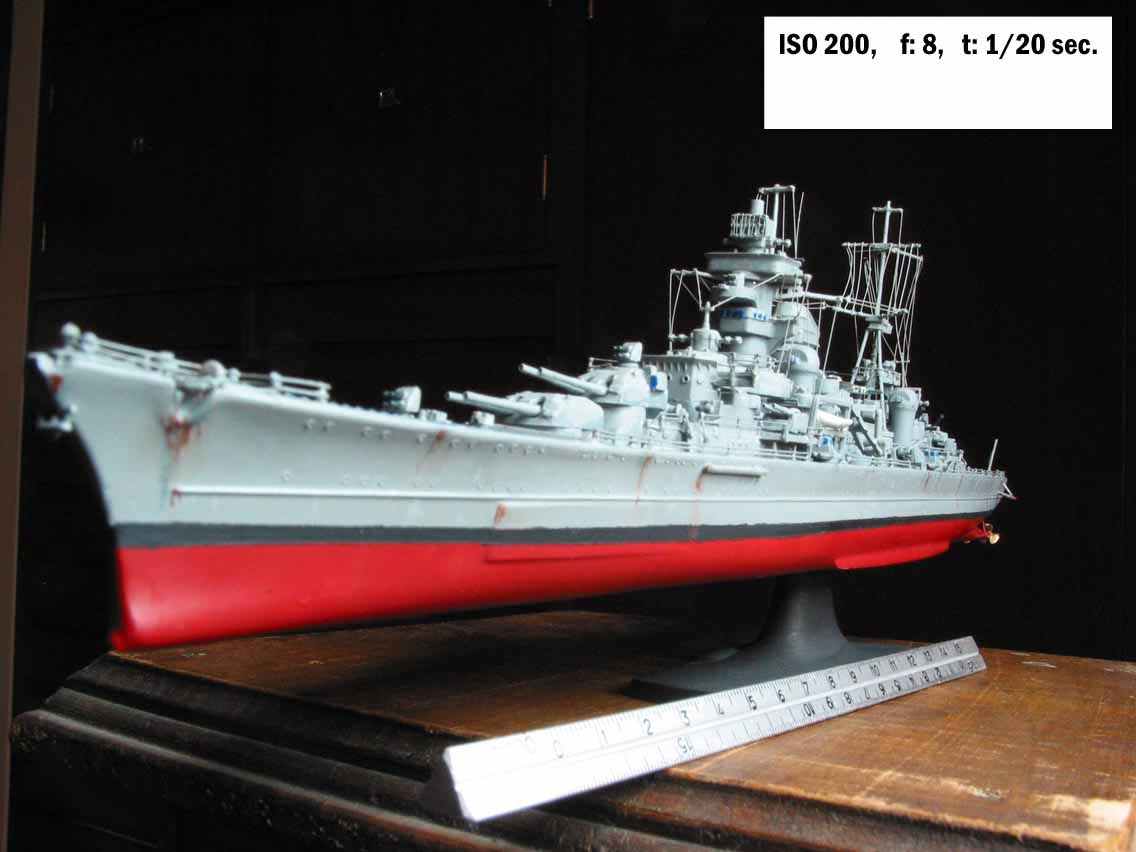
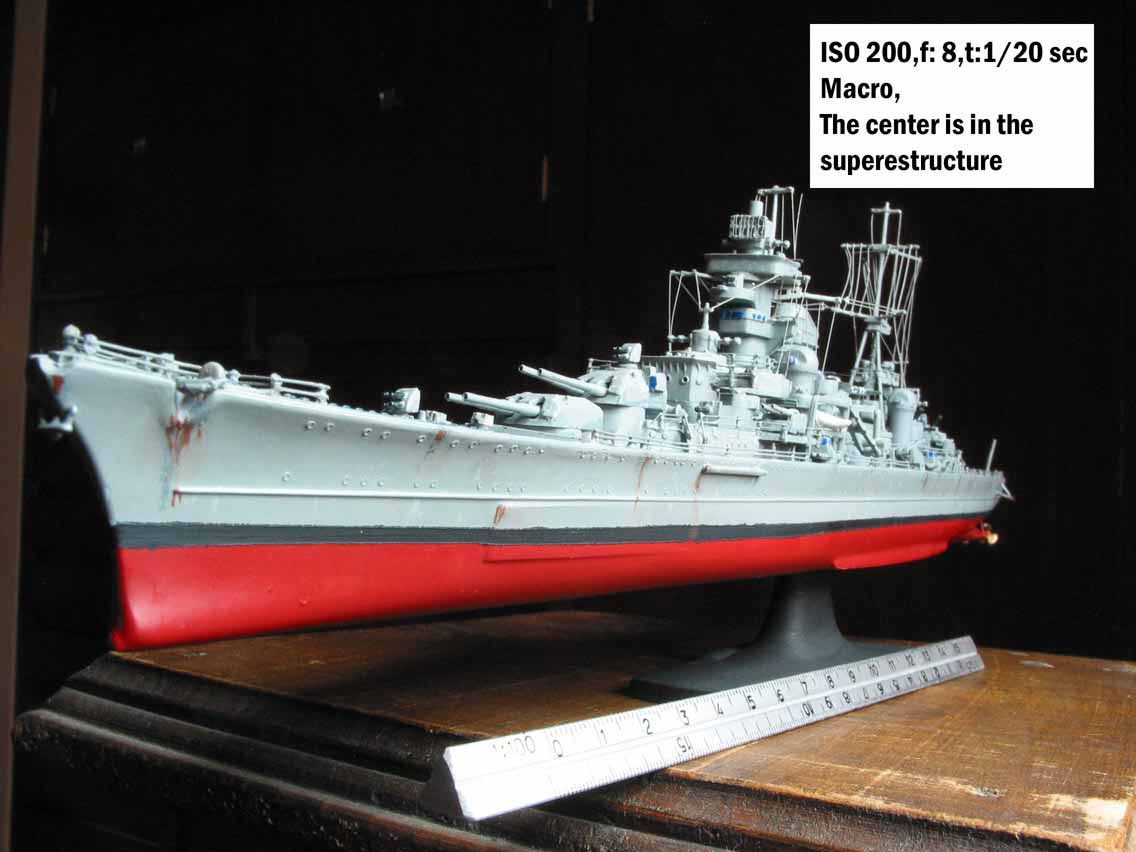
aperture. A small class of photography: the depth of field is the range
in which things are in focus respective to a reference. For example if
you are taking the picture of a ship from the front (bow) and you are aiming
your camera to the superstructure, the depth of field will be the area
in focus in front of and behind the superstructure. This area can be adjusted
by changing the shutter aperture, the shutter is the thing that allows
a certain amount of light to reach the film or chip. The bigger the aperture
the lest deep of field you gate, but in your camera the bigger the number
of aperture the smaller the aperture of the shutter, the bigger the field
of depth. Dizzy already? The thing is to get the highest
number of aperture in your camera, it can be from F8 to F22. But all has
a price: you have to had a lot of light to take a nice picture or you can
let the shutter to be open for a while, from several seconds to minutes.
That's why you need a tripod to let the camera take the picture without
additional movement and to stay in focus.
|
|
|
A.1) The Macro and Zoom options
If you have a little more state of the art camera, look for these two
options, the Macro is an option that allow you to take pictures of things
really close to the lengthb of the camera. For example in my camera a Canon
Power Shot G2 digital camera, is 2.4 in (6 cm). The information about depth
of field affects this options too, but the closer the focus point of the
object the smaller the depth of field you get. In some cameras you
have the option of getting additional lenses, check the information for
the advantages and disadvantages of it.
 |
 |
Some cameras have a Zoom, but this don't mean that you can get neat
pictures, look for the minimum focus distance using the zoom, some times
you can get a better image using the wide option of the length.
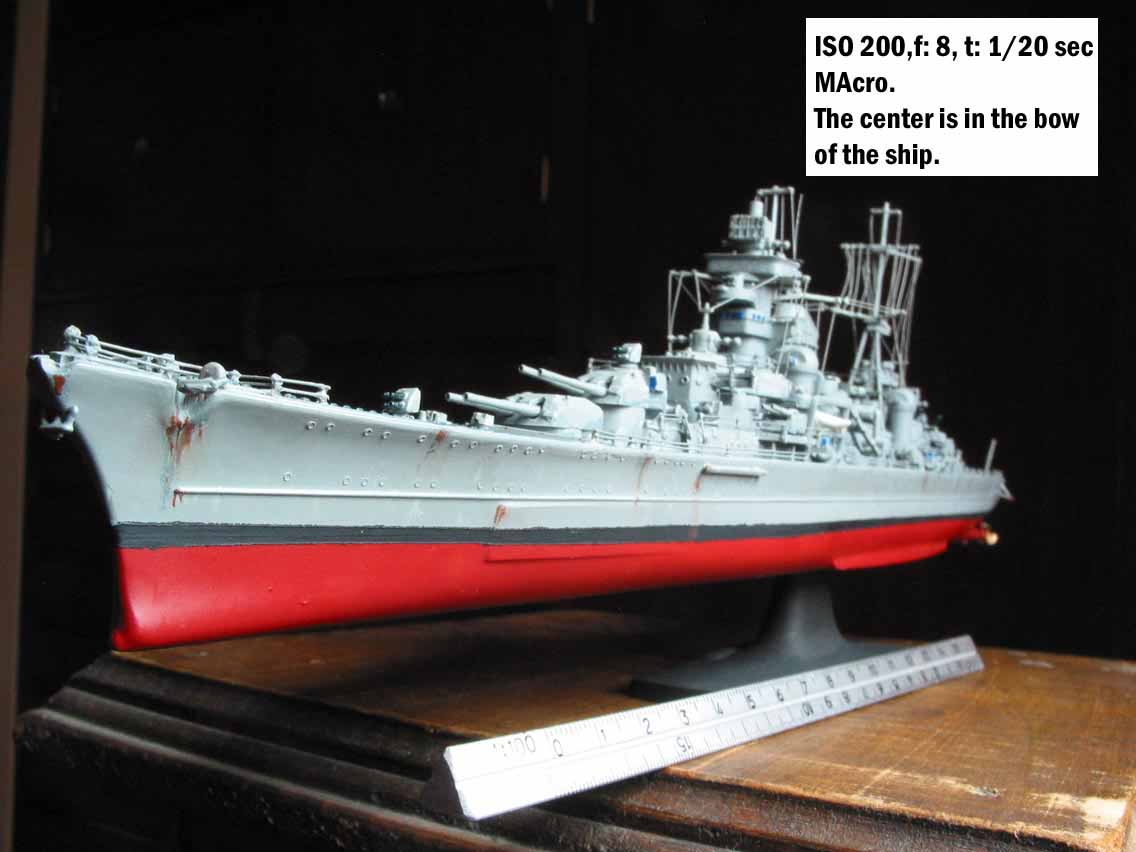
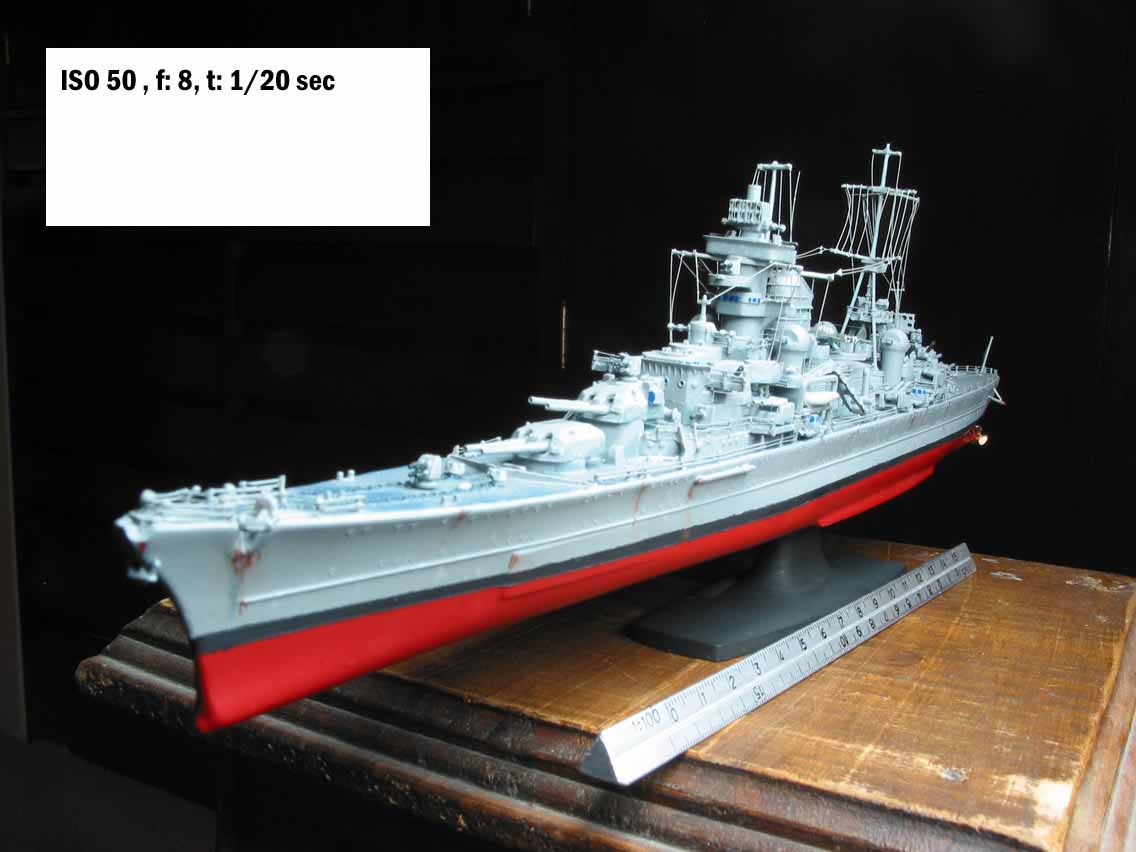
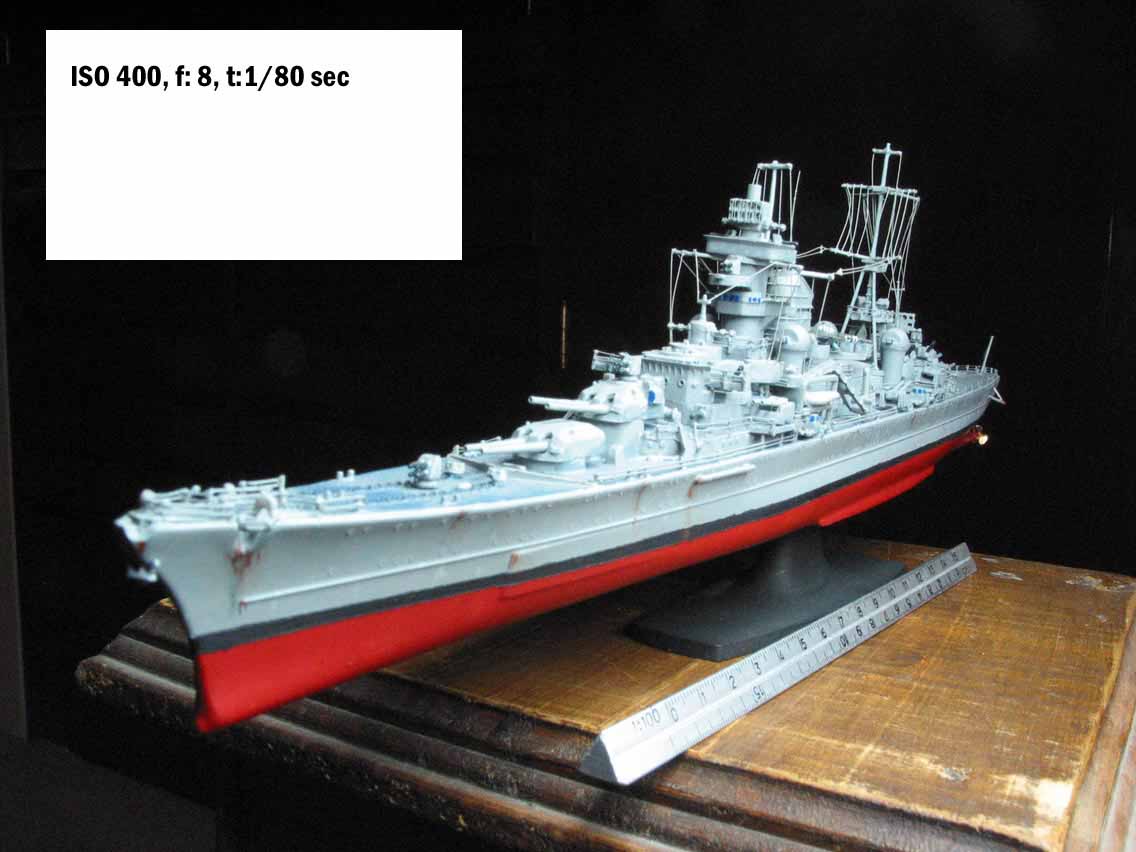
B) The Sensitivity
For those that said I only have a shoot and forget
camera, there's hope in heaven too. If you have one of those cameras and
it is a film camera there is a possibility, you can use a hi sensitivity
film. In this cameras you cant change anything, the speed is set, the aperture
is set, even the film sensitivity is set. The films have a code call ISO
or ASA and a number related to it 400, 200, 100, 50 this is the sensitivity
of the film (or the chip in digital cameras) that means that a hi sensitivity
film needs less light to capture the image, but it all comes with a price,
you got less resolution, this means that if you want your picture enlarged
you'll see little spots instead of a clear image. But if you use a 50 ISO
film you will be able to enlarge the image a bit and get a clear image.
You have to make some test picture to know how much additional light you
need and how much you can enlarge the image. But don't ask for miracles,
it is going to be very difficult if you want to take picture of a 1/700
tug with a snap and shoot camera, but who knows, you can invent a new technique.
 |
 |
C) Scanning
If you have printed pictures from a film you have to digitalize them.
I'm not a master in this field, but you have to follow the requirements
of the Site you want to display your work. This can be done in different
ways: scanners, multifunction equipment, film scanner, etc. The trick in
this area is the resolution you want, is similar to the film sensitivity,
how large you want the file to be to see the detail in it. In this case
a large file will have a nice detail, but taking the information from a
print its related to the resolution in it. You have to ask to the people
will scan the image or make test with your equipment to get the best result.
I hope this gave you a better idea of how to show your work, some nice
models will be nicer if people can see them. But to take nicer pictures
you have to play with presentation, light, shadows and image composition.